
IODD ST/LK
QuickGuide
Supported features
XX4XX
●
●
●
●
●
●
Products
Virtual Drive
Encryption
Admin Mode
Write Protect
WinToGo
Adm
XX3XX
●
●
●
XX1XX
●
●
●
●*
1
●
※ For ST/LK series, only 2.5-inch and 7mm or
smaller drives can be installed.
※ Encryption function must be [Administrator]-[User]
[2nd Password] thoroughly read the contents and
use it.
Guide Firmware / Software Download
http://dir.iodd.kr/
●*
1 WTG only as a physical drive.

SPECIFICATIONS
Encryption
Display
Input method
Support Drive Size
Size
Weight
material
Internal interface
External interface
Power
Supported file
Supported OS
TRIM/UAS function
● The function is only
for supported models
●
●
AES256-XTS Max. 38*2(76) digits
128x160 TFT LCD
Tact-Switch
2.5 inches (7mm or less)
80 (width) × 140 (length) × 14 (height) mm
100g
Plastic, acrylic
SATA2/SATA3 (sub-compatible)
USB-C (USB 3.1 Gen 1)
DC +5V USB power
ISO/VHD/RMD/VMDK/IMA
Win 7 and above, OSX 10 and above
Unsupported.
●
AES256-XTS BLOB encryption (up to 78 digits)
●
Bootable virtual ODD (CD/DVD/Other)
●
Bootable virtual HDD and USB drive
●
Administrator Mode / Text Viewer (ASCii/USC-2(UTF-16))
Windows-To-Go / Write Protection/ Remove safety
Multilingual / Built-n Help Key / Hotkey /OTG
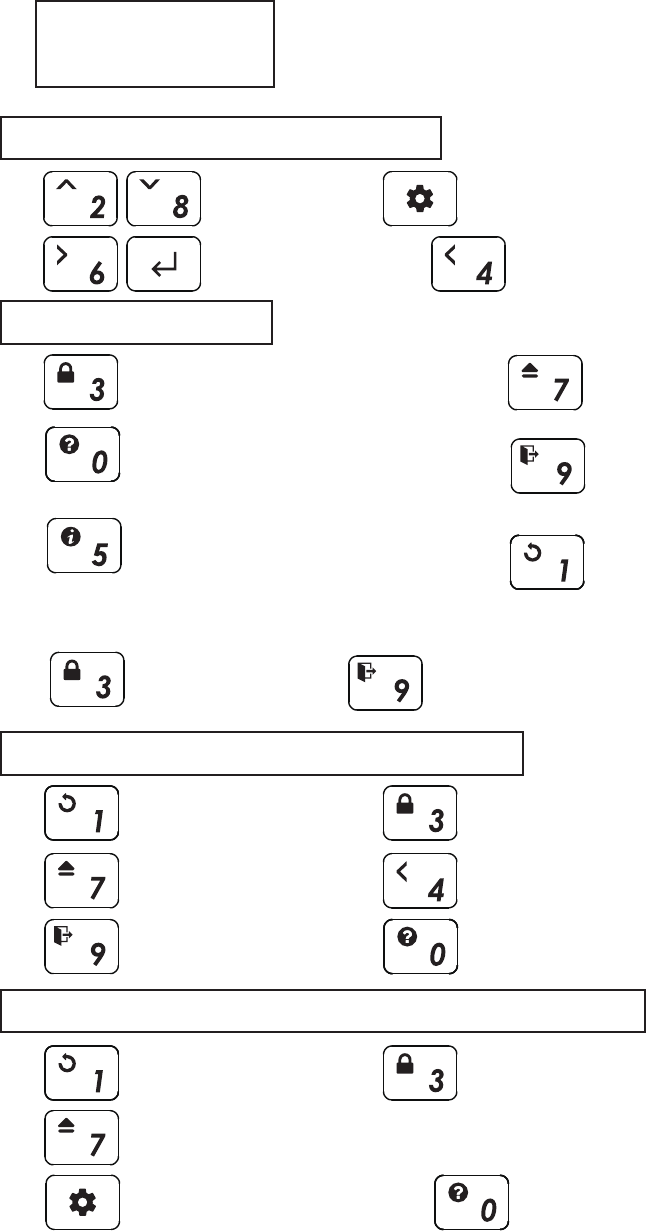
Keys
File/Menu Browsing
Function Keys
Long key ( push for 3 seconds )
Start-Up keys (during startup)
File/List
UP Down
View file information
Display full name, size,
and fragmentation information of the file
work only in the text viewer
Tooltip
A description of the current menu
/ error message
Select a
File/Menu/*.txt File
Enter to Menu(or Exit)
Reconnect to PC
Unmount all
Virtual drives(VHD/ISO)
Safe Removal.
(ISO loading state is save)
Reconnect to PC with
write-protected state is toggled.
Partition selection
*Only works when unmount
all virtual drives
Reconnected with
temporarily Write Protection disabled
Go to Upper
Folder / Menu
Refresh
File list
Instantly save
Instantly saves the
current virtual drive state.
Page Down
Txt Viewer PGDN
Connected with
Unmount all virtual drives(ISO, VHD)
Reset to
factory settings
Starts with
Write Protection
Enter to menu
without connecting to PC
Displays startup key info.
without connecting to PC
Disk Status
VBUS min.voltage/drive temp/health info
Page Up
Txt Viewer PGUP
Unmount the
most recently
mounted virtual drive

UI Info
Status Icons
Mount Information Area
File List Area
Status of the device
Icon
Description
Status Icons
Mount information Area
File list Area
Inform active ISO / VHD / RMD and settings.
● List folders and available files in the selected directory
● To use another partition,
Unmount all virtual drives and press button 4 for 3 seconds
to enter the [partition selection] .
windows10.iso
VHD_01_DATA
BACKUP VHD
OS
UTIL
Photobook.iso
linuxmint-17.3-cinn
Ubuntu-14.04.4.de
RMD_01_WTG
physical drive write-protect enable/disable status
Write-protect all (including virtual drives) disks
(Red)
/
Mount / unmount status of the ISO file/
Mode status (CD / DUAL / HDD)/ /
Power status (timer / sleep mode)/
AES256 encryption On
USB connection speed (3.0 / 2.0 / 1.1)/ /
/
Inform write protection on / off status (VHD/RMD)
Inform mounted file name (ISO/VHD/RMD)Filename.iso
Inform status of the virtual drive (removable / fixed)/

■ Virtual Drive Function
XX4XX
XX3XX
Mode Setting
● One virtual ODD / three VHDs (or RMDs) can be mounted
at the same time.
● At the first time, automatically finds mountable files on the
largest partition (GPT / MBR, NTFS / exFAT / FAT32)
You can select default partition (button 4 in the file list area)
● The advanced mode manager handles the settings
of individual virtual drives.
Press the button and select the [Mode setting] Menu.
Mode setting
To exit menu mode,
press the button and the settings is saved.
※ If any options change in the Mode Manager, the device reboots and
all currently mounted virtual drives are unmounted (ISO/VHD/RMD)
※ The drive order in menu may be same the
Virtual Drives Information Area of IODD.
//
5 - ,6-
---Disabled---
set the options of the selected (▶) drive.
Use the 5 button to enable / disable
the write protection function.
Use the 6 button to toggle
removable disk / fixed disk
You can change the order with the 3/9
buttons.The inactive bar can be moved.
Drives that are below the --Disabled--
Item are inactived.
1.Configure options for the selected
2. Configure the number of drives
and drive's order.

TXT Viewer
Keep Password 2 min
Write Protect
XX4XX
XX1XX
● TXT format file can be opened with IODD's built-in viewer.
● If used with encryption,safely view password-related text data.
In the TXT file item on the file list screen, press the or key.
● Users don't have to re-enter your password only once
within 2 minutes after entering the password.
● It reduces the number of times to enter a password for
installation work that requires a reboot.
● If two minutes have passed since you entered the password,
or when you reboot for the second time within 2 minutes,
you must re-enter the password.
1. Press the Menu button to enter the menu screen
and select [USB Control]
2. Check or uncheck the [□Keep P.W 2min] item
Feature enable/disable
● Use the disk write-protect feature to protect your disk.
In addition to menu access, function buttons (press button
for 3 seconds) or it can be activated by the start button
( button when connected).
1. Press the Menu button to enter the menu screen
and select [USB Control]
2. Check or uncheck the [□Write Protect] item
Feature enable/disable
■Encryption & Admin
XX4XX
XX1XX
● New IODD Series uses AES256-XTS encryption.
● There is no need to install a driver for encryption.
● Available for all operating systems.
● The length of the password is 4 to 38 digits(2nd Password is Same)
● Security is further strengthened with random keypad.
Enhanced Encryption
2nd Password(2nd P.W)
Admin mode
Users
IODD Admin Manager
(Windows Application)
New IODD has an AES256bit-XTS up to 38-digit double encryption
and an administrator Mode so that multiple users
(administrator*1/user*4) can use one device together.
2nd password is required when setting a password on the drive and when
installing a drive with a password already set to another IODD ST/LK. Up to 38 digits
can be entered.
If lost, the password cannot be retrieved or recovered in any way
This password is used only by administrator.
If there are multiple users using the same ST/LK, you can use the administrator
mode to set individual users' passwords and drive permissions.
Administrators can reset a user's password at any time.
Only administrators can unencrypt the entire device.
Up to 4 users, excluding administrators, are set as users,
Users can use internal data within the authority specified by the administrator.
When permission is granted, the user's password can be changed.
It is an application that allows the administrator function to be used on a PC.
It has the same functions as the main body of IODD,
and the password configuration file management function is added to make
it easier to manage multiple users and passwords.

● If the administrator's password is changed, all user accounts will be deleted.
● When an administrator sets or deletes an administrator's password,
all data on the disk is initialized and all user accounts are deleted.
1. Press the Menu button to select the [Encryption] [Admin] menu.
1.1 When setting the first password, select the [Set 2nd P.W.] menu and set the 2nd P.W
2. Select the [SetEncyrption] menu. Check the notification that all data inside will be deleted.
3. Enter the administrator password twice (4 - 38 digits)
3.1 The administrator sets the first digit of the password to zero.
4. Wait for a while to finish setting up admin encryption.
5. When IODD is reconnected, the 0+administrator password set in step 3 is requested.
ex) 0 55447788
1. Press the Menu button to select the [Encryption] [Admin] menu.
2. Select the [Remove Encryption ] menu. Check the notification that all data inside will be deleted.
3. Enter the administrator password once (4 - 38자리 숫자)
4.
Wait for a while to finish Remove admin encryption.
Admin | Set admin Password
Admin | Remove Admin Password
1. Press the Menu button to select the [Encryption] [Admin] menu.
2. Select the [Chg Password] menu. Check the notification [All user passwords Will be deleted]
If the Admin password is changed, all user passwords are deleted, and a new user
password must be set in Admin mode.
3.
Enter the Old administrator password once (4 - 38 digits)
4.
Enter the New administrator password Twice (4 - 38digits)
Admin | Change Admin Password
■ AES256 Encryption(Admin)
user identification number(Admin 0/Users 1-4)
Password (Max 37 Digits)
XX4XX
XX1XX
※ When setting/deleting the administrator password,
all data on the IODD drive is initialized.
※ Even if you forgot the administrator password, you can initialize the installed
drive and use it. Initialize the disk initialization method as MBR->GPT->MBR.
Please note that all existing data will be deleted.
※ If the 2nd password is lost, the encrypted drive cannot be used for
another IODD. It is impossible to access, so be careful not to lose it.
Notes on Encryption

Admin's User Management
● Administrators can set individual passwords for up to 4 users
and manage disk permissions
1. Press the Menu button to select the [Encryption] - [User] menu.
2. Enter 0+admin password.
3. Select the users to manage.
4. When you have finished setting, press the [ < 4 ] button to return
to the previous menu.
5. Select [Save Users].
5.1 If you exit the menu without selecting the [Save Users] menu,
Changed settings are not applied.
admin | User management
User-1
Set Password >
Del Password
□ Read Only
□ User Change
□ User Delete
A user password is a user identification (account)
number (1-4) fixed at the beginning of the password.
Read-only
The user cannot delete or change data on
the device's internal drive.
User Change
Users can change their user password arbitrarily.
Administrator can remove all user passwords.
User Delete
That user can delete their own user password.
The user account is also deleted.
1. Set or remove a user password.
2. Set the user's permission.

● The user's authority is set by the administrator.
● The user's initial password is set by the administrator.
● Even if the user changes or deletes the password,
the data inside the drive is maintained.
● Administrator can change/delete passwords of all users.
Encryption for User
Allow password change/delete
Encryption
Change Password >
Delete Password
Users can change or remove passwords
for their accounts.
Removing the password also deletes the account.
Allow Password Change
Allow Password Delete
Encryption
Change Password >
Users can only change their password.
Encryption
Delete Password
Users can remove passwords
Removing the password also deletes the account.
Users will not be able to activate the [encryption] menu.
Change/Delete Password Not Allowed
1. Press the Menu button to select the [Encryption] menu.
Only menus that the user can set are displayed.

● Administrator program for Admins.
● This is a Windows-only application.
● Faster access to Admin functions.
● A tooltip is displayed when you mouse over an item.
■ IODD Admin Manager
Main Menu Area
Application Download
select the language in the [Settings] menu
IODD Latestial Download Center
http://dir.iodd.kr
latest firmware, IODD Admin manager, and VHD Tools.
Admin panel Area
Main Menu Area
User management area
Current status area
Log Area
XX4XX
XX1XX

● The administrator can lock or unlock the IODD connected to the PC.
● All functions require an administrator password.
● Administrator can save or load password configuration file.
Admin Panel Area
Item Description
1. [Admin password] input Field
All functions of Admin manager require an administrator password.
If the administrator password is not known,
no changes to the program are saved to the IODD.
2. [Secondary password(2nd Password)] input Field
It is used when setting a password for the first time
in Admin manager or
when an encrypted disk is installed in another IODD.
Be careful not to lose the secondary password.
2.1. Secondary password [Set] button
The administrator can set a secondary password
on the machine (up to 38 digits).
3. [Unlock] button
Unlocks the password lock of the connected IODD.
4. [Lock] button
Password lock the connected IODD.
5. [Password configuration] tab
Admin can save/manage the current user settings
(passwords/permissions) as a password configuration file.
A master password is required for save and open
The master password can be set differently for each password
configuration file. Apart from the administrator password,
it is only used to save/open password configuration files.

User management area
● Administrators can set, change,
or delete passwords and permissions for individual users.
1. Check the user to be used among users 1-4 [1],
and check the password [2] and authority [3].
1.1. Click the [Set Password] button to apply.
1.2. If [Do not reconnect] is checked,
it will be applied immediately without reconnection.
1.3. The [Empty] button initializes all user input items in the area.
2. Users will have their passwords begin with
their user number and begin with 1-4.
2.1. The user password can be set up to 38 digits
(the first digit of the user identification number + 37 digits).
3. The administrator password is required to
change or remove a user's password in Admin manager.
3.1. Even if a user who has [Change Password] is
changes the password, the administrator can change
the user's password and privileges.
.

Current Status Area
Log area
● The administrator can check the
encryption lock status and user status
of the connected IODD.
● The administrator can check the
user's permission with the status of
the checkbox.
● Display the progress status log.
clear the contents with the [Clear] button.
Main Menu Area
● Close the program/ Change
The language using the [Settings]-[Preferences] menu
Supported languages :
Korean/English/German/French/Chinese/Japanese/Russian

Error Messages
Troubleshooting
Required | Cancel disk defragmentation
Status Messages
How to improve when USB recognition fail
Device Cleanup download
Windows 8 / 10
● When USB recognition repeatedly fails in the operating OS/PC
You can try the [Device Cleanup] utility.
● Although not valid in all situations, PCs that use many USB
devices can expect better recognition rates and speeds by
deleting USB usage information stored in the registry.
You can download it from the following http address.[Free ware]
https://www.uwe-sieber.de/misc_tools_e.html
Guide
Run the program as adSTstrator
Select the [Select all] menu from the [Devices] menu.
All USB connection information in the registry is selected.
[mouse right click] any of the selected items.
Select [Remove Device] to delete the registry information.
After the operation is finished, reboot the PC.
Check HDD
● There is an error in the drive. Please Do [Troubleshooting]
No appropriate partition
● There is no appropriate partition.
Drive Error
● Please contact customer service ([email protected])
Too Many Files
● The maximum number of files in one folder has been exceeded.
● ioddST allows max 32 files or sub folders in a folder.
● Split the folder into subfolders.
..
● There are no subfolders or supported files in the current folder.
Disc Locked
● The disk is held by some programs. Please unlock the disk.
● If you want to unlock manually, reconnect the USB cable.
DEFRAG
● Fragmentation of ISO file is allowed up to 24 pieces.
No for VHD.
● please do Disk Defragmenter for Disk Defragmentation.
Not Use Dynamic
● Dynamic VHD is not supported. fixed VHD is only supported.
Not Use Sparse
● Sparse files are not supported.
● Follow these steps until the error is clear.
1. press [7] and hold. and then connect to PC
2. press [1] and hold. and then connect to PC
3. Check Disk. ( for Windows)
4. pdate with the latest firmware
5. Reboot the PC
6. Change USB cable, and connect it to the back panel of PC
7. Connect to another pc
8. Connect to PC with pressing [9] and enter for 7 seconds.
wait for 2-3 minutes.
● Due to the characteristics of SSD/HDD drives,
it is recommended to turn off defragmentation.
● You must cancel the defragmentation reservation while
using the VHD.
1. In Windows file explorer, right click on iodd ST
Select [Properties] and select the [Tools] tab.
2. Select [Optimize] in [Drive Optimization and Defragmentation].
3. Select the ST and check the [Scheduled Optimization] item.
If so, click [Change Settings] and select
[Run Schedule (Recommended)]. Uncheck the item.
Windows 7
1. Run the [Defrag] at Windows control panels
2. In the Disk Defragmenter window that opens,
select the iodd ST to see the scheduling items.
3. If [Scheduled execution] is checked, clear it.
If you use multiple partitions
1. When an Iodd ST is split into multiple partitions,
it can be recognized as multiple drives in Explorer or
the AdSTstration Tool.
2. Cancel the disk defragmentation schedule for each
and every drive.
Please Wait ...
Disconnect ...
Saving data ...
Updating Flash ...
Input Limit...
Reconnect USB
Not Match...
NO DEVICE !!!
HDD ERROR !!!
HDD WARNING ???
please wait.
please disconnect.
please wait for saving data.
please wait for updating
Password error count exceeded.
please reconnect.
please reconnect.
Password is not matched.
HDD is not detected.
HDD Read Error.
or Too many bad sectors.
HDD have some bad Sectors.

VHD Guide
Bootable VHD Creat
RUFUS Download and Run
RUFUS Setting
VHD file usage and precautions
Fixed / removable change
Press the button and select the [MODE Select] item.
● VHD files can use various settings.
● You can change the properties of the VHD file at any time
with the [Mode Manager] menu.
Never delete a VHD file that is in use (mounted) or change
its file location, as this may cause a fatal error in the SSD.
and Unschedule the disk defragmentation of iodd ST
VHD file create
VHD file mount
● The Iodd ST can use VHD files to use the Virtual Drive (HDD)
and Virtual USB Memory Stick (RMD)
● Download the [VHD Tool]
ftp://iodd.kr/open/vhd_tools/
● Press the key to mount the VHD file.
The created VHD file is recognized as 'uninitialized drive'
● Select the [Create] tab of the VHD Tool.
● Specify the location and file name of the ST in [File name].
● Enter the size of the VHD file to be created in [Size].
!!! Must be smaller than or equal to the size of [Biggest linear Space].
● Click the [Create] to create the VHD file in the selected path.
Mode select
Write Protection On/Off
//
5 - ,6-
-------- Disable -------
Button 6 on the selected device (▶).
The device can be changed to
removable or fixed.
Removable: Recognized as removable
disk by the host
Fixed: Recognized as external HDD
Fixed Removable
Mode select
//
5 - ,6-
-------- Disable -------
In the selected device (▶),
use button 5 to set the device to
write protection On/Off
This option can be checked by the
lock status.
On OFF
Bootcamp for MAC OSX
● The WTG and encryption features of the IODD ST
make it possible to boot securely even on MACs.
● With your Mac turned off, connect the Ipod ST and press
the power button while holding down the [option] key to select
a boot disk. Choose the yellow UEFI disk
[Press and hold the Control key when first installing]
● Install the bootcamp support driver.
● External USB or VHD file for boot camp driver
-Download the driver from the boot camp control panel.
● VHD file for boot camp installation (fixed recommended)
● The RUFUS * utility can be used to create UEFI bootable
VHD files or Windows-to-go disks.
● You can boot Only support UEFI system
● The VHD file must be set as the [removable] disk
● The default settings are the same as for UEFI boot.
Select [USB Hard Drive List] in [Advanced Drive Properties].
Select the target VHD drive (fixed) to install on the device.
Set the partition type to [GPT] and the target system to [UEFI].
● Download Site(Official)
https://rufus.ie/
● After installation, run as adSTstrator
Preparations
After work
ioddST.vhd
5120410
1. Select the mounted VHD drive in [Device] Item.
3. image Options, select Standard Installation or Win-to-Go
4.Partition scheme set GPT / Target system to UEFI.
5. For Win-To-Go installations, MBR / BIOS (or UEFI-CSM) be more compatible.
6.Recommends default values for file systems and Cluster size
7. Press the start button and the boot file is created.
2. Select the original ISO file from the boot selection.

IODD Assembly

IODD
IODD Co.,Ltd.
http://en.iodd.kr
Made in Korea
Online-Gulde(Wiki)
Amazon Offical Brand Page
Amazon.com/iodd
http://en.iodd.kr
