
IODD MINI
QUICK GUIDE
This manual has been
translated from English
Version
into the language through Google Translator.
If you find any grammar/spelling errors,
please contact us via the email below.
for waiting for iodd mini!
■ Getting started
0. The internal SSD is shipped uninitialized.
Initialization and partitioning
and formatting are required.
1. The built-in firmware is the latest version,
Firmware ware update is not needed at this time
2. You can Select the partition type (GPT / MBR) and
format (NTFS / exFAT / FAT32) are supported
multiple partitions are supoorted.
3. If there is an ISO file in any folder on any partition,
you can mount it. If you have multiple partitions,
you can select the partition.(button 4 press 3 seconds)
4. select file and button 5 press.
You can check the information (name / size)
5. If you press the button 0 on any screen,
Help is available.
6. If you copy a lot of data, some heat may be generated.
In normal use,the proper temperature is maintained
Special Thanks

Specifications
Encryption
Display
Control
SSD
Product Size
Weight
Material
Internal Interface
External Interface
Power
Support File
Support OS
Trim/UAS
Features
AES256bit-XTS Max 16 Digits
128x160 TFT LCD
Tact-Switch
256GB / 512GB / 1TB
40x90x9mm
40g
Plastic/Aclye/Rubber
NGFF M.2 2242
USB 3.0 Micro-B type
DC +5V USB
ISO/VHD/RMD/VMDK/IMA
Windows 7 or later ,OSX 10 or later
not support
AES256 Encryption
Write-Protection / Virtual Drives (ODD/HDD/RMD)
Multilangual Menu / Start-up Keys
Builtin Help / Windows-To-Go
USB Safe Removal

KEYS
Browsing Keys
Function Keys
Long key ( push for 3 seconds )
Start-Up keys
(during startup)
Up/Down list
View file information
Display full name, size, and fragmentation information of the file
Tooltip
A description of the current menu / error message
Select a
file / Menu
Enter to Menu. (or Exit)
refreshes file lists
Reconnected with
all virtual drives detached. (VHD, RMD, IMA)
Safe Removal.
(and ISO loading state is save)
Reconnected with
Write-Protection
Partition
Selection Mode
Reconnected with
temporarily Write Protection disabled
Go to upper
Folder / Menu
Starts without connecting to PC
Reset to factory settings
Starts with
Write Protection
Enter to menu
without connecting to PC
Displays startup key info.
without connecting to PC

MAIN UI
Status bar area
Virtual Drives Information Area
File list area
Status of the device
icon
Description
Status bar area
Virtual Drives Information Area
File list area
Inform active ISO / VHD / RMD and settings.
● List folders and available files in the selected directory
● if you want another partition, press and hold the 4 button
for 3 seconds. [Partition Selection Mode] is appears.
windows10.iso
VHD_01_DATA
BACKUP VHD
OS
UTIL
Photobook.iso
linuxmint-17.3-cinn
Ubuntu-14.04.4.de
RMD_01_WTG
Whole write-protection on / off status/
Mount / unmount status of the ISO file
Mode status (CD / DUAL / HDD)//
Power status (timer / sleep mode)
/
AES256 encryption On
USB connection speed (3.0 / 2.0 / 1.1)//
Inform write protection on / off status (VHD/RMD)
Inform mounted file name (ISO/VHD/RMD)filename.iso
Inform status of the virtual drive (removable / fixed)

Virtual Drive Function
Mode Manager
Press the button and select the 'MODE SELECT' Menu.
● One virtual ODD / three VHDs (or RMDs) can be mounted
at the same time.
● At the first time, automatically finds mountable files on the
largest partition (GPT / MBR, NTFS / exFAT / FAT32)
You can select default partition (button 4 in the file list area)
● The advanced mode manager handles the settings
of individual virtual drives.
Mode select
To exit menu mode,
press the button and the settings is saved.
※ If any options change in the Mode Manager, the device reboot
s and
all currently mounted virtual drives are unmounted (ISO/VHD/RMD)
※ The drive order in menu may be same the
Virtual Drives Information Area of IODD.
//
5 - ,6-
---inactive area---
set the options of the selected (▶) drive.
Use the 5 button to enable / disable
the write protection function.
Use the 6 button to toggle
removable disk / fixed disk
You can change the order with the 3/9
buttons.The inactive bar can be moved.
Drives that are below the inactive bar
are inactived.
1.Configure options for the selected
2. Configure the number of drives
and drive's order.

AES256 Encryption
● iODD MINI supports AES256bit-XTS encryption.
● No driver and software installation is required.
● Available for all operating systems.
● Password can be set with 4 - 16 digits.
● Improved secure with random number keys
generated each time
※ When Set/Remove Encryption , all data is initialized (on SSD).
※ If you forget your password, it is impossible to recover by any means.
※ If you forget your password, you can initialize the SSD and reuse it
by converting the internal partition format
(MBR -> GPT -> What you want) (Device disassembly is required)
However, all existing data will be lost and the warranty is voided.
Precautions
1. Press the button and select the item 'AES256 Encryption'.
2. Select 'Set Encryption'
3. The message '(All)data will be Lost' will be displayed. Select '1. Yes'.
4. Enter the password to set (4 - 16 digits)
5. Only the data that you write from now on will be encrypted.
6. Ask for your password each time you reconnect.
1. Press the button and select the item 'AES256 Encryption'.
2. Select 'Remove Encryption'
3. The message '(All)data will be Lost' will be displayed. Select '1. Yes'.
4. Enter the your password. (4 - 16 digits)
5. If encryption is removed, all data on the SSD is initialized with garbage.
Set Encryption
Remove Encryption

Error Messages
Check HDD
● There is an error in the drive. Please Do [Troubleshooting]
No appropriate partition
● There is no appropriate partition.
Drive Error
● Please contact customer service ([email protected])
Too Many Files
● The maximum number of files in one folder has been exceeded.
● ioddMini allows max 32 files or sub folders in a folder.
● Split the folder into subfolders.
..
● There are no subfolders or supported files in the current folder.
Disc Locked
● The disk is held by some programs. Please unlock the disk.
● If you want to unlock manually, reconnect the USB cable.
DEFRAG
● Fragmentation of ISO file is allowed up to 24 pieces.
No for VHD.
● please do Disk Defragmenter for Disk Defragmentation.
Not Use Dynamic
● Dynamic VHD is not supported. fixed VHD is only supported.
Not Use Sparse
● Sparse files are not supported.

Troubleshooting
Status Messages
● Follow these steps until the error is clear.
1. press [7] and hold. and then connect to PC
2. press [1] and hold. and then connect to PC
3. Check Disk. ( for Windows)
4. pdate with the latest firmware
5. Reboot the PC
6. Change USB cable, and connect it to the back panel of PC
7. Connect to another pc
8. Connect to PC with pressing [9] and enter for 7 seconds.
wait for 2-3 minutes.
Please Wait ...
Disconnect ...
Saving data ...
Updating Flash ...
Input Limit...
Reconnect USB
Not Match...
NO DEVICE !!!
HDD ERROR !!!
HDD WARNING ???
please wait.
please disconnect.
please wait for saving data.
please wait for updating
Password error count exceeded.
please reconnect.
please reconnect.
Password is not matched.
HDD is not detected.
HDD Read Error.
or Too many bad sectors.
HDD have some bad Sectors.

How to improve when USB recognition fail
Device Cleanup download
● When USB recognition repeatedly fails in the operating OS/PC
You can try the [Device Cleanup] utility.
● Although not valid in all situations, PCs that use many USB
devices can expect better recognition rates and speeds by
deleting USB usage information stored in the registry.
You can download it from the following http address.[Free ware]
https://www.uwe-sieber.de/misc_tools_e.html
Guide
Run the program as administrator
Select the [Select all] menu from the [Devices] menu.
All USB connection information in the registry is selected.
[mouse right click] any of the selected items.
Select [Remove Device] to delete the registry information.
After the operation is finished, reboot the PC.

Required | Cancel disk defragmentation
Windows 8 / 10
● The drive built into the Iodd Mini is an SSD drive.
● Due to the characteristics of SSD drives,
it is recommended to turn off defragmentation.
● You must cancel the defragmentation reservation while
using the VHD.
1. In Windows file explorer, right click on iodd mini
Select [Properties] and select the [Tools] tab.
2. Select [Optimize] in [Drive Optimization and Defragmentation].
3. Select the Mini and check the [Scheduled Optimization] item.
If so, click [Change Settings] and select
[Run Schedule (Recommended)]. Uncheck the item.
Windows 7
1. Run the [Defrag] at Windows control panels
2. In the Disk Defragmenter window that opens,
select the iodd mini to see the scheduling items.
3. If [Scheduled execution] is checked, clear it.
If you use multiple partitions
1. When an Iodd Mini is split into multiple partitions,
it can be recognized as multiple drives in Explorer or
the Administration Tool.
2. Cancel the disk defragmentation schedule for each
and every drive.
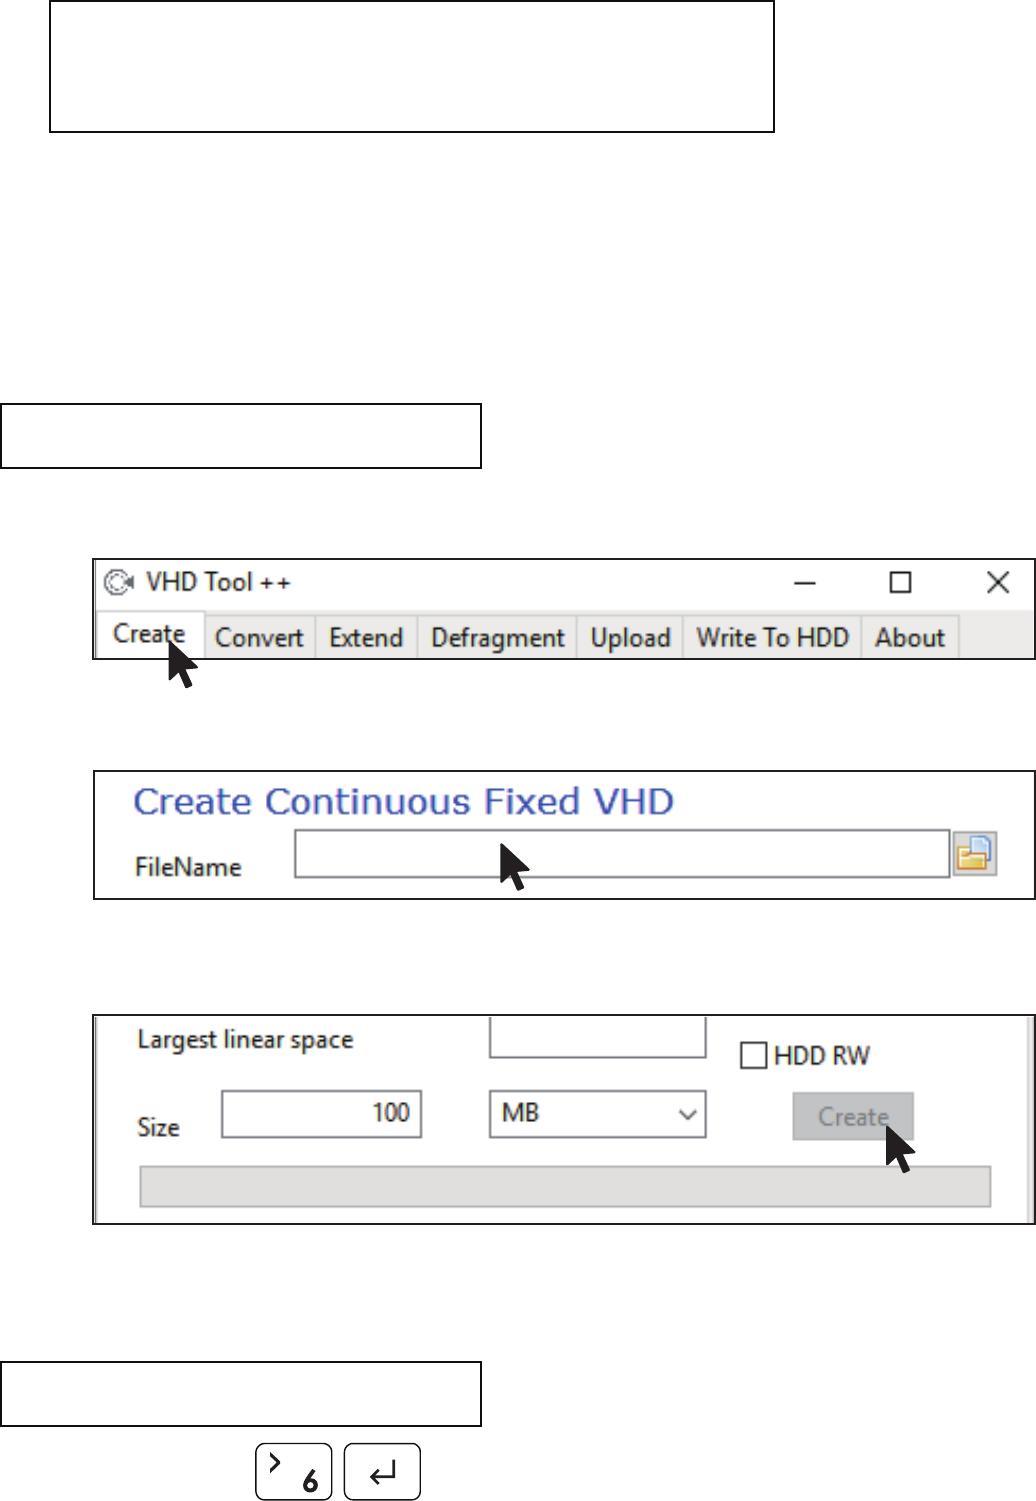
VHD Guide
VHD file create
VHD file mount
● The Iodd Mini can use VHD files to use the Virtual Drive (HDD)
and Virtual USB Memory Stick (RMD)
● Download the [VHD Tool]
ftp://iodd.kr/open/vhd_tools/
● Press the key to mount the VHD file.
The created VHD file is recognized as 'uninitialized drive'
● Select the [Create] tab of the VHD Tool.
● Specify the location and file name of the mini in [File name].
● Enter the size of the VHD file to be created in [Size].
!!! Must be smaller than or equal to the size of [Biggest linear Space].
● Click the [Create] to create the VHD file in the selected path.
ioddmini.vhd
5120410

Bootable VHD Creat
RUFUS Download and Run
● The RUFUS * utility can be used to create UEFI bootable
VHD files or Windows-to-go disks.
● You can boot Only support UEFI system
● The VHD file must be set as the [removable] disk
● Download Site(Official)
https://rufus.ie/
● After installation, run as administrator
1. Select the mounted VHD drive in [Device] Item.
3. image Options, select Standard Installation or Win-to-Go
4.Partition scheme set GPT / Target system to UEFI.
5. For Win-To-Go installations, MBR / BIOS (or UEFI-CSM) be more compatible.
6.Recommends default values for file systems and Cluster size
7. Press the start button and the boot file is created.
2. Select the original ISO file from the boot selection.

VHD file usage and precautions
Fixed / removable change
Press the button and select the [MODE Select] item.
● VHD files can use various settings.
● You can change the properties of the VHD file at any time
with the [Mode Manager] menu.
Never delete a VHD file that is in use (mounted) or change
its file location, as this may cause a fatal error in the SSD.
and Unschedule the disk defragmentation of iodd mini
Mode select
Write Protection On/Off
//
5 - ,6-
-------- Disable -------
Button 6 on the selected device (▶).
The device can be changed to
removable or fixed.
Removable: Recognized as removable
disk by the host
Fixed: Recognized as external HDD
Fixed Removable
Mode select
//
5 - ,6-
-------- Disable -------
In the selected device (▶),
use button 5 to set the device to
write protection On/Off
This option can be checked by the
lock status.
On OFF

RUFUS Setting
Bootcamp for MAC OSX
● The WTG and encryption features of the IODD MINI
make it possible to boot securely even on MACs.
● With your Mac turned off, connect the Ipod Mini and press
the power button while holding down the [option] key to select
a boot disk. Choose the yellow UEFI disk
[Press and hold the Control key when first installing]
● Install the bootcamp support driver.
● External USB or VHD file for boot camp driver
-Download the driver from the boot camp control panel.
● VHD file for boot camp installation (fixed recommended)
● The default settings are the same as for UEFI boot.
Select [USB Hard Drive List] in [Advanced Drive Properties].
Select the target VHD drive (fixed) to install on the device.
Set the partition type to [GPT] and the target system to [UEFI].
Preparations
After work

Only the following items will be covered under warranty
Applicable item
◆ IODD MINI Body - 1 years
The following items are not covered under warranty
Excluded items
◆ Bundle USB Cable
◆ Pouch
◆ User’s data on SSD drive
Even within the warranty period,
the following cases will be excluded.
0. Damaged or damaged seal labels on the body
1. Failure due to electrical or physical impact
2. Failure due to arbitrary modification
3. Failure due to environment outside the usage range
4. Failure due to severe pollution and breakage
5. Can not verify purchase date
6. Breakdown due to disasters, volcanoes, etc.
7. Failure due to incorrect use.
8. Scope not covered by other fire insurance
If the warranty does not apply,
repair costs will be incurred and repairs may be denied.
Warranty coverage is for the United States only,
not for the rest of the world.
Warranty, technical support and other inquiries,
please contact us by email.
Warranty Period
