
ibm.com/redbooks
Advanced Case Management
with IBM Case Manager
Wei-Dong Zhu
Brian Benoit
Bob Jackson
Johnson Liu
Mike Marin
Seema Meena
Juan Felipe Ospina
Guillermo Rios
Introducing case management and
IBM Case Manager
Building IBM Case Manager
solutions with use case example
Covering customization, rules,
deployment, and more
Front cover

Advanced Case Management
with IBM Case Manager
May 2014
International Technical Support Organization
SG24-7929-03

© Copyright International Business Machines Corporation 2013, 2014. All rights reserved.
Note to U.S. Government Users Restricted Rights -- Use, duplication or disclosure restricted by GSA ADP
Schedule Contract with IBM Corp.
Fourth Edition (May 2014)
This edition applies to Version 5.2.0, IBM Case Manager (product number 5725-A15).
Note: Before using this information and the product it supports, read the information in
“Notices” on page xiii.
© Copyright IBM Corp. 2013, 2014. All rights reserved. iii
Contents
Notices . . . . . . . . . . . . . . . . . . . . . . . . . . . . . . . . . . . . . . . . . . . . . . . . . . . . . . xiii
Trademarks . . . . . . . . . . . . . . . . . . . . . . . . . . . . . . . . . . . . . . . . . . . . . . . . . . . xiv
Preface . . . . . . . . . . . . . . . . . . . . . . . . . . . . . . . . . . . . . . . . . . . . . . . . . . . . . . xv
Authors . . . . . . . . . . . . . . . . . . . . . . . . . . . . . . . . . . . . . . . . . . . . . . . . . . . . . . . xv
Now you can become a published author, too! . . . . . . . . . . . . . . . . . . . . . . . xviii
Comments welcome. . . . . . . . . . . . . . . . . . . . . . . . . . . . . . . . . . . . . . . . . . . . . xix
Stay connected to IBM Redbooks . . . . . . . . . . . . . . . . . . . . . . . . . . . . . . . . . . xix
Summary of changes. . . . . . . . . . . . . . . . . . . . . . . . . . . . . . . . . . . . . . . . . . . xxi
May 2014, Fourth Edition . . . . . . . . . . . . . . . . . . . . . . . . . . . . . . . . . . . . . . . . . xxi
Part 1. Concept and overview . . . . . . . . . . . . . . . . . . . . . . . . . . . . . . . . . . . . . . . . . . . . . . . . . 1
Chapter 1. Case management concept . . . . . . . . . . . . . . . . . . . . . . . . . . . . . 3
1.1 Case management overview. . . . . . . . . . . . . . . . . . . . . . . . . . . . . . . . . . . . 4
1.2 What makes case management unique . . . . . . . . . . . . . . . . . . . . . . . . . . . 6
1.2.1 Cases are goal-driven and unpredictable . . . . . . . . . . . . . . . . . . . . . . 6
1.2.2 Cases are knowledge-intensive . . . . . . . . . . . . . . . . . . . . . . . . . . . . . 7
1.2.3 Modeling . . . . . . . . . . . . . . . . . . . . . . . . . . . . . . . . . . . . . . . . . . . . . . . 8
1.2.4 Tasks. . . . . . . . . . . . . . . . . . . . . . . . . . . . . . . . . . . . . . . . . . . . . . . . . . 8
1.2.5 Routine work and knowledge work . . . . . . . . . . . . . . . . . . . . . . . . . . 10
1.3 Case Management and IBM BPM Solutions . . . . . . . . . . . . . . . . . . . . . . . 10
1.4 The need for Enterprise Content Management . . . . . . . . . . . . . . . . . . . . . 14
1.4.1 Information complexity . . . . . . . . . . . . . . . . . . . . . . . . . . . . . . . . . . . 14
1.4.2 Security . . . . . . . . . . . . . . . . . . . . . . . . . . . . . . . . . . . . . . . . . . . . . . . 15
1.4.3 Retention. . . . . . . . . . . . . . . . . . . . . . . . . . . . . . . . . . . . . . . . . . . . . . 15
1.5 The need for collaboration. . . . . . . . . . . . . . . . . . . . . . . . . . . . . . . . . . . . . 17
1.6 Case management solutions. . . . . . . . . . . . . . . . . . . . . . . . . . . . . . . . . . . 17
1.6.1 Case data . . . . . . . . . . . . . . . . . . . . . . . . . . . . . . . . . . . . . . . . . . . . . 18
1.6.2 Case folder . . . . . . . . . . . . . . . . . . . . . . . . . . . . . . . . . . . . . . . . . . . . 19
1.6.3 Tasks. . . . . . . . . . . . . . . . . . . . . . . . . . . . . . . . . . . . . . . . . . . . . . . . . 20
Chapter 2. Typical case management applications . . . . . . . . . . . . . . . . . . 23
2.1 Typical applications . . . . . . . . . . . . . . . . . . . . . . . . . . . . . . . . . . . . . . . . . . 24
2.1.1 Solution patterns . . . . . . . . . . . . . . . . . . . . . . . . . . . . . . . . . . . . . . . . 25
2.1.2 Applications by industry . . . . . . . . . . . . . . . . . . . . . . . . . . . . . . . . . . 26
2.2 Complaints management example use case . . . . . . . . . . . . . . . . . . . . . . 29
2.2.1 Complaint scenario . . . . . . . . . . . . . . . . . . . . . . . . . . . . . . . . . . . . . . 30
iv Advanced Case Management with IBM Case Manager
2.2.2 Resolving the case . . . . . . . . . . . . . . . . . . . . . . . . . . . . . . . . . . . . . . 31
2.2.3 Content that is related to the case . . . . . . . . . . . . . . . . . . . . . . . . . . 32
2.2.4 Integration with other systems . . . . . . . . . . . . . . . . . . . . . . . . . . . . . 33
Chapter 3. IBM Case Manager overview . . . . . . . . . . . . . . . . . . . . . . . . . . . 35
3.1 IBM Case Manager capabilities. . . . . . . . . . . . . . . . . . . . . . . . . . . . . . . . . 36
3.1.1 Case design and deployment . . . . . . . . . . . . . . . . . . . . . . . . . . . . . . 36
3.1.2 Case management . . . . . . . . . . . . . . . . . . . . . . . . . . . . . . . . . . . . . . 36
3.1.3 IBM Case Manager API . . . . . . . . . . . . . . . . . . . . . . . . . . . . . . . . . . 36
3.1.4 Tools . . . . . . . . . . . . . . . . . . . . . . . . . . . . . . . . . . . . . . . . . . . . . . . . . 37
3.1.5 Solution templates. . . . . . . . . . . . . . . . . . . . . . . . . . . . . . . . . . . . . . . 37
3.1.6 Content and process management . . . . . . . . . . . . . . . . . . . . . . . . . . 37
3.1.7 Collaboration and social software tools. . . . . . . . . . . . . . . . . . . . . . . 37
3.1.8 Business rules. . . . . . . . . . . . . . . . . . . . . . . . . . . . . . . . . . . . . . . . . . 38
3.1.9 Case analytics. . . . . . . . . . . . . . . . . . . . . . . . . . . . . . . . . . . . . . . . . . 38
3.1.10 Reporting. . . . . . . . . . . . . . . . . . . . . . . . . . . . . . . . . . . . . . . . . . . . . 38
3.1.11 Content Analytics . . . . . . . . . . . . . . . . . . . . . . . . . . . . . . . . . . . . . . 38
3.1.12 Forms integration . . . . . . . . . . . . . . . . . . . . . . . . . . . . . . . . . . . . . . 38
3.2 IBM Case Manager environments. . . . . . . . . . . . . . . . . . . . . . . . . . . . . . . 39
3.2.1 Environments and case management phases . . . . . . . . . . . . . . . . . 39
3.2.2 Solutions and deployment in development environment. . . . . . . . . . 42
3.3 IBM Case Manager components. . . . . . . . . . . . . . . . . . . . . . . . . . . . . . . . 42
3.3.1 IBM Case Manager core components. . . . . . . . . . . . . . . . . . . . . . . . 44
3.3.2 IBM Case Manager optional components . . . . . . . . . . . . . . . . . . . . . 50
3.3.3 IBM Case Manager extensions . . . . . . . . . . . . . . . . . . . . . . . . . . . . . 52
3.4 IBM Case Manager architecture . . . . . . . . . . . . . . . . . . . . . . . . . . . . . . . . 54
3.4.1 Case Manager Builder . . . . . . . . . . . . . . . . . . . . . . . . . . . . . . . . . . . 55
3.4.2 Case Manager Client . . . . . . . . . . . . . . . . . . . . . . . . . . . . . . . . . . . . 55
3.4.3 Case Manager API . . . . . . . . . . . . . . . . . . . . . . . . . . . . . . . . . . . . . . 55
3.4.4 Content Platform Engine . . . . . . . . . . . . . . . . . . . . . . . . . . . . . . . . . . 60
3.5 IBM Case Manager configurations . . . . . . . . . . . . . . . . . . . . . . . . . . . . . . 60
3.5.1 Development environment configuration. . . . . . . . . . . . . . . . . . . . . . 60
3.5.2 Production environment with high availability . . . . . . . . . . . . . . . . . . 63
3.5.3 Production environment with partitioning . . . . . . . . . . . . . . . . . . . . . 65
Chapter 4. Inner workings of IBM Case Manager. . . . . . . . . . . . . . . . . . . . 69
4.1 IBM Case Manager object model . . . . . . . . . . . . . . . . . . . . . . . . . . . . . . . 71
4.1.1 Solution . . . . . . . . . . . . . . . . . . . . . . . . . . . . . . . . . . . . . . . . . . . . . . . 72
4.1.2 Case types . . . . . . . . . . . . . . . . . . . . . . . . . . . . . . . . . . . . . . . . . . . . 76
4.1.3 Roles . . . . . . . . . . . . . . . . . . . . . . . . . . . . . . . . . . . . . . . . . . . . . . . . . 80
4.1.4 Roles in-basket . . . . . . . . . . . . . . . . . . . . . . . . . . . . . . . . . . . . . . . . . 80
4.1.5 Personal in-baskets. . . . . . . . . . . . . . . . . . . . . . . . . . . . . . . . . . . . . . 81
4.1.6 Configuring manual work assignment . . . . . . . . . . . . . . . . . . . . . . . . 83
Contents v
4.1.7 Configuring role pages . . . . . . . . . . . . . . . . . . . . . . . . . . . . . . . . . . . 90
4.1.8 Document types . . . . . . . . . . . . . . . . . . . . . . . . . . . . . . . . . . . . . . . . 90
4.1.9 Task type. . . . . . . . . . . . . . . . . . . . . . . . . . . . . . . . . . . . . . . . . . . . . . 91
4.1.10 Tasks. . . . . . . . . . . . . . . . . . . . . . . . . . . . . . . . . . . . . . . . . . . . . . . . 97
4.2 Case object model implementation . . . . . . . . . . . . . . . . . . . . . . . . . . . . . 102
4.2.1 Design object store . . . . . . . . . . . . . . . . . . . . . . . . . . . . . . . . . . . . . 103
4.2.2 Target environment . . . . . . . . . . . . . . . . . . . . . . . . . . . . . . . . . . . . . 105
4.2.3 Project areas for supporting parallel project development . . . . . . . 107
4.3 IBM Case Manager pages. . . . . . . . . . . . . . . . . . . . . . . . . . . . . . . . . . . . 109
4.3.1 Default pages in a Solution . . . . . . . . . . . . . . . . . . . . . . . . . . . . . . . 109
4.3.2 Default Cases pages. . . . . . . . . . . . . . . . . . . . . . . . . . . . . . . . . . . . 110
4.3.3 Default Task pages . . . . . . . . . . . . . . . . . . . . . . . . . . . . . . . . . . . . . 111
4.3.4 IBM Case Manager widgets . . . . . . . . . . . . . . . . . . . . . . . . . . . . . . 113
4.4 Tasks and associated workflow processes . . . . . . . . . . . . . . . . . . . . . . . 114
4.4.1 Workflow association . . . . . . . . . . . . . . . . . . . . . . . . . . . . . . . . . . . 114
4.4.2 Workflow data fields . . . . . . . . . . . . . . . . . . . . . . . . . . . . . . . . . . . . 115
4.4.3 Workflow attachments. . . . . . . . . . . . . . . . . . . . . . . . . . . . . . . . . . . 117
4.4.4 Starting task workflows . . . . . . . . . . . . . . . . . . . . . . . . . . . . . . . . . . 117
4.4.5 Workflow processing and task state . . . . . . . . . . . . . . . . . . . . . . . . 118
4.5 Object model for IBM Content Manager integration . . . . . . . . . . . . . . . . 118
Part 2. Solution development. . . . . . . . . . . . . . . . . . . . . . . . . . . . . . . . . . . . . . . . . . . . . . . . 123
Chapter 5. IBM Case Manager tools . . . . . . . . . . . . . . . . . . . . . . . . . . . . . 125
5.1 IBM Case Manager tools overview . . . . . . . . . . . . . . . . . . . . . . . . . . . . . 126
5.2 IBM Case Manager configuration tool . . . . . . . . . . . . . . . . . . . . . . . . . . . 126
5.2.1 Starting the IBM Case Manager configuration tool . . . . . . . . . . . . . 127
5.2.2 Creating a profile. . . . . . . . . . . . . . . . . . . . . . . . . . . . . . . . . . . . . . . 127
5.2.3 Running the profile tasks. . . . . . . . . . . . . . . . . . . . . . . . . . . . . . . . . 129
5.3 IBM Case Manager administration client. . . . . . . . . . . . . . . . . . . . . . . . . 133
5.3.1 Copying a solution. . . . . . . . . . . . . . . . . . . . . . . . . . . . . . . . . . . . . . 133
5.3.2 Creating solution templates. . . . . . . . . . . . . . . . . . . . . . . . . . . . . . . 141
5.3.3 Using solution templates . . . . . . . . . . . . . . . . . . . . . . . . . . . . . . . . . 143
5.3.4 Exporting and importing a solution . . . . . . . . . . . . . . . . . . . . . . . . . 146
5.3.5 Exporting business rules . . . . . . . . . . . . . . . . . . . . . . . . . . . . . . . . . 150
5.3.6 Configure locks . . . . . . . . . . . . . . . . . . . . . . . . . . . . . . . . . . . . . . . . 151
5.3.7 Enabling case history store . . . . . . . . . . . . . . . . . . . . . . . . . . . . . . . 153
5.3.8 Widget packages. . . . . . . . . . . . . . . . . . . . . . . . . . . . . . . . . . . . . . . 153
5.3.9 Configuring an audit . . . . . . . . . . . . . . . . . . . . . . . . . . . . . . . . . . . . 154
5.3.10 Configuring security . . . . . . . . . . . . . . . . . . . . . . . . . . . . . . . . . . . 158
5.3.11 Manage project areas . . . . . . . . . . . . . . . . . . . . . . . . . . . . . . . . . . 163
5.3.12 Extra options for an administrator in administration client. . . . . . . 165
5.4 IBM Case Manager Builder . . . . . . . . . . . . . . . . . . . . . . . . . . . . . . . . . . . 166
vi Advanced Case Management with IBM Case Manager
5.4.1 Multiple user solution development in Case Manager Builder . . . . 167
5.4.2 Solution assets . . . . . . . . . . . . . . . . . . . . . . . . . . . . . . . . . . . . . . . . 168
5.4.3 Solution lock and draft object . . . . . . . . . . . . . . . . . . . . . . . . . . . . . 169
5.4.4 Case Manager Builder save options . . . . . . . . . . . . . . . . . . . . . . . . 175
5.4.5 Committing and deploying a solution . . . . . . . . . . . . . . . . . . . . . . . 175
Chapter 6. Designing case management solutions . . . . . . . . . . . . . . . . . 179
6.1 Business goals of a case management solution . . . . . . . . . . . . . . . . . . . 180
6.2 Designing the solution . . . . . . . . . . . . . . . . . . . . . . . . . . . . . . . . . . . . . . . 181
6.2.1 Agile and iterative methodologies . . . . . . . . . . . . . . . . . . . . . . . . . . 181
6.2.2 Case design . . . . . . . . . . . . . . . . . . . . . . . . . . . . . . . . . . . . . . . . . . 182
6.2.3 Task design. . . . . . . . . . . . . . . . . . . . . . . . . . . . . . . . . . . . . . . . . . . 183
6.2.4 Case documents . . . . . . . . . . . . . . . . . . . . . . . . . . . . . . . . . . . . . . . 185
6.2.5 Business rules. . . . . . . . . . . . . . . . . . . . . . . . . . . . . . . . . . . . . . . . . 186
6.2.6 Modeling how cases are created . . . . . . . . . . . . . . . . . . . . . . . . . . 186
6.3 Creating the solution . . . . . . . . . . . . . . . . . . . . . . . . . . . . . . . . . . . . . . . . 187
6.4 Defining your solution . . . . . . . . . . . . . . . . . . . . . . . . . . . . . . . . . . . . . . . 188
6.4.1 Defining case properties . . . . . . . . . . . . . . . . . . . . . . . . . . . . . . . . . 189
6.4.2 Defining case types. . . . . . . . . . . . . . . . . . . . . . . . . . . . . . . . . . . . . 189
6.4.3 Defining document types. . . . . . . . . . . . . . . . . . . . . . . . . . . . . . . . . 189
6.4.4 Defining roles . . . . . . . . . . . . . . . . . . . . . . . . . . . . . . . . . . . . . . . . . 190
6.4.5 Defining in-baskets . . . . . . . . . . . . . . . . . . . . . . . . . . . . . . . . . . . . . 190
6.4.6 Defining pages . . . . . . . . . . . . . . . . . . . . . . . . . . . . . . . . . . . . . . . . 190
6.4.7 Defining case types. . . . . . . . . . . . . . . . . . . . . . . . . . . . . . . . . . . . . 191
6.4.8 Defining views . . . . . . . . . . . . . . . . . . . . . . . . . . . . . . . . . . . . . . . . . 191
6.4.9 Defining tasks . . . . . . . . . . . . . . . . . . . . . . . . . . . . . . . . . . . . . . . . . 191
6.5 Configuring your solution. . . . . . . . . . . . . . . . . . . . . . . . . . . . . . . . . . . . . 195
6.5.1 Advanced in-basket configuration . . . . . . . . . . . . . . . . . . . . . . . . . . 195
6.5.2 Advanced property layout views within a case . . . . . . . . . . . . . . . . 196
6.5.3 Configuring pages for advanced user interfaces. . . . . . . . . . . . . . . 197
6.5.4 Advanced task configuration . . . . . . . . . . . . . . . . . . . . . . . . . . . . . . 197
6.5.5 Using forms to enhance user interfaces . . . . . . . . . . . . . . . . . . . . . 199
6.5.6 Providing users with custom tasks . . . . . . . . . . . . . . . . . . . . . . . . . 201
6.5.7 Configuring the security definitions . . . . . . . . . . . . . . . . . . . . . . . . . 201
6.5.8 Configuring case analytics and reporting . . . . . . . . . . . . . . . . . . . . 202
6.5.9 Configuring the Cognos Real-Time Monitor . . . . . . . . . . . . . . . . . . 205
6.6 Customizing and integrating your solution . . . . . . . . . . . . . . . . . . . . . . . 205
6.7 Documenting your solution . . . . . . . . . . . . . . . . . . . . . . . . . . . . . . . . . . . 208
Chapter 7. Building a simple solution: Part 1. . . . . . . . . . . . . . . . . . . . . . 211
7.1 Building the sample solution overview . . . . . . . . . . . . . . . . . . . . . . . . . . 212
7.2 Defining the solution basics. . . . . . . . . . . . . . . . . . . . . . . . . . . . . . . . . . . 213
7.2.1 Adding a solution. . . . . . . . . . . . . . . . . . . . . . . . . . . . . . . . . . . . . . . 213
Contents vii
7.2.2 Setting up properties . . . . . . . . . . . . . . . . . . . . . . . . . . . . . . . . . . . . 215
7.2.3 Setting up roles . . . . . . . . . . . . . . . . . . . . . . . . . . . . . . . . . . . . . . . . 220
7.2.4 Setting up in-baskets. . . . . . . . . . . . . . . . . . . . . . . . . . . . . . . . . . . . 222
7.2.5 Setting up document types . . . . . . . . . . . . . . . . . . . . . . . . . . . . . . . 225
7.3 Defining the case type. . . . . . . . . . . . . . . . . . . . . . . . . . . . . . . . . . . . . . . 227
7.3.1 Creating a case type . . . . . . . . . . . . . . . . . . . . . . . . . . . . . . . . . . . . 227
7.3.2 Configuring case type properties . . . . . . . . . . . . . . . . . . . . . . . . . . 229
7.3.3 Configuring the Case Summary view . . . . . . . . . . . . . . . . . . . . . . . 230
7.3.4 Configuring custom properties layout view . . . . . . . . . . . . . . . . . . . 231
7.3.5 Configuring the case search . . . . . . . . . . . . . . . . . . . . . . . . . . . . . . 239
7.3.6 Defining case folders structure . . . . . . . . . . . . . . . . . . . . . . . . . . . . 240
7.4 Defining embedded rules . . . . . . . . . . . . . . . . . . . . . . . . . . . . . . . . . . . . 241
7.5 Defining case tasks . . . . . . . . . . . . . . . . . . . . . . . . . . . . . . . . . . . . . . . . . 247
7.5.1 Creating Upgrade Options set. . . . . . . . . . . . . . . . . . . . . . . . . . . . . 248
7.5.2 Creating the Upsell Opportunity container task. . . . . . . . . . . . . . . . 249
7.5.3 Creating the Upgrade Product task. . . . . . . . . . . . . . . . . . . . . . . . . 251
7.5.4 Creating the Upgrade Plan task . . . . . . . . . . . . . . . . . . . . . . . . . . . 254
7.5.5 Creating the Call Customer task . . . . . . . . . . . . . . . . . . . . . . . . . . . 255
7.5.6 Creating the Verify Billing task . . . . . . . . . . . . . . . . . . . . . . . . . . . . 255
7.5.7 Creating the Verify Complaint task . . . . . . . . . . . . . . . . . . . . . . . . . 257
7.5.8 Creating the remaining tasks . . . . . . . . . . . . . . . . . . . . . . . . . . . . . 258
7.5.9 Reviewing task summary . . . . . . . . . . . . . . . . . . . . . . . . . . . . . . . . 265
Chapter 8. Building a simple solution: Part 2. . . . . . . . . . . . . . . . . . . . . . 267
8.1 Configuring workflow diagrams by using Step Designer . . . . . . . . . . . . . 268
8.1.1 Creating the Upgrade Product task diagram. . . . . . . . . . . . . . . . . . 268
8.1.2 Creating the Upgrade Plan task diagram . . . . . . . . . . . . . . . . . . . . 275
8.1.3 Creating the Call Customer task diagram . . . . . . . . . . . . . . . . . . . . 276
8.1.4 Creating the Verify Billing task diagram . . . . . . . . . . . . . . . . . . . . . 277
8.1.5 Creating the Verify Complaint task diagram . . . . . . . . . . . . . . . . . . 280
8.1.6 Creating the Review Product Complaint task diagram . . . . . . . . . . 281
8.1.7 Creating the Review Non-Product Complaint task diagram . . . . . . 282
8.1.8 Creating the Investigate Product Safety task diagram . . . . . . . . . . 283
8.1.9 Creating the Send Corresponding Letter task diagram. . . . . . . . . . 285
8.1.10 Creating the Close Complaint task diagram . . . . . . . . . . . . . . . . . 289
8.1.11 Creating the Investigate Employee task diagram . . . . . . . . . . . . . 290
8.1.12 Creating the Request Assistance task diagram . . . . . . . . . . . . . . 293
8.2 Saving and validating the solution. . . . . . . . . . . . . . . . . . . . . . . . . . . . . . 295
8.3 Deploying the Customer Complaints solution . . . . . . . . . . . . . . . . . . . . . 296
8.4 Testing the Customer Complaints solution . . . . . . . . . . . . . . . . . . . . . . . 298
8.5 Improving the solution . . . . . . . . . . . . . . . . . . . . . . . . . . . . . . . . . . . . . . . 309
8.5.1 Solution icon . . . . . . . . . . . . . . . . . . . . . . . . . . . . . . . . . . . . . . . . . . 310
8.5.2 Property choice list . . . . . . . . . . . . . . . . . . . . . . . . . . . . . . . . . . . . . 310
viii Advanced Case Management with IBM Case Manager
8.5.3 Solution properties . . . . . . . . . . . . . . . . . . . . . . . . . . . . . . . . . . . . . 310
8.5.4 Document properties. . . . . . . . . . . . . . . . . . . . . . . . . . . . . . . . . . . . 310
8.5.5 In-basket properties . . . . . . . . . . . . . . . . . . . . . . . . . . . . . . . . . . . . 311
Chapter 9. Migrating and deploying solutions . . . . . . . . . . . . . . . . . . . . . 313
9.1 Migration models and migration procedure overview . . . . . . . . . . . . . . . 314
9.1.1 Traditional FileNet P8 application migration model. . . . . . . . . . . . . 314
9.1.2 IBM Case Manager solution migration model . . . . . . . . . . . . . . . . . 316
9.1.3 Using the best of both migration models. . . . . . . . . . . . . . . . . . . . . 317
9.2 Migration and deployment procedure overview. . . . . . . . . . . . . . . . . . . . 320
9.3 Preparation . . . . . . . . . . . . . . . . . . . . . . . . . . . . . . . . . . . . . . . . . . . . . . . 322
9.3.1 Preparing IBM Case Manager assets . . . . . . . . . . . . . . . . . . . . . . . 322
9.3.2 Preparing FileNet P8 assets . . . . . . . . . . . . . . . . . . . . . . . . . . . . . . 324
9.3.3 Preparing other IBM assets and external artifacts . . . . . . . . . . . . . 327
9.4 Migration . . . . . . . . . . . . . . . . . . . . . . . . . . . . . . . . . . . . . . . . . . . . . . . . . 329
9.4.1 Migrating IBM Case Manager assets . . . . . . . . . . . . . . . . . . . . . . . 329
9.4.2 Migrating FileNet P8 assets . . . . . . . . . . . . . . . . . . . . . . . . . . . . . . 343
9.4.3 Migrating other IBM and external artifacts . . . . . . . . . . . . . . . . . . . 345
9.5 Deployment . . . . . . . . . . . . . . . . . . . . . . . . . . . . . . . . . . . . . . . . . . . . . . . 346
9.5.1 Deploying IBM Case Manager assets. . . . . . . . . . . . . . . . . . . . . . . 346
9.5.2 Deploying FileNet P8 assets . . . . . . . . . . . . . . . . . . . . . . . . . . . . . . 348
9.5.3 Deploying other IBM and external artifacts . . . . . . . . . . . . . . . . . . . 348
9.6 Configuration . . . . . . . . . . . . . . . . . . . . . . . . . . . . . . . . . . . . . . . . . . . . . . 349
9.6.1 Configuring IBM Case Manager assets . . . . . . . . . . . . . . . . . . . . . 349
9.6.2 Configuring FileNet P8 assets. . . . . . . . . . . . . . . . . . . . . . . . . . . . . 353
9.6.3 Configuring other IBM and external artifacts. . . . . . . . . . . . . . . . . . 354
Part 3. Solution customization and advanced topics . . . . . . . . . . . . . . . . . . . . . . . . . . . . 355
Chapter 10. User interface and widgets . . . . . . . . . . . . . . . . . . . . . . . . . . 357
10.1 User interface navigation. . . . . . . . . . . . . . . . . . . . . . . . . . . . . . . . . . . . 358
10.1.1 Navigating Case Manager Builder . . . . . . . . . . . . . . . . . . . . . . . . 358
10.1.2 Navigating Page Designer . . . . . . . . . . . . . . . . . . . . . . . . . . . . . . 359
10.1.3 Multiple user editing . . . . . . . . . . . . . . . . . . . . . . . . . . . . . . . . . . . 364
10.1.4 Navigating Case Manager Client . . . . . . . . . . . . . . . . . . . . . . . . . 365
10.2 Understanding page types and custom pages . . . . . . . . . . . . . . . . . . . 365
10.2.1 Default pages . . . . . . . . . . . . . . . . . . . . . . . . . . . . . . . . . . . . . . . . 365
10.2.2 Custom pages . . . . . . . . . . . . . . . . . . . . . . . . . . . . . . . . . . . . . . . . 367
10.3 Accessing the Properties View Designer . . . . . . . . . . . . . . . . . . . . . . . 372
10.3.1 System-generated view. . . . . . . . . . . . . . . . . . . . . . . . . . . . . . . . . 373
10.3.2 Designing a custom view . . . . . . . . . . . . . . . . . . . . . . . . . . . . . . . 373
10.3.3 Configuring the default view for a case type . . . . . . . . . . . . . . . . . 375
10.3.4 Overriding the default view in the Properties widget . . . . . . . . . . . 376
10.4 Using default widgets and their payloads . . . . . . . . . . . . . . . . . . . . . . . 377
Contents ix
10.4.1 Standard widgets that are provided by IBM Case Manager . . . . . 378
10.4.2 Widget payloads . . . . . . . . . . . . . . . . . . . . . . . . . . . . . . . . . . . . . . 379
10.4.3 Wiring a widget to another widget . . . . . . . . . . . . . . . . . . . . . . . . . 380
10.4.4 Widget incoming and outgoing events and payloads . . . . . . . . . . 382
10.4.5 In-basket widget event and corresponding payload . . . . . . . . . . . 383
10.4.6 Search widget event and corresponding payload . . . . . . . . . . . . . 384
10.5 Creating and deploying a custom widget . . . . . . . . . . . . . . . . . . . . . . . 386
10.5.1 Setting up your development environment . . . . . . . . . . . . . . . . . . 388
10.5.2 Creating your widget definition and catalog files. . . . . . . . . . . . . . 389
10.5.3 Creating the IBM Content Navigator plug-in . . . . . . . . . . . . . . . . . 392
10.5.4 Creating the custom page widget with content pane . . . . . . . . . . 393
10.5.5 Creating IBM Case Manager JavaScript API calls and objects . . 396
10.5.6 Building the custom widget package. . . . . . . . . . . . . . . . . . . . . . . 397
10.5.7 Deploying the custom widget package . . . . . . . . . . . . . . . . . . . . . 400
10.5.8 Adding the custom widget to the page . . . . . . . . . . . . . . . . . . . . . 404
10.6 Creating a custom task . . . . . . . . . . . . . . . . . . . . . . . . . . . . . . . . . . . . . 405
10.7 Using the Timeline Visualizer and Instruction widgets . . . . . . . . . . . . . 408
10.7.1 Configuring auditing and case history store . . . . . . . . . . . . . . . . . 409
10.7.2 Displaying case history in the Timeline Visualizer widget . . . . . . . 409
10.7.3 Displaying instructions in the Instruction widget . . . . . . . . . . . . . . 410
Chapter 11. Customization topics . . . . . . . . . . . . . . . . . . . . . . . . . . . . . . . 411
11.1 Using project areas when developing solutions . . . . . . . . . . . . . . . . . . 412
11.2 Automated handling of ingested documents . . . . . . . . . . . . . . . . . . . . . 413
11.2.1 Generalized approach for handling ingested documents . . . . . . . 414
11.2.2 Implementation methods. . . . . . . . . . . . . . . . . . . . . . . . . . . . . . . . 415
11.2.3 Sample JavaScript based implementation procedure. . . . . . . . . . 415
11.3 Splitting a case . . . . . . . . . . . . . . . . . . . . . . . . . . . . . . . . . . . . . . . . . . . 421
11.3.1 Splitting a case into two cases . . . . . . . . . . . . . . . . . . . . . . . . . . . 422
11.4 Basic customization scenarios . . . . . . . . . . . . . . . . . . . . . . . . . . . . . . . 424
11.4.1 Adding a button to the toolbar . . . . . . . . . . . . . . . . . . . . . . . . . . . . 424
11.4.2 Adding custom actions to menu action . . . . . . . . . . . . . . . . . . . . . 425
11.5 Intermediate customization scenarios . . . . . . . . . . . . . . . . . . . . . . . . . . 426
11.5.1 Enumerating documents . . . . . . . . . . . . . . . . . . . . . . . . . . . . . . . . 427
11.5.2 Opening multiple work items . . . . . . . . . . . . . . . . . . . . . . . . . . . . . 428
11.5.3 Adding entry template via custom action . . . . . . . . . . . . . . . . . . . 431
11.5.4 Adding an attachment to the case. . . . . . . . . . . . . . . . . . . . . . . . . 433
11.5.5 Creating in-basket dynamic filter. . . . . . . . . . . . . . . . . . . . . . . . . . 437
11.5.6 Filtering Case Information widget to show comments only . . . . . . 439
11.5.7 Modifying property attributes by using the Property Controller . . . 440
11.5.8 Getting the next work item with custom logic after completing a work
item . . . . . . . . . . . . . . . . . . . . . . . . . . . . . . . . . . . . . . . . . . . . . . . . . 443
11.5.9 Filling the Case List widget based on search results . . . . . . . . . . 447
x Advanced Case Management with IBM Case Manager
11.6 Advanced customization scenarios . . . . . . . . . . . . . . . . . . . . . . . . . . . . 449
11.7 Multilingual support . . . . . . . . . . . . . . . . . . . . . . . . . . . . . . . . . . . . . . . . 450
11.7.1 Translating the Case Manager user interface . . . . . . . . . . . . . . . . 450
11.7.2 Translating custom strings, solution assets, and others . . . . . . . . 451
Chapter 12. Advanced solution topics . . . . . . . . . . . . . . . . . . . . . . . . . . . 453
12.1 Introduction . . . . . . . . . . . . . . . . . . . . . . . . . . . . . . . . . . . . . . . . . . . . . . 454
12.2 Process Designer integration . . . . . . . . . . . . . . . . . . . . . . . . . . . . . . . . 455
12.2.1 Accessing Process Designer . . . . . . . . . . . . . . . . . . . . . . . . . . . . 455
12.2.2 Solution editing . . . . . . . . . . . . . . . . . . . . . . . . . . . . . . . . . . . . . . . 458
12.2.3 Process editing . . . . . . . . . . . . . . . . . . . . . . . . . . . . . . . . . . . . . . . 459
12.2.4 Activity parameters in Process Designer . . . . . . . . . . . . . . . . . . . 460
12.3 Shadow fields and queue updates . . . . . . . . . . . . . . . . . . . . . . . . . . . . 462
12.3.1 Shadow field defined. . . . . . . . . . . . . . . . . . . . . . . . . . . . . . . . . . . 463
12.3.2 Case properties, queues, and work items. . . . . . . . . . . . . . . . . . . 463
12.3.3 Shadow field synchronization . . . . . . . . . . . . . . . . . . . . . . . . . . . . 465
12.3.4 Prior version behavior . . . . . . . . . . . . . . . . . . . . . . . . . . . . . . . . . . 466
12.3.5 Parallel property changes . . . . . . . . . . . . . . . . . . . . . . . . . . . . . . . 469
12.4 Case operation components . . . . . . . . . . . . . . . . . . . . . . . . . . . . . . . . . 470
12.5 Advanced design examples . . . . . . . . . . . . . . . . . . . . . . . . . . . . . . . . . 472
12.5.1 Document arrival email notification . . . . . . . . . . . . . . . . . . . . . . . . 472
12.5.2 Creating more in-baskets . . . . . . . . . . . . . . . . . . . . . . . . . . . . . . . 483
12.5.3 Showing process errors in Case Manager Client . . . . . . . . . . . . . 492
Chapter 13. Business rules . . . . . . . . . . . . . . . . . . . . . . . . . . . . . . . . . . . . 507
13.1 Benefits of using rules . . . . . . . . . . . . . . . . . . . . . . . . . . . . . . . . . . . . . . 508
13.2 Integrated rules . . . . . . . . . . . . . . . . . . . . . . . . . . . . . . . . . . . . . . . . . . . 509
13.2.1 Text rules . . . . . . . . . . . . . . . . . . . . . . . . . . . . . . . . . . . . . . . . . . . 510
13.2.2 Decision tables . . . . . . . . . . . . . . . . . . . . . . . . . . . . . . . . . . . . . . . 516
13.2.3 Text rule versus decision table . . . . . . . . . . . . . . . . . . . . . . . . . . . 518
13.2.4 Implementation techniques . . . . . . . . . . . . . . . . . . . . . . . . . . . . . . 519
13.3 integrated rules versus external rules . . . . . . . . . . . . . . . . . . . . . . . . . . 521
13.4 Creating and invoking rules. . . . . . . . . . . . . . . . . . . . . . . . . . . . . . . . . . 522
13.4.1 Creating a simple text-based rule . . . . . . . . . . . . . . . . . . . . . . . . . 522
13.4.2 Reviewing a business rule . . . . . . . . . . . . . . . . . . . . . . . . . . . . . . 527
13.4.3 Invoking rules with parameters . . . . . . . . . . . . . . . . . . . . . . . . . . . 532
13.5 External rules engine integration. . . . . . . . . . . . . . . . . . . . . . . . . . . . . . 535
13.5.1 Incorporating a business rule in the case solution . . . . . . . . . . . . 535
Chapter 14. Integration points . . . . . . . . . . . . . . . . . . . . . . . . . . . . . . . . . . 545
14.1 Model APIs . . . . . . . . . . . . . . . . . . . . . . . . . . . . . . . . . . . . . . . . . . . . . . 546
14.2 REST APIs . . . . . . . . . . . . . . . . . . . . . . . . . . . . . . . . . . . . . . . . . . . . . . 546
14.2.1 Case Manager REST API . . . . . . . . . . . . . . . . . . . . . . . . . . . . . . . 547
14.2.2 Process Engine REST API . . . . . . . . . . . . . . . . . . . . . . . . . . . . . . 548
Contents xi
14.2.3 Content Management Interoperability Services API . . . . . . . . . . . 549
14.2.4 Navigating from REST API calls to Model API calls . . . . . . . . . . . 549
14.3 Using Java APIs . . . . . . . . . . . . . . . . . . . . . . . . . . . . . . . . . . . . . . . . . . 550
14.3.1 Integrating by using Content Engine Java API . . . . . . . . . . . . . . . 551
14.3.2 Integrating by using Process Engine Java API . . . . . . . . . . . . . . . 552
14.3.3 Integrating by using the Case Java API . . . . . . . . . . . . . . . . . . . . 553
14.4 Using Case Manager Client-side integration. . . . . . . . . . . . . . . . . . . . . 554
14.4.1 Website widget . . . . . . . . . . . . . . . . . . . . . . . . . . . . . . . . . . . . . . . 554
14.4.2 Script Adapter widget . . . . . . . . . . . . . . . . . . . . . . . . . . . . . . . . . . 554
14.4.3 Custom widget . . . . . . . . . . . . . . . . . . . . . . . . . . . . . . . . . . . . . . . 555
14.5 Using Content Platform Engine workflow integration . . . . . . . . . . . . . . 555
14.5.1 Custom components . . . . . . . . . . . . . . . . . . . . . . . . . . . . . . . . . . . 556
14.5.2 Web services. . . . . . . . . . . . . . . . . . . . . . . . . . . . . . . . . . . . . . . . . 556
14.5.3 Database interaction . . . . . . . . . . . . . . . . . . . . . . . . . . . . . . . . . . . 557
14.6 External data service. . . . . . . . . . . . . . . . . . . . . . . . . . . . . . . . . . . . . . . 557
14.7 Other supported integrations. . . . . . . . . . . . . . . . . . . . . . . . . . . . . . . . . 558
14.7.1 Integration with IBM Operational Decision Manager. . . . . . . . . . . 558
14.7.2 Integration with IBM Content Manager . . . . . . . . . . . . . . . . . . . . . 559
14.7.3 External Data Services framework . . . . . . . . . . . . . . . . . . . . . . . . 560
14.7.4 Integration with IBM Business Process Manager . . . . . . . . . . . . . 560
14.7.5 Integration with IBM Content Analytics with Enterprise Search . . 561
Appendix A. Additional material . . . . . . . . . . . . . . . . . . . . . . . . . . . . . . . . 563
Locating the Web material . . . . . . . . . . . . . . . . . . . . . . . . . . . . . . . . . . . . . . . 563
Using the Web material . . . . . . . . . . . . . . . . . . . . . . . . . . . . . . . . . . . . . . . . . 564
System requirements for downloading the Web material . . . . . . . . . . . . . 564
Downloading and extracting the Web material . . . . . . . . . . . . . . . . . . . . . 564
Related publications . . . . . . . . . . . . . . . . . . . . . . . . . . . . . . . . . . . . . . . . . . 565
IBM Redbooks . . . . . . . . . . . . . . . . . . . . . . . . . . . . . . . . . . . . . . . . . . . . . . . . 565
Online resources . . . . . . . . . . . . . . . . . . . . . . . . . . . . . . . . . . . . . . . . . . . . . . 566
Help from IBM . . . . . . . . . . . . . . . . . . . . . . . . . . . . . . . . . . . . . . . . . . . . . . . . 566
xii Advanced Case Management with IBM Case Manager
© Copyright IBM Corp. 2013, 2014. All rights reserved. xiii
Notices
This information was developed for products and services offered in the U.S.A.
IBM may not offer the products, services, or features discussed in this document in other countries. Consult
your local IBM representative for information about the products and services currently available in your
area. Any reference to an IBM product, program, or service is not intended to state or imply that only that
IBM product, program, or service may be used. Any functionally equivalent product, program, or service that
does not infringe any IBM intellectual property right may be used instead. However, it is the user's
responsibility to evaluate and verify the operation of any non-IBM product, program, or service.
IBM may have patents or pending patent applications covering subject matter described in this document.
The furnishing of this document does not give you any license to these patents. You can send license
inquiries, in writing, to:
IBM Director of Licensing, IBM Corporation, North Castle Drive, Armonk, NY 10504-1785 U.S.A.
The following paragraph does not apply to the United Kingdom or any other country where such
provisions are inconsistent with local law: INTERNATIONAL BUSINESS MACHINES CORPORATION
PROVIDES THIS PUBLICATION "AS IS" WITHOUT WARRANTY OF ANY KIND, EITHER EXPRESS OR
IMPLIED, INCLUDING, BUT NOT LIMITED TO, THE IMPLIED WARRANTIES OF NON-INFRINGEMENT,
MERCHANTABILITY OR FITNESS FOR A PARTICULAR PURPOSE. Some states do not allow disclaimer
of express or implied warranties in certain transactions, therefore, this statement may not apply to you.
This information could include technical inaccuracies or typographical errors. Changes are periodically made
to the information herein; these changes will be incorporated in new editions of the publication. IBM may
make improvements and/or changes in the product(s) and/or the program(s) described in this publication at
any time without notice.
Any references in this information to non-IBM websites are provided for convenience only and do not in any
manner serve as an endorsement of those websites. The materials at those websites are not part of the
materials for this IBM product and use of those websites is at your own risk.
IBM may use or distribute any of the information you supply in any way it believes appropriate without
incurring any obligation to you.
Information concerning non-IBM products was obtained from the suppliers of those products, their published
announcements or other publicly available sources. IBM has not tested those products and cannot confirm
the accuracy of performance, compatibility or any other claims related to non-IBM products. Questions on
the capabilities of non-IBM products should be addressed to the suppliers of those products.
This information contains examples of data and reports used in daily business operations. To illustrate them
as completely as possible, the examples include the names of individuals, companies, brands, and products.
All of these names are fictitious and any similarity to the names and addresses used by an actual business
enterprise is entirely coincidental.
COPYRIGHT LICENSE:
This information contains sample application programs in source language, which illustrate programming
techniques on various operating platforms. You may copy, modify, and distribute these sample programs in
any form without payment to IBM, for the purposes of developing, using, marketing or distributing application
programs conforming to the application programming interface for the operating platform for which the
sample programs are written. These examples have not been thoroughly tested under all conditions. IBM,
therefore, cannot guarantee or imply reliability, serviceability, or function of these programs.

xiv Advanced Case Management with IBM Case Manager
Trademarks
IBM, the IBM logo, and ibm.com are trademarks or registered trademarks of International Business
Machines Corporation in the United States, other countries, or both. These and other IBM trademarked
terms are marked on their first occurrence in this information with the appropriate symbol (® or ™),
indicating US registered or common law trademarks owned by IBM at the time this information was
published. Such trademarks may also be registered or common law trademarks in other countries. A current
list of IBM trademarks is available on the Web at http://www.ibm.com/legal/copytrade.shtml
The following terms are trademarks of the International Business Machines Corporation in the United States,
other countries, or both:
Cognos®
DB2®
developerWorks®
Domino®
FileNet®
IBM®
ILOG®
Lotus®
Lotus Notes®
Notes®
OmniFind®
Quickr®
Rational®
Redbooks®
Redbooks (logo) ®
Sametime®
WebSphere®
The following terms are trademarks of other companies:
Microsoft, and the Windows logo are trademarks of Microsoft Corporation in the United States, other
countries, or both.
Java, and all Java-based trademarks and logos are trademarks or registered trademarks of Oracle and/or its
affiliates.
Other company, product, or service names may be trademarks or service marks of others.
© Copyright IBM Corp. 2013, 2014. All rights reserved. xv
Preface
Organizations face case management challenges that require insight,
responsiveness, and collaboration. IBM® Case Manager, Version 5.2, is an
advanced case management product that unites information, process, and
people to provide the 360-degree view of case information and achieve optimized
outcomes. With IBM Case Manager, knowledge workers can extract critical case
information through integrated business rules, collaboration, and analytics. This
easy access to information enhances decision-making ability and leads to more
successful case outcomes. IBM Case Manager also helps capture industry
preferred practices in frameworks and templates to empower business users and
accelerate return on investment.
This IBM Redbooks® publication introduces the case management concept. It
includes the reason for and benefits of case management, and why it is different
from the traditional business process management or content management. In
addition, this book addresses how you can design and build a case management
solution with IBM Case Manager and integrate that solution with external
products and components.
This book is intended to provide IT architects and IT specialists with the
high-level concepts of case management and the capabilities of IBM Case
Manager. It also serves as a practical guide for IT professionals who are
responsible for designing, building, customizing, and deploying IBM Case
Manager solutions.
Authors
This book was produced by a team of specialists from around the world working
at IBM Software Development Lab in Costa Mesa, California.
The Redbooks publication team consists of the following members:
Wei-Dong Zhu (Jackie) is an Enterprise Content Management Project Leader
with ITSO. Jackie joined IBM in 1996 and has more than 10 years of software
development experience in accounting, image workflow processing, and digital
media distribution. She is a Certified Solution Designer for IBM Content
Manager, and has managed many Enterprise Content Management Redbooks
publications. Jackie holds a Master of Science degree in Computer Science from
the University of the Southern California.
xvi Advanced Case Management with IBM Case Manager
Brian Benoit is the Technical Consultant for Pyramid Solutions' ECM practice.
He is responsible for pre-sales support, Pyramid Product offerings, and support
for the Pyramid relationship with IBM’s ECM development groups. Brian joined
Pyramid Solutions in 2003 and has over 20 years experience in the IT industry.
Brian is an IBM Certified Specialist and Solution Design Technical Professional in
Content Manager, Case Foundation, and Case Manager. He is recognized for
developing IBM Case Manager solutions that are deployed in the financial,
insurance, and government industries.
Bob Jackson is a Client Solutions Professional (CSP) with the Eastern Region
ECM SWAT Team in the United States. In this role, Bob provides consultation on
complex Case Management presales projects. Bob also presented IBM Case
Manager topics to major corporations worldwide. Bob developed many internal
IBM case management education, complex case management demonstrations,
proof of technology presentations, and proof of concept projects. His expertise
includes ECM, business process management, portal servers, application
servers, and web development. Bob is a licensed professional engineer with a
Bachelor of Engineering in Materials Science from Thayer School of Engineering
at Dartmouth College. He also holds an Artium Bacculaurei from Dartmouth
College.
Johnson Liu is a Software Engineer with IBM Software Group in the United
States. Johnson developed many early training workshops, white papers, and
code samples for IBM Case Manager. Johnson has expertise in and supports
customers in the areas of widget development, user interface, and solution
deployment and conversion. Johnson has a Bachelor of Science degree from the
University of California in Business Information Management.
Mike Marin is an IBM Distinguished Engineer and the chief architect for the IBM
Case Manager product. Mike also is an Association for Computing Machinery
(ACM) Distinguished Engineer and life member, with an MSCS in Artificial
Intelligence. He has more than 20 years of experience designing and developing
system software. For the last 20 years, he developed several workflow, business
process management (BPM), and case management products. He also
participated in standard organizations including WfMC, OMG, and OASIS
working on BPM and workflow standards. Mike edited and contributed to the
definition of several software standards and wrote several papers and articles on
the subject.
Seema Meena is a Software Engineer at Software Group in IBM India Software
Lab. Seema has more than eight years of experience in software development.
She currently works on the IBM Case Manager Builder development. Seema
holds a Bachelor degree in Information Technology from Rajasthan University,
India. She joined IBM in 2008 and worked on the IBM eDiscovery Analyzer
product in the past.
Preface xvii
Juan Felipe Ospina is a Client Solution Specialist for Enterprise Content
Management with coverage for Colombia, Ecuador, Venezuela, and Peru, in
Latin America. He has 12 years experience in implementation of large-scale
information systems in content and business process management segments
and as a developer in Java technology, business analyst, and solution architect.
For the last five years, Juan Felipe has focused on case management and
capture solution design, development, and support. Juan Felipe has a degree in
Computer Science from EAFIT University of Medellin Colombia.
Guillermo Rios is a Client Solution Professional and a Senior Certified
Enterprise Content Management Solution Consultant in California, IBM US. He
holds a degree in Computer Science from Universidad Anahuac, Mexico.
Guillermo joined IBM in 2006 as part of the FileNet® acquisition where he
worked in the Latin America team as a Senior IT Specialist for eight years helping
customers and partners in the design and implementation of complex FileNet
solutions for the banking, insurance, petrochemical, and government sectors. For
the past four years, Guillermo focused on IBM Case Manager and IBM Case
Foundation solutions for North America ECM Technical Competency Center.
Guillermo is a SWAT team member for the ECM West IMT. He has 25 years of
experience in the Information Technology and Software Industry.
Special thanks to B A Nagabhushan, who contributed a portion of the content in
the Rules chapter.
Very special thanks to Thuy Do, Yvonne Santiago and Darik Siegfried, who
always are extremely helpful in the production of IBM Redbooks publications,
especially this one.
Thanks to the following IBM Case Manager development management, product
management, and architect team for their support of the project:
William Lobig
Martin Shramo
Dave Perman
Huzefa Hakim
Sean Yang
Lauren Mayes
In addition, thanks to the following people for helping us during and after the
residency:
Barry Beach
Joshua Burke
Dao Quynh Dang
Laurent Dubois
Mike Fannon
David Hanson
xviii Advanced Case Management with IBM Case Manager
Wen-Chin Hsieh (Steven)
Srinivas Jandhyala
Vishnu N KV
Diane McFee
Krishnaveni PillutlaLatha Ramakrishnaiah
Ravi Ray
Eugene Rozhdestvensky
Yvonne Santiago
Patricia Sort De Sanz
Brent Taylor
Xiao Ji Tian
Steve Timms
Thomas Yang
IBM Software Group, IBM US, and IBM India
Thanks to the authors of the previous edition of this book:
Wei-Dong Zhu
Michael Kirchner
Tom Ko
Michael Oland
Balunaini Prasad
Mike Prentice
Monique Ruggiero
Now you can become a published author, too!
Here’s an opportunity to spotlight your skills, grow your career, and become a
published author—all at the same time! Join an ITSO residency project and help
write a book in your area of expertise, while honing your experience using
leading-edge technologies. Your efforts will help to increase product acceptance
and customer satisfaction, as you expand your network of technical contacts and
relationships. Residencies run from two to six weeks in length, and you can
participate either in person or as a remote resident working from your home
base.
Find out more about the residency program, browse the residency index, and
apply online at this website:
http://www.ibm.com/redbooks/residencies.html
Preface xix
Comments welcome
Your comments are important to us!
We want our books to be as helpful as possible. Send us your comments about
this book or other IBM Redbooks publications in one of the following ways:
Use the online Contact us review Redbooks form found at this website:
http://www.ibm.com/redbooks
Send your comments in an email to:
Mail your comments to:
IBM Corporation, International Technical Support Organization
Dept. HYTD Mail Station P099
2455 South Road
Poughkeepsie, NY 12601-5400
Stay connected to IBM Redbooks
Find us on Facebook:
http://www.facebook.com/IBMRedbooks
Follow us on Twitter:
http://twitter.com/ibmredbooks
Look for us on LinkedIn:
http://www.linkedin.com/groups?home=&gid=2130806
Explore new Redbooks publications, residencies, and workshops with the
IBM Redbooks weekly newsletter:
https://www.redbooks.ibm.com/Redbooks.nsf/subscribe?OpenForm
Stay current on recent Redbooks publications with RSS Feeds:
http://www.redbooks.ibm.com/rss.html
xx Advanced Case Management with IBM Case Manager
© Copyright IBM Corp. 2013, 2014. All rights reserved. xxi
Summary of changes
This section describes the technical changes that were made in this edition of the
book and in previous editions. This edition also might include minor corrections
and editorial changes that are not identified.
Summary of Changes
for SG24-7929-03
for Advanced Case Management with IBM Case Manager
as created or updated on April 27, 2015.
May 2014, Fourth Edition
This revision reflects the addition, deletion, or modification of new and changed
information that is described next.
New information
The following new information is included:
Chapter 5, “IBM Case Manager tools” on page 125 is new.
Chapter 9, “Migrating and deploying solutions” on page 313 was re-written.
Chapter 11, “Customization topics” on page 411 many new sections about
customization scenarios were added.
Chapter 12, “Advanced solution topics” on page 453 is based on the original
“Round tripping” chapter and new content was added.
Chapter 13, “Business rules” on page 507 is new.
xxii Advanced Case Management with IBM Case Manager
Changed information
All existing chapters in parts 1 and 2 were updated.
In this version, we provide more explanation on designing a Case Manager
solution, the new functions and features Case Manager provides, and more
customization scenario samples.
The book chapters were re-organized into three parts. The original part 3 of the
book was dropped from this release except the “Integration points” chapter. The
previous version of the book can still be downloaded as additional material along
with this current version of the book.
This book covers IBM Case Manager, Version 5.2. The previous edition covers
IBM Case Manager, Version 5.1.1.

© Copyright IBM Corp. 2013, 2014. All rights reserved. 1
Part 1 Concept and
overview
This part introduces the concept of case management and IBM Case Manager. It
provides case scenarios for case management systems and addresses the
design approach for those solutions.
This part includes the following chapters:
Chapter 1, “Case management concept” on page 3
Chapter 2, “Typical case management applications” on page 23
Chapter 3, “IBM Case Manager overview” on page 35
Chapter 4, “Inner workings of IBM Case Manager” on page 69
Part 1
2 Advanced Case Management with IBM Case Manager

© Copyright IBM Corp. 2013, 2014. All rights reserved. 3
Chapter 1. Case management concept
This chapter introduces the basic concepts of case management, including those
aspects of case management that make it unique compared with other types of
business applications. The relationship between case management and
enterprise content management, collaboration, and business process
management also are explored. Finally, the concept of case management
solutions is introduced.
This chapter includes the following sections:
Case management overview
What makes case management unique
Case Management and IBM BPM Solutions
The need for Enterprise Content Management
The need for collaboration
Case management solutions
1
4 Advanced Case Management with IBM Case Manager
1.1 Case management overview
Case management was developed because certain business applications that
are performed by knowledge workers require a great deal of flexibility,
adaptability, control, and collaboration to achieve successful outcomes.
Traditional Enterprise Content Management systems and the structured control
of business process management (BPM) are insufficient to meet the
requirements of these applications. In certain industries, such as healthcare,
insurance, and the legal profession, case management is fairly well-understood.
The case management approach, however, can be successfully applied to a
broad set of business applications. Doing so gives knowledge workers and
businesses the capabilities they need to achieve their business objectives.
Case management is built around the concept of processing a
case, which is a
collection of information and coordinated activities by knowledge workers or case
workers. A case represents an entity that the organization must process and it is
sometimes identified by having a subject, similar to the subject of a sentence or a
narrative. The subject can be one of the following types:
Single person, such as a patient, customer, employee, or taxpayer
Legal entity, such as a business, church, or government
Two or more people or entities, such as in legal cases (Jones v. Smith)
An event, such as a fraud occurrence, security violation, or system outage
A
case folder is a container that allows workers to store and retrieve information
that pertains to the case. It also tracks the tasks that are required to process the
case.
A
case management solution is the application of case management technology
to a particular business problem in a particular domain. You can use case
management solutions in the following scenarios:
Customer complaint management where the subject is a customer
Benefit enrollment where the subject is an employee
Legal cases where the subject is a defendant
Allow processing where the subject is a citizen
Healthcare claim reimbursement where the subject is a patient
Credit card dispute management where the subject is a customer
For any case management solution, there can be many active cases. For
example, the customer complaint management solution creates a case for each
customer complaint. The term
case instance is sometimes used to refer to these
individual cases.
Chapter 1. Case management concept 5
Case management solutions are knowledge-intensive. These solutions require
case workers to coordinate data, tasks, processes, and services to achieve a
positive business outcome. The case workers need a large degree of flexibility
and adaptability to process the case. The requirement for flexibility makes these
solutions difficult to implement in traditional Enterprise Content Management and
BPM systems because most traditional implementations require predictable and
repeatable processes. Cases are less predictable than traditional processes
because the case worker judgment and experience influence how the case is
handled, and therefore, the outcome. However, case management solutions also
are repetitive, and therefore, require process support that makes it difficult to
implement them by using only an Enterprise Content Management system.
Case workers are not the only individuals who interact with a case. A case
participant might be a user who helps process and close a case. A participant
also might be a user who performs management operations, such as
assessments, audit, and outcome analysis. Management functions can be
performed on a single case instance, or across many case instances. Case
management solutions provide participants with views into the case that allow
them to efficiently complete their assignments. However, not all the participants
in a case need the same level of flexibility or access to the case. In most
situations, one or a few knowledge workers control the case and other
participants are restricted to performing well-defined activities. The participants
who interact with a case can be organized by roles. For example, in a credit card
dispute case solution, roles might include customer service representative,
dispute agent, dispute supervisor, data clerk, and fraud investigator.
Implementing a robust and effective case management solution requires a
software platform with a range of capabilities, including content management,
process management, business rules, collaboration, and analytics. The solution
must integrate seamlessly into the work environment of the case participants.
The user interface must provide flexibility and allow a high degree of
collaboration among the participants. For example, the interface must allow a
user to dynamically add more tasks to a case already in process.
A case management solution must provide case workers with the full context of
the case they are working on. This context is referred to as a
360 view of the
case. In practice, case workers with enough privileges must have access to all
the information pertinent to a case. This information includes history, documents
of various media types, and content added by other case workers. In addition, the
360 view includes all the process information for the case. By having all the
relevant information available, case workers can make better informed decisions.
6 Advanced Case Management with IBM Case Manager
Effective visualization of case information (including case history) is important to
improve knowledge workers’ productivity. The ability to visualize how the case
looked at the moment in which decisions were made, combined with the
comments of the workers that took the decision, provides invaluable insights to
other workers or supervisors.
1.2 What makes case management unique
Case management looks at repeatable business problems from the perspective
of the knowledge workers, and it empowers the knowledge worker to solve those
problems. It does so with a flexible solution that bundles the case information,
documents, rules, and all the tasks that might be required to solve the business
problem.
Case solutions are goal-oriented, but a business goal can be achieved in multiple
ways, and not all of them can be predetermined. Therefore, case workers require
the flexibility to decide how the goal is achieved. The focus of a case
management solution is the goal-oriented nature of the problem being solved. All
the detailed aspects of the solution work to achieve that goal. Whether it is a rule,
document, task, or a group of data elements, these characteristics all work to
help bring the case to its end state.
This focus is where the uniqueness of a case management solution originates.
The goal-oriented approach, in case solutions, is different than that of traditional
BPM solutions, which focus almost exclusively around process. The focus
around a case and its interactions with data, rules, content, and processes is the
complexity that differentiates them.
1.2.1 Cases are goal-driven and unpredictable
The concept of a goal-driven case solution is to bring focus on what is needed to
be done to a case. A case is to be processed, completed, paid, or resolved. The
data, rules, and activities that are identified exist to support this end goal.
Although the case constructs are defined, each individual case instance has
enough variability that a knowledge worker judgment is required to manage the
case to its end state.
For example, in a credit card dispute case, the business goal is to resolve the
dispute. Although each case instance has the same goal, the outcome of each
case can be different. In the credit card dispute example, some disputes end with
the merchant returning money to the customer. Other disputes end with the
customer maintaining the charge on the credit card, the bank fixing an
accounting mistake, and so on.
Chapter 1. Case management concept 7
In this example, each case is completed with a different outcome, but all of them
met the same business goal of solving the credit card dispute.
A case management solution is designed to provide the tools to solve a
repeatable situation. In a credit card dispute resolution, the situation is customers
who are disputing charges to their credit cards. Although all of the processing
patterns are similar, each dispute is different enough to present a certain level of
unpredictability in the process.
The overall case design might look similar, but the case worker must react to new
information in ways that cannot be predetermined. New information can change
the outcome of a case in ways that can be determined only by the case worker.
However, not all aspects of a case are unpredictable, and so IBM BPM
technology can be used to model the predictable aspects of case solutions.
These predictable aspects of the case processing can be encapsulated into
process fragments that can be used as part of the toolset that case workers use.
Case management recognizes that a business goal can be achieved in multiple
ways, not all of which can be predetermined. The path that follows from the start
of a case to the completion of that case can be different for each case instance.
Not all activities or steps that are required to complete a case can be known
when you design the case solution. For the known activities, the order of
execution might be unknown.
1.2.2 Cases are knowledge-intensive
The reason IBM BPM and Enterprise Content Management technologies are
insufficient for implementing case management is that cases are
knowledge-intensive, which requires the judgment of case workers. Therefore,
the outcome of the case depends more on human judgment than on the
underlying technology. The technology, however, must support the case worker
by providing the tools that are needed to advance the case to its resolution. It
cannot replace the judgment of the case worker, and should not unnecessarily
constrain the actions of the case worker.
Although the outcome of the case depends on case worker judgment, case
workers cannot arbitrarily decide the fate of a case. Case workers must justify
their decisions and collaborate, as necessary, to reach those decisions. The case
management solution must support this knowledge-intensive activity by providing
the tools and facilities to help the knowledge workers accomplish their work. At
the same time, it must provide the persistence, history, tracking, and monitoring
that is needed to justify and audit case worker actions and decisions.
8 Advanced Case Management with IBM Case Manager
1.2.3 Modeling
Case and process modeling are separate. Modeling is the definition of the
solution. It uses a tool to describe the solution that must be run to the system.
The tool is normally called a modeling or design tool, and the model is the human
readable output or printout that is produced by the tool. The IBM BPM process
modeling is well-understood and formalized by standards, such as the Business
Process Modeling Notation (BPMN). Case management has not been studied as
long or as deeply. However, there is an effort underway at the Object
Management Group (OMG) to define a modeling notation that is called Case
Management Modeling and Notation (CMMN). This notation is in beta status.
CMMN helps clarify and formalize case management modeling.
From a modeling perspective, case modeling focuses on knowledge worker
needs. It allows the person who is modeling the case to define the tools that are
needed to complete a case. Those tools can be modeled as tasks, which can be
process fragments. The modeling of cases focuses on what must be done to
complete a case instead of how it is done. Tasks in a case then describe what
must be done. Not defining the how gives the case workers more flexibility to
decide the best tasks for a particular case instance.
IBM BPM models focus on the activities that are required to achieve the business
goal and the efficient ordering of those activities. Therefore, IBM BPM models
describe how the processes are done, in addition to what must be done.
1.2.4 Tasks
For the case model to achieve a balance between formal and informal processes,
the formal processes are broken into process fragments. This concept is the
case
task, which corresponds to a process fragment, but also might be
implemented with other non-BPM technologies.
Tasks break the model of cases into two levels of abstractions. A task represents
a higher level of abstraction than process and describes “what” must be done. A
task also can describe “why” it must be done. For example, a task to review a
customer’s application must be done if a new customer application is received.
This concept allows the person modeling the case to model at a higher level of
abstraction and avoid describing the details of “how” a task must be done. When
you model a case, you are trying to answer the “what” and “why” questions by
using tasks. In contrast, when you model a IBM BPM process, the designer
answers the “what”, “who”, “when”, and “how” questions.

Chapter 1. Case management concept 9
The implementation of the task details corresponds to the lower level of
abstraction. Implementation might involve modeling a process fragment where
you answer the what, who, when, and how questions. However, it also can be
implemented by other technologies or applications.
Figure 1-1 shows the IBM Case Manager case task page with a model of a case
that contains seven tasks. Tasks are not connected with lines as they are in
traditional IBM BPM systems because there is no execution order between them.
The tasks are designed as tools for the case worker.
Figure 1-1 Example of tasks modeling in Case Manager Builder
10 Advanced Case Management with IBM Case Manager
1.2.5 Routine work and knowledge work
Most case solutions require knowledge workers and routine workers. Routine
workers are sometime called
heads-down workers, and are assigned repetitive
work that requires little judgment. Routine workers are suited for data entry
applications, such as scanning correspondence, and certain types of IBM BPM
applications.
In processing cases, organizations must manage the use of routine workers and
knowledge workers assignments. Most organizations manage the two pools of
workers separately, and separate routine workers roles and knowledge workers
roles. The concept of role allows organizations to fulfill those assignments by
moving workers between the roles, or having workers who are assigned to
multiple roles. Roles allow managers and supervisors to quickly and easily move
resources where they are needed.
1.3 Case Management and IBM BPM Solutions
Case management solutions have a primary focus on the data around the case
and what is needed to complete it. In a IBM BPM solution, the focus is on the
process and what is needed to complete it. The confusion at times comes when
the case uses a defined process. The use of these defined processes (which can
use IBM BPM) is needed within the case solution, but is not the focus of the
solution. The processes are short lived and achieve a specific purpose, such as
obtaining specific information, processing a rule, gaining approval, asking for
input, or updating other systems with decision.
Case management and business process management solutions have the
following key differences:
Cases tend to be more unpredictable and rely more on a knowledge worker’s
judgment than on system control or business-rule-based control flow.
The emphasis of case management is on designing a flexible process to drive
a business goal. The emphasis of business process management is on
designing a repeatable step-by-step procedure to solve a business problem.
In case management, the business problem is solved by a knowledge worker
who is using tools in the form of tasks that are not necessarily modeled. In
business process management, the business problems are always solved by
following a modeled process.
Case management solutions focus on the case and its data and activities, and
how to complete the case. BPM solutions focus exclusively on the process
and how to best accomplish that specific process.
Chapter 1. Case management concept 11
Cases have a nondeterministic lifecycle and can exist for a long time. IBM
BPM processes have a deterministic lifecycle and focus on processing within
a shorter timeline.
Cases always involve human participants, whereas a business process
management solution might not involve any human participants.
Cases always involve content because content is what knowledge workers
use to make decisions, whereas processes might not include content at all.
The knowledge workers who process a case decide which tasks are required
to complete the case. In a business process management system, the
software requires activities that are specified in a process model or business
rules.
When a case is closed, the case folder remains accessible. Case closure (or
completion) is a relative term in that a case is always accessible and can be
reopened for more processing, as required.
Case management solutions are considered partially repeatable, which means
that much of the processing is repeatable, but not entirely. The business goal is
always the focus, but the path to accomplish it is non-deterministic. The tasks
might or might not be performed, which is different from traditional IBM BPM.
Case management recognizes that many solutions cannot be fully described in a
IBM BPM system because of one or more of the following factors:
The focus is on the case data, not the process.
The flexibility that is required by knowledge workers is contrary to the forced
control flow that is imposed by processes.
Not all the tasks are known beforehand.
The order of the tasks is unknown.
The case data outlives the process completion.
There are several technologies that provide process functionality. These
technologies go from formal, structured processes at one end of a spectrum to
informal processes at the other. Formal processes were called
production
workflow
in the 1980s, and today are implemented by IBM BPM systems. These
solutions also are referred to as
process-centric.
A formal process encodes the business goals the process is designed to
accomplish, which gives the IBM BPM system full control over the business goal.
Formal processes might not have any human intervention. If they do, the
participants on the process do not need to know the business goal. If the
participants run their assigned activities, the IBM BPM system ensures that the
business goals are achieved.
12 Advanced Case Management with IBM Case Manager
The IBM BPM system is in complete control, which allows vendors to provide a
full suite of functions to model, track, monitor, and manage the processes. The
process can contain business rules that change the execution path of the
process, but the path that is taken is always modeled.
At the other extreme of the spectrum, informal processes were called
ad hoc
workflows
in the 1990s. They evolved into collaborating technologies, including
email and instant messaging. The informal process is not modeled and cannot
be easily tracked by the system. The participants in the process must agree on
and understand the business goal and have enough information about how to
achieve it. There is no process to follow, and the system does not know when the
goal is achieved or when the process is started. These types of processes and
technologies are useful for non-repetitive and one-of-a-kind assignments that do
not need to be tracked or audited.
Case management tries to achieve a balance between formal and informal
processes by formalizing parts of the process. These parts are called
process
fragments
or tasks. In addition, the system is aware of when the case starts and
when it finishes so it can track and monitor the cases. In a case management
system, the case workers are in control of how cases are processed. However,
they do not need to know all of the details about how to achieve the goal, and the
system can detect when it is achieved. The process fragments and tasks are
available as tools for the case worker to use.

Chapter 1. Case management concept 13
Figure 1-2 shows aspects of the process spectrum and positions case
management against formal and informal processes. It does not cover all
aspects of case management, but it includes some of the aspects that are
common with business process management.
Figure 1-2 Process spectrum
One aspect that is not shown in this figure is management and control. Within a
case management system, this is an overarching aspect of a solution. For
example, as shown in Figure 1-2, the line is drawn between “Process History
important for auditing” and “Documents and recordings are critical to justify
decisions” separating the nature of formal and informal processes. In contrast,
case management has an overarching view on both sides of the spectrum
concerning the case.
14 Advanced Case Management with IBM Case Manager
1.4 The need for Enterprise Content Management
During the processing of a case, multiple documents can be produced and used
by the various participants who interact to solve the case. Documents are a key
part of any case management solution because knowledge workers depend on
documents to complete their tasks. Case workers are no different, and so, while
resolving a case, multiple documents can be created and used. These
documents can be emails, text documents, spreadsheets, voice recordings,
images, video clips, presentations, and others. All this information must be stored
and organized as part of the case. This process requires cases to have a flexible
and familiar containment mechanism, similar to a folder structure in a file system.
However, a typical file system is not flexible enough to store case information. For
example, a document might be used simultaneously in multiple cases, and
therefore must be in each case folder. A change to the document must be
reflected in all the cases. It also is important that metadata, version, and security
are maintained so the complete history of the case is kept current and traceable.
These requirements are achieved in case management solutions by using an
Enterprise Content Management system to implement a case folder to collect the
information that is related to the case. A case folder (and all its contents) is
maintained after the case is complete for legal and compliance reasons. The
retained case also can be used in future cases or for analysis across cases. A
well-designed case management solution must include the design of the content
management aspects, such as folder organization and document types, including
metadata.
1.4.1 Information complexity
The amount of information or documents that is required to complete a case can
be different for separate instances of the same case solution. Certain cases
require more documentation or investigation than others, which means that
cases can have different amounts of information. This complexity translates into
case information complexity, which requires high levels of organization. Case
documents and information are normally organized in a hierarchical containment
structure that is similar to a traditional folder structure called a
case folder. For
example, a customer dispute case might have a folder structure as shown in
Figure 1-3 on page 16. The folder structure is populated with the documents and
files that are required to solve the case.
Chapter 1. Case management concept 15
A case can contain multiple documents of various types. To manage these
documents, you must associate metadata with them. You also need content and
metadata search capabilities. Finding information in a case is different from
finding information in a database because that information might be inside
documents that are stored in the case file. Case workers must easily find the
information that they need to work on the case, even if it is buried inside
documents. Enterprise Content Management systems make it easier to work
with this complexity of information.
The need to find case information is not important only for case workers who
handle a single case instance. It also is important for participants, such as
managers or analysts who deal with aggregations of case instances. These
participants must extract patterns from case information. For example, they might
want to determine the frequency that a particular pattern occurs in a collection of
cases. In the credit card complaint solution, a manager might want to find the
percentage of complaints that are filed for a particular product or a particular
merchant. This information might be present only in the documents or emails that
are contained in the cases.
1.4.2 Security
By using an Enterprise Content Management system to store case management
content, including information and documents, you can maintain fine-grain
access control over the information. It is common for cases to deal with sensitive
information, so these documents must be protected from unauthorized access. In
certain scenarios, even those working on the case should have limited access to
the case information.
1.4.3 Retention
Case information is long-lived and can be subject to the lifecycle of content
objects in an Enterprise Content Management system. In particular, when the
processing of a case is completed, all of the case information remains and is still
available for users with the correct security privileges. Therefore, cases can be
reopened for processing or auditing, if required.
Case information, including history and documents, can have regulatory
compliance retention requirements. Cases often are implemented as a case
folder (see Figure 1-3 on page 16) to collect all information and documents that
are related to a particular case instance. The case folder is retained after case
completion. Retaining case folders allows future cases to use the existing case
information, and facilitates compliance with legal and regulatory requirements.

16 Advanced Case Management with IBM Case Manager
For example, certain documents might need to be retained for five years,
whereas others must be retained for 10 years. The case management system
must enforce these regulatory compliance policies and satisfy audit
requirements. Even when regulatory compliance is not required, the retention of
case information is important for auditing purposes.
Figure 1-3 Example case showing partial case folder structure
Chapter 1. Case management concept 17
1.5 The need for collaboration
Case workers not only need information about the case to make decisions, but
must collaborate with other participants in the case. Most of this collaboration is
through the documents and information that is contained in the case folder.
These items include case notes, extra documents that are added to the case,
and decisions that are made. Other collaboration can occur through case worker
communication. Case workers must communicate with others who are working
the same case through case notes, instant messages, email, and phone
conversations. Technology supporting a case management solution must provide
these types of collaboration technologies. It also needs the capability to maintain
the collaborations as part of the case folder for case resolution and audit
purposes.
Case management recognizes that not all the tasks, steps, or activities of a
solution can be predefined. Therefore, case worker judgment and collaboration
are used to resolve the case. In certain case solutions, negotiation and
collaboration between case workers can be more important than imposing a fixed
set of activities in a particular order. However, too much negotiation and
collaboration can slow down the resolution of a case. Therefore, a balance must
be achieved. In many situations, experienced case workers can achieve the
correct balance. In other situations, business rules and analytics in the form of
decision support can be used to help strike the correct balance.
1.6 Case management solutions
A case management solution provides the software environment for case
workers to collaborate on the completion of cases. The solution can be modeled
and deployed by using a case management system. The solution is implemented
by using multiple technologies that include Enterprise Content Management,
collaboration, business rules, IBM BPM, and others. A case management system
is used to bring all of those technologies into a coherent framework.
Although the case is the focus of a case management solution, the solution might
be composed of multiple types of cases. For example, a customer complaint
solution might have multiple types of complaints, depending on the product or
service the customer is complaining about. Each type of complaint can be
slightly different and can be managed by a different type of case worker.
Therefore, a solution often is composed of one or more types of cases.
18 Advanced Case Management with IBM Case Manager
Case management software solutions are appropriate for situations in which the
work that must be accomplished is goal-oriented, knowledge-intensive, and
highly collaborative. These types of solutions are based on documents, such as
emails, faxes, pictures, and videos. These documents are required for the
knowledge workers to make decisions that are based on their judgment. Case
management provides the tools and collaboration environment for the knowledge
workers to complete their cases.
Case management solutions also are appropriate for work that involves complex
decision making by knowledge workers that is based on the information and
documents that are associated with case instances. Typical applications include
exception handling, complaint or dispute management, contract management,
lending applications, benefits enrollment, invoice processing, change request,
and incident reaction. These types of solutions require the integration of
capabilities from multiple technologies that include content management, IBM
BPM, collaboration tools, social software, business rules, and analytics. The
case paradigm is applicable in multiple industries and environments that include
insurance, banking, healthcare, government, and utilities.
1.6.1 Case data
A case consists of a collection of information that is used to achieve a business
goal. The first step in designing a case management solution is the identification
of this information. This information is in addition to the folders, documents, and
tasks. The case data defines what is needed for the case to be processed. This
data can come from a number of sources, forms, documents, external systems,
and user input. After it is collected, this data is maintained throughout the
lifecycle of the case to allow the knowledge worker to process the case through
completion. In addition, it should include data that is relevant for reporting and
processing (tasks).
A clear understanding of the data and its source is needed to design the solution.
Understanding when and where to obtain the data, and how and where to update
it is important. The data processing might be by a business task, a data entry
window for the case worker to complete, or by external systems. In all cases, you
want to keep the case data in the case folder for processing and archival
purposes.
Chapter 1. Case management concept 19
1.6.2 Case folder
The natural way to organize case information is to use a case folder in an
Enterprise Content Management system. The case folder can contain a folder
structure with subfolders that contain documents, history, and other information
that is used to process the case. In general, the case folder contains all the
information that is used to process and manage the case.
The case folder provides the context for the case workers to do their work. The
information that is contained in the case folder can be categorized into the
following types:
Properties: Not all case information is contained in documents. There are
discrete properties that identify the case and hold important status
information about the case. These properties, such as the customer name,
case priority, and account number, must be associated with the case folder.
Documents: Case management is content-centric, and case workers as
knowledge workers base their work on documents, including emails, text
documents, pictures, and spreadsheets. The case folder provides the
container to collect all the documents that are used in solving the case.
Tasks: The case folder contains all of the tasks that can be used in the case,
and each task contains state information. Some tasks might be waiting to be
run or are running or completed. This state information and history must be
preserved in the case folder.
History: Everything that happens to the case and its content must be
recorded as history. The case folder provides the container to keep that
history. The history includes when the case was created, when documents
and information were added, case comments, when tasks were started and
completed, and so on.
This collection of diverse and rich information is important to maintain in a central
place for case consistency and integrity. That central container is the case folder.
Having the case folder in an Enterprise Content Management system provides
the governance, lifecycle management, searching capability, archival integrity,
and security that is required. Case information is long-lived; therefore, after the
case is completed, the case folder and its information can be maintained in the
Enterprise Content Management system for future reference.
Cases must react to what is happening in the case folder so new tasks can be
run. New tasks might be needed when documents are added to the case, case
properties are modified or based on case actions. Case workers in the correct
role and with enough security privileges can view the state of the case tasks.
These case workers also can disable, run, and add new tasks to the case.

20 Advanced Case Management with IBM Case Manager
Figure 1-4 shows the basic functions of the case folder.
Figure 1-4 Case folder concept
1.6.3 Tasks
In a case management solution, tasks are tools the case workers use to process
a case. The case worker or workers in charge of a case must decide which tasks
must be run to complete the case. Depending on the modeling of the case
solution, tasks might be started by the system or classified as required or
optional. A case worker with enough privileges can start, disable, or add tasks,
depending on the requirements of the current case instance. Figure 1-5 on
page 21 shows the interface that a case worker can use to interact with the tasks
in a case solution that is implemented with IBM Case Manager.

Chapter 1. Case management concept 21
Figure 1-5 Example of tasks available to the case worker
Well-known tasks can be defined as part of the modeling of the case solution.
(Figure 1-1 on page 9 shows an example of such a model.) However, not all of
the tasks are understood at modeling time. The case workers can add tasks
when they are working a case. In case modeling, tasks introduce a higher level of
abstraction than the process fragments. During the processing of an actual case,
tasks introduce a higher level of control. Case workers with the correct privileges
can see and control the tasks by using an interface similar to the one that is
shown in Figure 1-5. Other case participants see work to be done in their role or
personal in-baskets and might not have access to the high-level tasks. Tasks are
not assigned to people; however, personnel assignments can be done in the
process fragments implementing the tasks.
Tasks can be nested and composed of other tasks. Tasks that contain other tasks
are called
container tasks. These tasks allow business analysts to organize case
solutions into sets of tasks that might be required at different phases of the case.
Neither Enterprise Content Management systems or BPM systems use tasks as
implemented by case management systems. Therefore, flexible case solutions
that use the task concept can be implemented only by using a case management
system.
22 Advanced Case Management with IBM Case Manager

© Copyright IBM Corp. 2013, 2014. All rights reserved. 23
Chapter 2. Typical case management
applications
This chapter addresses some of the typical solution patterns, in various
industries, where case management can be used. It also explores a case
management application example and the complaint management application in
greater detail.
This chapter contains the following sections:
Typical applications
Complaints management example use case
2
24 Advanced Case Management with IBM Case Manager
2.1 Typical applications
As described in 1.1, “Case management overview” on page 4, some solutions
are better-suited for case management than for other technologies. The need for
case management emerges from the need to provide flexible solutions that are
targeted for knowledge workers. These workers are more experienced and solve
complex business processes. These workers require a complete view of the
business process, including the properties, documents, roles, and activities
necessary for successful resolution. These solutions traditionally were
implemented by using business process management (BPM) or enterprise
content management (ECM) technologies. These technologies are focused on
subsets of the overall process that results in complex and expensive custom
applications, which often cannot meet the flexibility that is needed by the
knowledge workers.
Historically, BPM and ECM solutions focused on process automation and the
business process workers. Case management changes this focus towards the
knowledge workers. The knowledge workers are more expensive resources and
were poorly served by previous technologies. Their jobs involve complex
decisions and the need for technology that can adapt to the changing business
needs of each potential business object that they are working with.
Knowledge workers also are faced with finding ways to more efficiently work with
complex business situations. These knowledge workers require flexible software
technologies to help solve these situations. Case management solutions equip
knowledge workers with the tools they need to achieve their goals in a complex
business environment. Companies benefit from providing these valuable
resources with the tools to allow them to focus on the areas where their
knowledge is best applied.
The case management paradigm of having a case folder to contain all pertinent
information and data that is required to solve a problem is used in multiple
industries. In certain areas, there are industry-specific case patterns that are
found, such as mortgage underwriting, insurance claims, or court case
management.
Chapter 2. Typical case management applications 25
Many of these patterns are applicable across several industries to meet multiple
situations. Examples include, customer complaints, investigations, or back-office
operations, such as employee onboarding. Investigation (specifically fraud
investigation), is a solution pattern that can be applied across many industries.
For example, a customer inquiry into a banking account can trigger a fraud
investigation. Another example is a government agency that is looking into the
possibility of fraud within a disability claims case. These scenarios can lead to
multiple related cases being created and tracked.
2.1.1 Solution patterns
Cases involve processes that vary from structured, repetitive, goal-oriented work
to processes that are unstructured and unpredictable. Providing knowledge
workers with the tools to solve this work with the necessary control and
collaboration results in several solution patterns that can be used to define where
case management solutions are used. Case management solutions are based
on the following patterns:
The identification of a business object that is the central focus of the process.
This object is represented as a case folder that contains all of the properties,
interactions, activities, and supporting content.
The solution is designed for knowledge workers or experts to have access to
the activities that are necessary to solve the business situation by using a
combination of structured and unstructured approaches. The experience and
judgment of the worker affect how the resolution is achieved.
The use of event-driven activities where the arrival of documents or changes
to the case starts an activity. For example, a bank customer filing out a
dispute form might automatically start a credit card fraud investigation review
activity.
The use of non-predetermined activities as a major element of the solution,
which allows knowledge workers and experts to add activities to the solution
as needed.
The use of rich content as part of the solution. Most complex business
situations require multiple types of document content, including text
documents, spreadsheets, presentations, video, and pictures.
The need to provide collaboration technologies to support the knowledge
workers and experts who are solving the business situation.
The use of analytics for seeking patterns among real-time or historical data.
26 Advanced Case Management with IBM Case Manager
2.1.2 Applications by industry
In today’s environment, Industries face many challenges. One of them is
providing the tools and information for their valuable knowledge workers to focus
on applying their critical skills to best meet the businesses needs.
Ultimately, this translates to improved customer satisfaction, whoever that
customer might be. Case management technology helps by providing a flexible
environment where applications can be built that focus on the knowledge worker
and decision makers within the organization. In addition to cross-industry
patterns, each industry has specific processes that are well-suited for case
management.
Government
Economic changes and the need to more efficiently respond to the needs of
citizens forced government agencies to respond accordingly. Increasing
demands for transparency and interoperation between agencies increased the
need to implement solutions that can provide complete views of their processes
and citizen interactions.
Many government agencies are facing financial crises that are forcing them to
seek more efficient and complete methods of providing services. The varied
requests and services that are provided lend themselves to case management
solutions. Some of the following challenges are commonly addressed:
Benefit enrollment administration
Grant request and administration
Organizational license applications and renewals
Criminal and civil investigations
Citizen management
Taxpayer management
Court case management
Investigations (criminal, fraud, and general)
Citizen inquiries and complaints
Insurance
Increased competitiveness, regulation, and the frequency of growth through
acquisition increased the needs for companies within the insurance industry to
find solutions that can be deployed across the entire organization. The need to
provide consistency within business processes became a focus that is coupled
with the need to increase the ability of knowledge workers to perform effectively.
Chapter 2. Typical case management applications 27
Additionally, insurance companies find themselves with multi-faceted
relationships with their customers. It becomes increasingly important for
knowledge workers to have a complete view of the customer relationship when
they are interacting. The ability to provide consistent applications for
organizations that have grown through acquisitions becomes an essential
business need. The following insurance industry challenges are ideal candidates
for case-based solutions:
Policy underwriting
Policy maintenance
Claim processing
Auditing
Customer inquiry
Customer complaint
Annuity management
Banking
The banking industry recently saw many changes because of increased
regulation and the effects of the recent economic cycle. There was an increased
level of attention towards the managing of and interactions with customers and
implementing stricter enforcement of policies and capturing the activities
supporting decisions. Increased attention to customer relationships resulted in
more focus on consistency of service and providing knowledge workers with a
complete view of the various aspects of any process that they are working. The
efficient management of customer interactions or inquiries is as important as
asset management. The following banking industry challenges are ideal
candidates for case-based solutions:
Loan underwriting
Loan post close review
Mortgage servicing
Dispute resolution
Customer inquiry
Account opening and maintenance
Credit/Debit card inquiry
Loss mitigation
Commercial lending
Consumer lending
Investment and wealth management
28 Advanced Case Management with IBM Case Manager
Healthcare
The healthcare industry underwent dramatic changes with increasing
government regulations, coupled with a growing need for healthcare services.
These changes forced the industry to become more efficient. The nature of
healthcare processes makes highly structured and rigid applications unusable,
which imposes unnecessary constraints. The high percentage of knowledge
workers in the industry and the challenges make many of the following processes
ideal candidates for case-based solutions:
Patient discharge
Care coordination
Healthcare fraud and abuse
Clinical trials coordination
Claims adjudication
Member management
Provider management
Utilities
The utilities industry, like many others, underwent changes in technology with
many companies working to modernize their case management systems. With
many manual and paper-based processes, they provide an open environment to
apply case management solutions. As a highly regulated industry, the need to
efficiently complete business processes is a high priority. With the large effect of
increased weather-related incidents, the utilities industry discovered areas that
require increased management and efficiency to handle these extreme
variations. Case management solutions in the utilities industry address the
following challenges:
Rate case justification
Claim management
Post disaster management
Permit request management
Land rights management
Property management
Chapter 2. Typical case management applications 29
2.2 Complaints management example use case
Throughout this book, an example that is based on complaints management is
used to show the key aspects of the IBM Case Manager. Complaints
management is used because it is a good fit for the Case Management
paradigm. This section outlines a set of business requirements for this scenario.
There are many types of complaints management systems, including handling
service complaints, product complaints, and government-related complaints. The
example that is used here is a simplified and relatively generic version so that it
can be applicable to various different industries. Although intended to be realistic,
it is fictitious and is intended for illustrative purposes only. It does not describe
any exact processes or industry preferred practices.
In the example scenario, a company sells products and provides various
services. It has a centralized complaints management system that handles any
issues from customers. A customer calls in to lodge a complaint and a
representative completes a complaint form, which in turn creates the case that is
used to track this complaint.
The complaint case is first reviewed for validity and then is routed to a specialist,
depending on the category of the complaint. The process of resolving the case
does not necessarily take the same path every time. However, it almost always
involves collecting documents, collaboration between individuals and teams, and
tasks, such as reviews and investigations. Different tasks must be carried out
depending on the nature of each complaint. The outcome of the case relies on
the experience and judgment of the person who is working on the complaint
case. That person is guided by the company rules and regulations.
In this example, if the complaint is from a customer with a high rating, more tasks
must be performed. The customer rating is based on business rules. This rating
can depend on various different factors, such as transactions revenue, the
number of previous complaints, and time of membership.
In the real world, almost every case management system must be integrated to
one or more external systems. The example shows how this configuration is
supported through different integration points.
Many companies have a team of analysts who are responsible for analyzing the
historical patterns of the complaints and their outcomes. This process allows the
company to gain a better insight of customer-related issues. By learning from
previous complaints cases, the company improves not only its case processing,
but its products and services. The optional Content Analytics component can be
used to analyze the complaint data, comments from the case workers, and case
documents across many complaint cases.
30 Advanced Case Management with IBM Case Manager
For more information, see the previous version of this IBM Redbooks publication,
Chapter 18, “Integration with IBM Content Analytics”. The previous version of the
book can be found as part of the downloadable material that is associated with
this book. For more information, see Appendix A, “Additional material” on
page 563.
2.2.1 Complaint scenario
In the example, a company provides commercial products and services to many
customers. The company realizes that customer complaints can be a gold mine
of important information. They consider a complaint as valuable as any positive
feedback, maybe even more so. They want to process these cases efficiently,
and collect all of the feedback and related information centrally to support their
continuous quality improvement processes.
The company can receive complaints through the following methods:
The customer calls the support line or a particular account representative to
lodge a complaint.
The customer emails the complaint to the company.
The customer fills out an online form that is provided on the company website.
The customer sends in a written complaint by mail or fax.
The company has a Customer Relationship Management (CRM) system that
manages all of the details about their customers. All complaints must be matched
to a record in the CRM system, and the relevant information is added to the case
so that it is available to the reviewer.
The company uses a multi-dimensional system for rating its customers to help
give a balanced view of the customer and support the customer communication
processes. If a complaint is received from a high-value customer, the account
manager for the customer is notified. The account manager then contacts the
customer to assure them that the complaint is receiving attention.
In some situations, the client manager or customer relationship staff also might
suggest a different product to the customer as an alternative. From the case
management perspective, this up-sell activity means that a separate set of tasks
must be processed and tracked in the context of the case.
Handling complaints can span many departments in the organization. The
process often starts at the support contact center, and, depending on the nature
of the issue, is categorized into an appropriate type: Product, Service, Billing, or
Others. There are separate guidelines for the processing of each of these types
of complaints.
Chapter 2. Typical case management applications 31
Based on the type of the complaint, specialists might need to review the case in
detail. If the complaint is related to a safety issue, it must be routed to a special
department that carries out the necessary investigations.
2.2.2 Resolving the case
The complaint review process starts upon receipt of the complaint and a review
case is opened. The process ends and the case is closed when a final
determination is made by the principal assigned reviewer and communicated
back to the customer.
Company policy requires a response to all complaints. The reviewer is
responsible for finding a resolution in a timely manner. The first step is to screen
the complaint. For spurious complaints, no further action might be needed, and
the case is closed. All non-spurious complaints are reviewed by trained
specialists who have a deep understanding of regulatory requirements and
company policies and procedures.
Reviewing product-related complaints requires a good understanding of the
products and their components. In these cases, a specialist in the product
department is assigned to review the case. If it is a non-product-related
complaint, a specialist from the complaints department takes the case.
The specialist collects all of the necessary documentation that is related to the
case. This process might involve requesting more information from the customer
or getting information from other systems inside the company. In complex cases,
a small team of specialists might work on the case cooperatively. If a product
safety issue is suspected at any point, a safety investigator is required to
participate in the review and provide an assessment.
After the final determination is made, the outcome is communicated back to the
customer. Depending on the severity and complexity of the case, a formal report
might be filed in the case folder.
The specialist teams are led by their team managers. The managers are
responsible for the monitoring of service levels, distribution of work, and ensuring
correct operations by the teams. The managers have the authority to assign
tasks and to reassign work from one member of the team to another.
32 Advanced Case Management with IBM Case Manager
2.2.3 Content that is related to the case
As with most case management situations, handling complaints involves the
collection of documentation that is related to the case. The documentation
includes all forms of communication with the customer that is related to the
complaint, internal review and investigative reports, and any documentation that
is required for compliance purposes.
The case reviewer is responsible for ensuring the completeness and consistency
of the documentation. The information must be able to be used as evidence to
support the decision-making process. Case information that is related to
complaints is used by the Quality Review Board in their regular sessions. It also
is used to support the analysis of trends and to help identify new issues and
systemic discrepancies.
The following types of documents might be collected as part of a complaint case:
Complaint form: Standard form that is completed by the customer and sent
through mail, email, or fax that describes details of the issue.
Correspondence and supporting documents: Any written communication with
the customer, including extra documents that are received, such as receipts,
invoices, emails, and pictures.
Reports: Internal reports from reviewers or investigators.
Phone recording: Any phone calls that are recorded during the case.
Contracts: Any updated or new contracts that involve product up-sell or
service agreement changes.
There are associated tasks that run automatically whenever certain types of
documents are added to the case; for example, a review process when a new
contract arrives.
Chapter 2. Typical case management applications 33
2.2.4 Integration with other systems
The following systems are involved in this example:
The company Customer Relationship Management (CRM) system. Details
about the customer’s account must be retrieved from the CRM system and
added to the case information.
The Customer Rating system. This rules system is used to calculate the
customer rating. The rating is requested at the start of the case and added to
the case information.
The account managers portal. For high-rating customers, the appropriate
account manager on the portal is sent a task to reach out to the customer.
Analysis system. Case information, including all the documentation and
comments, must be made available for analysis.
34 Advanced Case Management with IBM Case Manager

© Copyright IBM Corp. 2013, 2014. All rights reserved. 35
Chapter 3. IBM Case Manager overview
By using IBM Case Manager, you can manage structured and unstructured
processes and content in dynamic, highly collaborative, and flexible ways. IBM
Case Manager supports the agile methodology by providing an environment on
which you can design, develop, validate, and test case solutions interactively.
IBM Case Manager also provides a rich set of tools for administration, template
management, and importing, exporting, and transferring case solutions to and
among various environments.
This chapter includes the following sections:
IBM Case Manager capabilities
IBM Case Manager environments
IBM Case Manager components
IBM Case Manager architecture
IBM Case Manager configurations
3
36 Advanced Case Management with IBM Case Manager
3.1 IBM Case Manager capabilities
IBM Case Manager provides capabilities for integrating content, processes, and
people into a unified platform for building case management applications. This
section describes the capabilities of IBM Case Manager, including content and
process management, collaboration and social software tools, business rules,
and analytics.
For more information about licensing of IBM Case Manager components, see the
following website and search for the term “Case Manager”:
http://www.ibm.com/software/sla/sladb.nsf
3.1.1 Case design and deployment
By using IBM Case Manager, you can design and deploy case solutions that
model real-world business solutions in any industry. Business analysts can use
the Case Manager Builder interface to create case solutions, such as Claim
Processing, Loan Processing, or Complaint Management in insurance and
banking sectors, or solutions in any other industry. The solutions can then be
easily deployed into the testing and production environments.
3.1.2 Case management
IBM Case Manager enables case workers to easily create cases, monitor their
in-baskets for outstanding work, process case work, and browse and search
cases. The user interface can be easily configured based on user roles and
customized, depending on specific needs of managing cases of a particular type.
3.1.3 IBM Case Manager API
The IBM Case Manager API serves as the integration tier between IBM Case
Manager components. For example, at design time, Case Manager Builder uses
the API to fulfill the requests that are related to the deployment of a solution in
the development environment for testing. At run time, Case Manager Client uses
the API to create, run, and manipulate cases and tasks. Custom applications can
use the IBM Case Manager API within custom widgets for the Case Manager
Client or a new user interface. For system and solution administration, the IBM
Case Manager administration client uses the API to deploy, administer, and
manage solutions in the development, test, and production environments.
Chapter 3. IBM Case Manager overview 37
3.1.4 Tools
IBM Case Manager provides various tools, such as IBM Case Manager
administration client, Document Generator (DocGen), and precondition checker.
Administrators and Business Analysts use these tools to configure and manage
their case management system for optimal use.
3.1.5 Solution templates
Solution Templates help organizations to jump-start the process of developing
case management solutions. The IBM DeveloperWorks website contains a set of
templates for several lines of business applications. Business analysts can build
solutions from these templates. The IBM Case Manager administration client tool
provides support for creating solutions from templates or templates from
solutions. The IBM Case Manager administration client also can be used to copy
solutions. Solution templates contain a predefined set of artifacts. These artifacts
include case metadata, roles, in-baskets, document types, page definitions, case
types, properties views, business rules, and task definitions. They can be
deployed into an IBM Case Manager environment. Solution templates capture
preferred practices for a case management use case, and can be modified to fit
the individual needs of an organization.
3.1.6 Content and process management
IBM Case Manager is built on top of a robust Content Platform Engine for content
and process management. Content Platform Engine is part of the IBM Case
Foundation platform. It allows case data and related content to be stored in an
enterprise-level content repository. At the same time, its active content capability
allows the system to automatically respond to important changes in any content
object that is stored in the repository and performs operations, such as filing it in
the appropriate case file, starting a case task for a case worker to work on the
received document or create a case. Case tasks run as processes in Content
Platform Engine to deliver work to case workers or external systems that are
integrated to the solution. IBM Case Manager supports automatic, manual, and
user-created case tasks.
3.1.7 Collaboration and social software tools
IBM Case Manager brings the power of collaboration to case management. This
capability allows case workers to ask other knowledge workers or experts for
advice in real time without leaving their case management environment. IBM
Lotus® Sametime® Entry is seamlessly integrated into the IBM Case Manager
Client and enables case worker to use instant messaging.
38 Advanced Case Management with IBM Case Manager
3.1.8 Business rules
IBM Case Manager has an embedded rules engine that allows business analysts
to add decision-making logic to a case solution directly within the IBM Case
Manager Builder tool. Case Manager Builder includes two design tools for
designing business rules, one text-based and one table-based.
3.1.9 Case analytics
By using IBM Case Manager, you can analyze, monitor, and report information at
the case level. It enables case workers, line-of-business managers and business
analysts to identify dynamic trends, and track the case and task processing. It
also allows them to monitor key performance indicators (KPIs) or service level
agreements (SLAs) in real time. This capability is part of the Case Analyzer
component, which processes information from IBM Case Foundation.
3.1.10 Reporting
IBM Case Manager supports powerful reporting that is based on IBM Cognos®
BI reports and Real Time Monitoring dashboards. You can customize reports to
view historical and work-in-progress data that is generated by Case Analyzer by
using online analytical processing (OLAP) cubes.
3.1.11 Content Analytics
IBM Case Manager uses IBM Content Analytics with Enterprise Search for text
and content analysis. This capability enables knowledge workers to analyze the
unstructured data within cases and identify statistically significant correlations.
Content Analytics uses case documents, case comments, and case metadata for
the analysis.
3.1.12 Forms integration
IBM Case Manager integrates with two form management components and
products: IBM FileNet eForms and IBM Forms. This integration allows you to use
customized, easy-to-use forms in your case solutions.
Chapter 3. IBM Case Manager overview 39
3.2 IBM Case Manager environments
IBM Case Manager is built on top of the IBM Case Foundation platform. This
configuration uses existing business process and content management to
simplify the creation, deployment, testing, and management of case solutions.
IBM Case Manager uses Content Platform Engine for creating and accessing
case solution objects and provides workflow processing and task running within
cases.
3.2.1 Environments and case management phases
IBM Case Manager supports three phases to accomplish end-to-end case
management: design, test, and manage. To realize the three phases, IBM Case
Manager supports three environments: development, test, and production. The
case design tool (Case Manager Builder) is used in the development
environment where the solution design phase takes place. After the design is
finished, case solutions are deployed on the test system. The test environment is
similar to a production environment, but it is used for user-acceptance testing or
pre-production testing. This process is called the testing phase. Solutions then
are deployed and run on a production environment, where the manage phase
takes place.
Development environment
The development environment consists of the IBM Case Manager design object
store and a target object store that is configured to include a workflow system.
You can use the development environment to design, deploy, test, and refine
case solutions before you move them into the test, pre-production, or production
environment.
In the design phase, you create a case solution for the business problem. Lay out
all the necessary solution artifacts, such as properties, roles, in-baskets, solution
pages, case types, properties layout views, business rules, tasks, and process
workflows by using the IBM Case Manager Builder tool. The design object store
contains all of the case solution artifacts that were created during the design
phase by using Case Manager Builder. The target object store contains the
deployed solution objects for testing.
The development environment allows for distinct project areas, each with their
own target object store and workflow region. The development environment
supports multiple project areas to allow different business analysts to create their
own solutions and reset their environments separately, if required.
40 Advanced Case Management with IBM Case Manager
In addition, IBM Case Manager Builder allows collaborative development.
Multiple users can edit a single solution at the same time. When a user edits an
artifact, that artifact or set of artifacts are locked until the user commits changes.
Test environment
The test environment is similar to the production environment, but is used for
user-acceptance, performance, and other pre-production testing. The test
environment consists of a staging object store and a target object store that was
configured to include a workflow system. However, it does not have Case
Manager Builder because solutions are designed in the development
environment only. Case solutions are deployed to the target object store by using
the Case Manager administration client. Small test environments are sometimes
configured to share resources with a development environment; for example, by
using the same database or LDAP server.
For the test phase, the solution artifacts in the development environment are
migrated and deployed to the test environment. During testing of the solution,
changes might be required. These changes must be made in the development
environment and the updated solution must be migrated again into the test
environment. After the iterative process of testing is complete and you are
satisfied with the solution performance, you are ready to migrate the solution
from the development environment to the production environment.
You migrate Case Manager artifacts by using the IBM Case Manager
administration client and FileNet P8 artifacts by using FileNet Deployment
Manager tools. For more information about these tools, see 3.4.1, “Case
Manager Builder” on page 55 and 3.4.2, “Case Manager Client” on page 55.
Production environment
The production environment is where the case solutions are deployed, run, and
managed. The production environment consists of a staging object store and a
target object store that are configured to include a workflow system. Similar to
the test environment, it does not have Case Manager Builder tool. This
environment often is separate from other environments so the production system
is isolated from any testing problems.
For the manage phase, the solution package and related artifacts are migrated
and deployed from the development to the production environment. You migrate
Case Manager artifacts by using the IBM Case Manager administration client
and FileNet P8 artifacts by using FileNet Deployment Manager tools. They are
then deployed to the target object store.

Chapter 3. IBM Case Manager overview 41
Figure 3-1 shows the IBM Case Manager environments. The Case Manager
administration client is used to export and import the solution package between
the different environments. After successful testing, you deploy the solution to the
production system. A case solution is always migrated from the development
environment’s design object store to a test or production environment’s staging
object store.
Figure 3-1 IBM Case Manager environments

42 Advanced Case Management with IBM Case Manager
3.2.2 Solutions and deployment in development environment
Use the development environment to design your solutions. Solutions that are
designed are in the IBM Case Manager design object store. Case Manager
Builder is used to build solutions, start development deployments, and reset the
target object store and region.
The development environment provides project areas with their own target object
stores and workflow isolated regions. Project areas help developers to limit the
effects of resetting the test environment where the target object store and
workflow isolated region are reinitialized, which deletes all solutions and other
artifacts that were deployed.
After the design cycle is finished and the solution is ready for testing, use IBM
Case Manager administration client to migrate the solution package from the
development environment to any preproduction and production environments.
For more information about solution deployment, see IBM Case Manager 5.2
Deployment Guide, which is available at this website:
https://www.ibm.com/developerworks/community/blogs/e8206aad-10e2-4c49-b
00c-fee572815374/entry/ibm_case_manager_5_2_solution_deployment_guide?l
ang=en
3.3 IBM Case Manager components
This section describes all of the components that comprise IBM Case Manager.
The core platform for IBM Case Manager consists of the Content Platform
Engine and the IBM Content Navigator framework. The IBM FileNet P8 Platform
was extended to include the IBM Case Manager native case object model. IBM
Case Manager does not contain any process or content data. Instead, IBM Case
Manager is an integration layer that is supported by a core FileNet P8 services
layer.
All data that is related to cases that are managed in IBM Case Manager solutions
are stored in the Content Platform Engine repositories.
Explanation: Figure 3-1 on page 41 explicitly shows only the development
and test (preproduction) environments because they differ in the way they are
used. Case Manager supports having multiple environments. The extra
environments often are more test environments that focus on dedicated
aspects, such as performance or integration testing.

Chapter 3. IBM Case Manager overview 43
Figure 3-2 shows the IBM Case Manager components, including customization
components.
Figure 3-2 IBM Case Manager components
IBM Case Manager components can be divided into the following categories:
Core components
Customization components
Customization extensions
The IBM Case Manager extensions, which are shown in a red box in Figure 3-2,
are not bundled with the IBM Case Manager license. These components must be
licensed separately.
Note: IBM Case Manager license provides unrestricted use of IBM Case
Foundation. Cognos Real Time Monitor is bundled with Case Foundation. To
enable its use, you must configure Case Analyzer services.
44 Advanced Case Management with IBM Case Manager
3.3.1 IBM Case Manager core components
The following IBM Case Manager components provide core functionality for
designing and processing case solutions:
Case Manager Builder
Case Manager Client
Case Manager API
Case Manager administration client
Content Platform Engine
Content Navigator
FileNet Workplace XT
Each of these components is described in this section.
Case Manager Builder
IBM Case Manager Builder is a web-based tool for business analysts to design
and develop case management solutions to solve real-world business problems.
With Case Manager Builder, business analysts create all Case Manager solution
artifacts, such as properties, roles, pages, document types, properties layout
views, rules, and tasks. You also can associate workflows and tasks. The tool
also can deploy these artifacts to a pre-configured project area that consists of
the target object store and workflow system isolated region within the
development environment.
Case Manager Builder creates a package of files that are known as the solution
package. It uses the Case Manager API to deploy the artifacts that are defined in
the solution package into the desired project area.
Case Manage Builder is used in the development environment to design and
develop the solution. When the solution is ready for system-level testing, it is
migrated and deployed into the test environment by using the IBM Case Manager
administration client tool.
Figure 3-3 on page 45 shows the Case Manager Builder home page that you see
after you log in to Case Manager Builder. This page lists all of the available
solutions in the design object store and their deployment status inside the
development environment.

Chapter 3. IBM Case Manager overview 45
Figure 3-3 Case Manager Builder home page
Case Manager Client
Case Manager Client is a web-based application that case workers use to create
and process cases and collaborate with others.
The IBM Case Manager Client is a widget application with a set of pages that are
configured to work together. Business analysts design the views and in-baskets
for case workers. They can use the predefined or customized pages with other
widgets for specific roles and tasks.
IBM Case Manager Client is integrated with IBM Content Navigator and provides
an improved user interface. It follows IBM OneUI style to maintain a consistent
user experience with IBM Content Navigator.

46 Advanced Case Management with IBM Case Manager
Figure 3-4 shows a Case List page in the Case Manager Client for a Claim
Management solution.
Figure 3-4 Case Manager Client for Customer Complaint Management solution
For more information about pages, see 4.1, “IBM Case Manager object model”
on page 71 and 4.2, “Case object model implementation” on page 102.
Case Manager API
IBM Case Manager provides tools for building custom web applications. It is
possible to use different extensions and APIs to extend the Case Manager Client
by adding custom pages, widgets, actions, events, or services.
Developers can use the following APIs to extend a case management client
application:
Case Manager JavaScript API
Case Manager Java API
CMIS for FileNet Content Manager
Case Manager JavaScript API
The IBM Case Manager JavaScript API is used to customize the case
management client application and provide modeling classes that represent case
management objects, such as solutions, case types, cases, and tasks. It also
provides classes that represent components of the client user interface, such as
page widgets, dialog boxes, toolbars, and menus.
The Case Manager JavaScript API uses the Dojo toolkit, which is an open source
JavaScript library for web development.
Chapter 3. IBM Case Manager overview 47
Developers also use the IBM Content Navigator JavaScript API to customize the
client application. The IBM Content Navigator JavaScript API includes more
modeling classes and widget classes that can be used in the Case Manager
application.
The classes in the IBM Case Manager JavaScript API are divided into the
following packages that are based on functionality:
icm.model.package
Contains the classes that represent objects in the Case Manager domain.
These case management objects, which include solutions, cases, work items,
and tasks, map to Content Platform Engine objects on the server.
icm.action.package
Represents actions that users can perform on case management objects.
These actions can be added in toolbars or menus for a widget.
icm.base.package
Supports the definition of custom events, actions, page widgets, and
constants.
icm.dialog.package
Contains classes that represent the dialog boxes that are used in Case
Manager Client.
icm.pgwidget.package
Contains classes that represent page widgets that are provided by IBM Case
Manager.
icm.util.package
Provides support for multiple widgets.
icm.widget.menu package
Represents the menus and toolbars that are used with page widgets.
Case Manager Java API
The IBM Case Manager Java API is used to build custom case management
applications. These applications can create cases, gather information about case
solutions, and start manual tasks. For more information about the Case Manager
Java API and the dependencies with IBM Content Navigator JavaScript model to
build custom case management applications, see 3.4.3, “Case Manager API” on
page 55.
CMIS for FileNet Content Manager
The IBM CMIS for FileNet Content Manager allows a case management
application to create and access case content that is stored in an object store.
48 Advanced Case Management with IBM Case Manager
Developers use this development tool to perform tasks, such as querying for
cases, creating a case, updating case properties, adding folders and documents
to a case, and gathering metadata for case and document classes.
CMIS REST API Java archive files are packaged with IBM Case Manager 5.2 but
are deprecated in the future. CMIS is now included with IBM Content Navigator
and is the recommended package to use in your custom case management
applications.
Case Manager REST API
In Case Manager 5.2, the REST protocols are provided for compatibility with
previous releases of IBM Case Manager. If you are developing a new custom
case management application, use the JavaScript API that is provided with IBM
Case Manager and IBM Content Navigator.
For a full listing of the IBM Case Manager API capabilities, see the IBM Case
Manager documentation. From IBM Case Manager 5.2 Information Center, click
Developing case management applications.
Case Manager administration client
The Case Manager administration client is a web-based application that is used
to administer the case management system. It is developed as an IBM Content
Navigator plug-in and follows the IBM OneUI style for user experience
consistency. It manages and administers solutions, solution templates, project
areas, and widget packages. With this tool, case administrators start the
following wizards:
Copy solutions
Deploy solutions
Import and Export solutions
Convert solutions to solution templates
Configure solution locks, security, and auditing
Import and Export solution templates
Manage project areas and target environments
Register custom widgets
Content Platform Engine
IBM Case Manager uses the Content Platform Engine to maintain the design,
staging, and target object stores. These object stores contain the solution-related
files. The design object store maintains the solution package files that are
created through Case Manager Builder. The staging object store maintains the
solution package files that are migrated with the IBM Case Manager
administration client. Each solution has its own folder to store its package of files.
Chapter 3. IBM Case Manager overview 49
The target object store maintains the deployed objects of the solution. Case
instances, task objects, and case documents are managed in the target object
store. The Case Manager Client interacts with the target object store to create
and process cases in the solution.
In addition to storing the solution-related files, the Content Platform Engine was
upgraded with the following features to support IBM Case Manager:
Tas k
The task class is a Content Platform Engine base class. An instance of the
Task class represents a piece of work in a case.
CaseType
This class is implemented as a subclass of the Case Folder class
(CmAcmCaseFolder).
Content activity monitoring
Content activity monitoring is an extension of the Content Platform Engine
auditing framework with which you can monitor and analyze property
changes.
Case object model
The Case object model provides add-ons for the design and target object
store metadata, code modules, and subscriptions for handling events from
cases.
In addition to the preceding features, the Content Platform Engine also provides
support for the documents, folders, annotations, and pages that are needed to
process a case.
The Content Platform Engine’s workflow system supports IBM Case Manager
mainly in the following areas:
Designing the solution in Case Manager Builder:
– Support for creating roles, in-baskets, tasks, and workflows that are
associated with case management solutions.
– Support for workflow authoring in Case Manager Builder.
– Support for sharing existing workflows in solution packages by using
Process Designer and associating them with Case Type tasks.
– Support for offline validation of workflows in Case Manager Builder.
– Support for augmented solution authoring in Process Designer, which also
is known as round-tripping authoring.

50 Advanced Case Management with IBM Case Manager
Running cases in Case Manager Client:
IBM Case Manager uses the workflow system of the Content Platform Engine
to process work items for tasks that are associated with a case instance. This
process includes provisioning roles and corresponding in-baskets that contain
the workflow steps to be completed by case workers. The workflow system
also provides the capability to retrieve, manipulate, and update case instance
properties during the running of work items.
FileNet Workplace XT
IBM Case Manager release 5.2 has a dependency on FileNet Workplace XT for
the following functions:
In the development environment, WorkplaceXT enables access to Process
Designer to support the workflow round-tripping between Process Designer
and Case Manager Builder. Additionally, it allows the developer to define form
policy templates for the case solution if this kind of form behavior is required.
In the production environment, WorkplaceXT is not required unless the case
management solution is using form policy templates.
3.3.2 IBM Case Manager optional components
The following components are bundled and integrated with IBM Case Manager
as customization components:
IBM Case Analyzer
IBM Case Monitor and Cognos Real-time Monitor
IBM FileNet eForms
IBM Sametime
IBM Content Analytics with Enterprise Search
Although these components are integrated with IBM Case Manager, they are not
essential for solution authoring or execution. However, they can add great value
and power to IBM Case Manager solutions.
Tip: Some of these optional components are licensed on a limited use basis.
For more information, see the licensing terms in the documentation.
Although Cognos BI is not included, Case Analytics reports can be loaded and
viewed in the Cognos BI report studio.
Chapter 3. IBM Case Manager overview 51
IBM Case Analyzer
IBM Case Analyzer services generate real-time and historical data for case
events that are based on content and Content Platform Engine’s workflow
system events. This real-time and historical data is used by Case Monitor and
Cognos Real-Time Monitor to monitor and run trend analysis for current cases.
In addition, you can use Case Analyzer services to output data to Microsoft
Analysis Services and to report on long-term trends by using pre-defined
Microsoft Excel reports or Cognos Business Intelligence reports that can be
customized to suit your business needs.
IBM Case Monitor and Cognos Real-Time Monitor
IBM Case Monitor Operational Dashboard integrates with Cognos Real-time
Monitor, which uses the real-time and historical data that is generated by the
Case Analyzer services. Case Monitor Operational Dashboard is used to monitor
and run trend analysis for case data. It allows you to define dashboards for
different roles that can monitor critical parameters, such as execution cycle times
or in-basket queue depth. You also can define watermarks and actions to be
taken when a watermark is exceeded.
IBM FileNet eForms
IBM FileNet eForms integration provides electronic form function in IBM Case
Manager. You can use a customized form as the user interface for displaying data
in a task workflow step and for viewing case properties. eForms facilitates
sophisticated data entry capabilities, graphical layout options, intelligence (such
as calculations and parameter validation), data submission, and lookup.
IBM Sametime
By using IBM Sametime, case workers can collaborate while processing cases,
including starting instant messaging sessions with others who are working on the
case.
IBM Content Analytics with Enterprise Search
IBM Content Analytics with Enterprise Search supports crawling of structured
and unstructured data of cases. Content Analytics contains a crawler for mining
case data for analysis and for finding document content, case comments, and
case data that is related to individual cases. You can use IBM Content Analytics
with Enterprise Search to explore correlations between unstructured and
structured case content with case data. For example, you can search for patterns
that repeat for cases that show an unusually long processing time.
52 Advanced Case Management with IBM Case Manager
3.3.3 IBM Case Manager extensions
IBM Case Manager supports integration with following products as extensions:
IBM Business Process Manager (IBM BPM)
IBM Content Manager
IBM Operational Decision Manager (IBM ODM)
IBM Forms
These extensions are not bundled with the IBM Case Manager product and are
separately licensed. For more information about product licensing, see this
website:
http://www.ibm.com/software/sla/sladb.nsf
IBM Business Process Manager
The integration of IBM Case Manager with IBM Business Process Manager (IBM
BPM) provides business analysts with an easy way to associate IBM BPM
processes to case solutions in Case Manager Builder. IBM Case Manager
administration client provides a task on the configured IBM PBM Server with IBM
Case Manager.
While you are designing a solution, Case Manager Builder looks for a process
application on IBM BPM Server with the same name as the solution name. It
associates this application to the case solution by using the default snapshot.
Also, Case Manager Builder provides an enhanced user interface for task editing.
By using this interface, you can associate process definitions of the process
application to Case Type tasks.
Solution deployment checks and validates the process application, snapshot,
and property mappings against the settings in the IBM BPM Server.
A new Content Platform Engine event handler manages starting snapshots on
IBM BPM Server and propagates property information that is based on the
defined mapping. At run time, a process instance starts when the corresponding
task is started in Case Manager Client. When the process instance ends, it
updates the corresponding output parameters to mark the task complete.
For more information about configuring IBM BPM with IBM Case Manager, see
Chapter 17, “Integrating with IBM Business Process Manager” of the previous
version of this IBM Redbooks publication. This version of the book can be found
as part of the downloadable material that is associated with this book. For more
information, see Appendix A, “Additional material” on page 563.

Chapter 3. IBM Case Manager overview 53
IBM Content Manager
The integration of IBM Case Manager with IBM Content Manager allows you to
use content that is stored in IBM Content Manager repository for access in case
solutions. The integration allows any existing IBM Content Manager content
repositories to work with IBM Case Manager seamlessly. IBM Content Manager
content remains in its repository and does not need to be moved or federated to
FileNet P8. Case documents are created in IBM Content Manager.
Configuring IBM Content Manager with Case Manager is easy by using the
provision of connection definition in the project area. Use Case Manager Builder
to define IBM Content Manager item type document dependency and
preconditions on Case Types and tasks. Event handlers are available in IBM
Content Manager and IBM Case Manager to exchange events between
repositories.
For more information about configuring IBM Content Manager with IBM Case
Manager, Chapter 15, “Integration with IBM Content Manager” of the previous
version of this IBM Redbooks publication. The previous version of the book can
be found as part of the downloadable material that is associated with this book.
For more information, see Appendix A, “Additional material” on page 563.
IBM Operational Decision Manager
The integration of IBM Case Manager with IBM Operational Decision Manager
allows you to manage complex business rules for processing cases. This
integration also allows you to separate the definition and evaluation of business
rules from the definition of tasks workflows. By using IBM Operational Decision
Manager, you can define business rules and maintain them outside of the Case
Manager solution application. This allows you to change the business rules
without requiring redeployment and testing of the solution.
Note: The integrated inbox feature, as described in section 17.4 of the
previous book, is no longer available as of Version 5.2 of IBM Case Manager.
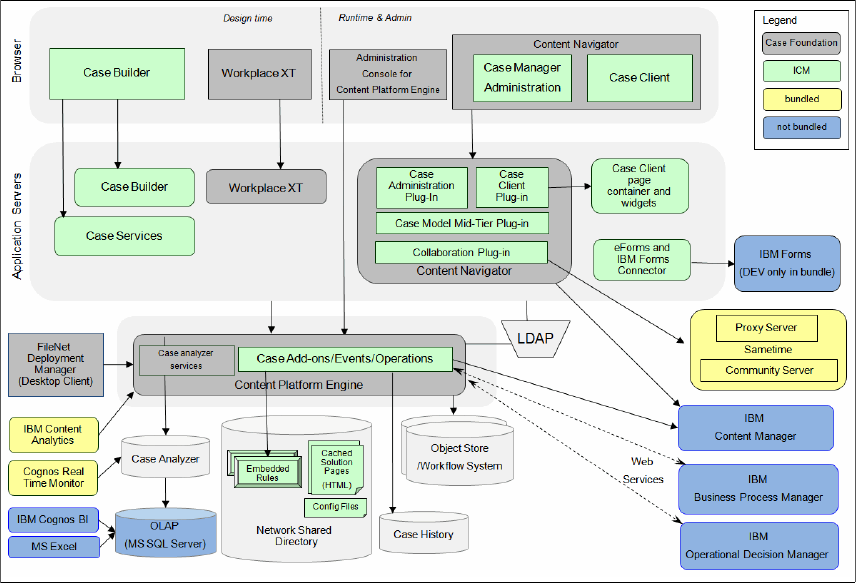
54 Advanced Case Management with IBM Case Manager
3.4 IBM Case Manager architecture
This section describes the high-level architecture of IBM Case Manager and the
interaction between various components, as shown in Figure 3-5.
Figure 3-5 IBM Case Manager high-level architecture
Specifically, this section describes the protocols, communication data, and
artifacts for the following applications:
Case Manager Builder
Case Manager Client
IBM Case Manager API
Content Platform Engine
Chapter 3. IBM Case Manager overview 55
3.4.1 Case Manager Builder
The Case Manager Builder client runs in a browser and communicates with the
server application by using HTTP protocol with JavaScript Object Notation
(JSON) payload. For certain tasks (such as deployment), it directly starts the IBM
Case Manager API by using HTTP. Case Manager Builder creates solution files
in the design object store by using the Content Engine Java API.
3.4.2 Case Manager Client
Case Manager Client is built on top of IBM Content Navigator as a plug-in so that
there is a consistency among clients for various IBM ECM products.
3.4.3 Case Manager API
The IBM Case Manager UI is based on IBM Content Navigator and provides
developers with the following set of JavaScript APIs to develop custom widgets to
enhance your case solutions:
IBM Content Navigator Model layer API
IBM Content Navigator Visual widget API
IBM Case Manager Model layer API
IBM Case Manager Page widget API
These JavaScript APIs allow developers to easily extend IBM Content Navigator
and IBM Case Manager functionality. The APIs also include the following
benefits:
Separation of business logic and User Interface
The model layer clearly partitions the business logic from the UI layer
Shared model object
Model objects that contain business and server side objects can be shared
across widgets, including custom widgets
Reusable components
Reuse visual widgets from the IBM Content Navigator widget library to build
more complex custom UI widgets and dialogs, and reuse and extend IBM
Case Manager page widgets for customization.
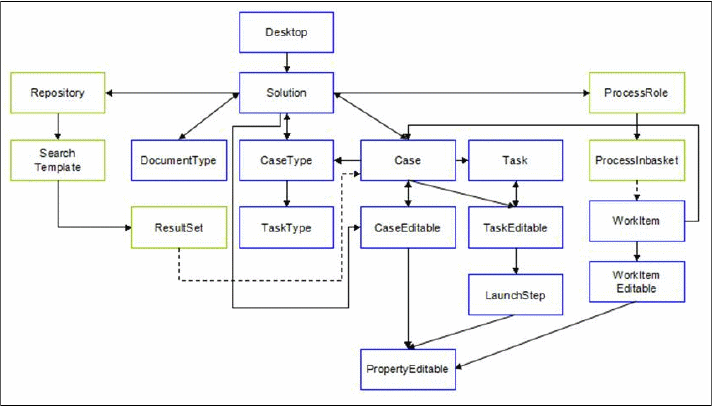
56 Advanced Case Management with IBM Case Manager
IBM Content Navigator JavaScript Model layer API
The non-visual JavaScript model API defines the client side model for IBM
Content Navigator. The modeling classes define the communication with the
mid-tier services and provide the data, server interaction APIs, and support
caching. Data in the content servers (such as IBM FileNet P8 and IBM Content
Manager) is stored as model objects and are used by the UI widgets.
IBM Content Navigator JavaScript Visual widget API
This toolkit provides the generic UI widgets, panes, and dialogs for performing
content and workflow related operations. This visual widgets library is based on
Dojo and IDX.
IBM Case Manager Model Layer API
The IBM Case Manager JavaScript API set is an extension of the IBM Content
Navigator APIs and includes model classes that represent case management
objects, such as solutions, case types, cases, and tasks. They communicate with
mid-tier services through a navigator plug-in. As with the navigator model API
and services, the public API is the JavaScript Model API; however, the plug-in
services are not public API.
These model classes provide functionality that is not possible to achieve through
the navigator API alone. Figure 3-6 shows the model object layer.
Figure 3-6 IBM Case Manager Model object layer
Chapter 3. IBM Case Manager overview 57
The model API provides the following functionality:
Retrieve the deployed solutions
Solutions that are deployed to any target object store are registered with the
navigator desktop.
For a particular solution:
– Retrieve the case type or document types
– Retrieve information about the properties across all case types
– Retrieve the roles
– Retrieve the static pages to show for a particular role
For a particular case type:
– Attributes (the rights the user has to cases of that case type, whether
dynamic tasks are supported, and the default view definition to use when
editing cases for this type)
– Retrieve information about properties of the case type
– Retrieve discretionary task types that can be created
– Discover the particular page to use for a page type and role
– Search for dynamic tasks compatible with this case type
For case objects:
– Retrieve a particular case or obtain a case model object, given a Navigator
ContentItem
– Create a case
– Update the properties of a case
– Split a case
– Relate cases together
– Retrieve the cases that are related to a case
– Add and retrieve comments on cases
– Retrieve the case history
– Retrieve the tasks that are associated with a case
For task objects:
– Start a manual task
– Enable and disable certain tasks
– Stop and restart the workflow that is associated with a task
– Create a discretionary task

58 Advanced Case Management with IBM Case Manager
Create dynamic (custom) tasks:
– Update the data that describes the dynamic task and validate the data
– Start a dynamic task, causing a dynamic workflow to be created and
started
Work items:
– Retrieve a particular work item or obtain a Case Manager WorkItem, given
a Navigator WorkItem
– Lock or unlock the work item
– Save or complete the work item
– Update the step parameters when saving or completing the work item
IBM Case Manager Page widget API
The IBM Case Manager visual layer APIs provide classes that represent page
widgets (Case Search, Case List, in-baskets, and so on), dialogs (Comments
and Reassign), and Actions that are configured on toolbars and menus.
Figure 3-7 shows the overall architecture for the IBM Case Manager Client.
Figure 3-7 Case Manager Client architecture
If the built-in case widgets do not provide the required functionality for your case
solution, developer can create custom widgets and pages to satisfy individual
requirements.
Chapter 3. IBM Case Manager overview 59
Page widget
An IBM Case Manager Page widget is a particular visual component that
contains UI and business logic. It relies on IBM Content Navigator and IBM Case
Manager model layers for data interaction. Usually, page widgets make available
configurable preferences for Business Analyst to customize. Page widgets are
reusable. These widgets are self-contained and perform only a single
responsibility.
A page widget is a Dojo dijit, an event endpoint, and a container of actions.
Page
An IBM Case Manager Page is a visual component that is composed of several
page widgets, which work together to fulfill larger functions. The page controls
the layout of page widgets, set up of the event wiring between page widgets, and
services as an event broker routing the event from publisher to handler. Unlike
IBM Content Navigator visual components, page is no longer an MVC unit, there
is not a centralized controller between page widgets. They work together by
using unidirectional communication (event) and bidirectional communication
(coordination). If a page widget does not fit to a custom solution in a page, it can
be replaced by a custom page widget.
A page also is a Dojo dijit and consists of the following parts:
A page digit class inherits from IBM Case
Manager/container/AbstractICMPage
An html template embeds page widgets in <div/> by using data-dojo-type
with their configuration in data-dojo-props.
a JSON format configuration file contains the configuration of page title, event
wiring, and disabled broadcast events
Container widget
An IBM Case Manager container widget is the content pane of the case feature.
It provides a selector for the user to select a solution and role. The container
shows the pages that are associated with the role in a tab container. By default,
there are cases and work pages. Users can start working from these pages,
starting cases, and work items in new pages for further processing.
Event
An event is the mechanism that provides the unidirectional communication
means from one page widget to another page widget (or container). The Case
Manager Client supports event broadcasting, event wiring, and publishing event
cross pages. The event mechanism is built on top of dojo/topic APIs, with more
scope to limit the event publish/subscribe inside a page rather than global.
60 Advanced Case Management with IBM Case Manager
Coordination
Coordination mechanisms provide the bidirectional communication means
between page widgets. A coordinator sets up a sequence of coordination topics
(for example beforeSave, Save, and afterSave) by step function, and registers
callback and errback to be called when all participants complete their work.
3.4.4 Content Platform Engine
Content Platform Engine accepts both HTTP and Internet Inter-ORB Protocol
(IIOP) requests from its clients. IBM Case Manager uses Java APIs to store,
retrieve, and update solution artifacts, solution metadata, and case instances and
manage process metadata and work items.
3.5 IBM Case Manager configurations
This section describes configurations for the following types of IBM Case
Manager environments:
Development environment configuration
Production environment with high availability
Production environment with high availability and solution partitioning
3.5.1 Development environment configuration
IBM Case Manager development environments normally consist of single
instances of each component. No hardware-based load balancing, server-level
clustering, or IBM WebSphere® ND clustering is required. For development
environments, installing IBM HTTP Server (IHS) to front the IBM Case Manager
WebSphere Application Server profile is optional.

Chapter 3. IBM Case Manager overview 61
Figure 3-8 shows the IBM Case Manager and FileNet P8 components that make
up the development environment.
Figure 3-8 Logical view of IBM Case Manager development environment
This environment consists of the following objects:
WebSphere Application Server profile:
– Content Platform Engine
– IBM Content Navigator:
• IBM Case Manager Client plug-in
• IBM Case Manager administration client plug-in
– IBM Case Manager Builder
– FileNet Workplace XT
External infrastructure components:
– Relational database management system (RDBMS)
– Content storage subsystem
– LDAP Directory Server
– IBM Case Manager configuration tool

62 Advanced Case Management with IBM Case Manager
For more information about the hardware and software requirements for IBM
Case Manager and the underlying IBM FileNet P8 Platform, see IBM FileNet P8
Hardware and Software requirements, which is available at this website:
http://www.ibm.com/support/docview.wss?rs=3278&uid=swg27013654
The IBM Case Manager WebSphere Application Server profile and FileNet P8
components (Content Platform Engine) can be collocated and run on a single
server. Alternatively, they can be separated and run on multiple servers. The
servers can be physical servers or guest hosts that run on supported virtualized
platforms. The IBM Content Navigator and IBM Case Manager must be on the
same WebSphere Application Server ND cluster. The FileNet Workplace XT
component must be on a different WebSphere Application Server ND cluster.
The IBM Case Manager WebSphere Application Server profile that is shown in
Figure 3-8 on page 61 contains the following applications:
Case Manager Builder
A solution builder tool that is deployed only in the development environment.
IBM Case Manager run time (also known as the Case Manager Client)
The runtime environment that is used for starting, processing, and interacting
with cases. This run time is deployed in the development and production
environments as a Content Navigator plug-in.
Content Navigator
Case Manager Client uses the IBM Content Navigator framework and
provides extended document viewing capabilities, such as rendition and
annotation support for office documents and PDF. It also can provide
side-by-side viewing of multiple documents in the same viewer.
Case Manager administration client also uses the IBM Content Navigator
framework.
FileNet Workplace XT
FileNet Workplace XT is required for development purposes if the solution
uses P8 eForms policies and entry templates. FileNet Workplace XT is not
required for a production environment.
Integration Tier Application (also known as IBM Case Manager API)
Important: The IBM Case Manager applications must all be in the same
WebSphere Application Server profile. The IBM Case Manager configuration
tool does not run under WebSphere Application Server, but must be installed
on the same server as the IBM Case Manager applications.
Chapter 3. IBM Case Manager overview 63
The communication layer between components of the IBM Case Manager
applications. It also provides you with the ability to customize standard
capabilities.
3.5.2 Production environment with high availability
The example configuration describes the topology of a sample production IBM
Case Manager environment that is configured for high availability. It is focused
only on configurations that are specific to IBM Case Manager. IBM Case
Manager production environments differ from development environments in the
following ways:
The Case Manager Builder application is not installed or used in a production
environment. Solutions can be designed in the development environment
only. The solution package must be migrated from the development FileNet
P8 domain to the production FileNet P8 domain by using IBM Case Manager
administration client.
In a development environment, Case Manager Builder is used to deploy
solutions. In a production environment, IBM Case Manager administration
client or IBM Case Manager configuration tool is used.
Solutions cannot be modified in the production environment. Changes to
solutions can be made only in a development environment.
Production IBM Case Manager environments can contain DMZs, hardware
load balancers, HTTP servers (IHS), and WebSphere Application Server ND
clustering. Connection strings that map to multiple instances of the
application are required for the following URLs:
– Content Engine EJB
– IBM Case Manager API
– Case Manager Client
IBM Case Manager WebSphere Application Server clusters require a network
share directory (NFS mount) that is accessible to all of the nodes in the
cluster. This share directory contains files that are needed by IBM Case
Manager API for globalization, pages, and other resources. These files are
needed when the IBM Case Manager deployment profile is created.
Production IBM Case Manager environments can use FileNet P8 distributed
deployment and domain partitioning configuration options.
The LDAP security configuration for production solutions is more restricted
than the development environment. Production environments can use a
different LDAP than development. The LDAP is tied to the FileNet P8 domain
that hosts the IBM Case Manager production domain.

64 Advanced Case Management with IBM Case Manager
Production environments can contain a secure DMZ-fronting IBM Case
Manager.
A single FileNet P8 domain is used for the development of a Case Manager
solution. Production environments usually consist of an independent FileNet
P8 domain (different from the development FileNet P8 domain). In some
situations, it is possible to have production environments with multiple FileNet
P8 domains to completely isolate production environments, although each
FileNet P8 domain requires its own staging object store and contains one or
more target environments.
Figure 3-9 shows a production IBM Case Manager environment with built-in
redundancy for each component to provide higher availability. The figure does
not include the optional Case Manager components.
Figure 3-9 Overview of a highly available Case Manager environment
Case worker clients connect to the Case Manager Client URL to log in and
interact with cases. In a highly available IBM Case Manager WebSphere
Application Server profile, there are two or more instances of IBM Content
Navigator (Content Navigator Case Manager Client plug-in) application that are
running. Load balancing and failover for the IBM Content Navigator application
instances are achieved by using WebSphere Application Server Network
Deployment for this application cluster, fronted by a load balancer.
Chapter 3. IBM Case Manager overview 65
This solution often is IBM HTTP Server (IHS) or a hardware-based device. Case
Worker client connections require session persistence. This means that the load
balancing mechanism must support session affinity or “sticky sessions”. This
session persistence ensures that clients are always directed to the same IBM
Content Navigator instance resource, which is initially chosen to receive the
traffic.
In an IBM Case Manager environment, the Enterprise JavaBeans (EJB) and web
services interface are used to interact with the Content Platform Engine. For
more information about high availability and scalability for the Content Platform
Engine, see this website:
http://www.redbooks.ibm.com/cgi-bin/searchsite.cgi?query=filenet
3.5.3 Production environment with partitioning
Some IBM Case Manager implementations require that individual solutions be
segregated within a single production FileNet P8 domain or be isolated into
separate FileNet P8 domains. This section describes some sample
configurations for IBM Case Manager that show separation options for individual
solutions.
When you are planning IBM Case Manager solutions, remember the following
considerations:
Estimated number of solutions and case workers
Anticipated number of concurrent solution designers
Does Line of Business require dedicated environments, or can shared target
environments be used?
Does each dedicated environment require a different LDAP Directory Service
repository?
In terms of software maintenance, is it acceptable to have multiple
environments that need patching and updating?
In terms of operational considerations, is the ability to stop, start, and backup
IBM Case Manager solutions independently a requirement?
The simplest configuration is to host all IBM Case Manager solutions in a single
target environment. In this type of configuration, all of the solutions are deployed
to a single target object store and share a single isolated region.

66 Advanced Case Management with IBM Case Manager
Figure 3-10 shows a single FileNet P8 domain with three solutions being
deployed from the DOS stage object store to the TOS1 target object store. The
global configuration database (GCD) also is shown.
Figure 3-10 One target object store hosting three IBM Case Manager solutions
Instead of having all the IBM Case Manager solutions in a single shared target
environment, each solution can be deployed into a separate target environment.
In this configuration, each solution is provided with a dedicated target object
store and workflow system isolated region. This configuration provides data
separation between the solutions, which provides more flexibility for database
operations and maintenance.
In this scenario, it is possible to configure each target environment with their own
LDAP Directory Server repository to isolate the security between solution
spaces. To accomplish this, your P8 domain must be configured with federated
LDAP repositories. You configure each target environment to point to a specific
LDAP realm.
TOS1
Region1
GCD
DOS
Database
schema
Solution A
Solution B
Solution C
Deploy
Global configuration Database
Target Environment
Staging Area

Chapter 3. IBM Case Manager overview 67
Figure 3-11 shows this type of configuration.
Figure 3-11 Multiple target object stores with one solution in each
TOS1
Region1
TOS2
Region2
GCD
DOS
Database
schema
Deploy
Database
schema
Deploy
TOS3
Region3
Deploy
Solution A
Solution B
Solution C
Database
schema
Global configuration database
Staging Area

68 Advanced Case Management with IBM Case Manager
If you want total solution separation, each solution can be deployed into its own
FileNet P8 domain. Figure 3-12 shows this type of configuration in which the
databases for all three domains are hosted by the same DB2® instance.
Figure 3-12 Dedicated FileNet P8 domain for each IBM Case Manager solution
It also is possible to host the databases for each domain in separate instances or
database servers. This type of deployment provides the most flexibility for
production environments.
Note: When dedicated P8 Domains are used for each IBM Case Manager
solution, each P8 Domain must have their own distinct IBM Case Manager
server instance.
TOS1
Region1
GCD1
DOS1
Database
schema
Deploy
Solution A
TOS2
Region2
GCD2
DOS2
Deploy
Solution B
TOS3
Region3
GCD3
DOS3
Deploy
Solution C
Database
schema
Database
schema
ICM administration
client
ICM administration
client
ICM administration
client
Global configuration database
Global configuration database
Global configuration database
Staging Area
Staging Area
Staging Area
Target environment
Target environment
Target environment

© Copyright IBM Corp. 2013, 2014. All rights reserved. 69
Chapter 4. Inner workings of IBM Case
Manager
If you plan to develop customized IBM Case Manager solutions, a good
understanding of the inner workings of IBM Case Manager is vital. This
understanding also is useful when you are troubleshooting IBM Case Manager
solutions.
This chapter describes the inner workings of IBM Case Manager. It addresses
the IBM Case Manager object model and the way it uses the internal services
from the IBM FileNet Content Platform Engine. This chapter also describes the
integration with the IBM Content Manager from the data model perspective.
This chapter includes the following sections:
IBM Case Manager object model
Case object model implementation
IBM Case Manager pages
Tasks and associated workflow processes
Object model for IBM Content Manager integration
4

70 Advanced Case Management with IBM Case Manager
Important: In this chapter, it is assumed that you are familiar with IBM FileNet
P8 Platform. If you are not familiar with this platform, see the following
Redbooks and product information center:
IBM FileNet P8 Platform and Architecture, SG24-7667
IBM FileNet Content Manager Implementation Best Practices and
Recommendations, SG24-7547
Introducing IBM FileNet Business Process Manager, SG24-7509
IBM FileNet Business Process Manager was renamed to IBM Case
Foundation.
IBM FileNet P8 Platform main information page at this website:
http://www.ibm.com/software/ecm/filenet

Chapter 4. Inner workings of IBM Case Manager 71
4.1 IBM Case Manager object model
IBM Case Manager object model consists of the solution, case type, task,
external process, step, document type, and role. Figure 4-1 shows the IBM Case
Manager object model.
Figure 4-1 IBM Case Manager object model
There can be many solutions in an IBM Case Manager system. For example, you
can have one for Complaints Management, one for Human Resource Case
Management, and one for the Legal Department.
Each solution can handle various
case types. For example, the Complaints
Management system must handle customer complaints, internal employee
complaints, and customer feedback. The solution might have a case type for
each of these inputs.
Each solution has various metadata definitions (properties), document types,
and roles.
Each case type can have a number of
tasks. A task has one or more steps that
must be completed. A task also can start external processes from IBM Business
Process Manager. For example, a task in the Complaints Management use case
might be to review a product-related complaint.
External process
Step
Task
Document type
Role
Case type
Solution
Page View
72 Advanced Case Management with IBM Case Manager
A role represents a specific business function. For example, in the Complaints
Management system, a role might be a Reviewer or Investigator. You assign
users or groups of users to a role. People with different roles can access cases in
different ways, and roles are assigned to run a particular step in a task.
Document types help you to organize and classify the documents that belong to a
case. You can provide more information about the documents by assigning
properties to the document type. For example, a document type in the example
might be a complaint letter. Different types of cases can access different types of
documents. Documents often are used by the case workers while they process
task steps.
The following sections describe each entity within the IBM Case Manager object
model.
4.1.1 Solution
A solution consists of a user interface with document types, property types, case
types, and tasks. For example, a solution in a Complaints Management system
might include the following case types:
Customer complaints
Internal employee complaints
Customer feedback
The different types of cases within this solution are related, but have different
tasks that must be completed to complete the case. Roles are defined at the
solution level so that case workers with roles in this solution can handle different
case types within it. The case types all use similar document types (such as a
complaint letter) and properties (such as the date when the complaint was
received).

Chapter 4. Inner workings of IBM Case Manager 73
Figure 4-2 shows the solution components.
Figure 4-2 Solution model
Each IBM Case Manager solution has a solution prefix to provide unique
identification in an object store and workflow system isolated region.
Case Manager Client represents a solution in which users log in to manage and
process their cases. The solution contains the pages for case and step data.
These pages are known as
Case pages and Step pages. The pages display user
interface widgets that allow users to view in-baskets of available work, process
work, and search for cases
.
A solution is represented in a target object store as a folder of type Deployed
Solution (CmAcmDeployedSolution). The deployed solution folder contains
definitions for case types and their instances. The name of the deployed solution
folder is the solution name.
For more information about the CmAcmDeployedSolution class, see the IBM
Case Manager V5.2 Information Center and click Developing case
management applications → Content Platform Engine add-on extensions
for Case Manager Builder → IBM Case Manager target object store
extensions → Folder subclasses → Deployed Solution class.
nnn
1
1
Case Type
Solution
Document
Type
Role
Folder Task
Property
In-Basket
Process
Choicelist
Page
n
n
n
n
1
n
n
n
1
n
1
n
n
11
n
n
Rule
n
n
View
n

74 Advanced Case Management with IBM Case Manager
A solution is represented as an application space in an isolated region. An
application space contains the roles and their in-baskets. A roster is defined in an
isolated region for each solution. The application space name is the solution
name. The roster name is a normalized version of the solution name to conform
with the naming convention for a roster in the process services of the Content
Platform Engine.
Solution package
A solution package is a set of files and folders that are the artifacts of a solution.
Figure 4-3 shows the solution package content.
Figure 4-3 Solution package
A solution package contains the following files and folders:
Solution Definition File (SDF)
The SDF contains definitions of property types, document types, case types,
and task types that are used in the solution.
Process Engine Configuration File
The Process Engine Configuration File defines the workflow system
configuration for a solution. The file contains definitions for the application
space, roster, event logs, queues, in-baskets, and roles.
Solution folder
Collection XPDL
Solution Definition
Case Type
Folders
Property
Choice List
Document
Type
Configuration
Role
In-Basket
Task
Task
Task
Task
Base
Workflow
Workflow
<case> XPDL
Workflow
Workflow
Reuse
Workflow
Workflow
Created by P8 Process
Designer
Views
View
May call
another
workflow
Rules
Rule
Pages
Page
Chapter 4. Inner workings of IBM Case Manager 75
Case Type Workflow Definitions (Case XPDL)
The XML Process Definition Language (XPDL) is a collection of workflows
that are associated with each case type. Case Manager Builder creates a
separate XPDL file for each case type. Each task in a case type corresponds
to a workflow in the XPDL. The XPDL file also can contain zero or more
workflows that are not associated with a task. These workflows can be used
by any task workflow in the XPDL file.
For the task with reused workflow, Case Manager workflow inherits the
original workflow that was imported in the solution workflow collection.
Solution Workflow Process Collection (Collection XPDL)
The XPDL contains the reusable IBM Case Foundation workflow definitions.
These definitions are created by using FileNet Process Designer. They can
be used as a “Reuse workflow” in the solution if their base class is changed to
CaseWorkObject.
Pages folder
The pages folder contains page objects that represent the Case Manager
Client user interface layouts (pages). Case Manager Builder creates the page
objects for the default pages when the solution is created to display a list of
available page layouts for task steps, role-based solution views, and for
role-based case detail views. These page files are stored as content for each
page object.
Views folder
The views folder includes a subfolder for each case type that contains view
objects. The view objects represent the layout of the Properties widget. By
default, a system-generated view is available in each case type. The
system-generated view provides an ordered list of all the case type
properties. View files are stored as content on the view objects.
Rules folder
The rules folder contains the rule files for each rule that is created in any case
type under a solution. There are two different types of rules that are
supported in Case Manager Builder: text-based rules and decision
table-based rules. Both of these rule categories are stored in different
formats. The text-based rules are stored in a text format and the decision
table-based rules are stored in an XML format. The rule files are stored under
separate case type folders in the rules folder.
In addition to these artifacts, there might be more artifacts that are included in a
solution package, such as forms and document templates.

76 Advanced Case Management with IBM Case Manager
4.1.2 Case types
A case type defines the tasks and the document types that are needed to
support them, and the steps to solve a particular business problem. The
definition of a case type also includes the case folder structure and allocation of
solution properties that are displayed to case workers in the Case Manager
Client. A case is an instance of a case type.
A case type has the following items:
A collection of properties that become case folder properties.
A collection of property views that specify the properties that Case Manager
Client displays in the case widgets.
A folder structure for storing documents.
A collection of rules that can be used in a task to determine process routing or
to update case properties.
A collection of tasks to specify business processes and process data.
A page layout that specifies which Client widgets to use to create cases, view
cases, and split cases at run time.
(Optional) A custom task page layout that specifies which Client widgets to
use to view the work item of a custom task at run time.
(Optional) An initiating document type. In an IBM Case Manager system,
users can create a case instance directly from the Case Manager Client user
interface or by adding a document of the initiating document type.
Content Platform Engine implements the case type as a subclass of the Case
Folder class (CmAcmCaseFolder). The Case Folder class is a subclass of the
Base Case class (CmAcmBaseCase).
For more information about the CmAcmCaseFolder class, see IBM Case
Manager 5.2 Information Center and click Developing case management
applications → Content Platform Engine add-on extensions for Case
Manager Builder → IBM Case Manager target object store extensions →
Folder subclasses → Case Folder class.
Consideration: When a document of the initiating document type enters the
system, it triggers the creation of a case. You also can create a case directly
without a initiating document.

Chapter 4. Inner workings of IBM Case Manager 77
When you design a solution, Case Manager Builder defines a roster for each
solution and an event log for each Case Type in that solution by default. The
roster is used by all task workflow definitions for that solution (across all case
types). The event log is used for all task workflows that are defined for the case
type. You can create an extra event login Process Designer and assign it to any
workflow in the case type XPDL.
The event log name is <solution prefix>_<normalized case type name>.
Ensure uniqueness within each isolated region because the solution prefix
provides identification for a solution in an isolated region. This is important
because multiple solutions can have the same case type name.
Cases
A case is an instance of a case type. It also is called a case instance. A case is
persisted by using a case folder structure.
Figure 4-4 shows a case instance. As shown in the diagram, a case or case
instance is created from a case type. A case instance comes with a case folder,
case properties, tasks that are associated with the case (optional), and case
comments (optional).
Figure 4-4 Case instance
A case contains a case folder and case history that is associated with it. The
case history comes from the object store audit log and workflow system event
log, which is not shown in Figure 4-4. The case folder can have subfolders to
structure the document content. The comments from case workers throughout
the case lifecycle also are associated with the case.
Case folder
Properties
Other folder
Task
Case comment
Document
Case instance comes
from a Case Type
Folder structure was
defined in the Case Type
Documents comes from
a document class
Comments are case
folder annotations
CE Audit
Log
Case History
Tasks
Annotations
History
Containment
Containment
78 Advanced Case Management with IBM Case Manager
Users can create cases by completing one of the following tasks:
Creating a case folder of subclass CmAcmDeployedCaseType. Case
Manager Client uses this method to create a case when users start the add
case operation.
Creating a document of the initiating document type. This method works only
for a case type that has a initiating document property that is defined.
In an IBM Case Manager environment, case workers can update the case
properties in one of the following ways:
Update the case properties from Case Manager Client.
Update the case properties from the data that is associated with a task for a
case. The task also can include data from a workflow process or an external
process, such as IBM WebSphere Process Server.
Update the case properties by using custom applications.
Case state
At any moment, a case has one of the following states, which the Content
Platform Engine event handler manages:
NEW
A case is set to this state when Content Platform Engine creates it.
INITIALIZING
A case is set to this state while Content Platform Engine initializes the case
properties. While Case Manager is initializing the case, the case should not
be used nor any operation performed on it.
WORKING
A case is set to this state when there are incomplete tasks or when case
initializing is finished and the case is ready for further operations.
COMPLETE
A case is set to this state when all of its required tasks are completed or
manually disabled, or any running task processes are completed or stopped.
FAILED
This state is not used by the default IBM Case Manager. However, you can
use this state in your custom applications to indicate a case that is in an
exception or abnormal state.

Chapter 4. Inner workings of IBM Case Manager 79
Figure 4-5 shows the state diagram for a case.
Figure 4-5 Case state transition
The Content Platform Engine Case Folder Update event handler enforces the
following case state transition rules (see Figure 4-5):
The user cannot reset the state to NEW.
The user cannot reset the state to INITIALIZING.
If a case is in the WORKING state, the case state can be set to either
COMPLETED or FAILED.
If a case is in the COMPLETED state, the case state can be set to
WORKING.
If a case is in the FAILED state, the case state can be set to WORKING or
COMPLETE.
A case is set to COMPLETED state if all the required tasks are started and any
running tasks are completed or stopped. The required tasks here are the tasks
that are marked as required at design time. After a task is started, the Case
Manager Client also displays the started task as a required task.
Remember: Capitalized letters and underscores are used for the Case and
Task states in this book. The actual states that are represented in the Content
Platform Engine differ because they use spaces and are not capitalized. For
example, the actual state is “Disabled by user” instead of
“DISABLED_BY_USER”.
NEW INITIALIZING WORKING
COMPLETE
FAILED
80 Advanced Case Management with IBM Case Manager
4.1.3 Roles
A role represents a specific business function. For example, in a Complaints
Management system, a role might be a Reviewer or Investigator. You assign
users or groups to roles. Roles can access only tasks that are assigned to those
roles unless the role also can reassign work to others.
Roles are defined at the solution level, so roles are shared across case types.
During the task design process, steps in a task are associated with roles. At run
time, case administrators are responsible for assigning actual users to the roles.
Each role has at least one in-basket that is associated with it. The role
determines the pages to which the users or groups of the role have access.
When you define a case type, you can select different Case page layouts for
different roles.
Each role has at least one solution page that is associated with it. You can create
and assign solution pages to the role that provides case workers with access to
the cases and work items in a solution.
4.1.4 Roles in-basket
The roles in-basket is a bucket that contains the work items that the users or
groups that belong to the role can access. The role in-basket is created
automatically by IBM Case Manager Builder when you create a role. For more
information about configuring the details of the role in-basket, such as the
columns, sorting, and in-basket filters, see 7.2.3, “Setting up roles” on page 220.
A role can access more than one role in-basket, as shown in 12.5.2, “Creating
more in-baskets” on page 483.
For each role and associated in-basket that is defined in a solution, Case
Manager Builder defines a role, associated in-basket, and a work queue in the
Process Engine Configuration File. You also can use Process Designer to create
a role without creating a work queue. In addition, you can use Process Designer
to delete the work queue that is created for a role that is defined in Case
Manager Builder.
The properties that are specified for a role in-basket become the displayed data
fields for the corresponding isolated region work queue.

Chapter 4. Inner workings of IBM Case Manager 81
Table 4-1 specifies the mapping between roles in a solution and workflow system
configuration elements.
Table 4-1 Roles in solution to workflow system element mapping
The normalized role name is the role name that uses only characters that are
valid for a queue name in workflow system.
4.1.5 Personal in-baskets
The personal in-basket displays the workflow work items that are assigned to a
particular case worker.
A work item is assigned to the personal in-basket as a result of any of the
following actions:
Case workers move a work item to their own personal in-basket.
Case workers reassign an item to a different case worker.
An automated processing step assigns the item to a specific workgroup.
Each user often has a personal in-basket. However, you can configure a role to
not show its personal in-basket to a case worker. Therefore, having an in-basket
for a user is optional.
IBM Case Manager implements personal in-basket as an in-basket of the “Inbox”
queue.
Roles in solution Roles Queues
Role name example:
Customer Service
Representatives
Same as role
name in solution
<solution prefix>_<normalized role
name>
Example:
CC_CustomerServiceRepresentatives

82 Advanced Case Management with IBM Case Manager
IBM Case Manager also supports configuring how the personal in-basket is
displayed at the level of each role. When you define a role, you can select
between the available options, as shown in Figure 4-6.
Figure 4-6 Configuring the personal in-basket for a role
The following settings are available:
Personal (Common)
All roles that are configured for this setting share a personal in-basket
definition. As a result, users see the same columns, sorting, and filtering
when they access their personal in-basket, independent of which role they are
currently using.
Personal (Role)
This new setting enables you to have custom in-basket definitions for certain
roles. You can use different columns, sort orders, and filters for each role to
represent the work that is shown in the personal in-basket for that particular
role.
Do not show personal in-basket
This setting hides the personal in-basket from being shown for a role. It is
helpful if the role is not intended to use a personal in-basket at all. When this
option (as shown in Figure 4-6) is set, Case Manager Client hides the
personal in-basket at run time.

Chapter 4. Inner workings of IBM Case Manager 83
At the level of the isolated region, all solutions that are inside a Project Area
share an Inbox queue for the personal in-basket. IBM Case Manager uses a
default workflow data field that is named “SolutionIdentifier” to filter work items
into personal in-baskets that are based on the solution name.
4.1.6 Configuring manual work assignment
IBM Case Manager uses in-baskets to present users the work, which is assigned
to them personally or to the roles of which they are a member. IBM Case
Manager provides various configuration options to provide better control of how
users can assign work to themselves or to other case workers.
Moving work to the personal in-basket
When you configure a role, you can define whether role members are allowed to
transfer work from the role in-basket to their personal in-basket, as shown in
Figure 4-7.
Figure 4-7 Configuring a role to allow moving work to the personal in-basket
When this option is enabled, case workers are allowed to transfer work from the
role in-basket to their personal in-basket. They do so by selecting one or more
items in the role in-basket and by using the menu option Move Item to personal
In-basket. They also can move work back from their personal in-basket to the
role in-basket. They can do so by selecting the corresponding entries from their
personal in-basket and by using the menu option Return Item. You can use this
configuration for roles that might have to spend a longer time to complete their
work. You also might need to suspend work and you want to make sure that the
person that started to work on an item can continue this work later on.
Remember: Users cannot access personal work that is assigned to them if
they are member of a single role that hides the personal in-basket. In this
case, you must make sure that you do not directly assign work to users in this
role.

84 Advanced Case Management with IBM Case Manager
You might want to disable this configuration for roles that perform heads-down
processing or roles that must complete each work item that they open. If work is
not assigned to users in this role in any other way (from users in other roles or by
automated rule-based assignments in the process), you can hide the personal
in-basket completely for the role. For more information, see 4.1.5, “Personal
in-baskets” on page 81.
At the technical level, this configuration is stored as a boolean attribute for the
role and is called ECM_canMoveWorkToPersonalInBasket.
Assigning work to other users
Another configuration setting defines whether a role can assign work to other
users, as shown in Figure 4-8.
Figure 4-8 Configuring a role to reassign work to other users
When this option is enabled, users can select one or more entries from the role
in-basket or their personal in-basket and assign them to another user. When
work is reassigned from your personal in-basket, you see an extra option in the
panel, as shown in Figure 4-9.
Figure 4-9 Optional approval check when work is reassigned
Selecting the option means that you want to approve the work item after the
person you assigned it to completes it. As a result, this work item reappears in
your in-basket in the same workflow step after the other person completed it.
Otherwise, the work item is placed automatically into the next workflow step.
At the technical level, this configuration is stored as a boolean attribute for the
role and is called ECM_canAssignWork.
Important: IBM Case Manager allows a user to assign work to other users
only if all of the following conditions are true:
The user is member of at least one role with ECM_canAssignWork = true.
The work item is not locked by another user.
The current workflow step has the reassign option enabled.

Chapter 4. Inner workings of IBM Case Manager 85
As a default, the reassign option is enabled for each process step you create in
IBM Case Manager Builder Step Editor or in the Process Designer. However, you
might encounter situations where you want to ensure that the same person
performs two sequential workflow steps, or you want to prevent users from
reassigning a workflow step for other reasons. In that case, you can disable the
reassign option for the step. This setting can be modified in the Step Editor or by
opening the General tab for the step in Process Designer.
Viewing all assigned work
IBM Case Manager has an in-basket that allows users to view all work items that
are assigned to them throughout the complete solution. This in-basket is helpful
in situations where a role member must quickly determine which work is
assigned to a particular user. For example, a supervisor who is notified that a
team member is sick must find all work that is assigned to that person to decide
which work items must be shifted to other case workers.
To display this in-basket for a role, enable the setting that is shown in
Figure 4-10.
Figure 4-10 Configuring a role to show the in-basket for all assigned work
As a result, a new in-basket that is named “All Assigned Work” is available in IBM
Case Manager Builder, as shown in Figure 4-11.
Figure 4-11 Configuring the in-basket that shows all assigned work

86 Advanced Case Management with IBM Case Manager
The default columns that are configured for this in-basket are Step Name, Time
Created, Subject, and Assigned To. You can change these columns and add
filters in the same way as you do for a regular role in-basket. Generally, do not
remove the Assigned To column, which shows the user ID from the Content
Platform Engine process services with their short name as configured in the
LDAP directory.
Figure 4-12 shows how the “All Assigned work in-basket” is presented to the user
in the IBM Case Manager Client. The sorting for the work item in this basket is by
user ID and then by the column that you select.
Figure 4-12 In-basket showing all work that is assigned for a solution
For this use case, configure the supervisor role to show the “All assigned work”
in-basket and to enable this role to reassign work to others. The supervisor role
can then easily find all work that is assigned to a particular user and can reassign
some or all of it to other case workers.
You can configure the access to the “All assigned work” in-basket for several
roles in a solution. At the technical level, this configuration is stored as a boolean
attribute for the role and is called ECM_viewAssignedWorkInBasket.
Default settings
When you create a role in IBM Case Manager Builder, the configuration
parameters are set to the default values that are listed in Table 4-2.
Table 4-2 Default parameters for new roles
Role custom attribute Default value
ECM_canMoveWorkToPersonalInBasket true
ECM_canAssignWork true
ECM_viewAssignedWorkInBasket false

Chapter 4. Inner workings of IBM Case Manager 87
As a result, a role member can move work from a role in-basket to their personal
in-basket and assign work to other users. You can change the role custom
attributes in IBM Case Manager Builder or by opening the Process Designer for a
solution. In the Process Designer, click View → Roles and then click the
Custom Attributes tab to display the window that is shown in Figure 4-13.
Figure 4-13 Modifying role custom attributes by using Process Designer
For more information about how to access the Process Designer from a solution
in IBM Case Manager Builder, see “Configuration in Process Designer” on
page 476.
If you changed custom attributes for a role, you must redeploy your solution for
the new configuration to be picked up.
Role-based reassignment window
To reassign work, you can select the person that you want to assign the work to,
based on their role. It also is possible to select the users by searching for names
in the LDAP directory.
When you select a role from the list, the users that are assigned to that role are
shown in the right side of the window. You can then select the user that you want.
The number of roles that are displayed depends on the security settings, which
are described in the next section. Users see the role-based assignment window,
as shown in Figure 4-14 on page 88.
Tip: For test purposes, you can directly modify the role attributes in the
runtime environment by using the Process Configuration Console. However,
any changes you apply here are overwritten with the information in the
solution package after you redeploy the solution.

88 Advanced Case Management with IBM Case Manager
Figure 4-14 Role-based user selection for reassigning work
Case workers can still search the Directory Services for the user name by
selecting the option Search All Users at the top of the role list, as shown in
Figure 4-15.
Figure 4-15 Search for users in the directory service for reassigning work

Chapter 4. Inner workings of IBM Case Manager 89
Work reassignment and security
In addition to the configuration settings, the security that is configured for the
workflow system affects whether users can move or reassign work, and which
information is displayed in the role-based assignment dialog.
By default, all users are not restricted on the use of rosters, event logs, and
queues that are defined in a solution. Therefore, set the security on these objects
as required to satisfy your security requirements. When you change security,
adhere to the rules that are listed in Table 4-3.
Table 4-3 Access right requirements for reassigning work
The user needs to belong only to one role of the solution to have access to all the
roles of the solution and the roles membership. To change the role attributes,
such as adding a new member to a role, the user must have the write access to
the application. That is, for read-only operations, such as retrieving the list of
roles or the members of a role, the user needs to belong only to one role.
Action Access right
Move work to personal in-basket from role
in- basket
1. Query and Process right on the
current work queue
2. Query right on Inbox queue
3. ECM_moveToPersonalInbasket = true
for role that uses in-basket
Reassign work from role in-basket 1. Query and Process right on the
current work queue
2. Has ECM_canAssignWork=true
Return work from personal in-basket Query on destination work queue
Reassign work from personal in-basket Has ECM_canAssignWork=true
Return work from “All assigned work”
in-basket
Query on destination work queue
Reassign work from “All assigned work”
in-basket
1. Query and Process on Inbox queue
2. Has ECM_canAssignWork=true

90 Advanced Case Management with IBM Case Manager
4.1.7 Configuring role pages
Each role must have one solution page. The solution page that is assigned to a
role provides the solution access to the case worker in IBM Case Manager
Client. These solution pages are shown to the user when a solution is opened in
Case Manager Client for the first time. When a role is created, it contains two
solution pages Work and Cases, by default. A user also can create custom
solution pages and assign them to a role. Figure 4-16 shows the window that is
used to assign a solution page to a role in IBM Case Manager Builder.
Figure 4-16 Assigning solution pages to the role
4.1.8 Document types
Document types help you to organize and classify the documents that belong to
a case. You can provide more information about the documents by assigning
properties to the document type. For example, a document type in the example
might be a complaint letter.
The document type maps to a document class in the IBM FileNet P8 domain. It
maps to an item type in IBM Content Manager, if IBM Content Manager
integration is used.
Documents that are associated with cases are categorized into types. A
document type can trigger a case or task creation. When you design the case
types, you can assign a document type to be the initiating document type (also
called
initiating document type) for a case type. When users create a document
of the initiating document type for a case type, IBM Case Manager creates a
case instance of that case type. A document type can be the initiating document
type for one or more case types.

Chapter 4. Inner workings of IBM Case Manager 91
When you design task types, you can specify a document type as a filing
precondition for a task creation. If a user files a document in a case instance
folder, IBM Case Manager creates a task instance. This process occurs if the
task has the filing precondition and the document class is the same as the
document type that is specified for the precondition. The task with filing
precondition can be repeatable.
4.1.9 Task type
A task type contains tasks. A task has one or more steps that must be
completed. For example, a task might be to review a product-related complaint. A
task is not completed until all of the steps in the main workflow are completed. A
case is not completed until all required tasks are completed or manually disabled
and any other running task process are completed or stopped.
The following types of tasks are available:
Container task
Task with reused workflow
Case Manager normal task
Tasks can be moved to READY state by the following preconditions:
Document filing
Property update
Property condition is met
Only tasks with the filing and property update preconditions can be repeated.
The filing and property update preconditions can have a property expression as
more constraints.
For example, you can define a repeatable task with filing (of document class A)
and property condition (P1 > 100 and P2 = true). For another example, you can
define a repeatable task with property P1 update and property expression
condition (P2 = true).
Tip: The display name for a document type is the document type name. The
symbolic name for a document type uses the following format:
<solution prefix>_<normalized document type name>
Consideration: Required tasks are all the tasks that are running (the started
tasks) and the tasks that have the required attributes.
92 Advanced Case Management with IBM Case Manager
In the first example, Case Manager promotes the task if a document of type A is
filed in the case folder and (P1 >100 and P2=true). In the second example, Case
Manager promotes the task if P1 is updated (regardless of the value) and (P2 =
true).
Document filing and property update preconditions are always evaluated first,
then the property expression is evaluated.
A task also can be designated as optional or required. A required task must be
completed before the case is set to complete. All of the other running tasks must
be completed or stopped for the case to complete.
Tasks can be included in sets. A set is inclusive or exclusive. Placing a task in an
inclusive set means that all of tasks in that set must be completed for the case to
complete. Placing a task in an exclusive set means that only one task in the set
must be completed.
Hidden task
By using IBM Case Manager, you can define hidden tasks. A hidden task works
the same way as a non-hidden task of the same type, but it is not displayed in the
Tasks tab in IBM Case Manager Client. Hidden tasks are helpful for background
processing tasks, such as initialization or cleaning up that are started based on
certain conditions, but do not need to be visible to the case worker.
You can configure hidden tasks as being started automatically based on a
condition or you start them based on API calls. Although hidden tasks are not
shown in the Tasks tab, their status changes and any comments you
programmatically add in a hidden task are displayed in the History view.
Container task and subtask
IBM Case Manager release 5.2 also supports the concepts of container task and
subtask
. A container task is similar to a task in that it can have preconditions. It
can start automatically, manually, or discretionary and it can be defined as
hidden or repeatable. Also, all required container tasks must be completed or
manually disabled for a case to be completed. However, the following important
features distinguish a container task:
It does not have a workflow that is associated with it
It contains one or more subtasks
A container task contains one or more subtasks. Subtasks can be container
tasks or tasks. Subtasks can be automatic or manual tasks only, not discretionary
tasks. Subtasks can have preconditions and can be required and hidden.
Chapter 4. Inner workings of IBM Case Manager 93
When you organize subtasks in sets, all subtasks in a set must belong to the
same container task. Task sets cannot cross container task boundaries. You can
move existing top-level tasks into newly created container tasks.
Container tasks are useful to group a number of tasks. You also can make them
available to the case worker only when certain conditions of phases in the case
management process are reached. This way, container tasks help to reduce the
number of tasks that are presented in the IBM Case Manager Client. This is
especially useful for complex case types. For example, a comprehensive task
type can have many single tasks defined. However, depending on the
progression of the case, many of these tasks never need to be created because
their corresponding preconditions are not met. Therefore, they are of no value for
the case worker in that case.
Without container tasks, all of these tasks are visible in the Task tab of the Case
Information widget. However, most of them are in the waiting state and might
never get started. By using high-level container tasks, the worker sees only a few
container tasks waiting instead of all of the subtasks that are part of the container
tasks.
Container tasks also reduce the resources that are spent for a case. Each task
instance corresponds to a Task Object in the Content Platform Engine, even if the
task is in waiting state. Another advantage of the container task is the
performance for a case creation. If you have a case with 200 independent tasks,
Case Manager creates 200 task objects. However, if the 200 tasks are grouped
into 5 containers and 35 stand-alone tasks, Case Manager creates only 40 task
objects.
Discretionary container tasks are powerful tools that allow case workers to bring
in a predefined set of tasks into a case. This is useful when you cannot describe
all of the preconditions that automatically or manually start the tasks. It provides
support for highly dynamic and adaptive case management by enabling case
workers to judge and decide which tasks must be used on a case-by-case basis.
Because container tasks do not have a workflow that is associated with them,
you cannot convert an existing task into a container task. In that case, create a
container task instead and move your existing task into that container task.
A container task is completed only when the following conditions are true:
All required subtasks are completed or manually disabled (for manual tasks
only). All required tasks that are in the FAILED state also must be stopped.
Any working subtasks are complete or stopped/aborted.
94 Advanced Case Management with IBM Case Manager
A case is completed when the following situations are true:
All required tasks (containers included) are completed, manually disabled, or
stopped.
All running tasks are completed or stopped.
An optional container task in WAITING or READY state is not evaluated for the
case completion computation, even if the container task includes a required
subtask. This is because the subtasks are not created until the container task is
in the WORKING state. If a container task contains a required subtask that is
intended to affect the case completion computation (even if the container task is
not started), configure the container task as a required container task.
Task Classes
A Task type is a definition of a task class. IBM Case Manager release 5.2 uses
one single task type, which is CmAcmCaseTask. Previous IBM Case Manager
releases used a separate task type CmAcmCaseTaskWithIntiatingDocument for
tasks that are associated with a document filing precondition. This class is
deprecated in release 5.1.1. The document that started the task (the initiating
document) is stored in the CmAcmTriggerDocument property with the task.
For more information about the CmAcmCaseTask class, see the IBM Case
Manager 5.2 Information Center and click Developing case management
applications → Content Platform Engine add-on extensions for Case
Manager Builder → IBM Case Manager target object store extensions →
CmTask subclasses → Case Task class.
Case Task class properties
The Case Task class (CmAcmCaseTask) features the following properties:
Task Name
If a task is a discretionary task, case workers specify the task name when
they create the task. Otherwise, the task has the name of the task class,
which is the name that you provided for the task in IBM Case Manager
Builder.
Disabled State
The value of this property indicates whether a task is disabled. If it is disabled,
the value also indicates how it was disabled. This integer property has the
following choice list that is associated with it (the actual integer value is shown
in parenthesis):
– ENABLED(0): The task is not disabled.
– DISABLED_BY_USER(1): A task was disabled by a case worker.
Chapter 4. Inner workings of IBM Case Manager 95
– DISABLED_BY_EXCLUSIVE(2): A task is disabled because it belongs to
an exclusive group and one of the tasks in the group was promoted to the
WORKING state.
– DISABLED_ABORTED(3): A task is disabled because its associated
workflow was aborted.
Required State
The value of this property indicates whether the task completion is required to
complete a case. A case is completed only when all of the required tasks are
completed. This integer property contains a choice list with the following
values:
– OPTIONAL(0): The task is not required for a case. This is the default
value.
– REQUIRED_BY_USER(1): This value indicates that the task is marked as
required when a manual or discretionary task is started.
– REQUIRED_BY_INCLUSIVE(2): This value indicates that the task
belongs to an inclusive group and one of the members of the group is in
the WORKING state.
Launch Mode
The value of this property specifies the state of a task when IBM Case
Manager creates the task, and whether the task is repeatable. This integer
property contains a choice list with the following values:
– SYSTEM_MANUAL(0): This value indicates that the task is defined as a
manual task. When IBM Case Manager creates a task by using the
Content Platform Engine event handler, IBM Case Manager promotes the
task from WAITING to READY. This process occurs unless the task has a
precondition that prevents it from being promoted. The task remains in the
READY state until a case worker starts the task, which then promotes it to
the WORKING state. For more information, see “Case object model
implementation” on page 102.
– SYSTEM_AUTOMATIC(1): This value indicates that this task is an
auto-launch task. When IBM Case Manager creates a task by using
Content Platform Engine event handler, Case Manager promotes the task
from WAITING to READY and then to WORKING state if the task has a
precondition that is met. Case Manager then starts its associated
workflow. For more information, see 4.2, “Case object model
implementation” on page 102.
– USER_AUTOMATIC(2): The property indicates that the task is marked as
a discretionary task. IBM Case Manager creates a task only when a case
worker requests one. After it is created, IBM Case Manager promotes the
task from WAITING to WORKING state and starts its associated workflow.

96 Advanced Case Management with IBM Case Manager
For more information, see “Case object model implementation” on
page 102.
– SYSTEM_MANUAL_REPEATABLE(3): This value specifies the task is
manual and repeatable. This value has the same attribute as
SYSTEM_MANUAL.
– SYSTEM_AUTOMATIC_REPEATABLE(4): This value specifies that the
task is auto-launch and repeatable. This value has the same attribute as
SYSTEM_AUTOMATIC.
Group Mode
This property specifies whether a task is stand-alone, inclusive, or exclusive.
This property is a choice list property with the following values:
– Not Grouped (0): The task does not belong to any group. This value is the
default value.
– Exclusive (1): The task belongs to an exclusive group. When IBM Case
Manager promotes a member of an exclusive group from READY to the
WORKING state, the rest of the group is set to
DISABLED_BY_EXCLUSIVE.
– Inclusive (2): The task belongs to an inclusive group. When IBM Case
Manager promotes a member of an inclusive group from READY to the
WORKING state, the rest of the group is promoted to
REQUIRED_BY_INCLUSIVE.
Is Container
This property specifies whether a task is a container task, and can have the
values TRUE or FALSE.
Parent Task
This object valued property contains the parent container task for Subclass.
Filing Document
This object valued property contains the document, that if filed, triggers the
start of the task, if the task has the document filing precondition.
Remember: For a repeatable task, multiple instances of the task can be
created for any case. For a non-repeatable task, only one instance of the
task can be created. Only tasks with filing or property update preconditions
can be marked as repeatable.
Restriction: A repeatable task cannot belong to a group. A non-repeatable
task can belong to no more than one group.
Chapter 4. Inner workings of IBM Case Manager 97
Process Instance ID
This string valued property contains the ID of the process that was started on
the workflow system or IBM Process Server for the task.
Last Failure Reason
This string property provides information about why the task was set to the
FAILED state. It is automatically populated when workflow system moves a
task into this state. For example, CmAcmError Launch Failed indicated that
IBM Case Manager cannot start the corresponding task workflow.
Content Platform Engine can update the task state and this field.
Last Restart Date
This date and time property is updated by IBM Case Manager when a task is
restarted.
Restart Count
This integer property is used by IBM Case Manager to track the number of
restart attempts for a task. You can use this information, for example, to
abandon restarting a task after it reaches a number of unsuccessful restarts.
4.1.10 Tasks
Tasks are the instances of task types that are created by IBM Case Manager
when a case is created.
Task states
A task can be in one of the following states:
WAITING
A task is in this state when IBM Case Manager first creates it.
READY
A task is in this state when the precondition for the task is met.
WORKING
IBM Case Manager starts a workflow that is associated with a task when it is
in this state. A task can enter this state when one of the following events
occurs:
– A case worker creates a discretionary task.
– A case worker starts a manual task that is in the READY state.
– The task was in COMPLETED state and a restart was issued successfully
through the API.
98 Advanced Case Management with IBM Case Manager
– The exception for the task, in the FAILED state, is rectified. The Disabled
State property for the task is not set to DISABLED_ABORTED, and a
restart was issued successfully through the API.
– The task was in FAILED state with Disabled State equal to
DISABLED_ABORTED, and a Restart was issued successfully through
the API.
Case workers cannot disable a task in this state.
COMPLETE
The task is completed. Any workflow that is associated with the task also is
completed. Case workers cannot disable a task in this state.
FAILED
A task can enter this state under the following conditions:
– The associated workflow is in the FAILED or MALFUNCTION state. If the
failure condition is rectified, the workflow system sets the state back to
WORKING and the work item can continue to be processed.
– All the work items for a workflow that is associated with the task are
deleted abnormally. Also, in this case the state of the task can be set back
to WORKING by issuing a Stop request to gracefully clean up the existing
work objects. Then, issue a Restart request.
– The task was in WORKING state and a Stop request was issued
successfully through the API. This action sets the Disabled State property
to DISABLED_ABORTED.
Case workers cannot manually disable a task in FAILED state. However, you
can provide the capability to stop and restart the task by issuing the
corresponding requests through the Case Manager API.
Stopping and Restarting Tasks
With IBM Case Manager 5.2, you can issue Stop and Restart requests for tasks
at the API level.
You can use a Stop request to gracefully end a task in WORKING state. As a
result, any existing workflows for this task are ended. Stopping tasks is useful in
the following situations:
A task no longer must be completed.
A task process failed and cannot be recovered.
A case must be ended; for example, when a customer decides not to pursue a
complaint.
Additionally, a Stop request cleans up a task in the FAILED state.

Chapter 4. Inner workings of IBM Case Manager 99
In both cases, the task ends in the FAILED state with the Disabled State property
set to DISABLED_ABORTED. If wanted, you can restart the task by issuing a
Restart request.
A Restart request can be used to demote a successfully finished task from
COMPLETED back to WORKING state. As a result, a new instance of the
corresponding workflow is started. You also can issue a Restart request to
demote a task in FAILED state back to WORKING state if one of the following
conditions is met:
The tasks Disabled State property is equal to DISABLED_ABORTED
The tasks Last Failure Reason property has the value “CmAcmError Launch
Failed”
Figure 4-17 shows the state diagram for a task.
Figure 4-17 Task state transition
IBM Case Manager supports Stop and Restart invocation against a workflow
system-based regular task only. It is not supported to stop or restart an IBM
BPM-based task and container tasks. Additionally, discretionary tasks can be
stopped only.
A stop request deletes all of the active work items for a single workflow process
instance. This process updates the corresponding task’s state to FAILED and the
Disabled State property to DISABLED_ABORTED. Any further workflows that
are started by this main workflow are not ended by the request. Furthermore,
ending a workflow does not compensate any changes that are applied to external
systems, such as values that are changed by using DBExecute or Web Services
calls.
100 Advanced Case Management with IBM Case Manager
Restarting a task always starts the latest workflow that was deployed for that
task. If the solution was redeployed since the start of the task, the workflow that
is started at restart can differ from the initial one. The restart does not affect the
Date Started property of the task, which remains the time of the original first
start. However, it does change the properties Task State, Process Instance ID,
Disabled State, Last Date Restarted, Restart Count, and Last Failure Reason.
The user who initiates a Stop request must have query rights on the roster and
query and process rights on all queues of the solution. For a Restart request to
succeed, the requesting user must have create rights for the solution roster.
Existing and running task instances of earlier IBM Case Manager versions can
be stopped, but they cannot be restarted after the system is upgraded.
Task preconditions
The following preconditions to start a task are possible:
Filing
To create a task, case workers must file into a case instance a document of a
document class that is specified in the filing precondition for the task. IBM
Case Manager sets the state of a task that is based on its start mode. You can
select which document types are evaluated for a filing precondition.
Multi-selection of document types is supported. A filing precondition can be
combined with property expression preconditions.
Property update
Creates a task if one or more case properties are changed. If multiple
properties are selected for a property update precondition, the properties are
logically combined in an OR condition. For example, Complaint Category OR
Complaint Description is changed. More case property expressions can be
added to the property update precondition with an AND operator. The case
property update precondition can be combined by AND or OR. For example,
(Complaint Category OR Complaint Description is changed) AND
(Complaint Status = Processing OR Complaint Status = Pending).
Property expression
When an expression that contains case properties satisfies the condition that
is specified in the property precondition, IBM Case Manager sets the state for
a task to READY. Then, based on its start mode, the task is promoted to
WORKING state.
No precondition
IBM Case Manager promotes the state of a task to WORKING immediately
after creation.

Chapter 4. Inner workings of IBM Case Manager 101
A task precondition can be a filing or property update precondition, with added
property expression for extra constraint.
Task precondition evaluation
When a case is created, IBM Case Manager takes the following actions:
Top-level non-discretionary tasks are created and put into their initial state,
which is WAITING.
Tasks with no precondition or with property preconditions that are met are
promoted to READY state.
If a task is configured as automatic, it is moved to WORKING and the
associated workflow starts.
Tasks with a property update or document filing precondition wait until the
property condition is met or the document is filed.
For repeatable tasks with a property update precondition when the update event
triggers, the system checks whether a task of that type is in the WAITING state. If
it is not in that state, a task is created.
When the container task is moved into the WORKING state, the following
processing is started:
The corresponding top-level subtasks are created and put in WATING state.
Subtasks with no precondition or property preconditions that are met are
promoted to READY state.
Subtasks that are configured as automatic are promoted to WORKING state
and the corresponding workflow starts.
Subtasks with property update or document filing conditions wait for the
appropriate event to happen before they are evaluated.
With IBM Case Manager release 5.2, you can change the preconditions for tasks
in a deployed solution by redeploying the solution. This process can change the
precondition and the precondition type. For example, you might decide that a
verification task be started based on a property update instead of a property
condition. You also can change a property-based precondition to a document
filing precondition, or vice versa.
Consideration: When you create a case and a value is entered for a
property, this action does not count as a property update precondition.

102 Advanced Case Management with IBM Case Manager
If you change the precondition for task and redeploy the solution on a production
system, run the Precondition Checker utility to update running cases. The
Precondition Checker checks for any existing tasks that are in a Waiting state. If
the tasks satisfy the changed precondition, they are promoted to a READY state.
It is mandatory to run the Precondition Checker in the following situations:
A property precondition was changed
A property update or document filing precondition was changed to a property
precondition
An existing precondition of any kind was changed to “No precondition”
You do not need to run the Precondition Checker if a property update
precondition or document filing precondition is used or changed. These
precondition types are automatically evaluated the next time that a document is
filed or the property is updated.
4.2 Case object model implementation
This section describes how IBM Case Manager services organize and manage
the objects that are addressed in 4.1, “IBM Case Manager object model” on
page 71 as data.
IBM Case Manager organizes its objects into the following main categories:
Design object store (solution packages or artifacts).
Target environment (solution instances or deployed solutions). The target
environment consists of one target object store and its associated workflow
system isolated region.
Important: Do not change the task from Automatic or Manual to Discretionary
for production systems because starting a discretionary task is different from a
system triggered start of a task. Discretionary tasks use a different user
interface to start, and often require more information to be passed when they
are started. This process can cause incompatibilities with existing task
instances.
Important: For documents that are already in a case, a new or changed
document filing precondition is not evaluated.

Chapter 4. Inner workings of IBM Case Manager 103
4.2.1 Design object store
In IBM Case Manager, there are two main object store add-ons: design object
store add-ons and target object store add-ons. A design object store is an object
store with IBM Case Manager design object store add-ons that are applied to it.
In a development environment, IBM Case Manager uses a design object store to
organize and manage the solution packages and artifacts. The solution package
contains elements, such as solution definition file (SDF), Process Engine
Configuration File, and case type XPDL.
IBM Case Manager configuration tool installs IBM Case Manager design object
store add-ons while it configures an IBM Case Manager environment. IBM Case
Manager configuration tool also creates a folder structure for IBM Case Manager
to organize IBM Case Manager solution packages and artifacts.
Figure 4-18 shows the root folder structure for IBM Case Manager in a design
object store.
Figure 4-18 Design object store folder structure
Audit Configurations
Root Folder
IBM Case Manager
Connection Definitions
Data Sets
+
+
+
-
Contains default set of IBM Case Manager
widgets
Data Sets contain basic Target Object Store
configuration and add-ons
Folder structure for Templates is similar to Solutions folder
structure
<Solution name>
+
Solutions
<Solution name>
Pages
Solution Workflow Collection
Configuration
Solution Definition
<case name> XPDL
+
-
-
Set of default pages and custom pages
Each solution is tagged with the
corresponding project area
Views
Rules
+
+
Collection of properties view defined under
case types in a solution
Contains separate rule file for each rule
created in a solution .
+
Page Templates
Rule Packages
Security Configurations
Solution Templates
+
+
+
Widgets
+
Audit configuration stores audit configuration settings for
tracking the history of cases.
Connection definition include project area definitions
Security configuration contains the set of permissions
configured for solution objects, users, roles etc.
Contains default set of page templates
available in IBM Case Manager
This folder contains the solution rule zip file
when the solution rules are exported
104 Advanced Case Management with IBM Case Manager
A design or staging object store contains the following artifacts:
Solution definition
A solution definition is a collection of SDFs, Process Engine Configuration
File, XPDL, and pages. A solution package is stored under the Solutions
folder in a design or staging object store. For more information about SDF,
Process Engine Configuration File, XPDL, pages, views, and rules, see
“Solution package” on page 74.
Solution template
A solution template is a collection of IBM Case Manager artifacts that can be
customized and extended to build a complete solution. A solution template is
stored in the Solution Templates folder.
Connection definition
A connection definition specifies the target environment to which an IBM
Case Manager solution is deployed. It contains the information about the
connection point that is providing access to the associated isolated region
and page mapping. IBM Case Manager uses the connection point to discover
the target object store and isolated region number.
Audit configuration
An audit configuration stores the audit configuration settings for tracking the
history of cases in IBM Case Manager. An audit configuration is stored in the
Audit Configurations folder. Audit configuration settings are stored in an audit
manifest file.
Security configuration
A security configuration contains the security permissions for objects and
roles that are stored on an IBM FileNet P8 Platform environment. A security
configuration file stores the permissions that are configured for different
users, groups, and roles. A security configuration is stored in the Security
Configurations folder.
Page template
A page template is a collection of the default set of pages that are available in
IBM Case Manager that also can be used for creating custom pages in IBM
Case Manager Builder. A page template is stored in the Page Templates
folder.
Rule package
Rule package is a collection of solution rules. The rule package is created
when an administrator exports a solution’s embedded rules, in IBM Case
Manager administration client. It contains the solution rule .zip file that is
generated on export. A rule package is stored in the Rule Packages folder.

Chapter 4. Inner workings of IBM Case Manager 105
Widget package
The Widget package is a collection of default widgets available in IBM Case
Manager. A widget package is stored in the Widgets folder.
4.2.2 Target environment
The target environment consists of one target object store and its associated
isolated region. A target object store is a Content Platform Engine object store
with IBM Case Manager add-ons that are required for a target object store. IBM
Case Manager configuration tool installs IBM Case Manager target object store
add-ons as part of configuring an IBM Case Manager environment. IBM Case
Manager configuration tool also creates a folder structure for IBM Case Manager
to organize deployed solutions.
Figure 4-19 shows the root folder structure for IBM Case Manager in a target
object store.
Figure 4-19 Target object store structure
Remember: A solution definition refers to the solution as defined in the
Design or Staging Object Store. A solution package refers to the archive file of
the solution that is created when you export the solution.
Solution Deployments
Root Folder
IBM Case Manager
Case Types
<Solution name>
-
-
-
<case name>
-
Case Structure
+
Cases
-
<year>
-
<month>
-
<day>
-
<random number>
-
<case instance>
+
-
Contains for each Case Type, the
information needed to create
case instances.
Actual case folder
Cases are stored in a year,
month, day, random number
folder structure to avoid
large amount of instances in
a single folder
Contains all the solutions
deployed in this object store
106 Advanced Case Management with IBM Case Manager
A target object store contains the following artifacts for a deployed solution:
Deployed solution folder
A deployed solution folder is a folder structure for a deployed solution in the
target object store. Case instances are created under this structure.
Case class
A case class is a representation for a case type in a solution.
Document class
A document class is a definition of a document type.
Property template
A property template is a definition of a property type.
Task class
A task class is a definition of a task type.
Subscription
A subscription relates a case or task event condition to corresponding
Content Platform Engine event actions.
Each target object store is associated with a workflow system isolated region. An
isolated region stores process data for the solutions. When users deploy the
solutions, IBM Case Manager API transfers the workflow configuration
information and workflow collections for the solution to the isolated region.
Workflow system metadata includes application space, roster, event logs,
queues, roles, in-baskets, and workflow classes.
Figure 4-20 on page 107 shows the workflow system isolated region in a target
object store.

Chapter 4. Inner workings of IBM Case Manager 107
Figure 4-20 Target object store and workflow system isolated region
4.2.3 Project areas for supporting parallel project development
Project areas are used when the development environment for IBM Case
Manager must be shared between different solution development teams. Project
areas allow solution teams to develop their solutions iteratively without affecting
other development teams that share the environment. In particular, developers
can isolate the effects of resetting the test environment to a single project area.
Project areas are used only in development environments. A single design object
store can hold multiple project areas, and each one maps to one development
environment. A solution must be unique at the design object store level. That is,
two project areas cannot have the same solution.
Project areas are used to determine the access to the solutions. Each has its
own target object store and workflow system isolated region. Each project area
can have multiple solutions and be shared by multiple developers. However, each
developer uses only one project area.
Figure 4-21 on page 108 shows how project areas in the design object store can
be mapped to the target object stores.
Target Object Store
Isolated Region
Solution
Workflow
Event
Log
Roster
Inbox
Queue
Application Space
Work
Queue
TaskRole
In-Basket
Case
In-Basket

108 Advanced Case Management with IBM Case Manager
Figure 4-21 Project areas
Project areas are created and managed by IT administrators. An IT administrator
runs a task to create and configure a default project area. Other project areas
can be set up by using IBM Case Manager administration client.
IBM Case Manager administration client handles the privileges that are required
for a user to access the design object store of the project area. However, it does
not add the privileges for the user in the target object store and isolated region.
To avoid reconfiguration later, plan the necessary user access to a project area
before you create the target object store and workflow system.
Remember these restrictions when you are planning project areas:
To perform a test environment reset requires system administrative privileges
on the target object store. This action clears out the data in the project area to
provide a clean environment for further development.
Users who work in project areas must be assigned to the workflow system
administration and configuration privilege groups.
Remember: For IBM Content Manager integration, each target object store in
IBM FileNet P8 maps to an IBM Content Manager Server (Library Service).
Therefore, you need multiple IBM Content Manager servers for multiple
project areas.
Development Environment (Sandbox)
Case
Manager
Builder
Design Object Store
Project Area 1
Project Area 2
Project Area n
Target Object Store 1
Target Object Store 2
Target Object Store n
Isolated region
Isolated region
Isolated region
Chapter 4. Inner workings of IBM Case Manager 109
For more information about setting up Project Areas by using IBM Case Manager
administration client, see the IBM Case Manager Information Center and click
Administering your case management system → Setting up project areas.
4.3 IBM Case Manager pages
The IBM Case Manager application consists of a set of pages that are displayed
in the Case Manager Client for your solution. IBM Case Manager provides a set
of default pages that can be customized. Alternatively, you can create custom
pages to use in place of the default pages.
Case Manager Client supplies the following default pages:
Solution page: The Solution page contains Work page and Cases page
layouts.
Cases page: The Cases page contains pages for case layouts, such as Add
Case and Case Details.
Step page: The Step page contains pages for step layouts, such as Add
Tasks and Work details.
To customize applications, you can use the default pages as templates to create
more pages to provide customized views for different user roles and create page
layouts for steps and cases. For more information about pages, see Chapter 10,
“User interface and widgets” on page 357.
4.3.1 Default pages in a Solution
Default pages in the solution include a Solution page, a Work page, and a Case
page.
Solution page
Solution pages provide case workers with access to cases and work items that
are in a solution. The solution pages include Work page and the Cases page, as
shown in Figure 4-22 on page 110.

110 Advanced Case Management with IBM Case Manager
Figure 4-22 Solution pages
Work page
The Work page contains in-basket widgets that display the work items in the
in-basket of a role and a personal in-basket. By default, the Work page contains
the Add Cases and Manage Roles options. Add Cases allows case workers to
create new cases. Manage Roles allows the case administrators to assign role
membership.
For more information, see 4.1.4, “Roles in-basket” on page 80
Cases page
The Cases page provides case search capability. The page also displays search
results in a Case List widget.
4.3.2 Default Cases pages
In the Case pages, the default pages include Add Case, Add Case Form, Case
Detail, Case Detail Form, and Split Case.
Add Case page
The Add Case page is a default Case page for manually creating a case
instance.
Add Case Form page
The Add Case Form page is similar to the Add Case page. However, it uses a
Form widget instead of a Case Data widget for capturing case data when it
creates a case. The use of the Add Case Form page as a form can provide extra
capabilities, such as dynamic input regions, lookups, or verifications. These
capabilities can be used to guide the case worker through the case creation
process.

Chapter 4. Inner workings of IBM Case Manager 111
Case Details page
The Case Details page is a default Case page for displaying case data. This
page contains widgets for various case views, such as the Case Data view, Case
History view, and Case Task view.
Case Details Form page
The Case Details Form page is similar to the Case Details page, but it uses the
Form widget instead of the Case Data widget. This page contains widgets for
various case views, such as the Case Data view, Case History view, and Case
Task view.
Split Case page
The Split Case page is used to create a case that is based on an existing case. It
shows the data and documents for two cases next to each other in preparation of
the split. Default Case pages are shown in Figure 4-23.
Figure 4-23 Default Case pages
4.3.3 Default Task pages
The Task pages contain the following default pages: Add Task page, Add Task
Form page, Work Details page, Work Details Form page, and Form Attachment
Work Details page.
112 Advanced Case Management with IBM Case Manager
Add Task page
Case Manager Client displays this page when a case worker adds a
discretionary task for a case.
Add Task Form page
The Add Task Form page is similar to the Add Task page, but it uses the Form
widget instead of the Case Data widget.
Work Details page
Case Manager Client displays this page when a case worker opens work items
from an in-basket.
Work Details Form page
The Work Details Form page is similar to the Work Details page, but it uses the
Form widget instead of the Case Data widget.
Form Attachment Work Details page
This page allows the user to enter data to a form, which is then saved as a form
document that is attached to the work item.

Chapter 4. Inner workings of IBM Case Manager 113
Custom Task Details page
Case Manager Client displays this page when a case worker opens a custom
task work item. Default task pages are shown in Figure 4-24.
Figure 4-24 Task pages
4.3.4 IBM Case Manager widgets
A page contains a set of widgets. For more information about standard widgets
that are available in IBM Case Manager, see 10.4.1, “Standard widgets that are
provided by IBM Case Manager” on page 378.
For more information about the standard widget, see the IBM Case Manager 5.2
Information Center and click Designing your case management solution and
application → Adding and deploying a case management solution →
Designing the case management client application → Creating a custom
page → Widgets.
For more information about enhancing your IBM Case Manager solution by
developing and adding your own widgets, see 10.5, “Creating and deploying a
custom widget” on page 386.
114 Advanced Case Management with IBM Case Manager
4.4 Tasks and associated workflow processes
In IBM Case Manager, each non-container task or a task that does not have
subtasks has a workflow that is associated with it. A workflow in an IBM Case
Manager environment derives from the CaseWorkObject class that was
introduced in Content Platform Engine, Version 5.0.
When a non-container task is promoted to WORKING state, IBM Case Manager
starts a workflow that is associated with it. A task enters the Working state when
one of the following conditions is satisfied:
A user creates a discretionary task
A user starts a manual task that is in the READY mode
A precondition is satisfied for an auto-launch task
For more information, see 4.2, “Case object model implementation” on page 102.
This section describes the Content Platform Engine enhancements that are used
by IBM Case Manager.
4.4.1 Workflow association
Task types are associated with workflow definitions. Workflow definitions can be
defined and connected to a task by using one of the following methods:
New workflows
Workflow definitions can be created by using the Step Editor in IBM Case
Manager Builder. They can be enhanced by using the Process Designer. In
addition, you can edit workflow definitions directly from the task page.
Reuse workflow
Existing workflow definitions that were created by using Process Designer
can be used when you create a task in IBM Case Manager Builder.
Created by WebSphere Integration Designer
Existing workflow definitions that were defined in WebSphere Integration
Designer that run in WebSphere Process Server can be used when you
create a task in IBM Case Manager Builder.
Created by WebSphere IBM BPM Process Designer
Workflow definitions that were created by using WebSphere IBM BPM
Process Designer and available to run in WebSphere Process Server can be
used when you create a task in IBM Case Manager Builder.
Chapter 4. Inner workings of IBM Case Manager 115
For more information about using the workflow in WebSphere Process Server,
see Chapter 17, “Integrating with IBM Business Process Manager” of the
previous version of this IBM Redbooks publication. The previous version of the
book can be found as part of the downloadable material that is associated with
this book. For more information, see Appendix A, “Additional material” on
page 563 for details.
IBM Case Manager uses the CmAcmTaskWorkflowLaunchEventAction action
type to wire a task type to a workflow subscription. IBM Case Manager starts the
workflow that is associated with a task when such an event action is triggered.
4.4.2 Workflow data fields
Case properties can be accessed directly from a workflow instance. Case
properties can be used in expressions of step parameters and route conditions,
and to assign system instructions.
Functions
IBM Case Manager Builder adds the following extra data fields that are required
by IBM Case Manager components:
SolutionIdentifier
The SolutionIdentifier is a string-valued field that contains the <solution
prefix>_<solution name> value. Case Manager Client uses the
SolutionIdentifier to identify from which solution a work item comes when the
personal in-basket is displayed.
F_CaseFolder
F_CaseFolder identifies the case class and its instance. Content Platform
Engine uses the F_CaseFolder data field to retrieve and update the values for
the case properties.
F_CaseTask
F_CaseTask identifies the task class and its instance. Content Platform
Engine uses the F_CaseTask data field to update the state for a task.
You can access the case property by using the
F_CaseFolder.propertySymbolicName syntax. In the example environment, the
solution prefix is CC. Therefore, the case property Customer Name can be
accessed in a workflow step by using F_CaseFolder.CC_CustomerName.
You can directly assign a new value to the case property or use it in a workflow
expression the same way as any other workflow data field.

116 Advanced Case Management with IBM Case Manager
IBM Case Manager 5.2 provides enhanced support to access the case and task
object properties in a workflow by using Business Objects in the expression
builder in Process Designer, as shown in Figure 4-25.
Figure 4-25 Accessing case and task properties in the Expression Builder
With this process, you can easily access case or task properties from a workflow
definition. It also helps avoid errors because of misspelling. To access the
business objects data fields, open the expression builder and select Business
Objects from the drop-down menu on the left side. Then, select F_CaseFolder
or F_CaseTask as the business object, and double-click one of the associated
data fields from the Properties list.
For more information about using the Expression Builder, see the IBM FileNet P8
5.2 Information Center and click Integrating workflow into document
management → Designing workflows → Define workflow properties →
Expression Builder.
You can also define step parameters directly from Process Designer and start
them with F_CaseFolder.<properties>.
Saving data in a task step
The information that is displayed in the Properties widget or the Form widget
when a task is opened from an in-basket reflects the case data. IBM Case
Manager Builder automatically adds these assignments for case properties that
are marked as read/write for this workflow step. Process Designer does the same
when you define the step parameter for the step.
Chapter 4. Inner workings of IBM Case Manager 117
For more information about the shadow fields and in-basket synchronization in
IBM Case Manager 5.2, see 12.3, “Shadow fields and queue updates” on
page 462.
4.4.3 Workflow attachments
From the Step Editor of IBM Case Manager Builder, you define the attachments
for a workflow and assign them to a step as the step parameters. If a task has a
filing precondition, one of the attachments is selected as the initiating attachment
for the workflow. The initiating attachment is added as a read/write parameter for
the start step of a workflow. If you do not want to update the attachment, you can
add it as read-only parameter.
When IBM Case Manager starts the workflow by using the Content Platform
Engine event handler, Content Platform Engine assigns the filing document to
the attachment parameter for a task.
4.4.4 Starting task workflows
The method IBM Case Manager uses to run a workflow that is associated with a
task depends on a launch mode of the task. The following alternatives are
available:
Auto launch
This mode is for a task that starts automatically. The Content Platform Engine
event handler is responsible for creating and starting a task when it creates a
case instance. Content Platform Engine starts the task if it has no
precondition or the precondition is satisfied. If the launch fails, IBM Case
Manager sets the task properties State to FAILED and Last Failure Reason to
“CmAcmError Launch Failed”.
Manual launch
This mode is for tasks that start manually. The tasks must be in the READY
state before users can start the task. If starting the workflow fails, the same
task properties are set as described for Auto launch.
User
This mode is for a discretionary task. When users click Add Task in IBM Case
Manager Client, IBM Case Manager Client presents the users with the Add
Task window so that they can edit the workflow data fields. The Add Task
window displays only the workflow data fields that are part of the step
parameters of the launch step for the corresponding task workflow.
118 Advanced Case Management with IBM Case Manager
For a workflow that is associated with a discretionary task, you can edit the
launch step from the Step Editor of Case Manager Builder or by using the
Process Designer.
For more information about launch mode, see 4.1.9, “Task type” on page 91.
4.4.5 Workflow processing and task state
Content Platform Engine updates the state of a task that is associated with a
workflow during workflow processing to one of the following task states:
FAILED
If an exception occurs, the state of the task is set to FAILED. When the error is
rectified, the exception is cleared and the state is reset back to WORKING.
If a user stops the workflow abnormally, the state is set to FAILED and the
task property Disabled State is set to DISABLED_ABORTED. A workflow can
be stopped abnormally if the user deletes all of the work items for a workflow.
For more information about gracefully stopping and restarting tasks by using
the IBM Case Manager API, see “Stopping and Restarting Tasks” on page 98.
COMPLETED
If a workflow is completed normally, the state of the task is set to
COMPLETED.
WORKING
This is the initial state of a task when a workflow is started. A workflow is in
progress when a task is in WORKING state.
4.5 Object model for IBM Content Manager integration
The goal of the integration with IBM Content Manager is to enable IBM Case
Manager to store and use documents in IBM Content Manager. This integration
allows IBM Content Manager to be the document repository for all the documents
that are attached to cases and tasks.
You can interact with IBM Content Manager documents that are attached to
cases and tasks in the same way as you do with documents that are stored in
IBM FileNet P8. You can attach the IBM Content Manager documents, update
them, and delete them from the case. In addition, document events can trigger
tasks.

Chapter 4. Inner workings of IBM Case Manager 119
The integration depends on the tight linking of documents in IBM Content
Manager and folders in IBM Case Manager. This integration is done by using
proxy objects in each of the respective repositories.
Each document in IBM Content Manager that is attached to a case is
represented by a proxy document in IBM FileNet P8. This proxy document is then
filed in the case folder.
Each case folder in IBM FileNet P8 is represented as a proxy folder in IBM
Content Manager. These objects are monitored by the IBM Content Manager
adapter and the IBM Case Manager event handlers. When events occur on these
objects, they are mapped with the appropriate action.
Figure 4-26 shows the object model that is used for the IBM Content Manager
integration.
CM8 in the figure stands for IBM Content Manager. ICM in the figure
stands for IBM Case Manager.
Figure 4-26 Object model for IBM Content Manager integration
Restriction: A solution can use IBM FileNet P8 or IBM Content Manager as
document repository, but not both.

120 Advanced Case Management with IBM Case Manager
Event subscriptions are supported as with the IBM FileNet P8 repository. For
example, you can configure a solution so a new case is created when a case
worker creates a document in an IBM Content Manager item type. Adapters are
used to monitor the events and ensure that the appropriate actions are carried
out.
The associations of event subscriptions and IBM Content Manager item types
are configured when you set up the integration.
For each document that is associated with a case in IBM Content Manager, there
is a proxy document in IBM Case Manager (IBM FileNet P8), of class
CmAcmCM8ProxyDocument. This proxy object holds no user properties.
For more information about the object class, see the IBM Case Manager 5.2
Information Center and select Developing case management applications →
Content Platform Engine add-on extensions for Case Manager Builder →
IBM Case Manager target object store extensions → Custom subclasses
and properties of the Document class → Proxy Document Class.
For each case folder in IBM Case Manager (IBM FileNet P8), there is a proxy
object in IBM Content Manager. This proxy object does not include any user
properties. Instead, it contains the following properties that identify the case
folder in IBM Case Manager:
Case ID
Case folder GUID
Initiating document ID
Object store symbolic name
Solution name
Case type
Case folder name
The information about the integration connection with IBM Content Manager is
held in a special custom object of the IBM Content Manager Integration Data
class, CmAcmCM8IntegrationData. The information is managed by IBM Case
Manager administration client.
For more information about the class, see the IBM Case Manager Information
Center and select Developing case management applications → Content
Platform Engine add-on extensions for Case Manager Builder → IBM Case
Manager target object store extensions → Custom Object subclass.
Restriction: With IBM Content Manager integration, the case folder does not
support the use of subfolders. All documents are held in one level.
Chapter 4. Inner workings of IBM Case Manager 121
For more information about IBM Content Manager Integration, see Chapter 15,
“Integration with IBM Content Manager” of the previous version of this IBM
Redbooks publication. The previous version of the book can be found as part of
the downloadable material that is associated with this book. For more
information, see Appendix A, “Additional material” on page 563.
122 Advanced Case Management with IBM Case Manager

© Copyright IBM Corp. 2013, 2014. All rights reserved. 123
Part 2 Solution
development
This part guides you as you get started with IBM Case Manager solution
development. It describes designing a solution, building a simple solution, and
deploying a solution.
This part includes the following chapters:
Chapter 5, “IBM Case Manager tools” on page 125
Chapter 6, “Designing case management solutions” on page 179
Chapter 7, “Building a simple solution: Part 1” on page 211
Chapter 8, “Building a simple solution: Part 2” on page 267
Chapter 9, “Migrating and deploying solutions” on page 313
Part 2
124 Advanced Case Management with IBM Case Manager

© Copyright IBM Corp. 2013, 2014. All rights reserved. 125
Chapter 5. IBM Case Manager tools
IBM Case Manager provides a rich set of tools for administration, configuration,
and solution development. The tools are designed to help administrator and
business analysts to set up IBM Case Manager application and get started with
basic configuration and solution development.
This chapter describes these tools and includes the following sections:
IBM Case Manager tools overview
IBM Case Manager configuration tool
IBM Case Manager administration client
IBM Case Manager Builder
5
Tip: We recommend using this chapter as a reference of how to use the tools.
If you want to quickly get started with solution design and building, you can
jump to the following chapters:
For more information about getting started with designing a Case Manager
solution, see Chapter 6, “Designing case management solutions” on
page 179
For more information about getting started with building a simple Case
Manage solution, see Chapter 7, “Building a simple solution: Part 1” on
page 211 and Chapter 8, “Building a simple solution: Part 2” on page 267.
For more information about deployment, see Chapter 9, “Migrating and
deploying solutions” on page 313.
126 Advanced Case Management with IBM Case Manager
5.1 IBM Case Manager tools overview
The IBM Case Manager tools are simple to use and help user to quickly build the
case management solutions. The following main tools are available in IBM Case
Manager:
IBM Case Manager configuration tool
You can create an environment profile by using this tool. You can define the
connection to the application server, Content Platform Engine repository, and
IBM Content Navigator to configure the system. This tool also is used for the
initial configuration of the system. You can run the tasks to deploy IBM Case
Manager solutions.
IBM Case Manager administration client
You can import a solution template and create a solution from the template by
using IBM Case Manager administration client. The administration client is a
tool that is available as a plug-in with IBM Content Navigator. It serves as a
user interface for performing administration tasks. The administration client
simplifies the administration tasks, such as importing a solution template,
creating a solution from a template, copying a solution, configuring a solution,
auditing a solution, configuring security, and much more.
IBM Case Manager Builder
You can create and update the solution in IBM Case Manager Builder.
IBM Case Manager Builder is used to create and edit Case Manager
solutions. After editing is complete, you can deploy and test the solution in
Case Manager Builder. Starting with V5.2, multiple users can create different
components, such as customized pages, workflow designing, metadata
creation, and view designing simultaneously, in a solution that facilitates faster
solution development.
In the remaining sections of the chapter, we describe each tool.
5.2 IBM Case Manager configuration tool
The IBM Case Manager configuration tool is focused on the initial configuration
of a system. IBM Case Manager configuration tool is used to create the
development and production environment profiles to set up the IBM Case
Manager application. The tool also provides other functions, such as solution
import and export, create solution from template and copy solution, but you are
encouraged to use IBM Case Manager administration client for these tasks as
described in 5.3, “IBM Case Manager administration client” on page 133.

Chapter 5. IBM Case Manager tools 127
5.2.1 Starting the IBM Case Manager configuration tool
To start the IBM Case Manager configuration tool, go to <Case Manager Install
Directory>/configure, and run the configmgr command.
To run the command-line interface (CLI) for the configuration tool, run the
configmgr_cl command from the <Case Manager Install
Directory>/configure directory.
5.2.2 Creating a profile
Complete the following steps to create a development environment or production
environment profile:
1. Open File → Create Profile to create a profile, as shown in Figure 5-1.
Figure 5-1 Creating a profile
2. Enter a profile name to create a profile and click Next. Select the option to
create a development or production environment profile, as shown in
Figure 5-2 on page 128.

128 Advanced Case Management with IBM Case Manager
Figure 5-2 Defining the profile details
3. Specify the Application server, Content Navigator server, and Content
Platform Engine server details and click Next.
4. Select the tasks for the profile to configure Case Manager Builder, Case
Manager Client, and other optional components. The IBM Case Manager
configuration tool tasks configure the environment and deploy the
applications. The list of tasks that are available for a profile are shown in
Figure 5-3 on page 129.

Chapter 5. IBM Case Manager tools 129
Figure 5-3 Selecting tasks for the profile
For more information about configuring the environment, see the IBM Case
Manager Information Center and select Installing and configuring IBM Case
Manager → Installing and configuring on a stand-alone server →
Configuring IBM Case Manager.
5.2.3 Running the profile tasks
After the development profile is created, you can run the tasks that were selected
while you were creating the environment profile. The profile is opened in the IBM
Case Manager configuration tool to run the tasks, as shown in the Figure 5-4 on
page 130.

130 Advanced Case Management with IBM Case Manager
Figure 5-4 Running the tasks
The following tasks are available in a profile:
Update the Content Platform Engine Client Connector Files
This task replaces the Content Platform Engine Client files. The task is not
needed if Content Platform Engine Client installer is running. After you run
this task, the configuration tool must be restarted.
Configure the Login Modules
This task configures the login modules that are used by IBM Case Manager to
connect to the Content Platform Engine server. Configuring Login Modules is
not necessary if you are deploying to the same WebSphere profile as Content
Platform Engine server.
Configure LDAP
This task configures the directory service authentication settings for IBM
Case Manager. This is a required task and the user can test the LDAP server
connection by using the Test LDAP Connection option.
Import the LTPA Key
This task configures the Lightweight Third-Party Authentication (LTPA) for the
IBM Case Manager applications. IBM Case Manager uses WebSphere
Application Server LTPA tokens to provide single sign-on support.
Configure the Case Management Object Stores
This task installs the case management design and target object store
addons and updates code modules, event handlers, subscriptions, page
templates, case operations code module, and case operations configuration
file.
Chapter 5. IBM Case Manager tools 131
Define the Default Project Area
This task defines the default project area and creates the connection
definition that is associated with that project area.
Create Case Manager Applications
This task creates the Case Manager API WAR file, Case Manager Help
System WAR file, Case Manager Builder EAR file, and Case Forms WAR file.
This task also configures WorkplaceXT for a development profile.
For more information about configuring the Workplace XT, see the IBM Case
Manager Information Center and select Installing and configuring IBM
Case Manager → Installing and configuring in a cluster deployment or
network deployment → Configuring IBM Case Manager → Configuring
the development environment for cluster or network deployment →
Running the development environment configuration tasks →
Configuring Workplace XT for a development environment.
Deploy the Case Manager API
This required task deploys the IBM Case Manager application to the
application server. You can update different parameters and save the
changes. Run the task to apply the settings.
Register the IBM Case Manager Services plug-in
This task registers the IBM Case Manager services plug-in with IBM Content
Navigator. The Case Manager model API is in this plug-in, which is used by
Case Manager Client and can be used by any user-created Content
Navigator plug-ins.
Deploy Workplace XT
This task deploys the Workplace XT EAR to the IBM Case Manager server.
Workplace XT EAR must be packaged before this task is run, either manually
or by using the Create Case Manager Applications task. If Workplace XT is
installed on a different server or is in a different profile, skip this task and
manually deploy the application.
Deploy Case Manager Builder
This task deploys the Case Manager Builder EAR to the application server.
You must run Create Case Manager Applications task first to make the Case
Manager Builder WAR file. You also must run Deploy Case Manager API task
for Case Manager Builder to work.
132 Advanced Case Management with IBM Case Manager
Deploy the Case Manager Help System
This task deploys the Case Manager help system WAR file to the application
server. Deploying the help system WAR file makes the IBM Case Manager
helps system available for you in Case Manager Builder and Case Manager
Client. You must run Create the Case Manager Applications task to create the
help system WAR file.
Deploy and Register Widgets Package
This task registers the widgets package to the application server. The default
widgets package for Case Manager Client is selected by default; however, this
task also can be used for registering custom widgets packages. If there is an
EAR inside the widgets package, this task deploys the EAR.
Deploy the Forms Application
This task is used to deploy the case Forms like eForms and IBM Forms. You
must run Create Case Manager Applications task first to create the Case
Forms WAR file. If you are configuring IBM Forms, you must restart the
application server before you can use IBM Forms with Case Manager.
Register the IBM Case Manager administration client plug-in
This task registers the IBM Case Manager administration client plug-in. This
task is required for the IBM Case Manager administration client feature to be
available for use by a desktop on IBM Content Navigator.
Register Project Area
This task registers the project area with the IBM Content Navigator server.
You must run Configure the Case Management Object Stores, Deploy and
Register Widgets Package, and Register the IBM Case Manager
administration client plug-in tasks before this task is run. This task creates the
default IBM Case Manager desktop and the IBM Case Manager
administration client desktop.
Configure Business Rules
(Optional) This task enables and configures business rules for IBM Case
Manager. You run the Register Project Area task before this task is run. Rules
are deployed to the specified rules repository directory.
Register the External Data Service
This task registers an external data service for use with a solution, saving the
association in the connection definition of the project area for the solution.
This task is optional and is disabled by default.
You must restart the application server after running all of the tasks.
Chapter 5. IBM Case Manager tools 133
5.3 IBM Case Manager administration client
IBM Case Manager administration client is a web-based tool that can be used for
performing administrative tasks in IBM Case Manager. It is available as a plug-in
on IBM Content Navigator desktop that was created by default during the IBM
Case Manager configuration process.
If the IBM Case Manager administration client is not available by default, you can
open the default desktop for Case Manager Client and add the IBM Case
Manager administration client feature under appearance tab. This enables IBM
Case Manager administration client plug-in on the Case Manager Client desktop.
This section describes the following features that are provided by IBM Case
Manager administration client:
Copying a solution
Creating solution templates
Using solution templates
Exporting and importing a solution
Exporting business rules
Configure locks
Enabling case history store
Widget packages
Configuring an audit
Configuring security
Manage project areas
Extra options for an administrator in administration client
5.3.1 Copying a solution
In a development environment, a solution copy is useful. As a solution is
developed, you might want to test a few ideas before you incorporate the
changes into the primary solution. You can use a copy to create a sandbox
solution for isolated development and testing without affecting the primary
solution. When you are satisfied with changes, you can add the changes to the
primary solution.
There are two methods to copy a solution: By using Case Manager Builder and
by using IBM Case Manager administration client. More options are available
when you use the IBM Case Manager administration client to perform a solution
copy.

134 Advanced Case Management with IBM Case Manager
Copying a solution by using administration client
To use administration client to copy a solution, complete the following steps.
(these steps often are done by an IBM Case Manager administrator):
1. Log in to the following IBM Case Manager administration client:
http://<server>:<port>/navigator/?desktop=icmadmin
2. Open the design object store in the left panel. Right-click the solution name
folder to copy the solution, as shown in Figure 5-5.
Figure 5-5 Copy a Solution option in administration client


138 Advanced Case Management with IBM Case Manager
If successful, the solution is available in Case Manager Builder for you to edit, as
shown in Figure 5-9.
Figure 5-9 Copied solution available in Case Manager Builder
Copying a solution by using Case Manager Builder
An alternative to using administration client to copy a solution is to use the Case
Manager Builder. Complete the following steps to copy a solution in Case
Manager Builder:
1. Log in to the Case Manager Builder at:
http://<server>:<port>/CaseBuilder
2. Select the solution that you want to copy to activate solution actions, as seen
in Figure 5-10 on page 139.


140 Advanced Case Management with IBM Case Manager
In this example, the name is Customer Complaints Duplicate, and the
solution prefix is CCD.
4. Verify that Validate this solution before copying is selected to ensure that
the new solution begins in a validated state and then click OK.
The solution is then copied and is available for editing within Case Manager
Builder, as shown in Figure 5-12.
Figure 5-12 Copied solution
Restriction: You cannot copy a solution that has files that are checked out
in the solution package if you select the Validate this solution before
copying option.
Requirement: The solution prefix must be unique. A unique prefix ensures
that the artifacts that are created in each solution are created as unique
objects when they are deployed. Although this is not enforced when you
create or copy solutions, you receive an error when you deploy a solution
with a duplicate prefix.

Chapter 5. IBM Case Manager tools 141
5.3.2 Creating solution templates
A solution template is a collection of assets that are created by Case Manager
Builder that can be used as the basis of a new solution. These assets include the
properties, document types, roles, pages, tasks, and workflows for a solution.
This section describes how to convert a solution into a solution template.
Creating a solution template is useful for standardizing default assets within a
solution, or for creating an industry template that is to be deployed to external
entities.
To promote a solution to a solution template, complete the following steps:
1. Log in to IBM Case Manager administration client at:
http://<server>:<port>/navigator/?desktop=icmadmin
2. Right-click the solution and select the Convert to Solution Template option,
as shown in Figure 5-13.
Figure 5-13 Selecting Convert to Solution Template
3. Review the solution details that are provided in the first window of the wizard,
click Finish, as shown in Figure 5-14 on page 142.

142 Advanced Case Management with IBM Case Manager
Figure 5-14 Convert a Solution to a Template: Review the solution properties
Test your solution template after it is created and address any issues before you
pass it to others to use. If the template creates identifiers, perform a run through
of a new solution that is based on the template to verify that nothing was broken.
The following extra options are available when you create a solution template:
Create unique identifiers when a solution is created from the template.
If your solution does not have any dependencies on any identifiers, select this
option.
An example of the use of this option is if a solution was developed entirely in
Case Manager Builder or Process Designer. With such a solution, no external
assets rely on any symbolic names. This is the default option.
Use existing unique identifiers when a solution is created from the template.
If your solution has dependencies on any identifiers and requires that those
identifiers do not change names, select this option.
An example for the use of this option is if your solution contains extra assets
that rely on objects in the solution. These extra assets can be an IBM Form,
stored search, or custom application that interfaces with solution data. A
company-wide form might reference CC_Address from the sample solution. If
so, a basic template provides the Address property to all new solutions so that
the form does not require modification. The form continues to map to
CC_Address and all new solutions that are based on the template contain
CC_Address for the form.
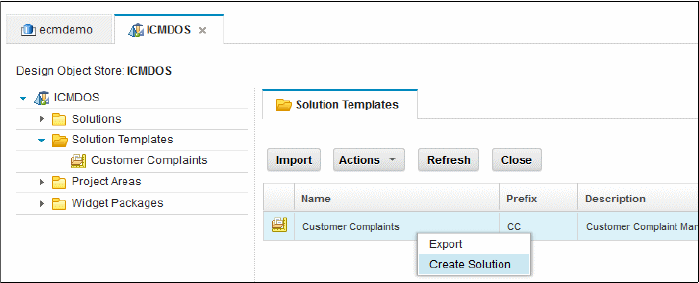
Chapter 5. IBM Case Manager tools 143
5.3.3 Using solution templates
To create a solution from a solution template, you can use IBM Case Manager
administration client and Case Manager Builder.
Using a template in IBM Case Manager administration client
To create a solution by using a solution template in IBM Case Manager
administration client, complete the following steps:
1. Log in to IBM Case Manager administration client at:
http://<server>:<port>/navigator/?desktop=icmadmin
2. Right-click the template name in the Solution Templates folder and select
Create Solution, as shown in Figure 5-15.
Figure 5-15 Selecting Create Solution
3. Specify a name and prefix for the new solution and the project area. Leave the
other options as default and click Finish.
For the example, enter Customer Complaints Newer1 as the name of the new
solution and CCN1 as the prefix, as shown in Figure 5-16 on page 144.
If you have more than one project area, you can select another project area.
For the example, use the default project area of
dev_env_connection_definition.

144 Advanced Case Management with IBM Case Manager
Figure 5-16 Create a Solution from a Template: Specifying new solution details
Upon completion, your are informed whether the action is successful. If so, you
can see your new solution in Case Manager Builder.
Using a template in Case Manager Builder
To create a solution by using a solution template in Case Manager Builder,
complete the following steps:
1. Log in to Case Manager Builder at:
http://<server>:<port>/CaseBuilder

Chapter 5. IBM Case Manager tools 145
2. Select the template that you want from the list and click Add Solution, as
shown in Figure 5-17.
Figure 5-17 Selecting a template to create a solution in Case Manager Builder
3. Complete the solution name and prefix for the new solution and click OK.
In the example, Customer Complaints Newer is the solution name and CCN is
the solution prefix, as shown in Figure 5-18.
Figure 5-18 Specifying new solution details
4. The solution is created and you are automatically taken to the edit window of
the new solution.

146 Advanced Case Management with IBM Case Manager
5.3.4 Exporting and importing a solution
A solution also can be exported and imported in IBM Case Manager
administration client. Users can export the solution and move it to the different
environments. Complete the following steps to export a solution:
1. Right-click a solution in IBM Case Manager administration client and select
Export → Solution, as shown in Figure 5-19.
Figure 5-19 Export a solution
2. In the wizard, enter the solution package file name and click Finish.
For example, enter Customer_Complaints_solution.zip as the name of the
solution package, as shown in Figure 5-20 on page 147.

Chapter 5. IBM Case Manager tools 147
Figure 5-20 Export solution: Specify solution package name
By using the IBM Case Manager administration tool, you can import a solution
package. To import a solution package, complete the following steps:
1. Click Import and select the Import Solution option to import a solution in
IBM Case Manager administration client, as shown in Figure 5-21.
Figure 5-21 Importing a solution
2. In the wizard, select the solution package .zip file name by using the Browse
option and click Next, as shown in Figure 5-22 on page 148.


Chapter 5. IBM Case Manager tools 149
4. In this step, users can map IBM Case Manager users and groups for the
solution. Click Finish, as shown in Figure 5-24.
Figure 5-24 Import a solution: Mapping users and groups
5. The solution is successfully imported into the environment and a success
message is shown, as shown in Figure 5-25.
Figure 5-25 Import a solution: Solution successfully imported

150 Advanced Case Management with IBM Case Manager
5.3.5 Exporting business rules
In IBM Case Manager 5.2, users can export the business rules that were created
in a solution by using IBM Case Manager administration client.
Export creates a download package for the solution's rule configuration. To
export a solution rule configuration, complete the following steps:
1. Right-click a solution in IBM Case Manager administration client and select
Export → Business Rules, as shown in Figure 5-26.
Figure 5-26 Exporting business rules of a solution
2. In the wizard, enter the rule package name and click Finish.
For the example, enter Customer_Complaints_rules.zip as the name of the
solution rules package, as shown in Figure 5-27 on page 151.
Remember: Administration-related wizards from past releases are still
available in the IBM Case Manager configuration tool, but the focus of
administration is now available in the IBM Case Manager administration client.
Users are encouraged to use the administration client instead of the
configuration tool.

Chapter 5. IBM Case Manager tools 151
Figure 5-27 Export business rules: Specifying rule package details
On successful completion, the rules package is saved on the local file system.
For more information about creating rules and configuration, see Chapter 13,
“Business rules” on page 507.
5.3.6 Configure locks
IBM Case Manager administrator can configure the locks setting for the
multi-user editing environment by using IBM Case Manager administration client.
Administrator can unlock solution artifacts that are preventing the development or
deployment of a solution. Multiple locks can be released in one request.
Complete the following steps to unlock a solution:
1. Open the solutions in IBM Case Manager administration client. Right-click the
solution name and select Configure → Locks, as shown in Figure 5-28 on
page 152.

152 Advanced Case Management with IBM Case Manager
Figure 5-28 Selecting Configure Locks
2. The wizard shows the locked solution artifacts. Select a solution artifact and
click Unlock, as shown in Figure 5-29.
In this example, Customer Information view is locked by the user p8admin.
Figure 5-29 Configure Locks: Selecting solution artifact to unlock

Chapter 5. IBM Case Manager tools 153
5.3.7 Enabling case history store
In IBM Case Manager administration client, administrators can enable a case
history store for a target object store. To use the Timeline Visualizer widget to
view custom properties in the case history over time, users must enable case
history store.
To enable case history store, select the Enable case history store option in the
target object store, as shown in Figure 5-30.
Figure 5-30 Enabling case history store
5.3.8 Widget packages
Custom widget packages can be registered by using IBM Case Manager
administration client. By default, IBM Case Manager Widget package is
registered.
You can register more widget packages in IBM Case Manager administration
client. In the design object store, select Widget Packages → Register Custom
Widgets, as shown in Figure 5-31 on page 154.

154 Advanced Case Management with IBM Case Manager
Figure 5-31 Widget packages
Registering custom widgets
IBM Case Manager administration client supports registering and removing of
custom widget packages.
You can upload custom widget packages to IBM Case Manager. Register the
widgets to make them available for design and run time. If a custom widgets
package contains an EAR file, the EAR must be manually deployed.
5.3.9 Configuring an audit
Users can create and modify an audit configuration for a solution by using IBM
Case Manager administration client. To apply an audit configuration to a solution,
complete the following steps:
1. Log in to IBM Case Manager administration client at:
http://<server>:<port>/navigator/?desktop=icmadmin
2. Right-click the solution and select Configure → Auditing, as shown in
Figure 5-32 on page 155.
Tip: The custom widgets package also can be registered using the IBM Case
Manager configuration tool, which deploys the EAR file.


158 Advanced Case Management with IBM Case Manager
6. Review the selected properties and click Save.
In this example, select the Customer Name and Complaint Category
properties and click Next, as shown in the Figure 5-36.
Figure 5-36 Configure auditing: Selected properties to audit
7. Select Apply audit configuration and then click Apply to apply the audit
configuration to the solution immediately, as shown in Figure 5-37.
Figure 5-37 Configuring auditing: Applying the audit configuration
5.3.10 Configuring security
Security configuration for a solution is defined in IBM Case Manager
administration client. Administrators can perform the following steps to define the
security for a solution:
1. Open the solution in IBM Case Manager administration client and right-click
the solution to configure the security. Click Configure → Security, as shown
in Figure 5-38 on page 159.

Chapter 5. IBM Case Manager tools 159
Figure 5-38 Solution Security Configuration
2. Select Create a security configuration to assign the permissions to different
objects and roles of a solution and click Next, as shown in Figure 5-39.
Figure 5-39 Security Configuration: Create a security configuration
3. Enter a security manifest name and click Next.
In this example, enter security_configuration as the security manifest
name, as shown in Figure 5-40 on page 160.

160 Advanced Case Management with IBM Case Manager
Figure 5-40 Security Configuration: Specifying the security configuration details
4. The wizard shows all of the roles of a solution and different permission
options for each role. Select the permissions for different roles and click Next,
as shown in Figure 5-41.
In this example, select Create Case permission for the role Contact Center to
allow the role to create cases and the View Case permission for the role
Manager to allow the role to view case details in IBM Case Manager.
Figure 5-41 Security Configuration: Specifying role permissions

Chapter 5. IBM Case Manager tools 161
5. Select the user and specify privileges for the user to define them as an
administrator and click Next.
In this example, select user P8Admin and assign the administrator privileges,
as shown in Figure 5-42.
Figure 5-42 Security Configuration: Assigning user privileges
6. Select the user and associate with different roles, as shown in Figure 5-43 on
page 162. In this example, user P8Admin is associated with role Specialist.

162 Advanced Case Management with IBM Case Manager
Figure 5-43 Security Configuration: Associate users with roles
7. Select the option to apply the security configuration. Click Save to save the
configuration and then click Apply to apply the security configuration to the
deployed solution immediately, as shown in Figure 5-44.
Figure 5-44 Security Configuration: Applying the security configuration to the solution

Chapter 5. IBM Case Manager tools 163
5.3.11 Manage project areas
Project areas are used only in development environments. A single design object
store can hold multiple project areas and each object store maps to one
development environment. Project areas are created and managed by IT
administrators. An IT administrator often creates and configures a project area by
using IBM Case Manager administration client.
In IBM Case Manager administration client, the design object store contains a
default folder to define project areas. An administrator can right-click the project
area folder to define a new project area. To view the project area details,
right-click an existing project area and select View and Edit, as shown in
Figure 5-45.
Figure 5-45 Project Areas: View and Edit option
In this example, project area dev_env_connection_definition is defined as the
default project area, as shown in Figure 5-46 on page 164.


Chapter 5. IBM Case Manager tools 165
5.3.12 Extra options for an administrator in administration client
An IBM Case Manager administrator has an extra set of options that are not
available through Case Manager Builder. The first set of options concerns
properties. The example solution has a property that is called Address that is
used in the following examples:
Create properties when the new solution is deployed.
Properties are created for the new solution by using the prefix that is defined
for it. In the original example solution, the symbolic name of this property is
CC_Address. In the new solution, with this option selected, the CC_Address
property is copied into the new solution with the symbolic name of
CCID_Address. The new property is controlled by the new solution, which can
modify the property as needed.
Use existing properties when the new solution is deployed.
Properties that are defined in the original solution continue to be used in the
new solution. Properties that are defined in the original solution do not have
their prefix changed to match the prefix that is defined for the new solution. In
the original solution, the symbolic name of this property is CC_Address. With
this option selected, the property maintains the symbolic name CC_Address.
The property is not controlled by the new solution; only the original solution
can modify the property.
The second set of options concern document types. The example solution has a
document type that is called Customer Correspondence that is used in the
following examples:
Use new document types when the new solution is deployed.
Document types that are defined in the original solution have their prefix
changed to match the prefix that is defined for the new solution. In the original
solution, the symbolic name of this document type is
CC_CustomerCorrespondence. With this option selected, the document type
takes on the symbolic name CCID_CustomerCorrespondence. The document
type is then controlled by the new solution, which can modify the document
type as needed.
Remember: If you use existing properties, you must track solution
migration and deployments. A copied solution that reuses properties must
be deployed after the original solution.

166 Advanced Case Management with IBM Case Manager
Use existing document types when the new solution is deployed.
Document types that are defined in the original solution do not have their
prefix changed to match the prefix that is defined for the new solution. In the
original solution, the symbolic name of this document type is
CC_CustomerCorrespondence. With this option selected, the document type
maintains the symbolic name CC_CustomerCorrespondence. The document
type is not controlled by the new solution. Only the original solution can
modify the document type.
The last option concerns assets in a solution folder.
Copy other document or folder assets.
This option is useful if you decide to store any solution assets that are not
defined in Case Manager Builder or Process Designer in the solution folder.
This option duplicates those objects from the original solution folder to the
new solution folder. The restriction is that only base folder and documents are
copied.
5.4 IBM Case Manager Builder
IBM Case Manager Builder is a web application tool that is designed to create
and deploy solutions.
For more information about how to create a solution in IBM Case Manager
Builder, see the following resources:
Chapter 6, “Designing case management solutions” on page 179
Chapter 8, “Building a simple solution: Part 2” on page 267
Starting from IBM Case Manager V5.2, Case Manager Builder supports multiple
users editing a solution. Multiple developers can build different parts of a solution
at the same time. Designing in multiple user mode speeds up the solution design
process and enables solution developers to make effective use of their
development team.
Remember: If you use existing document types, you must track solution
migration and deployments. A copied solution that reuses document types
must be deployed after the original solution.

Chapter 5. IBM Case Manager tools 167
5.4.1 Multiple user solution development in Case Manager Builder
Case Manager Builder supports multiple users editing a solution at the same
time. This allows multiple users to design different parts of the solution
concurrently.
When a user edits a solution element, such as a rule, that element is
automatically locked with the user’s ID. The lock protects the element from being
modified by a second user until all of the first user’s changes are complete. When
a user completes their modifications, they must commit their changes to release
the locks. The commit operation makes the changes part of the released solution
definition.
The save and close operation allows the user to save their work and exit their
editing session without losing their work. Changes are not included in the
released solution and the locks remain in place until the Commit operation occurs
(see Figure 5-48). This allows for deployment of the solution while portions of the
solution are edited.
Figure 5-48 Commit the changes to a solution
Administrators can remove locks by using the Case Administration tool
(http://<host name>:<port>/navigator/?desktop=icmadmin). Removing the
locks releases the solution element for editing and discards the associated
updates.
The commit operation promotes the edits to the solution, which results in new
versions of the solution objects and releases the locks. After the commit is
complete, the changed solution elements are included in the next deployment.
Note: Not only is it a good general security practice, developers should always
use different user accounts. If they share an account, unexpected results can
occur if the users do not coordinate resulting in changes being committed
before they are completed.
168 Advanced Case Management with IBM Case Manager
Solution assets that can be edited in parallel are in the following categories:
A user can create and modify pages in the page designer.
A user can create and modify rules in rule designer.
A user can create and modify views in view designer.
A user can create and modify task workflows in step designer.
A user can create and modify the following solution definition assets:
– Properties and choice lists
– Document types
– Case types including case folders, case search, and case summary view
– Solution description and solution icon
A user can create and modify the following workflow system configuration
assets:
–Roles
– In-baskets
5.4.2 Solution assets
Solution assets are associated with specific configuration files. An IBM Case
Manager solution contains the following assets:
Solution Definition File (SDF): Contains solution objects, such as properties,
choice lists, document types, case types, and tasks.
Process Engine Configuration File: Contains workflow system objects, such
as roles, in-baskets, and rosters.
Solution Workflow Collection (Global) XPDL: Contains the reusable Content
Platform Engine workflow definitions. Existing Content Platform Engine
workflows can be selectively imported into the collection.
Case type XPDLs: Case type XPDL contains workflow definition for each
case type.
Pages folder contains one file for each page that is defined in a solution.
Rules folder contains one file for each rule that is defined in a case type.
Views folder contains one file for each view definition that is created in a case
type.
In addition to these assets, the following assets are added to support multiple
user editing:
Solution locks object: Contains the lock information for a solution.

Chapter 5. IBM Case Manager tools 169
Case type XPDL draft object: Each case type XPDL has a draft object to
maintain its draft content. This object is name as <case type symbolic
name>_Draft.
Global XPDL draft object: Global XPDL has a separate draft object to
maintain its draft content. It is named as Solution Workflow
Collection_Draft.
All the assets of a solution are shown in Figure 5-49.
Figure 5-49 Solution assets
5.4.3 Solution lock and draft object
The solution lock and draft object are introduced in IBM Case Manager 5.2 to
support multiple user editing in the Case Manager Builder. The solution lock
object is created when a user is editing a solution artifact. The solution draft
object stores the assets information before the solution is committed.
Solution locks
When a user edits, adds, or deletes an asset in the Case Manager Builder, the
respective asset file is locked for the user and a solution lock object is created for
the solution. A solution lock object stores the lock information of all the assets in
a solution. Solution locks object files are created under the solution folder and is
a subclass of the Solution Lock Control custom object.
After an asset is locked by the user, other users who edit the solution can see the
associated assets in read-only mode. The solution locks are stored in an XML
format inside solution locks object. Each lock contains the following attributes:
type: Represents the object type, such as SDF, page, rule, view, and task.
resource: Contains the name of the asset that is locked.
displayName: Contains the display name of the asset.

170 Advanced Case Management with IBM Case Manager
lockedby: Contains the name of the user who locked the asset.
caseType: Includes the case type name to which the asset belongs. It is
applicable only for view, rule, and task object.
The structure of a solution lock object is shown in Example 5-1.
Example 5-1 Solution lock object structure
<?xml version="1.0" encoding="UTF-8" standalone="yes"?>
<lockArrayList>
<lock>
<type>0</type>
<resource>sdf</resource>
<displayName>Solution Definition File</displayName>
<lockedby>dave</lockedby>
<timestamp>2013-08-21T22:59:58.429Z</timestamp>
</lock>
<lock>
<type>1</type>
<resource>peconfig</resource>
<displayName>PE Configuration File</displayName>
<lockedby>dave</lockedby>
<timestamp>2013-08-21T22:59:58.548Z</timestamp>
</lock>
<lock>
<type>2</type>
<resource>CmAcmCASE_PAGE</resource>
<resourceId>CmAcmCASE_PAGE</resourceId>
<displayName>Case Details Form</displayName>
<lockedby>paula</lockedby>
<timestamp>2013-08-22T12:17:20.959Z</timestamp>
</lock>
<lock>
<type>5</type>
<resource>SRIXX_Task11</resource>
<displayName>Task11</displayName>
<caseType>SRIXX_CaseType11</caseType>
<lockedby>paula</lockedby>
<timestamp>2013-08-22T12:17:36.699Z</timestamp>
</lock>
</lockArrayList>

Chapter 5. IBM Case Manager tools 171
Locking the SDF
The SDF is locked when any of the solution objects that are stored in it are
locked, such as properties, choice lists, document types, case types, and tasks.
When a user adds, modifies, or deletes any of the SDF object, the SDF is locked
for that user. For example, when a user is editing properties in Case Manager
Builder, SDF is locked and other users can see the lock icon for all of the SDF
objects, as shown in Figure 5-50.
Figure 5-50 Properties that are locked by another user
Locking the Process Engine Configuration File
The Process Engine Configuration File contains details about roles and
in-baskets. When a user modifies any artifact that is stored in the Process Engine
Configuration File, the file is locked for that user and other users can view only
the configuration assets, such as roles and in-baskets.
Locking pages, views, and rules
Pages, views, and rules contain separate configuration files for each object.
When a user edits any of these objects, the respective assets are locked. Other
users can view only the basic asset information, such as name and description.
In the example that is shown in Figure 5-51 on page 172, a page Work is locked
by a user and it appears as locked to other users.
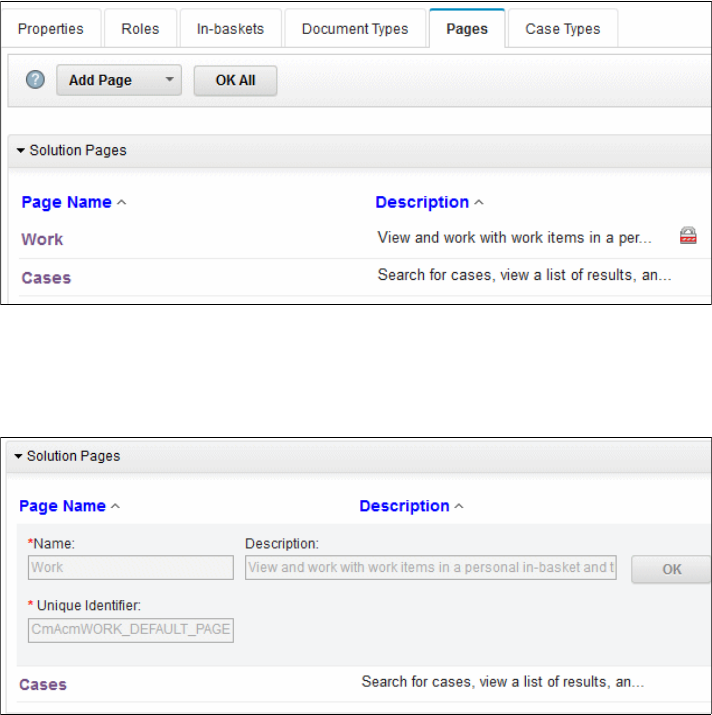
172 Advanced Case Management with IBM Case Manager
Figure 5-51 Page that is locked by another user
Page Work is shown to users in read-only mode. Users can view only the details
of the page, such as name and description, as shown Figure 5-52.
Figure 5-52 Read-only view of page that is locked by another user

Chapter 5. IBM Case Manager tools 173
An error message is shown to the user when the user clicks the page name to
edit the page content, which is locked by another user, as shown in Figure 5-53.
Figure 5-53 Error message that is shown on edit of a locked artifact
Locking tasks
Tasks are locked when the task workflow that is opened for editing is a step
designer or process designer. Other users can still open the locked task to view
the workflow in a read-only mode. A lock icon is shown to indicate that a task is
locked. Different users can simultaneously lock and edit different task workflows
under a case type.
Show locked objects
In IBM Case Manager Builder, users can click the Show Locked Items link from
anywhere inside the solution. Clicking this link shows the assets that are locked
by the logged in user and the assets that are locked by other users who are
editing the solution, as shown in Figure 5-54.
Figure 5-54 Show locked items link in Case Manager Builder

174 Advanced Case Management with IBM Case Manager
The locked item information window provides the details of the locked solution
artifacts, as shown in Figure 5-55.
Figure 5-55 Details of locked items
Draft objects
When user clicks the Save button in Case Manager Builder, it saves the changed
assets in their respective draft objects.
The following draft objects are available for different assets:
The draft object for SDF, PE configuration, page, rule, and view asset is their
respective CPE reservation object.
For each case type XPDL, there is a separate custom draft object. If the data
remains in the draft, it cannot be viewed by other users. Case type draft object
stores the draft workflows of the tasks in a case type.
The draft object for Global XPDL is Solution Workflow Collection_Draft,
which stores the draft content of the reused business process workflows.
Chapter 5. IBM Case Manager tools 175
5.4.4 Case Manager Builder save options
To support multiple users editing in Case Manager Builder, the save options were
updated in Case Manager 5.2. Users can see the following Save, Save and
Close, and Close buttons in Case Manager Builder to save a solution:
Save: This option saves the locked solution assets to draft or reservation
object for the logged in user. The user remains inside the solution and can
continue editing the solution.
Save and Close: This option works similar to save model. The logged in user
moves out of the solution and returns to manage solutions page in Case
Manager Builder.
Close: By using this option, the user can exit the solution and keep the items
in draft or reservation object. The user is prompted to save any unsaved
changes before returning to the manage solutions page in Case Manager
Builder.
5.4.5 Committing and deploying a solution
When the work to edit a solution is finished, users can commit the solution
changes and release the lock on all the modified assets. After the changes are
committed, the solution is ready for deployment and the user can deploy the
solution assets.
Committing a solution
When a user commits a solution, all locks that are owned by the user are
released. Assets that are locked by other users are not updated and remain
locked. When a user commits the changes, the draft changes are committed as
major versions into the respective configuration files. After they are committed,
the solution package files are available for deployment and for other users to edit
or view.
A solution change can be committed in IBM Case Manager Builder from the
manage solutions page. A commit link is provided for each solution to commit the
changes, as shown in Figure 5-56 on page 176.

176 Advanced Case Management with IBM Case Manager
Figure 5-56 Commit link for a solution
On commit, a confirmation window is shown to the user to provide the details of
the items that are locked, as shown in Figure 5-57.
Figure 5-57 Confirmation window that is shown to the user upon commit
Users can review the lock details and click Commit My Changes to commit the
solution changes.
Deploying a solution
If there are any uncommitted changes in the solution, a deployment confirmation
window is shown to the user when a user deploys a solution. The deployment
confirmation window shows the assets that are locked by the current user and
other users. Users can commit the changes before the deployment is performed.
Figure 5-58 on page 177 shows the deployment confirmation window.
Note: IBM Case Manager administration client can be used to unlock solution
assets that are owned by other users. For more information, see 5.3.6,
“Configure locks” on page 151.

Chapter 5. IBM Case Manager tools 177
Figure 5-58 Confirmation window that is shown to the user upon deployment
When a user deploys the solution, only the committed assets are deployed. The
assets that are locked by the other users are in draft mode and are not deployed.
For more information about multiple users editing the solution, see IBM Case
Manager Information Center and select Designing your case management
solution and application → Adding and deploying a case management
solution → Multiple user editing of solutions.
178 Advanced Case Management with IBM Case Manager

© Copyright IBM Corp. 2013, 2014. All rights reserved. 179
Chapter 6. Designing case
management solutions
This chapter describes how to design solutions with IBM Case Manager. It
covers the various approaches, alternatives that are available, and key
considerations. The Complaint Management example is used to show the design
process.
This chapter is intended to help the solution designer to plan and design a
solution. It describes design principles and gives an overview of the range of
tools and features that can be used to build an IBM Case Manager solution.
This chapter includes the following sections:
Business goals of a case management solution
Designing the solution
Creating the solution
Defining your solution
Configuring your solution
Customizing and integrating your solution
Documenting your solution
6
180 Advanced Case Management with IBM Case Manager
6.1 Business goals of a case management solution
The goals of the solution must be understood before you design it. The many
different types of case management solutions across many industries have their
own unique set of design goals. However, the following common goals are
associated with solutions that are built on the IBM Case Manager:
Support the knowledge worker to enhance the quality of the decision making
for each case
Provide faster, more accurate, and fair case resolutions
Collect all information that is related to a case, such as documents, activities,
and comments
Improve productivity by supporting a collaborative environment where
information can be securely and easily shared
Automatically start activities that are mandatory for the case
Automatically start tasks according to predefined conditions or events
Allow the case worker to start other optional tasks or add new tasks when
needed
Provide a framework in which all of the tasks that are related to a case can be
started and tracked together in the context of the case
Provide auditing information about how case outcomes were determined
Allow the case worker to search for cases that are based on categories, data
ranges, document content, and so on
Allow the case worker to search for ongoing and historic cases
Support the use of analytic tools that can help to gain insights from past
cases and mitigate risks and reduce fraud
Improve agility by using business rules for decision support
IBM Case Manager provides many capabilities and tools that can be used to help
meet these goals when you design a solution.
Chapter 6. Designing case management solutions 181
6.2 Designing the solution
This section describes various topics that are related to designing case
management solutions.
Before you design a solution with IBM Case Manager, you should have a basic
understanding of the IBM Case Manager components and data model. For more
information about the components, see 3.3, “IBM Case Manager components”
on page 42. For more information about the data model, see 4.1, “IBM Case
Manager object model” on page 71.
Consider reusing an existing solution template and then using your new design
as a template for future solutions. For more information about solution templates,
see the following sections:
5.3.2, “Creating solution templates” on page 141
5.3.3, “Using solution templates” on page 143
5.3.4, “Exporting and importing a solution” on page 146
6.2.1 Agile and iterative methodologies
One of the most common problems in developing a solution for users is the
inability for the user to evaluate and validate the solution before it is completed
and deployed. This problem is magnified when you are working with knowledge
workers who have an intimate knowledge of the business process and how it can
and must be completed. Previous applications were often built by using the
traditional waterfall application development methodology. This approach fails to
manage the growing complexity and variation of case management solutions. In
that approach, requirements are gathered statically and dictated by the
capabilities of the technology.
IBM Case Manager provides a rich set of tools that allows solutions to be rapidly
prototyped and reviewed by the users. The complete initial case definition can be
quickly prototyped and provided to the users in a development environment for
direct interaction and feedback. They can have hands-on access to the case
data, documents, and the tasks. Feedback can be directly modified in the Case
Manager Builder tool, which provides continued refinement of the user interface.
Iterative methodology helps ensure that the requirements are more inline with
what the business requires. It also provides early feedback on what the system
looks like and how it behaves. Providing early access to the solution interface
provides earlier confirmation of the approach and increased positive adoption of
the solution by users.
182 Advanced Case Management with IBM Case Manager
Agile and iterative methodology allows the creation of flexible systems that
handle adversity and can be delivered in multiple phases. This is a general
statement about this approach because individual projects and organizations
vary on how they approach projects and the implementation must best serve the
solution.
6.2.2 Case design
Case design is the first part of all case management projects, and the most
important. A clear and precise definition of what the case is defines all other
aspects of the solution. The tasks, document types, rules, and reports are all
created and used to support the case. Thus, the identification and definition of
the case is crucial.
The definition of the case is not always an easy process nor is there a single right
answer. The case must be defined in a way that can be applied to the business
process and business goal. Sometimes a case, such as a claim, can be easily
identified. Sometimes, it might not be so easy to identify what is a case. In
general, a case is a business entity that has an identifiable beginning, lifecycle,
and end. It often is the focus of a business process that all users interact with and
reference. Common case types include a loan, account, policy, and claim. The
more clearly defined the case is, the easier it is to find the attributes of it.
It is often the situation that a solution requires multiple case types. A good
approach is to identify cases as they align with the overall business processes
and lifecycle. An example of this can be seen in the banking industry where the
underwriting process represents one case that completes by generating another
case, the loan.

Chapter 6. Designing case management solutions 183
After the case is identified, the next part is to obtain the data around it. This data
can come from various sources, as shown in Figure 6-1.
Figure 6-1 Multiple sources for case data
As shown in Figure 6-1, the case can interact with that data at any point within
the case’s lifecycle. The identification of the interaction points and the timing of
the data are part of the design of the case. The case data addresses the
following questions:
What data is needed to complete the case?
What data or systems must be aware of the case’s progress?
From which systems does the case need data?
What key performance indicators and other reporting metrics are needed
against the case?
What systems act as the system of record for the data?
What synchronization is needed with the case management solution and the
system of record (assuming the case management solution is not the system
of record)?
6.2.3 Task design
The key concept of case management design is to understand what the various
pieces of work in the overall business process are. You can then define them as
separate tasks, which become part of the case worker’s tool set. The way to
identify these tasks is by looking at how a case can be completed.
184 Advanced Case Management with IBM Case Manager
A good place to start is looking at the checklist of activities that the knowledge
worker uses to know that a process is completed. It is important to explore all of
the activities that might occur within the lifecycle of the case and under which
conditions they do occur. It is desirable to generate as complete a list as possible
of all of the activities that might occur in a normal process, even those activities
that occur only occasionally but can be defined. Look for verbs in requirements to
represent discrete activities that can be mapped to an implementable task.
After the activities are defined, work with users to understand the following
information:
How a user interacts with the tasks.
When and why the tasks are needed or defined.
How and when these tasks must be started.
Who works on the tasks.
Any dependencies among the defined tasks.
Tasks whose start can be determined by system or document events can be
configured to start automatically. Those tasks that are started by the knowledge
workers are available to the case worker who can decide whether and when they
are begun.
A task in IBM Case Manager is implemented as a workflow process fragment. A
case can have many tasks that are associated with it. Each task involves a
fragment of the work that is necessary to complete the case with one or many
steps and one or more participants. The tasks can be run in sequence, parallel,
independent of each other, or in relation to each other. IBM Case Manager tracks
all the tasks in the context of its case. When you design a case management
solution, some of the main design decisions are related to the definition of tasks.
Common questions include: How do you decide how to break down the
necessary work into tasks? Is it better to have bigger tasks that handle larger
segment of work, or many smaller tasks? These questions do not have a single
answer but there are guidelines that can be followed in determining what is a
task. The primary driver is the overall business process that is supported and the
logical breakdown of work within the process.
A task typically has a clear start event (either system or user) and a defined
completion. A typical approach to defining tasks is to limit them to no more than
3 - 5 user steps whenever possible. It is best to try to limit the complexity of
individual tasks and use preconditions to manage task order rather than build
large complex tasks. This provides greater flexibility within the solution and
greater adaptability to changing business needs.
Chapter 6. Designing case management solutions 185
The following common situations tend to work well when they are modeled as an
IBM Case Manager task:
You have a defined activity within the lifecycle of a case and can determine
the specific event that triggers the initiation of the task. These tasks often
represent the key activities in the ideal process lifecycle of a case.
You must start work when an event happens and that event can occur at any
point in the life of the case.
A set of work must be completed, but there is no particular defined sequence
in which they must be carried out. This situation is commonly modeled in
business process management tools as a star or spider-shaped process
diagram. Each branch can be defined as an all-inclusive set of multiple tasks.
This requires that when one task is started, each task must be complete for
the case to be completed.
Decisions and workflow paths are too numerous or complex, and it is simpler
to allow knowledge workers to decide whether the work is needed.
Defining a long complete sequence of work, such as in a business process
management process, that identifies every decision, event, and exception is
too involved. Instead, define several tasks, and allow the knowledge worker to
decide which tasks must be carried out and when.
Workflow paths that depend on various factors that are not known at the time
of case creation. These can be defined as discretionary tasks, which give the
knowledge worker control.
6.2.4 Case documents
A case almost always includes documents or some form of content. These
documents can directly and indirectly support the case. Most content is in the
form of documents that arrive throughout the lifecycle of the case, some of which
help instantiate a case or tasks and others that are there for support. Content can
take nearly any digital format, including forms, audio, images, and video. When
you design the document types for a case solution, all of these types must be
accounted for. The document type represents the classification of the incoming
content and defines the data that is applied to documents of that type.
Forms also play a role in what is considered content within the system. A form
can be a set of data or help to visual a set of data. The differences here can have
some impact on design. Forms that are used for a user interface construct must
exist at design time to ensure that it is part of the solution package and to tie it
within the user interface. Outside of these design considerations, the rest of the
design follows a typical Enterprise Content Management focus. Document types
are displayed within the case. They have properties and security that must be
implemented.
186 Advanced Case Management with IBM Case Manager
6.2.5 Business rules
Within the scope of the case management solution, business rules can be
implemented. These business rules are implemented in areas that allow for a
more dynamic and flexible solution. Although it is common in the first
implementation to not include these rules, they provide a way to separate
repeatable or frequently changing business logic outside of the task workflows.
Business rules are outside of the tasks that allow for the rule inputs and outputs
to be defined independently of the task workflow. The detailed decisions that
affect a task routing to be encapsulated within a rule can be called from a single
step or multiple steps rather than increase the complexity of the tasks workflow.
With the rules being defined externally to the tasks, the same rule can be applied
to multiple tasks within a case and modified as needed without requiring the
updates to be made to all tasks. After rules are defined, they help ensure
consistency and accuracy when data is involved.
6.2.6 Modeling how cases are created
When you design a case management solution, consider how the cases are
created. This process depends on the specific application. You can create a case
in the following ways when you are using IBM Case Manager:
Manually through user action
A case worker can actively add a case by using the default add case page. By
using this page, the user can enter the case properties directly on the page
and create the case.
Created when a specified document is created or added
A particular document type can be defined to be the initiator of a case. When
a document of this type is created, the system automatically creates a case. It
then passes the document metadata to the case properties and files the
document into the case folder. For example, an insurance application
document might automatically create a case. In addition, other users can
access a form that can be used to create the case. For example, an online
complaint form might be used to create a case. This form is saved as the
document type that was defined to initiate the case.
Chapter 6. Designing case management solutions 187
In a workflow or task process
A case can be created within a workflow process that is part of the case,
within a task, or an external workflow. By using the ICM_Operations
component queue, a workflow process can use the
createCaseUsingSpecifiedCaseType operation to create a case. For example,
a loan application process can start a case to investigate a potential fraud
situation.
Programmatically
A case can be created programmatically by external systems in one of the
following ways:
– By using the IBM Case Manager model layer set of JavaScript toolkit API.
– By using the Case Representational State Transfer (REST) application
programming interface (API).
– By using the Content Management Interoperability Services (CMIS) REST
API interface. External data services are not started when you use the
CMIS REST interface.
– By using the Java/.NET/Web Services Content Platform Engine API
interface.
6.3 Creating the solution
Creating a case management solution involves the following key levels of effort to
build. These levels provide different degrees of complexity and detail but allow for
a usable solution to be rapidly developed and made available for customer
review. After the requirements and overall approach to the solution are designed,
this approach can be used to develop the complete solution that is deployed.
This represents one approach to building a solution and does not cover all of the
capabilities that are available within IBM Case Manager. This is intended to
provide an approach and starting point to building complete solutions:
Defining the solution with Case Manager Builder
The initial solution can be defined entirely within Case Manager Builder. This
initial level provides a solution that can be presented and tested by the users
to evaluate the core case definition foundation. The properties, roles,
documents, and tasks are available to evaluate. This process can be repeated
several times to refine the initial definition and clarify business requirements.
The resulting solution generally results in a prototype but can represent a
complete solution for simpler business cases.
188 Advanced Case Management with IBM Case Manager
Refining the solution by using more advanced configuration
Other tools that are available within IBM Case Manager provide the ability to
further enhance the initial definition by using other available functionality. After
the core definition is completed, the solution can be further extended through
configuration to provide more detail and specific functions that are required.
This can be accomplished through configuration by using more advanced
tools, such as Process Designer, without the need for coding.
Customizing the solution by using custom code
Most real-world implementations require a degree of custom development
that in most cases involves connectivity to external data sources. Separating
this development from the definition and configuration allows for it to be
managed separately and in a more traditional development approach. The
custom developed pieces can then be added to the existing solution when
they are completed and then the complete solution is deployed.
The more functionality that can be included through definition and configuration,
the easier the solution is to develop and maintain. Utmost effort often is made to
meet requirements through definition and configuration. Not all customization
can be eliminated, but the flexibility of the tools that are included in IBM Case
Manager can reduce this effort.
6.4 Defining your solution
The goal of the definition activities is to rapidly create a solution that can be
presented to users and updated based on feedback by using the Case Manager
Builder tool. This process can be repeated several times before it is moved to
configuration as multiple prototypes. The resulting definition provides the
fundamental structure of the solution, including the data model and tasks without
the need for any programming or scripting.
For more information about the IBM Case Manager data model concept, see 4.1,
“IBM Case Manager object model” on page 71.
The definition of the solution normally involves direct participation by the
line-of-business experts and representatives of each of the roles within the
solution. These experts have in-depth knowledge of the overall process and how
the defined solution fits their needs. Applying their feedback to subsequent
iterations of the definition results in better alignment with the needs and goals of
the project.
Chapter 6. Designing case management solutions 189
6.4.1 Defining case properties
The solution properties are used to describe and identify each case for search,
processing, reporting, and auditing purposes. The defined properties also are
used to define the properties that are applied to document types. Solution
properties are available within the Content Platform Engine object store and are
available for reuse by other solutions. The use of existing properties enables the
solution developer to maintain a uniform document taxonomy for all solutions and
items that are defined within the solution.
For each property, the following information must be provided:
Data type (string, Boolean, date-time, float, or integer)
Single value or multiple value
Optionally, the following information can be provided for a property:
Maximum length (string) or minimum or maximum value (integer)
Default value
Choice list (integer and string)
6.4.2 Defining case types
Each solution in IBM Case Manager can have one or more case types. A case
type is made up of properties, views, folders, and tasks. It is a specific instance
type of the overall case that was defined. The Case type is a level of
encapsulation of the overall case into a specific business case. Each case type
that is defined in a solution shares the following resources with other case types:
Pool of properties available in the solution
Document types in the solution
Roles and in-baskets that are defined in the solution
6.4.3 Defining document types
Each solution has zero or more document types defined. Document types are
defined within Case Manager Builder, and can have properties that are
associated with them from the list of available properties in the solution. Default
document types are available in the Content Platform Engine object store.
Reusing document types allows the solution developer to maintain a uniform
document taxonomy for all solutions.
Document types also include documents that are stored as structured form data
objects.

190 Advanced Case Management with IBM Case Manager
The Complaint Management solution example has the following document types:
Correspondence: Triggers a task for document approval before it is mailed to
the complainant
Supporting Document: Used for any other document that is filed into a case,
such as an email or scanned in letter
6.4.4 Defining roles
Roles are representative of the types of individuals or groups of individuals that
perform actions within the solution. Create a role for any functional group or type
of user that acts as a participant in a task. In addition, roles can be defined for
non-active task participants who can interact with the cases.
6.4.5 Defining in-baskets
In-basket definition creates a base in-basket configuration. Each role has a
shared work queue and a single in-basket for that queue. When you define the
in-basket, you set up the properties that display, the ability to sort, the default sort
order, and any filter options. All work that is assigned to this role within the task
map that was created in Step Editor goes to these shared work queues. The
work is presented in the in-baskets that are defined in Case Manager Builder.
6.4.6 Defining pages
Page definition provides an opportunity to modify the default page layouts within
Case Manager Builder to meet the overall page structure that is wanted within
the solution. The Page Designer gives extensive control over the design of the
user interface. In the initial definition, it is effective to modify only the existing
pages to provide a baseline design of the overall solution.
Page layout changes can be made within the configuration of the solution. The
goal of the definition is to establish the core case and flow of the case rather than
focusing on the details of the user interface. The page modifications within the
definition can be limited to the widgets and their layout on the default pages.
Remember: Not all documents that are stored in cases by the users must be
identified as a solution document type. Any document in the system can be
stored in a case folder. However, those document types that trigger case
creation, start tasks, or have specific meaning and purpose within the solution
must be identified in Case Manager Builder.
Chapter 6. Designing case management solutions 191
6.4.7 Defining case types
One of the key aspects of the initial design is the identification of the case types.
It is here that those cases are defined. Within the solution, each of the case types
are defined within Case Manager Builder. The properties, views, folders, and
tasks for each case are defined for that case. Each case type that is defined in a
solution shares with other case types:
Pool of properties available in the solution
Document types in the solution
Roles and in-baskets that are defined in the solution
6.4.8 Defining views
There are three primary views available within a case definition. The Case
Summary view contains the properties that are returned from searches and
included in the summary view of the case. The Case Search view identifies the
properties that are available to search for a case.
The Properties Layout view provides the ability to define how properties are
presented to users when they process a task step or open a case. In the
definition of the solution, the initial view of the case properties is laid out and
applied to the Properties widget of the appropriate pages. The flexibility of the
Properties Layout view reduces the need to use forms to present case and
workflow properties to users. More views can be refined and adjusted within the
configuration to create task step or role-specific views.
6.4.9 Defining tasks
The definition of the tasks often is the most time-consuming portion of the overall
case definition. The tasks and the activities they perform are outlined in the
design must be defined at this point. The name, type, preconditions, and process
flow are set for each task. Each task often is given a name that provides the user
with a general description of what the task does. The name of each task often
starts with an action word, such as “Review”, “Perform”, “Assess”, and “Update”.
After the task is named, it is necessary to define the characteristics of the task
and how it starts, whether it is required, visibility, and preconditions.
How tasks are started
A task can start automatically based on an event that is occurring within a case.
When a task is set to start automatically, it starts when the defined preconditions
are met (if there are any) without the need of user actions.
192 Advanced Case Management with IBM Case Manager
A task can be started manually by a user. Manually started tasks are created
when the preconditions (if there are any) are met. After a manual task is created,
a user can start or disable the task.
Discretionary tasks are tasks that do not have preconditions and are based on
the decisions of the user when to create these tasks. These tasks are often the
activities that are most variable and require the expertise of the knowledge
worker to determine when they need to run rather than an easily definable
condition.
Required tasks
This type of task is one that the case state cannot be set to completed until this
task is completed.
Hidden tasks
Defining a task as hidden still allows a task to run and perform all of its actions,
but the task is not visible to users when the list of tasks that are running within the
case is reviewed. The most common use for hidden tasks is for background tasks
that perform automated processes, such as data synchronization from other
systems.
Preconditions
For automatic and manual tasks, it is necessary to define the business
preconditions under which that task is created. When a task is set with no
preconditions, it is created at the same time that the case is created. For tasks
that can run only after the case is created, the preconditions must be defined.
Task preconditions can be evaluated based on the filing of a document within a
case or under the conditions of a property being set or changed. The condition is
evaluated when the defined event is met. Defining preconditions that are based
on the combination of document arrival, multiple property changes, and property
values provides the ability to meet most business needs in defining the
conditions under which tasks are created. The following condition evaluations
can be defined:
A document is filed in the case.
This condition allows for the definition of which document types create the
task. It can be defined to occur when any document type is filed within the
case or from the list of document types that are defined within the solution.
When the expected document types are filed within the case, any other
property conditions that were set are then evaluated.

Chapter 6. Designing case management solutions 193
A property condition is met.
This condition evaluates the value of the specified case property and creates
the task when the defined property conditions are met.
A case property is updated.
This condition allows for the evaluation of a set of property conditions when
there is a change to one or more selected case properties.
Repeatable
Tasks with a document that is filed and property condition is met can be set as
repeatable. A repeatable task is one that can be run more than once in the
lifecycle of a case and must run when the precondition is met.
Table 6-1 shows the task types, their characteristics, and the use cases.
Table 6-1 Task types comparison
Task type Characteristics Use cases
Required
Automatic
Started by:
System
Repeatable:
Ye s
A workflow that runs when the case is created. It
must be completed.
Required
Automatic with
property
preconditions
A workflow that runs whenever a property
condition is met when the case is created or after
a property value changes. It must be completed.
A user can start the workflow by updating the
case properties to meet the preconditions.
Optional
Automatic with
property
preconditions
Same as required automatic, except this task
does not have to be completed to complete the
case.
Required
Manual
Started by:
User
Repeatable:
Ye s
A workflow that runs when a user starts it. It must
be completed.
Required
Manual with
property
preconditions
A workflow that runs when a user starts it. It must
be completed.
A user can start the workflow only if the
precondition is met.
Optional
Manual
A workflow that runs when a user starts it. This
task does not have to be completed.
Optional
Manual with
property
preconditions
When the precondition is satisfied, the user can
start the workflow. This task is the same as
optional manual, but has property preconditions.

194 Advanced Case Management with IBM Case Manager
The use of all-inclusive and mutually exclusive sets
An all-inclusive set is a group of tasks in which if any of the tasks in the set is
started, all of the tasks must be completed. An all-inclusive set is a way to
designate a group of tasks as having to be completed for the case to be
completed.
All-inclusive sets form a simple abstraction of parallel and required work activity.
In practice, all-inclusive sets are often used with a group of optional manual
tasks. When a user starts or disables one of the tasks, the other tasks in the
group also must be started or disabled.
Mutually exclusive sets are groups of tasks in which only one of the tasks within
the set can be run within the lifecycle of the case and starting any of these tasks
disables the remaining tasks.
Task steps
With the task properties and preconditions set, the focus can shift to defining the
underlying workflow of the task. This is where all of the users steps of the task
are to be defined and placeholders for system steps can be created. The focus of
the task workflow definition is to identify the role, decisions, and properties of
each user step of that task’s workflow.
When a
document of a
certain type is
added
precondition
Started by:
System or user
Repeatable:
Ye s
A required, optional automatic, or manual
workflow process that runs when a document of
a certain type is filed in the case. If the task is
flagged as repeatable, every document of that
type that is received starts the workflow.
When a
document of
any type is
added
precondition
A required, optional automatic, or manual
workflow process that runs when a document of
any type is filed in the case. If the task is flagged
as repeatable, every document that is received
starts the workflow.
User created
task
(discretionary)
Started by:
User
Repeatable:
Ye s
A predefined workflow that is started by a user
where the user can name the task and supply
the start parameters. These parameters include
case properties, user or workgroup assignment,
and documents to attach to the workflow.
Task type Characteristics Use cases
Chapter 6. Designing case management solutions 195
6.5 Configuring your solution
This section describes the features, benefits, and considerations of the advanced
configuration capabilities that are available with IBM Case Manager.
As in defining the solution, the capabilities that are outlined in this section require
no coding or scripting. A good understanding of the IBM Case Manager
architecture is needed. Many capabilities that are outlined in this section are
available by using enhanced capabilities of the Case Manager Builder and the
IBM FileNet Process Designer to make direct modifications to the solution. Other
configuration capabilities are available by using other products that are bundled
with IBM Case Manager
6.5.1 Advanced in-basket configuration
When the solution was defined, a single in-basket was created for each of the
roles that were created. In a real-world environment, a greater division of work is
needed and more in-baskets can be defined to further separate the work within a
queue. You can use the Process Configuration Console through Process
Designer to configure more in-baskets in IBM Case Manager. Each extra
in-basket that is configured for a role is displayed as an extra tab on the Work
page.
The added in-baskets are configured to define the properties and work items that
are returned to the user. In-baskets are configured to provide the following
specific presentations and capabilities of the work queues or inbox:
Adding system fields as columns
Fields that were not defined in the Case Manager Builder but are available in
the system and can be added to the work queue and in-basket as columns.
The use of pre-filtered, sorted in-baskets
Different views of work queues can be displayed to a user or role by
configuring more in-baskets that contain pre-filtered, sorted work items.
Setting the order of in-baskets
The order in which in-baskets are displayed in the Case Manager Client can
be configured.
196 Advanced Case Management with IBM Case Manager
Definition of properties that can be filtered by the user or through widget
wiring
In addition to allowing users to filter work items for search purposes, filter
definitions can be wired with other widgets to enable a runtime filtering
capability. This runtime filter allows the solution designer to create in-baskets
that present the worklist for users filter for their specific context within the
application. As an example, a user might select their role and geographical
region and see only in-basket work items that pertain to that geographical
region.
Multiple in-baskets per role
Having only one in-basket per role is often a limiting factor for solutions and
makes it more difficult for users to find their work or determine which work to
select. More in-baskets can be created and assigned to roles within the same
queue to provide the ability to group work in the manner that the business selects
and processes work
.
In-baskets from multiple queues
In-baskets from multiple queues can be associated with a role. This allows a user
to access various work from a single role. This is often used to provide
supervisors or managers direct access to the same in-baskets as the roles that
they manage.
6.5.2 Advanced property layout views within a case
The initial property layout view that is built in the definition provides a starting
point for presenting case properties when a user opens a case or a task work
item. When you examine the advanced configuration of the property layout views,
views often are created for the following ways in which users can view the case:
Hide fields on case details pages
There are often instances where there is a need to show only a portion of the
case properties or adjust the properties that are shown for specific roles.
Property layout views allow for the configuration of varying displays of case
properties and the ability to select the properties that are shown.
Make case properties read-only on case details pages
Each field within a property layout view can be set as read-only. This allows
control over which properties can be changed by users when a case is
viewed. This functionality extends to individual property control at the case
detail page level.
Chapter 6. Designing case management solutions 197
Enhance field level flexibility
Individual properties can be further controlled by applying formatting
definitions to the fields.
6.5.3 Configuring pages for advanced user interfaces
Most case management solutions must provide different views of the case and
work items that are based on the user’s role or the step that is being processed.
Multiple page layouts must be configured to meet these requirements. The Case
Manager Builder interface provides business analysts and solution developers
with the ability to modify and configure pages. This configuration can be the
modification of an existing page or the configuration of a new page. After the
pages are configured, they can be associated with the following different roles for
case details pages or workflow steps for work details pages:
Case views that are based on user’s role
Specific views that are based on workflow steps
Task-specific start step pages
Additional widgets on the work and case pages
With the ability to copy or create pages that are used within different portions of
the case, it is common for these pages to have different layouts or contain
different widgets. When pages are configured for each role or step, the widgets
that are chosen for the page and their configurations often are based on the
primary functions that the user is performing on the page.
Advanced widgets, such as the case visualizer or custom widgets that are
developed for Case Manager, can extend the functionality that is available in the
configuration of pages.
6.5.4 Advanced task configuration
The use of Case Manager Builder with FileNet Process Designer to configure
solutions is known as
round-tripping. The solution designer goes back and forth
between Case Manager Builder and FileNet Process Designer to use the most
advanced functions. This configuration is an important aspect of building
solutions with IBM Case Manager. For more information, see Chapter 12,
“Advanced solution topics” on page 453.
For more information about capabilities that are available within the FileNet
Process Designer, see Introducing IBM FileNet Business Process Manager
,
SG24-7509.
198 Advanced Case Management with IBM Case Manager
Advanced routing
Case Manager Builder allows the business analyst to assign responses to routes
in the process. It is common for workflow routing to be dependent on workflow
and case properties in addition to (or in some cases, instead of) a response by a
user. By using Process Designer, routes can have broader and more complex
branching calculations.
Updating case properties
Case properties can be updated directly by the workflow by using an Assign
system step. The following actions within the workflow process and the results of
system steps and actions can directly modify the case properties:
Gathering data from other systems
Case properties can be populated with data from other systems. Workflow
processes can obtain this data by using dbexecute system steps, other
system steps, Web Services steps, or custom component integration
operations.
Sending case data to other systems
When data from the case management solution is required by other systems,
tasks workflow processes can send case data by using the built-in Web
Services capabilities.
Defining custom workflow parameters
Case properties live within the case and are available to all tasks and activities
that interact with the case. When there is the need for properties that are only
needed within the context of the task and are not needed after the task is
completed, they are configured as custom workflow parameters. This
configuration defines the temporary properties or properties with a limited scope
of focus within the task.
These properties can still be available to the user at each of the individual user
steps of the workflow process and used in In-baskets to present the data to
users.
Running ICM_Operations
IBM Case Manager includes ICM_Operation component functions that provide
advanced case interactions that can be used within task workflows. These
functions provide many of the common case interactions that are performed by
the system as a workflow runs.

Chapter 6. Designing case management solutions 199
ICM_Operations also includes the function to run the rule operations. The Case
Manager Builder Step Editor provides the ability to add a rule step to the
workflow but the Process Designer must be used in cases where custom
parameters must be passed into the rule.
Performing system and component steps
In Case Manager Builder Step Editor, placeholders can be added to the workflow
to represent system activities that are needed within the process. Within Process
Designer, you can configure the activities that those steps perform. These steps
can be system steps or component steps that offer various automated
functionalities to enhance the workflow.
Working with document attachments
Document attachments provide a way of highlighting key documents that are
associated with a task and the ability to update and modify the document as
needed. By using the standard ICM_Operations, a task that starts when a
document is filed in the case can file the document in a specified location of the
case. CE_Operations can be used to modify the document and update any
necessary properties.
For more information, see 11.2, “Automated handling of ingested documents” on
page 413
6.5.5 Using forms to enhance user interfaces
Forms in IBM Case Manager are used to extend the available data collection
capabilities. Although the property view layout features significantly reduce the
need to use forms, they are not eliminated completely. There are certain
situations where forms can be used to extend the functionality of a solution. The
property view layout designer has reduced the need for forms within Case
Manager solution, but there is still instances where the use of forms is a benefit.
IBM Case Manager supports FileNet eForms and IBM Forms. Form templates
use the available forms design, templates, validation, and runtime scripting
capabilities. This section outlines these capabilities.
Remember: Each form product has its own unique user interface functions
and features. For example, IBM Forms supports dynamic forms. These forms
allow the visibility of form fields, controls, and sections to be controlled that are
based on pre-filled data and field value entries, such as property information.

200 Advanced Case Management with IBM Case Manager
Forms in IBM Case Manager provide the following functions:
Dynamic forms interface
Forms to create or edit form data objects in cases
Form policy-based operations to create cases
Dynamic forms interface
A typical presentation to the user provides a static view of the case properties.
There are times when there is a need to dynamically present the properties that
are relative to the values of other properties. For example, when a Boolean
property indicates whether an address was collected, you might want to show
those address fields and not show them when the property is false. This is one
example of how a form might need to be dynamic.
Form to create or edit form data objects in cases
A form template can be attached to a workflow and presented to the user within
the Form Widget. When a form is presented this way, the template and the form
data are filed within the case as a document. This form data object can be
accessed like any other document within a case.
Form data objects can be extended to provide more business object functionality
by extending the form data object class. This extended object class can be
configured to use case properties, such as enabling normalized data collection in
the case. The extended form data object class can be added to the solution to
allow you to define its uses in the solution. This method is useful for collecting
structured data objects that are to be used for analysis and reporting purposes.
Form policy-based operations to create cases
The following techniques can be used to create cases by using a form policy:
By using a form document policy, a form can be used to create a form data
object. This object is designed as the Starting document type for a case type
in the solution.
By using a form workflow policy, a form can be used to start a workflow
process that runs any number of process operations. These operations can
include the creation of the case folder by, for example, having a step in the
process that calls the createCaseUsingSpecifiedCaseType operation in
ICM_Operations.
Tip: These techniques do not require users to be logged in to IBM Case
Manager to create cases. For example, links to these form policies can be
published to a portal where users can complete a form to start the case.
Chapter 6. Designing case management solutions 201
6.5.6 Providing users with custom tasks
In many case solutions, it is not possible to define every possible task that might
occur in the lifecycle of a case. When it is common that there are variations in the
types of tasks that are run or it is difficult to clearly define those tasks, custom
tasks can be activated for the solution. By using custom tasks, users can create
ad hoc tasks that define the tasks flow at run time.
Great care must be used when this functionality is provided so that overuse and
the resulting avoidance of the use of defined tasks by the users is avoided. It is
recommended that this functionality is provided only to advanced knowledge
workers and carefully tracking is done by using reports and analytics.
6.5.7 Configuring the security definitions
The configuration of case security uses security modeling that is part of the Case
Foundation Platform. Case Manager solutions have several areas of
consideration for security. Some are managed within the Case Manager Builder
while others require Administration Console for Content Platform Engine.
The following aspects of security definitions must be considered when you set up
your production environment:
Case Content security
Role security
Page security
Case content security
Each case type is defined by a corresponding case folder class in the target
object store. This class can be modified to deny users and groups permission to
the case instances. Modify the default instance security of the case folder class
with the Administration Console for Content Platform Engine.
Setting the appropriate security on the case type class, case folder class, and
task classes controls who has permissions to those objects. These permissions
include creating cases, accessing case information, creating tasks, and other
actions.
Security also can be set on the document classes that are associated with a
case type. Each document class that is defined within Case Manager Builder
creates a corresponding document class when it is deployed. Access to these
document classes can be controlled as any other content object.
202 Advanced Case Management with IBM Case Manager
Role security
Role membership is controlled through the management of roles within the Case
Manager Client. When a page is configured to include the Manage Role button,
users with access to that page can associate users of groups with the roles that
are defined for the solution. This configuration controls the list of roles that are
available to a user and the queues that are associated with those roles.
More detailed security can be applied to roles and queues by using the Process
Configuration Console.
Page security
Most page-level security within Case Manager is handled through the association
of task detail and add task pages and their association with specific steps in the
task workflow processes. Case detail pages and solution pages are managed
through Case Manager Builder.
The Case detail page that is presented to the user when they open a case is
determined by the default case detail page and the ability to associate specific
case detail pages with specific roles. Also, the solution pages that are available
to a role is configured within the Case Manager Builder in the same location that
the roles are defined.
6.5.8 Configuring case analytics and reporting
Case analyzer manages the data that is used in providing analytics and reports
for IBM Case Manager solutions. Case, task, and workflow information is
collected from logs and added to an analytics database. Reporting tools can then
use this database to generate in-progress and historical information. Case
analyzer processes this information into cubes and fact tables.

Chapter 6. Designing case management solutions 203
Cubes
Cubes are multi-dimensional tables of information. The types of cubes that are
managed by Case Analyzer are listed in Table 6-2.
Table 6-2 Types of cubes that are supported by Case Analyzer
Reporting by using cubes enables reports to be “sliced and diced” and users can
drill down to obtain more detail. Cubes often are used to supply summarized
information about cases, tasks, and workflow information.
Cube Description
Case load Stores historical information about the number of cases in process
during a specified time.
Cases in
progress
Stores nearly up-to-the-moment information about all cases that are
in progress in the system. The information includes the number of
cases, processing times, and status.
Task load Stores historical information about the number of tasks in process
during a specified time.
Tasks in
progress
Stores nearly up-to-the-moment information about all tasks that are
in progress in the system. The information includes the number of
tasks, processing times, and status.
Queue load Stores historical information about the amount of work that is done
in each queue during a specified time period.
Work in
progress
Stores nearly up-to-the-moment information about all work that is in
the system. The information includes the number of work items,
processing times, and status. The information can be broken down
by workflow or work item and by user.
Work item
processing time
Stores historical information about processing time for work items
during a specified time. The information can be broken down by user.
Routing Stores historical information about the number of work items going
from a source step to a destination step. The information can be
broken down by user, time, and exposed user-defined fields.
Work load Stores historical information about the amount of work that is done
in the system during a specified time.
Workflow in
progress
Stores nearly up-to-the-moment information about all work that is in
the system. The information includes the number of work items,
processing times, and status. The information can be broken down
by workflow or work item.
204 Advanced Case Management with IBM Case Manager
IBM Case Manager includes reports that are based on Microsoft Excel. These
standard reports provide a basis for configuring new reports, as required.
Fact tables
Fact tables are single-dimensional tables of information. By using fact tables, you
can generate reports that contain detailed case information. Reports list all
cases, tasks, or workflows and can group, total, and provide averages by using
tabular calculations in the report. The fact tables do not summarize the data
directly from multiple cases, tasks, or workflows.
Exposed field
An exposed field in the reporting database is a case property or a workflow data
field. Each cube (fact) table can have zero or more exposed fields. Exposing
fields allows case properties to be made available for reporting purposes.
Configuring a solution for reporting involves creating exposed fields and setting
up reports. This process can use Cognos BI, Microsoft Excel, or other tools that
can generate reports from a reporting database.
In the Complaint Management solution example, the following case properties
might be exposed for reporting: Complaint Type, Received Date, and Customer
number. Cognos BI can be used to generate graphical reports that show the
frequency of complaints that are submitted by Complaint Type.
Generating detailed reports on cases in progress
Case properties to be used in the reports are set up as exposed fields. These
exposed fields are then added to the Case In Progress fact tables. Reports are
generated from the fact tables.
Generating detailed reports on completed cases
Case properties that are used in the reports are set up as exposed fields. These
exposed fields are then added to the Case Load fact tables. Reports are
generated from the fact tables.
Generating detailed reports on tasks or workflows in progress
Properties and data fields that are used in the reports are set up as exposed
fields. These exposed fields are the added to the task or workflow in progress
fact tables. Reports are generated from the fact tables.
Generating graphical, historical management reports
Properties and data fields that are used in the reports are set up as exposed
fields. These exposed fields are then added to the cubes that are used for the
management reports. Reports are generated from the cubes.
Chapter 6. Designing case management solutions 205
Storing reports in cases
Reports that are an object format, such as Microsoft Excel or Word or a PDF, can
be stored in the target object store as documents and opened by users. These
documents can be generated and viewed, for example, in situations where
decision making on specific cases depends on status or management reports on
other cases.
6.5.9 Configuring the Cognos Real-Time Monitor
By using real-time monitoring, you can present key performance indicators that
are used by line-of-business managers. Dashboard objects can display summary
and detailed performance information that is based on business matrixes. For
example, dashboards objects can be configured to show the number of cases
that are created over a specific period.
Because real-time monitoring uses the same cubes and fact tables that are used
in reporting, similar procedures are used to extend the reporting database to
display case, task, and workflow information. Dashboard objects can then be
configured to display more information as required.
Modifying dashboard objects with case properties
As in reporting, case properties that are used in the dashboard objects must be
set up as exposed fields. These exposed fields are then added to the Case In
Progress cube. Dashboard objects are modified or created by using the cube
(summary dashboard objects) or fact tables (detailed dashboard objects).
Create watch point email notifications
Watch points enable line-of-business managers to receive emails when a
threshold is reached, such as when more than the expected number of cases are
generated. Watch points can be configured directly on the real-time monitor
dashboard objects.
6.6 Customizing and integrating your solution
Most of the functions that are required by solutions can be met through solution
definition and configuration. In many cases, there still are requirements that are
beyond the scope of functionality that can be configured. In these cases, it
becomes necessary to customize the solution. It is recommended that
configuration be used as much as possible to meet these requirements as
customization increases the effort to build and support the solution.
206 Advanced Case Management with IBM Case Manager
IBM Case Manager includes an extensive set of options for customizing solutions
to meet the various needs of projects. The following tools can be used for
customization:
Custom widgets
External Data Services
Custom workflow components
Extending forms
Published APIs
Custom widgets
When the standard widgets cannot provide the functionality that is required for a
solution, custom widgets can be developed and configured into the solution
pages to meet these needs. Developers can develop custom widgets that can be
placed on a page and interact with the standard and any other custom widgets
that might be there.
A custom widget is available to all solutions within an environment that allows
more generic custom widgets to be used in multiple solutions. A custom widget
can be developed generically with the intent for reuse or for a specific solution
that addresses specific needs.
For more information about custom widgets, see 10.5, “Creating and deploying a
custom widget” on page 386.
External data services
You can use the external data service (EDS) representational state transfer
(REST) protocol to create an external data service to get data from an external
source (such as a file or a table in a database) to customize field properties and
manage property behavior in Case Manager.
External data services provide the following abilities:
Interface between cases and other information sources
Load case data at query time
Enables real-time presentation and storage of case data
For more information about the external data services, see 14.6, “External data
service” on page 557.
Chapter 6. Designing case management solutions 207
Custom workflow components
When a custom action is required within a task workflow process that cannot be
met by the standard system steps or included components, a custom component
step can be developed. Many connections to external systems can be
accomplished through database connectivity or a web service, both of which are
standard system steps. When these steps are not available or the functionality
cannot be achieved without customization, the following custom component
steps can be developed to meet this functionality:
Automated work processing that is performed by Java object or Java
Message Service (JMS) queue
Runs functions from within a workflow
Extends process functionality without full application deployment
For more information about workflow components, see 14.5.1, “Custom
components” on page 556
Extending forms
IBM Forms and FileNet eForms can be extended by using scripting. By using
scripting, the forms can be more flexible within the user interface or provide
interaction with external systems.
FileNet eForm provides JavaScript API. The API is often used to develop
enhanced forms that are used for data entry.
IBM eForm has server APIs that provide low-level access to XFDL forms in Java,
C, and COM. With these APIs, you can develop applications that analyze,
validate, and create XFDL forms. IBM Form also provides Functional Call
Interface for runtime custom XFDL capabilities.
Published APIs
Case Manager includes several published APIs that allow for customization in
each of the outlined methods. This provides the full flexibility and control over
solutions that are needed to meet the most demanding requirements. The
following APIs are available that allow the developer to select the most
appropriate choice for their needs:
IBM Case Manager JavaScript API
Use this API to customize your Case Manager Client application.
IBM Case Manager Java API
Use this API to create servlets for custom web applications and to develop
custom component queue applications.
208 Advanced Case Management with IBM Case Manager
Content Platform Engine add-on extensions for Case Manager Builder
Use these add-on extensions to access the custom metadata and data that is
stored in object stores.
IBM CMIS for FileNet Content Manager
Use the IBM Content Management Interoperability Services (CMIS) for
FileNet Content Manager to enable applications and clients that use the
OASIS CMIS standard to access content that is stored on Content Platform
Engine. In a case management application, you use CMIS to manage the
case folders and documents and to retrieve case information.
For more information about the APIs, see Chapter 14, “Integration points” on
page 545.
6.7 Documenting your solution
Case Manager Builder enables the solution designer to effectively capture
requirements directly into the tool. A document can then be generated by using
the available solution description generation tool that contains all of the
configuration data within your solution. This solution description document
provides a way to communicate and present the configuration details of the
solution for review, discussion, and analysis.
The Solution Document Generator is a command-line tool. For more information
about how to use it, see the IBM Case Manager Version 5.2 Information Center
at this website:
http://pic.dhe.ibm.com/infocenter/casemgmt/v5r2m0


© Copyright IBM Corp. 2013, 2014. All rights reserved. 211
Chapter 7. Building a simple solution:
Part 1
This chapter and Chapter 8, “Building a simple solution: Part 2” on page 267
describe how to build a simple solution. The use case that was introduced in 2.2,
“Complaints management example use case” on page 29 is used to show a
step-by-step procedure for building your solution. In later chapters in this book,
we build on top of this use case to introduce other features and capabilities, such
as case splitting, customizing user interface, and deployment.
This chapter includes the following sections:
Building the sample solution overview
Defining the solution basics
Defining the case type
Defining embedded rules
Defining case tasks
7
212 Advanced Case Management with IBM Case Manager
7.1 Building the sample solution overview
The Customer Complaints solution is a simple solution that is intended to show
much of the IBM Case Manager functionality. However, the solution is kept simple
for easier reading and understanding. The Customer Complaints solution
describes the use of following IBM Case Manager functions:
Smaller task-based processes
Container tasks
Automatic, required, and manual tasks
Mutually exclusive task sets
Document-based preconditions
Property-based preconditions
Preconditions that are based on property updates
In this chapter, we break down building the sample Customer Complaints
solution to the following basic steps:
1. Defining the solution basics:
– Adding a solution
– Setting up properties
– Setting up roles
– Setting up in-baskets
– Setting up document types
2. Defining the case type:
– Creating a case type
– Configuring case type properties
– Configuring the Case Summary view
– Configuring custom properties layout view
– Configuring the case search
– Defining case folders structure
3. Defining embedded rules.
4. Defining case tasks:
– Creating Upgrade Options set
– Creating the Upsell Opportunity container task
– Creating the Upgrade Product task
– Creating the Upgrade Plan task
– Creating the Call Customer task
– Creating the Verify Billing task
– Creating the Verify Complaint task
– Creating the remaining tasks (as listed in Table 7-6 on page 247)
– Reviewing task summary

Chapter 7. Building a simple solution: Part 1 213
The rest of the steps for building the sample solution are described in Chapter 8,
“Building a simple solution: Part 2” on page 267
7.2 Defining the solution basics
By using IBM Case Manager Builder, we define the solution basics for the
Customer Complaints solution. This section describes the following steps:
Adding a solution
Setting up properties
Setting up roles
Setting up in-baskets
Setting up document types
In 7.3, “Defining the case type” on page 227, we describe the creation of case
types by using the properties, roles, in-baskets, and document types that are set
up in this section.
7.2.1 Adding a solution
To create and define the basic solution information, complete the following steps:
1. Log in to Case Manager Builder by using the following URL:
http://<server>:<port>/CaseBuilder
Make sure to log in with a user that has sufficient rights to create the case
solution, as shown in Figure 7-1.
Figure 7-1 Logging in to Case Manager Builder

214 Advanced Case Management with IBM Case Manager
2. In the Manage Solutions window, click Add Solution, as shown in Figure 7-2.
Figure 7-2 Creating a solution by using the wizard
3. Name the solution and provide the following information:
– Enter the name of the solution Customer Complaints in the Name field.
– Enter a 2 - 5 alphanumeric character prefix that starts with an alphabetic
character in the Solution prefix field.
This sample solution uses the prefix CC. A unique solution prefix is
required to prefix all object types that are used in the solution.
– Select the icon for the solution. The solution icon represents the solution
type, such as Aerospace, Energy, or Financial. IBM Case Manager is
bundled with a set of default solution icons.
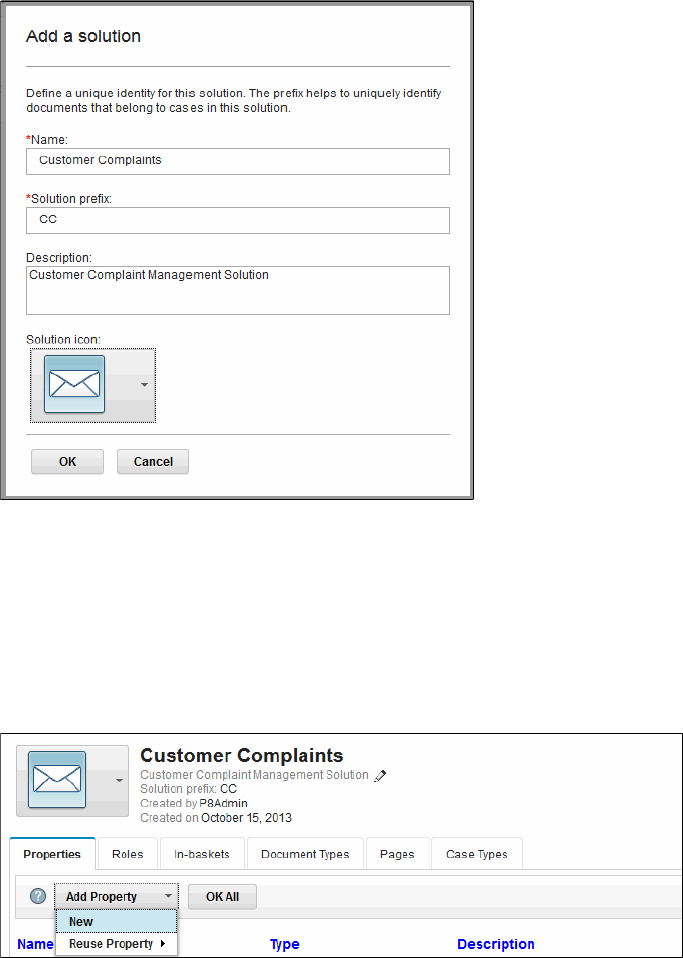
Chapter 7. Building a simple solution: Part 1 215
Figure 7-3 shows the results of naming the solution.
Figure 7-3 Naming the solution
7.2.2 Setting up properties
To set up properties for the solution, complete the following steps:
1. Click the Properties tab.
2. Click Add Property → New, as shown in Figure 7-4.
Figure 7-4 Setting up new property

216 Advanced Case Management with IBM Case Manager
3. Use the information from to Table 7-1 on page 218 to enter the property
definition for Address, as shown in Figure 7-5.
a. For the property Name field, enter Customer Address.
b. For property Type, select String.
c. Expand Define Property Values and enter 200 for Maximum length.
d. Click OK to continue.
Figure 7-5 Setting up Customer Address property
4. In the same manner, add the rest of the properties that are listed in Table 7-1
on page 218.
5. For the property with choice list, select your choice in the Manage Choice
Lists Name field. For example, complete the following steps to define the
choice list Case Sources as shown in Figure 7-6 on page 217:
a. Enter Case Sources in the Manage Choice Lists Name field.
b. To add a choice, click Add Choice Item and enter the choice information.
In the example, enter Form for Display Name and Value.
c. Repeat these to add the following choice items for Case Sources choice
list:
Form, Email, Fax, and Letter
Tip: The basic property types are string, integer, datetime, float, and
Boolean. Properties can be a single value or multiple values. The
Customer Complaint solution uses only single values.
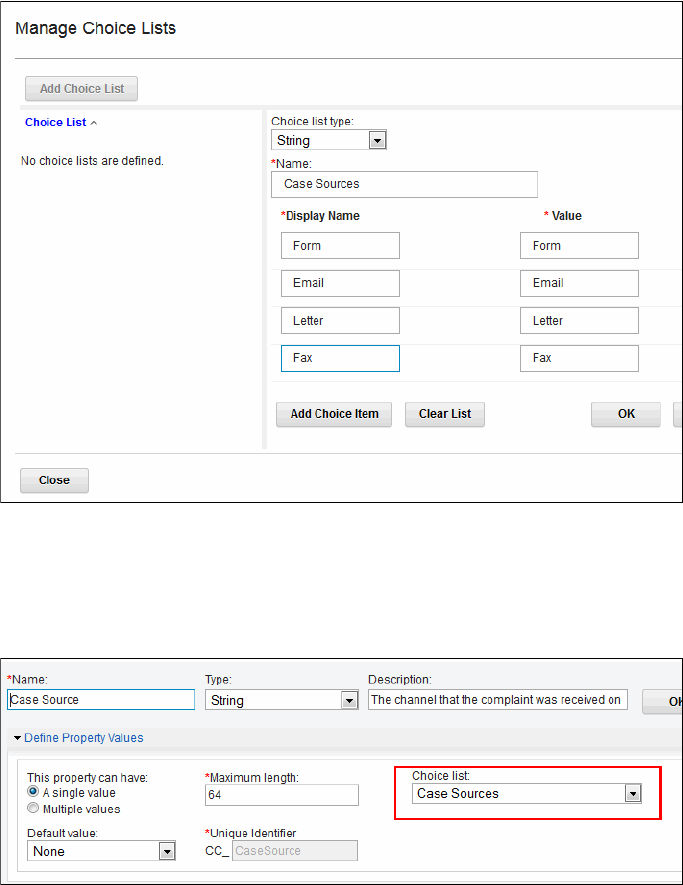
Chapter 7. Building a simple solution: Part 1 217
d. Click OK to complete the choice list.
Figure 7-6 Adding a choice list
e. To verify the choice list you just added, select the choice list for the
property. In the example, the Case Sources choice list is selected for the
property Case Source, as shown in Figure 7-7.
Figure 7-7 Example of a property with choice list

218 Advanced Case Management with IBM Case Manager
f. To add another choice list, click Add Choice List. Table 7-1 shows the
complete choice list that we add for the solution.
g. When you finish creating all of the choice lists, click Close.
6. Repeat steps 1 - 5 to complete the solution properties by using Table 7-1.
Table 7-1 shows a complete choice list we use for our sample solution.
Table 7-1 Complaint solution property choice list
Table 7-2 shows the sample solution properties.
Table 7-2 Complaint solution properties
Tip: You can select a default value from the choice list. However, the
example does not use a default value. Click Save after you complete the
properties configuration.
Choice list Choice Item
Case Sources Form, Email, Fax, Letter
Case States Open, Closed, Processing, Pending, On Hold
Complaint Categories Product, Billing, Service, Other
Upgrade Category Product, Service Plan
Property Type Description
Case Number String(10) Auto-generated case number.
Case Source String(64), Choice list:
Case Sources
The channel on which the
complaint was received.
Complaint Category String(64), Choice list:
Complaint Categories
The type of complaint that was
submitted.
Complaint
Description
String(1000) The description of the complaint
that was submitted.
Complaint Received
Date
DateTime The date and time the complaint
is received.
Complaint Status String(64), Choice list:
Case States
The status of the complaint.
Customer Name String(64) The first and surname of the
customer, which was obtained
from the CRM system.

Chapter 7. Building a simple solution: Part 1 219
Customer Number String(10) The customer number that is
used to query the CRM system.
Customer City String(64) Customer city, which is obtained
from the CRM system.
Customer Address String(200) Customer street name, which is
obtained from the CRM system.
Customer Rating String(64) Calculated value that indicates
how the customer is rated.
Customer Since Integer The number of years the
customer was with the company.
Customer State String(64) Customer state, which is
obtained from the CRM system.
Customer Email String(64) The email address of the
customer, which is obtained
from the CRM system.
Part Number String(64) The part number of the product
that is specified in the complaint.
Safety Check Boolean This property is set to true if a
safety check is required.
Tota l Tra nsaction
Amount
Float The transaction amount that is
filed in the complaint.
Telephone String(64) The customer telephone
number, which is obtained from
the CRM system.
Valid Boolean Set to true if the complaint is a
valid complaint.
Upgrade Category String(64), Choice list:
Upgrade Category
The type of upgrade requested.
Upsale Opportunity Boolean Set to true if there is a possibility
of a product or non-product
upsell.
Property Type Description

220 Advanced Case Management with IBM Case Manager
Part of the completed property list looks similar to the list that is shown in
Figure 7-8.
Figure 7-8 Completed properties
7.2.3 Setting up roles
After you set up the properties for your solution, create the role and select the
type of in-baskets to display for the role. To configure role view for the personal
in-basket, complete the following steps:
1. Select the Roles tab and click Add Role.
2. Enter the following role information:
a. For the role field, enter Contact Center.
Indexing and performance consideration: The Case Manager Builder
application does not provide a method for indexing property values. To index a
property, you must use the FileNet Enterprise Manager or Administrative
Console on the target object store to set the index property for simple indexes.
For more complex indexes, use the database tool to define them.
Properties that are used as case search criteria often require indexing to
improve performance. Monitor your system during testing and in production to
determine the final set of properties to configure for indexing.
For more information, see “Indexing IBM FileNet P8 Content Engine
databases”, which is available at this website:
http://pic.dhe.ibm.com/infocenter/p8docs/v5r2m0/topic/com.ibm.p8.per
formance.doc/p8ppt121.htm

Chapter 7. Building a simple solution: Part 1 221
b. For the role description, enter These workers handle calls and email
complaints.
c. Select Personal (Role) for type of in-basket, as shown in Figure 7-9, This
show a custom view for this role.
d. Allow user to move work into personal in-basket and reassign work to
others, as shown in Figure 7-9.
Figure 7-9 Defining Contact Center Role
Tip: The type of personal in-basket to display for a role can be customized.
The following selections are available:
Personal (Common): Show the common view: Defines a common
in-basket for every role.
Personal (Role): Show the custom view: Defines an in-basket specific
for the role.
Do not show common or role personal in-baskets: Show just personal
inbox: Not role in-basket is shown for the role.

222 Advanced Case Management with IBM Case Manager
3. Repeat steps 1 - 4 to complete the solution roles by using the information that
is provided in Table 7-3.
Table 7-3 Customer Complaint solution roles
7.2.4 Setting up in-baskets
Role in-baskets contain work items that are assigned to a role. Within an
in-basket, you can define the columns that you want to show for the role, such as
filters and sort.
To set up the in-baskets, complete the following steps:
1. Click the In-baskets tab.
2. Click Contact Center in-basket and then click the In-basket General tab.
3. Select the solution properties to be included in the in-basket display for the
role. These properties are included in Case Manager Client when users
access the role in-basket for their role, as shown in Figure 7-10 on page 223.
Role In-basket Description
Contact Center Contact
Center
These workers handle calls and email
complaints.
Investigator Investigator This role performs detailed investigation on
complaints when required.
Manager Manager This role is for the manager of the complaint
Contact Center workers.
Specialist Specialist Members of this role handle product-specific
complaints.
Billing Agent Billing Agent These workers handle billing-specific
complaints.
Sales Agent Sales Agent This role is for the sales agents who interact with
customers for any sales opportunities.

Chapter 7. Building a simple solution: Part 1 223
Figure 7-10 Selecting the in-basket properties
4. Set up the following sort information for the properties:
– Complaint Received Date: Select Sortable and set the sort order to
Ascending.
– Customer Rating: Select Sortable.
– Complaint Category: Select Sortable.
This configuration looks as shown in Figure 7-11.
Figure 7-11 Configuring the in-basket sort parameters
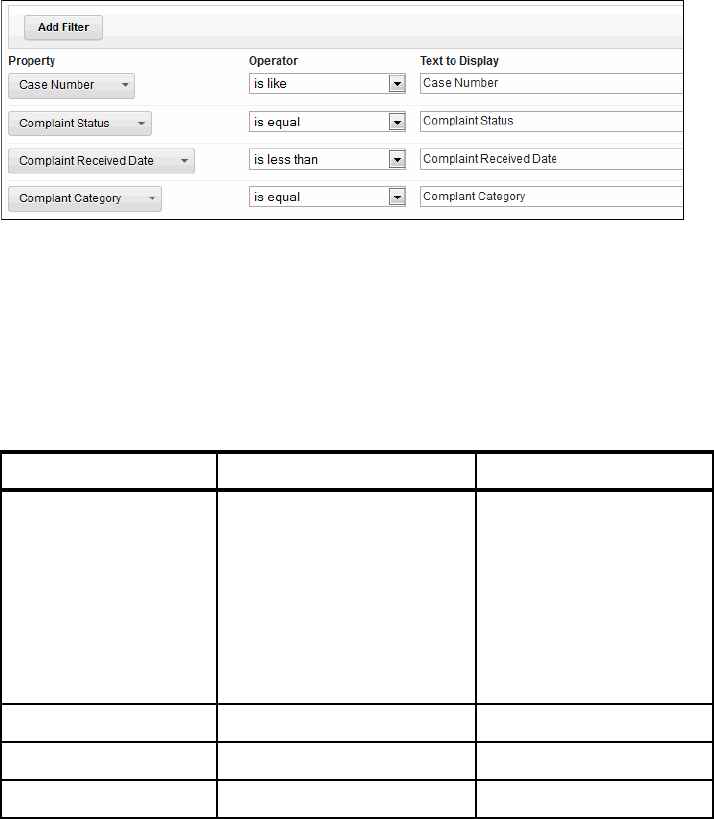
224 Advanced Case Management with IBM Case Manager
5. Click Add Filter on the in-basket Filters tab. Select the following properties
and the associated operators for your filters:
– Case Number with operator is like.
– Complaint Status with operator is equal.
– Complaint Received Date with operator is less than.
– Compliant Category with operator is equal.
The result looks similar to Figure 7-12.
Figure 7-12 Adding filters for an in-basket
6. Click OK All to complete the in-basket configuration for the Contact Center
role.
7. Repeat steps 1 - 6 for the other roles. Assign the properties, sort parameters,
and filter as you did for the Contact Center role in-basket. See the Table 7-4
for the in-basket configuration.
Table 7-4 In-basket definition
In-basket Columns Filter
Complaints Complaint Received Date
(sortable, sort default),
Customer Rating (sortable),
Complaint Category
(sortable),
Case Number,
Complaint Status,
Customer Name,
Customer Number
Complaint Category
Equal,
Complaint Receive Date
Less than,
Complaint Status Equals,
Customer Name Like
Investigator Case Number N/A
Manager Case Number N/A
Specialist Case Number N/A

Chapter 7. Building a simple solution: Part 1 225
7.2.5 Setting up document types
For your solution, set up the necessary document types. For the Customer
Complaints solution, a document type for customer correspondence is needed.
To create the document type, complete the following steps:
1. Click the Document Types tab.
2. Click Add Document Type.
3. Enter the following document type information:
– For name of the document type, enter Correspondence.
– For description, enter the description, as shown in Figure 7-13 on
page 226.
Billing Agent Case Number N/A
Specialist Case Number N/A
Sales Agent Case Number, Customer
Name, Customer Address,
Customer Telephone,
Customer Email, Customer
City, Customer Rating
Customer Name Like,
Case Number Equal
My Work (Common
Personal in-basket)
Complaint Received Date,
Case Number,
Complaint Status,
Complaint Category,
Customer Name,
Customer Number,
Customer Rating
N/A
My Work (Personal
in-basket for Manager
Role)
Case Number, Complaint
Category, Complaint
Description, Complaint
Received Date, Complaint
Status, Customer Name,
Customer Number, Customer
Rating, Customer Since, Part
Number, Safety Check,
Upsale Opportunity
Case Number Equal,
Customer Name Like,
Complaint Received Date
Less than
Tip: It is a good idea to click Save after you complete the roles configuration.
In-basket Columns Filter

226 Advanced Case Management with IBM Case Manager
Figure 7-13 Add a new document type
4. Add properties for this document type. For the sample solution, we use the
properties that we created for the document type. Complete the following
steps to add the properties:
a. Click Add Property and select Existing.
b. Click Case Number to assign the existing properties to the document
type, as shown in Figure 7-14.
c. Repeat these steps to add other properties that you want for the document
type.
Figure 7-14 Adding an existing property to document type

Chapter 7. Building a simple solution: Part 1 227
5. Click OK, then click OK All to complete the document property configuration.
6. Repeat these steps for the other document types. See Table 7-5 for the list of
all document types and their properties.
Table 7-5 Customer Complaint solution document types
7.3 Defining the case type
After you define the solution properties, roles, in-baskets, and document types,
you can define the case type that uses the solution information.
In this section, the follow tasks are described:
Creating a case type
Configuring case type properties
Configuring the Case Summary view
Configuring custom properties layout view
Configuring the case search
Defining case folders structure
7.3.1 Creating a case type
To set up the Complaint case type, complete the following steps:
1. Click the Case Types tab.
2. Click Add Case Type, as shown in Figure 7-15 on page 228.
Document type Properties Description
Correspondence Case Number Documents that are sent to the customer to
communicate the complaint status.
Supporting Document Case Number Documents that are received from the
customer to support customer complaints.
Tip: The properties for documents are significant to the document rather than
the case. In this example, the case properties are used for illustrative
purposes only.


Chapter 7. Building a simple solution: Part 1 229
As shown in Figure 7-16 on page 228, the configuration options for the case
type include configuring the document type so that it adds a case when the
document is created. You also also change the default page so it displays the
add case, split case, and case details web pages. Because you are creating
cases manually for this solution and the default pages are used, leave these
options unchanged.
4. Select Enable case workers to create custom tasks to allow case workers
to define custom task flows in run time.
7.3.2 Configuring case type properties
A case contains multiple properties that are needed to help knowledge workers
to complete various tasks for the case. After the configuration options are set up
for the case type, you add properties that are needed for the case type.
Complete the following steps to add properties to the case type:
1. For the created case type, select Properties in the left pane to configure
which properties are available within the case.
2. Add all of the properties that were defined to the case by clicking Add
Property → Existing → Select all → OK, as shown in Figure 7-17.
3. Click OK All.
Figure 7-17 Configuring the case properties

230 Advanced Case Management with IBM Case Manager
7.3.3 Configuring the Case Summary view
To work on a case, there are multiple views that are associated with the case
where knowledge workers use to perform their work. The main view is the Case
Summary view.
Complete the following steps to configure the Case Summary view:
1. In the left pane, select the Views option as shown in Figure 7-18. From this
window, you can go to the Case Summary tab, Properties Layout tab, and
Case Search tab to configure various views that are used for the case type.
2. From the Case Summary tab, add the properties from the Available
Properties field to the right field so that they appear in the Case Summary
View, as shown in Figure 7-18.
Figure 7-18 Adding properties that appear in the Case Summary view
Tip: To the right side of each of the properties in the Available Properties field
is an arrow. Clicking that arrow to move the property into the Properties in the
Case Summary view field and back.
The order that the properties are displayed in the view is the order that they
are displayed in this field. The properties can be moved up or down by clicking
the Move Up or Move Down icons to the right of the property name.

Chapter 7. Building a simple solution: Part 1 231
7.3.4 Configuring custom properties layout view
By using the Properties View Designer, you can define custom interfaces for data
entry and presentation purposes. Here, we describe how to create a view with a
customized layout of the properties that we created earlier.
Complete the following steps to create the Customer Information view with the
properties layout specified:
1. Click the Properties Layout tab.
2. Click Add View, enter Customer Information, and then click OK, as shown in
Figure 7-19.
Figure 7-19 Creating a view
3. Click the Open Properties View Designer icon at the right of Customer
Information view tittle, as shown in Figure 7-20.
Figure 7-20 Opening Properties View Designer

232 Advanced Case Management with IBM Case Manager
4. Properties View Designer provides different containers for defining custom
layouts. For this solution, we add a property list, titled layout, tabbed layout,
and multiple column layout containers into a custom view. For adding a
container, drag it from the containers list palette on the left of property view
designer to the canvas, as shown in Figure 7-21.
Figure 7-21 Containers list palette and canvas

Chapter 7. Building a simple solution: Part 1 233
5. Drag the property list container to the canvas, as shown in Figure 7-22.
Figure 7-22 Adding property list container to custom layout
6. Drag the Customer Rating field into the property list container that was added
in step 5. Properties palette is below the containers palette to the left of
property view designer, as shown in Figure 7-23.
Figure 7-23 Adding Customer Rating property into property list container

234 Advanced Case Management with IBM Case Manager
7. Change the settings for the Customer Rating property that was added in step
6. For our solution, we are changing the control type to Static text, as shown
in Figure 7-24.
Figure 7-24 Changing settings to Customer Rating property
8. Following the same procedure that was used for adding the property list
control, add a tabbed Layout container to the bottom of the canvas, as shown
in Figure 7-25.
Figure 7-25 Adding tabbed layout container

Chapter 7. Building a simple solution: Part 1 235
9. Assign a tab title in the settings section. Use Customer Information and
Compliant Information for titles, as shown in Figure 7-26.
Figure 7-26 Tabbed layout titles
10.Select Customer Information Tab in the tabbed layout that was configured in
step 9 and add a multiple column layout into it.
11.Drag the following properties to multiple column layout, as show in
Figure 7-27 on page 236:
–Left column: customer number, customer since, customer address, and
customer state
– Right Column: customer name, customer city, customer email, and
customer telephone
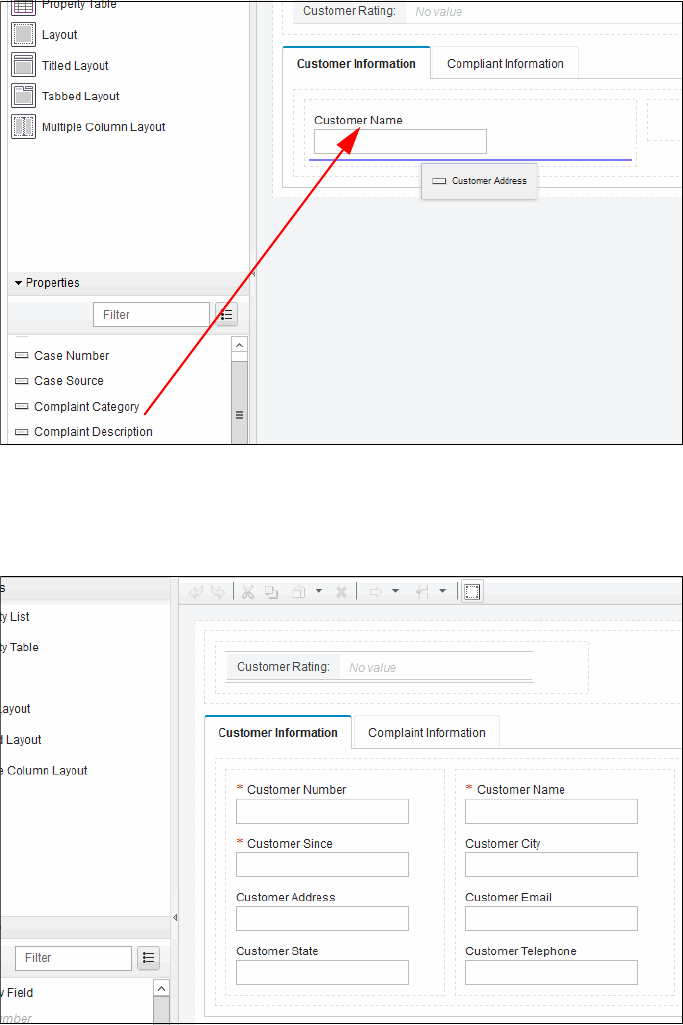
Chapter 7. Building a simple solution: Part 1 237
12.Click the Complaint Information tab and add a property list container. Then,
drag the following properties, as shown in Figure 7-29 on page 238:
– Case Number
– Total Transaction Amount
– Complaint Received date
– Part Number
– Compliant Description
13.Add a titled container below the property list container that was added in step
12. Then, drag the following properties, as shown in Figure 7-29 on page 238:
– Case Source
– Complaint Status
– Complaint Category
– Upgrade Category
– Safety Check
– Update Opportunity
– Valid


Chapter 7. Building a simple solution: Part 1 239
15.Assign the properties view that was defined as the default view for the
solution (the case creation and case data widget use this default view), as
shown in Figure 7-31.
Figure 7-31 Assigning custom layout as default view
7.3.5 Configuring the case search
Case workers frequently perform searches within a case to find specific
information to perform a task. In this section, we describe how to define the
properties that can be made available for the case workers who want to search
for cases.
Complete the following steps to define the properties that are available for case
search:
1. Click the Case Search tab.
2. Configure the Case Search view by adding properties in the left column
(Available Properties) to the right column (Properties in the Case Search
view), as shown in Figure 7-32 on page 240.
Tip: By using IBM Case Manager 5.2, case designers can define custom
properties layouts and assign them to the properties widget in Page section.
This feature provides flexibility when data entry and display interfaces are
defined.

240 Advanced Case Management with IBM Case Manager
Figure 7-32 Case Search view configuration completed
When case worker perform searches, these property fields are available for them
to perform the search.
7.3.6 Defining case folders structure
By defining a case folder structure, a case worker can access all related content
through a folder hierarchy that is consistent with the business problem that is
being solved.
Complete the following steps to define a case folders structure:
1. In the left pane, select the Case Folders option to create folders for storing
case objects.
2. Click Add Folder and enter Supporting Documents for the folder name, as
shown in Figure 7-33 on page 241. Click OK.

Chapter 7. Building a simple solution: Part 1 241
Figure 7-33 Case Folder configuration
3. Repeat step 3 for Supporting Documents.
4. Click Save.
7.4 Defining embedded rules
From IBM Case Manager 5.2, you can use the embedded rules feature. In this
section, we describe how to define a table-based rule by using this new
capability.
In this chapter, we define only the rule. In Chapter 8, “Building a simple solution:
Part 2” on page 267, we show you how to use the rule within a case task.
We define the following business rules:
By default, a customer’s rating is SILVER. This value is assigned by using the
default value for the case property, Customer Rating.
If the person is a customer for 5 - 10 years, the customer’s rating is GOLD.
If the person is a customer for more than 10 years, the customer’s rating is
DIAMOND.
If the customer has more than 10,000 USD in transaction amount, the
customer’s rating also is DIAMOND.
Complete the following steps to define the embedded rules as a table-based rule
for a customer’s rating:
1. Select the Rules page and click Add Rule.
Remember: When you create a case, IBM Case Manager creates a
subfolder structure for the case as specified by the “Case Folders”
attributes in a case type definition.

242 Advanced Case Management with IBM Case Manager
2. Enter the following rules information and click OK (as shown in Figure 7-34):
– For rule name, type Customer Rating Table.
–Select Table-based rule as the rule type.
Figure 7-34 Creating an embedded rule: Table-based rule
3. After the rule is created, open Rule Designer by clicking Rule Name or the
Rule Designer icon to the right, as shown Figure 7-35.
Figure 7-35 Opening rules designer
4. Click each column header and assign the following names for each column
that we use in the rule table, as shown in Figure 7-36:
– Customer Since
– Transaction Amount
– Customer Rating
Figure 7-36 Naming Table Rule Columns
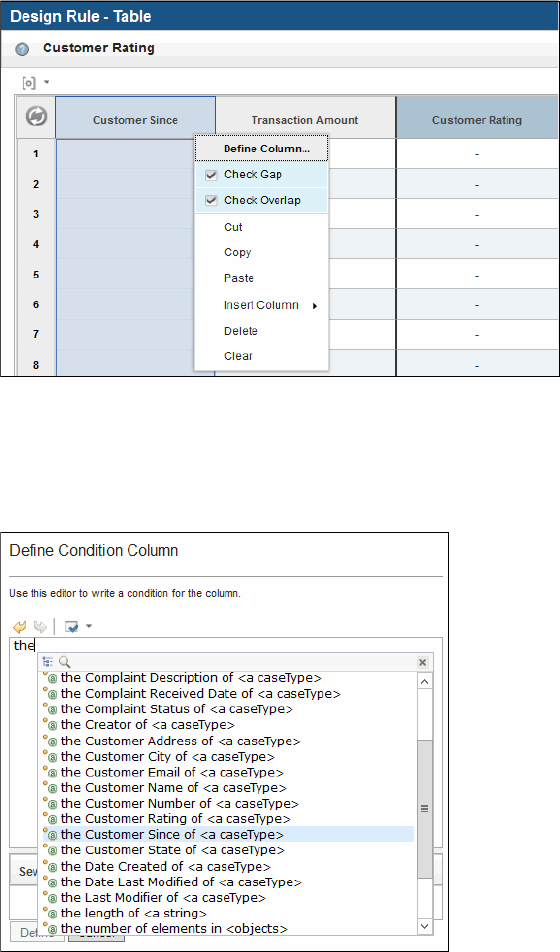
Chapter 7. Building a simple solution: Part 1 243
5. Define the column condition for Customer Since. To do so, right-click the
column header and select Define Column, as shown in Figure 7-37. The
Condition Editor opens.
Figure 7-37 Defining condition for customer since column
6. The Condition editor features interactive help to support rule authoring. Press
the spacebar to show the list of available fields and scroll down to find “the
Customer Since of” field, as shown in Figure 7-38.
Figure 7-38 List of case fields in condition editor

244 Advanced Case Management with IBM Case Manager
7. Click <a caseType> and then select Complaint from the list, as shown in
Figure 7-39.
Figure 7-39 Defining field and case type to be evaluated in condition
8. To complete the column condition, press the spacebar and select is more
than <a number> from the list, as shown in Figure 7-40.
Figure 7-40 Defining condition value
Tip: The column condition that we defined affects every cell for this
column; however, you can override the condition for a specific cell if
required.

Chapter 7. Building a simple solution: Part 1 245
9. Complete the following steps to define condition values for the Customer
Since column:
a. Add a condition for customers with 10 years or more by entering 10 in the
first column cell.
b. In the next cell that is below the cell that was defined in the previous step,
define a custom value of 5 - 10 years. To do so, right-click the column cell
and select Edit Custom Value, then write the custom value as shown in
Figure 7-41.
Figure 7-41 Defining a custom value for cell
The completed the Customer Since column can look as shown in Figure 7-42.
Figure 7-42 Complete customer since column

246 Advanced Case Management with IBM Case Manager
10.Following the same procedure for defining the Customer Since column, edit
the Custom Values, and define a custom value in the third row for the
Transaction Amount Column, as shown in Figure 7-43.
Figure 7-43 Define custom value for transaction amount
11.For the Customer Rating column, you set the values for this field when the
other columns values (Customer Since and Transaction Amount) are met, as
shown in Figure 7-44.
Figure 7-44 Setting value to customer rating field
12.Click Save in the upper right of the pane.

Chapter 7. Building a simple solution: Part 1 247
The completed Customer Rating Table looks as shown in Figure 7-45.
Figure 7-45 Complete customer rating rule table
7.5 Defining case tasks
The following steps describe how to create the tasks that are required by the
Customer Complaints solution. Table 7-6 lists all of the tasks for the Customer
Complaints solution with the attributes that are associated with each task.
Table 7-6 Customer Complaint solution tasks
Task Attributes Description
Upsell
Opportunity
Required, Automatic,
Container, Property
precondition
This container task starts the subtasks that
are contained in it when there is a
possibility of an upsell opportunity.
Upgrade
Product
Required, Automatic,
Exclusive, Property
precondition
This task starts automatically when there is
a product-related upsell opportunity.
Upgrade Plan Required, Automatic,
Exclusive, Property
precondition
This task starts automatically when there is
a non-product related upsell opportunity.
Call
Customer
Required, Automatic This task starts automatically when there is
an upsell opportunity.
Verify Billing Optional, Automatic,
Filing, Property
preconditions
This task starts automatically when a
customer submits a supporting document
for billing-related complaints.
Verify
Complaint
Required, Automatic,
Repeatable, Property
update precondition
This task starts automatically and is
repeated when the complaint category
property is changed.

248 Advanced Case Management with IBM Case Manager
7.5.1 Creating Upgrade Options set
You must create a task set to make two tasks mutually exclusive. To create a task
set, complete the following steps:
1. In the left pane, select the Tasks option.
2. Click Manage Sets.
3. Click Add Set and enter Upgrade Options as the name of the managed set.
Review
Product
Complaint
Optional, Automatic,
Property precondition
This task starts automatically when a
property condition is met to handle all
product complaints.
Review
Non-Product
Complaint
Optional, Automatic,
Property precondition
This task starts automatically when a
property condition is met to handle all
non-product complaints.
Investigate
Product
Safety
Optional, Manual,
Property precondition
This task can be started at anytime to
perform a product safety investigation.
Send
Correspondin
g Letter
Required, Automatic,
Document Filing, and
Property preconditions
This task starts automatically when a case
worker files a corresponding letter into a
case. After the letter is reviewed, it is sent
to the customer through a third-party letter
generation software.
Close
Complaint
Required, Manual This task starts manually when a complaint
must be closed.
Investigate
Employee
Discretionary This discretionary task can be started one
or more times to investigate one or more
employees.
Request
Assistance
Discretionary This discretionary task can be started one
or more times to request help to handle the
complaint.
Task Attributes Description

Chapter 7. Building a simple solution: Part 1 249
4. Select A mutually exclusive set and click OK to complete the creation of the
Complaint Type set, as shown in Figure 7-46.
Figure 7-46 Creating a managed task set
5. Click OK at the bottom of the Manage Sets window to close the window. The
set is associated with tasks later in this procedure.
7.5.2 Creating the Upsell Opportunity container task
The Call Customer, Upgrade Product, and Upgrade Plan tasks must be
completed when there is an opportunity for the company to upsell its product or
plan to the customer. These tasks can be grouped into a new container task that
is started when there is an upsell opportunity.

250 Advanced Case Management with IBM Case Manager
To create a container task for Upsell Opportunity, complete the following steps:
1. On the Tasks page, click Add Task.
2. Select Container task, as shown in Figure 7-47.
Figure 7-47 Creating the Container task menu option
3. On the General tab, complete the following steps to configure the task
attributes:
a. Select Upsell Opportunity as the task name.
b. Select Task Starts: Automatically.
c. Leave the Required option cleared because this task is an optional task.

Chapter 7. Building a simple solution: Part 1 251
4. On the Preconditions tab, complete the following steps to configure the
preconditions for the task, as shown in Figure 7-48:
a. Select A property condition is met.
b. Click Add condition to configure the first condition:
• For Property, select Upsale Opportunity
• For Operator, select =
Figure 7-48 Configuring the Upsell Opportunity precondition
5. For Value, select True.
6. Click OK.
7.5.3 Creating the Upgrade Product task
The Upgrade Product task belongs to the previously defined set Upgrade
Options. After it is created, this task must be moved as a subtask under the
Upsell Opportunity container task. Complete the following steps to create this
task and move it into the container:
1. On the Tasks page, click Add Task
2. Select Task, as shown in Figure 7-49 on page 252.

252 Advanced Case Management with IBM Case Manager
Figure 7-49 Creating Upgrade Product task
3. On the General tab, complete the following steps to configure the task
attributes:
a. Select Task Starts: Automatically.
b. Select Upgrade Options from the Assign to set field.
c. Select the Required option for this task.
The results are shown in Figure 7-50.
Figure 7-50 Creating Upgrade Product task: General tab

Chapter 7. Building a simple solution: Part 1 253
4. On the Preconditions tab, complete the following steps to configure the
preconditions for the task, as shown in Figure 7-51:
a. Select A property condition is met.
b. Click Add condition to configure the first condition:
• For Property, select Upsale Opportunity
• For Operator, select =
• For Value, select True
c. Click Add condition to configure the next condition:
• For Property, select Upgrade Category
• For Operator, select =
• For Value, select Product
d. Click OK.
Figure 7-51 Preconditions for Upgrade Product Task
5. Click Move task, as shown in Figure 7-52.
Figure 7-52 Moving the Upgrade Product task option

254 Advanced Case Management with IBM Case Manager
6. Select Upsell Opportunity as the target container task and then click OK, as
shown in Figure 7-53.
Figure 7-53 Moving the Upgrade Product task to a container task
7. You can see the task moved to the container by clicking Go to subtasks of
Upsell Opportunity, as shown in Figure 7-54.
Figure 7-54 Opening the subtasks of Upsell Opportunity
7.5.4 Creating the Upgrade Plan task
Similar to the Upgrade Product task, the Upgrade Plan task is a subtask of the
Upsell Opportunity container task. It has property preconditions and belongs to
Upgrade Options set. Use the same procedure that is described in 7.5.3,
“Creating the Upgrade Product task” on page 251 to configure the Upgrade Plan
task. The preconditions for the Upgrade Plan task are shown in Figure 7-55 on
page 255.

Chapter 7. Building a simple solution: Part 1 255
Figure 7-55 Upgrade Plan task preconditions
7.5.5 Creating the Call Customer task
Similar to the Upgrade Product task and Upgrade Plan tasks, Call Customer is a
subtask of the Upsell Opportunity container task. However, it has no property
preconditions and does not belong to any set. Use the same procedure that is
described in 7.5.3, “Creating the Upgrade Product task” on page 251 to configure
the Call Customer task.
At this stage, the Upsell Opportunity container task contains the subtasks that
are shown in Figure 7-56.
Figure 7-56 Subtasks of Upsell Opportunity
7.5.6 Creating the Verify Billing task
As shown in Table 7-6 on page 247, the Verify Billing is an optional task. It
automatically starts when a Supporting document is filed into a case.
Complete the following steps to create the Verify Billing task:
1. On the Tasks page, click Add Task.
2. Select Task, as shown in Figure 7-57 on page 256.

256 Advanced Case Management with IBM Case Manager
Figure 7-57 Creating Verify Billing Task
3. On the General tab, enter Verify Billing as the name, select Task Starts:
Automatically and Optional.
4. On the Preconditions tab, complete the following steps to configure the task
preconditions:
a. Select A document is added to the case.
b. Select Document of a type defined for this case and Supporting
Document from the menu for the document type.
c. Add the following preconditions:
• Valid = True
• Complaint Category = Billing
d. Click OK.

Chapter 7. Building a simple solution: Part 1 257
The preconditions are shown in Figure 7-58.
Figure 7-58 Configuring the Verify Billing task preconditions
7.5.7 Creating the Verify Complaint task
As shown in Table 7-6 on page 247, the Verify Complaint is an optional task. It
automatically starts when the Complaint Category property is updated.
Complete the following steps to create the Verify Complaint task:
1. On the Tasks page, click Add Task and then select Task.
2. On the General tab, enter Verify Complaint as the name and select Task
Starts: Automatically and Required.
3. On the Preconditions tab, complete the following steps to configure the task
preconditions:
a. Select A case property is updated.
b. Select Complaint Category from the menu for case properties list.
c. Select Task is repeatable.
d. Click OK.

258 Advanced Case Management with IBM Case Manager
The preconditions are shown in Figure 7-59.
Figure 7-59 Configuring the Verify Complaint task preconditions
7.5.8 Creating the remaining tasks
Table 7-6 on page 247 shows a list of other tasks that must be created for the
solution. This section describes how to create them based on the configuration
and precondition windows that are provided for each task.
This section describes the creation of the following tasks:
Review Product Complaint
Review Non-Product Complaint
Investigate Product Safety
Send Corresponding Letter
Close Complaint
Investigate Employee
Request Assistance
Creating the Review Product Complaint task
As shown in Table 7-6 on page 247, the Review Product Complaint task is an
optional task that automatically starts when a valid product-related complaint is
received.
Create the Review Product Complaint task with the configuration that is shown in
Figure 7-60 on page 259. Make sure that you select Task Starts: Automatically
and leave the Required option cleared because this is an optional task.


260 Advanced Case Management with IBM Case Manager
Creating the Review Non-Product Complaint task
The Review Non-Product Complaint task is similar to the Review Product
Complaint task. Use the same procedure that is described in “Creating the
Review Product Complaint task” on page 258. The preconditions for the “Review
Non-Product Complaint” task are shown in Figure 7-62.
Figure 7-62 Configuring Review Non-Product Complaint task preconditions
Creating the Investigate Product Safety task
The Investigate Product Safety task is an optional task that can be started
manually by a case worker. The task is created when the value of the Valid
property is equal to true and the value of the Complaint Category property is
equal to Product.
Add the task with the configuration as shown in Figure 7-63 on page 261. Make
sure to select the Task Starts: Manually option and leave the Required option
cleared to make it an optional task.

Chapter 7. Building a simple solution: Part 1 261
Figure 7-63 Configuring the General tab for Investigate Product Safety
Set the Preconditions for the Investigate Product Safety task as shown in
Figure 7-64.
Figure 7-64 Configuring the Investigate Product Safety preconditions
Creating the Send Corresponding Letter task
As shown in Table 7-6 on page 247, the Send Corresponding Letter task is a
required task. It automatically starts when a Correspondence document is filed
into a case.

262 Advanced Case Management with IBM Case Manager
Create the task with the configuration that is shown in Figure 7-65. Make sure to
select the Task Starts: Automatically and Required options.
Figure 7-65 Configuring the general tab for Send Corresponding Letter
For precondition setup, see Figure 7-66.
Figure 7-66 Configuring Send Correspondence Letter task preconditions

Chapter 7. Building a simple solution: Part 1 263
Creating the Close Complaint task
The Close Complaint task is a required task that can be started manually by a
case worker and does not feature any preconditions. Add the task with the
configuration that is shown in Figure 7-67.
Figure 7-67 Configuring the Close Complaint task

264 Advanced Case Management with IBM Case Manager
Creating the Investigate Employee task
As shown in Table 7-6 on page 247, the Investigate Employee task is a
discretionary task. A case worker can create this task at any time during a case
processing.
Add the task with the configuration as shown in Figure 7-68. Make sure that the
Discretionally option is selected for the “This task starts” field.
Figure 7-68 Configuring the general tab for Send Corresponding Letter
Creating the Request Assistance task
The Request Assistance task is another discretionary task. Add the task with the
configuration as shown in Figure 7-69 on page 265.

Chapter 7. Building a simple solution: Part 1 265
Figure 7-69 Configuring the general tab for Request Assistance
7.5.9 Reviewing task summary
After you edit the attributes for all of the tasks, the simple Customer Complaints
solution features required tasks, optional tasks, and discretionary tasks.
Figure 7-70 shows all of the required tasks for the Customer Complaints solution.
Figure 7-70 Required tasks for the Customer Complaints solution
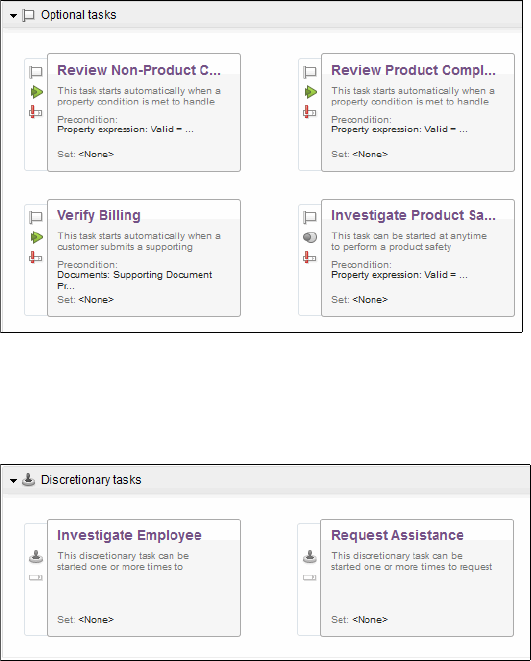
266 Advanced Case Management with IBM Case Manager
Figure 7-71 shows all of the optional tasks for the Customer Complaints solution.
Figure 7-71 Optional tasks for the Customer Complaints solution
Figure 7-72 shows all of the discretionary tasks for the simple Customer
Complaints solution.
Figure 7-72 Discretionary tasks for the Customer Complaints solutions

© Copyright IBM Corp. 2013, 2014. All rights reserved. 267
Chapter 8. Building a simple solution:
Part 2
This chapter and Chapter 7, “Building a simple solution: Part 1” on page 211
describe how to build a simple solution. The use case that was introduced in
Chapter 2, “Typical case management applications” on page 23 is used to
provide step-by-step procedures to build the solution. Chapter 7, “Building a
simple solution: Part 1” on page 211 and this chapter show how to build a simple
case. Later chapters in this book build on this use case to show how to
implement more advanced features into the solution.
This chapter includes the following sections:
Configuring workflow diagrams by using Step Designer
Saving and validating the solution
Deploying the Customer Complaints solution
Testing the Customer Complaints solution
Improving the solution
8

268 Advanced Case Management with IBM Case Manager
8.1 Configuring workflow diagrams by using Step
Designer
In this section, we show how to use the Case Manager Builder Step Designer to
create the workflow diagrams for the tasks that are listed in Table 7-6 on
page 247:
Upgrade Product task
Upgrade Plan task
Call Customer task
Verify Billing task
Verify Complaint task
Review Product Complaint task
Review Non-Product Complaint task
Investigate Product Safety task
Send Corresponding Letter task
Close Complaint task
Investigate Employee task
Request Assistance task
8.1.1 Creating the Upgrade Product task diagram
To create a workflow diagram for the Upgrade Product task, complete the
following steps:
1. Click the Go to subtasks icon on Upsell Opportunity container task.
2. Click the Edit steps icon to the right of the Upgrade Product task, which is
below the Edit Task icon, as shown in Figure 8-1.
Figure 8-1 The Open Step Editor (Edit steps) icon

Chapter 8. Building a simple solution: Part 2 269
3. The Step Designer interface opens, as shown in Figure 8-2. The Step
Designer window consists of horizontal sections that are known as
swimlanes. Other than the System swimlane, each new swimlane represents
a user role or workflow group. Steps are added to the swimlanes and the work
is routed between the steps by
connectors.
Figure 8-2 Using the Step Editor to design the Upgrade Product workflow task
Troubleshooting: If the swimlanes are missing when you open the Step
Editor, ensure that the current version of your browser is supported by IBM
Case Manager.


Chapter 8. Building a simple solution: Part 2 271
5. The Step Editor assigns the default role to the new swimlane. To select a
different role, complete the following steps:
a. In the left pane, under Role Property, select the role from the Role
drop-down menu. For this Customer Complaints solution, select Sales
Agent, as shown in Figure 8-4.
Figure 8-4 Selecting the role for a swimlane

272 Advanced Case Management with IBM Case Manager
6. Drag a Step icon onto the Sales Agent swimlane. The result is shown in
Figure 8-5.
Figure 8-5 Adding a step to the swimlane
7. In the Step Properties pane (on the left), enter Communicate Upgrade Options
in the Name field. This process sets the step name.
8. Click the Edit icon to the right of the Case Properties field.
9. On the Case Properties tab, click Select Property.

Chapter 8. Building a simple solution: Part 2 273
10.Click Select all to choose all of the case properties as the step parameters,
as shown in Figure 8-6. Click OK.
Figure 8-6 Editing step properties
Remember: This example maps all of the case properties to data fields in
the task (workflow). However, only those fields that are required by the task
must be mapped.


Chapter 8. Building a simple solution: Part 2 275
The Case Manager Builder Step Designer uses an elastic band effect when
you connect the icons. The graphic then becomes a series of curves that
connect the two steps, as seen in Figure 8-8.
Figure 8-8 Connecting the two steps
12.Click the Validate icon to apply your changes and validate the task. If there
are validation errors, they are displayed in the lower left on the task.
13.Click Save and then Close to complete editing of the task workflow.
14.Click Save and Close to save and close the solution.
8.1.2 Creating the Upgrade Plan task diagram
Use the same procedure that is described in 8.1.1, “Creating the Upgrade
Product task diagram” on page 268 to create the following task diagram for the
Upgrade Plan task:
1. Select Sales Agent for the swimlane role.
2. Enter Communicate Plan Upgrade Options for the step name.
Tip: Save and Close the solution often to save the solution artifacts in the
design object store.

276 Advanced Case Management with IBM Case Manager
3. Select all case properties as the step parameters.
Figure 8-9 shows the task diagram for the Upgrade Plan task.
Figure 8-9 Upgrade Plan task diagram
8.1.3 Creating the Call Customer task diagram
Use the same procedure that is described in 8.1.1, “Creating the Upgrade
Product task diagram” on page 268 to create the following task diagram for the
Call Customer task:
1. Select Sales Agent for the swimlane role.
2. Enter Call Customer for the step name.

Chapter 8. Building a simple solution: Part 2 277
3. Select all case properties as the step parameter
Figure 8-10 shows the task diagram for the Call Customer task.
Figure 8-10 Call Customer task diagram
8.1.4 Creating the Verify Billing task diagram
Use the same procedure that is described in 8.1.1, “Creating the Upgrade
Product task diagram” on page 268 to create the following task diagram for the
Verify BIlling task:
1. Open the solution for editing.
2. On the Case Type tab, start the Step Editor for this task.
3. Select Billing Agent for the swimlane role.
4. Enter Verify Supporting Doc for the step name.

278 Advanced Case Management with IBM Case Manager
5. In the Step Properties pane, click Responses. Add Valid Billing and
Invalid Billing as the responses for Verify Supporting Doc step, as shown
in Figure 8-11. Click OK.
Figure 8-11 Adding response to a step
6. Select all case properties as the step parameters and click OK.
7. Drag the connector from the Launch Step to the Verify Complaint step.
8. Create another Billing Adjustment step in the Billing Agent swimlane.
9. Drag the connector from the Verify Supporting Doc to the Billing Adjustment.


280 Advanced Case Management with IBM Case Manager
12.Connect Verify Supporting Doc and Send Correspondence, and set the
response to Invalid Billing. The final task diagram for Verify Billing task is
shown in Figure 8-13.
Figure 8-13 Verify Billing task diagram
13.Validate, save, and close.
8.1.5 Creating the Verify Complaint task diagram
Use the same procedure that is described in 8.1.1, “Creating the Upgrade
Product task diagram” on page 268 to create the following task diagram for the
Verify Complaint task:
1. Open the solution for editing.
2. On the Case Type tab, start the Step Editor for this task.
3. Select Contact Center for the swimlane role.
4. Enter Verify for the step name.
5. Select all case properties as the step parameters and click OK.

Chapter 8. Building a simple solution: Part 2 281
6. Add a Rule Step into the System swimlane.
7. Enter Customer Rating for the rule step name.
8. Select Customer Rating Table for the rule name.
9. Drag the connector from the Launch Step to the Customer Rating step, and
from the Customer Rating step to the Verify Complaint step.
10.Validate, save, and close.
Figure 8-14 shows the task diagram for the Verify Complaint task.
Figure 8-14 Verify Complaint task diagram
8.1.6 Creating the Review Product Complaint task diagram
Use the same procedure that is described in 8.1.1, “Creating the Upgrade
Product task diagram” on page 268 to create the following task diagram for the
Review Product Complaint task:
1. Select Specialist for the swimlane role.
2. Enter Review Product Complaint for the step name.
3. Select all case properties as the step parameters.

282 Advanced Case Management with IBM Case Manager
Figure 8-15 shows the task diagram for Review Product Complaint task.
Figure 8-15 Review Product Complaint task diagram
8.1.7 Creating the Review Non-Product Complaint task diagram
Use the same procedure that is described in 8.1.1, “Creating the Upgrade
Product task diagram” on page 268 to create the following task diagram for the
Review Non-Product Complaint task:
1. Select Specialist for the swimlane role.
2. Enter Review Non-Product Complaint for the step name.
3. Select all case properties as the step parameters.

Chapter 8. Building a simple solution: Part 2 283
Figure 8-16 shows the task diagram for Review Non-Product Complaint task.
Figure 8-16 Review Non-Product Complaint task diagram
8.1.8 Creating the Investigate Product Safety task diagram
Use the same procedure that is described in 8.1.1, “Creating the Upgrade
Product task diagram” on page 268 to create the following task diagram for the
Investigate Product Safety task:
Select Investigator for the swimlane role.
Enter Investigate Product Safety for the step name.
Select all case properties as the step parameters. Change the access
attribute to Read only for the following properties:
– Customer Telephone
– Customer Email
– Customer State
– Customer Rating
– Customer Number


Chapter 8. Building a simple solution: Part 2 285
Figure 8-18 shows the task diagram for the Investigate Product Safety task.
Figure 8-18 Investigate Product Safety task diagram
8.1.9 Creating the Send Corresponding Letter task diagram
This task is started when a document of type Correspondence is filed in the case.
The document must be attached to the task workflow.
Complete the following steps to create the Send Corresponding Letter task
diagram:
1. Complete the following steps to create the attachment that starts the task as a
property in the workflow:
a. Start the Step Builder for the Send Corresponding Letter task.
b. Click Manage Attachments at the top of the Step Editor.
c. Click Add Attachment.
d. In the Attachment Name field, enter CorrespondingLetter. Do not include
any spaces because Content Platform Engine does not allow spaces in
attachment name.

286 Advanced Case Management with IBM Case Manager
e. In the Prompt field, enter Corresponding Letter. Unlike the Attachment
Name, the Prompt field can have spaces. It represents the display name
for an attachment.
f. Click OK.
g. Select CorrespondingLetter from the Initiating Attachment field and click
Close, as shown in Figure 8-19. This process sets the
CorrespondingLetter attachment as a starting attachment for the task
workflow.
Figure 8-19 Creating the attachment so that it is available as a parameter to the step
2. Use the procedure that is described in 8.1.1, “Creating the Upgrade Product
task diagram” on page 268 to add a swimlane role and step and edit the
following step properties:
a. Select Contact Center for the swimlane role.
b. Enter Review Corresponding Letter for the step name.

Chapter 8. Building a simple solution: Part 2 287
c. Select all case properties. Select Read only for all the case properties that
were added as step parameters, as shown in Figure 8-20.
Figure 8-20 Adding case properties to the step in Read only mode
3. In the Step Properties pane, click the Edit icon to the right of the Attachments
field.
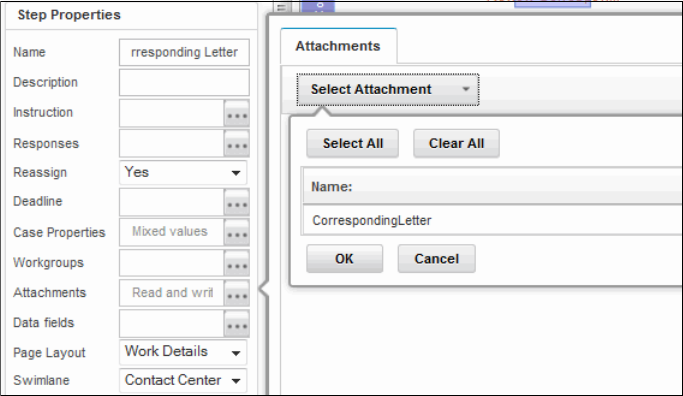
288 Advanced Case Management with IBM Case Manager
4. Click Select Attachment → CorrespondingLetter, as shown in Figure 8-21.
Click OK to accept the selection.
Figure 8-21 Selecting an attachment for a step
5. Click OK to finish selecting attachments.
6. Draw the connector from the Launch Step to the Review Corresponding Letter
step.

Chapter 8. Building a simple solution: Part 2 289
Figure 8-22 shows the task diagram for the Send Corresponding Letter task.
Figure 8-22 Send Corresponding Letter task diagram
The Send Corresponding Letter task also can contain a step that generates a
customer letter. This step uses a third-party tool to generate the letter to be sent
to the customer.
8.1.10 Creating the Close Complaint task diagram
Use the same procedure that is described in 8.1.1, “Creating the Upgrade
Product task diagram” on page 268 to create the following task diagram for the
Close Complaint task:
1. Select Specialist for the swimlane role.
2. Enter Review and Close for the step name.
3. Select all case properties as the step parameters.

290 Advanced Case Management with IBM Case Manager
Figure 8-23 shows the task diagram for Close Complaint task.
Figure 8-23 Close Complaint task diagram
8.1.11 Creating the Investigate Employee task diagram
The Investigate Employee task is a user-created task. When a case worker
creates this task, Case Manager Client presents the case worker with the Launch
Step page. The case worker can then enter the values for the properties and
attachments. These values are used to start the task workflow data fields and
attachments when the workflow is started.
Complete the following steps to create the Investigate Employee task diagram:
1. Complete the following steps to define the attachments for the task workflow,
as shown in Figure 8-24 on page 291:
a. Click Manage Attachments at the top of the Step Editor.
b. Click Add Attachment.
c. In the Attachment Name field, enter CorrespondingLetters (no spaces
allowed).
d. In the Prompt field, enter Corresponding Letters.
e. Click OK.

Chapter 8. Building a simple solution: Part 2 291
f. Repeat these steps for the attachment SupportingDocuments.
g. Click Close.
Figure 8-24 Defining attachments to use in the Investigate Employee task diagram
2. Update the step properties for the Launch Step by completing the following
steps:
a. Select Launch Step.
b. In the Step Properties panel, click the Edit icon to the right of the
Attachments field.
Requirement: For a case worker to see the attachment when they are
opening a work item, you must define the attachment by using Add
Attachments. After you define it, use step properties to add the attachment
to the step. The attachment must be created in each task that contains
steps where the attachment is shown.

292 Advanced Case Management with IBM Case Manager
c. Select CorrespondingLetters and SupportingDocuments from the
Select Attachment menu, as shown in Figure 8-25. Click OK to accept the
selection.
Figure 8-25 Adding attachments to the Launch Step
d. Click OK to finish adding attachments for the Launch Step.
e. In the Step Properties panel, click the Edit icon to the right of the Case
Properties field.
f. On the Case Properties tab, click Select Property.
g. Click Select all to choose all the case properties as the step parameters,
and then click OK.
h. In the Step Properties pane, click OK to save the changes for the Launch
Step.
3. Create the following role swimlane and step by using the procedure that is
described in 8.1.1, “Creating the Upgrade Product task diagram” on
page 268:
a. Select Manager for the swimlane role.
b. Enter Investigate Employee for the step name.
c. Select all case properties as the step parameters.
d. Draw the connector from the Launch Step to the Investigate Employee
step.
Figure 8-26 on page 293 shows the task diagram for the Investigate Employee
task.

Chapter 8. Building a simple solution: Part 2 293
Figure 8-26 Investigate Employee task diagram
8.1.12 Creating the Request Assistance task diagram
The Request Assistance is another user-created task. Use the procedure that is
described in 8.1.11, “Creating the Investigate Employee task diagram” on
page 290 to configure the Launch step and create the following task diagram:
1. For attachments, select SupportingDocuments.
2. For first role swimlane, select Contact Center.
3. Complete the following steps for the step on the Contact Center:
a. Enter Request Help as its step name.
b. For the case properties, select all properties.
c. For the attachment, select SupportingDocuments.
4. For the second role swimlane, select Specialist.
5. Complete the following steps for the step on the Specialist swimlane:
a. Enter Process Request as its step name.
b. For the case properties, select all properties.
c. For the attachment, select SupportingDocuments.


Chapter 8. Building a simple solution: Part 2 295
8.2 Saving and validating the solution
To complete the solution, save and validate it by completing the following steps:
1. From the Case Type window, click Save, as shown in Figure 8-28.
Figure 8-28 Saving the tasks
2. Click Validate, as shown in Figure 8-29.
Figure 8-29 Validating the case type
Remember: This validation is for this Case type and its collection of Tasks
only. This process does not validate the entire solution.

296 Advanced Case Management with IBM Case Manager
3. Click Save and Close to save the solution.
The solution is now complete. After you build the solution, you must deploy it in
an environment before you can use it.
8.3 Deploying the Customer Complaints solution
In the development environment, use Case Manager Builder to deploy the
solution by completing the following steps:
1. On the Manage Solutions page, select the Customer Complaints solution.
2. Click Deploy, as shown in Figure 8-30.
Figure 8-30 Deploying the Customer Complaints solution
3. Click Deploy to confirm and commit changes that were made on the solution
before deployment, as shown in Figure 8-31 on page 297.

Chapter 8. Building a simple solution: Part 2 297
Figure 8-31 Deploy confirmation to commit changes
After the deployment is completed, Case Manager Builder displays the
deployment status for the solution on the Manage Solutions page (a green
rounded icon with a check mark). For the simple Customer Complaints solution,
Case Manager Builder displays the successful deployment, as shown in
Figure 8-32.
Figure 8-32 Successful deployment message
Troubleshooting: If the deployment is unsuccessful, check the deployment
detail and deployment error logs from the More Actions menu, as shown in
Figure 8-33 on page 298.
The deployment might take some time to complete. The status bar shows the
deployment status.

298 Advanced Case Management with IBM Case Manager
Figure 8-33 Locating the deployment logs
8.4 Testing the Customer Complaints solution
The users Bill, Carl, Ian, Isabella, Mary, Steve, and Sally are used to create
cases and process the work for the roles that are specified in the sample
solution. Make sure to add these users to your LDAP server before you begin. If
you cannot add these users to your LDAP server, replace them with the
appropriate users from your LDAP.
After the successful deployment, test the solution by completing the following
steps:
1. From Case Manager Builder, click Test for the Customer Complaints solution,
as shown in Figure 8-34.
Figure 8-34 Testing the solution
Requirement: Follow the guidelines in the “Planning for IBM Case Manager
security” section in IBM Case Manager Information Center to give users
access to the cases and tasks.
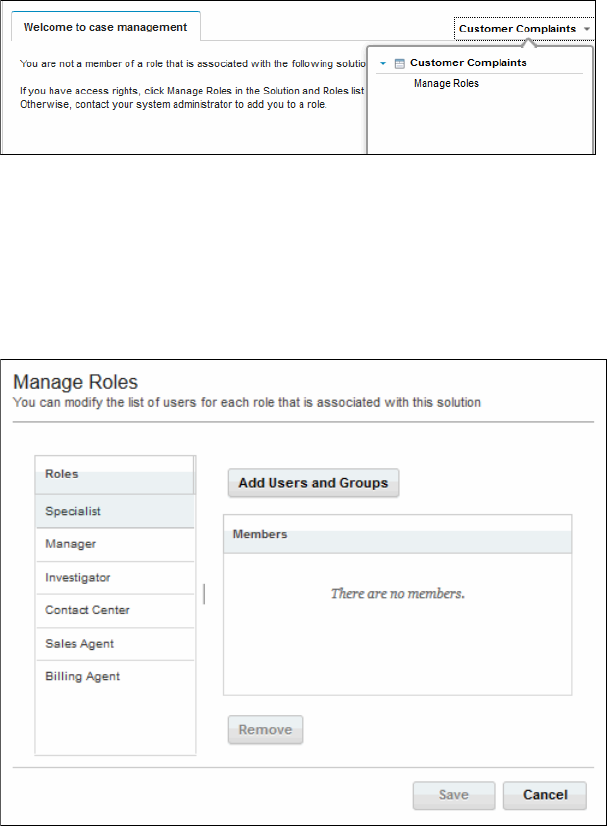
Chapter 8. Building a simple solution: Part 2 299
2. The first time the solution is tested, members must be assigned to the roles
defined for the solution. After Case Manager Client displays the solution page,
click Customer Complaints → Manage Roles (as shown in Figure 8-35) to
assign users and groups to each role.
Figure 8-35 Select Manage Roles for the first time
The Manage Roles window is displayed for the solution, as shown in
Figure 8-36. You must assign members to each role to test your solution.
These members can be specific users or a group of users. Users and groups
are defined and maintained on the LDAP provider that is configured for your
IBM FileNet P8 Platform.
Figure 8-36 Manage Roles window
3. To add new members to a role, complete the following steps:
a. Highlight a role from the Roles pane.

300 Advanced Case Management with IBM Case Manager
b. Click Add Users and Groups. The Add Users and Groups window opens,
as shown in Figure 8-37.
Figure 8-37 Add Users and Groups window for a role
c. Select the appropriate directory server to use from the Directory
drop-down menu.
d. Select the type of member to add (User or Group) from the Search for
drop-down menu.
e. Enter the name of the user or group (or the first characters) and click
Search. A list of matching users (or groups) is listed in the Available panel.
f. Select the members that you want to add from the Available panel and
click the + icon to add the members to the role.
g. Click Add to save the members for the role.
4. Complete the process in step 3 to add the following users to each role:
– For the Billing Agent role, add Bill.
– For the Contact Center role, add Carl.
– For the Investigator role, add Ian and Isabelle.
– For the Manager role, add Mary.
– For the Specialist role, add Steve.
– For the Sales Agent role, add Sally.
5. Log out of Case Manager Client.
6. Log in as Carl to create a case.


Chapter 8. Building a simple solution: Part 2 303
9. Enter the following information for Complaint Information and Flags:
– Enter 9876 for Case Number.
– Enter 1,500 for Total Transaction Amount.
– Set today’s date for Complaint Received date.
–Set 548-8759 for Part Number.
– Set the Category to Product.
– Set Valid flag to true.
– Set Upsale Opportunity flag to true.
10.Click Add to add the case.
11.To see the newly created case, complete the following steps:
a. Select the Cases tab.
b. Enter 12345 (or enter % to search for all cases) for the Case Number.
c. Click Search.
d. Click the Title link to open the case.
12.After the case is opened, select the Tasks tab to display the status of the
following tasks that are defined for this case type. Figure 8-41 on page 304
shows the task status for the selected case:

304 Advanced Case Management with IBM Case Manager
Figure 8-41 List of tasks for a running case
– The Send Corresponding Letter task is in the Waiting state because it is
waiting for a document of type Correspondence to be filed in the case.
– The Upsell Opportunity container task is started automatically when the
condition Upsale Opportunity = true is met.
– The Call Customer subtask of the Upsell Opportunity container task is
started automatically.

Chapter 8. Building a simple solution: Part 2 305
– The Upgrade Plan subtask is disabled because it belongs to an exclusive
set. The Upgrade Product subtask is already started when the
preconditions Upsale Opportunity = true and Upgrade Category = Product
are met. See Table 7-6 on page 247 for the list of exclusive tasks.
– The Review Product Complaint task is started because the conditions
Product Category = Product and Valid = true are met.
– The Close Complaint task is created but not started because it is a manual
task. Similarly, the Investigate Product Safety task is created but not
started because it is a manual task.
13.Click Close to close the case view.
14.Select the Work tab. Because Carl is logged in, Carl cannot process the work
item because there is no task that is associated to his role now. There are no
work items that are displayed in his in-basket.
15.To process the work item, log out as Carl and log in back as Steve.
Figure 8-42 shows the work item in the Specialist in-basket. Steve opens the
work item in the Specialist in-basket, sets the Complaint Status to
Processing, and completes the work.
Figure 8-42 In-basket for Specialist role
16.The case now has one completed task, as shown in Figure 8-43 on page 306.

306 Advanced Case Management with IBM Case Manager
Figure 8-43 Current completed tasks
17.The Contact Center creates a letter to inform the customer of the case status
in the Letter Templates folder and files it in the current case. File the
document to the subfolder Correspondence of the case instance. To file the
letter, complete the following steps:
a. Click the Documents tab of Case Information.
b. Double-click the Correspondence folder.
c. Click Add → Add Document from Local System, as shown in
Figure 8-44.
Figure 8-44 Selecting Add Document

Chapter 8. Building a simple solution: Part 2 307
d. Click Browse to locate a document in your local workstation.
e. By default, the Document Title is set to the name of the local document.
You can change the Document Title of the document.
f. For Class, select Correspondence.
g. Enter the Case Number.
h. Click Add to add the document to the case folder.
Figure 8-45 shows the Add Document window.
Figure 8-45 Selecting a document of the correct document type

308 Advanced Case Management with IBM Case Manager
18.The Send Corresponding Letter task is started automatically when a new
document is filed into the case, as shown in Figure 8-46.
Figure 8-46 Send Corresponding Letter task started
19.Carl processes the work for the Send Corresponding Letter task.
20.Sally processes the work for the Call Customer and Upgrade Product tasks,
which closes the possible upsell opportunity. Processing these two tasks
completes the Upsell Opportunity task.
21.Steve reviews the case information, then sets the Complaint Status to Close.
This step completes the work for the Close Complaint task.

Chapter 8. Building a simple solution: Part 2 309
All of the required tasks for the current case are completed, as shown in
Figure 8-47.
Figure 8-47 List of all completed tasks
8.5 Improving the solution
The example that is presented in this chapter and Chapter 7, “Building a simple
solution: Part 1” on page 211 is a simple solution. Solution development often
takes multiple iterations. The next iteration of solution development can improve
the following areas:
Solution icon
Property choice list
Solution properties
Document properties
In-basket properties

310 Advanced Case Management with IBM Case Manager
It is beyond the scope of this book to provide detailed implementation steps for
these areas. These potential improvements are described to showcase the
improvements that you can build into the solution for future iterations.
8.5.1 Solution icon
The current default icon (as shown in Figure 8-48) might not depict the solution
properly. You might want to change it to another icon by selecting one of the
icons that are bundled with IBM Case Manager.
Figure 8-48 Current solution icon
8.5.2 Property choice list
Table 7-1 on page 218 lists the following case states: Open, Closed, Processing,
Pending, and On-Hold. To produce a case status report for the number of invalid
cases, you might want to have more choices, such as Invalid. By using this
choice, you can differentiate between cases that are closed because the case
workers resolve them, and those that the case workers determined were invalid.
8.5.3 Solution properties
You can manage the solution properties for the customer address better by
breaking up the address into smaller pieces. Instead of Address, Customer City,
and Customer State, you can have the properties Customer Street Address,
Customer City, Customer State, and Customer ZIP Code. You can then construct
the customer address by using these properties. Also, you might want to design
the properties for the customer address to handle the format differences between
nationalities.
8.5.4 Document properties
Currently, a document associates only with a single case property (the Case
Number). To search for the documents with different attributes, such as the
document’s received date and case priority, you must add more properties for the
documents.
Chapter 8. Building a simple solution: Part 2 311
8.5.5 In-basket properties
If you want to sort the in-basket by Customer Number and Case Number, you
can modify the in-basket definition to sort by Customer Number and Case
Number. Additionally, you can add filters to the In-basket definition to produce a
subset of activities.
312 Advanced Case Management with IBM Case Manager

© Copyright IBM Corp. 2013, 2014. All rights reserved. 313
Chapter 9. Migrating and deploying
solutions
After a solution is developed and tested, often it is necessary to migrate the
solution from a development environment to a testing or production environment.
This process can be involved, and can incorporate many tools and techniques.
With IBM Case Manager, we can use different migration models, depending on
the kind of asset that we want to migrate. This chapter describes the different
migration models, starting with describing the advantages for each approach and
suggesting how to combine the best of each one.
This chapter includes the following sections:
Migration models and migration procedure overview
Migration and deployment procedure overview
Preparation
Migration
Deployment
Configuration
9
314 Advanced Case Management with IBM Case Manager
9.1 Migration models and migration procedure overview
Multiple instances of IBM Case Manager that use distinct application server
instances are deployed to create different environments to serve various
purposes. The term
environment in this chapter describes a collection of servers
that often belong to a distinct IBM FileNet P8 domain that was created for one
particular purpose.
For example, you can have an environment for business analysts and solution
developers to create a solution, an environment for developers to perform
functional testing, and another testing environment for system integrators to test
everything. Lastly, every company has a production environment on which the
final tested solution is deployed for case workers to work on active and archived
cases.
In this section, we describe the differences between the traditional FileNet P8
application migration model and IBM Case Manager migration model and explain
the advantages for using each one when assets are migrated between
environments.
For simplification of explanation, we use the following abbreviations:
DEV: Development
UAT: User acceptance, testing, and quality assurance
PROD: Production
9.1.1 Traditional FileNet P8 application migration model
In this migration model, an application moves in stages through multiple
environments. This movement is often expressed by using the following
shorthand:
DEV → UAT → PROD
If an issue is found in the UAT environment, a correction to the application can be
applied and tested directly in the UAT environment. After the user acceptance
tests pass, the application often is migrated directly from the UAT environment to
the PROD environment. The application modifications must then be separately
replicated to the development environment to bring the development version of
the application in sync with the version that was moved to the PROD
environment. It is critical to have well-defined processes in place to ensure that
application modifications are managed as a potentially bidirectional process
between the environments.
The stages are shown in Figure 9-1 on page 315.

Chapter 9. Migrating and deploying solutions 315
Figure 9-1 Traditional FileNet P8 application migration model
Although there are no strict requirements, the following requirements are
accepted preferred practices for these environments:
Development must not be done in the same environment as the production
site.
For the integrity of the test environment, it should be separate from
development. Segregating these activities in different environments avoids
the introduction of unwanted configuration changes or code changes by
developers before those changes are ready to be tested. It also allows for
verification of changes to be conducted in a clean environment by using
documented procedures to ensure that the results are well-understood and
repeatable.
Similarly, segregating production from development and test avoids the
introduction of unwanted changes before those changes are ready to be put
into production.
Highly advised is the use of the same LDAP foundation across all stages,
except the development environment. This yields more reliable security
testing and allows for scripts and procedures that are developed during
testing to be used when the same changes are applied to production.
For most FileNet P8 application development efforts (traditional and those
supported by IBM Case Manager), the recommendation is to segregate the
environments by the FileNet P8 domain. The isolation that is achieved by this
approach is optimal to allow people to work simultaneously and
independently on the same project but in different phases without adversely
affecting each other. In particular, giving each environment its own FileNet P8
domain makes it easy to grant domain-wide permissions in each environment
to different groups.
316 Advanced Case Management with IBM Case Manager
For example, developers can be given full permission to configuration objects
in the development environment, but no permission to configuration objects in
the production environment.
9.1.2 IBM Case Manager solution migration model
The DEV, UAT, and PROD environments (as described in the previous section)
and the other environments also exist with an IBM Case Manager system. The
same recommendations for environment separation and other preferred
practices apply. However, the migration model for an IBM Case Manager solution
application differs in one important way from the traditional application migration
model.
To better control versions of the solution definition, the solution design tools
(Case Manager Builder and FileNet Process Designer) are only available in the
development environment. This configuration ensures that the solution, which is
the core of the solution application, follows a well-controlled modification
process. The solution definition is governed by using well-defined procedures
with a “one source” approach. The development environment manages the
solution definition and all other environments contain migrated versions that are
deployed to, but not edited in, those other environments.
Any issues that are found in UAT that require changes to the solution must be
resolved and tested first in the development environment. Then, the solution is
migrated and redeployed to the UAT environment for verification and further
testing. Therefore, the solution moves through the environments in stages: DEV
-> UAT, DEV -> PROD, as shown in Figure 9-2 on page 317.
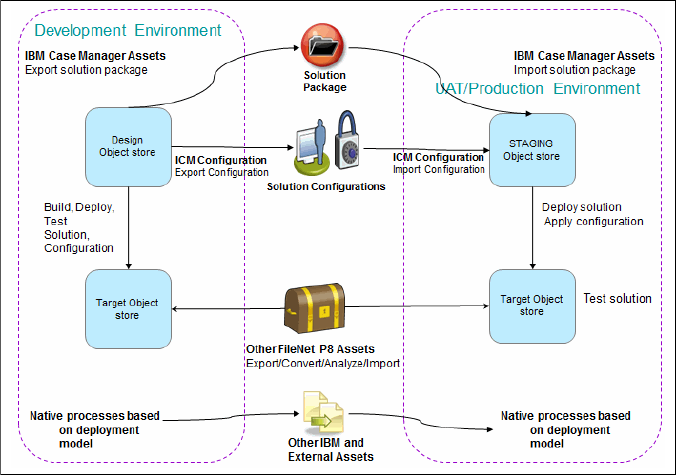
Chapter 9. Migrating and deploying solutions 317
Figure 9-2 IBM Case Manager solution migration model
9.1.3 Using the best of both migration models
Some external factors can affect the overall solution application, but not affect the
core solution definition. As those aspects are modified and tested in the UAT
environment, the resulting configuration changes should be migrated directly
from UAT to PROD to reduce the risk of unforeseen issues. Aspects not affecting
the core and ideally managed without requiring solution redeployment include
the following examples:
Security model changes and LDAP differences
Audit definition requirements
Translation of assets to support localization
The UAT environment can still be used to capture, potentially automate, and test
the configuration steps that are required to support the solution. If the UAT
environment for the IBM Case Manager system uses the same LDAP as the
production environment, then, as with the traditional application, the testing,
solution application installation, and configuration documentation and any
automation that is developed can be used directly when the solution is deployed
into the production environment.
318 Advanced Case Management with IBM Case Manager
Therefore, the solution and its supporting configurations can follow the following
distinct migration paths:
Solution definition:
– DEV -> UAT
– DEV -> PROD
Security and Audit Definition Configurations
DEV -> UAT -> PROD
Localization
DEV -> UAT -> PROD
The core application migration path uses the IBM Case Manager solution
migration model where all assets should treat the development environment as
the “single source” for the solution application.
Depending on the circumstances, some FileNet P8 assets might originate in the
UAT or production environments. These assets include Content Platform Engine
object store metadata (property templates, document classes, or choice lists)
that exists in the enterprise that is reused when a new solution is designed.
Another example is Content Platform Engine workflow system assets that are
defined outside of IBM Case Manager that are incorporated into the solution,
such as a workflow system configuration or component queue. Following the
traditional application model, the definition of these assets might be modified in
the UAT environment and then must be migrated back to development.
Figure 9-3 on page 319 shows the migration paths.

Chapter 9. Migrating and deploying solutions 319
Figure 9-3 Advanced solution application migration
Incorporation of the traditional migration model for non-core aspects makes
available experiences and configurations from the testing environments when the
solution is migrated and deployed to the production environment.
The more environments that must be maintained, the more important it is to
produce a repeatable migration and deployment process to achieve the following
goals:
Save time
Reduce errors
Reduce risks
Ensure similarity among environments
Reproduce problems reliably for troubleshooting and resolution
The outcome that is achieved by blending the traditional application migration
model with the IBM Case Manager solution migration model can meet those
goals by allowing a site to develop and automate a repeatable deployment
process in UAT. This repeatable process can then be used when the solution is
migrated and deployed into other environments, most especially production. The
following key tasks can be completed:
Capture and automate repeatable process for moving solution to PROD

320 Advanced Case Management with IBM Case Manager
Write clear instructions for the entire process capturing the following
important facts:
– Security credentials that are used and required
– Manual security changes
– Configuration tweaks needed and how the tweaks are applied
– Order in which assets must be migrated and deployed
Test deployment plan and instructions in UAT
Figure 9-4 shows the overall migration and deployment process at a high level.
This reflects migrating and deploying from a development environment to a
non-development environment.
Figure 9-4 High-level process: Solution application migration DEV to UAT
9.2 Migration and deployment procedure overview
When you are migrating and deploying an IBM Case Manager solution
application, you must consider the following different types of assets:
IBM Case Manager assets: These assets include assets that were created in
Case Manager Builder when the solution was designed.
Chapter 9. Migrating and deploying solutions 321
Other IBM FileNet P8 assets: These assets are created by using FileNet P8
tools, not managed by IBM Case Manager.
Other IBM and external assets: These assets are developed outside of IBM
Case Manager and FileNet P8 tools.
The overall migration and deployment procedure includes the following overall
steps:
1. Preparation:
a. Preparing IBM Case Manager assets
b. Preparing FileNet P8 assets
c. Preparing other IBM assets and external artifacts
2. Migration:
a. Migrating IBM Case Manager assets
a. Migrating FileNet P8 assets
a. Migrating other IBM and external artifacts
3. Deployment:
a. Deploying IBM Case Manager assets
b. Deploying FileNet P8 assets
c. Deploying other IBM and external artifacts
4. Configuration:
a. Configuring IBM Case Manager assets
b. Configuring FileNet P8 assets
c. Configuring other IBM and external artifacts
For more information about migrating and deploying of these assets, see the IBM
Case Manager 5.2 Solution Deployment Guide, which is available at this website:
https://www.ibm.com/developerworks/community/blogs/e8206aad-10e2-4c49-b
00c-fee572815374/entry/ibm_case_manager_5_2_solution_deployment_guide
This guide is divided into three parts and each part focuses on one of the three
types of assets. The content of this chapter is based on the guide. However, we
present the migration and deployment information in a sequential approach,
following the logical order of steps you perform during a solution migration.
You can use the procedure that is presented in this book as a checklist for your
application migration and deployment process. For more information, always
reference the guide.
The rest of the chapters in this book follow the overall procedure that is outlined
here for preparing, migrating, deploying, and configuring the solution.
322 Advanced Case Management with IBM Case Manager
9.3 Preparation
This phase is focused on the identification and preparation of all assets for the
migration process.
9.3.1 Preparing IBM Case Manager assets
When you are preparing IBM Case Manager assets, you must consider the
various aspects that are associated with the following tasks:
Identifying solution application artifacts and assets.
Assembling migration and deployment instructions.
Performing one-time configuration and setup tasks.
Identifying solution application artifacts and assets
During the solution design and development phase, it is important to create and
maintain a solution package and supplemental material that represents a listing
of all assets in the entire solution application. As a part of this, information to help
the application migration and deployment process must be included. This
documentation is needed during the deployment phase and for future tracking
and change management purposes. When the solution application migration and
deployment is documented, the following items must be noted:
A description of the IBM Case Manager solution components. These consist
of solution assets that are created during solution development by using the
Case Manager Builder and administration client. Solution assets are listed in
Table 9-1 on page 323.
Any environment-specific references within the solution, such as a URL for
the website widget or a stored search for the ContentList widget. These
references must be mapped as a part of the solution migration.
The solution roles and the LDAP users or groups that are required to
associate with the roles.

Chapter 9. Migrating and deploying solutions 323
Table 9-1 lists the assets to consider during the preparation stage.
Table 9-1 IBM Case Manager assets
Assembling migration and deployment instructions
A comprehensive set of tailored instructions should be written to document the
process to follow when a solution application is migrated from the development
environment to test or production environment. The document should include the
required tasks, their order of execution, configuration details and options, and the
roles (participants) that are involved in the processes with information about the
required system privileges.
Type Defined by
using
Location Migration tool Deployment
tool
Solution
definition
Case Manager
Builder
Design Object
Store (DOS)
Configuration
tool/
administration
client
Configuration
tool/
administration
client
Process
Engine
configuration
for solution
Case Manager
Builder,
Process
Designer
DOS Configuration
tool/
administration
client
Configuration
tool/
administration
client
Solution
workflow
collection
Case Manager
Builder,
Process
Designer
DOS Configuration
tool/
administration
client
Configuration
tool/
administration
client
Task
workflows
Case Manager
Builder,
Process
Designer
DOS Configuration
tool/
administration
client
Configuration
tool/
administration
client
Pages, views,
roles
Case Manager
Builder
DOS Configuration
tool/
administration
client
Configuration
tool/
administration
client
Case instance
security
Case Manager
administration
client
DOS Administration
client
Administration
client
Case history,
audit
configuration
Case Manager
administration
client
DOS Administration
client
Administration
client
324 Advanced Case Management with IBM Case Manager
Performing one-time configuration and setup tasks
After an application is migrated and deployed into a new system for the first time,
other configuration steps are often required to be performed in the new
environment. This also is true for an application that is built around IBM Case
Manager. These other steps are referred to collectively as
system configuration.
At the application and solution level redeployment, system configuration
information can be overwritten during the redeployment process and might need
respecification. However, most configuration steps do not need repeating. These
types of system configuration tasks and their procedures are specific to the
solution and its environment. These procedures are not described in this chapter.
However, in the next section of this chapter, we describe some one-time setup
tasks that are required by the FileNet P8 tools that are used for migrating other
FileNet P8 assets.
9.3.2 Preparing FileNet P8 assets
As you start to prepare for your migration of FileNet P8 assets, consider the
following areas:
Object identifier and dependencies
Source and destination environment compatibility
Identifying and documenting other solution application assets
Performing one-time configuration and setup tasks
Object identifier and dependencies
When objects are moved between multiple environments, you must consider
dependencies. Objects are often dependent on other objects in the object store,
the workflow system, or on external resources, as shown in the following
example:
A workflow definition that contains references to attachments (document or
folder). Those attachments must exist in the specified object store in the
destination environment by the time the workflow definition is imported.
An application’s stored search definition is an XML document in an object
store. The XML content references object stores by name and ID. This type of
dependency is automatically handled by FileNet Deployment Manager.
A document references an external website that contains its content. This
type of dependency must be maintained manually.
The extra effort of maintaining the dependencies in the destination
environment can be reduced by following the pattern of having stable GUIDs.
Not following the stable GUID pattern might require more deployment logic.

Chapter 9. Migrating and deploying solutions 325
Source and destination environment compatibility
Part of preparing to migrate any FileNet based application between environments
is ensuring the source and destination object stores are compatible. This process
includes the following tasks:
Ensuring add-ons, which define classes or properties in the destination object
store (target environment) are the same as in the source object store (project
area or target environment)
Considering the release levels of the software and deployment tools that are
used.
Verifying all content to be deployed is checked in before the import process is
started.
Planning the corresponding administrative groups in the source and
destination environments.
Ensuring any services that are required by the solution application are
available when the solution and associated other assets are deployed.
Identifying and documenting other solution application assets
As described in 9.3.1, “Preparing IBM Case Manager assets” on page 322, it is
important to create and maintain a listing of all assets in the entire solution
application during the solution design and development phase. Table 9-2 lists
other FileNet P8 assets to be considered.
Table 9-2 Other FileNet P8 assets to be considered for solution deployment
Note: For more information, see the topic in IBM FileNet P8 5.2 Information
Center, which is available at this website:
http://pic.dhe.ibm.com/infocenter/p8docs/v5r2m0/topic/com.ibm.p8.com
mon.deploy.doc/deploy_ce_import_concepts.htm
Type Defined by
using
Location Migration tool Deployment
tool
Reused
Content
Platform
Engine
classes and
properties
Administration
Console for
Content
Platform
Engine
Target object
store
FileNet
Deployment
Manager
FileNet
Deployment
Manager

326 Advanced Case Management with IBM Case Manager
Reused
queues and
component
queues
Process
Configuration
Console
Target object
store
Process
Configuration
Console and
FileNet
Deployment
Manager
Process
Configuration
Console
Content
Platform
Engine
marking sets
Administration
Console for
Content
Platform
Engine
FileNet P8
domain
FileNet
Deployment
Manager
FileNet
Deployment
Manager
Content
Platform
Engine event
subscription
Administration
Console for
Content
Platform
Engine
Target object
store
FileNet
Deployment
Manager
FileNet
Deployment
Manager
Content
Platform
Engine code
module
Administration
Console for
Content
Platform
Engine
Target object
store
FileNet
Deployment
Manager
FileNet
Deployment
Manager
Content
Platform
Engine event
workflow
definition
Process
Designer
Target object
store
FileNet
Deployment
Manager
FileNet
Deployment
Manager
IBM FileNet
eForms for
FileNet P8
form template
IBM FileNet
eForms for
FileNet P8
designer
Target object
store
FileNet
Deployment
Manager
FileNet
Deployment
Manager
IBM Forms
form template
IBM Forms
Designer
Target object
store
FileNet
Deployment
Manager
FileNet
Deployment
Manager
Type Defined by
using
Location Migration tool Deployment
tool

Chapter 9. Migrating and deploying solutions 327
Performing one-time configuration and setup tasks
After an application is migrated and deployed into a new system for the first time,
the following tasks are often required to be performed in the new target
environment:
Create FileNet Deployment Manager deployment tree.
If more than one FileNet Deployment Manager instance is used to perform the
export, import, and deploy process, a deployment tree must be created for
each FileNet Deployment Manager instance that is used.
Create FileNet Deployment Manager environment.
This task is used to create environments in FileNet Deployment Manager to
enable the tool to connect to an Content Platform Engine environment.
9.3.3 Preparing other IBM assets and external artifacts
As described in 9.3.1, “Preparing IBM Case Manager assets” on page 322,
during the solution design and development phase, it is imported to create and
maintain a listing of all assets in the entire solution application. Table 9-3 on
page 328 summarizes other IBM and external artifacts to be considered.
Workplace
FileNet
Workplace XT
or IBM
Content
Navigator
search stored
in the FileNet
P8 repository
Workplace
FileNet
Workplace XT
or IBM
Content
Navigator
Target object
store
FileNet
Deployment
Manager
FileNet
Deployment
Manager
Search
templates
Search
Designer
Target object
store
FileNet
Deployment
Manager
FileNet
Deployment
Manager
Type Defined by
using
Location Migration tool Deployment
tool

328 Advanced Case Management with IBM Case Manager
Table 9-3 Other IBM and external assets
Solution
asset
Defined by
using
Location Migration tool Deployment
tool
IBM Content
Manager item
types
IBM Content
Manager
system
administration
client
IBM Content
Manager
library server
IBM Content
Manager
system
administration
client
IBM Content
Manager
system
administration
client
IBM Content
Navigator
desktop
IBM Content
Navigator
IBM Content
Navigator
configuration
database
IBM Content
Navigator
administration
tool
IBM Content
Navigator
administration
tool
IBM
Operational
Decision
Manager rules
project
(formerly
known as
WebSphere
ILOG® JRules
BRMS)
IBM
Operational
Decision
Manager Rule
Designer
IBM
Operational
Decision
Manager
Decision
Center
Reused IBM
Business
Process
Manager
processes
IBM Business
Process
Manager
Process
Designer
Process
center,
Process
server
Process
center
administration
tool
Process
center
administration
tool
IBM Content
Analytics with
Enterprise
Search
IBM Content
Analytics with
Enterprise
Search
administration
console
File IBM Content
Analytics with
Enterprise
Search
administration
console
IBM Content
Analytics with
Enterprise
Search
administration
console
Case Analyzer Process Task
Manager
OLAP
database
Process Task
Manager
Microsoft SQL
Server OLAP
Services
Cognos
Real-time
Monitoring
Cognos
Real-time
Monitoring
Workbench
Database for
Cognos
Real-time
Monitoring
Cognos
Real-time
Monitoring
Workbench

Chapter 9. Migrating and deploying solutions 329
9.4 Migration
The migration phase consists of exporting the assets from the source
environment, staging the solution definition in the destination staging object
store, and preparing to import the remaining assets into the destination
environment.
9.4.1 Migrating IBM Case Manager assets
By using information from the solution documentation, you prepare a solution
package for migration. To ensure that a consistent version of the solution is
packaged, freeze development activities for the solution to be migrated while the
assets are exported.
Custom widget External tool
(example:
Rational®
Application
Developer)
External tool External tool IBM Case
Manager
configuration
tool or
administration
client
IBM Content
Navigator
administration
tool
Application
Server's
administration
console
External Data
Service
External tool External tool External tool External tool
Email
templates that
are checked in
as documents
Target object
store
FileNet
Deployment
Manager
Solution
asset
Defined by
using
Location Migration tool Deployment
tool

330 Advanced Case Management with IBM Case Manager
Figure 9-5 shows migration from a non-development environment, such as a test
environment, to another test environment where it can be tested, or the final
production environment where the solution is used by case workers.
Figure 9-5 Overview of basic solution migration from UAT to PROD
As shown in Figure 9-5, the migration process from a final UAT system to the
production system consists of the following steps:
1. Export the solution.
To export the deployed and tested solution from the development
environment, complete the following steps:
a. Log in to the IBM Case Manager administration client by using the
following URL:
http://<ICMserver_host:ICMserver_port>/navigator/?desktop=icmadmi
n
The following default URL is used when IBM WebSphere is used as the
application server:
http://<ICMserver_host>:9080/navigator/?desktop=icmadmin
Note: The freeze is accomplished by coordination between the users in the
development environment and the solution administrator who is performing
the export. Project planning and procedures should include how such a freeze
is communicated.

Chapter 9. Migrating and deploying solutions 331
For example, the default URL that is used when Oracle WebLogic is used
as the application server is shown in the following example:
http://<ICMserver_host>:7001/navigator/?desktop=icmadmin
b. Browse to the design object store for the development environment and
open it by completing the following steps:
i. Select the Solutions node in the navigation pane, as shown in
Figure 9-6.
ii. Select the wanted solution from the list on the right side. Use the
Actions drop-down menu and choose Export → Solution.
Figure 9-6 Export IBM Case Manager solution
c. In the Name the solution package dialog box, enter the Solution package
file name. Click Next.
d. Verify that the information about the Review the solution package to export
dialog box is correct. Click Finish to start the export process.
e. Wait for the processing to complete and confirm that the solution package
successfully exported.
f. Click Download and Close to use your browser to download the solution
package .zip file to a well-known location.
2. Export the security configuration manifest.
If a security configuration was created, you can export the manifest that can
be associated with the solution from the development or UAT environment.
The security configuration can be applied to the imported solution after it is
deployed. Before it is applied, the imported configuration can be edited to
incorporate any changes that are required by the security model or LDAP for
the destination environment.
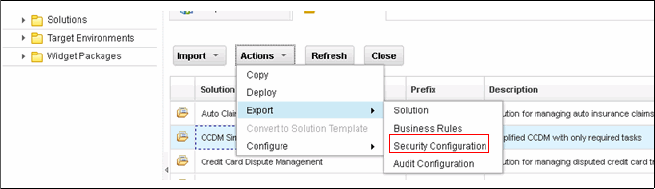
332 Advanced Case Management with IBM Case Manager
To export the security configuration manifest, complete the following steps:
a. Log in to the IBM Case Manager administration client by using the
following default URL:
http://<ICMserver_host:ICMserver_port>/navigator/?desktop=icmadmi
n
b. Open the wanted design (development environment) or staging
(non-development) object store.
c. Select the Solutions node in the navigation pane.
d. Select the wanted solution from the list on the right side. Use the Actions
drop-down menu and choose Export → Security Configuration, as
shown in Figure 9-7.
Figure 9-7 Export security configuration
e. In the Name the package and select security manifests to export dialog
box, enter the Configuration package file name. From Available manifests,
select the security configuration manifest to export. Click Next, as show in
Figure 9-8 on page 333.

Chapter 9. Migrating and deploying solutions 333
Figure 9-8 Exporting security configuration manifest
f. Verify that the information in the Name the security configuration dialog
box is correct. Click Finish to start the export process.
g. Wait for the processing to complete and confirm the configuration package
successfully exported.
h. Click Download and Close to use your browser to download the
configuration package .zip file to a well-known location.
3. Import the solution.
Use the IBM Case Manager administration client to import a solution package
that was previously exported from another environment. The exported
solution package includes all assets that were created for the solution in Case
Manager Builder.
Note: When a solution package or a deployment package is reimported,
service data mappings that are submitted through the IBM Case Manager
or FileNet Deployment Manager tools can appear not to be applied. This
might happen when the package contains a document object asset where
the service mapping applies to the content and that asset exists in the
destination object store with the same ID. For more information about
actions that can be taken if this occurs, see “Reimport of assets with
content containing environment-specific references” in IBM Case Manager
Information Center, which is available at this website:
http://pic.dhe.ibm.com/infocenter/casemgmt/v5r2m0

334 Advanced Case Management with IBM Case Manager
Complete the following steps to import the solution:
a. Log in to the IBM Case Manager administration client by using the default
URL:
http://<ICMserver_host:ICMserver_port>/navigator/?desktop=icmadmi
n
b. Open the desired staging (non-development) object store.
c. Click Solutions → Import → Import Solution to start the import solutions
wizard, as shown in Figure 9-9.
Figure 9-9 Importing solution
d. In the Solution package file name field, enter or browse to the .zip file that
contains the solution package to be imported. Click Next, as shown in
Figure 9-10.
Figure 9-10 Select solution package to import
e. Review the information in the Review the solution package to import dialog
box. Check the Replace existing solution option at the bottom of the
dialog box so that the import updates the existing solution definition.
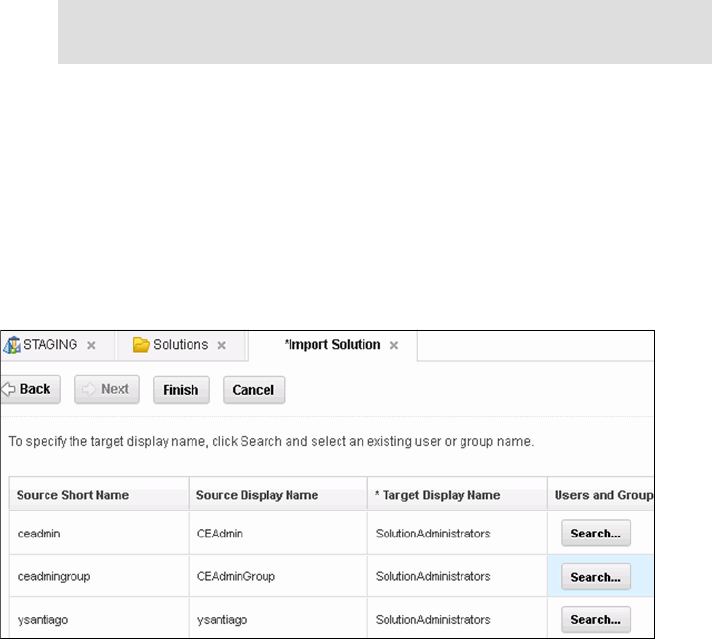
Chapter 9. Migrating and deploying solutions 335
f. Click Next.
g. In the Map users and groups dialog box, click Search to select the user or
group to map to values that are valid for this environment.
h. Map all users and groups to users and groups that are valid in the
destination environment LDAP. Users can be mapped to groups and
multiple users or groups can be mapped to the same user or group (as
shown in Figure 9-11). The information that is captured during the
preparation phase helps with choosing the mappings.
Figure 9-11 Map users and groups
i. Click Finish and verify that the import completed successfully, as shown in
Figure 9-12 on page 336.
Note: Not selecting this option results in an import error if the solution
exists in the destination environment.

336 Advanced Case Management with IBM Case Manager
Figure 9-12 Verify solution import results
4. Import security configuration manifest.
LDAP differences are managed by editing the security configuration after it is
imported, but before it is applied to the deployed solution. The security
configuration wizard indicates which security principles are invalid and must
be corrected. For more information about the security configuration manifest
import operation, see the IBM Case Manager topic “Importing the security
configuration”, which is available at this website:
http://pic.dhe.ibm.com/infocenter/casemgmt/v5r2m0/topic/com.ibm.case
mgmt.design.doc/acmdc055.htm
For a comprehensive description of the contents of the security configuration
manifest and other concepts that are related to security, see the IBM Case
Manager 5.2 Information Center topic “Security”, which is available at this
website:
http://pic.dhe.ibm.com/infocenter/casemgmt/v5r2m0/topic/com.ibm.case
mgmt.design.doc/acmsc000.htm
Complete the following steps to import the security configuration manifest:
a. Log in to the IBM Case Manager administration client by using the
following default URL:
http://<ICMserver_host:ICMserver_port>/navigator/?desktop=icmadmi
n
b. Open the wanted staging (non-development) object store. Click
Solutions → Import → Import Security Configuration to start the
import solutions wizard.

Chapter 9. Migrating and deploying solutions 337
c. In the Security configuration package file name field, enter or browse to
the .zip file that contains the security configuration package to be
imported, as shown in Figure 9-13. Click Next.
Figure 9-13 Import security configuration
d. Review the information in the Verify the selected security configuration
information dialog box. Click Finish to start the import process, as shown
in Figure 9-14.
Figure 9-14 Verify security configuration information
e. Verify that the security configuration was successfully imported. Click
Close to close the wizard.

338 Advanced Case Management with IBM Case Manager
5. Edit security configuration.
As shown previously in this section, the scenario starts with a security
configuration manifest that is migrated with the solution package as a part of
the overall solution application package. However, the security configuration
must be modified to reflect the LDAP for the destination environment. It is
assumed that the proper users and groups are in the test or production LDAP
before editing the security configuration.
Complete the following steps to edit the security configuration:
a. Log in to the IBM Case Manager administration client by using the
following default URL:
http://<ICMserver_host:ICMserver_port>/navigator/?desktop=icmadmi
n
b. Open the wanted staging (non-development) object store. Select the
Solutions node in the navigation pane. Select the wanted solution from
the list on the right side. Use the Actions drop-down menu and choose
Configure → Security, as shown in Figure 9-15.
Figure 9-15 Edit security configuration
c. Complete the following steps in the Create or edit a security configuration
dialog box:
i. Choose Edit a security configuration, as shown in Figure 9-16 on
page 339.
ii. From the list of security configuration manifests that are associated
with this solution that appears at the bottom of the dialog box, select
the security configuration manifest that was created or imported.
iii. Click Next.

Chapter 9. Migrating and deploying solutions 339
Figure 9-16 Selecting security configuration to edit
d. Complete the following steps in the Name the security configuration dialog
box:
i. In the drop-down menu for the Target environment name, choose the
target environment definition that contains the deployed solution to
which the security configuration is applied, as shown in Figure 9-17.
Figure 9-17 Name the security configuration
ii. Click Next.

340 Advanced Case Management with IBM Case Manager
e. Complete the following steps in the Modify permissions for roles dialog
box:
i. Review the specifications for case types, roles, and permissions that
were created by the business analyst and solution developer in the
source environment. These specifications often do not need to be
modified, especially if the solution migration is between a test and
production environment.
ii. Click Next to proceed.
f. Complete the following steps in the Define the administrators and assign
privileges dialog box:
i. Click Add to add the users and groups that administer the solution
deployment.
ii. Click Remove to remove the users and groups that should not be
administrators for the deployed solution.
iii. Click Save to save any changes.
iv. Click Next.
Note: The Invalid column contains an indication of which users and
groups are not valid for the destination target environment LDAP. These
entries must be removed.
At least one valid entry must be added to ensure that a user has the
permissions that are needed to administer the solution. The following
preferred practices are helpful:
Add the user who is editing the security configuration manifest so
that user can make further modifications after the security
configuration is applied later. In this example, this user is ceadmin.
Notice that the Remove button is disabled for this user so the entry
cannot be removed after it is added.
Add a group that holds all users that can act as solution
administrators. Groups are easier to manage than lists of users that
are added directly to the security configuration.

Chapter 9. Migrating and deploying solutions 341
g. In the Associate users and groups with roles dialog box, review the
specifications that were entered when the security configuration manifest
was created or modified in the source for the destination environment, as
shown in Figure 9-18.
Complete the following steps to remove a group or user entry:
i. Expand the wanted role.
ii. Select the user or group entry to be removed.
iii. Click Remove.
Figure 9-18 Remove user or group entry
Complete the following steps to add users and groups:
i. Use Add to open the Associate users and groups to role dialog box.
ii. Select the wanted users and groups to all the roles (see step h).
h. Complete the following steps in the Associate users and groups to role
dialog box, as shown in Figure 9-19 on page 342:
i. Confirm that the wanted role appears in the Role drop-down menu.
ii. Use the search icon to search for users or groups who are appropriate
for this role.
iii. Add the wanted users and groups from the result set.
iv. Repeat these steps until all of the required users and groups for the
particular role are selected.

342 Advanced Case Management with IBM Case Manager
Figure 9-19 Associate users and groups to role
v. Click Add to confirm your choices.
vi. When you return to the Associate users and groups with roles dialog
box, expand the selected role to see your additions, as shown in
Figure 9-20.
Figure 9-20 Verify users or groups association
vii. Click Save to save any changes.
viii.Click Next to proceed.
i. In the Apply the security configuration dialog box, click Save to confirm
your choices, as shown in Figure 9-21 on page 343.

Chapter 9. Migrating and deploying solutions 343
Figure 9-21 Apply security configuration changes
j. Close the Configure Security tab.
9.4.2 Migrating FileNet P8 assets
The process of migrating FileNet assets involves a series of tasks. This section
describes the following tasks that must be performed:
1. Export FileNet workflow system configuration.
Export the required Content Platform Engine Workflow System assets from
the target object store in the project area of the development environment
where the solution application was created and tested. Required Workflow
System assets are those that were created with the Process Configuration
Console or Process Designer when they were not started from Case Manager
Builder or not in solution edit mode.
2. Export FileNet Content Manager assets.
Export the required FileNet Content Manager assets from the target object
store in the project area of the development environment where the solution
application was created and the unit was tested.
Note: Do not select the Apply the security configuration option now.
The security configuration is applied after the solution is deployed.
Note: For more information about a complete scenario for this security
configuration sample, see Part 1 of IBM Case Manager 5.2 Solution
Deployment Guide, which is available at this website:
https://www.ibm.com/developerworks/community/blogs/e8206aad-10e2-
4c49-b00c-fee572815374/entry/ibm_case_manager_5_2_solution_deploy
ment_guide
344 Advanced Case Management with IBM Case Manager
3. Create security principals half map.
For a source half map, it is best to retrieve principal data from the deployment
datasets that were created when the FileNet Content Manager assets were
exported. This creates a relatively small source security principals half map
that contains only the security principals that are referenced by the assets
that were exported.
4. Create services half map.
This task is optional, depending on the solution application design. A common
example includes the IBM Forms form template that contains a web services
reference that must be mapped to a valid value for the destination
environment. Service information can be extracted from the following sources:
– FileNet Content Manager deployment dataset that contains documents
whose content can be processed by FileNet Deployment Manager to
extract the service data.
– FileNet workflow system configuration export file.
– Service half map for the source FileNet Deployment Manager
environment.
5. Create FileNet Deployment Manager deployment package.
In FileNet Deployment Manager, a deployment package is a compressed file
of deployable assets that FileNet Deployment Manager can use to migrate
them into a different environment.
6. Extract FileNet Deployment Manager deployment package.
Prepare the FileNet Deployment Manager instance on the destination
environment: You often start this task by expanding the deployment package
that was created during the export of the FileNet P8 assets, which contains
the source environment half maps and the deployment datasets to be
converted and imported.
7. Create security principals half map.
In the source environment, the deployment dataset is used to filter the LDAP
repository for the destination environment and avoid a time-consuming
download when the LDAP population is large. For the destination
environment, a deployment dataset is not available. Use the information that
was gathered in the preparation phase regarding the security principals that
are used for the destination environment to create a label file. Use this label
file (in FileNet Deployment Manager) to filter the security principals that are
retrieved from the LDAP information.

Chapter 9. Migrating and deploying solutions 345
8. Create services half map.
To create the services half map for the destination environment, a short cut is
available. Often, mapping services are done by editing host and port
specifications in a set of URLs. The FileNet Deployment Manager services
mapping mechanism allows for the direct editing of the services information to
easily correct those values to reflect a new environment.
9. Create source-destination pair with data mappings.
The source-destination pair identifies the source and destination
environments to use for a specific deployment. The data that is gathered for
the pair includes the wanted mappings between the environments for
corresponding object stores, security principals, and services.
10.Convert deployment dataset by using mapping data.
The convert operation uses the export deployment dataset and the data maps
to convert the source objects with information that is specific to the
destination environment. During the conversion process, errors can occur
when unmapped entries are present in the deployment dataset that is
converted. An unmapped entry is benign if it is not referenced in the exported
data.
11.Generate change analysis report.
Change Impact Analysis is an information-only operation that reports on but
does not modify the destination environment. The report includes warnings
and errors for potential import issues. It also includes sizing and other data
that reflects the change impact analysis.
9.4.3 Migrating other IBM and external artifacts
The following samples of external assets can be considered in the migration
process:
Package custom widget
Exported IBM Content Navigator desktop
Note: For more information about a complete scenario for this security
configuration sample, see Part 3 of IBM Case Manager 5.2 Solution
Deployment Guide, which is available at this website:
https://www.ibm.com/developerworks/community/blogs/e8206aad-10e2-4c4
9-b00c-fee572815374/entry/ibm_case_manager_5_2_solution_deployment_g
uide
346 Advanced Case Management with IBM Case Manager
9.5 Deployment
Deploying the solution creates the objects that are required for solution
execution. The deployment procedures are explained in this section.
9.5.1 Deploying IBM Case Manager assets
The following tasks must be considered when you are deploying an IBM Case
Manager solution:
1. Suspend and backup the system.
Before any system modification, it is prudent to back up the portions of the
system that are affected by the changes. For the best possible backup,
activity on the system should be temporarily suspended. This allows a
consistent snapshot of all of the related data to be captured. You must plan to
suspend the system by using locally defined procedures. Include in your
planning how the system and solution administrators access the system to
perform the necessary solution deployment and system configuration tasks.
For more information about backups, see “Backing up your system” in the IBM
Case Manager Information Center, which is available at this website:
http://pic.dhe.ibm.com/infocenter/casemgmt/v5r2m0/topic/com.ibm.case
mgmt.design.doc/acmad003.htm
2. Deploy the solution.
Deploy the imported solution to the wanted project area or target
environment. You also must deploy more assets and import customization
first. For more information, see the Checklist appendix in Part 1 of the
deployment guide, then you can deploy the solution.
If the destination environment is a development environment, the solution is
deployed for testing by using the Case Manager Builder. The following
procedures assume that the destination environment is a non-development
environment, test or production, and the solution is deployed by using the IBM
Case Manager administration client:
a. Log in to the IBM Case Manager administration client by using the
following default URL:
http://<ICMserver_host:ICMserver_port>/navigator/?desktop=icmadmi
n
b. Complete the following steps to open the wanted staging
(non-development) object store:
i. Select the Solutions node in the navigation pane.

Chapter 9. Migrating and deploying solutions 347
ii. Select the imported solution from the list on the right side. Use the
Actions drop-down menu and click Deploy, as shown in Figure 9-22.
Figure 9-22 Deploy case solution
c. In the Target environment name drop-down menu in the Select the target
object store dialog box, choose the target environment definition name for
the target environment to which the solution is deployed. Click Next.
d. In the Review the solution to deploy dialog box, verify the information and
click Finish and then verify that deploy completed successfully, as shown
in Figure 9-23.
Figure 9-23 Review deployed solution
e. Click View Log to save the log for later reference. It is recommended that
you choose a file naming scheme and location so these logs can be used
to retain a history of the changes that are applied to the system.
Open and review the saved log to verify that the solution deployed as
expected.

348 Advanced Case Management with IBM Case Manager
9.5.2 Deploying FileNet P8 assets
The following tasks must be considered when FileNet P8 assets are deployed:
1. Import FileNet Content Manager assets.
Use FileNet Deployment Manager to import assets that are contained in the
expanded deployment package. Import options are used to ensure that a set
of exported assets is consistent when imported. The following import options
often are used when a solution application is migrated:
– Import Object ID: This ensures that for an asset that is stored as a
document (such as a form template or workflow attachment), the
association to a specific document object version is retained.
– Always Update vs. Update if newer: Because it is important for a solution
application deployment to fully replicate the design from the source
development environment, the use of the Always Update option is typical.
However, if your business needs require that assets that are modified
directly in the target environment take precedence over older changes
from the IBM Case Manager development environment, you can select the
Update if newer option.
2. Import FileNet workflow system assets.
Import the required Content Platform Engine Workflow System assets into the
target environment where the solution application is deployed.
9.5.3 Deploying other IBM and external artifacts
The following tasks must be considered when other IBM and external artifacts
are deployed:
Deploy and register widgets.
For a custom widget to be deployed with an IBM Case Manager solution, the
widget package must be registered with the IBM Case Manager server and
registered as a plug-in with IBM Content Navigator server in the target
environment. For more information, see 10.5.7, “Deploying the custom widget
package” on page 400.
Note: To quickly see all of the solutions that are deployed in the test or
production environment, use the following Case Manager Solutions List link
from the IBM Case Manager API deployment information URL, default value:
http://<ICMserver_host:ICMserver_port>/CaseManager/CASEREST/v1/info

Chapter 9. Migrating and deploying solutions 349
Import desktop.
An IBM Content Navigator desktop is created in the target environment.
9.6 Configuration
After a solution is migrated and deployed, more system configuration steps might
be required (depending on the features of the solution). These configurations
steps are described in this section.
9.6.1 Configuring IBM Case Manager assets
In this section, we describe only the following configurations that are managed by
using the IBM Case Manager administration client:
Security configuration
Audit configuration
Complete the following steps to configure Case Manager assets:
1. Apply the security configuration.
This task shows how an existing security configuration manifest that was
created or edited to accommodate the requirements in the test or production
environment is applied to the deployed solution. You start with a security
configuration manifest that was migrated with the solution package as a part
of the overall solution application package. Then, you modify the security
configuration manifest to reflect the LDAP for the destination environment.
Complete the following steps to apply the security configuration:
a. Log in to the IBM Case Manager administration client by using the
following default URL:
http://<ICMserver_host:ICMserver_port>/navigator/?desktop=icmadmi
n
Note: Other configurations outside of the IBM Case Manager administration
client scope are described in the Part 2 of IBM Case Manager 5.2 Solution
Deployment Guide, which is available at this website:
https://www.ibm.com/developerworks/community/blogs/e8206aad-10e2-4c4
9-b00c-fee572815374/entry/ibm_case_manager_5_2_solution_deployment_g
uide

350 Advanced Case Management with IBM Case Manager
b. Open the wanted staging (non-development) object store and complete
the following steps:
i. Select the Solutions node in the navigation pane.
ii. Select the wanted solution from the list on the right side.
iii. Click Actions → Configure → Security, as shown in Figure 9-24.
Figure 9-24 Apply Security Configuration
c. In the Create or edit a security configuration dialog box, click Edit a
security configuration.
From the list that appears at the bottom of the window, select the security
configuration manifest that was created or imported and edited for this
environment. Click Next.
d. In the Name the security configuration dialog box, complete the following
steps:
i. In the drop-down menu for the Target environment name, choose the
target environment definition that contains the deployed solution to
which the security configuration is applied.
ii. Click Next, as shown in Figure 9-25 on page 351.

Chapter 9. Migrating and deploying solutions 351
Figure 9-25 Choosing target environment to apply security configuration
e. For each subsequent dialog, review the information for accuracy, then click
Next.
Repeat this step until the Apply the security configuration dialog box
opens.
f. Making the following selections in the Apply the security configuration
dialog box:
• Apply the security configuration to ask the system to use the
security configuration manifest to apply the security configuration to the
deployed solution in the selected target environment.
• Apply the role membership to ask the wizard to configure the role
memberships. This takes the place of the use of the Manage Roles
operation in IBM Case Manager 5.2 Case Manager Client.
• Apply to all discretionary tasks to ask the wizard to apply the
specified security to all discretionary tasks in the solution. Use this
option often provides a starting point. Then, security is further refined
manually by using ACCE to customize access to individual
discretionary tasks.
Click the Apply button to start the process, Figure 9-26 on page 352.

352 Advanced Case Management with IBM Case Manager
Figure 9-26 Apply security configuration
g. Verify that the process completes successfully, as shown in Figure 9-27.
Figure 9-27 Review security configuration
h. Click View Log to save the log for later reference. It is recommended that
you choose a file naming scheme and location so these logs can be used
to retain a history of the changes that are applied to the system. Open and
review the saved log to verify that security was applied as expected.
2. Modify and verify.
After completing the deployment and configuration process, we might need to
make some final configurations and verify that solution process is complete
and consistent. The following tasks are common in this stage:
a. Optional modification of existing case instances.
Changing a solution and redeploying it can affect existing case instances.
IBM Case Manager tools help modifying existing case instances, including
precondition checking and case synchronization.

Chapter 9. Migrating and deploying solutions 353
b. Verify deployed solutions.
Before releasing the system for testers or case workers to use, the
deployed solution should be tested to verify that all of its components are
working correctly. The tests are specific to the solution and vary depending
on the features of the solution and behaviors of its cases. The following
sample of tests might be run from Case Manager Client:
• Access the newly deployed solution from Case Manager Client.
• Use the Add Case feature to create a case instance. Verify that the
preconditions for the case are met.
• Use the search case function to find the case instance that was
created.
• Open the case and visit various pages while reviewing the data that is
displayed in the views.
c. Open and complete a work item from an in-basket to verify that the
workflow system is operating properly.
d. Repeat the tests by using different user accounts that belong to groups
that are assigned to different roles. Confirm that the assigned permissions
reflect the expected behavior for the roles.
9.6.2 Configuring FileNet P8 assets
In this section, we describe how to configure a component queue that is
referenced by the solution application that we migrated. This is one example of
configuration steps that might be required for other FileNet P8 assets after a
solution is migrated and deployed.
For a component queue, the Adapter and Operations tabs contain information
that is brought to the destination system with the export and import of the queue
definition by using the Process Configuration Console. Some properties might
need modification to reflect the destination system. For example, the JAAS
credentials often must be updated to reflect the correct user account for
processing the component queue on the target environment.
Note: For more information about redeployment restrictions and
synchronizing cases with case type changes, see the IBM Case Manager 5.2
Information Center topic “Synchronizing cases with solution data”, which is
available at this website:
http://pic.dhe.ibm.com/infocenter/casemgmt/v5r2m0/topic/com.ibm.case
mgmt.design.doc/acmdr005a.htm

354 Advanced Case Management with IBM Case Manager
For more information about the Java adapter and its properties, see “Creating a
component queue” in the FileNet P8 Information Center, which is available at this
website:
http://pic.dhe.ibm.com/infocenter/p8docs/v5r2m0/topic/com.ibm.p8.pe.con
figui.doc/bpfc084.htm
9.6.3 Configuring other IBM and external artifacts
The following examples of configuration steps are required for other IBM and
external artifacts:
1. Register target environment on desktop.
In this step, you register the target environment to which the solution was
deployed. You can register target environments for a test environment or
production environment by using the IBM Case Manager configuration tool or
administration client.
2. Complete IBM Content Navigator desktop configuration.
Because the source environment and the target environment are different,
more configuration is often required before the imported desktop is usable.
For more information about common issues and their resolution, see Part 3 of
the Solution Deployment Guide, which is available at this website:
https://www.ibm.com/developerworks/community/blogs/e8206aad-10e2-4c4
9-b00c-fee572815374/entry/ibm_case_manager_5_2_solution_deployment_g
uide?lang=en
Note: For more information about a complete example for this configure step,
see Part 2 - phase 4 of the Solution Deployment guide, which is available at
this website:
https://www.ibm.com/developerworks/community/blogs/e8206aad-10e2-4c4
9-b00c-fee572815374/entry/ibm_case_manager_5_2_solution_deployment_g
uide

© Copyright IBM Corp. 2013, 2014. All rights reserved. 355
Part 3 Solution
customization and
advanced topics
This part describes IBM Case Manager solution customization topics, such as
user interface customization, development, rules, security, and advanced topics.
This part includes the following chapters:
Chapter 10, “User interface and widgets” on page 357
Chapter 11, “Customization topics” on page 411
Chapter 12, “Advanced solution topics” on page 453
Chapter 13, “Business rules” on page 507
Chapter 14, “Integration points” on page 545
Part 3
356 Advanced Case Management with IBM Case Manager

© Copyright IBM Corp. 2013, 2014. All rights reserved. 357
Chapter 10. User interface and widgets
This chapter describes the user interface of IBM Case Manager solutions. The
chapter introduces working with default widgets, creating a custom widget with
Model API and Dojo, manipulating pages in Page Designer, controlling payloads,
and customizing the runtime appearance.
This chapter includes the following sections:
User interface navigation
Understanding page types and custom pages
Accessing the Properties View Designer
Using default widgets and their payloads
Creating and deploying a custom widget
Creating a custom task
Using the Timeline Visualizer and Instruction widgets
10

358 Advanced Case Management with IBM Case Manager
10.1 User interface navigation
In IBM Case Manager, users can navigate easily between Case Manager Builder
and Case Manager Client. The user interface for Case Manager Builder allows
business analysts to design and develop case solutions through multiple tabs
and tools. The user interface for Case Manager Client provides case workers
with customized page layouts and tabbed views. To open Case Manager Client
from Case Manager Builder, click the Test link on a specified solution within
Case Manager Builder.
10.1.1 Navigating Case Manager Builder
With the Customer Complaints Solution deployed and in edit mode in Case
Manager Builder, the tabs list the properties, roles, in-baskets, document types,
pages, and case types, as shown in Figure 10-1.
Figure 10-1 Viewing the tabs in Case Manager Builder

Chapter 10. User interface and widgets 359
10.1.2 Navigating Page Designer
Within Case Manager Builder, Page Designer allows business analysts to design
the page layout, widget event wiring, widget settings, and appearance of pages.
Page Designer is where preinstalled widgets and custom widgets are wired to
other widgets on the page. By using Page Designer, you also can edit the
settings of the preinstalled and custom widgets on the page.
After the changes on a page are saved, the business analyst must deploy the
solution before the changes are seen on the page in Case Manager Client.
Widget palette area
The preinstalled widgets and the custom widgets are in the widget palette area of
Page Designer, as shown in Figure 10-2. The preinstalled widgets are
categorized into Case widgets and Utility widgets. Custom widgets that have a
custom category also appear here. Business analysts can drag widgets from the
widget palette area to the main layout area to add them to the page.
Figure 10-2 Widget palette area in Page Designer

360 Advanced Case Management with IBM Case Manager
Main layout area
The main layout area of Page Designer, as shown in Figure 10-3, is where the
widgets are displayed on the page and where they are added, deleted,
rearranged, resized, wired to other widgets, or have their settings modified.
Figure 10-3 Main layout area in Page Designer
In the main layout area, the widgets are laid out according to how the layout is set
in the page options settings. There are icons on each widget to change its
settings and wiring. Also, each widget on the main layout area can have its height
adjusted to automatically fill its allotted section or to be a specific percentage or
pixel count of its size.
Each widget has the following height settings:
Automatic: This setting means that the widget does not have an explicit
height. The widget grows in the specific column until the widget’s height
conflicts with another widget’s specified height.
Percent: This setting means that the widget grows in the specific column by
the specified percentage.

Chapter 10. User interface and widgets 361
Pixel: This setting means that the widget grows in the specific column by the
specified pixel count.
Toolbar area
The toolbar area of Page Designer allows the business analyst to open the Page
Options pop-up window, open the Wire Events pop-up window, show or hide the
hidden widget area, and show or hide borders on the page. All of these options
are in the form of four icons in the toolbar area, as shown in Figure 10-4.
Figure 10-4 Toolbar area in Page Designer
Page Options
The Page Options pop-up window in Page Designer allows a business analyst to
change the page title, set the layout of the page, and add sizing options to the
sections of a page.
In Figure 10-5 on page 362, the Page Options pop-up window shows the page
title and layout style for the Cases page.
The Page title allows the business analyst to change the name of the page, add a
special character, and append a case ID, case title, step name, or work item ID.
Note: When you are setting the size of a widget in Page Designer, make sure
to confirm and verify the wanted sizing of the widget in Case Manager Client.
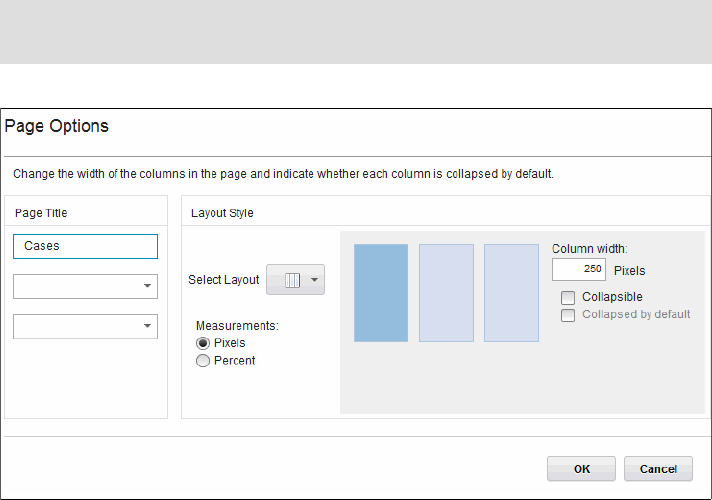
362 Advanced Case Management with IBM Case Manager
The Layout style allows the business analyst to choose a one-column, two-row,
two-column, three-column, or three-column header, two-column header or footer,
two-column header, or two-column footer. Layout style also allows the business
analyst to set the columns as collapsible or collapsed by default. The columns
can be sized according to a specified number of pixels or by a specified
percentage.
Figure 10-5 Page options in Page Designer
Editing widget wiring and settings
Wiring a preinstalled widget or custom widget is done through the Wiring Events
pop-up window in Page Designer or by clicking the Edit wiring icon on a specific
widget. Both options to edit wiring are shown in Figure 10-6 on page 363.
Note: The collapsible option allows the case worker to toggle the specified
column to be shown or hidden on the page in Case Manager Client.

Chapter 10. User interface and widgets 363
Figure 10-6 Two options to open the Wire Events pop-up window.
Each preinstalled widget in IBM Case Manager includes events that are incoming
or outgoing events that can be wired to another widget. In the Wire events pop-up
window, widgets can subscribe to an outgoing event from another widget or
broadcast an event to another widget.
For more information about the incoming and outgoing events for each widget,
see the IBM Case Manager Information Center, which is available at this website:
http://pic.dhe.ibm.com/infocenter/casemgmt/v5r2m0/topic/com.ibm.casemgm
t.help.doc/acmwc026.htm
Show or hide borders and hidden widgets
In Page Designer, there is a show or hide borders icon and a show or hide hidden
widget icon that can be toggled on or off in the Toolbar area. The show or hide
border icon allows the business analyst to show or hide border lines around the
columns on the page. When enabled, the border lines are visible during design
time in Page Designer and in run time in Case Manager Client.
The show or hide hidden widget icon allows the business analyst to add or
remove widgets from the hidden widget area that does not render the widgets in
run time in Case Manager Client. However, the widgets still load and function as
if they are visible on the page.

364 Advanced Case Management with IBM Case Manager
10.1.3 Multiple user editing
In IBM Case Manager V5.2, different users can edit different portions of a
solution simultaneously, commit the changes, and deploy their changes
independently.
After one user modifies a solution asset, such as a page, view, business rule,
in-basket, role, document type, case type, or task, that solution asset is locked
until the user saves and commits the changes. After changes to solution assets
are committed and deployed, the changes to the solution assets are available in
Case Manager Client to the other users of the solution.
As shown in Figure 10-7, Case Manager Builder has a pop-up window that
shows lock information about what solution assets are locked by which user.
Figure 10-7 Lock Information pop-up window in Case Manager Builder
Note: If there are any locked items by another user, Case Manager Builder
warns you when you attempt to deploy the solution.
Chapter 10. User interface and widgets 365
For more information about multi-user usage, see 5.4.1, “Multiple user solution
development in Case Manager Builder” on page 167, and the IBM Case
Manager Information Center, which is available at this website:
http://pic.dhe.ibm.com/infocenter/casemgmt/v5r2m0/topic/com.ibm.casemgm
t.help.doc/acmsdh54.htm
10.1.4 Navigating Case Manager Client
IBM Case Manager enables users to access cases through case URLs. The URL
can be sent via email. When the user clicks the link, IBM Case Manager
automatically opens the case detail page for user handling.
10.2 Understanding page types and custom pages
This section describes how to manipulate the pages in Page Designer within
Case Manager Builder. When you first deploy a solution, IBM Case Manager
automatically creates a set of default pages. You can create more pages to use
with your case management application. This section introduces how to create,
customize, and design pages in Page Designer in IBM Case Manager.
This section assumes that you created, deployed, and tested your solution with
the Case Manager Builder application in your development environment. If you
have not done so, read the following chapters before you proceed:
Chapter 7, “Building a simple solution: Part 1” on page 211
Chapter 8, “Building a simple solution: Part 2” on page 267
10.2.1 Default pages
Case Manager Client automatically creates the following page types for every
deployed solution:
Solution
Case Details
Add Case
Split Case
Add Task
Work Details
Custom Task Details
Every page type contains corresponding default pages.
366 Advanced Case Management with IBM Case Manager
Solution
The Solution page type is the main IBM Case Manager page type. This page
type contains the following default pages:
Work page (for displaying work items)
Cases page (for displaying case instances)
Case Details
The Case Details page type allows a case worker to view or update properties for
a case. The Case Details page also allows the case worker to add documents,
tasks, or comments to the case. This page type contains the following default
pages:
Case Details (for viewing or updating a case)
Case Details Form (for viewing or updating a case with a Form)
Add Case
The Add Case page type allows a case worker to create specific cases. This
page type contains the following pages:
Add Case (for creating a new case)
Add Case Form (for creating a new case with a Form)
Split Case
The Split Case page type allows a case worker to create a case that is based on
existing cases. This page type contains the default page Split Case, which is
used for creating a case with the reused values from an existing case.
Add Task
The Add Task page type displays when a case worker adds a discretionary task
to a case. This page type contains the following default pages:
Add Task (for adding a task, adding a document, or viewing documents)
Add Task Form (for adding a task, adding a document, or viewing documents
with a Form)
Work Details
The Work Details page type includes the step pages that display when a case
worker opens a work item. This page type contains the following default pages:
Work Details (for viewing, updating, or completing a work item)
Work Details Form (for viewing, updating, or completing a work item with a
Form)
Chapter 10. User interface and widgets 367
Form Attachment Work Details Page (for saving a form data document to a
step)
Custom Task Details
The Custom Task Details page type displays a step page that allows a case
worker to open a work item from a custom task. This page type contains the
default page Custom Task Details, which is used for viewing details about a work
item from a custom task.
For more information, see the IBM Case Manager Information Center, which is
available at this website:
http://pic.dhe.ibm.com/infocenter/casemgmt/v5r2m0/topic/com.ibm.casemgm
t.help.doc/acmwrh19.htm
10.2.2 Custom pages
You can create pages for case workers for each different page type to meet
specified requirements.
Creating a page
To customize a page as a specific page type, create a page and configure
widgets and delete widgets as needed.
Customizing a created page in Page Designer
Complete the following steps to customize a page in a Solution page type:
1. In Case Manager Builder, click Edit on the solution, then browse to the Pages
tab and complete the following steps to add the page:
a. Click Add Page → Solution Page.
b. Enter a value for the page name then click OK to register the page as a
Solution page, as shown in Figure 10-8 on page 368. You also can enter a
description for the page.
These steps also apply for the other page types.

368 Advanced Case Management with IBM Case Manager
Figure 10-8 Custom Solution page registration
2. After the page is registered, click the hyperlink on the page name or the first
icon to open Page Designer, as shown in Figure 10-9 on page 369. This is
where widgets and the page layout can be customized.

Chapter 10. User interface and widgets 369
Figure 10-9 Icons to open, edit, copy, or delete a page in Case Manager Builder
3. After opening Page Designer, click the Page options icon in the Toolbar area.
Change the layout to three-column header. The page layout changes to a
different layout. A header is a top section of the page in which the toolbar
widget is placed. You also can rename the page in the Page options pop-up
window.
4. Dragging a widget from the widget palette area to the main layout area adds
the widget to the page. Drag the Toolbar widget to the header section of the
page, as shown in Figure 10-10 on page 370.

370 Advanced Case Management with IBM Case Manager
Figure 10-10 Dragging the Toolbar widget to the main layout area
5. Repeat step 4 for the Search and Case List widget. Drag the Search widget
into the left column and the Case List widget into the center column. Click
Save or Save and close to save the changes in Page Designer.
Adding a custom page to a case type, role, or work item
After a page is designed and saved, adding the custom page to a case type, role,
or work item shows the page to the specific user when the user browses Case
Manager Client. This comes after the page is saved and Page Designer is
closed.
Note: Because Case List has handler functions for the Search widget’s
search cases event, the Case List widget does not need to be wired to the
Search widget to display case items.
Chapter 10. User interface and widgets 371
Only the Custom Task Details, Add Case, Split Case, and Case Details page
types can be specified for a case type. To assign a custom page to a case type,
complete the following steps:
1. In Case Manager Builder, click the Case Types tab and select the case type.
2. Select the appropriate custom page that was created by selecting from the
following drop-down menus:
– Default layout for Custom Task Details page
– Default layout for Add Case page
– Default layout for Split Case page
– Default layout for Case Details page
3. To set a custom default case details page for a specific role, select the role
and click Add Role under the Override default case details page layout for
label.
Only Solution page types can be specified for a role. To assign a custom page to
a role, complete the following steps:
1. In Case Manager Builder, click the Roles tab and then click the specified role
or the pencil icon to edit the role.
2. Click the Pages tab when you are editing the role and then click the Assign
Page drop-down menu to select the newly created custom page, as shown in
Figure 10-11 on page 372. Make sure to click OK to confirm your changes
and then save your changes in Case Manager Builder.

372 Advanced Case Management with IBM Case Manager
Figure 10-11 Associating a custom page with a role
Only Work Details page types can be specified for a work item. To assign a
custom page as the default Work Details page for a step in a task, complete the
following steps:
1. In Case Manager Builder, click the Case Types tab and select the case type.
2. Select Tasks to open the Tasks page.
3. On the wanted task, click the Edit Steps icon to open Step Designer.
4. Within Step Designer, select the step and in the Step Properties area, select
the wanted page from the Page Layout drop-down menu.
10.3 Accessing the Properties View Designer
This section describes the new Properties View Designer in IBM Case Manager.
The Properties View Designer defines views to display different layouts for the
Properties widget. The Properties widget can display a system-generated view
or a custom view that is designed by the user.

Chapter 10. User interface and widgets 373
10.3.1 System-generated view
The system-generated view is a view that is automatically rendered by the
Properties widget. It has a standard format that consists of all of the properties in
the case type that are arranged vertically in alphabetical order.
10.3.2 Designing a custom view
Augmenting the system-generated view is useful for many different scenarios.
For example, the business analyst might want to include only a subset of case
properties in the case type, control the ordering of case properties in the case
type, or place the case properties into a layout that includes multiple columns
and tabs. In addition, the business analyst might need to set up different views for
each role.
By using the Properties View Designer, you can create various custom views for
each case type. Before you access the Properties View Designer, ensure that the
wanted case properties are in the Properties page for a case type in Case
Manager Builder.
Complete the following steps:
1. In the Views page of the case type, click the Properties Layout tab to list any
custom views that are created.
2. Click Add View and enter a name and description for the new custom view,
as shown in Figure 10-12. Click OK to confirm the new view.
Figure 10-12 Adding a custom view on the Properties Layout tab

374 Advanced Case Management with IBM Case Manager
3. Click the name of the newly created custom view or the open properties view
designer icon to open the Properties View Designer.
The user interface is structured similarly to the Page Designer tool.
The left pane has the different containers to drag onto the canvas. The left
pane also has the properties of the case type to drag into the different
containers on the canvas, which is the main layout area in the center of the
Properties View Designer.
There is a top toolbar where the business analyst can cut, copy, move, undo,
redo, and change the padding between the properties.
4. Drag the Tabbed layout container to the white shaded region, as shown in
Figure 10-13.
Figure 10-13 Adding a container to the Properties View Designer
5. After dragging the tabbed layout container into the canvas, two tabs are
shown in the container. Click and rename the tab title to be Customer Related
in the title field for the Settings pane. The second tab can be renamed as
Complaint Related.
6. Proceed to drag properties that relate to the Customer into the Customer
Related tab. Then, drag properties that relate to the Complaint into the
Complaint Related tab.
The result is shown in Figure 10-14 on page 375.

Chapter 10. User interface and widgets 375
Figure 10-14 Adding properties to the tabbed layout container
For more information, see the IBM Case Manager Information Center, which is
available at this website:
http://pic.dhe.ibm.com/infocenter/casemgmt/v5r2m0/topic/com.ibm.casemgm
t.help.doc/acmsdh60.htm
10.3.3 Configuring the default view for a case type
The default view can be accessed through the Views tab within a specific case
type. Selecting a default view (whether it is the system-generated view or the
default view) renders that view for all the pages that the Properties widget is on.
Alternatively, you can specify what view to show on a specific page through the
Edit Settings window on the Properties widget.

376 Advanced Case Management with IBM Case Manager
By default, the default view for a case type is the system-generated view. The
system-generated view displays each property in the case type vertically without
any custom layout.
To configure the default view for a case type, complete the following steps:
1. In the Properties Layout tab, ensure that the default view is set to the newly
created custom view, as shown in Figure 10-15. This renders the properties
layout with the newly created custom view.
Figure 10-15 Setting the default view of a case type with a custom view
2. After setting the default view of a case, validate in Case Manager Client that
the custom view that is selected as the default view shows up in the Case
Details page.
10.3.4 Overriding the default view in the Properties widget
In some cases, you might want the Properties widget to render a different view
than the default view for a particular case type. You can configure the Properties
widget to render the system-generated view or a specific custom view. Complete
the following steps:
1. Within Page Designer for a Case Details page, click the Edit Settings icon
for the Properties widget.
Note: When you are configuring the Properties widget view, we recommend
that you configure the system-generated view or a custom view as the default
view for a particular case type. The default view is rendered in the Properties
widget whenever the Properties widget is not specifically configured to render
another view.

Chapter 10. User interface and widgets 377
2. In the settings pop-up window for the Properties widget, click the Add icon to
add the newly created custom view to the Properties widget, as shown in
Figure 10-16. Make sure to save the page and deploy the changes to see the
new custom view in the Case Details page in Case Manager Client.
Figure 10-16 Setting a custom view in the settings window of the Properties widget
10.4 Using default widgets and their payloads
This section describes default widgets that are provided by IBM Case Manager
and their payloads.
Note: If the Properties widget is configured in this manner, the default view
setting is ignored.
To minimize the configuration burden of setting a view for each case type in
the Properties widget, you should override the default view only when
necessary.
378 Advanced Case Management with IBM Case Manager
10.4.1 Standard widgets that are provided by IBM Case Manager
Case Manager Client provides a series of widgets for case workers to manage
cases and process work items. You can drag these widgets into your spaces and
pages. The following standard widgets are provided by IBM Case Manager:
Attachments widget
Displays a list of the documents that are attached to a work item.
Case Information widget
Displays an overview of a case. It can display up to four views: Summary,
documents, tasks, and history.
Case List widget
Receives search criteria from the Case Search widget or a custom search
widget, runs the search, and displays the search result.
Case Toolbar widget
Provides actions that case workers can take for an opened case.
Content List widget
Runs a search that is based on a predefined search template and displays the
list of matching documents.
Form widget
Used to view and edit case property values or work item fields values with the
help of IBM Forms or FileNet eForms.
In-baskets widget
Allows users to view and work with work items in their personal in-basket and
the in-basket that is associated with their role.
Instruction widget
Used to display the instructions for completing a work item that is associated
with a custom task.
Original Case Data widget
Displays property values for a case that is split to create another case. A case
worker can compare the values in this widget with the values that are
displayed in the Split Case Data widget for the new case.
Process History widget
Shows the status of a task by showing the milestones that are defined in the
process.
Chapter 10. User interface and widgets 379
Properties widget
Used to enable case workers to view and edit the property values for a case
or a work item.
Script Adapter widget
Transform data from one widget to another through widget event
communication.
Search widget
Used to define the search conditions for cases that are based on selected
property values. This widget works with the Case List widget to run queries
for cases.
Select Case Documents widget
Used to select the documents from an existing case that also are to be
associated with a new split case.
Split Case Data widget
Used to create a case that reuses property values from an existing case.
Timeline Visualizer widget
Provides a visual representation of the extended history for case events,
tasks, and work items over time for the case.
Toolbar widget
Used to open a web page, add cases, manage roles, or run a custom action.
Website widget
Display the website that is associated with a specified URL.
Work Item Toolbar widget
Used to respond to work items or to add new tasks.
10.4.2 Widget payloads
The widget communication is established by events. Most Case Manager Client
widgets publish events and handle events. The data that is published or handled
by an event is called a
payload.
A widget can publish an event in the following ways:
The widget can broadcast the published event to all other widgets on the
page. The event is processed by any widget that can handle the published
event.

380 Advanced Case Management with IBM Case Manager
The widget can send the published event to specific widgets. This method of
sending events is accomplished by wiring the published event to a
corresponding event that is handled by the receiving widget.
You can add a wire between a source widget and a target widget. When the
source widget publishes the wired event, the published event is sent to the event
handler (or handlers) in the widget (or widgets) to which it is wired.
10.4.3 Wiring a widget to another widget
To wire a widget to another widget, complete the following steps in Page
Designer:
1. Click the Edit wiring icon on the individual widget in the main layout area or
the Edit wiring icon in the Toolbar area, as shown in Figure 10-17.
Figure 10-17 Selecting Edit Wiring from the Widget menu icon
The Wire Events pop-up window opens with focus on the widget and the
wiring it has with other widgets on the page.

Chapter 10. User interface and widgets 381
2. Ensure that the Script Adapter widget is selected in the Widget drop-down
menu at the top of the Wire Events pop-up window.
3. Click the drop-down menu for Source widget and select Case List, then
select Select Case as the outgoing event, as shown in Figure 10-18.
Figure 10-18 Wiring Case List widget to Script Adapter
The drop-down menu for the source widget includes all of the widgets in the
page that can handle events. The widgets that can publish events only are not
listed.
4. Click Add Wire and the two widgets are officially wired. An entry appears in
the table, as shown in Figure 10-19.
Figure 10-19 Widget wiring entry
The source end of the wire displays the event that is sent by the source
widget. The target end of the wire displays the event that the target widget
receives.
To change the source or outgoing event, click the drop-down menu for the
source widget field or the outgoing event field. Then, click Add Wire to add a
new widget wiring.
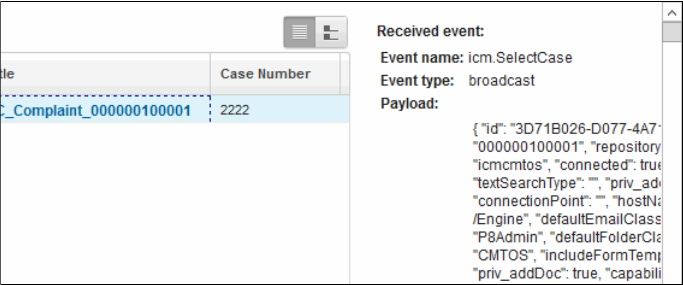
382 Advanced Case Management with IBM Case Manager
It is possible to have multiple wirings to one widget or change the selected
widget by clicking the widget drop-down menu on the top of the Edit Wiring
window.
5. When you complete your wiring, click OK to exit the Edit Wiring pop-up
window and save the changes.
6. To test the widget wiring, go into Case Manager Client and click one case
instance in Case List widget. You can see that Script Adapter can receive the
Select Case event, as shown in Figure 10-20.
Figure 10-20 Received event in the Script Adapter widget
10.4.4 Widget incoming and outgoing events and payloads
In IBM Case Manager V5.2, each widget has incoming and outgoing events
whose payloads contain model objects or JavaScript Object Notation (JSON)
properties. For preinstalled widgets, each incoming or outgoing event has a
specific payload that contains an icm or ecm Model object. Model objects starting
with icm refer to IBM Case Manager Model objects; model objects starting with
ecm refer to IBM Content Navigator Model objects.
Each Model object is an instance of an IBM Case Manager or IBM Content
Navigator model class.
For more information about the IBM Case Manager Model classes, see this
website:
http://pic.dhe.ibm.com/infocenter/casemgmt/v5r2m0/index.jsp?topic=%2Fco
m.ibm.casemgmt.development.doc%2Fjsdoc%2Findex.html

Chapter 10. User interface and widgets 383
For more information about IBM Content Navigator Model classes, see this
website:
http://pic.dhe.ibm.com/infocenter/cmgmt/v8r4m0/index.jsp?topic=/com.ibm
.developingeuc.doc/doc/JavaScriptdoc/index.html
10.4.5 In-basket widget event and corresponding payload
The events that are published by the In-baskets widget are listed in Table 10-1.
This is an example of the events and payloads that a preinstalled widget
generates.
Table 10-1 Outgoing events that are broadcasted by the In-baskets widget
The events that are handled by the In-baskets widget are listed in Table 10-2.
Table 10-2 Incoming events that are handled by the In-baskets widget
Event title Event ID Payload Description
In-basket
selected
icm.SelectInBasket selectInbasket The user opened the page
that contains the
In-baskets widget or
clicked a tab to display a
different in-basket.
Work item
selected
com.ibm.ecmwidg
ets.acm.SelectRow
WorkItem The user clicked a row or
pressed Enter in the
in-basket to select the work
item.
Send
selected work
items
icm.SendSelectWo
rkItems
result,
selectWorkItems
Another widget requested
information for the
in-basket rows that are
specified in the event
payload.
Event title Event ID Payload Description
Apply filter icm.ApplyFilter filter Update the work items that are
listed in the in-basket that are
based on the specified filters.
Clear content icm.ClearContent Empty Clear the content in the
In-baskets widget.
Refresh icm.Refresh Any value Refresh the in-basket to update
the list of work items after a user
completes or closes a work item.

384 Advanced Case Management with IBM Case Manager
For more information about incoming and outgoing events for each widget, see
the IBM Case Manager Information Center, which is available at this website:
http://pic.dhe.ibm.com/infocenter/casemgmt/v5r2m0/topic/com.ibm.casemgm
t.help.doc/acmwc026.htm
10.4.6 Search widget event and corresponding payload
The event that is published by Search widget is shown in Table 10-3.
Table 10-3 Outgoing events that are broadcasted by the Search widget
The event icm.SearchCases is an example of the following formats of a payload:
caseType: A symbolic name of the specific case type that is being searched
on.
searchTemplate: An IBM Content Navigator model object
(ecm.model.SearchTemplate)
caseTypeTitles: A JSON object that has the titles of the types of cases that
are being searched on.
detailsViewProperties: An array of JSON objects that are the properties to
be displayed in the details view of the Case List widget.
Request
selected work
item
icm.RequestSelect
WorkItems
Any value Send the information for the
in-basket rows that are specified
in the event payload. The
In-basket widget handles the
event and sends the specified
work items along with the
incoming payload.
Role Selected icm.ReceiveRole role Updates the In-baskets widget to
display the in-baskets that are
associated with the specified
role.
Event title Event ID Payload Description
Event title Event ID Payload Description
Search cases icm.SearchCases caseType, searchTemplate,
caseTypeTitles,
detailsViewProperties,
magazineViewProperties
The user starts a
search for cases.

Chapter 10. User interface and widgets 385
magazineViewProperties: An array of JSON objects that are the properties to
be displayed in the magazine view of the Case List widget.
The event that is handled by Search widget is shown in Table 10-4.
Table 10-4 Incoming events that are handled by the Search widget
Enhancements to the Search Widget
There are significant enhancements to the Search widget in IBM Case Manager
V5.2 that allow users to apply advanced search options for case searching. In the
Settings window of the Search widget in Page Designer, the business analyst
can allow users to designate certain properties to be searched on as shown in
Figure 10-21. This setting can be enabled or disabled within Page Designer for
the Search widget. These are user-specified properties in Advanced Search.
Figure 10-21 Settings window for the Search widget
Specific case properties also can be configured to be searched on in the
Advanced Search window through the Case Search view in a case type, as
shown in Figure 10-22 on page 386.
Event title Event ID Payload Description
Clear content icm.ClearContent null Clear the content in the Search
widget.

386 Advanced Case Management with IBM Case Manager
Figure 10-22 Adding properties to the Case Search view
In Case Manager Client, the case worker can click the Advanced Search link to
search on specific case properties. The case worker can then specify any other
properties in the user-specified properties section on the Advanced Search
window.
10.5 Creating and deploying a custom widget
This section describes how to create a widget that is called the Custom Search
widget and deploy it in the IBM Case Manager, Version 5.2 environment. The
Custom Search widget has a similar role to the Case Search widget. In simple
search mode, the default Case Search widget uses only one property to search
cases. The Custom Search widget allows a user to search cases against all
properties, as shown in Figure 10-23 on page 387.
Note: The search results that are displayed in the Case List widget from the
Search widget can be shown in a Details view or a Magazine view.
The Details view and Magazine views for the Case List widget can be found on
the Case List widget in Case Manager Client and in the Settings window for
the Case List in Case Manager Builder.

Chapter 10. User interface and widgets 387
Figure 10-23 Custom search widget in Case Manager Client
For more information about the custom search widget, see the Converting a
Custom Search Widget from Case Manager 5.1.1 to Case Manager 5.2
developerWorks® article, which is available at this website:
https://www.ibm.com/developerworks/community/groups/service/html/commun
ityview?communityUuid=e8206aad-10e2-4c49-b00c-fee572815374#fullpageWidg
etId=Wf2c4e43b120c_4ac7_80ae_2695b8e6d46d&file=e3ff1d40-31e0-469a-9ecf-
aa7a03e73a46
For more information about custom widgets in IBM Case Manager V5.2, see the
IBM Case Manager Information Center, which is available at this website:
http://pic.dhe.ibm.com/infocenter/casemgmt/v5r2m0/topic/com.ibm.casemgm
t.development.doc/acmwt000.htm
To create the Custom Search widget, you must set up your development
environment first.

388 Advanced Case Management with IBM Case Manager
10.5.1 Setting up your development environment
An IBM Case Manager 5.2 custom widget includes the following components:
Widget definition JSON file
Catalog JSON file
IBM Content Navigator custom plug-in JAR file
EAR file (optional)
A custom widget in IBM Case Manager can be packaged in a JAR file or in a JAR
and an EAR file. It is up to the application developer to choose whether to include
an EAR file in the custom widget package. With an EAR file, an application
developer can include the custom widget with a content pane inside of an EAR
file, such as the custom search widget. With a JAR file, an application developer
can package one or more IBM Content Navigator custom plug-ins.
The following benefits are achieved by including the optional EAR file in the
custom widget package:
Separates IBM Content Navigator plug-in code from the custom widget code,
which allows the application developer to add modularity
Organizes multiple custom widgets within the EAR file apart from the JAR file,
which allows the application developer to deploy and register one custom
widget package
Debugging the custom widget can be easier with folder path because of the
modularity of the EAR file and the JAR file
Can help avoid class path conflicts
The following benefits are achieved by not including the optional EAR file in the
custom widget package:
Allows application developer to use only IBM Case Manager administration
client to register and unregister the custom widget package. The application
developer does not need to navigate to the application server.
Convenient for simple widget testing and deployment because there is no
other EAR file to maintain.
To set up your development environment, create a project that contains the files
for the Custom Search widget (see Figure 10-24 on page 389). You also can use
Eclipse or another integrated development environment (IDE).
Note: Ensure that you have the appropriate Java JRE or JDK configured on
your Eclipse or IDE to compile the project or run the ANT file to build the
widget package.

Chapter 10. User interface and widgets 389
Figure 10-24 Creating a project for the Custom Search widget
10.5.2 Creating your widget definition and catalog files
The widget definition and catalog JSON files are used to register the widget
package and page widgets.
In this example, these two JSON files are contained in a directory that is called
ICMRegistry where this folder also can include images that are used for the
widget package, such as thumbnails or icons and any translated resource files.
As shown in Figure 10-24, the widget definition and catalog files are in the
ICMRegistry directory.
Complete the following steps to create your widget definition and catalog files:
1. Create the widget definition JSON file. The file mainly defines source files,
events, and properties for the widget. Complete the following steps:
a. The beginning clause of the widget definition file contains the ID, title,
category, description, preview icon path, icon path, help path, and runtime
class name, as shown in Example 10-1 on page 390.

390 Advanced Case Management with IBM Case Manager
Example 10-1 Defining the beginning of the widget definition JSON file
{
"id":"CustomSearchWidget",
"title":"Simple Custom Search Widget",
"category":"CustomWidgets",
"description":"This widget shows payload from Search Widget",
"definition":"CustomSearchWidget.json",
"preview": "images/caseinfo_preview.png",
"icon": "images/caseinfo_icon.png",
"runtimeClassName":"icm.custom.pgwidget.customSearchWidget.Custom
SearchWidget",
"help": "acmwrh126.htm",
"previewThumbnail":"images/caseinfo_thumb.png",
b. The second portion of the widget definition JSON file includes any
properties to be included in the custom widget. In the custom search
widget, there are two properties. These properties are in the Edit Settings
window of the widget within Page Designer.
One property is called PreferredHeight and another is customProperty1.
They are shown in Example 10-2.
Example 10-2 Defining properties in widget definition JSON file
"properties":[
{
"propertyType":"property",
"type":"string",
"id":"PreferredHeight",
"defaultValue":"100%",
"disabled":true,
"required": false,
"visibility":false,
"title":"Preferred Height"
},
{
"propertyType":"property",
"type":"string",
"id":"customProperty1",
"defaultValue":"http://",
"required":false,
"visibility":true,
"style": "width:95%;",
"title":"Custom property 1"
}
],

Chapter 10. User interface and widgets 391
c. The last portion of the widget definition JSON file is the events section
where the application developer declares that the custom widget
subscribes or publishes to an event. In the case of the custom search
widget, it broadcasts the icm.SearchCases event, as shown in
Example 10-3. The functionName is empty because we are not
subscribing and handling an event.
Example 10-3 Events section for widget definition file
"events":[
{
"id":"icm.SearchCases",
"title":"Custom Search Event 1252",
"functionName":"",
"direction":"broadcast",
"description":"Custom Event 1"
}
]
}
2. Create the catalog JSON file. The file has the description for the widget
package and lists the widgets that the package holds. Complete the following
steps:
a. The first part of the catalog JSON file contains the name, description,
version, categories, and locale, as shown in Example 10-4. The locale
should be entered as shown in Example 10-4 if no locale is specified. For
other locales, specify them under the folder nls in ICMRegistry. The
categories and version fields are optional.
Example 10-4 First section of catalog JSON
{
"Name":"IBM Case Manager Custom Widget Package",
"Description":"IBM Case Manager Custom Widget Package",
"Locale":"",
"Version":"5.2",
"Categories":[
{
"id":"CustomWidgets",
"title":"Custom Widgets"
}
],

392 Advanced Case Management with IBM Case Manager
b. The last section of the catalog JSON includes the same first part of the
widget definition file, as shown in Example 10-5. In the case of multiple
widgets in one widget package, the other widget definitions are listed in
this section of the catalog JSON file.
Example 10-5 Last section of catalog JSON
"Widgets":[
{
"id":"CustomSearchWidget",
"title":"Simple Custom Search Widget",
"category":"CustomWidgets",
"description":"This widget shows payload from Search
Widget",
"definition":"CustomSearchWidget.json",
"preview": "images/caseinfo_preview.png",
"icon": "images/caseinfo_icon.png",
"runtimeClassName":"icm.custom.pgwidget.customSearchWidget.Custom
SearchWidget",
"help": "acmwrh126.htm",
"previewThumbnail":"imags/caseinfo_thumb.png"
}
]
}
10.5.3 Creating the IBM Content Navigator plug-in
The IBM Content Navigator plug-in allows the custom widget to extend functions,
widgets, actions, and services to IBM Content Navigator and to IBM Case
Manager. The plug-in registers the Dojo module path for the runtime code for the
custom widget.
In the initial JavaScript file, it is important to load the CSS files that are used for
the page widget and to register the Dojo module path for the custom widget’s
runtime code, as shown in Example 10-6 on page 393.

Chapter 10. User interface and widgets 393
Example 10-6 Sample ICMCustomPlugin.js file
var icmContextRoot = "/ICMCustomWidgets";
var loadCSS = function(cssFileUrl){
if (dojo.isIE) {
document.createStyleSheet(cssFileUrl);
} else {
var head = document.getElementsByTagName("head")[0];
var link = document.createElement("link");
link.rel = "stylesheet";
link.type = "text/css";
link.href = cssFileUrl;
head.appendChild(link);
}
};
var paths = {
"icm/custom":"/ICMCustomWidgets/icm/custom"
};
require({paths:paths});
For more information about how to create plug-ins in IBM Content Navigator, see
the IBM Redbooks publication, Customizing and Extending IBM Content
Navigator, SG24-8055, which is available at this website:
http://www.redbooks.ibm.com/abstracts/sg248055.html
10.5.4 Creating the custom page widget with content pane
When a custom page widget is created, you should remember that an IBM Case
Manager page widget or an IBM Case Manager custom widget is essentially a
Dojo dijit. A Dojo dijit is a widget that is part of Dojo’s User Interface (UI) library.
The IBM Case Manager page widget adds the following facilities to the standard
Dojo dijit:
Page container events
Widget settings
These facilities enable the page widget construction and allow the business
analyst to dynamically adjust page behavior without any (or very little)
programming.
394 Advanced Case Management with IBM Case Manager
When a page widget is created, you first create a normal Dojo dijit, which is
responsible for rendering the user interface and handling user interaction to
collect user input. Ideally, this dijit should be designed as a reusable component
that takes in context and renders.
The UI dijit should not access any IBM Case Manager Page container-related
APIs, which limits its usage to only the IBM Case Manager Case Client.
Separating the UI dijit from the page widget layer allows you to reuse this dijit in a
custom application or plug-in built on top of IBM Content Navigator. The dijit also
can be reused in a non-ECM environment if it does not use any ECM related API.
The dijit should also make available necessary Dojo methods and events to allow
interested parties (the page widget wrapper or other custom widgets) to
exchange data or get notified by user interaction.
After the user interface part of the page widget is finished, you create a page
widget wrapper that extends this UI dijit and converts it into an IBM Case
Manager page widget. The page widget wrapper should be the place where the
page container-related code is kept. It accepts widget settings from the page
container and passes them to the underlying dijit. It should also connect to Dojo
events that are exposed on the dijit to be notified of user actions.
As an optional separation, you can separate the event handling logic from the
page widget when the event handling is getting complex. For example, if you
have complex logic to pre-process or post-process the event data, you can
create a separate event listener object, which holds the event handler
implementations. Then, page widget can delegate the event handling logic to the
event listener object.
Figure 10-25 on page 395 shows the high-level idea of constructing a page
widget. The classes in the black box implement and handle the user interface
while the classes in the red box are base IBM Case Manager classes that the
custom widget inherits.
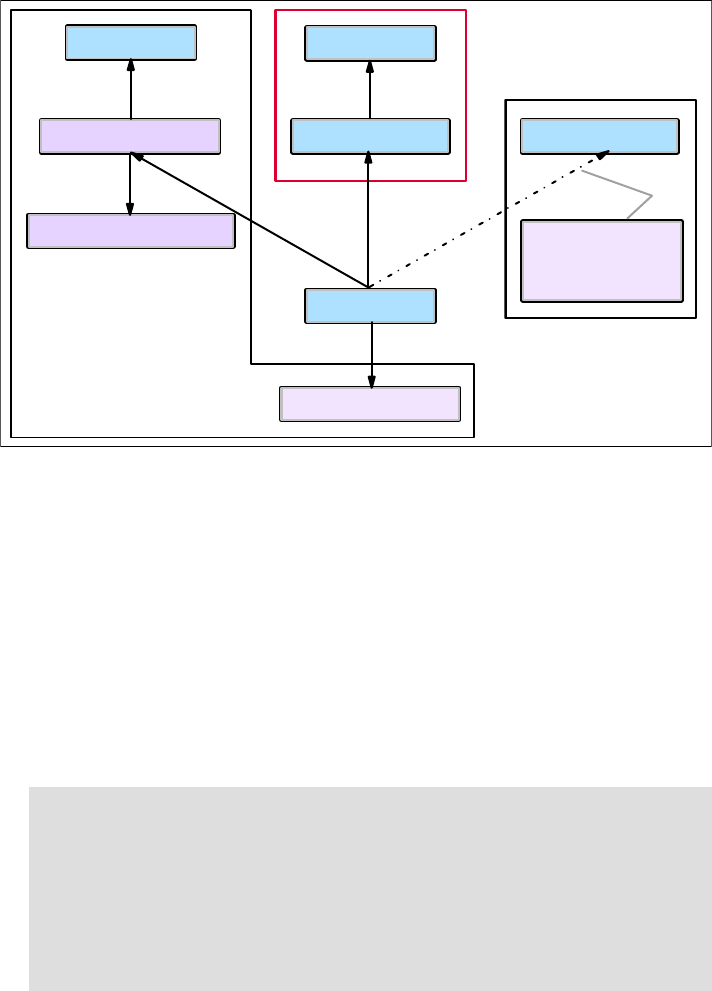
Chapter 10. User interface and widgets 395
Figure 10-25 Recommended structure for a custom page widget
Complete the following steps to create the custom page widget with content
pane:
1. Create the content pane HTML page and content pane JavaScript file to
display a user interface in the custom search widget.
2. Create the main custom widget JavaScript file, CustomSearchWidget.js. In
CustomSearchWidget.js, the file grabs the values from the content pane
HTML page from the user that ate based on the input, then uses the IBM
Case Manager JavaScript Reference API to construct a search criteria
payload, then broadcasts the search results and payload to the Case List
widget to run the search.
Note: It is important to follow the preferred practices of Dojo when
developing widgets. It is strongly recommended to include and handle the
lifecycle events that are defined in a Dojo widget, which include, but are not
limited to, the constructor, postCreate, startup, and destroy.
It is strongly recommended that you use the AMD style of declaring
classes and modules because Dojo is dropping support for older
Dojo-specific APIs in future versions.
_Base Widget
WidgetContentPane
WidgetContentPane.html
_EventStub
BasePageWidget
PageWidget
EventListener
BaseActionContext
Optional, for widget
has toolbar/menus.
API will covered in
action framework.

396 Advanced Case Management with IBM Case Manager
For more information about how to create a custom page widget, see this
website:
https://www.ibm.com/developerworks/community/blogs/e8206aad-10e2-4c4
9-b00c-fee572815374/resource/ACM_LP/ICM52CustomWidgets.pdf?lang=en
10.5.5 Creating IBM Case Manager JavaScript API calls and objects
The IBM Case Manager JavaScript API is useful for custom widgets to call
certain actions and start events that are used by other preinstalled page widgets.
The documented IBM Case Manager JavaScript API is available at this website:
http://pic.dhe.ibm.com/infocenter/casemgmt/v5r2m0/index.jsp?topic=%2Fco
m.ibm.casemgmt.development.doc%2Fjsdoc%2Findex.html
In the custom search widget, the icm.util.SearchPayload class is started to
create a search payload, set the schema and data structures, and send the
search criteria and payload to the Case List widget, as shown in Example 10-7.
There are two methods in the class: getSearchPayload() and setModel(model).
Example 10-7 Performing the custom search using IBM Case Manager JavaScript API
var solution = this.solution;
var params = {};
params.ObjectStore = solution.targetObjectStore.id;
var criterion = new ecm.model.SearchCriterion({"id":
"CmAcmCaseIdentifier", "selectedOperator": "STARTSWITH", "dataType":
"xs:string", "defaultValue" : "%", "value": "%", "values": ["%"]});
params.criterion = [criterion];
var ct;
widget.solution.retrieveCaseTypes(function(theCaseTypes)
{
ct = theCaseTypes[0].name;
});
params.caseType = ct;
params.solution = solution;
var searchPayload = new icm.util.SearchPayload();
searchPayload.setModel(params);
var payload = searchPayload.getSearchPayload();
this.onBroadcastEvent("icm.SearchCases", payload);

Chapter 10. User interface and widgets 397
In setModel(model), it expects an IBM Case Manager JavaScript API object to be
passed as a parameter. Certain IBM Case Manager JavaScript API methods
require a parameter to be used as a callback function to perform processing on
the object.
10.5.6 Building the custom widget package
Package the custom search widget by using three separate Apache Ant build
scripts files to create the widget package with the IBM Content Navigator plug-in
JAR file and the custom page widget EAR and WAR files.
The first build.xml file creates the IBM Content Navigator plug-in file, as shown
in Example 10-8.
Example 10-8 Ant build file for the IBM Content Navigator plug-in JAR file
<?xml version="1.0" encoding="utf-8"?>
<project name="ICM Client Build" default="all" basedir=".">
<target name="clean">
<delete>
<fileset dir=".">
<include name="*.jar" />
</fileset>
</delete>
</target>
<target name="buildPlugin">
<javac target="1.5" source="1.5" destdir="./bin" srcdir="./src"
debug="on" includeantruntime="false">
<classpath>
<pathelement location="./lib/navigatorAPI.jar" />
</classpath>
</javac>
<copy todir="./bin" overwrite="yes">
<fileset dir="./src">
<include name="com/ibm/icm/extension/custom/WebContent/**/*.*"
/>
</fileset>
</copy>
Note: To build the IBM Content Navigator plug-in JAR file, the
navigatorAPI.jar file must be included in Eclipse or the IDE. The
navigatorAPI.jar file often is found in ...\ECMClient\configure\lib.

398 Advanced Case Management with IBM Case Manager
<jar destfile="./ICMCustomPlugin.jar"
manifest="./src/META-INF/MANIFEST.MF" update="true">
<fileset dir="./bin">
<include name="**/*.*" />
</fileset>
</jar>
</target>
<target name="all" depends="clean,buildPlugin"></target>
</project>
The second build.xml file creates the WAR and EAR files for the custom page
widget, as shown in Example 10-9.
Example 10-9 Ant build file for the custom page widget EAR and WAR files
<?xml version="1.0" encoding="utf-8"?>
<project name="ICM Client Build" default="all" basedir=".">
<target name="clean">
<delete>
<fileset dir=".">
<include name="*.war" />
<include name="*.ear" />
</fileset>
</delete>
</target>
<target name="createWAR">
<war destfile="./ICMCustomWidgets.war"
webxml="./WebContent/WEB-INF/web.xml">
<fileset dir="./WebContent">
<include name="**/*.*" />
</fileset>
</war>
</target>
<target name="createEAR">
<ear destfile="./ICMCustomWidgets.ear"
appxml="./WebContent/META-INF/application.xml">
<fileset dir="." includes="*.war"/>
</ear>
</target>

Chapter 10. User interface and widgets 399
<target name="all" depends="clean,createWAR,createEAR"></target>
</project>
The third build.xml file packages the IBM Content Navigator plug-in JAR file, the
EAR file for the custom page widget, and the directory that is holding the widget
definition and catalog JSON files into one .zip file that is ready to deploy into
IBM Case Manager, as shown in Example 10-10.
Example 10-10 Main Ant build file
<?xml version="1.0" encoding="utf-8"?>
<project name="ICM Custom Widget Build" default="all" basedir=".">
<property name="plugin.home" value="../ICMCustomPlugin" />
<property name="webapp.home" value="../ICMCustomWidgets" />
<target name="clean">
<delete>
<fileset dir=".">
<include name="*.jar" />
<include name="*.zip" />
</fileset>
</delete>
</target>
<target name="package">
<ant antfile="${plugin.home}/build.xml" >
<property name="basedir" value="${plugin.home}"/>
</ant>
<ant antfile="${webapp.home}/build.xml">
<property name="basedir" value="${webapp.home}"/>
</ant>
<zip destfile="../ICMCustomWidgets.zip">
<fileset dir="${plugin.home}">
<include name="*.jar" />
</fileset>
<fileset dir="${webapp.home}">
<include name="*.ear" />
</fileset>
<zipfileset dir="../ICMRegistry" prefix="ICMRegistry">
</zipfileset>
</zip>
</target>

400 Advanced Case Management with IBM Case Manager
<target name="all" depends="clean,package"></target>
</project>
10.5.7 Deploying the custom widget package
If the custom widget package does not contain the optional EAR file, the IBM
Case Manager administration client deploys and registers the custom widget
package.
If the custom widget package contains an optional EAR file, the IBM Case
Manager configuration tool deploys and registers the custom widget package.
Both options are described in this section. Do not perform both options; instead,
perform only one option, depending on the structure of the custom widget
package.
Complete the following steps to deploy the custom widget package by using the
IBM Case Manager administration client:
1. Open the IBM Case Manager administration client.
2. Click to open the design object store under the Object Stores folder in the
navigation tree.
3. Click the Widget Packages folder to open it in a new tab, as shown in
Figure 10-26.
Figure 10-26 Widget Packages tab in Case Manager administration client
4. Click Register Custom Widgets.

Chapter 10. User interface and widgets 401
5. Browse to the newly created custom widget package file. Then, click Next.
6. Verify the selected widget package details and click Finish to register the
custom widget package, as shown in Figure 10-27.
Figure 10-27 Verify selected widgets package in the administration client
Complete the following steps to deploy a custom widget package by using the
IBM Case Manager configuration tool:
1. Open the IBM Case Manager configuration tool.
2. Click File → Open Profile and select the IBM Case Manager configuration
profile file.
3. Right-click Deploy and Register Widgets Package and select Copy
Selected Task, as shown in Figure 10-28 on page 402. A copy of the existing
task with the existing values is made.
Note: Selecting the Replace if already registered option in the Verify the
selected widgets package window replaces the existing custom widget with
the updated widget package if the custom widget package is already
deployed and registered on the Application Server.

402 Advanced Case Management with IBM Case Manager
Figure 10-28 Copying the Deploy and Register Widgets Package task

Chapter 10. User interface and widgets 403
4. Open the newly copied Deploy and Register Widgets package task. Change
the value in Widgets package file path to the path of the newly created custom
widget package, as shown in Figure 10-29.
Figure 10-29 Modifying the Widgets package file path in the configuration tool
5. After all of the information is verified as correct on the copied version of the
Deploy and Register Widgets Package, click Save and then click Run Task.
6. Validate that you see that the task finished running successfully without any
errors in the Console window on the bottom of the IBM Case Manager
configuration tool.
The expected output looks as is shown in the following example:
Starting to run Copy_of_Deploy and Register Widgets Package
Copy_of_Deploy and Register Widgets Package ************
Finished running Copy_of_Deploy and Register Widgets Package

404 Advanced Case Management with IBM Case Manager
10.5.8 Adding the custom widget to the page
After successfully deploying and registering the custom widget package by using
the IBM Case Manager administration client or the IBM Case Manager
configuration tool, the custom widget must be added to the page (or pages) via
Page Designer.
Complete the following steps to add the custom widget to the page:
1. In IBM Case Manager Builder, edit the wanted solution.
2. Open Page Designer with the wanted page on which to add the custom
widget. For the custom search widget, it is added to the Cases page.
3. Drag the custom widget from the widget palette to the main layout area, as
shown in Figure 10-30 on page 405.
Note: If the custom widget package is deployed and registered on the
Application Server, rerunning the Deploy and Register Widgets Package
with the updated custom widget package updates the existing widget
package.
If there are changes to the widget definition or catalog JSON files, it is
strongly recommended that you uninstall the custom widget package and
then reinstall it.
Note: If the custom widget package includes an EAR file, make sure that the
custom widget enterprise application in WebSphere or other application
server is started before the custom widget is added to the page.
Note: The custom widget's catalog and definition JSON files specify the
widget palette category section in which the widget appears within Case
Manager Builder.

Chapter 10. User interface and widgets 405
Figure 10-30 Dragging the custom search widget onto the main layout area
4. Click Save to save the custom widget onto the page.
5. Open Case Manager Client to view the new custom widget (or widgets).
10.6 Creating a custom task
This section shows a simple step-by-step example of how to create a custom
task in IBM Case Manager V5.2. A custom task allows a case worker to define a
custom workflow for a work item.
Case workers can now create custom tasks to represent procedures that are not
predefined in the case type.
For more information about custom tasks, see the IBM Case Manager
Information Center at this website:
http://pic.dhe.ibm.com/infocenter/casemgmt/v5r2m0/topic/com.ibm.casemgm
t.client.doc/acmrth09.htm

406 Advanced Case Management with IBM Case Manager
Custom tasks must be enabled for the solution before case workers can make
use of this feature. Complete the following steps:
1. Open Case Manager Builder and edit the wanted solution.
2. Edit the wanted case type.
3. On the Case Type attributes page, select the Enable case workers to create
custom tasks option, as shown in Figure 10-31.
Figure 10-31 Enable case workers to create custom tasks
After the custom tasks are enabled, make sure that you commit the changes and
deploy the solution. Then, the case worker can create custom tasks by
completing the following steps:
1. Browse to the case details, work details, or the tasks tab in the Case
Information widget to create a custom task. Click Add custom task to create
a custom task.
The custom task editor pop-up window opens to allow the case worker to start
creating the custom task.
2. Enter a name and a description for the custom task.

Chapter 10. User interface and widgets 407
3. Click insert an item and choose from the following options:
– Work item:
i. Enter the name for the work item.
ii. Assign the work item to a user or group.
iii. Click the editable properties for this work item drop-down menu to
include case properties to include in the custom task.
iv. Click the deadline drop-down menu to specify a time frame for which
the work item must be completed.
v. Enter instructions to complete the work item. A document reference,
the value of a selected case property, and a hyperlink can be added to
the instruction field.
– Decision point:
i. Enter a label for the response button.
ii. Insert an item for the decision point and add any child items if the user
selects the response.
– Wait until or for
Enter a date and time to delay a work item until a specific time and date or
for a specified amount of time.
4. After a custom task is created, click Validate to validate the task and click
Start to start the custom task. Figure 10-32 on page 408 shows a sample
custom task.
Note: A decision point must follow a work item. The user must make a
decision if the work item is assigned to the user.

408 Advanced Case Management with IBM Case Manager
Figure 10-32 Sample custom task
10.7 Using the Timeline Visualizer and Instruction
widgets
This section describes the Timeline Visualizer widget and the Instruction widget,
which are the two new preinstalled widgets for IBM Case Manager V5.2.
The Timeline Visualizer widget provides a visual representation of the history of a
case. For more information about the timeline visualizer widget, see the IBM
Case Manager Information Center at this website:
http://pic.dhe.ibm.com/infocenter/casemgmt/v5r2m0/topic/com.ibm.casemgm
t.help.doc/acmwrh124.htm
The Instruction widget displays instructions to complete a work item through a
custom task. For more information about the instruction widget, see the IBM
Case Manager Information Center at this website:
http://pic.dhe.ibm.com/infocenter/casemgmt/v5r2m0/index.jsp?topic=%2Fco
m.ibm.casemgmt.help.doc%2Facmwrh129.htm
Chapter 10. User interface and widgets 409
10.7.1 Configuring auditing and case history store
To use the Timeline Visualizer widget, it is necessary to configure auditing and a
case history store to track the history of the cases. Complete the following steps
to configure auditing and the case history store for the Timeline Visualizer
widget:
1. Open the IBM Case Manager administration client.
2. Select the design or staging object store and select Solutions.
3. Right-click the wanted solution and select Configure → Auditing.
4. Follow the wizard steps to configure auditing. Select the appropriate
properties to audit within the wizard and apply the audit profile.
For more information about configuring auditing, see the IBM Case Manager
Information Center at this website:
http://pic.dhe.ibm.com/infocenter/casemgmt/v5r2m0/index.jsp?topic=%2
Fcom.ibm.casemgmt.design.doc%2Facmdt036.htm
After auditing is configured, a new case history store must be made to hold
the data that is needed by the Timeline Visualizer widget to track extended
history of cases.
5. Within the IBM Case Manager administration client, click the target object
store to open it in a new tab.
6. Click New Case History Store and follow the wizard to create a case history
store for the target object store.
10.7.2 Displaying case history in the Timeline Visualizer widget
The Timeline Visualizer widget contains a horizontal bar as the timeline, which
shows the time duration and the work items for the case. The Timeline Visualizer
also uses vertical bars to represent events. Through an event density histogram,
the widget displays a view of when case events occurred over the life of a case.
The user interface of the Timeline Visualizer widget includes a primary and a
secondary timeline. The primary timeline shows the duration of the entire case.
Users can move sliders and zoom in on the specific range within the case
timeline, which is represented by the secondary timeline. The Timeline Visualizer
widget is on the case details page by default. The user interface of the Timeline
Visualizer widget (when it is maximized) is shown in Figure 10-33 on page 410.

410 Advanced Case Management with IBM Case Manager
Figure 10-33 Timeline Visualizer widget user interface
10.7.3 Displaying instructions in the Instruction widget
The Instruction widget displays the instructions for completing a work item as set
in the instructions field creating a custom task is created. The instructions are
displayed in rich text format and can include hyperlinks and property values.
The Instruction widget is on the Custom Task Details page by default. A sample
view of the Instruction widget is shown in Figure 10-34.
Figure 10-34 Sample view of Instruction widget
Toolbar
Primary Timeline
Histogram
Secondary Timeline
(zoom)
Case Series
Tasks and Step
Series

© Copyright IBM Corp. 2013, 2014. All rights reserved. 411
Chapter 11. Customization topics
This chapter provides a detailed description of many important or advanced
topics that you might need to learn when you customize a case management
solution.
This chapter includes the following sections:
Using project areas when developing solutions
Automated handling of ingested documents
Splitting a case
Basic customization scenarios
Intermediate customization scenarios
Advanced customization scenarios
Multilingual support
11

412 Advanced Case Management with IBM Case Manager
11.1 Using project areas when developing solutions
Companies require solutions for various purposes. Creating these solutions
requires the involvement of various teams, business analysts, and the
departments of the organization.
The solutions can be grouped by using project areas so that only the relevant
business analysts are given access privileges to the solution and solution
definition. Project areas add security and autonomy to IBM Case Manager
solution development.
In addition, project areas help to limit the effect of resetting the test environment
to other users who are working on other projects in the same development
environment. Resetting the test environment removes deployed case solution
artifacts from the target object store and the process configuration information. A
reset also reinitializes the target object store and the isolated region that is
associated with the project area.
Instead of resetting everything in a test environment, you can use project areas
to reset the development environment only of a particular project area. This
isolation prevents the reset that disrupts the work of other business analysts who
are working on different project areas.
Users and solutions can easily be moved from one project area to another, but
each user can belong only to one other project area in addition to the default
project area. After a user is assigned to a project area, the user can modify or
define solutions within that specific project area.
Project areas are available only in the development environment. There is at
least one default project area. You can create secondary project areas according
to your business needs.
Project areas can be created and modified by using Case Manager
administration client, the Case Manager configuration tool, or the command line.
Note: Before resetting the test environment, it is important to save
user-defined assets from the target object store or they are deleted and
cannot be restored.
For more information about how to save user-defined assets, see the IBM
Case Manager Information Center at this website:
http://pic.dhe.ibm.com/infocenter/casemgmt/v5r2m0/index.jsp?topic=%2
Fcom.ibm.casemgmt.design.doc%2Facmdr001.htm
Chapter 11. Customization topics 413
We recommend the use of the Case Manager administration client to manage
project areas.
For more information about how to set up and manage project areas in IBM Case
Manager V5.2, see the IBM Case Manager Information Center at this website:
http://pic.dhe.ibm.com/infocenter/casemgmt/v5r2m0/topic/com.ibm.casemgm
t.design.doc/acmdt015.htm
11.2 Automated handling of ingested documents
Case Manager solutions often ingest incoming documents from external
systems. These documents can be from any of the following sources:
Scanned documents:
– Datacap Taskmaster and other capture systems
– Desktop scanning software
IBM Content Collector:
– IBM Content Collector for Email (Microsoft Exchange, IBM Lotus
Domino®, or SMTP)
– IBM Content Collector for Sharepoint
– IBM Content Collector for Files
Microsoft Office:
– FileNet Integration for Microsoft Office (Microsoft Outlook)
– FileNet Integration for Microsoft Office
– FileNet Services for IBM Lotus Quickr® (Microsoft Office or IBM Lotus
Notes®)
Desktop documents:
– Documents that are uploaded into the system with Workplace or
WorkplaceXT
– FileNet Services for Lotus Quickr
– Drag-and-drop with IBM Case Manager, IBM Content Navigator, and
WorkplaceXT
APIs:
–Java
– Content Manager Interoperability Services (CMIS)
–WebDAV
414 Advanced Case Management with IBM Case Manager
Other systems:
– IBM Content Platform Engine Bulk Import Tool
– Third-party software that interfaces with FileNet APIs to ingest documents
11.2.1 Generalized approach for handling ingested documents
Whenever possible, it is an efficient and good practice to automatically handle
these incoming documents; for example, by automatically attaching them to
existing relevant cases or creating cases and attaching them to these created
cases.
To design a process that automatically handles the ingested documents,
consider the following factors:
The document ingest software should classify only the document according to
the document types that are defined in the solution.
The case type and document type have a property (or set of properties) that
serves as the
key to the case. That is, each case has a unique, business-level
identifier that is associated with every case. Examples of keys are Claim
Number, Loan Number, Investigation ID, Case Number, Quote Number, and
Request Number.
Every ingested document that is filed into a case folder is indexed with this
key.
An event action can be triggered by the document class (type) if there is an
event subscription to the creation event.
The event action locates the corresponding case folder by using the case
identification key from the document and files the document into the case
folder.

Chapter 11. Customization topics 415
11.2.2 Implementation methods
Table 11-1 lists several ways to implement the automation process.
Table 11-1 Implementation methods for automated case document filing
11.2.3 Sample JavaScript based implementation procedure
You can implement the automated-filing of the ingested documents by using
JavaScript.
From Case Manager Builder, complete the following steps:
1. Define the case property that is to be used as the key.
For example, use Case Number as the key.
2. Add the property to the document type that is ingested.
3. Deploy the solution.
Location Method Description
Client-side Custom code that
runs on client
application
The client application runs the case folder search
and stores the document in the matching case
folder upon ingest.
Server-side JavaScript Event
Action
A JavaScript based event action is created to
handle the matching and filing of the case
document.
This method is appropriate for low-volume and
non-production implementations.
Server-side Java Event Action A Java based event action is created to handle the
matching and filing of the case document.
This method is the best method for production
implementations.
Server-side Workflow Event
Action
A workflow-based event action starts a workflow
to perform some processing that is based on a
document or folder action.
Remember: The key that is used is not necessarily the same as the Case
Title designated property, although this is a common practice.

416 Advanced Case Management with IBM Case Manager
From Administration Console for Content Platform Engine (ACCE), complete the
following steps:
1. Select the object store in the domain navigation pane.
We first define an event action before we create a subscription. In the
Administration Console for Content Platform Engine, this allows the new
subscription to use the newly created JavaScript Event action.
2. Create an event action by selecting object store → Events, Actions,
Processes → Event Actions → New Event Action, as shown in
Figure 11-1.
Figure 11-1 Adding a new event action
3. By using the wizard, add an event action. In the example, the display name is
called Automated Case Document Filing Action.
4. In the next window in the wizard, select JavaScript as the event action type.
5. Paste the JavaScript code that is provided in Example 11-1 on page 417.

Chapter 11. Customization topics 417
Example 11-1 Sample JavaScript code
importPackage(java.io);
importClass(java.lang.System);
importClass(java.lang.Integer);
importClass(java.util.Iterator);
importClass(Packages.com.filenet.api.engine.EventActionHandler);
importClass(Packages.com.filenet.api.util.Id);
importPackage(Packages.com.filenet.api.events);
importPackage(Packages.com.filenet.api.property);
importPackage(Packages.com.filenet.api.exception);
importPackage(Packages.com.filenet.api.core);
importPackage(Packages.com.filenet.api.constants);
importClass(Packages.com.filenet.api.query.SearchSQL);
importClass(Packages.com.filenet.api.query.SearchScope);
importClass(Packages.com.filenet.api.collection.IndependentObjectSet
);
function onEvent(event, subscription) {
// customize to some other string property symbolic name as needed
var keyIdentifierName = "CC_CaseNumber";
var os = event.getObjectStore();
var id = event.get_SourceObjectId();
// get document's key identifier value
var fe = new FilterElement(null, null, null, "Name " +
keyIdentifierName, null);
var pf = new PropertyFilter();
pf.addIncludeProperty(fe);
var doc = Factory.Document.fetchInstance(os, id, pf);
var identifier =
doc.getProperties().get(keyIdentifierName).getStringValue();
// find case folder of same key identifier value
var sqlStr = "SELECT [" + keyIdentifierName + "], [FolderName],
[PathName], [Id] FROM [CmAcmCaseFolder] WHERE ([" +
keyIdentifierName + "] = '" + identifier + "')";
var sql = new SearchSQL(sqlStr);
var ss = new SearchScope(os);
var objectSet = ss.fetchObjects(sql, new Integer(1), null, null);
var iter = objectSet.iterator();
if (iter.hasNext())
{
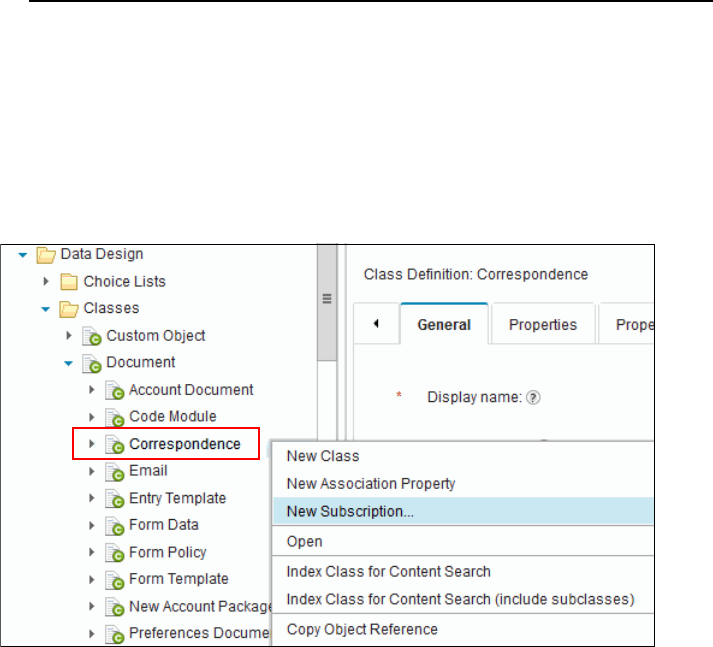
418 Advanced Case Management with IBM Case Manager
var folder = iter.next();
// file the doc and save
var drcr = folder.file(doc, AutoUniqueName.AUTO_UNIQUE,
doc.getProperties().getStringValue("Name"),
DefineSecurityParentage.DO_NOT_DEFINE_SECURITY_PARENTAGE);
drcr.save(RefreshMode.NO_REFRESH);
}
}
6. Create a subscription for the wanted document class or object by using the
newly created event action. Complete the following steps:
a. Identify and click the wanted document class or object for which you want
to create a subscription.
The example uses the Correspondence document type.
b. From the Action menu, click New Subscription to add a subscription (see
Figure 11-2) to this document class.
Figure 11-2 Adding a subscription to the Correspondence document class

Chapter 11. Customization topics 419
7. By using the wizard, enter a display name. In this example, the display name
is Automatic Case Document Filing Subscription, as shown in Figure 11-3.
Figure 11-3 Creating a subscription
8. In the Select the Triggers window of the wizard, select the wanted triggers for
the new subscription. In our example, select Creation Event, as shown in
Figure 11-4 on page 420.

420 Advanced Case Management with IBM Case Manager
Figure 11-4 Specify triggers window for creating a new subscription
9. In the Select an Event Action window of the wizard, choose the newly created
event action and finish the wizard to complete the new subscription.
Test your implementation by creating a document of the specified class. Make
sure that the document is filed into the appropriate case folder.
For more information about how to create a code module for automated
document ingesting can be found at the IBM FileNet P8 Information Center,
which is available at this website:
http://pic.dhe.ibm.com/infocenter/p8docs/v5r2m0/topic/com.ibm.p8.ce.adm
in.tasks.doc/p8pcc047.htm
For more information about how to handle ingested documents through workflow,
see 14.5, “Using Content Platform Engine workflow integration” on page 555.
Chapter 11. Customization topics 421
11.3 Splitting a case
There are instances in which you must split a single case into two separate
cases. For example, in the Customer Complaints solution, a customer might file a
complaint for a product defect and a service failure on the same complaint form
or email. Based on company guidelines, these are two different types of
complaints that must be resolved through two separate review processes. In this
situation, the case worker must split the original case into two separate cases.
Many of the details, such as customer name and the date when the complaint
was filed, are the same for both cases.
The
Split Case page is designed for splitting cases. The Split Case page is
started when the case worker clicks Split Case on the Case toolbar.
When a case is split, a case is created that is based on information from the
original case. Documents in the original case can be selectively moved to the
new case. The new case can be of the same case type or a different type within
the same solution. After the split, the two cases continue independently. The
case history shows the split action and the other related case.
This section describes how to split a case by using the Split Case page.

422 Advanced Case Management with IBM Case Manager
11.3.1 Splitting a case into two cases
The Split Case window is opened by clicking Split Case in the Case Details
page, as shown in Figure 11-5. If there are multiple case types in the solution,
you can select the case type to be created from the split action.
Figure 11-5 Split Case window
The Split Case page contains the following widgets:
Case toolbar: Displays header information.
Split Case Data: Shows the case properties that can be edited for the new
case. The properties fields are completed with matching values from the
original case.
Select Case Documents: Allows a user to select documents from the original
case to be added to the new case.
Original Case Data: Displays read-only property values from the original
case.
Tip: The property fields in the new case are completed with matching values
from the original case. However, if the case has a property that has a default
value and the current value of the property in the original case is NULL, the
property is set to the default.

Chapter 11. Customization topics 423
Review the data that is presented for the new case, edit it if necessary, and then
select the case documents to be added to the new case. After user confirmation,
the split operation is completed, which copies the information to a new case
instance. The new case and original case continue independently and complete
separately.
The tasks from the original case continue to run, and new tasks for the new case
are started in the normal fashion. They function the same as though they were
created through the Add Case function. If the user chooses to do so, selected
documents are filed into new case at the case root level. The history of the
original and the new case shows the split action and a link to the other case.
Figure 11-6
shows the history of the split case activity for the example use case.
Figure 11-6 History of the case

424 Advanced Case Management with IBM Case Manager
11.4 Basic customization scenarios
In IBM Case Manager, there are various ways to customize a solution to add
functionality by using custom code in the custom action or toolbar, code in the
script adapter widget that is wired with preinstalled widgets, or with custom
widgets. These can be considered as basic, intermediate, and advanced levels of
customization to IBM Case Manager. This section focuses on the basic
customization scenarios.
The customization scenarios are provided as a subset of the many different ways
to customize IBM Case Manager. Each customization scenario can be altered to
achieve a different result and be provided as working examples.
The following basic customization examples are shown in this section:
Adding a button to the toolbar
Adding custom actions to menu action
11.4.1 Adding a button to the toolbar
In this example, we add two new buttons to the toolbar. The first button opens a
web page to the Toolbar widget. Complete the following steps:
1. From Case Manager Client, open Page Designer on the wanted page.
2. Edit the settings of the Toolbar widget on the page.
3. Click the Add button icon to show the Action and Alignment drop-down
menus for a new button.
For the Action drop-down menu, choose from Add Case, Custom Add Case
Action, Event Action, Manage Roles, Open Web Page, Preferences, and
Script Action.
For the Alignment drop-down menu, choose from Left, Right, or Center.
4. In this example, we select Open Web Page as the action, Left as alignment,
and enter http://ibm.com as the URL, as shown in Figure 11-7 on page 425.
Disclaimer: IBM does not warrant, represent, or imply reliability, serviceability,
or function of the code that is presented in association with this book. IBM is
under no obligation to update content nor provide further support.
All code is provided “as is,” with no warranties or guarantees whatsoever.

Chapter 11. Customization topics 425
Figure 11-7 Adding a custom button to the toolbar
5. Click OK to add the new button to the toolbar. Then, click OK again to exit the
Toolbar window and save the changes.
6. Commit and deploy the changes to the solution and validate the button in
Case Manager Client.
11.4.2 Adding custom actions to menu action
We customize the menu action of the Case List widget in this example. The menu
options for the Case List widget are called when the user right-clicks a case in
the Case List widget.
Complete the following steps to add an option to show a link to the case through
a menu action in the Case List widget:
1. From Case Manager Builder, open Page Designer on the wanted page.
2. Edit the settings of the Case List widget on the page. In this example, we edit
the settings of the Case List widget on the Cases page.
3. Click the Menu tab, and then click Add Menu Item.
There are various actions that are available by default. For example, choosing
Script Action allows a custom script to be run when the button or menu is
selected.

426 Advanced Case Management with IBM Case Manager
4. Select Script Action as the action. The window automatically fills with three
other text areas: execute, show this script action, and enable this
script action.
5. Copy and paste the script that is provided in Example 11-2 into the Execute
section of the window. This script checks against the Case Title to see
whether it matches with a variable set. In this script, we acquire the value of
the case from the Case List widget by using
this.getActionContext(“CaseReference”). Then, we perform a simple IF
statement to check against the first element in the array that is given from the
function call this.getActionContext(“CaseReference”).
Example 11-2 Sample script action
var x = this.getActionContext("CaseReference");
var c = "CC_Complaint_000000100001";
if(c == x[0].getCaseTitle())
{
alert("This is a special case, please review this case.");
}
else
{
alert("This is a normal case, please proceed.");
}
6. Click OK to add the menu item. Click OK again at the bottom of the Case List
settings window to save the changes.
7. Commit and deploy the changes to the solution and validate the script in Case
Manager Client.
11.5 Intermediate customization scenarios
There are various ways to customize an IBM Case Manager solution. This
section focuses on the intermediate level of customization scenarios. This type of
customization involves adding code in the script adapter widget that is wired with
preinstalled widgets.
The customization scenarios are provided as a subset of the many different ways
to customize IBM Case Manager. Each customization scenario can be altered to
achieve a different result and are provided as working examples.

Chapter 11. Customization topics 427
We show the following intermediate level of customization examples:
Enumerating documents
Opening multiple work items
Adding entry template via custom action
Adding an attachment to the case
Creating in-basket dynamic filter
Filtering Case Information widget to show comments only
Modifying property attributes by using the Property Controller
Getting the next work item with custom logic after completing a work item
Filling the Case List widget based on search results
11.5.1 Enumerating documents
This customization scenario allows a user to enumerate the number of
documents that are attached to a case by using the Script Adapter widget and
wiring it to the Case List widget on the Cases page.
We want the user to select a case in the Case List widget, for a pop-up window to
show the number of documents, and show the document ID of each document in
the root folder of the case. We want to use a script that gets the case folder
ContentItem from the case editable object that is passed in the payload.
Complete the following steps:
1. From Case Manager Builder, open Page Designer on the Cases page.
2. Drag the Script Adapter widget from the widget palette area to the main layout
area. The location of the widget does not matter (whether it is in the hidden
widget area or in a column on the page).
3. Click the Edit Settings icon of the Script Adapter widget and paste the code
in Example 11-3 into the text area that is labeled JavaScript. Click OK to exit
the window.
Example 11-3 Sample script for enumerating documents
var caseEditable = payload.caseEditable;
var caseObj = caseEditable.getCase();
var caseFolder = caseObj.caseFolder;
var actionsHandler = ecm.model.desktop.getActionsHandler();
if (actionsHandler) {
actionsHandler.actionOpen(caseFolder, function(caseFolder,
resultSet) {
alert("The selected case folder has " +
resultSet.items.length + " items.");
for (var i = 0 ; i < resultSet.items.length; i ++) {

428 Advanced Case Management with IBM Case Manager
console.log("Document ID : " + resultSet.items[i].id +
"\n" + "Document Title: " + resultSet.items[i].name);
alert("Document ID : " + resultSet.items[i].id +
"\n" + "Document Title: " + resultSet.items[i].name );
}
});
}
return payload;
4. Click the Edit Wiring icon of the Script Adapter widget and wire it to the Case
List widget to receive the Select Case outgoing event. Click Add Wire and
then click OK to exit the window.
5. Save and close the Cases page, deploy the changes to the solution, and
validate this customization scenario in Case Manager Client, as shown in
Figure 11-8.
Figure 11-8 Viewing pop-up window from enumerating document sample
11.5.2 Opening multiple work items
In this customization scenario, the user can add a custom script to the Script
Adapter widget to open multiple work items with multiple tabs in Case Manager
Client. This opens multiple work items simultaneously in one action. The Script
Adapter widget is wired to the In-baskets widget.
Complete the following steps:
1. Within Case Manager Builder, open Page Designer on the Work page.
2. Click the Edit Settings icon in the In-baskets widget then click the Menu tab.
3. Click the Add Menu Item icon and select Event Action for the Action
drop-down menu.

Chapter 11. Customization topics 429
4. Enter Open All for the Label field, open_all for the Menu Identifier field,
open_all_event for the Event Name field, and select Broadcast as the Event
Type, as shown in Figure 11-9.
Figure 11-9 Adding a menu action for the In-baskets widget
5. Click OK to add the new menu action for the In-baskets widget. Click OK to
save the changes to the In-baskets widget.
6. Drag the Script Adapter widget from the widget palette area to the main layout
area. Click the Edit Settings icon and paste the script that is shown in
Example 11-4 on page 430 into the JavaScript text area. Then, click OK to
save the changes to the Script Adapter widget.
Tip: When possible, it is recommended that you add the Script Adapter to
the hidden widgets page to avoid cluttering the page.

430 Advanced Case Management with IBM Case Manager
Example 11-4 Sample script to open multiple work items
for (var i in payload.WorkItem){
var w = payload.WorkItem[i];
var h = new icm.util.WorkItemHandler(this, true);
w.retrieveStep(function(workItem){
h.handleWorkItem(workItem);
});
}
7. Click the Edit Wiring icon on the Script Adapter widget to wire the Script
Adapter widget to the In-baskets widget. Select In-baskets as the source
widget, select *open_all_event as the outgoing event, and select Receive
event payload as the Incoming event.
8. Click Add Wire and then click OK to exit the window.
9. Save and close Page Designer and deploy the changes to the solution. To
validate this customization scenario, click the first work item once and hold
the Shift key to highlight the second work item in the In-baskets widget. Then,
right-click either case and select Open All to open them in multiple tabs, as
shown in Figure 11-10.
Figure 11-10 Opening multiple work items
Chapter 11. Customization topics 431
11.5.3 Adding entry template via custom action
This customization scenario allows the user to create a custom toolbar action to
open an IBM Content Navigator action for an entry template. The entry template
must be created beforehand and then the custom toolbar action starts the IBM
Content Navigator action.
Complete the following steps:
1. Create an entry template that uses FileNet Workplace XT by using the IBM
FileNet Workplace XT Entry Template Designer.
For more information about entry templates, see the IBM FileNet P8
Information Center at this website:
http://pic.dhe.ibm.com/infocenter/p8docs/v5r1m0/index.jsp?topic=%2Fc
om.ibm.usingeuc.doc%2Feuche013.htm
2. Copy the version series ID of the newly created entry template.
3. Within Case Manager Builder, open Page Designer on the Cases page.
4. Click the Edit Settings icon on the Toolbar widget and click the Add Button
icon.
5. Select Script Action when you are clicking the drop-down menu for Action.
Add the value Add Entry Template for the label field.
6. Paste the script that is in Example 11-5 on page 432 into the Execute text
area. Make sure to replace the text in the first line with the version series ID of
the newly created template.
This script allows you to open a window to add an entry template that is
started as an IBM Content Navigator action. The script calls the Navigator
action through
ecm.model.desktop.getActionsHandler(lang.hitch(this,function(actions
Handler). We can display the entry template through the version series ID
and the repository ID.

432 Advanced Case Management with IBM Case Manager
Example 11-5 Sample script for opening an entry template
var entryTemplateId = "YOUR VERSION SERIES ID HERE";
var repositoryId = this.getWidget().getSolution().getTargetOS().id;
require([
"dojo/_base/declare",
"dojo/_base/lang"
], function(
declare,
lang
) {
ecm.model.desktop.getActionsHandler(lang.hitch(this,
function(actionsHandler) {
var repository =
ecm.model.desktop.getRepository(repositoryId);
repository.retrieveItem(entryTemplateId,
function(item) {
if (item && item.mimetype) {
switch (item.mimetype) {
case
"application/x-filenet-documententrytemplate":
case
"application/x-filenet-entrytemplate":
actionsHandler.actionView(repository, [
item
]);
break;
}
}
}, "EntryTemplate", "current", entryTemplateId);
}));
});
7. Click OK to add the button to the toolbar widget and then click OK to save the
changes to the toolbar widget.
8. Save and close the page in Page Designer, then deploy the changes to the
solution. To validate this customization scenario, click Add Entry Template to
open a pop-up window to add the entry template, as shown in Figure 11-11
on page 433.

Chapter 11. Customization topics 433
Figure 11-11 Adding an entry template in Case Manager Client
11.5.4 Adding an attachment to the case
Often, a case worker wants to add an attachment to the case from the local
system but does not want to browse to the repository each time to find the case
folder. This customization scenario allows the case worker to add an attachment
to file into the case without having to browse to the case folder in the Save in field
for the Add Document window on the Work Details page. This customization
scenario uses custom script in an event action in the Attachment widget. It also
uses custom script in a Script Adapter widget.

434 Advanced Case Management with IBM Case Manager
Complete the following steps:
1. From Case Manager Builder, open Page Designer on the Work Details page.
2. Click the Edit Settings icon for the Attachments widget on the page.
3. Click the Menus tab, then click the Add Menu Item icon.
4. Select Event Action under the Action drop-down menu. Then, enter the
following values:
– Label: Add Document From Local File System
–Event Name: icm.AddDocToBothCaseAndAttachment
– Event Type: Wiring
– Enable this event action: Paste the script that is shown in Example 11-6.
Example 11-6 Sample script for Attachment widget event action
if (attachment && attachment.length > 0) {
attachment = attachment[0];
}
if ((attachment && (attachment.get("readOnly") == true)) ||
(!attachment)){
return false;
}else{
return true;
}
5. Click OK at the bottom of the form to add the new menu item. Click OK again
to save the changes to the Attachments widget.
6. Drag the Script Adapter widget from the widget palette area to the main
layout area. It is recommended to put this Script Adapter widget into the
hidden widgets area. Click Show/Hide Hidden Widgets in the toolbar area of
Page Designer to show the hidden widgets area.
7. Click the Edit Settings icon on the Script Adapter widget.
8. Select the Block outbound event option.
Note: If you are using the Customer Complaints solution, make sure that the
appropriate step has an attachment added as part of the workflow.

Chapter 11. Customization topics 435
9. Paste the custom script that is shown in Example 11-7 into the JavaScript text
area. This custom script uses the Add Document dialog, retrieves the case
folder, and makes it as the parent folder of the Add Document dialog. It also
hides the Save in field that is present in the Add File from Add Document
dialog.
Example 11-7 Sample custom script for adding an attachment
var self = this;
/*Wire to page container icm.SendWorkItem event, retrieve the
workitem related case.*/
if(payload.eventName == "icm.SendWorkItem"){
self.workItemEdt = payload.workItemEditable;
self.workItemEdt.retrieveStep(function(){
self.case = self.workItemEdt.getCase();
});
}
/*Wire to event action on attachment, which published the user
configured event icm.AddDocToBothCaseAndAttachment*/
if(payload.eventName == "icm.AddDocToBothCaseAndAttachment"){
/*Get the selected attachment sent from event action*/
self.attachment = payload.Attachment;
/*Callback to add case document as attachment*/
var _addToAttachment = function(contentItem){
self.onPublishEvent("icm.SendEventPayload",
{"attachmentName":self.attachment.id, "documents":[contentItem]});
};
/*retrieve the case folder, make it as the parent folder of the
add document dialog*/
self.case.retrieveCaseFolder(function(){
var parentFolder = self.case.getCaseFolder();
require(["dojo/dom-style",
"ecm/widget/dialog/AddContentItemDialog"],function(domStyle,
AddContentItemDialog){
/*Create the add document dialog*/
self.addContentItemDialog = new AddContentItemDialog();
var contentItemGeneralPane =
self.addContentItemDialog.addContentItemGeneralPane;
/*Hide the "Save in" field - ICM requirement*/

436 Advanced Case Management with IBM Case Manager
domStyle.set(contentItemGeneralPane._documentOnlyArea,
"display", "none");
/*Show the add document dialog*/
self.addContentItemDialog.show(parentFolder.repository,
parentFolder, true, false, _addToAttachment, null, false, null,
true);
});
});
}
10.Click OK in the Script Adapter widget. Then, click the Edit Wiring icon on the
Script Adapter widget.
11.Under the section that is labeled Incoming Events for the Script Adapter,
specify the following values under each drop-down menu:
– Source widget: Page Container
– Outgoing event: Send work item
– Incoming event: Receive event payload
12.Click Add Wire.
13.Specify a second incoming event for the Script Adapter with the following
values:
– Source widget: Attachments
– Outgoing event: *icm.AddDocToBothCaseAndAttachment
– Incoming Event: Receive event payload
14.Click Add Wire.
15.Under the section that is called Outgoing Events for the Script Adapter,
specify the following values under each drop-down menu:
– Outgoing event: Send event payload
– Target widget: Attachments
– Incoming event: Add document attachment
16.Click Add Wire. Then, click OK to save the changes to the wiring for the
Script Adapter widget.
17.Save the changes to the page, deploy the changes in Case Manager Builder,
and open Case Manager Client to validate the customization scenario.
18.On the Work Details page, browse to the Attachments widget, click Actions,
and then select the newly created menu item, Add Document From Local
File System. The window that opens after you click the menu item does not
require the user to specify where to save the attachment. The attachment is
automatically saved to the case folder.

Chapter 11. Customization topics 437
11.5.5 Creating in-basket dynamic filter
This customization scenario adds an in-basket dynamic filter. The in-basket
widget loads when the dynamic filter is received so that the results that are
shown in the in-basket widget already are filtered to the case worker.
Complete the following steps:
1. From Case Manager Builder, open Page Designer on the Work page.
2. Drag the Script Adapter widget from the widget palette area to the main layout
area.
3. Wire the Script Adapter widget to the Page Container widget under the
Incoming Events section by setting the following values:
– Source widget: Page Container
– Outgoing event: Page Activated
– Incoming event: Receive event payload
Click Add Wire to add this wiring setting.
4. Wire the Script Adapter widget to the Page Container widget under the
Outgoing Events section by setting the following values:
– Outgoing Event: Send event payload
– Target widget: In-baskets
– Incoming event: Apply filter
Click Add Wire to add this wiring setting.
5. Validate that the In-basket widget is wired appropriately.
6. Click the Edit Settings icon for the Script Adapter widget and paste the script
that is shown in Example 11-8 on page 438 into the JavaScript text area. The
following script grabs the current user name and constructs variables to pass
to the icm.model.InbasketDynamicFilter.fromJSON(data); function to
perform the dynamic filter.
Note: The script that is shown in Example 11-8 on page 438 is specific to
the Customer Complaints solution. Make sure to create a case property for
the Customer Complaints solution that is called AssignedToUser. The
in-basket dynamic filter searches on this case property and matches it to
the user name, which is case-sensitive.

438 Advanced Case Management with IBM Case Manager
Example 11-8 Sample script for in-basket dynamic filter
var myUser = ecm.model.desktop.userDisplayName;
var data = {
"queueName":"CC_Specialist",
"inbasketName":"Specialist",
"hideFilterUI":false,
"queryFilter":"(CC_AssignedToUser = :A)",
"queryFields":[
{
"name":"CC_AssignedToUser",
"type":"xs:string",
"value":"*"
}
],
"hideLockedByOther":"true"
};
data.queryFields[0].value = myUser;
var model = icm.model.InbasketDynamicFilter.fromJSON(data);
console.log(model);
var modelArray = [];
modelArray.push(model);
return {"dynamicFilters":modelArray};
7. Click the Edit Settings icon for the In-baskets widget and select the Do not
populate the in-basket until the dynamic filter is received option. This
ensures that the in-basket widget loads only when the filter is received.
8. Save and close the changes to the page within Page Designer. Ensure that
the newly created case property AssignedToUser is available to the case type
and the Specialist in-basket.
9. To validate this customization scenario, create a case and enter P8Admin if
you are logged in as P8Admin for the case property AssignedToUser on the
Work Page in Case Manager Client. Ensure that the case is opened to the
Specialist queue and it appears in the in-basket widget on Case Manager
Client.
In Figure 11-12 on page 439, there are three work items in the Specialist
queue, but only one is available because it has the value P8Admin, which
matches the logged in user.
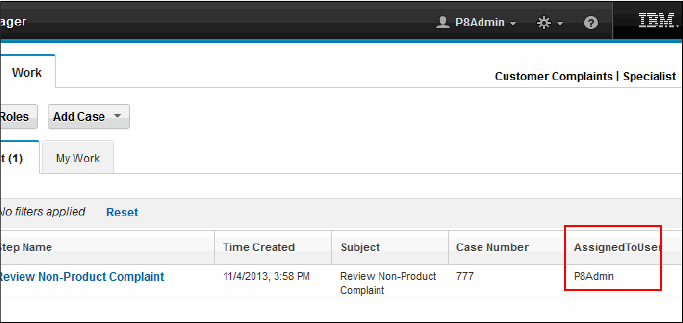
Chapter 11. Customization topics 439
Figure 11-12 In-basket widget dynamic filter
11.5.6 Filtering Case Information widget to show comments only
This customization scenario allows the Case Information widget to show only
comments that are attached to the case. This helps to filter down the History tab
of the Case Information widget.
Complete the following steps:
1. From Case Manager Builder, open Page Designer for a page or a custom
page with the Case List widget. In this example, we customize the Cases
page.
2. Drag the Script Adapter widget from the widget palette area to the main layout
area.
3. Wire the Script Adapter widget to the Page Container widget under the
Incoming Events section by setting the following values:
– Source widget: Page Container
– Outgoing event: Page Opened
– Incoming event: Receive event payload
Click Add Wire to add this wiring setting.
4. Wire the Script Adapter widget to the Page Container widget under the
Outgoing Events section by setting the following values:
– Outgoing Event: Send event payload
– Target widget: Case Information
– Incoming event: Filter History
Click Add Wire to add this wiring setting.

440 Advanced Case Management with IBM Case Manager
5. Click the Edit Settings icon for the Script Adapter widget. Paste the code that
is shown in Example 11-9 into the JavaScript text area. This script filters the
payload of the Case Information widget to show only case comments.
Example 11-9 Sample script to show comments only
payload = {"show":"Summary", "showValue":"Summary",
"forEntry":"Comments", "forValue":"Comments"};
return payload;
6. Save the changes to the page, deploy the changes to the solution, and open
Case Manager Client to the page with the Case List widget. In this example,
we open the Cases page and click a case in the Case List widget. The History
tab of the Case Information widget shows the comments of the case.
11.5.7 Modifying property attributes by using the Property Controller
This customization scenario involves hiding or showing certain case properties,
depending on what the user selects in a choice list case property. This scenario
demonstrates how to adjust the PropertyController settings in the context of the
Coordination topic.
When the page broadcasts a SendCaseInfo event, for example, each widget
begins the process of loading their widget content. This loading is asynchronous
and can take longer for some widgets, such as the Form widget. In the case of
data widgets, such as the Properties, Form, Attachments widgets, one widget
can complete the loading process and prepare for user input before another.
Therefore, the user can begin interacting with that widget’s user interface while
the other widgets are still loading. Because all of these widgets share a controller
instance, it becomes difficult to ascertain the controller’s initial state when testing
for dirty state.
The LOADWIDGET and AFTERLOADWIDGET topics were introduced to
coordinate the loading process so that all widgets can be certain of the moment
when the loading process was complete by all data widgets.
Specifically, the LOADWIDGET topic indicates that a widget can begin loading its
content. The completion callback is called when the loading process is complete.
The Properties widget responds to this topic by loading the widget in a read-only
state to temporarily prevent user input.
Important: This customization scenario and the LOADWIDGET and
AFTERLOADWIDGET topics are not available in IBM Case Manager V5.2. It
is available in IBM Case Manager V5.2.0.001.

Chapter 11. Customization topics 441
After all of the widgets respond to the LOADWIDGET topic, then the
AFTERLOADWIDGET topic is triggered. Its payload includes a time stamp that
indicates the moment when all data widgets were loaded. The Properties widget
responds to this topic by switching the view to an editable state to allow user
input.
The following customization scenario shows how coordination topics can be used
to customize some of the controller while the page is loaded:
1. Open the Case Details page in Page Designer.
2. Drag the Script Adapter widget from the widget palette area to the main layout
area or the hidden widgets area.
3. Wire the Script Adapter to the Send case information event from the Page
Container widget.
4. Click the Edit Settings icon for the Script Adapter widget and paste the
custom script that is shown in Example 11-10 into the JavaScript text area.
This custom script uses the Property Controller to detect if the user changed
the Upgrade Category case property value to Product or Service Plan on the
Case Details page. If the user selects Product, the Part Number case
property becomes required and the Customer Since case property is hidden.
If the user selects Service Plan, the Customer Since case property becomes
required and the Part Number case property is hidden.
IBM Case Manager V5.2.0.001 adds the LOADWIDGET and
AFTERLOADWIDGET topics that allows the coordination events to be run.
Example 11-10 Sample custom script for modifying property attributes
require(["icm/base/Constants",
"icm/model/properties/controller/ControllerManager"],
function(Constants, ControllerManager) {
var coordination = payload.coordination;
var editable = payload.caseEditable;
var collectionController;
var upgradePropertyController;
var productPropertyController;
var servicePropertyController;
var handle;
/* Define the value change handler for the CC_UpgradeCategory
property. This
handler updates the state of the CC_PartNumber and
CC_CustomerSince
properties each time the value of the CC_UpgradeCategory
property changes. */
442 Advanced Case Management with IBM Case Manager
var upgradeMethodValueChangedHandler =
function(upgradeMethodValue) {
productPropertyController.set("hidden", upgradeMethodValue !==
"Product");
productPropertyController.set("required", upgradeMethodValue
=== "Product");
servicePropertyController.set("hidden", upgradeMethodValue !==
"Service Plan");
servicePropertyController.set("required", upgradeMethodValue
=== "Service Plan");
};
/* Define the handler for the LOADWIDGET topic. */
var loadTopicHandler = function(context, complete, abort) {
/* Create the controller binding. */
collectionController = ControllerManager.bind(editable);
upgradePropertyController =
collectionController.getPropertyController("CC_UpgradeCategory");
productPropertyController =
collectionController.getPropertyController("CC_PartNumber");
servicePropertyController =
collectionController.getPropertyController("CC_CustomerSince");
/* Wire up the value changed handler for the CC_UpdateCategory
property. */
handle = upgradePropertyController.watch("value",
upgradeMethodValueChangedHandler);
/* Call the value changed handler directly to update the
initial state
of the CC_PartNumber and CC_CustomerSince properties based on
the current
value of the CC_UpgradeCategory property. */
upgradeMethodValueChangedHandler(upgradePropertyController.get("valu
e"));
/* Call the coordination completion method. */
complete();
};
/* Define the handler for the AFTERSAVE and AFTERCANCEL topics.
*/
var closeTopicHandler = function(context, complete, abort) {
/* Release the value changed handler. */

Chapter 11. Customization topics 443
handle.remove();
/* Release the controller binding. */
ControllerManager.unbind(editable);
/* Call the coordination completion method. */
complete();
};
/* Wire up the coordination topic handlers. */
coordination.participate(Constants.CoordTopic.LOADWIDGET,
loadTopicHandler);
coordination.participate(Constants.CoordTopic.AFTERSAVE,
closeTopicHandler);
coordination.participate(Constants.CoordTopic.AFTERCANCEL,
closeTopicHandler);
});
5. Save the changes to the page and deploy the changes to the solution. To
validate this customization scenario in Case Manager Client, open the Case
Details page and notice that the Customer Since field is hidden and the Part
Number field is required when Product is selected in the Upgrade Category
field. Similarly, notice that the Part Number field is hidden and the Customer
Since field is required when Service Plan is selected in the Upgrade Category
field.
11.5.8 Getting the next work item with custom logic after completing
a work item
This customization scenario allows the user to complete a work item, then have
some custom logic to retrieve the next work item automatically. The custom logic
in this specific example retrieves the next work item that has the same step name
as the one that was opened from the In-baskets widget.
This customization scenario uses the get next option that is available in the
Work Item Toolbar widget’s Complete action. The Complete action in the Work
Item Toolbar widget can be enabled to automatically get the next work item. This
retrieves the next work item when the case worker clicks Complete.
Note: This customization scenario can be modified to be added to the
Work Details page, Add Cases page, or Add New Task page. The wiring
and the custom script must be modified accordingly.

444 Advanced Case Management with IBM Case Manager
This customization (as shown in Figure 11-13) extends this standard feature in
IBM Case Manager and adds custom logic.
Figure 11-13 Work Item Toolbar widget’s Complete action
For the Customer Complaints solution, if a case worker is of the Specialist Role
and opens the only Review Product Compliant work item in the work queue and
the rest of the work items in the queue for the Specialist role are Review
Non-Product Compliant work items, the work details page notifies the case
worker that there are no more work items to retrieve.
Complete the following steps to customize the solution:
1. Open the page or custom Work Details page in Page Designer. In this
example, we use the Work Details page.
2. Open the Edit Wiring window and select the Page Container widget. Click the
Event Broadcasting tab and clear the Send work item. This ensures that the
custom script we add in later broadcasts this event, instead of the page.

Chapter 11. Customization topics 445
3. Click the Edit Settings icon on the Work Item Toolbar widget. Click the
Toolbar tab and double-click the Complete toolbar label to edit it.
4. Select the Automatically get the next work item option. This enables the
Complete button on the work details page to retrieve the next work item. Click
OK to save the changes to the Complete button, then click OK again to save
the changes to the Work Item Toolbar.
5. Drag the Script Adapter widget from the widget palette area to the main layout
area.
6. Click the Edit Settings icon on the Script Adapter widget and paste the script
that is shown in Example 11-11 into the JavaScript text area. This script is a
sample that requires the next work item to have the same step name as the
first work item that was opened from the In-baskets widget directly. This can
be changed or modified if you want to retrieve the next work item by using
different criteria.
Example 11-11 Sample script to process a work item
var widget = this;
require([
"dojo/_base/declare",
"dojo/_base/lang",
"icm/util/WorkItemHandler",
], function(
declare,
lang,
WorkItemHandler
) {
if(payload !== null){
var workItemEditable = payload.workItemEditable;
var UIState = payload.UIState;
if ( workItemEditable !== null) {
/*If the current work item is not gotten from get next
function, just show it*/
var stepName = workItemEditable.getStepName();
if(UIState !== null && UIState.get("GetNext") === true){
/*do any rules based on business logic*/
if ( widget.lastWorkItemStepName && stepName !==
widget.lastWorkItemStepName){
/* if the work item is not expected. We always need to
handle the work item with same stepName for handling */
var icmWorkitem = workItemEditable.getWorkItem();

446 Advanced Case Management with IBM Case Manager
if(UIState !== null &&
UIState.get("workItemReadOnly") !== true){
icmWorkitem.abortStep(lang.hitch(this,
function(){
var handler = new WorkItemHandler(widget);
handler.handleNextWorkItem(icmWorkitem);
}));
}else{
var handler = new WorkItemHandler(widget);
handler.handleNextWorkItem(icmWorkitem);
}
}else{
widget.lastWorkItemStepName = stepName;
widget.onBroadcastEvent("icm.SendWorkItem",
payload);
}
}else{
widget.lastWorkItemStepName = stepName;
widget.onBroadcastEvent("icm.SendWorkItem", payload);
}
}
}
});
return null;
7. Click the Edit Wiring icon on the Script Adapter widget and enter the following
values under the section that is labeled Incoming Events for the Script
Adapter:
– Source widget: Page Container
– Outgoing event: Send work item
– Incoming event: Receive event payload
8. Click OK to save the changes to the Script Adapter widget.
9. Save the changes to the page, deploy the changes to the solution, and open
Case Manager Client to validate this customization scenario. To validate,
open a work item directly from the In-baskets widget to view the work item on
the Work Details page. Then, complete the work item and notice that the next
work item with the same step name comes up automatically. When there are
no more work items with the same name in the In-baskets widget, a window
opens.
Chapter 11. Customization topics 447
11.5.9 Filling the Case List widget based on search results
This customization scenario allows the user to automatically complete the Case
List widget with a list of cases that is based on search results. This allows the
user to load a page with the Case List widget that already contains the cases that
are relevant to the user.
This customization scenario can be added to a custom page so that a case
worker has the cases already preinstalled that are based on the customer state
and sorted by the complaint received date.
Complete the following steps:
1. Open the page or custom page with the Case List widget in Page Designer. In
this example, we use the Cases page.
2. Drag the Script Adapter widget onto the page.
3. Click the Edit Wiring icon for the Script Adapter widget.
4. Under the Incoming Events section, make the following selections:
– Source widget: Page Container
– Outgoing event: Page opened
– Incoming event: Receive event payload
Click Add Wire to add the wiring.
5. Under the Outgoing Events section, make the following selections:
– Outgoing event: Send event payload
– Target widget: Case List
– Incoming event: Search cases
Click Add Wire to add the wiring.
6. Click the Edit Settings icon for the Script Adapter widget and paste the script
that is shown in Example 11-12 on page 448 into the JavaScript text area.
This script creates a case search that filters on cases by the customer state
field, removes that field from the Case List view, and sorts the result by the
complaint received date. This is done by using the utility class of
icm.util.SearchPayload that can be referenced in the IBM Case Manager
JavaScript API reference documentation.

448 Advanced Case Management with IBM Case Manager
Example 11-12 Sample custom case list script
var solution = this.solution;
var params = {};
var self = this;
var caseType = solution.getPrefix() +"_Complaint";
var complaintReceivedAttrId = solution.getPrefix()
+"_ComplaintReceivedDate";
var customerStateAttrId = solution.getPrefix() +"_CustomerState";
var customerStateAttrDisplayName = "Customer State";
require(["icm/util/SearchPayload"],function(SearchPayload){
solution.retrieveCaseTypes(function(){
solution.retrieveAttributeDefinitions(function(attributesDef) {
var searchPayload = new SearchPayload();
searchPayload.attributeDefinitions = attributesDef;
params.ObjectStore = solution.getTargetOS().id;
var criterion = new ecm.model.SearchCriterion({"id":
customerStateAttrId, "name":customerStateAttrDisplayName,
"selectedOperator": "NOTIN", "dataType": "xs:string","defaultValue"
: "Completed", "value": "Completed", "values": ["Completed"]});
params.criterions = [criterion];
params.CaseType = caseType;
params.solution = solution;
var searchPayload = new SearchPayload();
searchPayload.setModel(params);
var payload = searchPayload.getSearchPayload();
var property;
var newdvprops = [];
for (var i=0; i<payload.detailsViewProperties.length;
i++) {
property = payload.detailsViewProperties[i];
if(property.symbolicName !== customerStateAttrId ){
newdvprops.push(property);
}
}

Chapter 11. Customization topics 449
payload.detailsViewProperties = newdvprops;
payload.searchTemplate.resultsDisplay.sortAsc = true;
payload.searchTemplate.resultsDisplay.sortBy =
complaintReceivedAttrId;
self.onBroadcastEvent("icm.SearchCases", payload);
});
});
});
7. Select the Block outbound event option.
8. Save the changes to the page in Page Designer, deploy the changes to the
solution, and open Case Manager Client. When the page opens with the
Case List widget, you notice that only the cases with the customer state filled
out are shown and those shown cases are sorted by the complaint received
date.
11.6 Advanced customization scenarios
The advanced customization scenario consists of creating custom widgets to
accomplish any solution customization that cannot be done through custom
scripts as described in 11.5, “Intermediate customization scenarios” on
page 426.
Multiple custom widgets can be packaged into one widget package to be
registered and deployed by using the IBM Case Manager administration client or
the IBM Case Manager configuration tool.
Having custom widgets provides a more organized way to add complex
customization cases.
For more information about custom widget development, see 10.5, “Creating and
deploying a custom widget” on page 386.

450 Advanced Case Management with IBM Case Manager
11.7 Multilingual support
Companies must develop solutions that can be used in different geographic
regions with support for multiple languages. IBM Case Manager has multilingual
support throughout the solution. A single solution can be translated to more than
one language and locale.
IBM Case Manager V5.2 supports 29 languages, including right-to-left
languages, such as Hebrew and Arabic.
This section describes what can be localized and how to configure individual
components for multilingual support in IBM Case Manager.
11.7.1 Translating the Case Manager user interface
The components of IBM Case Manager can be translated easily through the
browser locale or by setting the application language. The text in Case Manager
Builder and Case Manager Client are translated automatically when the browser
locale or the application language is changed.
Figure 11-14 shows Case Manager Builder in the Spanish language.
Figure 11-14 Translating Case Manager Builder to Spanish

Chapter 11. Customization topics 451
All default strings in pages and views are automatically translated to supported
languages in Case Manager Client, as shown in Figure 11-15. Also shown is a
custom string in the toolbar button that is labeled Add Entry Template that is not
translated. This custom string is not translated automatically.
For more information about translating custom strings, see 11.7.2, “Translating
custom strings, solution assets, and others” on page 451.
Figure 11-15 Translating Case Manager Client to Spanish
11.7.2 Translating custom strings, solution assets, and others
More steps must be taken to translate the following items:
Custom strings on a page or view
Solution workflow assets that are stored in the Content Platform Engine
Solution content assets that are stored in the Content Platform Engine
Form templates with IBM Forms or FileNet eForms
For information, see the IBM Case Manager Information center, which is
available at this website:
http://pic.dhe.ibm.com/infocenter/casemgmt/v5r2m0/topic/com.ibm.casemgm
t.design.doc/acmdt025.htm
452 Advanced Case Management with IBM Case Manager

© Copyright IBM Corp. 2013, 2014. All rights reserved. 453
Chapter 12. Advanced solution topics
Although solutions can be built completely within IBM Case Manager Builder
application, more advanced customization is often required. For example, a loan
application might require a web services call to a loan rating application or when
a document is added to a case, the case owner must be notified via email. Such
activities require capabilities of the underlying system that are beyond the skill
set of the Case Manager Builder business user target audience. This chapter
describes some of the advanced capabilities that are available within the system
and the tools available for using those capabilities.
This chapter includes the following sections:
Introduction
Process Designer integration
Shadow fields and queue updates
Case operation components
Advanced design examples
12
454 Advanced Case Management with IBM Case Manager
12.1 Introduction
Many solution design and editing tasks are accomplished in the IBM Case
Manager Builder application. That user interface abstracts the complex
underlying configuration of solution design and editing into a simplified
case-oriented user environment.
IBM Case Manager provides the Step Designer for creating and managing tasks
within the Case Manager Builder. The following task components are provided:
Activity steps
Attachments
Properties
Routes
Rule steps
Stub steps
Workflow groups
There are many configuration options for each of these components that allow
the Step Designer user to create and manage complex workflow operations
within a case.
This chapter is intended for the user who works with the solution in ways that are
not available in the Step Designer application. Others that are involved in solution
design should review these topics to better understand the capabilities that are
not accessible from the Case Manager Builder application.
The person who performs the activities that are described in this chapter might
have one of many titles in an organization, such as business analyst, IT
administrator, developer, systems engineer, and architect. This chapter
describes activities that are not traditional developer activities because actual
programming is not required.
Configuration activities in this chapter are similar to advanced macro
programming because the user drags configurable operations into a workflow
map instead of writing code in a programming language. Although understanding
programming principles is helpful, knowledge of a programming language is not
required. For the purposes of this chapter, we call this person the
solution
designer
.
The solution designer is expected to have advanced training in workflow design
and in the underlying content and workflow environments. IBM provides several
training courses to prepare the solution designer to do this type of workflow
design and editing.

Chapter 12. Advanced solution topics 455
We also recommend that you review the following IBM Redbooks publications:
IBM FileNet Content Manager Best Practices and Recommendations,
SG24-5447, which is available at this website:
http://www.redbooks.ibm.com/abstracts/sg247547.html?Open
Introducing FileNet Business Process Manager, SG24-7509, which is
available at this website:
http://www.redbooks.ibm.com/abstracts/sg247509.html?Open
12.2 Process Designer integration
A solution designer can use a combination of the Case Manager Builder Step
Designer and the Process Designer application for advanced solution editing.
Process Designer allows the advanced user to edit complex workflows and it
provides for advanced manipulation of the target execution environment.
For more information about enhancing solution designs by using Process
Designer, see the IBM Case Manager Information Center at this website:
http://pic.dhe.ibm.com/infocenter/casemgmt/v5r2m0/index.jsp?topic=%2Fco
m.ibm.casemgmt.help.doc%2Facmpdh01.htm
12.2.1 Accessing Process Designer
You can access Process Designer from IBM Case Manager Builder and from the
Process Designer that is hosted by Workplace FileNet Workplace XT.
Accessing from IBM Case Manager Builder
The Process Designer is integrated with Case Manager Builder. In distributed
environments, make sure that the proper library JAR files are installed for
Process Designer to function property with the Case Manager application.
For more information, see IBM Case Manager Information Center at this website:
http://pic.dhe.ibm.com/infocenter/casemgmt/v5r2m0/index.jsp?topic=%2Fco
m.ibm.casemgmt.installing.doc%2Facmin141.htm
Note: IBM FileNet Business Process Manager was renamed as IBM Case
Foundation.

456 Advanced Case Management with IBM Case Manager
Process Designer is accessible within Case Manager Builder at the Solution and
Task levels. Figure 12-1 shows the option of using Process Designer within Case
Manager Builder at the Solution level.
Figure 12-1 Accessing Process Designer from Case Manager Builder’s Solution level
When a solution or task is opened by using the Process Designer in this manner,
the multiuser editing mechanism protects the solution artifacts from editing
conflicts. Workflows and workflow configuration functionality (including roles and
in-basket definitions) are editable only if a lock is granted for the items.
For more information about multi-user editing, see 5.4.1, “Multiple user solution
development in Case Manager Builder” on page 167.
Figure 12-2 on page 457 shows the option of opening Process Designer within
Case Manager Builder at the Task level.

Chapter 12. Advanced solution topics 457
Figure 12-2 Edit Task in Process Designer
Table 12-1 lists the differences between solution-level integration and task-level
integration.
Table 12-1 Differences between Solution level and Task level integration
Solution-level integration Task-level integration
Process Designer selectively locks
portions of the solution as they are
accessed.
Process Designer locks the selected task.
The user can edit all of the unlocked task
workflows and the solution workflow
configuration
a
that are associated with the
case type.
a. Queue, roster, and in-basket configurations.
The user can edit unlocked task
workflows only.
The user can edit the solution
configuration objects such as Views →
Configuration, Views → Roles, and
Views → In-baskets are enabled
Advanced solution configuration is
disabled.

458 Advanced Case Management with IBM Case Manager
Accessing from Workplace FileNet Workplace XT
When Process Designer is started as an applet in Workplace FileNet Workplace
XT, it accesses solutions through direct access to the object store where the
solution elements are stored.
For Process Designer to work properly with case elements, the proper libraries
must be installed. In distributed environments, it is possible they were not
installed properly. For more information about the proper configuration for
WorkplaceXT, see this website:
http://pic.dhe.ibm.com/infocenter/casemgmt/v5r2m0/topic/com.ibm.casemgm
t.installing.doc/acmin141.htm
12.2.2 Solution editing
You can edit a solution by using the Process Designer. This is equivalent to
editing the solution from the Case Manager Builder, except that the solution
designer retains the ability to modify other solution elements in Case Manager
Builder.
Complete the following steps to edit the solution from the Process Designer:
1. Start the Process Designer and select File → Solution → Edit, as shown in
Figure 12-3.
Figure 12-3 Edit solution through Process Design
2. Select the solution to edit by browsing to the object store and selecting the
solution definition.
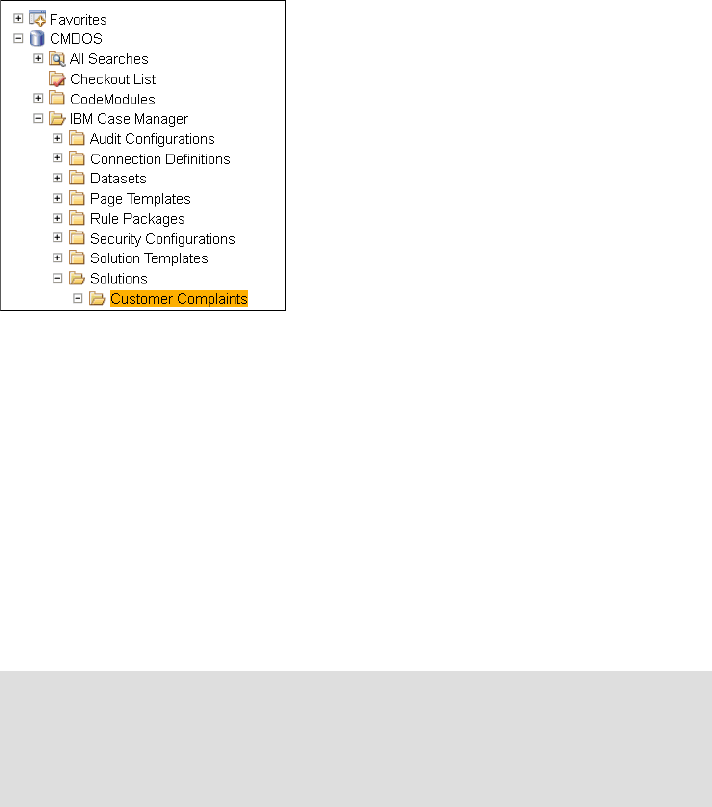
Chapter 12. Advanced solution topics 459
Case Manager solution documents are stored in a design object store.
Solution documents are stored in <Object Store> → IBM Case Manager →
<Solution Name>.
Figure 12-4 shows the Customer Complaints solution that is stored in
CMDOS → IBM Case Manager → Customer Complaints.
Figure 12-4 Solution document hierarchy
As with solution editing that is listed in Table 12-1 on page 457, you have control
over most aspects of the solution. The solution or task is opened by using the
multiuser editing mechanism that protects the solution artifacts from editing
conflicts. That mechanism ensures that workflows and workflow configuration are
editable only if a lock is granted for the items.
12.2.3 Process editing
You can edit a workflow process by using Process Designer. This editing method
is used to correct problems with the workflow that prevent it from being opened
as part of a solution.
Warning: This method should be used only when a solution workflow cannot
be opened through other methods. Otherwise, avoid accessing workflows in
this manner because it bypasses the built-in Case Manager multiuser locking
mechanism. When a workflow is opened this way, it is opened as a
stand-alone workflow that is independent of the Case Manager environment.

460 Advanced Case Management with IBM Case Manager
Complete the following steps to open the workflow in the Process Designer:
1. Start the Process Designer and select File → FileNet → FileNet
Open/Checkout.
2. Select the process to edit by browsing to the design object store and selecting
the workflow object.
Because this way of opening a workflow process is outside the scope of a
solution workflow, validation is run against the running workflow system. Solution
properties, queues, and so forth, that are not deployed to the running workflow
system can result in false failures. Further, inserting operations can cause a
workflow to not be opened in Case Manager Builder.
As of Case Manager version 5.2, multiuser editing of a solution creates locking
that is circumvented when this method is used. Again, you should refrain from
the use of this editing method to situations where directed to do so by IBM
support.
For more information about multi-user editing, see 5.4.1, “Multiple user solution
development in Case Manager Builder” on page 167.
12.2.4 Activity parameters in Process Designer
Because they are so flexible, activity steps often require special configuration.
Understanding how to access the parameter configuration options helps you
better implement them.
Figure 12-5 shows the most common method for adding workflow data fields to
an activity step. The user selects the data field under the Available Parameters or
the Selected Parameters columns and moves them by using the arrows that are
between the columns.
Figure 12-5 Step parameters

Chapter 12. Advanced solution topics 461
When the Business Objects icon is selected on the step, the window that is
shown in Figure 12-6 opens. The user selects the case or the task property by
using the drop-down menu. The selected parameters appear without their
F_CaseFolder and F_CaseTask prefixes in the selected properties column.
Figure 12-6 Business Object parameter selection
Figure 12-7 on page 462 shows the step details of the use of the advanced
editing option. All of the shown step parameters are case properties. Workflow
data fields appear without the function icon and the expression column matches
the Name column. The expression column shows the value that is passed to the
step parameter that is shown in the Name column.

462 Advanced Case Management with IBM Case Manager
Figure 12-7 Step parameter details
12.3 Shadow fields and queue updates
As of Case Manager 5.2, enhancements in handling case properties within the
workflow system removed the need for shadow fields (for more information about
shadow fields definition, see 12.3.1, “Shadow field defined” on page 463). These
enhancements have implications for new tasks and older tasks in solutions that
were upgraded from previous versions of Case Manager. We recommend that
you refrain from using shadow fields in any solutions because their use can lead
to confusion and unexpected behavior.
We include the description of shadow fields in this section only for older tasks
that still have and must use shadow fields.
When a Case Manager solution is upgraded to 5.2, shadow fields are not
removed. You can and should remove these shadow fields unless you used them
for a specific purpose. Upgraded solutions can include operations that use
shadow fields as workflow data fields. Therefore, before shadow properties are
removed, the workflow must be examined to ensure that removing the shadow
fields does not cause unexpected results.

Chapter 12. Advanced solution topics 463
12.3.1 Shadow field defined
A shadow field is a workflow data field that is named the same as a case
property. They were instituted to provide a mechanism for displaying case
properties values on in-baskets. Both case properties and workflow data fields
are used as variables in the workflow. Table 12-2 lists the types of workflow
variables.
Table 12-2 Comparison of workflow variables
The example that is listed in Table 12-2 shows how three different variables for
TaskTrigger are available to a task workflow. When a case property and its
shadow field are present in a workflow, the case property or the shadow field
value displays in a queue. Further, when a task workflow starts with a shadow
field, the value of the shadow field is set to the Case Property value by the
Launch Event processor.
The case property and its shadow field continue to exist as two independent
variables that are available to the workflow designer. We recommend against the
use of shadow fields for new task workflow steps to reduce confusion. The use of
a like-named Data Field for a case property, such as TaskTrigger alongside
F_CaseFolder.TEST_TaskTrigger, remains an acceptable practice. Further,
solutions that are upgraded from older versions should be evaluated regarding
how existing shadow fields are used.
12.3.2 Case properties, queues, and work items
Case properties are stored on the case folder object. Queue information is a
snapshot of a subset of the work object that is stored in easily accessible
database tables for performance reasons. The remainder of the information for a
step is stored in the workflow work object.
Naming Scope Example
Case
Property
F_CaseFolder.<solution
prefix>_<name>
Global to
case
F_CaseFolder.TEST_Task
Trigger
Shadow
Field
<solution prefix>_name Local to
workflow
TEST_TaskTrigger
Example data_field_name Local to
workflow
TaskTrigger
464 Advanced Case Management with IBM Case Manager
In Case Manager, work items are assigned to three types of queues: individual
user, group, and system queues. Work items that are assigned are retrieved from
the queues for processing. Each queue entry presents a snapshot of the
available workflow variables at the time when the entry was created or modified.
The Case Manager Builder application handles configuring queues when roles
and in-baskets are created and modified. Advanced configuration is available to
the solution designer through direct configuration of the queue settings by using
Process Designer when in solution edit mode.
Queue updates
When case properties are made available on a queue for use in an in-basket,
those properties are automatically tagged for Event Update and the Value
Provider is set to F_CaseFolder. These related settings are visible when the
solution is edited in the Process Designer but not visible in the Case Manager
Builder.
The following statements are true in relation to queue updates:
Event Update and Value Providers are automatically configured on each
queue when the role is created in the Case Manager Builder. It is possible to
have Queue A set up differently from Queue B. Therefore, two queues might
display different information.
When the Value Provider is set to F_CaseFolder, the workflow system uses
the named case folder property as the source for the queue entry. Otherwise,
the queue entry uses the named workflow data field value.
Event Update controls how often the queue entry is updated. If selected, it
triggers an update to the queue entries for that property name whenever the
Case Folder that is specified by the F_CaseFolder Value Provider is updated.
Changes to the value on the case folder (regardless of the source) results in
an update to all queue entries for that named variable. Because the case
property is not stored on the work object, the work object is not modified.
When a shadow field exists in the workflow, Case Manager Builder configures
the step to display the case property value on activity steps. Further, the
solution designer can inadvertently attach the wrong parameter to a step
depending on how they add the parameter to the step in process designer.
Because a shadow field is stored on the work object, its value is accessible
when the work object it queried. Incorrectly expecting the two independent
values to be the synchronized is one of the areas where confusion arises.
Depending on the mechanism that is used to view a parameter that is associated
with a case or a task, different values are returned. Users confuse the values
because of their shared name.

Chapter 12. Advanced solution topics 465
Troubleshooting solutions requires the involved users to carefully communicate
what value they are reviewing. When a shadow property exists, the following
values with the same name are available for review:
Case property from the case folder
Queue value
Shadow property value from the work object
For example, the search and the case information widgets use the case folder
objects while the in-basket widget shows queue entries. The vwtool and Process
Administrator applications display granular information about running workflows
that require a special understanding of the core workflow system.
Queue configuration details
When you are working on solutions where there are shadow properties, the
solution designer must look at several parts of the configuration to understand
how the values are displayed on the queue. They must review the queue
configuration with the individual activity steps to understand if the entries that are
displayed on the queue are as expected.
To access the advanced queue settings (as shown in Figure 12-8), open the
solution in Process Designer and click View → Configuration, expand the work
queues, right-click a queue, then click Properties → Data Fields.
Figure 12-8 Queue Event Update and Value Provider Settings
12.3.3 Shadow field synchronization
Step Designer no longer creates shadow fields when a case property is assigned
to an activity step. But, it does create entries on the activity step to extract the
case properties for the step, as shown in Figure 12-9 on page 466.

466 Advanced Case Management with IBM Case Manager
The advanced menu on the Step Properties tab provides details about what
displays in the user interface. In Figure 12-9, the first operation is interpreted as:
F_CaseFolder. CC_UpgradeCategory is a case string field with read/write on the
step. It is used on the step as CC_UpgradeCategory. When the step completes
or a save occurs, the value of CC_UpgradeCategory is written back to the case
because write is set.
Figure 12-9 Advanced View of Step Parameters
When the queue is viewed, the values that are displayed on the queue can differ
from what is seen on the workflow object when the Process Administrator or
vwtool is used. When an administrator views a work item, they might be looking
at the work object, the workflow roster, or the queue record. Each returns
different information.
For more information about accessing the step parameters display as shown in
Figure 12-9, see 12.2.4, “Activity parameters in Process Designer” on page 460.
For information about vwtool, see this website:
http://pic.dhe.ibm.com/infocenter/p8docs/v5r2m0/topic/com.ibm.p8.pe.vw.
doc/bpfvl056.htm
12.3.4 Prior version behavior
When a case property was associated with a task activity step, the Case
Manager Builder automatically created a shadow data field in the workflow.
Because it was named the same as the case property, people sometimes
incorrectly assumed that the case property and the shadow field were kept
synchronized. This field is displayed in people’s In-baskets.
When the variable is modified in the Case Manager activity step, the case
property updates automatically and workflow data fields are updated by a post
assignment that is automatically added to the step by Case Manager Builder.
Figure 12-10 on page 467 shows how case properties update the local field
when an activity step was created in Case Manager Builder. Case Manager
Builder version 5.2+ does not create the After Completion assignment
operations.

Chapter 12. Advanced solution topics 467
Figure 12-10 Shadow Field After Completion Assignments
Experienced workflow designers are familiar with these shadow fields and the
issues that are associated with their use. Solution designers often use the local
variables within the workflow as local parameters. They strategically insert
assignment steps to update the case property with the shadow field value. They
also were aware that activity steps were configured to retrieve the current case
property value and assign it to the shadow field.
When modified outside the scope of an activity step, the shadow field value often
differs from the case property value. Workflows that are designed in this way
pose a special challenge when the solution is upgraded because removing the
shadow fields can cause the workflow to fail or behave unexpectedly.
Case properties do not automatically synchronize with workflow fields. To keep
them in synchronization on activity steps and make them visible on the queues,
the special configuration assignments that are shown in Figure 12-10 were
automatically added to the steps. These operations ensured that the shadow
field and the case property were synchronized when the step was run.
Implications
As of version 5.2, builders of new solutions and editors of solutions that are
migrated from earlier versions must understand that the values that are displayed
on a queue depend on the Event Update and Value Provider settings. They also
must understand that the post-assignment operations might not be present on an
activity step. Assuming that we have a Case Property with a matching shadow
field, Table 12-3 on page 468 shows the possible queue configurations.

468 Advanced Case Management with IBM Case Manager
Table 12-3 Possible queue configurations
Solutions that are transferred from older versions of Case Manager retain their
configuration and behavior with the caveat that the queue information is updated.
When a solution is upgraded to version 5.2, the activity steps retain their old
configuration.
New activity steps are added without the post assignment operations, which
means that the solution designer must be aware that the local shadow value is
not synchronized with the case property value when the activity step completes.
Further, a case property that is added to an activity step results in the
suppression of the shadow field changes on the activity step.
When updated workflows are modified, the confusion is worse because an older
step might have the post-assign operations to update the shadow field where
new steps in the task do not update the local shadow field.
Event Update
setting
Value
Provider
setting
The queue
displays
Queue update
checked F_CaseFolder The case property
value.
When a step that changes
the case property
completes, the value of the
case property is updated
on the queue.
checked F_CaseFolder The case property
value.
Changes to the Case
Folder that is associated
with the queue value result
in the value being updated
on the queue.
unchecked F_CaseFolder The case property
value.
Changes to the Case
Folder that is associated
with the queue do not
change what is displayed
on the queue for the
named property.
checked or
unchecked
blank The shadow field
value.
Event Update has no
effect. The queue entry
updates with the data field
value only when the step is
active.
Chapter 12. Advanced solution topics 469
In summary, remember the following points:
Avoid the use of shadow fields.
Upgraded solutions might contain shadow fields that largely behave the same
as in early versions of Case Manager.
Modifying case properties or shadow fields that are available on queues
trigger a queue update so that the in-baskets reflect the changes.
In new activity steps, post assignments are not automatically created.
Therefore, the case property and the local shadow field might not have the
same value upon step completion.
Custom widgets and other applications that make API calls into the system
must be properly configured to retrieve the correct information. The retrieved
value can be incorrect because the case property, the queue property value,
and the data field in the work object can all have different values for the same
property name.
12.3.5 Parallel property changes
Consider the question “What happens when my case property changes in two
parallel tasks or in two steps running in a parallel workflow branch?” Both Case
Manager Builder users and solution designers must design their solutions while
taking into account that case properties are global case variables whose values
can be changed at any time through several mechanisms. Case properties
always reflect the value that they were last assigned.
If two steps modify a case property, the case property has the value set by the
last step when they complete. Further, because of real-time system resource and
queuing issues, there is no guarantee which step makes the last change.
Consider the following assignment steps that are configured to modify the
property F_CaseFolder.ClaimAmount:
F_CaseFolder.ClaimAmount initial value is 0
– Step A runs the setting
F_CaseFolder.ClaimAmount=F_CaseFolder.ClaimAmount+1000
– Step B runs the setting F_CaseFolder.ClaimAmount=10
If the two steps are queued to run simultaneously, the outcomes might be:
– If Step B runs last F_CaseFolder.ClaimAmount is10
– If Step A runs last F_CaseFolder.ClaimAmount is 1010
Case properties are global variables accessible to any running case task.
Further, with the proper permissions, they also are modifiable from the Case
Information widget.

470 Advanced Case Management with IBM Case Manager
The solution designer can create local data fields by using the Process Designer.
Those data fields exist only for the duration of the workflow and are independent
of the case properties. At appropriate times, the data field values can be
assigned to case properties by simple assignment steps.
12.4 Case operation components
Case Manager offers the following case operation components:
ICM_Operations
ICM_RuleOperations
The ICM_Operations and its operations that are listed in Table 12-4 provide
workflow operations for case management.
Table 12-4 ICM_Operations
Operation Description
addCommentTo
CurrentCase
Add a comment to the current case.
addCommentTo
CurrentTask
Add a comment to the current task.
createCaseUsingSame
CaseType
Creates an instance of case by using the same case
type.
createCaseUsingSpecified
CaseType
Creates an instance of a case for the specified case
type.
createDiscretionaryTaskIn
CurrentCase
Creates a task instance of a discretionary task type.
createSubfolderUnder
CurrentCase
Creates a subfolder under the current case folder.
fileAttachmentsTo
CurrentCase
Files attachments to a specified subfolder under the
current case folder.
getCasePropertyNames Returns a list of the names of the properties in a case.
This operation is a prerequisite for the createCase
operations.
getCasePropertyValues Returns a list of the property values of a specified case.
This operation is a prerequisite for the createCase
operations.

Chapter 12. Advanced solution topics 471
The ICM_RulesOperations provides an operation (see Table 12-5) that is related
to integrated rules processing.
Table 12-5 ICM_RulesOperations
As other workflow operations are needed, more operations are added to these
components.
For more information about these operations, see the following resources:
Adding case operations to a task:
http://pic.dhe.ibm.com/infocenter/casemgmt/v5r2m0/index.jsp?topic=%2
Fcom.ibm.casemgmt.help.doc%2Facmpdh20.htm
Adding rule operations to a task by using Process Designer:
http://pic.dhe.ibm.com/infocenter/casemgmt/v5r2m0/topic/com.ibm.case
mgmt.design.doc/acmdt043.htm
getCaseStructure Returns the case structure for a case. The structure is
returned as a list of folder names and document series
IDs. This operation is a prerequisite to the createCase
methods.
relateCurrentCase Creates a relationship between the current working
case and the targeted case.
terminateTasksIn
CurrentCase
Terminates all workflows (tasks) in the current case.
Tasks are terminated only if they did not complete and
did not fail.
unfileAttachmentFrom
CurrentCase
Unfiles an attachment from a case folder.
unrelateCurrent
Case operation
Unrelate the current working case.
Operation Description
executeRule Executes a rule
Operation Description
472 Advanced Case Management with IBM Case Manager
12.5 Advanced design examples
IBM Case Manager is built on the core IBM FileNet P8 Case Foundation
platform. The platform provides world-class enterprise content management and
business management services and access to external web services. The
examples in this section are intended to show how some of those services are
accessed.
12.5.1 Document arrival email notification
Often we must notify internal or external users about aspects of a case. For
example, an insurance underwriter must be notified if a document is added to a
submission for which they are responsible. Or, a customer service representative
sets a flag on the case they are working so that they receive a notification when
an email arrives from the customer.
For our example, we notify a user when a document is added to a case. We use
this example to show the use of some of the advanced processing capabilities
that are available to the solution designer.
For this example, we assume that there are users who should be notified when a
document is added to a case. We create a task that runs each time a document
of any type is added to the case. That task extracts information from the
document and uses it for the subject of the email and for the email body. We use
a case property to determine who is to receive the email message.
The component integrator is part of the toolset from the process services in the
Content Platform Engine. It extends the capabilities of the workflow system with
Java class public methods. When installed, those methods act as components in
the workflow process. For our example, we use the CE_Operations component
that is included with the IBM Case Foundation product. CE_Operations provides
a suite of operations for manipulating and interrogating content that is stored in
the Enterprise Content Management system repositories.
This example uses the simple solution that was developed in Chapter 7, “Building
a simple solution: Part 1” on page 211 as the basis. This technique is easily
implemented and extended in any solution. For this example, the solution
designer creates the task and inserts the activity and stub step configuration that
is often done by the business analyst.
Creating the task in Case Manager Builder
Creating the task can be completed by a business user or by the solution
designer. The user creates a string property for the email recipient (or recipients),
then creates a task by inserting steps and attachments as needed.
Chapter 12. Advanced solution topics 473
Complete the following steps:
1. Log in to Case Manager Builder:
http://<host>:<port>/CaseBuilder
2. Edit the Customer Complaints solution by mousing over the solution and
clicking Edit.
3. Click Properties → Add Property → New.
4. Enter the following information and click OK:
–Name: Notification Recipients
– Description: Comma delimited list of email addresses for email
notification
– Maximum Length: 1024
The default maximum length of 64 is sufficient for one email address.
Setting the value to 1024 allows for several email addresses without the
need for an array.
5. Click Case Types and select the Complaint case type.
6. Click Tasks.
7. Create a task by selecting Add Task → New Task.
8. Configure the task as shown in Figure 12-11 on page 474:
–Name: Supporting Document Notification
– This task starts: Automatically
– This task is: Not required

474 Advanced Case Management with IBM Case Manager
Figure 12-11 Configure Task General Settings
When you set these preconditions, you can choose to have the task start
when a document of any type is added to the case. You also can set up the
task to start whenever a document of a specific type is added to the case.
For our example, we are going to send an email when a document of the
Supporting Document type is added to the case. We also are going to have
the email sent when a document is added rather than the first time a
document is added, which is why we set the task as repeatable.
When a task starts that is based on adding a document to the case, property
preconditions can be used to decide whether the task starts. For example, we
can create a case property Notify on Document Arrival as a true or false
Boolean. Then, it can be used as a task precondition to determine whether
the task runs.

Chapter 12. Advanced solution topics 475
9. Select the Preconditions tab and configure the following preconditions and
then click OK, as shown in Figure 12-12:
– When precondition must be met: A document is filed in the case
– Task is repeatable: Select this option.
– Any document type: Clear this option
– Select the Supporting Document for the document type.
Figure 12-12 Applying preconditions to a task
This completes the task creation and from this point, the business user can
edit the steps by using the Step Editor and insert stub steps into the task
signifying what is needed. For this case, we save and close the solution at this
point.
10.Click Validate → Save and close.
11.If the new task is edited by another user, click Commit to commit the
changes.

476 Advanced Case Management with IBM Case Manager
Configuration in Process Designer
Now that the task is created, the solution designer edits the workflow to insert the
following workflow elements by using Process Designer:
Attachment property that points to the received document marking it as the
starting document.
Workflow data fields for transient information.
Component operations to read properties from the newly arrived document.
Assignment operations to set values on the local workflow data fields that are
used in sending the email message.
Component operation to send an email message.
The task can be created by the business user and the solution designer then
completes the more advanced configuration. You can start your solution editing
in Process Designer in multiple ways. For this example, we edit the solution from
the Case Manager Builder by completing the following steps:
1. To start editing the solution from Case Manager Builder, enter the following
URL in a web browser:
http://<host>:<port>/CaseBuilder
2. Go to the Customer Complaints solution (as shown in Figure 12-13) and
select More Actions → Open Process Designer to start the Process
Designer application on the solution.
Figure 12-13 Edit Solution in Process Designer
Commit consideration: The user should make sure that all related task and
solution changes are committed for two conditions: if another user is editing
the workflow or the task is ready to run. If the solution is deployed, the new
task runs after it is committed even though it might not be fully configured. If
steps are inserted into the task, they should not fail should the solution be
deployed before it is configured by the solution designer.
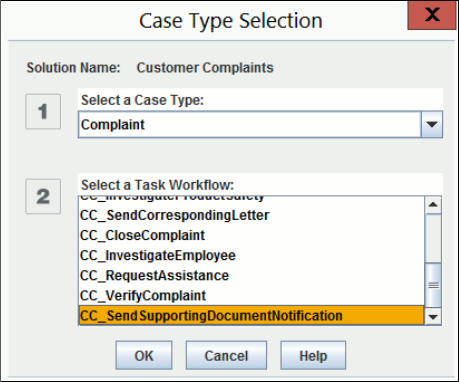
Chapter 12. Advanced solution topics 477
3. Edit the Send Supporting Document Notification workflow that was created in
Case Manager Step Designer, as shown in Figure 12-14.
Figure 12-14 Selecting a Task Workflow
When a user opens a Task Workflow, this workflow is locked to the user ID to
prevent editing conflicts.
When a solution is edited in Process Designer, the solution designer can
access the process-related aspects (including the queue definitions) of the
entire solution. For example, the solution designer can select steps from one
task workflow and copy it to another by editing that workflow.
4. Set up the attachment information by clicking Workflow Properties →
Attachments and configure it by using the following information (see
Figure 12-15 on page 478):
–Name: Document
– Description: Document
– Initiating Attachment icon: selected
– Array box: not selected
The blue arrows that are shown in Figure 12-15 on page 478 point to the icon
and the resulting icon on the attachment. The red arrow points to the Array
box.

478 Advanced Case Management with IBM Case Manager
Figure 12-15 Attachment Configuration
5. Set up data fields information by clicking Workflow Properties → Data
Fields and configure the following information:
–Name: Document Title
–Type: String
– Description: The title of the document
The workflow extracts information from the new document and uses that
information in the email body and email message.
6. To extract the properties from the document that started this task, drag a
component step onto the workflow map. Add the required operations as
shown by completing the following steps for each table row:
a. Click the Add icon, as shown in Figure 12-16.
Figure 12-16 Add getStringProperty using the Add icon
b. Select CE_Operations for the component drop-down list and select
getStringProperty from the Operation list, as shown in Figure 12-17 on
page 479.

Chapter 12. Advanced solution topics 479
Figure 12-17 Select getStringProperty operation from CE_Operations
c. Enter the operation parameters for sourceDocument, symoblicProName,
and return_value, as shown in Figure 12-18.
Figure 12-18 Operation parameters configuration
Note: The quotation marks for symbolicPropName are required. For
return_value, no quotation marks are used because the return_value is
assigned to the data field that we created. When values are entered in
process designer, it is important to press the Enter key each time to complete
the editing operation.

480 Advanced Case Management with IBM Case Manager
d. Click OK.
e. Repeat these steps for each value that you want to retrieve from the
document.
Figure 12-19 shows the added operation, getStringProperty.
Figure 12-19 Added operation, getStringProperty
7. Complete the following steps to insert steps and routes onto the workflow:
a. Drag an Assignment step from the icon bar onto the workflow map. Set its
name to Set email Properties by clicking the step and entering the step
name.
a. Drag a Component step from the icon bar onto the workflow map. Set its
name to Send email by clicking the step and entering the step name.
b. Insert routes to connect the steps, as shown in Figure 12-20.
Figure 12-20 Steps and Routes
Tip: The difference between items with quotation marks and no double
quotation marks in Process Designer is that quotation marks are treated as a
string. Items with no quotation marks are treated as a variable, whether it is a
data field, attachment, or other. You can use the expression builder by
selecting Build Expression to assist with supplying values for a field.

Chapter 12. Advanced solution topics 481
8. Complete the following steps to configure the Send email step, as shown in
Figure 12-21:
a. Select the Send email step and add the sendMail operation as you did for
the getStringProperty operation from CE_Component.
b. For this step, there are several inputs to the sendMail operation. The
Process Designer automatically creates data fields for component steps.
This shortcut is why we do not create the data fields earlier. Instead, click
in the empty expression field.
If the data field does not exist, the first drop-down menu option is <create
[Field Name]>. Add the data fields to the workflow by clicking in each of
the empty expressions and selecting the <create from>, <create to>,
<create subject>, and <create body> for each of the step parameters:
from, to, subject, and body. Figure 12-21 shows creating the body data
field.
If there is an existing data field of the correct data type that should be used
for an operation, it appears as an option in drop-down list. Because each
of the inputs is String data types, they appear as options for each of the
steps after they are created.
Figure 12-21 Create Data Fields for sendMail
After the Send email step is configured, click Workflow Properties →
Data Fields to see the new data fields that were created.

482 Advanced Case Management with IBM Case Manager
Figure 12-22 shows the fields with their default values. You can choose to
define default expressions and descriptions for the fields at this point.
Instead, the assign step set the values by using information from the new
document.
Figure 12-22 Configured data fields
9. Configure the Set Email Props step. For each of the data fields in Table 12-6,
complete the following steps:
a. Click the first empty field in the Name column and select the name from
the drop-down menu.
b. Click the Expression column and enter the expression from Table 12-6
exactly as shown, including the quotation marks.
Table 12-6 Set email Props Assignments
When values are entered in the Expression field, the editor remains active
until you press the Enter key on your keyboard. If you did not press the
Enter key, the expression shows with a second set of borders.
After the process is completed, the step is configured as shown in
Figure 12-23 on page 483.
Name Expression
from “[email protected]”
to F_CaseFolder.CC_NotificationemailAddresses
subject “New Supporting Document for Case” +
F_CaseFolder.CC_CaseNumber
body “The supporting document” + documentTitle + “ was
received on “ + timetostring(systemtime()) + “. “

Chapter 12. Advanced solution topics 483
Figure 12-23 Assignment Parameters for Set email Props step
10.Before you return to Case Manager Builder, validate the workflow collection
by clicking File → Validate Workflow Collection and making any required
corrections.
11.Close, commit, and deploy the solution.
After all of the required changes are made, you must commit the changes
before the solution is deployed.
12.5.2 Creating more in-baskets
Case Manager Builder allows the business analyst to specify roles. A single
in-basket is defined for each role. An IT administrator can add more in-baskets
for extra server-side filtering or organization. This section describes some use
cases for adding in-baskets.
There are various reasons to create more in-baskets for a role. Extra in-baskets
can help with server-side filtering on geographic regions or customer status, for
example. For the Customer Complaints use case scenario, we create an
in-basket for complaint categories. Creating a choice list makes it easy to
designate in-baskets.
The following choice list is defined for the complaint categories:
Product
Service
Billing
Other
Important: Always validate your workflow collection before you save and
close your solution in Process Designer. Make sure that there are no errors
before you return to Case Manager Builder.

484 Advanced Case Management with IBM Case Manager
Complete the following steps to create an in-basket for each category. Apply the
in-baskets to the Contact Center role:
1. From Case Manager Builder, select Customer Complaints solution, and
click More Actions → Open Process Designer.
2. When you are prompt to select a case type, select Complaint, as shown in
Figure 12-24. Because we are editing the in-baskets, we can select any of the
task workflows. Click OK when you are done.
Figure 12-24 Selecting Complaint Case Type
3. Click View → In-baskets, as shown in Figure 12-25.
Figure 12-25 Selecting In-baskets for a solution
4. Check that we are modifying the CC_ContactCenter queue under Queue for
in-baskets.
Tip: As you consider names, remember the special characters that are
supported in role names and in-basket names: hyphen (-), underscore (_), and
period (.).

Chapter 12. Advanced solution topics 485
5. Select the Add icon (as shown in Figure 12-26) to add four new in-baskets.
Figure 12-26 Adding four new in-baskets to the Contact Center queue
6. Double-click each in-basket and rename them to Product, Service, Billing,
and Other.
7. Select the first custom in-basket, Product.
8. On the Create Columns and Labels tab, click the Add icon.


Chapter 12. Advanced solution topics 487
9. The column labels for each field are not clear to a user. Double-click each
column label and rename them to something clearer. Rename the labels to
remove the CC_ prefix and add spaces, as shown in Figure 12-28.
Figure 12-28 Renaming the column label for each field
10.Repeat steps 7 - 9 for the other three custom in-baskets.
11.Return to the Product in-basket and click the Define Content tab.
12.Complete the following steps to create a filter:
a. Select Create a filter to define in-basket content.
b. In the first section, Select attributes, select CC_ComplaintCategory.
c. Leave is equal selected.
d. Enter ‘Product’.
e. Click ADD to add the filter that you specified.

488 Advanced Case Management with IBM Case Manager
Figure 12-29 shows a configured filter for the Product in-basket.
Figure 12-29 Defining a filter for the Product in-basket
13.Repeat step 12 on page 487 for each in-basket, defining the following filter
appropriately:
– For the Service in-basket, specify CC_ComplaintCategory = ‘Product’
– For the Billing in-basket, specify CC_ComplaintCategory = ‘Billing’
– For the Other in-basket, specify CC_ComplaintCategory = ‘Other’
14.To associate these in-baskets with a role, click View → Roles, as shown in
Figure 12-30.
Figure 12-30 Accessing roles in a solution in Process Designer
15.Select the Contact Center role.
16.Click the Edit icon that is next to Select in-baskets for this role.


Chapter 12. Advanced solution topics 491
Figure 12-33 shows that only the work items of the Product category are showing
in the Product in-basket.
Figure 12-33 Viewing the custom in-basket of the Contact Center role
You can create multiple in-baskets for a queue that can be added to a role.
However, you cannot assign multiple roles to the same queue, as shown in
Figure 12-34.
Figure 12-34 Restriction on assigning roles to queues

492 Advanced Case Management with IBM Case Manager
12.5.3 Showing process errors in Case Manager Client
The default error handling procedure for processes requires an IT administrator
to view malfunction steps in the Process Administrator tool. However, it might be
more convenient to view the errors in the Case Manager Client. Some errors
might not require the deep technical capabilities that are available in the Process
Administrator tool. This section describes how to show errors in the Case
Manager Client to facilitate error handling.
A default Malfunction process map is associated with every workflow. This
default process map can be overridden so that errors are shown in the Case
Manager Client. To show process errors to a role in the Case Manager Client,
complete the following steps:
1. Go to the configuration view:
a. From Case Manager Builder, select Customer Complaints solution, and
select More Actions → Open Process Designer.
b. Select the case type Complaint and then select any of the task workflow.
Click OK.
Because we are working on the solution configuration, we can select any
of the task workflows, as shown in Figure 12-35.
Figure 12-35 Selecting the Complaint Case Type

Chapter 12. Advanced solution topics 493
c. Click View → Configuration, as shown in Figure 12-36.
Figure 12-36 Selecting Configuration for a solution
2. Complete the following steps to create a queue:
a. Right-click Work queues and select New.
b. For the queue name, enter Administration and click OK.
As shown in Figure 12-37, this queue is the queue that receives work
items to process errors.
Figure 12-37 Creating the Administration queue
3. Complete the following steps to configure the queue:
a. Right-click Administration and select Properties.
b. Add system fields to be shown with an in-basket:
i. Click the System Fields tab.
ii. Select F_StepName under Available Items and use the green arrow to
add it to Selected Items. For the example, we add F_StepName, but
any others can be added as needed.
iii. Click OK.

494 Advanced Case Management with IBM Case Manager
The results are shown in Figure 12-38.
Figure 12-38 Adding a system property to the system fields on the new queue
c. Complete the following steps to add data fields to be shown with an
in-basket:
i. Click the Data Fields tab.
ii. Click the Exposed Data Fields icon in the upper right.
iii. Add the properties of the solution to Selected Properties, as shown in
Figure 12-39 on page 495. Click OK.

Chapter 12. Advanced solution topics 495
Figure 12-39 Adding solution properties to data fields on the new queue
d. You can manually add more data fields. Earlier, you created extra workflow
data fields for the Verify Document task. Add those fields to the queue.
Double-click the cell with a blank Field Name and enter the data fields that
you defined. The result should look as shown in the example in
Figure 12-40.
Figure 12-40 Adding the additional data fields to the new queue

496 Advanced Case Management with IBM Case Manager
4. Complete the following steps to create and configure an in-basket on this
queue:
a. Click the In-baskets tab.
b. Click the Add icon.
c. Double-click the new in-basket name to rename it and enter Malfunction.
The new in-basket is added, as shown in Figure 12-41.
Figure 12-41 Adding a Malfunction in-basket
d. Go to the Create Columns and Labels tab.
e. Click the Add icon. In the example, select Show system fields.
f. Select the following data fields:
• CC_CaseNumber
• CC_CustomerName
• CC_CustomerNumber
• F_StepName
• F_Subject
• Workflow_DocCaseNumber
• Workflow_DocCustomerName
• Workflow_DocCustomerNumber
• Workflow_DocTitle
g. Rename the column label for each data field to be more readable. Then,
use the up and down arrow icons to sort the columns in a logical
sequence. The result is shown in Figure 12-42 on page 497.

Chapter 12. Advanced solution topics 497
Figure 12-42 Configuring the Malfunction in-basket on the Administration queue
h. Click OK in the queue properties window to close it and return to the
solution configuration.
5. Open the Validate Document workflow and browse through the submaps to
see the Malfunction submap. Notice that it is read only.
6. Complete the following steps to override and configure the Malfunction
submap:
a. Click the Create Map icon, select Override Inherited Map, and click OK.
The Malfunction map is selected by default, as shown in Figure 12-43 on
page 498.

498 Advanced Case Management with IBM Case Manager
Figure 12-43 Creating a map to override the Malfunction map
b. Complete the following steps to modify the process of the Malfunction
map:
i. Select the Review step.
ii. For the Step Name, enter Review Error.
iii. For the Activity Type, select the Administration work queue, as shown
in Figure 12-44 on page 499.

Chapter 12. Advanced solution topics 499
Figure 12-44 Configuring a step in the Malfunction map
c. This step must function within the Case Manager Client user interface so
you must use an available Step page as your step processor. Click the
General tab and select the step processor.
The example uses CC_CmAcmSTEP_DEFAULT_PAGE, as shown in
Figure 12-45.
Figure 12-45 Selecting the default Step page

500 Advanced Case Management with IBM Case Manager
d. While you are in the Review Error step, select the Parameters tab. Move
everything from Available Parameters other than SolutionIdentifier, as
seen in Figure 12-46.
Figure 12-46 Exposed parameters of the Review Error step
e. Click the Routing tab. Add the two responses by double-clicking the
empty cell under Name to edit a response and enter Skip. Enter Repeat for
the second response.
The configured responses are shown in Figure 12-47.
Figure 12-47 Configured responses for the Review Error step
Tip: You might receive the following error about validation on
deployment:
A step with a queue assigned to it should have a valid requested
interface.
This error means that you have not set the Step Processor to a valid
Step page. For every activity step in a solution, the Step Processor
must be set to a registered Step page for the solution.

Chapter 12. Advanced solution topics 501
f. In the workflow map, create two return steps to replace the default system
step. Right-click the existing Return system step and select Delete.
g. Make sure that the General System Palette is available, as shown in
Figure 12-48. The palette menu is opened by clicking the arrow icon to the
right of the available palette.
Figure 12-48 Available system palette
h. Drag the two return steps into the workflow, as shown in Figure 12-49.
Figure 12-49 Adding two return steps after you remove the system step
i. Complete the following steps to rename each return step and set its
expression:
i. Click the first Return step.
ii. Under the General tab, enter Return True for the Step Name.
iii. Enter true for the Return Expression.
iv. Click the second Return step.
v. Under the General tab, enter Return False for the Step Name.
vi. Enter false for the Return Expression, as shown in Figure 12-50 on
page 502.

502 Advanced Case Management with IBM Case Manager
Figure 12-50 Configured the return steps
For more information about how return values are used in a submap, see the
IBM FileNet Information Center at this website:
http://publib.boulder.ibm.com/infocenter/p8docs/v5r1m0/topic/com.ibm
.p8.pe.designerui.doc/bpfdh003.htm
7. Complete the following steps to create a route from the Review Error step to
the Return True step:
a. On the route properties, enter Repeat for the Route.
b. Select Conditional Route under Routing.
c. Select ALL for the Condition.
d. Select Repeat for the Response.
e. Click ADD to create the condition.
The result should look as the example that is shown in Figure 12-51 on
page 503.

Chapter 12. Advanced solution topics 503
Figure 12-51 Adding a conditional route that is based on a Repeat response
8. Create a route between the Review Error step and the Return False step.
Enter Skip as the route name and set the response as Skip. The route
configuration is shown in Figure 12-52.
Figure 12-52 Adding a conditional route that is based on a Skip response

504 Advanced Case Management with IBM Case Manager
9. Validate the workflow collection by clicking File → Validate Workflow
Collection. The example workflow validation is successful as shown in
Figure 12-53.
Figure 12-53 Validated workflow collection after you configure the Malfunction map
10.Save, commit, and deploy the solution.
Malfunctions now insert a work item into the Administrators queue. You can
assign the Malfunction in-basket to any role. For more information, see 12.5.2,
“Creating more in-baskets” on page 483. It can be an IT role or the Contact
Center role in the example solution. This user can review the values and
determine whether the step must be repeated (possibly with new values) or end
and the workflow process continues.
As a brief example of this error handling, the following process might occur with
the Verify Document task:
1. Add the Malfunction in-basket to the Contact Center role.
2. A document is added to a case as a Supporting Document with the following
properties:
– Title: Bob's Attachment
– Case Number: C1600
– Customer Name: Bob
– Customer Number: 88489299
3. The Verify Document task is started.
4. A user in the Contact Center role sees the Verify Document work item.
5. The user determines that the content is not relevant.
6. For some reason, the user removes the document from the attachments by
using the attachments widget. The user then clicks Remove Document.

Chapter 12. Advanced solution topics 505
7. An error occurs because the system has a null value for the Document
attachment. The CE_Operations cannot move a null object.
8. An advanced user in the Contact Center role sees a work item in the
Malfunction in-basket, as shown in Figure 12-54.
Figure 12-54 Work item in an in-basket because of error
9. This advanced user notices that an attachment is missing. The user adds the
document in the case, Bob’s Attachment, back to the attachment, as shown in
Figure 12-55.
Figure 12-55 Adding a document from the case as a workflow attachment
10.The advanced user believes that this action fixes the problem and selects the
Repeat response so that the CE_Operations can try again.
11.The document is confirmed as moved out of the case.
506 Advanced Case Management with IBM Case Manager

© Copyright IBM Corp. 2013, 2014. All rights reserved. 507
Chapter 13. Business rules
As of version 5.2, IBM Case Manager provides an integrated rules engine. IBM
Case Manager continues to support IBM Operational Decision Management
through web services. The integrated rules capabilities make it easier for users
who are not experts at business rules management systems to embed rules
decisions in case solutions.
This chapter describes business rules engine concepts and techniques for using
integrated and external rules. It outlines the benefits of using embedded and
external rules engines to manage business rules in a case management system.
This chapter includes the following sections:
Benefits of using rules
Integrated rules
Integrated rules versus external rules
Creating and invoking rules
External rules engine integration
IBM Operational Decision Management was previously known as IBM
WebSphere ILOG JRules.
This chapter does not describe the IBM rules products in detail. For more
information about ILOG JRules, see the Redbooks publication: Governing
Operational Decisions in an Enterprise Scalable Way, SG24-8127.
13
508 Advanced Case Management with IBM Case Manager
13.1 Benefits of using rules
Business decisions are continually made within an organization. Those decisions
often rely on business or legal policies or rules. There are many rules for
business operations, government procedures, pricing calculations, eligibility
checks, validations, underwriting, and fraud detection. These decision rules often
are in many different locations: people’s memory, paper files, and so on. They
also are often embedded in programming code or in workflow definitions. This
practice means that any changes to the business rules require the involvement of
an IT engineer or software developer.
Rules engines allow for more efficient and consistent rule evaluations through
centralization and by abstracting the rules out of the workflow or program. The
business analyst or IT professional can use rules to design and implement
complex decision processes by using native language instead of using
programming or complex workflow decision mechanisms. Although the
underlying workflow systems can be, and often are, used to implement many of
the decisions available in a rules engine, the practice is problematic. It leads to
excessive complexity, which makes creating and maintaining the workflows more
costly.
Rules software separates business rules from application software. It provides
tools for defining, managing, testing, and running business rules. By using rules
engine software, the business analysts can concentrate on defining and
managing of the business rules. Likewise, the IT engineers and developers can
focus on the application software.
For case management systems, human judgment and the business rules are key
factors in deciding the outcome of cases. The use of the rules engine to guide the
case workers and support the business processes yields better and more
consistent outcomes.
Also, business rules often change more frequently than the workflow processes.
Separating the definition and deployment lifecycle levels of the workflow system
and the rule logic results in a more adaptive system overall. Incorporating a rules
engine into a case management system is useful because a change in the
business rules often affects the behavior of ongoing and new tasks.
The following methods can be used by rules engines to enhance case
management systems:
Intelligently prioritize.
Intelligently assign case workers to tasks.
Chapter 13. Business rules 509
Business rules within the case can be used to automatically create and
assign tasks. They can trigger fully automated actions that are based on
external events, the completion of other case tasks, or expiration of task
deadlines.
Apply rules to the key facts and information and guide the responses that are
based on that information.
Simplify certain tasks through automating the decision logic.
Produce consistent, predictable, outcomes.
Rules engines all rely on underlying programming codes for their running. But,
they provide a more easily understood business rule language. Instead of having
to learn the details of a programming language, rules engines provide easily
understood native language grammar, which makes them more readily available
to the business user. For example, a simple rule is “if the Total Transaction
Amount of a complaint is more than 10000, then set the Customer Rating of the
complaint to “DIAMOND”.”
13.2 Integrated rules
The integrated rules engine that is included in Case Manager allows business
users to implement business decisions quickly, accurately, and easily. The
integrated rules allow the business user to configure and manage business
decisions in the same environment that they use to build their solution. Because
of the complexities that are involved in implementing decision rules in external
rules engines, their use is limited. Case Manager simplifies rule creation and
implementation, which makes business rules accessible to the business users in
addition to the IT professionals.
The Case Manager rules engine uses the Business Rules Embedded component
of IBM Operational Decision Manager 8.5. Case Manager integrated rules, which
also known as
embedded rules, to provide for two types of rules: textual and
decision tables. These two rule types provide a robust capability for decision
making within the case management system. The integrated rules use case
properties in their evaluation and pass case properties to the rules engine. The
results return directly to the case in a seamless integration.
510 Advanced Case Management with IBM Case Manager
Consider the situation where you must chain together several rules to implement
a complex decision. Often in those situations, outcomes from one rule are
considered in evaluating a subsequent rule, but the interim outcome is discarded.
For the situation where the solution designer must have local variables
exclusively for evaluating the rules, rule parameters are local variables that are
used for rule execution.
A rule parameter simplifies the solution design when it is necessary to pass an
input to a rule that is the result of an operation in the workflow. One example is
when you are dealing with interest rates. Before passing the interest rate to the
rule, an assignment step in the workflow can divide the rate by 100 to get the
proper order float value for the rate. When a rule invocation step is inserted into
the solution by using the Case Manager Builder, the parameter becomes a
workflow data field that is accessible for the duration of the task.
For more information about setting up an embedded rule in a Case Manager
solution, see 7.4, “Defining embedded rules” on page 241.
For more information, see the following tutorials:
Business Rules Embedded in IBM Case Manager 5.2 - Architecture and
Configuration, which is available at this website:
http://www.ibm.com/developerworks/community/groups/service/html/comm
unityview?communityUuid=e8206aad-10e2-4c49-b00c-fee572815374#fullpag
eWidgetId=Wf2c4e43b120c_4ac7_80ae_2695b8e6d46d&file=1772f359-9c11-4f
b3-b683-d6dd307bbf90
Authoring Business Rules in IBM Case Manager 5.2, which is available at this
website:
http://www.ibm.com/developerworks/community/groups/service/html/comm
unityview?communityUuid=e8206aad-10e2-4c49-b00c-fee572815374#fullpag
eWidgetId=Wf2c4e43b120c_4ac7_80ae_2695b8e6d46d&file=4cfd9937-b81b-48
16-887c-b90554fc2cc5
13.2.1 Text rules
Text rules, which also are written in Business Action Language (BAL), are a
simple, yet powerful, form of rules that are available to use. They are the
foundation for decision tables, which are described in 13.2.2, “Decision tables” on
page 516.
A text-based rule can have the following sections:
Definitions: Declares variables and assigns values to the variables that are
used in the context of a rule. The data types of the variables are determined
Chapter 13. Business rules 511
by the assigned value. Multi-value variables can be declared and assigned
values.
If: This section is for specifying the conditions.
Conditions can be grouped by any of the following options:
– All of the conditions are true
– Any of the conditions are true
– None of the conditions are true
The following common operators are available for conditions:
– For integers and floats: equals <a number>, does not equal a <number>,
between <min> and <max>. An integer or float also can be checked
whether it belongs in a multi-value property or definition by using “is one of
{<multi-value property> or group of numbers}”.
– For strings: contains <a character / a string>, does not contain <a
character / a string>, is empty, is not empty, starts with <a character / a
string>, ends with <a character/ a string>. The length of a string can be
verified by “the length of <a string>”.
– For DateTime properties: at <a time>, is on <a date>, is on <a day of the
week>, is in <a month>, is in <a year>, is after <a date> and before <a
date>.
– For Boolean properties: is <true / false>, is not <true / false>. Any other
condition that evaluates into true or false also can be used; for example, “is
Monday is after Sunday”, which evaluates to “is true”.
Then: This section specifies the actions to be run. Various actions can be
specified. Usually, a “set <variable> to <value” is used for actions in this
section. Specifically for Boolean values, the statement is “make it <a
Boolean> is <a variable>”. Another operator is the “print” statement, which
takes a string value as its argument.
Else: This section specifies the actions to be run when the conditions that are
specified are not met. The format of the actions is the same as described in
the Then section.
For more information about the operators, see the Operational Decision Manager
V8.5 Information Center, which is available at this website:
http://pic.dhe.ibm.com/infocenter/dmanager/v8r5/index.jsp?topic=%2Fcom.
ibm.wodm.rules.embedded.overview%2Farules%2Fcon_rules_embedded_arules_o
verview.html
Custom parameters are variables that are defined and used in a rule. They can
be single value or multi-value. Custom parameters are used to map external data

512 Advanced Case Management with IBM Case Manager
(for example, credit rating of a customer or currency exchange rate) from an
external service into a business rule.
All case properties are available in creating rules. They can be specified as
shown in the following format:
<property> of <CaseType>
For example:
set CustomerAge of Banking to 60
For Boolean properties, they can be specified in the following format:
make it <true / false> that <CaseType> is <property>
For example:
make it true that Banking is Member
Where Member is a Boolean.
You use the provided text-based rule editor to create and edit a rule. The editor
has an option of enabling completion menu options. Completion menu options
help you write rules by providing the necessary syntax and prompting for the
relevant variables or values for rules.
All errors and warnings are shown in real time in the console at the bottom of the
editor. Solution deployment is unsuccessful until all errors in the rules are
resolved.
Text-based rule example 1
In our sample application, we need to set the Customer Rating of the caller. The
sample rule (as shown in Figure 13-1) says: if the Total Transaction Amount (from
the Complaint case type) is more than $10,000, then sets the Customer Rating to
“DIAMOND”.
Figure 13-1 Simple text-based rule

Chapter 13. Business rules 513
Text-based rule example 2
As another example for a text-based rule, we describe the business requirements
for a loan approval process, the properties that must be generated for the
solution, the choice lists that are involved, the custom properties that are needed
for creating a text-based rule that handles the loan approval, and the actual rule
that is used for the loan approval. This is meant to be an example and is not
intended for use in a production system.
In this example, approving a loan includes the following business requirements:
Requested loan amount should be less than $1,500,000. This might change
as decided by the management; therefore, the maximum loan amount should
be easily adjustable.
Credit rating of an account holder must be more than 80. The bank receives
the account holder’s credit rating from an external agency.
The account holder cannot have a history of being a defaulter. An external
agency maintains the list of defaulters.
The account holder should have a salary account in the bank or the account
holder should have an account with the bank for at least 36 months. The
person also should be in a “GOLD” category of customers with the bank.
If all of these conditions are satisfied, the customer’s loan can be approved.
Also, there should be a place where remarks can be added when the loan is
processed. The person processing the loan also can append message to the
loan case.
The properties that are needed for the solution are listed in Table 13-1.
Table 13-1 Solution properties
Property name Type Description
Account Holder Name String Name of the Account Holder
Account Number Integer Account Number
Age Integer Age of the Account Holder
Gender String Account Holder gender, which is
associated with the string choice list,
Gender List.
Customer Category String Customer Category, which is associated
with the string choice list, Customer
Category List

514 Advanced Case Management with IBM Case Manager
Table 13-2 shows the choice list options for the solution.
Table 13-2 Choice list options
Table 13-3 shows the custom parameters that are required to create the loan
approval rule.
Table 13-3 Customer parameters that are created for the rule
Is Salary Account Boolean Is this account a Salary account of the
customer?
Relationship Start Date DateTime Date on which the customer started
working with the bank
Account Balance Float Balance in Account
FD Deposit Amount Float Amount the customer is depositing as
Fixed Deposit
FD Interest Rate Float FD Interest Rate decided by the business
rule
FD Deposit Term Integer Term of the FD Deposit in days
Requested Loan
Amount
Float Loan Amount requested by the customer
Remarks String For capturing processing remarks, with
maximum length of 1333 characters
Approval Status Boolean Set to True if the loan is approved
Choice list Options
Gender List MALE
FEMALE
Customer Category List GOLD
SILVER
NORMAL
Name Data type Single value or
multiple values
Credit Rating From External Agency Integer Single Value
Relationship Duration in Months Integer Single Value
Property name Type Description

Chapter 13. Business rules 515
For this example, “Bank Processes” is created as a case type in the solution.
The completed rule is shown in Example 13-1.
Example 13-1 Sample text rule for loan approval
Definitions
set 'Loan Threshold' to 1500000;
set 'Requested Loan Amount in Rule' to a number in { the Requested
Loan Amount of 'Bank Processes'};
set 'Credit Rating From External Agency in Rule' to a number in
{'Credit Rating From External Agency'};
set 'Relationship Duration in Months in Rule' to a number in
{'Relationship Duration in Months'};
if
all of the following conditions are true :
- the Account Holder name of 'Bank Processes' is not null
- the number of elements in 'List Of Defaulters' is more than 0
- the Customer Category of 'Bank Processes' is not null
- 'Requested Loan Amount in Rule' is less than 'Loan Threshold'
- 'Credit Rating From External Agency in Rule' is more than 80
- the Account Holder Name of 'Bank Processes' is not one of 'List Of
Defaulters'
- any of the following conditions is true :
- 'Bank Processes' is Is Salary Account
- 'Relationship Duration in Months in Rule' is more than 36 and
the Customer Category of 'Bank Processes' is GOLD)
then
make it true that 'Bank Processes' is Approval Status;
print "Loan is approved";
print " | Processed by: " + the Last Modifier of 'Bank Processes';
else
print "Bank Manager Review requested";
print " | Processed by: " + the Last Modifier of 'Bank Processes';
Figure 13-2 on page 516 shows when the text rule is created in the solution.
List Of Defaulters String Multiple Values
Name Data type Single value or
multiple values

516 Advanced Case Management with IBM Case Manager
Figure 13-2 Loan approval rule
13.2.2 Decision tables
Decision tables provide a spreadsheet style table for evaluating complex
decisions. Decision tables aggregate multiple rules into a single table, which
simplifies the design effort and makes the rules more easily readable by others.
Table-based rules are suitable for defining rules that are similar, but with different
ranges of values. A table-like interface is used, with the columns being the
conditions and actions. Each row of a table-based rule can be considered as a
single rule.
By default, table-based rules have three condition columns, one action column
and up to 20 rows. Other columns and rows can be added. For each column,
conditions and actions must be defined. These options are available by
right-clicking the menu.
A Refresh button at the upper-left corner of the table validates and removes any
unused rows. Also, the values in the rows are sorted in the ascending order. Any
overlaps or gaps are verified if the options are enabled in the menu.
For each row in a text-based column, the conditions in all the condition columns
are evaluated and all the corresponding actions are then executed. All rows in the
decision table are executed. If there are rows with the same values in all the
condition columns but different values in the action columns, the results depend
on the execution order. Ensure that the combination of the condition columns is
unique in the decision table.
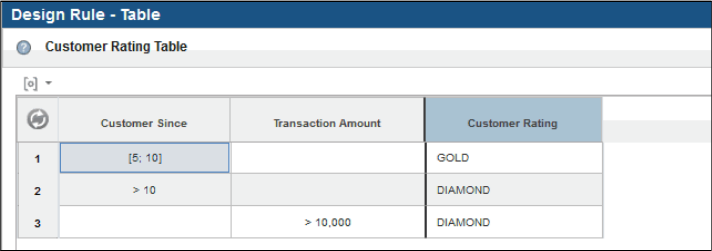
Chapter 13. Business rules 517
“Otherwise” is used in condition columns for addressing values that are not
satisfying the conditions in other rows. “Otherwise” covers the gaps in the values.
“Disable” is used in action columns wherever a value cannot be specified
because of some conditions.
Decision table example
Figure 13-3 shows a decision table for our Complaint example. The first two
columns are conditions that are based on the Customer Since and Transaction
Amounts properties. The third column is an action column that sets Customer
Rating that is based on the conditions. The rules that are shown in Figure 13-3
dictate the following conditions:
If the Transaction Amount is greater than $10,000, the caller’s Customer
Rating is set to “DIAMOND”.
Otherwise, if the caller is with the company for more than 10 years (that is, the
condition of Customer Since > 10), set the Customer Rating to “DIAMOND”.
Otherwise, if the caller is with the company for 5 - 10 years (that is, the
condition of Customer Since [5,10]), set the Customer Rating to “GOLD”.
For all other scenarios or conditions, Customer Rating is not set in this particular
example.
Figure 13-3 Decision table
To see the rule in text format from within Case Manager Builder, pause the
mouse over the index for a row and the pop-up window shoes the underlying rule,
as shown in Figure 13-4 on page 518. In this example, the second rule from the
table is translated as: If the Customer Since value (of the Complaint case type) is
more than 10, set the Customer Rating (of the Complaint case type) to
DIAMOND.

518 Advanced Case Management with IBM Case Manager
Figure 13-4 Decision table underlying evaluation
13.2.3 Text rule versus decision table
One of the common challenges people encounter is the decision of which rule
type to use. Table 13-4 lists some of the differences in the two rule types. To the
rules engine, the two rule types are same. In fact, most decision tables can be
expressed in a complex set of text rules, and the vice versa. Because of their
graphical nature and the ease with which they are implemented, decision tables
are preferred.
Table 13-4 Comparison between text rules and decision tables
Categories Text rule Decision table
When to use it Best suited for simply
stated business decisions.
Best suited when
decisions involve multiple
related inputs that produce
multiple outcomes, which
are most easily understood
in tabular form.
Inputs One or two Many
Outcomes One or two Many
Example input Transaction Amount Product Type
Transaction Amount
Random Number
Example outcome IRS Notification required QC Required
email Notification Required
email Recipient

Chapter 13. Business rules 519
Figure 13-5 shows another decision table.
Figure 13-5 Sample decision table
13.2.4 Implementation techniques
A single rule can address the business decision. Breaking complex decisions
rules into several easily managed rules simplifies implementation. Also, a portion
of one decision can be reused in another decision. When business rules are
developed for decision making, there is sometimes a need to execute several
discrete rules as part of a decision. In an external rules engine, the execution of
the rules is controlled by the rule workflow.
If you are familiar with the previous rules implementation, you are used to
creating rules, rule sets, and rule flows in the Rules Studio or the Rule Team
Server environments that uses these concepts. The integrated rules engine
provides similar capabilities, as shown in Table 13-5 on page 520.
Example rule If the cash transaction
amount is greater than
$10,000, IRS Notification
Required is true.
See Figure 13-5.
Categories Text rule Decision table

520 Advanced Case Management with IBM Case Manager
Table 13-5 integrated rules equivalents to IBM Operational Decision Manager
Because the integrated rules are executed directly within the Case Manager
workflow system, the workflow system provides a ready-made mechanism for
creating custom rules implementations. Where rules within a rule set executed in
parallel, or serially, each rule step can be implemented in the same way.
For decisions that require more than a single rule step, the solution designer
should use a case task to implement the rule. The reasons are that the task can
be repeated and the task workflow rules instances can share parameters. That
way, complex decisions that involve multiple rules are achieved without the extra
burden that an external rules engine entails.
The integrated rules engine allows the business user a great deal of latitude in
implementing complex decisions. Case Manager provides the ability to use rules
without the need for extensive rules training. Where the business user develops
rules and later analysis determines that an external rules engine is required,
Case Manager Builder provides utilities for transferring rules to IBM Operational
Decision Manager.
For more information about the integration of IBM Operational Decision Manager
with IBM Case Manager, see this website:
http://www.ibm.com/developerworks/community/groups/service/html/communi
tyview?communityUuid=e8206aad-10e2-4c49-b00c-fee572815374#fullpageWidge
tId=Wf2c4e43b120c_4ac7_80ae_2695b8e6d46d&file=aa46cea1-17df-4d18-bfac-7
c3768874aa1
IBM Operational Decision Manager Embedded Rules Equivalent
Rule Flow Task Workflow
Decision Table Decision Table
Business Rule Text Rule
Rule Package Submap
Decision Tree Not Available
Variables Rule Parameters
Special data types: hashes,
multi-dimensional arrays, and so on.
Not Available

Chapter 13. Business rules 521
13.3 Integrated rules versus external rules
Providing two mechanisms for invoking rules in IBM Case Manager leads to a
great deal of flexibility. This flexibility gives the user the choice of which
technology to use at any time.
The integrated rules capabilities in IBM Case Manager are included with the
product. But, there are situations where the use of an external rules engine is a
better decision for an organization. IBM provides the ability to export an existing
rule from a Case Manager solution for import into the IBM Operational Decision
Management (IODM) rules engine. The tutorial that was described in the
previous section shows how to transfer the rules.
Guidance for choosing between integrated rules and external rules via IODM is
provided in Table 13-6.
Table 13-6 Embedded versus external rules
Category Embedded External rule
Rules creation
and
management
Simplified rules creation and
implementation via Case
Manager Builder application.
Developed by using IODM tools
and implemented via web
services calls.
Target users Can be created and maintained
by business users without
special training.
Decision Server Rules designer
requires special training and is
geared towards technical user.
Decision Center is geared
towards the business analyst.
Where
maintained
Contained with the solution and
can be transferred with the
solution.
Maintained externally.
Integration Direct Integration: The business
rule is tailored to the solution
and uses case properties
directly.
Integrated via web services, the
rules are more general.
Where
executed
Executed from the Case
Manager environment without
more configuration and
installation.
Centrally maintained rules that
are hosted on external rules
servers.
Installation No special installation or
integration is required.
Requires separate installation of
the rules server software.

522 Advanced Case Management with IBM Case Manager
13.4 Creating and invoking rules
This section describes how to create a simple text-based rule and invoking rules
that have parameters. We also review a table-based rule to see how the
conditions and actions work in such a rule.
13.4.1 Creating a simple text-based rule
This example describes the process of creating one of the rules that exists in the
sample solution. It provides a quick overview of the rules designer for text-based
rules. You can delete the rule and re-create it, or create a duplicate rule with a
different name. If you choose to create a rule like this, give it a different name.
To create a simple text-based rule, complete the following steps:
1. Start Case Manager Builder.
Integration
with case
properties
Tightly integrated, directly uses
Case Manager case properties
in the rules.
Case properties that are passed
to rules engine via a web service.
Data types Supports IBM Case Manager
data types: strings, integers,
floats, and Booleans both as
single value fields and as single
dimension arrays.
Supports all Java data types,
including hashes, enumerations,
and multi-dimensional arrays of
those data types.
Custom widget
and forms
integration
Rules are called from a task
step.
Rules are available to
applications from various means.
For example, a web service call
can invoke the rule.
Rules changes Business rules are maintained
within. Changing a rule requires
redeployment of the Solution
Implemented within the Rules
Engine outside the scope of Case
Manager.
Rule sharing Limited to within a case type. Rules are available to all parts of
an organization.
Rule validation Accomplished with test cases. Rule execution simulation
provided.
MS Office
Integration
Not included. Provided.
Category Embedded External rule

Chapter 13. Business rules 523
2. Edit the Customer Complaints solution.
3. Select Case Types → Complaint → Rules to see the rules for your solution,
as shown in Figure 13-6.
Figure 13-6 Rules List in Case Manager Builder
4. Click Add rule.
5. Enter Transaction Amount Rating for the Name and click OK.
The default is for a text-based rule. If you want to create a Decision table,
select the Table-based rule option.
After the pop-up window closes, the new rule is listed.
6. Open the rule for editing by clicking its name or by hovering over the rule and
selecting the Design Rule icon, as shown in Figure 13-7.
Figure 13-7 Design rule

524 Advanced Case Management with IBM Case Manager
7. Edit the text rule. Text rules start with a blank space. You can enter the rule in
the blank space. When completed, the new text rule appears as shown in
Figure 13-8. Although you can enter the rule, it is easier to use the
wizard-driven rule creation method.
Figure 13-8 Complete rule
To create a text-based rule by using rule wizard, complete the following steps:
1. Start the rule wizard by holding down the Ctrl key and pressing the Spacebar.
Whenever the Ctrl+space combination is used, the wizard appears and
guides the user through the rule creation. When the options appear, hovering
the mouse over one of the options results in more information, as shown in
Figure 13-10 on page 525.
Because of the direct integration of the rule with Case Manager, the options
that are available to the user are tied directly to the case type. This provides
an intuitive interface when you are using the same case properties that are
used elsewhere in the solution without the need for abstract variables
common to programming implementations. Therefore, the rule options are
dynamically generated based on the properties of the case type.
As shown in Figure 13-9, you can press Ctrl+space and select the correct
option from the menu listing.
2. Press Ctrl+space and go to if <condition>, as shown in Figure 13-9.
Figure 13-9 Text Rule Wizard: if

Chapter 13. Business rules 525
3. Select the Total Transaction Amount of <a caseType> from the choices
that are provided by the wizard, as shown in Figure 13-10.
Figure 13-10 Text Rule Wizard: the Total Transaction Amount of <a caseType>
4. Select Complaint → is more than <a number> → <number>.
5. At this point, you must enter the value for the transaction amount. Your choice
of the <number> indicates to the editor that you want to enter a number. Enter
10000 for the number.
Rule parameters: In this example, we are entering an actual number. We
also have the option of the use of a rule parameter instead of the number.
Rule parameters are workflow data fields on the task, but they are not case
properties. Rule parameters enhance rule flexibility by providing temporary
variables for rule execution. For example, to use a percentage rate as an
input, the data field might be theInterestRate. In the workflow, an
assignment calculates the value as follows in an assignment step before
the rule invocation, as shown in the following example:
InterestRate=F_CaseFolder.<prefix>_InterestRate/100

526 Advanced Case Management with IBM Case Manager
When you clicked the <number> at the end of the previous step, the wizard
disappeared because the system expects you to enter a value that is based
on your choice. Now that the number is entered, we completed setting up the
rule condition. The next step is to create the rule action.
6. Press Ctrl+Space. Then, select Customer Rating of <a caseType> →
Complaint → <string>.
At this point, the wizard disappears and leaves a pair of quotation marks to
bind the string. In the quotation marks, enter the word DIAMOND. Click to the
right of “DIAMOND” and select “;” to finish the rule so that it appears as
shown in Figure 13-11.
Figure 13-11 Complete Rule
7. Click Save → Close.
Now the rule is created and must be implemented.
For this sample, we add the rule at the end of Verify Complaint task. To
implement the new rule to the task, complete the following steps:
1. Edit the solution.
2. Select Case Types → Complaint → Tasks.
3. On the Verify Complaint task, click the Edit Steps icon.
4. Drag a rule step into the system swimlane.
5. Complete the following steps to configure the new rule step:
a. In the Name field, enter Transaction Amount Rating.
Wizard tip: The wizard automatically appears whenever the system
anticipates your input in the rule designer. When you finish entering 10000,
if you pressed the Spacebar, the wizard reappears and is ready for the next
input because the rule is not yet complete. Occasionally, you might realize
that you made a mistake. When that happens, click the text editor and
backspace over the error. If the wizard does not automatically appear,
press Ctrl+space to reactivate the wizard.

Chapter 13. Business rules 527
b. In the Description field, enter Execute transaction amount rating rule.
c. In the rule field, select the rule Transaction Amount Rating from the
pull-down menu.
6. Create a connection from the Verify step to the new rule step.
7. Click Save → Save and Close → Commit → Deploy.
After the solution completes deploying, the rule is invoked when the task runs.
13.4.2 Reviewing a business rule
Decision tables provide a convenient way of aggregating large sets of similar
business rules into a tabular form. Decision tables are composed of rows and
columns; each row corresponds to a single rule, with the columns defining the
conditions and actions that apply to the rules.
Complete the following steps to examine the table-based rule in our example:
1. Edit the Customer Complaints solution.
2. Select Case Type → New Account case type.
3. Select Rules. The rules that are associated with the solution are displayed, as
shown in Figure 13-12. For our sample, there are two table-based rules and
one text-based rule.
From here, you can add, edit, and delete the solution rules. If you hover your
mouse over an entry, options for modifying and deleting the rule display.
By selecting the pencil icon, you can edit the rule name, description, and rule
type, as shown in Figure 13-12.
Figure 13-12 Edit rule

528 Advanced Case Management with IBM Case Manager
4. Click the QC Decision rule to open it in the rule designer, as shown in
Figure 13-13.
Decision tables contain one or more condition columns, and one or more
action or outcome columns. Each condition is evaluated and if the condition
evaluates to true, the outcome (or outcomes) are set by that row.
The decision table (as shown in Figure 13-13) contains the following condition
columns:
– Category
– Amount
– Random Selection
The table contains the following action columns:
– Start QC
– Send email
– email Recipient
Figure 13-13 QC Decision table-based rule
5. Click the Rules Parameters icon in the upper left corner of the table and view
the rule parameter, Random Number, that is used in the rule, as shown in
Figure 13-14 on page 529.

Chapter 13. Business rules 529
Figure 13-14 The rule parameter, Random Number, which is used in the QC Decision
rule
In Case Manager business rules, case properties are used in evaluating the
rules. Rule parameters are used when business rules require information that
is passed from the workflow. In our example, we use one such parameter,
Random Number. This allows the user to define the data type for the
parameter.
You can add more custom parameters for the rule.
6. Click Close to close the pop-up window.
7. Review individual rows in the rule table by placing the cursor over the row
index. After a short pause, a pop-up window opens, as shown in Figure 13-15
on page 530. The tabular form of the rule often is much easier to understand
when complex combinations of related properties are evaluated. The pop-up
window shows the following details of the rule:
– The Category column compares the value of the Complaint Category of
the case type to the values in the column. Because the Complaint
Category uses the Billing choice list, the decision table rules constrain
the possible match options to the same choice list.

530 Advanced Case Management with IBM Case Manager
–The Amount column compares the value of the case property Total
Transaction Amount to the values in the column. As shown in
Figure 13-15, the rule is using a greater than condition.
Figure 13-15 Detail of the first row rule in the QC Decision rule table
–The Random Number is used for selecting a random sample of the cases to
run through Quality Control. The Random Number is number 0 - 100. Its
value is calculated in the workflow and passed to the rule when it is called.
– The actions for the rules are to set the values of two Boolean case
properties that are based on the condition columns. Start QC is set to true.
Send email is set to false. As with the case list, the two Boolean operations
are automatically constrained to the possible values.
– The rule passes back a string property Notification email Addresses from
the column. Because the property is a string property, the user can enter
any valid string into the column.
Here, we see that the Credit Score is a workflow property.
8. Complete the following steps to review the configuration for each of the
condition columns:
a. Right-click the column header.
b. Select Update Column... to edit the column condition.
The rules are configured for each condition column starting with an if. The
same wizard that is used to configure a text-based rule is used for the
columns. You can try configuring a column by deleting the existing

Chapter 13. Business rules 531
configuration text in the editor and starting the wizard by pressing Ctrl+space.
When done, click Cancel.
Decision tables are flexible. Empty cells are not evaluated as part of the
decision. As shown in Figure 13-16, conditions can be grouped and an
otherwise condition used. To better understand the effect of empty cells, we
review the conditions for some of the rules that are shown in Figure 13-16.
Figure 13-16 Otherwise and empty Cells
Otherwise is an “else” condition. It is used in groups of conditions and sub
conditions to ensure matches and to provide for actions when a series of
conditions are not met. From the decision table, you can observe the following
rules:
– If Category is Billing, the Amount is 1,000 or over but no more than
10,000, then 10% require QC, no email is sent, though carly is assigned
as email Recipient.
– If Category is Billing, the Amount is 10,000 or over but no more than
50,000, then 20% require QC, email is sent, and dave is assigned as the
email Recipient.
– If Category is Billing, the Amount is 50,000 or over, then all require QC.
For 30%, email is sent and paula is assigned as the email Recipient. For
other 70%, email is sent and tom is assigned as the email Recipient.
– Else, (that is otherwise, if Category is Billing, the Amount is less than
1,000) 5% require QC, no email is sent, and frank is assigned as the email
Recipient.
532 Advanced Case Management with IBM Case Manager
– For Product, 10% require QC.
– When Category is not matched, 100% require QC.
Implementing this in a series of if . . . then . . . else statements is difficult.
Therefore, the decision tables are easier to configure and manage.
9. When conditions are evaluated, they result in actions. Complete the following
steps to review the three action columns:
a. Right-click the column header.
b. Select Update Column to review the action (or actions) that are defined for
that column.
c. Select Cancel.
When all of the conditions are met in the condition columns, then all of the
actions are taken. Figure 13-16 on page 531 shows that the actions set
values true or false for the two Boolean case properties. They also set the
email Recipient string to a value.
After the condition columns are configured, the user double-clicks the correct
cell to set the value for that condition. When a value is entered into the actions
columns, those values are used when all of the conditions are met for that row
in the table.
13.4.3 Invoking rules with parameters
When rules involve only case properties, they are invoked through the Case
Manager Builder. As described in 13.4.2, “Reviewing a business rule” on
page 527, rules can use parameters that are not part of the case. To invoke such
a rule, you drag the rule step into the task. Because the rule requires more
configuration, the advanced solution designer must configure it by using the
Process Designer tool.
For more information about editing solutions with the Process Designer, see
12.2, “Process Designer integration” on page 455. Example steps also are
provided in “Configuration in Process Designer” on page 476 under that section.
Complete the following steps to invoke a Case Manager rule by using the
Process Designer:
1. Start Case Manager Builder.
2. Open the Task workflow map in Process Designer.
3. Drag a component step to the workflow map if it is not previously added by
using the Case Manager Builder.
4. Change the step name to Execute Rule.

Chapter 13. Business rules 533
5. Configure the rule operation on the step by selecting it from the
ICM_RuleOperations component. Create data fields for each of the
component parameters. Figure 13-17 shows the completed operation
parameters for the step.
Figure 13-17 Execute Rule Component Step
6. Drag an assignment step to the workflow map.
7. Change the Name to Assign Rule Parameters.
8. Assign the following values to the parameters that are created for the
component:
– caseId: F_CaseFolder
– ruleName: “QC Review”
– customRuleParameterNames: { “RandomNumber”}
– customRuleParameterValues: { numbertostring(random(99)) }
– ruleReturnValue: “”
9. Connect the new steps into the workflow where needed with the Assign Rule
Value Parameters step that occurs before the Execute Rule step. The final
map appears similar to the example that is shown in Figure 13-18 on
page 534.

534 Advanced Case Management with IBM Case Manager
Figure 13-18 QC Rule Invocation
10.Select Validate → File → Solution → Save and Close → Commit →
Deploy.
After the solution is deployed, run cases with various parameters to test the rule.

Chapter 13. Business rules 535
13.5 External rules engine integration
IBM Operational Decision Manager is an enterprise rules engine upon which the
integrated rules capabilities are based. It provides rules capabilities beyond Case
Manager’s integrated rules. Integrating with Operational Decision Manager is
accomplished by using the web services interfaces.
For more information about implementing rules management, see the IBM
Redbooks publication Governing Operational Decisions in an Enterprise
Scalable Way, SG24-8127.
You also can find more information from the Information Center, which is
available at this website:
http://www.ibm.com/support/docview.wss?uid=swg21503801
13.5.1 Incorporating a business rule in the case solution
The rule projects are accessed from the FileNet workflow system by defining an
external source. This external source defines the URL for the location of HTDS
Web Services Description Language (WSDL) on RES.
Note: When a rules step is configured, Case Manager Builder creates the rule
step as a single step without variables. When component steps are configured
manually in Process Designer, the use of data fields for the step is preferred
because the variables make implementation and troubleshooting easier.
When they are used, rule operation failures because of incorrect inputs on the
data fields can be corrected to allow the workflow to continue. The system
administrator can change the data field values and continue the workflow
repeating the failed step by setting the F_WFReminder=1. This allows the
solution designer to aggregate problems by using fewer fixes rather than
redeploying the solution for every error.
If the rule step is added through Case Manager Builder, it is not necessary to
create data fields for every rule parameter. Instead, it is recommended that
assignments are created for the customRuleParameterNames and
customRuleParameterValues.

536 Advanced Case Management with IBM Case Manager
At run time, an IBM Case Manager task includes a step to run the business rules
in the JRules project. The rules are run through the web service interface by
using the WSDL. Data fields are mapped and exchanged with the business
object model (BOM) that are defined in the JRules project.
To configure the integration to the Rules project, you need the location of HTDS
WSDL. Complete the following steps:
1. Log in to the Rules Execution Server console by using the following URL:
http://localhost:8080/res, username/password = resAdmin/resAdmin
2. Click the Explorer tab.
3. Expand RuleApps in the Explorer tree to see the deployed versions of your
rule application, as shown in Figure 13-19.
Figure 13-19 RES console
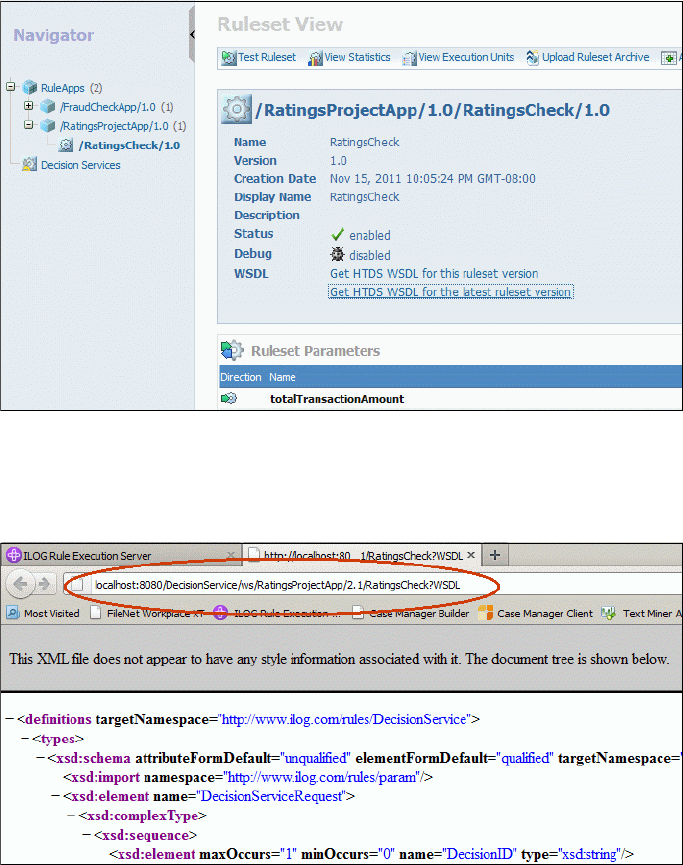
Chapter 13. Business rules 537
4. Click the link for the latest rule set WSDL, as shown in Figure 13-20. You
need the WSDL to configure in FileNet Process Designer to start this rule as
a web service.
Figure 13-20 Getting the WSDL
5. This action brings up the WSDL in the browsers (see Figure 13-21). Copy the
URL for the location of the WSDL for use later.
Figure 13-21 WSDL for Rules application project
6. Use the WSDL that was obtained for your rule application from the Rules
Execution server to configure a partner link in FileNet Process Designer.

538 Advanced Case Management with IBM Case Manager
Integrate: Configuring web services to start the rule
The next step is to configure the step in the workflow task to start the web service
for the rule.
Ensure that the FileNet Component Manager and the ILog JRules Execution
Server (RES) are running before you configure the web service to start the rule.
By using the Complaints Management example, the customer’s rating is based
on the total transaction amount and how long the customer is with the company.
The rating in turn determines whether an outreach to the customer by a client
manager is necessary.
The calculation of the rating can be done at various points in the case. It also can
be configured to run as an individual task. For this example, the rating value is
determined at the beginning of the case so that this information is available from
the start.
A task to verify the complaint information at the start of the case exists. Extend
that task to include a step to get the customer rating from WebSphere ILOG
JRules by completing the following steps:
1. By using Case Manager Builder, configure the Verify Case task and add a
Stub step to the system swimlane. Extend this stub in the next step by using
the Process Designer to start the web services call to WebSphere ILOG
JRules.
Tip: This URL contains a specific rule application version number. However,
removing the RuleApp version automatically references the latest version of
the RuleApp. The altered URL looks as it does it the following example:
localhost:8080/DecisionService/ws/RatingsProjectApp/RatingsCheck?WSDL

Chapter 13. Business rules 539
Figure 13-22 shows the Stub step, which is named CalculateRating.
Figure 13-22 CalculateRating stub step
Ensure that all of the necessary case properties are assigned to the steps,
and then save and redeploy the solution.
2. Complete the following steps to set up the partner link:
a. Log in to the FileNet Workplace XT and open the Process Designer.
b. Select the solution option from the menu and browse through the design
object store to find and edit the Customer Complaints solution.
c. Select the Verify complaint workflow definition from the workflow list in
the View menu.
d. Click the Web Services tab.
e. Select Partner Link and configure it by clicking Invoke and then enter the
WSDL URL as shown in Figure 13-23 on page 540. This example uses a
Partner Link that is called “Rules_TDS”.
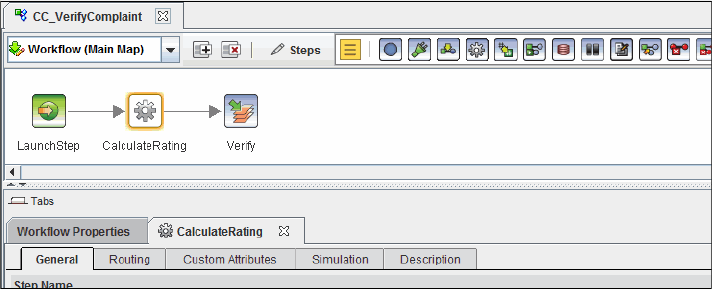
540 Advanced Case Management with IBM Case Manager
Figure 13-23 Setting up the partner link
3. Set up the parameters.
The following main parameters that are needed to calculate the ratings should
be there because they are part of the case data that was created by the Case
Manager Builder:
– CustomerName: String
– Total transaction amount: Float
– CustomerSince: Integer
– CustomerRating: String
You need to add a number of workflow data fields for this workflow. The
following fields are required for calling the Rules web services. They are not
part of the case data; therefore, these data fields do not exist yet:
– DecisionID: String
– ILOGMessage: String
– Count: Integer
Figure 13-24 on page 541 shows the data fields for the workflow. The default
values ensure that none of the input parameters to the web service are null.
The detail usage of each one is explained in the next step.

Chapter 13. Business rules 541
Figure 13-24 Data fields for the workflow
4. Configure the web services Invoke step by clicking the System step (which is
called CalculateRating) that was created in Case Manager Builder. Select the
function Invoke, then Assign, as shown in Figure 13-25.
Figure 13-25 System step
Requirement: Ensure that none of the parameters that are used to start
the web service have a null value at run time.

542 Advanced Case Management with IBM Case Manager
5. Configure the Invoke function.
The Invoke function starts the WebSphere ILOG JRules web service.
Configure the parameters as needed for the rules application. These
parameters must match the parameter definitions that were made earlier in
the Rules Studio.
Process Designer does not support data fields that are complex structures.
However, the Invoke function automatically maps to the data elements up to
one level down.
For the example, the definition of the parameters in Rules Studio includes a
structural object for Customer. It is not possible to use the customer structure
directly for the Invoke function. Instead, the Invoke function automatically
initializes to show the data elements next level down, such as name,
joiningYear, and totalTransactions.
More information: The Invoke function can be configured in two different
ways. The usual parameter mapping method is shown here. If you require
more complex structures, use the XML message method.
For more information, see the FileNet P8 Information Center at this
website:
http://publib.boulder.ibm.com/infocenter/p8docs/v5r2m0
Click Integrating workflow into document management → Process
Designer → About steps → Using Web Services in FileNet
workflows → Web Services - XML message example.
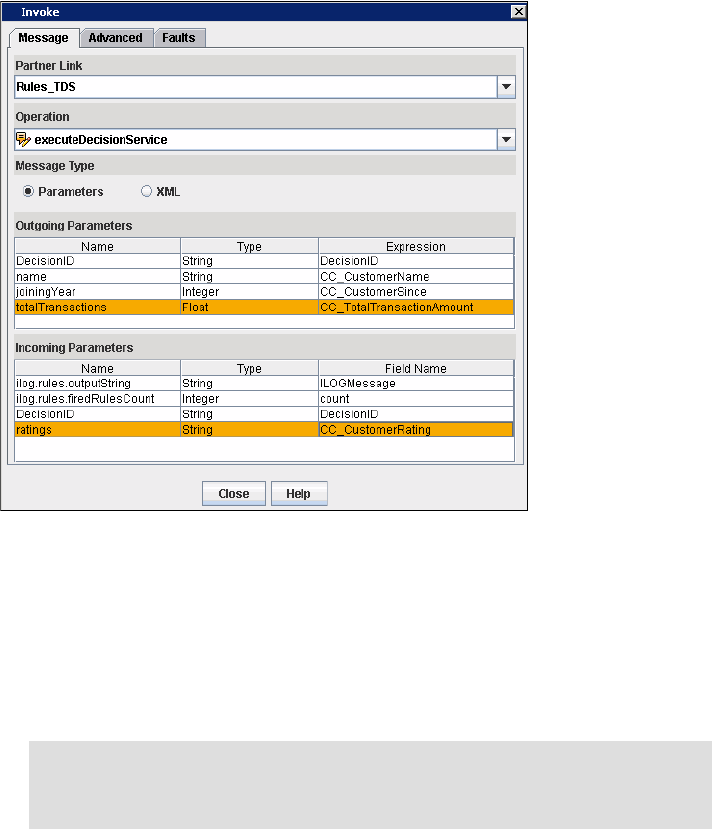
Chapter 13. Business rules 543
Figure 13-26 shows the Invoke function configuration.
Figure 13-26 Configuring the Invoke function
Apart from the workflow data fields, the other parameters are as follow:
– DecisionID: This is an optional parameter on input for JRules, but is
available by default when the Invoke step for the integration is configured.
– ILOGMessage: This returns messages from the rules engine.
– Count: returns the count of rules fired.
6. Configure the Assign function.
The returned value for the customer rating is saved into the parameter
CC_CustomerRating. This is a workflow parameter in this task. There also is
a Case Data value, CC_CustomerRating, that holds the corresponding
information for the case. By default, when a task is created in Case Manager
Builder, the case data is mapped automatically to workflow parameters.
Restriction: At run time, none of the outgoing parameters can be null. Null
values can cause errors on the web service invocation. This restriction
includes all the internal parameters, such as DecisionID.

544 Advanced Case Management with IBM Case Manager
After you extend this task, map the value back into the Case Data so that it is
shown on the Case Manager Client user interface. Use the assign function
and the F_CaseFolder value, which identifies the case folder instance.
CustomerRating is the only parameter that changed in this example.
Set Assign as shown in the following example (see Figure 13-27):
F_CaseFolder.CC_CustomerRating (case data) = CC_CustomerRating
(workflow data)
Figure 13-27 Assigning rating to case data
7. Run the Verify commad and save the solution. Exit Process Designer. Use
Case Manager Builder to run the Commit command, then run the Deploy
command and test the updated task.
8. Test the business rule by creating a case in the Case Manager Client.
Tip: To check whether a rule was run, use View Statistics (from the
Ruleset view) from the JRules RES console.
Alternatively, use Process Administrator Tracker to make sure that
WS_queue is not accumulating WS invocation requests.

© Copyright IBM Corp. 2013, 2014. All rights reserved. 545
Chapter 14. Integration points
Case management systems often are not stand-alone systems. Depending on
the industry and the type of application, a case management system can be
integrated with back-end systems, databases, and other business applications.
Integration with the external systems can be achieved in many ways. Often, it
depends on the integration points and tools available for the systems that are
involved.
This chapter describes at a high level the different application programming
interfaces (APIs) and other integration points that are supported by IBM Case
Manager. It is intended as a quick reference guide about considering the best
approach for integration.
This chapter includes the following sections:
Model APIs
REST APIs
Using Java APIs
Using Case Manager Client-side integration
Using Content Platform Engine workflow integration
External data service
Other supported integrations
14
546 Advanced Case Management with IBM Case Manager
14.1 Model APIs
The Model API originated with IBM Content Navigator that allows application
developers to write code that interacts with the client and user interface of IBM
Content Navigator. For application development purposes, there is the IBM
Content Navigator API reference and the IBM Case Manager API reference
documentation.
The Case Manager Model API extends the IBM Content Navigator API by adding
other functionality to each object that is created from a class.
For more information about specific examples of Model API in IBM Case
Manager, see the following sections:
10.5, “Creating and deploying a custom widget” on page 386
11.4, “Basic customization scenarios” on page 424
11.5, “Intermediate customization scenarios” on page 426
For more information about the IBM Content Navigator API reference, see the
following resources:
IBM Redbooks publication, Customizing and Extending IBM Content
Navigator, SG24-8055:
http://www.redbooks.ibm.com/abstracts/sg248055.html?Open
IBM Content Navigator Information Center:
http://pic.dhe.ibm.com/infocenter/p8docs/v5r2m0/topic/com.ibm.develo
pingeuc.doc/eucdi000.htm
For more information about the IBM Case Manager JavaScript API reference,
see the IBM Case Manager Information Center:
http://pic.dhe.ibm.com/infocenter/casemgmt/v5r2m0/index.jsp?topic=%2Fco
m.ibm.casemgmt.development.doc%2Fjsdoc%2Findex.html
14.2 REST APIs
There are three Representational State Transfer (REST) APIs that are provided
with IBM Case Manager. Each one serves a specific purpose. These APIs are
Hypertext Transfer Protocol (HTTP) calls that offer an abstraction from
lower-level coding languages.
Chapter 14. Integration points 547
14.2.1 Case Manager REST API
The Case Manager REST API is used for case-related actions. As of IBM Case
Manager 5.1.1, these same actions are now available in the Case Manager Java
API as described in 14.3.3, “Integrating by using the Case Java API” on
page 553.
This API returns responses in the JavaScript Object Notation (JSON) format.
You use this API for the following case-specific information:
Solutions that are available and their information
Case types that are available in a solution
Task types that are available for case types
Tasks available that are in a case and actions that can be performed on them
Comments for a case or for a task or document within a case
History of a case
Your application can request information about case objects and manipulate
those case objects by using this API. The API can be used in the following
examples:
A web front end on the internet retrieves case history that is based on a case
record locator and presents it to the external user. Use the case history
resource for a case.
An external application must read the status of all tasks in a case. Use the list
of task instances resource for a case.
An external application processes fees that are associated with a case and
adds a comment to the case. Use the case comments resource for a case.
An external application must create a case for processing extra information.
Use the cases resource.
A custom widget must create a task without leaving the page. Use the
discretionary task types resource to list available tasks to create, and then
use the create task resource to create the task.
For more information about this API, see IBM Case Manager, Version 5.2
Information Center, which is available at this website:
http://pic.dhe.ibm.com/infocenter/casemgmt/v5r2m0/topic/com.ibm.casemgm
t.development.doc/acmdv014.htm
548 Advanced Case Management with IBM Case Manager
14.2.2 Process Engine REST API
Though Content Engine and Process Engine merged to a single engine, Content
Platform Engine, the REST API that is described here is still referred as Process
Engine REST API. The Process Engine REST API is used for workflow-related
information. All of the methods in this API are immediately available or can be
built by using the Process Engine Java API.
This API returns responses in JSON format.
Use this API for the following role and work item-related information:
Roles
Work basket information and filters
Work items that are assigned to a role or user
Work item information
Saving and completing work items
Current user and search for users
Your application can request information about business process objects and act
on those objects by using this API. It can be used in the following examples:
A web front end on the internet must display actions for external users as part
of a process in a case. Use the queue elements resource on a designated
role in-basket with query parameters as necessary.
A web front end on the internet must complete an action or work item as part
of a process in a case. Use the step element resource to update the work item
information and dispatch it, which completes the step.
An external application that employees use daily must display a work item
count for each of their role work baskets. Use the role resource to get work
baskets. Then, use queue elements count resource on those work baskets.
A custom widget must show all work items across multiple roles for a
manager to view in one list. Use the role names resource on the solution
application space to gather work baskets and then queue elements.
For more information about this API, see IBM FileNet P8, Version 5.2 Information
Center, which is available at this website:
http://publib.boulder.ibm.com/infocenter/p8docs/v5r2m0/index.jsp?topic=
/com.ibm.p8.pe.dev.doc/rest/rest_ref.htm
Chapter 14. Integration points 549
14.2.3 Content Management Interoperability Services API
The Content Management Interoperability Services (CMIS) API is used for
content-related information. All of the methods in this API are immediately
available or can be built by using the IBM FileNet Content Engine Java API.
This API returns responses in XML format.
Use this API for the following content-related information:
Get and update properties on content objects
Create content objects
Query for content objects
Upload or download document content
Check in or checkout document objects
Work with versions of document objects
Your application can request information about content objects and act on those
objects by using this API. It can be used in the following examples:
A web front end on the internet must add form details from an external user
as a document in a case. Use the create document resource to provide the
form details as a content stream.
An external application must capture the state of a case at the time of an
event in the external system. Use the content resource for the case folder to
retrieve object properties.
A custom widget is working with a specific document and must present a
toolbar that is based on user security for that document. Use the content
resource for the document object to retrieve allowable actions.
For more information about this API, see the following OASIS website about
Content Management Interoperability Services Version 1.0:
http://docs.oasis-open.org/cmis/CMIS/v1.0/os/cmis-spec-v1.0.html
14.2.4 Navigating from REST API calls to Model API calls
Though REST API is still supported in IBM Case Manager V5.2, it is
recommended that application developers to move from REST API to the Model
API for development purposes. You should migrate REST API calls to Model API
calls for the following reasons:
You can easily extend IBM Content Navigator and IBM Case Manager
functionality when you develop custom widgets.
The Model API clearly separates business logic from the user interface layer,
which makes development easier and more efficient.
550 Advanced Case Management with IBM Case Manager
Model objects that contain business or server-side objects can be shared
across widgets, including custom widgets.
The CMIS REST API is still available in the IBM Content Navigator API.
The JavaScript toolkit provides a more standard, object-oriented
programming model.
The following developerWorks articles describe how to map REST calls to Model
API calls and give an example of how to move between REST API calls to Model
API calls in custom widgets in IBM Case Manager V5,2:
Using the Model API and REST API call in custom widgets for IBM Case
Manager V5.2:
https://www.ibm.com/developerworks/community/groups/service/html/com
munityview?communityUuid=e8206aad-10e2-4c49-b00c-fee572815374#fullpa
geWidgetId=Wf2c4e43b120c_4ac7_80ae_2695b8e6d46d&file=4afc8752-188b-4
7e1-95c2-0c595e96cfed
Mapping REST calls to Model API calls in Case Manager 5.2:
https://www.ibm.com/developerworks/community/groups/service/html/com
munityview?communityUuid=e8206aad-10e2-4c49-b00c-fee572815374#fullpa
geWidgetId=Wf2c4e43b120c_4ac7_80ae_2695b8e6d46d&file=63d89c08-282a-4
8b2-a90d-dff346469f01
14.3 Using Java APIs
There are two Java APIs that are provided as standard IBM FileNet APIs. IBM
Case Manager is built on FileNet P8, so these APIs are readily available with IBM
Case Manager. These APIs offer much more flexibility and granular control than
the REST APIs. These APIs are based on Java and require Java programming.
Added in Case Manager 5.1.1 is the new Case Java API.
For more information, see this website:
http://pic.dhe.ibm.com/infocenter/casemgmt/v5r1m1/topic/com.ibm.casemgm
t.development.doc/acmjd001.htm
In addition to the two Java APIs, FileNet P8 supports other languages through a
web service abstraction. For brevity, topics are addressed by referencing the
Java APIs that map to web services.
Chapter 14. Integration points 551
14.3.1 Integrating by using Content Engine Java API
Though Content Engine and Process Engine merged into a single engine,
Content Platform Engine, the Java API that is described here is still commonly
referred as Content Engine Java API. The Content Engine Java API is used to
implement full Enterprise Content Management capabilities. The Content Engine
Java API can access all objects in the content repository. These objects include,
but are not limited to, documents, compound documents, folders, custom objects,
document types, subscriptions, and security.
When compared to CMIS, the Content Engine Java API offers finer control of all
objects in the repository. CMIS is a specification that is still under development
and is designed for compatibility with various repository types. As a result, only a
subset of enterprise content management functions is made available through
CMIS.
For more information about this API, see IBM FileNet P8, Version 5.2 Information
Center at this website:
http://publib.boulder.ibm.com/infocenter/p8docs/v5r2m0/topic/com.ibm.p8
.ce.dev.java.doc/overview-summary.html
Your application can access and manipulate content objects in a FileNet P8
environment by using this API. It can be used in the following examples:
An external application must run actions in a batch. Use the batch utilities to
group the operations together.
An external application must configure complex access control lists (ACLs) on
objects. Use the security utilities to configure ACLs.
An external application must not abstract data for performance reasons. Use
the communication utilities to avoid the performance effect of abstracting data
to XML or other format for communication.
An external application must use core FileNet P8 capabilities. Use the
extensive range of utilities that are provided by the Content Platform Engine
client.
A custom REST API must be developed to meet a specific requirement that is
not available in CMIS. Use the extensive range of utilities that are provided by
the Content Platform Engine client and make them available by using a
custom REST API.
552 Advanced Case Management with IBM Case Manager
14.3.2 Integrating by using Process Engine Java API
Though Content Engine and Process Engine merged into a single Content
Platform Engine, the Java API that is described here is still commonly referred to
as Process Engine Java API. The Process Engine Java API is used to implement
full FileNet P8 workflow system capabilities. The Process Engine Java API can
access all information that is related to workflows. This information includes, but
is not limited to, application spaces, roles, work items, exceptions, queues,
rosters, security, and system details.
You use this API to harness the full capabilities of a FileNet P8 workflow system.
When compared to Process Engine REST API, the Process Engine Java API
offers finer control of all information that is related to workflows. Process Engine
REST API was around for a few years, whereas the Process Engine Java API
was available for many years. As a result, only a subset of workflow system
functions is available through Process Engine REST API.
Your application can access and manipulate workflow-related objects in a FileNet
P8 environment by using this API. It can be used in the following examples:
An external application must generate a report on the history of work items.
Use the utilities to provide the step information.
An external application must analyze a process. Use the process utilities to
analyze a running workflow.
An external application must start a workflow. Use the workflow utilities to
start a workflow.
An external application must configure a workflow system. Use the
configuration utilities to work with isolated regions or the entire system.
An external application must use an action that is not available in the Process
Engine REST API. Use the appropriate utilities that are provided by the
workflow system client.
For more information about this API, see the IBM FileNet P8, Version 5.2
Information Center at this website:
http://publib.boulder.ibm.com/infocenter/p8docs/v5r2m0/topic/com.ibm.p8
.pe.dev.java.doc/filenet/vw/api/package-summary.html
Chapter 14. Integration points 553
14.3.3 Integrating by using the Case Java API
New in 5.1.1, IBM Case Manager provides a Java API for handling common
case-based operations. These operations include methods and objects for
gathering information, creating cases and tasks, and update existing case
information.
Similar to the Case Rest API, as described in 14.2.1, “Case Manager REST API”
on page 547, the new Case Java API can be used to retrieve and manipulate the
following case-specific information:
Deployed solutions and Case Manager configuration information
Case types and document types that are included in a deployed solution
Available task types
Create, update, and split cases
Create relationships between cases
Create and retrieve case comments
Retrieve case history
Start manual and discretionary tasks
Your application can request information about case objects and manipulate
those case objects by using this API. The API can be used in the following
examples:
An external, Java based application must read the status of all tasks in a
case. The com.ibm.casemgmt.Case class has methods for retrieving the tasks
of a case, which are represented as com.ibm.casemgmt.tasks.Task objects.
An external enterprise Java application processes fees that are associated
with a case and adds a case comment. The com.ibm.casemgmt.Case class
can be used to add and retrieve comments, which are represented as
com.ibm.casemgmt.Comment objects.
An external application must create a case for processing extra information.
The com.ibm.casemgmt.Case class has factory methods that can be used to
create a case.
For more information about this API, see the IBM Case Manager, Version 5.2
Information Center at this website:
http://pic.dhe.ibm.com/infocenter/casemgmt/v5r2m0/topic/com.ibm.casemgm
t.development.doc/acmjd001.htm
554 Advanced Case Management with IBM Case Manager
14.4 Using Case Manager Client-side integration
The IBM Case Manager interface is designed by using a mashups container.
Mashup containers by design are a combination of various widgets that can run
actions, display information, or both. Case Manager Client-side integration
means that the user’s browser is requesting or presenting data from a resource.
This resource is not necessarily an IBM Case Manager resource.
14.4.1 Website widget
Simple integration is available by using the website widget. The basic function of
the widget is to display a website within an iframe. A default website can be
configured for when the widget initially loads. This first page can be your home
page or a start page for work in another system. Because the website is
displayed in an iframe, browsing in this widget enables the user to browse around
and still reference the IBM Case Manager user interface.
An extended function is the ability to show websites dynamically. The widget can
receive a URL. If a URL payload is received, the widget renders that URL in the
iframe. The URL can contain a query string so you can access any web
resources, even with query parameters. You can develop a custom widget to
send a URL or you can use the Script Adapter to integrate other widgets with the
website display.
14.4.2 Script Adapter widget
For complex integration between widgets and retrieving external data, use the
Script Adapter widget. This widget is provided with Business Space.
The basic function of this widget is to receive a payload from an event and send
that payload as an event. The payload and the event can be anything. This
feature is most useful when you translate payloads between existing widgets on
a page. One widget might send a payload with “ContactName” whereas another
widget requires “Name” only. In this instance, the Script Adapter can transform
the payload as needed.
An extended function of the Script Adapter widget is to run actions that
JavaScript can perform. For example, “ContactName” is not allowed to be empty
as it is passed to another widget. The Script Adapter can throw a JavaScript alert
or open a dojo.dialog to alert the user that “ContactName” is empty.
Chapter 14. Integration points 555
Additionally, the Script Adapter does not necessarily have to send a payload. It
can react to receiving a payload and run an xhr.post to save payload information
to a server-side API.
14.4.3 Custom widget
For complete control of a widget, from what it does to what it presents to which
payloads are available, you can create a custom widget.
When you are developing your own widget, you have few limitations. You can
harness the full capabilities of JavaScript and the Dojo libraries. You can
customize payloads and create useful events on receiving or sending. You can
interact with existing systems that provide a REST interface, or you can create
your own iframe as an advanced Website widget. You can render data from other
widgets or back-end systems, as required. You also can create a settings
interface to configure the widget differently on different pages.
Consider the following points when you create a custom widget:
Events to send and receive
Payloads to send and receive
Calling the back-end services by using HTTP requests
Authentication that might happen when calling the back-end services
Capabilities of JavaScript
Capabilities of Dojo
Widget definition XML
Widget settings and configuration
Presentation of the widget on a page
14.5 Using Content Platform Engine workflow
integration
Tasks within a solution include workflows that are processed by IBM FileNet
Content Platform Engine. Content Platform Engine provides many useful
integration capabilities. These integration capabilities include the customer
component, web services, and database interaction.
556 Advanced Case Management with IBM Case Manager
14.5.1 Custom components
A custom component is a Java object that extends the capabilities of the
workflow engine. A Component Integrator makes a custom component available
within the process of a workflow by monitoring a queue and passing information
to the custom component.
The custom component offers nearly limitless processing capabilities within a
workflow. If you must react to data in a workflow in a way that is not available in
the Process Designer palette, use a custom component. The full capabilities of
Java are available when you develop a component.
A custom component is useful in the following ways:
Converting a deadline date to an integer that represents minutes for use in a
step deadline. Input: Time (date). Output: Integer (minutes).
Calculating total compound interest on a monthly deposit over time. Input:
Integer (months), Float (deposit), Float (rate). Output: Float (interest).
Evaluating if two sets of integer arrays are equal, element by element. Input:
Integer[] (first array), Integer[] (second array). Output: Boolean (evaluation).
You have existing Java code that runs database lookups or interfaces with
other systems and is useful in the process of a workflow. The input and output
values vary, but you might need to consider a harness Java class as an
interface to reuse your code.
14.5.2 Web services
Web services is a standard method of communication between two systems,
often over HTTP. The process services of the Content Platform Engine offer an
interface to use external web services by providing or receiving data from within
a workflow.
Web services are a standard practice in many organizations. Therefore, you
might find that you are integrating IBM Case Manager with an external system
that provides a web service. If so, web services integration by using Process
Designer and other documented workflow system configuration is often the
quickest method of integration.
Chapter 14. Integration points 557
Web services might be useful for the following reasons:
To have an external system that provides a web service to process
information in the flow of a task.
To interface with WebSphere Service Registry and Repository or Universal
Description Discovery and Integration (UDDI) registries.
To interface with WebSphere ILOG business rules.
14.5.3 Database interaction
The DbExecute system step in Process Designer allows a flexible method to run
a stored procedure in a remote database.
If you store procedures that are created in your database, it is easy to implement
the DbExecute system step as a step in your task workflow.
14.6 External data service
An extra point of integration for a Case Manager solution is an external data
service. This service allows Case Manager to provide users with contextual
property information when they are working with cases and case documents.
The following common use cases are for an external data service:
Creating conditional choice lists where the values that are available in a
property are dependent upon the value of another property. A common
example is city and state in which cities are available in the city drop-down
menu depends on the selected state.
Populating fields that are based on a lookup, such as account number.
Complex data validation.
An external data service (EDS) is implemented as a RESTful service that
handles JSON-based property update requests from Case Manager Client. The
EDS is called from the Case Manager API application that is deployed on the
Case Manager server.
558 Advanced Case Management with IBM Case Manager
For more information about the external data services, see the following
resources:
“Getting case data from an external source” at the IBM Case Manager
Information Center:
http://pic.dhe.ibm.com/infocenter/casemgmt/v5r2m0/topic/com.ibm.case
mgmt.development.doc/acmdv087.htm
Chapter 16 “External Data Service Framework” of Advanced Case
Management with IBM Case Manager (the previous version of the book)
14.7 Other supported integrations
In the previous version of this IBM Redbooks publication, we extensively
described the integration of IBM Case Manager with the following IBM products
and framework:
IBM WebSphere ILOG JRules
The product was rebranded as IBM Operational Decision Manager
IBM Content Manager
External Data Services framework
IBM Business Process Manager
IBM Content Analytics with Enterprise Search
The product was merged with OmniFind® Enterprise Search and is known as
IBM Content Analytics with Enterprise Search
These contents were not updated for this edition of the book. However, they are
still valuable to use as reference.
To access this content, download the previous version of the book. For more
information, see Appendix A, “Additional material” on page 563.
The integration chapters from the previous version of the book are summarized
here for your reference.
14.7.1 Integration with IBM Operational Decision Manager
IBM Operations Decision Manager provides an integrated business rules and
events management platform to improve the quality of transaction and
process-related decisions and help determine the appropriate course of action
for each customer, partner, and internal interaction.
Chapter 14. Integration points 559
The product IBM Operations Decision Manager was previously known as IBM
WebSphere ILOG JRules.
In Chapter 14 “Integration with WebSphere ILOG JRules” of the previous version
of this IBM Redbooks publication, we described the integration between IBM
Case Manager and IBM WebSphere ILOG JRules. The chapter outlines the
benefits of the use of JRules to manage business rules in a case management
system, and uses a simple example to show how this works.
The chapter includes the following sections:
Benefits of using rules engine software
Incorporating a business rule in the case solution
This chapter does not describe the IBM WebSphere ILOG JRules product in
detail. For more information about the product, see the Redbooks publication:
Patterns: Integrating WebSphere ILOG JRules with IBM Software, SG24-7881.
The chapter was not updated for this edition of the book. However, its content is
still valuable to use as reference.
To view this chapter, download the previous version of the book. For more
information, see Appendix A, “Additional material” on page 563.
14.7.2 Integration with IBM Content Manager
In Chapter 15 “Integration with IBM Case Manager” of the previous version of this
IBM Redbooks publication, we describe the integration between IBM Case
Manager and IBM Content Manager. The integration allows users to directly
access documents that are stored in Content Manager more easily from case
solutions. Companies that use Content Manager content repositories can use the
integration to seamlessly use Content Manager documents in case solutions.
The chapter includes the following sections:
Benefits of Content Manager integration
Architecture of the integration
Integration configuration steps
Using Content Manager documents in case solutions
The chapter was not updated for this edition of the book. However, its content is
still valuable to use as reference.
To view this chapter, download the previous version of the book. For more
information, see Appendix A, “Additional material” on page 563.
560 Advanced Case Management with IBM Case Manager
14.7.3 External Data Services framework
IBM Case Manager offers an improved and easier-to-use data integration across
systems that provides a seamless and consolidated view of a case. You can
configure an IBM Case Manager solution to reference data that is stored in an
external system, such as a customer relationship management (CRM) system.
In Chapter 16 “External Data Service Framework” of the previous version of this
IBM Redbooks publication, we introduced the external data service framework
and described how it can be used to initiate case data in IBM Case Manager.
The chapter includes the following sections:
Implementing an External Data Service
Registering the External Data Service
The chapter was not updated for this edition of the book. However, its content is
still valuable to use as reference.
To view this chapter, download the previous version of the book. For more
information, see Appendix A, “Additional material” on page 563.
14.7.4 Integration with IBM Business Process Manager
IBM Case Manager supports IBM Business Process Manager (IBM BPM) to
improve configuration flexibility and productivity. Case workers can view IBM
Case Manager and IBM BPM work items simultaneously from the same
integrated view. Solution designers can define case tasks that were previously
implemented in IBM BPM and managed in the Process Center.
In Chapter 17 “Integration with IBM Business Process Manager” of the previous
version of this IBM Redbooks publication, we described how to use the
capabilities of IBM Case Manager and IBM BPM to manage human-centric,
integration-centric, and content-centric business processes. These processes
can achieve end-to-end process control and visibility across your business
network.
The chapter includes the following sections:
Introduction to IBM Case Manager and IBM BPM
Implementing a task as IBM BPM process application
Implementing a task as an IBM BPM automated process
Configuring an Integrated Inbox
The chapter was not updated for this edition of the book. However, its content is
still valuable to use as reference.
Chapter 14. Integration points 561
To view this chapter, download the previous version of the book. For more
information, see Appendix A, “Additional material” on page 563.
14.7.5 Integration with IBM Content Analytics with Enterprise Search
IBM Content Analytics with Enterprise Search (ICAwES) helps companies to
gather and mine unstructured and structured data to gain actionable insights that
improve and enhance business operations. IBM Case Manager can use the
natural language processing techniques of ICAwES to discover patterns, trends,
and correlations between various cases. These discoveries help the case
workers and executives with insights into their business and provide an
opportunity to respond with appropriate actions.
In Chapter 18 “Integration with IBM Content Analytics with Enterprise Search” of
the previous version of this IBM Redbooks publication, we described the
integration between IBM Case Manager and ICAwES. At the time of that writing,
ICAwES Analytics was not merged with the Enterprise Search product; therefore,
it was known as IBM Content Analytics with Enterprise Search. In addition,
Content Engine and Process Engine in IBM FileNet P8 Platform were not
merged to the single Content Platform Engine of today; therefore, the chapter still
refers to Content Engine by its old name.
The chapter includes the following sections:
IBM Content Analytics with Enterprise Search overview
Installing Content Analytics Version 2.2
Installing IBM FileNet Content Engine Client
Configuring script to resolve Content Engine Client paths
Configuring crawlers to access case solutions
Rapid insights detection with the Text Mining application
The chapter was not updated for this edition of the book. However, its content is
still valuable to use as reference.
To view this chapter, download the previous version of the book. For more
information, see Appendix A, “Additional material” on page 563.
562 Advanced Case Management with IBM Case Manager

© Copyright IBM Corp. 2013, 2014. All rights reserved. 563
Appendix A. Additional material
This book refers to additional material that can be downloaded from the Internet,
as described in the following sections.
Locating the Web material
The Web material that is associated with this book is available in softcopy on the
Internet from the IBM Redbooks Web server, which is available at this website:
ftp://www.redbooks.ibm.com/redbooks/SG247929
Alternatively, you can go to the IBM Redbooks website at:
http://www.ibm.com/redbooks
Select Additional materials and open the directory that corresponds with the
IBM Redbooks form number, SG247929.
A
564 Advanced Case Management with IBM Case Manager
Using the Web material
The additional Web material that accompanies this book includes the file
SG247929-02.pdf, which is a previous version of this IBM Redbooks publication
System requirements for downloading the Web material
The Web material requires the following system configuration:
Hard disk space:50 MB minimum
Downloading and extracting the Web material
Create a subdirectory (folder) on your workstation and extract the contents of the
Web material.zip file into this folder.
© Copyright IBM Corp. 2013, 2014. All rights reserved. 565
Related publications
The publications that are listed in this section are considered particularly suitable
for a more detailed discussion of the topics that are covered in this book.
IBM Redbooks
The following IBM Redbooks publications provide more information about the
topic in this document. Some publications that are referenced in this list might be
available in softcopy only:
Customizing and Extending IBM Content Navigator, SG24-8055
Disaster Recovery and Backup Solutions for IBM FileNet P8 Version 4.5.1
Systems, SG24-7744
Federated Content Management: Accessing Content from Disparate
Repositories with IBM Content Federation Services and IBM Content
Integrator, SG24-7742
IBM Content Analytics Version 2.2: Discovering Actionable Insight from Your
Content, SG24-7877
IBM FileNet Content Manager Implementation Best Practices and
Recommendations, SG24-7547
IBM FileNet P8 Platform and Architecture, SG24-7667
IBM High Availability Solution for IBM FileNet P8 Systems, SG24-7700
Introducing IBM FileNet Business Process Manager, SG24-7509
Understanding IBM FileNet Records Manager, SG24-7623
You can search for, view, download, or order these documents and other
Redbooks, Redpapers, Web Docs, draft, and other materials at the following
website:
http://www.ibm.com/redbooks
566 Advanced Case Management with IBM Case Manager
Online resources
The following websites also are relevant as further information sources:
IBM Case Manager main information page
http://www.ibm.com/software/products/en/casemana
IBM FileNet P8 Platform main information page
http://www.ibm.com/software/ecm/filenet
IBM FileNet Content Manager main information page:
http://www.ibm.com/software/products/en/filecontmana
IBM FileNet Case Foundation main information page:
http://www.ibm.com/software/products/en/case-foundation
IBM Case Manager Version 5.2 Information Center:
http://pic.dhe.ibm.com/infocenter/casemgmt/v5r2m0
IBM FileNet P8 Version 5.2 Information Center:
http://publib.boulder.ibm.com/infocenter/p8docs/v5r2m0
IBM Content Navigator Information Center:
http://pic.dhe.ibm.com/infocenter/p8docs/v5r2m0/topic/com.ibm.develo
pingeuc.doc/eucdi000.htm
IBM Operation Decision Manager Version 8.5 Information Center:
http://pic.dhe.ibm.com/infocenter/dmanager/v8r5/index.jsp
IBM FileNet P8 Platform product documentation:
http://www-01.ibm.com/support/docview.wss?rs=86&uid=swg27036917
This URL includes links to all expansion IBM FileNet P8 products.
Help from IBM
IBM Support and downloads
http://www.ibm.com/support
IBM Global Services
http://www.ibm.com/services

(1.0” spine)
0.875”<->1.498”
460 <-> 788 pages
Advanced Case Management
with IBM Case Manager

®
SG24-7929-03 ISBN 0738439290
INTERNATIONAL
TECHNICAL
SUPPORT
ORGANIZATION
BUILDING TECHNICAL
INFORMATION BASED ON
PRACTICAL EXPERIENCE
IBM Redbooks are developed by
the IBM International Technical
Support Organization. Experts
from IBM, Customers and
Partners from around the world
create timely technical
information based on realistic
scenarios. Specific
recommendations are provided
to help you implement IT
solutions more effectively in
your environment.
For more information:
ibm.com/redbooks
®
Advanced Case Management
with IBM Case Manager
Introducing case
management and
IBM Case Manager
Building IBM Case
Manager solutions
with use case
example
Covering
customization, rules,
deployment, and
more
Organizations face case management challenges that require
insight, responsiveness, and collaboration. IBM Case Manager,
Version 5.2, is an advanced case management product that unites
information, process, and people to provide the 360-degree view
of case information and achieve optimized outcomes. With IBM
Case Manager, knowledge workers can extract critical case
information through integrated business rules, collaboration, and
analytics. This easy access to information enhances decision
making ability and leads to more successful case outcomes. IBM
Case Manager also helps capture industry preferred practices in
frameworks and templates to empower business users and
accelerate return on investment.
This IBM Redbooks publication introduces the case management
concept. It includes the reason for and benefits of case
management, and why it is different from the traditional business
process management or content management. In addition, this
book addresses how you can design and build a case
management solution with IBM Case Manager, and integrate that
solution with external products and components.
This book is intended to provide IT architects and IT specialists
with the high-level concepts of case management and the
capabilities of IBM Case Manager. It also serves as a practical
guide for IT professionals who are responsible for designing,
building, customizing, and deploying IBM Case Manager solutions.
Back cover
