


Certification Study Guide: IBM Tivoli Access
Manager for e-business 6.0
February 2006
International Technical Support Organization
SG24-7202-00

© Copyright International Business Machines Corporation 2006. All rights reserved.
Note to U.S. Government Users Restricted Rights -- Use, duplication or disclosure restricted by GSA ADP
Schedule Contract with IBM Corp.
First Edition (February 2006)
This edition applies to Version 6, Release 0, Modification 0 of IBM Tivoli Access Manager for
e-business (product number 5724-C87).
Note: Before using this information and the product it supports, read the information in
“Notices” on page vii.

© Copyright IBM Corp. 2006. All rights reserved. iii
Contents
Notices . . . . . . . . . . . . . . . . . . . . . . . . . . . . . . . . . . . . . . . . . . . . . . . . . . . . . . vii
Trademarks . . . . . . . . . . . . . . . . . . . . . . . . . . . . . . . . . . . . . . . . . . . . . . . . . . . viii
Preface . . . . . . . . . . . . . . . . . . . . . . . . . . . . . . . . . . . . . . . . . . . . . . . . . . . . . . . ix
The team that wrote this redbook. . . . . . . . . . . . . . . . . . . . . . . . . . . . . . . . . . . . ix
Become a published author . . . . . . . . . . . . . . . . . . . . . . . . . . . . . . . . . . . . . . . . x
Comments welcome. . . . . . . . . . . . . . . . . . . . . . . . . . . . . . . . . . . . . . . . . . . . . . x
Chapter 1. Certification overview . . . . . . . . . . . . . . . . . . . . . . . . . . . . . . . . . 1
1.1 IBM Professional Certification Program . . . . . . . . . . . . . . . . . . . . . . . . . . . 2
1.1.1 Benefits of certification . . . . . . . . . . . . . . . . . . . . . . . . . . . . . . . . . . . . 3
1.1.2 Tivoli Software Professional Certification . . . . . . . . . . . . . . . . . . . . . . 4
1.2 Access Manager for e-business V6.0 certification . . . . . . . . . . . . . . . . . . . 7
1.2.1 Job description and target audience . . . . . . . . . . . . . . . . . . . . . . . . . . 7
1.2.2 Prerequisites . . . . . . . . . . . . . . . . . . . . . . . . . . . . . . . . . . . . . . . . . . . . 7
1.2.3 Test 876 objectives . . . . . . . . . . . . . . . . . . . . . . . . . . . . . . . . . . . . . . . 8
1.3 Recommended educational resources . . . . . . . . . . . . . . . . . . . . . . . . . . . 16
1.3.1 Courses. . . . . . . . . . . . . . . . . . . . . . . . . . . . . . . . . . . . . . . . . . . . . . . 16
1.3.2 Publications. . . . . . . . . . . . . . . . . . . . . . . . . . . . . . . . . . . . . . . . . . . . 24
Chapter 2. Planning. . . . . . . . . . . . . . . . . . . . . . . . . . . . . . . . . . . . . . . . . . . . 27
2.1 Access management overview . . . . . . . . . . . . . . . . . . . . . . . . . . . . . . . . . 28
2.2 Core components . . . . . . . . . . . . . . . . . . . . . . . . . . . . . . . . . . . . . . . . . . . 28
2.2.1 User registry . . . . . . . . . . . . . . . . . . . . . . . . . . . . . . . . . . . . . . . . . . . 31
2.2.2 Policy Server . . . . . . . . . . . . . . . . . . . . . . . . . . . . . . . . . . . . . . . . . . . 32
2.2.3 WebSEAL . . . . . . . . . . . . . . . . . . . . . . . . . . . . . . . . . . . . . . . . . . . . . 37
2.2.4 Plug-In for Web servers . . . . . . . . . . . . . . . . . . . . . . . . . . . . . . . . . . 38
2.2.5 Plug-In for Edge Server. . . . . . . . . . . . . . . . . . . . . . . . . . . . . . . . . . . 40
2.3 Management components. . . . . . . . . . . . . . . . . . . . . . . . . . . . . . . . . . . . . 41
2.3.1 Web Portal Manager . . . . . . . . . . . . . . . . . . . . . . . . . . . . . . . . . . . . . 41
2.4 Additional components . . . . . . . . . . . . . . . . . . . . . . . . . . . . . . . . . . . . . . . 43
2.4.1 Policy Proxy Server . . . . . . . . . . . . . . . . . . . . . . . . . . . . . . . . . . . . . . 43
2.4.2 Authorization service. . . . . . . . . . . . . . . . . . . . . . . . . . . . . . . . . . . . . 45
2.4.3 Access Manager Session Management Server . . . . . . . . . . . . . . . . 45
2.4.4 Access Manager for Microsoft .NET Applications . . . . . . . . . . . . . . . 47
2.4.5 WebSphere Application Server integration . . . . . . . . . . . . . . . . . . . . 48
2.4.6 Access Manager for BEA WebLogic Server . . . . . . . . . . . . . . . . . . . 49
2.5 Interfaces. . . . . . . . . . . . . . . . . . . . . . . . . . . . . . . . . . . . . . . . . . . . . . . . . . 50
2.5.1 Tivoli Access Manager Authorization API (aznAPI) . . . . . . . . . . . . . 51

iv Certification Study Guide: IBM Tivoli Access Manager for e-business 6.0
2.5.2 Administration API. . . . . . . . . . . . . . . . . . . . . . . . . . . . . . . . . . . . . . . 55
2.5.3 External authentication interface (EAI) . . . . . . . . . . . . . . . . . . . . . . . 56
2.5.4 Java API for Access Manager . . . . . . . . . . . . . . . . . . . . . . . . . . . . . . 58
2.5.5 Access Manager-based authorization for Microsoft .NET . . . . . . . . . 58
2.6 Placing components in a network . . . . . . . . . . . . . . . . . . . . . . . . . . . . . . . 58
2.6.1 IBM Global Security Kit (GSKit) . . . . . . . . . . . . . . . . . . . . . . . . . . . . 60
2.6.2 Sizing and availability . . . . . . . . . . . . . . . . . . . . . . . . . . . . . . . . . . . . 62
2.7 Upgrade considerations . . . . . . . . . . . . . . . . . . . . . . . . . . . . . . . . . . . . . . 63
2.7.1 Additional upgrade considerations . . . . . . . . . . . . . . . . . . . . . . . . . . 65
2.7.2 Useful commands for the upgrade process . . . . . . . . . . . . . . . . . . . 66
Chapter 3. Installation. . . . . . . . . . . . . . . . . . . . . . . . . . . . . . . . . . . . . . . . . . 69
3.1 Installation overview . . . . . . . . . . . . . . . . . . . . . . . . . . . . . . . . . . . . . . . . . 70
3.1.1 User registry . . . . . . . . . . . . . . . . . . . . . . . . . . . . . . . . . . . . . . . . . . . 70
3.1.2 Installation methods . . . . . . . . . . . . . . . . . . . . . . . . . . . . . . . . . . . . . 72
3.2 Base components . . . . . . . . . . . . . . . . . . . . . . . . . . . . . . . . . . . . . . . . . . . 74
3.2.1 GSKit. . . . . . . . . . . . . . . . . . . . . . . . . . . . . . . . . . . . . . . . . . . . . . . . . 75
3.2.2 LDAP client . . . . . . . . . . . . . . . . . . . . . . . . . . . . . . . . . . . . . . . . . . . . 76
3.2.3 Tivoli Security Utilities . . . . . . . . . . . . . . . . . . . . . . . . . . . . . . . . . . . . 76
3.2.4 Access Manager License (PDlic) . . . . . . . . . . . . . . . . . . . . . . . . . . . 76
3.2.5 Access Manager Runtime (PDRTE) . . . . . . . . . . . . . . . . . . . . . . . . . 77
3.2.6 Access Manager Policy Server (PDMgr). . . . . . . . . . . . . . . . . . . . . . 77
3.2.7 Access Manager Authorization Server (PDAcld) . . . . . . . . . . . . . . . 78
3.2.8 Access Manager Policy Proxy Server (PDProxy) . . . . . . . . . . . . . . . 79
3.2.9 Tivoli Access Manager development (PDAuthADK) system . . . . . . . 79
3.2.10 Access Manager Runtime for Java (PDJRTE) . . . . . . . . . . . . . . . . 80
3.2.11 Access Manager Web Portal Manager (PDWPM) . . . . . . . . . . . . . 80
3.3 Web security components . . . . . . . . . . . . . . . . . . . . . . . . . . . . . . . . . . . . . 81
3.3.1 Web Security Runtime (PDWebRTE) . . . . . . . . . . . . . . . . . . . . . . . . 82
3.3.2 WebSEAL (PDWeb) . . . . . . . . . . . . . . . . . . . . . . . . . . . . . . . . . . . . . 82
3.3.3 The Plug-in for Edge Server (PDPlgES) . . . . . . . . . . . . . . . . . . . . . . 83
3.3.4 WebSEAL ADK (PDWebADK) . . . . . . . . . . . . . . . . . . . . . . . . . . . . . 83
3.3.5 Plug-in for Web Servers (PDWebPI). . . . . . . . . . . . . . . . . . . . . . . . . 83
3.3.6 Attribute Retrieval Service (PDWebARS) . . . . . . . . . . . . . . . . . . . . . 84
3.3.7 Access Manager for WebLogic Server (PDWLS) . . . . . . . . . . . . . . . 85
3.4 Setting up a Session Management Server (PDSMS) . . . . . . . . . . . . . . . . 86
3.4.1 Session Management Server administrative interfaces . . . . . . . . . . 87
Chapter 4. Configuration and customization . . . . . . . . . . . . . . . . . . . . . . . 91
4.1 Basic customization tasks . . . . . . . . . . . . . . . . . . . . . . . . . . . . . . . . . . . . . 92
4.1.1 Secure domain . . . . . . . . . . . . . . . . . . . . . . . . . . . . . . . . . . . . . . . . . 92
4.1.2 Protected object space . . . . . . . . . . . . . . . . . . . . . . . . . . . . . . . . . . . 94
4.1.3 Users and groups . . . . . . . . . . . . . . . . . . . . . . . . . . . . . . . . . . . . . . . 96
4.1.4 Security policy . . . . . . . . . . . . . . . . . . . . . . . . . . . . . . . . . . . . . . . . . . 99

Contents v
4.1.5 Default security policy . . . . . . . . . . . . . . . . . . . . . . . . . . . . . . . . . . . 111
4.2 WebSEAL customization. . . . . . . . . . . . . . . . . . . . . . . . . . . . . . . . . . . . . 113
4.2.1 Authentication and single sign-on mechanisms . . . . . . . . . . . . . . . 114
4.3 Supported WebSEAL authentication mechanisms . . . . . . . . . . . . . . . . . 114
4.3.1 Basic authentication with user ID and password. . . . . . . . . . . . . . . 115
4.3.2 Forms-based login with user ID and password . . . . . . . . . . . . . . . . 116
4.3.3 Authentication with X.509 client certificates . . . . . . . . . . . . . . . . . . 116
4.3.4 Failover authentication . . . . . . . . . . . . . . . . . . . . . . . . . . . . . . . . . . 117
4.3.5 Authentication with RSA SecurID token . . . . . . . . . . . . . . . . . . . . . 118
4.3.6 Windows desktop single sign-on (SPNEGO) . . . . . . . . . . . . . . . . . 118
4.3.7 Authentication using customized HTTP headers . . . . . . . . . . . . . . 120
4.3.8 Authentication based on IP address . . . . . . . . . . . . . . . . . . . . . . . . 120
4.4 Advanced WebSEAL authentication methods. . . . . . . . . . . . . . . . . . . . . 120
4.4.1 MPA authentication . . . . . . . . . . . . . . . . . . . . . . . . . . . . . . . . . . . . . 121
4.4.2 Switch user authentication . . . . . . . . . . . . . . . . . . . . . . . . . . . . . . . 122
4.4.3 Re-authentication . . . . . . . . . . . . . . . . . . . . . . . . . . . . . . . . . . . . . . 123
4.4.4 Authentication strength policy (step-up) . . . . . . . . . . . . . . . . . . . . . 125
4.4.5 External authentication interface (EAI) . . . . . . . . . . . . . . . . . . . . . . 127
4.4.6 No authentication . . . . . . . . . . . . . . . . . . . . . . . . . . . . . . . . . . . . . . 127
4.5 Standard junctions. . . . . . . . . . . . . . . . . . . . . . . . . . . . . . . . . . . . . . . . . . 128
4.5.1 WebSEAL object space and authorization configuration . . . . . . . . 129
4.5.2 Creating a local type standard junction . . . . . . . . . . . . . . . . . . . . . . 133
4.5.3 URL filtering . . . . . . . . . . . . . . . . . . . . . . . . . . . . . . . . . . . . . . . . . . 133
4.5.4 The challenges of URL filtering . . . . . . . . . . . . . . . . . . . . . . . . . . . . 142
4.6 Virtual host junction . . . . . . . . . . . . . . . . . . . . . . . . . . . . . . . . . . . . . . . . . 142
4.6.1 Creating a remote type virtual host junction . . . . . . . . . . . . . . . . . . 143
4.6.2 Defining interfaces for virtual host junctions . . . . . . . . . . . . . . . . . . 145
4.7 Transparent path junctions . . . . . . . . . . . . . . . . . . . . . . . . . . . . . . . . . . . 146
4.8 Advanced junction configuration . . . . . . . . . . . . . . . . . . . . . . . . . . . . . . . 147
4.8.1 Mutually authenticated SSL junctions . . . . . . . . . . . . . . . . . . . . . . . 148
4.8.2 WebSEAL-to-WebSEAL junctions over SSL. . . . . . . . . . . . . . . . . . 149
4.8.3 Stateful junction. . . . . . . . . . . . . . . . . . . . . . . . . . . . . . . . . . . . . . . . 149
4.8.4 Junction throttling . . . . . . . . . . . . . . . . . . . . . . . . . . . . . . . . . . . . . . 151
4.8.5 Supporting not case-sensitive URLs . . . . . . . . . . . . . . . . . . . . . . . . 153
4.8.6 Junctioning to Windows file systems. . . . . . . . . . . . . . . . . . . . . . . . 153
4.9 WebSEAL single sign-on mechanisms . . . . . . . . . . . . . . . . . . . . . . . . . . 154
4.9.1 Tivoli Global Sign-On (GSO) lockbox . . . . . . . . . . . . . . . . . . . . . . . 155
4.9.2 Forms-based single sign-on . . . . . . . . . . . . . . . . . . . . . . . . . . . . . . 158
4.9.3 Single sign-on using HTTP BA headers . . . . . . . . . . . . . . . . . . . . . 159
4.9.4 Supplying identity information in HTTP headers . . . . . . . . . . . . . . . 161
4.9.5 Using LTPA authentication with WebSEAL. . . . . . . . . . . . . . . . . . . 163
4.10 SSO across Access Manager domains. . . . . . . . . . . . . . . . . . . . . . . . . 166
4.10.1 Cross-domain mapping framework . . . . . . . . . . . . . . . . . . . . . . . . 166

vi Certification Study Guide: IBM Tivoli Access Manager for e-business 6.0
4.10.2 Cross-domain single sign-on. . . . . . . . . . . . . . . . . . . . . . . . . . . . . 167
4.10.3 e-community single sign-on . . . . . . . . . . . . . . . . . . . . . . . . . . . . . 169
4.11 Session Management Server . . . . . . . . . . . . . . . . . . . . . . . . . . . . . . . . 175
4.11.1 WebSEAL Session Management Server configuration. . . . . . . . . 176
Chapter 5. Programming. . . . . . . . . . . . . . . . . . . . . . . . . . . . . . . . . . . . . . . 181
5.1 External authentication interface . . . . . . . . . . . . . . . . . . . . . . . . . . . . . . . 182
5.1.1 External authentication C API . . . . . . . . . . . . . . . . . . . . . . . . . . . . . 187
5.2 Authorization API overview . . . . . . . . . . . . . . . . . . . . . . . . . . . . . . . . . . . 189
5.2.1 Configuration of an aznAPI application . . . . . . . . . . . . . . . . . . . . . . 189
5.2.2 Entitlement service interface . . . . . . . . . . . . . . . . . . . . . . . . . . . . . . 191
5.2.3 External Authorization Service (EAS) . . . . . . . . . . . . . . . . . . . . . . . 193
Chapter 6. Auditing and troubleshooting . . . . . . . . . . . . . . . . . . . . . . . . . 197
6.1 Native auditing. . . . . . . . . . . . . . . . . . . . . . . . . . . . . . . . . . . . . . . . . . . . . 198
6.1.1 Native auditing configuration. . . . . . . . . . . . . . . . . . . . . . . . . . . . . . 199
6.1.2 Auditing using logaudit . . . . . . . . . . . . . . . . . . . . . . . . . . . . . . . . . . 205
6.1.3 WebSEAL HTTP logging. . . . . . . . . . . . . . . . . . . . . . . . . . . . . . . . . 206
6.1.4 XML output of native audit events. . . . . . . . . . . . . . . . . . . . . . . . . . 208
6.2 Common Auditing and Reporting Service . . . . . . . . . . . . . . . . . . . . . . . . 208
6.2.1 Audit infrastructure . . . . . . . . . . . . . . . . . . . . . . . . . . . . . . . . . . . . . 208
6.2.2 Reporting. . . . . . . . . . . . . . . . . . . . . . . . . . . . . . . . . . . . . . . . . . . . . 209
6.2.3 Common Auditing and Reporting Service configuration . . . . . . . . . 212
6.3 Troubleshooting techniques . . . . . . . . . . . . . . . . . . . . . . . . . . . . . . . . . . 220
6.3.1 Routing files . . . . . . . . . . . . . . . . . . . . . . . . . . . . . . . . . . . . . . . . . . 221
6.3.2 Java properties files . . . . . . . . . . . . . . . . . . . . . . . . . . . . . . . . . . . . 224
6.3.3 Message event logging . . . . . . . . . . . . . . . . . . . . . . . . . . . . . . . . . . 226
6.3.4 Trace event logging. . . . . . . . . . . . . . . . . . . . . . . . . . . . . . . . . . . . . 229
6.3.5 Troubleshooting WebSEAL servers . . . . . . . . . . . . . . . . . . . . . . . . 230
6.3.6 Diagnostic utilities . . . . . . . . . . . . . . . . . . . . . . . . . . . . . . . . . . . . . . 231
Appendix A. WebSEAL junction options . . . . . . . . . . . . . . . . . . . . . . . . . 235
Appendix B. Sample questions . . . . . . . . . . . . . . . . . . . . . . . . . . . . . . . . . 241
Questions . . . . . . . . . . . . . . . . . . . . . . . . . . . . . . . . . . . . . . . . . . . . . . . . . . . . 242
Answer Key . . . . . . . . . . . . . . . . . . . . . . . . . . . . . . . . . . . . . . . . . . . . . . . . . . 244
Related publications . . . . . . . . . . . . . . . . . . . . . . . . . . . . . . . . . . . . . . . . . . 245
IBM Redbooks . . . . . . . . . . . . . . . . . . . . . . . . . . . . . . . . . . . . . . . . . . . . . . . . 245
Other publications . . . . . . . . . . . . . . . . . . . . . . . . . . . . . . . . . . . . . . . . . . . . . 245
Online resources . . . . . . . . . . . . . . . . . . . . . . . . . . . . . . . . . . . . . . . . . . . . . . 246
How to get IBM Redbooks . . . . . . . . . . . . . . . . . . . . . . . . . . . . . . . . . . . . . . . 246
Help from IBM . . . . . . . . . . . . . . . . . . . . . . . . . . . . . . . . . . . . . . . . . . . . . . . . 246
Index . . . . . . . . . . . . . . . . . . . . . . . . . . . . . . . . . . . . . . . . . . . . . . . . . . . . . . . 247

© Copyright IBM Corp. 2006. All rights reserved. vii
Notices
This information was developed for products and services offered in the U.S.A.
IBM may not offer the products, services, or features discussed in this document in other countries. Consult
your local IBM representative for information on the products and services currently available in your area.
Any reference to an IBM product, program, or service is not intended to state or imply that only that IBM
product, program, or service may be used. Any functionally equivalent product, program, or service that
does not infringe any IBM intellectual property right may be used instead. However, it is the user's
responsibility to evaluate and verify the operation of any non-IBM product, program, or service.
IBM may have patents or pending patent applications covering subject matter described in this document.
The furnishing of this document does not give you any license to these patents. You can send license
inquiries, in writing, to:
IBM Director of Licensing, IBM Corporation, North Castle Drive Armonk, NY 10504-1785 U.S.A.
The following paragraph does not apply to the United Kingdom or any other country where such provisions
are inconsistent with local law: INTERNATIONAL BUSINESS MACHINES CORPORATION PROVIDES
THIS PUBLICATION "AS IS" WITHOUT WARRANTY OF ANY KIND, EITHER EXPRESS OR IMPLIED,
INCLUDING, BUT NOT LIMITED TO, THE IMPLIED WARRANTIES OF NON-INFRINGEMENT,
MERCHANTABILITY OR FITNESS FOR A PARTICULAR PURPOSE. Some states do not allow disclaimer
of express or implied warranties in certain transactions, therefore, this statement may not apply to you.
This information could include technical inaccuracies or typographical errors. Changes are periodically made
to the information herein; these changes will be incorporated in new editions of the publication. IBM may
make improvements and/or changes in the product(s) and/or the program(s) described in this publication at
any time without notice.
Any references in this information to non-IBM Web sites are provided for convenience only and do not in any
manner serve as an endorsement of those Web sites. The materials at those Web sites are not part of the
materials for this IBM product and use of those Web sites is at your own risk.
IBM may use or distribute any of the information you supply in any way it believes appropriate without
incurring any obligation to you.
Information concerning non-IBM products was obtained from the suppliers of those products, their published
announcements or other publicly available sources. IBM has not tested those products and cannot confirm
the accuracy of performance, compatibility or any other claims related to non-IBM products. Questions on
the capabilities of non-IBM products should be addressed to the suppliers of those products.
This information contains examples of data and reports used in daily business operations. To illustrate them
as completely as possible, the examples include the names of individuals, companies, brands, and products.
All of these names are fictitious and any similarity to the names and addresses used by an actual business
enterprise is entirely coincidental.
COPYRIGHT LICENSE:
This information contains sample application programs in source language, which illustrates programming
techniques on various operating platforms. You may copy, modify, and distribute these sample programs in
any form without payment to IBM, for the purposes of developing, using, marketing or distributing application
programs conforming to the application programming interface for the operating platform for which the
sample programs are written. These examples have not been thoroughly tested under all conditions. IBM,
therefore, cannot guarantee or imply reliability, serviceability, or function of these programs. You may copy,
modify, and distribute these sample programs in any form without payment to IBM for the purposes of
developing, using, marketing, or distributing application programs conforming to IBM's application
programming interfaces.

viii Certification Study Guide: IBM Tivoli Access Manager for e-business 6.0
Trademarks
The following terms are trademarks of the International Business Machines Corporation in the United States,
other countries, or both:
Eserver®
Eserver®
Redbooks (logo) ™
z/OS®
AIX®
Domino®
DB2®
Everyplace®
HACMP™
IBM®
Lotus Notes®
Lotus®
Notes®
Redbooks™
RACF®
S/390®
Tivoli®
WebSphere®
The following terms are trademarks of other companies:
Java, JavaScript, JDBC, JSP, J2EE, Solaris, Sun, Sun Java, Sun ONE, and all Java-based trademarks are
trademarks of Sun Microsystems, Inc. in the United States, other countries, or both.
ActiveX, Microsoft, Visual Basic, Windows, Win32, and the Windows logo are trademarks of Microsoft
Corporation in the United States, other countries, or both.
UNIX is a registered trademark of The Open Group in the United States and other countries.
Linux is a trademark of Linus Torvalds in the United States, other countries, or both.
Other company, product, or service names may be trademarks or service marks of others.

© Copyright IBM Corp. 2006. All rights reserved. ix
Preface
This IBM® Redbook is a study guide for the “IBM Certified Deployment
Professional - IBM Tivoli® Access Manager V6.0” certification test, test number
876, and is meant for those who want to achieve IBM Certifications for this
specific product.
The IBM Certified Deployment Professional - IBM Tivoli Access Manager V6.0
certification, offered through the Professional Certification Program from IBM, is
designed to validate the skills required of technical professionals who work in the
implementation of the IBM Tivoli Access Manager Version 6.0 product.
This book provides a combination of theory and practical experience needed for
a general understanding of the subject matter by discussing the planning,
installation, configuration and customization, programming, auditing, and
troubleshooting of Access Manager for e-business solutions. It also provides
sample questions that will help in the evaluation of personal progress and
provide familiarity with the types of questions that will be encountered in the
exam.
This publication does not replace practical experience, nor is it designed to be a
stand-alone guide for any subject. Instead, it is an effective tool that, when
combined with education activities and experience, can be a very useful
preparation guide for the exam.
The team that wrote this redbook
This redbook was produced by a team of specialists from around the world
working at the International Technical Support Organization, Austin Center.
Axel Buecker is a Certified Consulting Software IT Specialist at the International
Technical Support Organization (ITSO), Austin Center. He writes extensively and
teaches IBM classes worldwide on areas of software security architecture and
network computing technologies. He holds a degree in Computer Science from
the University of Bremen, Germany. He has 19 years of experience in a variety of
areas related to workstation and systems management, network computing, and
e-business solutions. Before joining the ITSO in March 2000, Axel worked for
IBM in Germany as a Senior IT Specialist in Software Security Architecture.
Vladimir Jeremic is a Security Consultant with the IBM Global Services Security
and Privacy Group. He has eight years of experience in the IT field related to

x Certification Study Guide: IBM Tivoli Access Manager for e-business 6.0
security, networking, and programming. He is a Tivoli Certified Professional and
holds a BS E.E. degree from the University of Novi Sad, in Serbia and
Montenegro. He has experience in designing and writing learning materials.
Vladimir has participated in several other ITSO projects, including working with
Axel on the Certification Study Guide for IBM Tivoli Identity Manager V4.6.
Thanks to the following people for their contributions to this project:
Alison Chandler, Editor
IBM ITSO, Poughkeepsie Center
Kristin Wall Gibson, Elizabeth Purzer, Ben Briggs, Susan Farago, Christopher
Craver
IBM U.S.
Become a published author
Join us for a two- to six-week residency program! Help write an IBM Redbook
dealing with specific products or solutions, while getting hands-on experience
with leading-edge technologies. You'll team with IBM technical professionals,
Business Partners and/or customers.
Your efforts will help increase product acceptance and customer satisfaction. As
a bonus, you'll develop a network of contacts in IBM development labs, and
increase your productivity and marketability.
Find out more about the residency program, browse the residency index, and
apply online at:
ibm.com/redbooks/residencies.html
Comments welcome
Your comments are important to us!
We want our Redbooks™ to be as helpful as possible. Send us your comments
about this or other Redbooks in one of the following ways:
Use the online Contact us review redbook form found at:
ibm.com/redbooks
Send your comments in an e-mail to:

Preface xi
Mail your comments to:
IBM Corporation, International Technical Support Organization
Dept. JN9B Building 905
11501 Burnet Road
Austin, Texas 78758-3493

xii Certification Study Guide: IBM Tivoli Access Manager for e-business 6.0

© Copyright IBM Corp. 2006. All rights reserved. 1
Chapter 1. Certification overview
This chapter provides an overview of the skill requirements needed to obtain an
IBM Advanced Technical Expert certification. The following sections are
designed to provide a comprehensive review of specific topics that are essential
for obtaining the certification:
IBM Professional Certification Program
IBM Tivoli Access Manager for e-business Version 6.0 certification
Recommended study resources
1

2 Certification Study Guide: IBM Tivoli Access Manager for e-business 6.0
1.1 IBM Professional Certification Program
Having the right skills for the job is critical in the growing global marketplace. IBM
Professional Certification, designed to validate skill and proficiency in the latest
IBM solution and product technology, can help provide that competitive edge.
The Professional Certification Program from IBM offers a business solution for
skilled technical professionals seeking to demonstrate their expertise to the
world.
The program is designed to validate your skills and demonstrate your proficiency
in the latest IBM technology and solutions. In addition, professional certification
can help you excel at your job by giving you and your employer confidence that
your skills have been tested. You may be able to deliver higher levels of service
and technical expertise than non-certified employees and move on a faster
career track. Professional certification puts your career in your control.
The certification requirements are tough, but not impossible. Certification is a
rigorous process that differentiates you from everyone else. The mission of IBM
Professional Certification is to:
Provide a reliable, valid, and fair method of assessing skills and knowledge
Provide IBM with a method of building and validating the skills of individuals
and organizations
Develop a loyal community of highly skilled certified professionals who
recommend, sell, service, support, and use IBM products and solutions
The Professional Certification Program from IBM has developed certification role
names to guide you in your professional development. The certification role
names include IBM Certified Specialist, IBM Certified Solutions/Systems Expert,
and IBM Certified Advanced Technical Expert for technical professionals who
sell, service, and support IBM solutions.
For technical professionals in application development, the certification roles
include IBM Certified Developer Associate and IBM Certified Developer. IBM
Certified Instructor certifies the professional instructor.
The Professional Certification Program from IBM provides you with a structured
program leading to an internationally recognized qualification. The program is
designed for flexibility by enabling you to select your role, prepare for and take
tests at your own pace, and, in some cases, select from a choice of elective tests
best suited to your abilities and needs. Some roles also offer a shortcut by giving
credit for a certification obtained in other industry certification programs.
You might be a network administrator, systems integrator, network integrator,
solution architect, solution developer, value-added reseller, technical coordinator,

Chapter 1. Certification overview 3
sales representative, or educational trainer. Regardless of your role, you can
start charting your course through the Professional Certification Program from
IBM today.
The IBM Professional Certification Program Web site is:
http://www.ibm.com/certify/index.shtml
1.1.1 Benefits of certification
Certification is a tool to help objectively measure the performance of a
professional on a given job at a defined skill level. Therefore, it is beneficial for
individuals who want to validate their own skills and performance levels, those of
their employees, or both. For optimum benefit, the certification tests must reflect
the critical tasks required for a job, the skill levels of each task, and the frequency
at which a task needs to be performed. IBM prides itself in designing
comprehensive, documented processes that ensure that IBM certification tests
remain relevant to the work environment of potential certification candidates.
In addition to assessing job skills and performance levels, professional
certification may also provide such benefits as:
For employees:
– Promote recognition as an IBM Certified Professional
– Help to create advantages in interviews
– Assist in salary increases, corporate advancement, or both
– Increase self-esteem
– Provide continuing professional benefits
For employers:
– Measure the effectiveness of training
– Reduce course redundancy and unnecessary expenses
– Provide objective benchmarks for validating skills
– Make long-range planning easier
– Help to manage professional development
– Aid as a hiring tool
– Contribute to competitive advantage
– Increase productivity, morale, and loyalty
For Business Partners and consultants:
– Provide independent validation of technical skills
– Create competitive advantage and business opportunities
– Enhance prestige of the team
– Contribute to IBM requirements for various IBM Business Partner
programs

4 Certification Study Guide: IBM Tivoli Access Manager for e-business 6.0
Specific benefits might vary by country (region) and role. In general, after you
become certified, you should receive the following benefits:
Industry recognition
Certification may accelerate your career potential by validating your
professional competency and increasing your ability to provide solid, capable
technical support.
Program credentials
As a certified professional, you receive an e-mail with your certificate of
completion and the certification mark associated with your role for use in
advertisements and business literature. You can also request a hardcopy
certificate, which includes a wallet-size certificate.
The Professional Certification Program from IBM acknowledges the individual
as a technical professional. The certification mark is for the exclusive use of
the certified individual.
Ongoing technical vitality
IBM Certified Professionals are included in mailings from the Professional
Certification Program from IBM.
1.1.2 Tivoli Software Professional Certification
The IBM Tivoli Professional Certification Program offers certification testing that
sets the standard for qualified product consultants, administrators, architects,
and partners.
The program also offers an internationally recognized qualification for technical
professionals who are seeking to apply their expertise in today's complex
business environment. The program is designed for those who implement, buy,
sell, service, and support Tivoli solutions and who want to deliver higher levels of
service and technical expertise.
Whether you are a Tivoli customer, partner, or technical professional wanting to
put your career on the fast track, you can start your journey to becoming a Tivoli
Certified Professional today.
Benefits of being Tivoli certified
Tivoli certification has the following benefits:
For the individual:
– IBM Certified certificate and use of logos on business cards

Chapter 1. Certification overview 5
– Recognition of your technical skills by your peers and management
– Enhanced career opportunities
– Focus for your professional development
For the Business Partner:
– Confidence in the skills of your employees
– Enhanced partnership benefits from the Business Partner program
– Higher rates for billing out your employees
– Stronger customer proposals
– Demonstration of the depth of technical skills available to prospective
customers
For the customer:
– Confidence in the services professionals handling your implementation
– Ease of hiring competent employees to manage your Tivoli environment
– Enhanced return on investment (ROI) through more thorough integration
with Tivoli and third-party products
– Ease of selecting a Tivoli Business Partner that meets your specific needs
Certification checklist
The steps to certification are as follows:
1. Select the certification you would like to pursue.
2. Determine which tests are required by reading the certification role
description.
3. Prepare for the test, using the following resources:
– Test objectives
– Recommended educational resources
– Sample/Assessment test
– Other reference materials
– Opportunities for experience
4. Register to take a test by contacting one of our worldwide testing vendors:
– Thomson Prometric
– Pearson Virtual University Enterprises (VUE)
Note: Certificates are sent by e-mail; however, a paper copy of the
certificate and a laminated wallet card can also be requested by
sending an e-mail to mailto:[email protected]bm.com.
Note: These resources are available from each certification description
page and from the Test information page.

6 Certification Study Guide: IBM Tivoli Access Manager for e-business 6.0
5. Take the test. Be sure to keep the Examination Score Report provided upon
test completion as your record of taking the test.
6. Repeat steps three through five until all required tests are successfully
completed for the certification. If there are additional requirements (such as
another vendor certification or exam), follow the instructions on the
certification description page to submit these requirements to IBM.
7. After you meet the requirements, you will be sent an e-mail asking you to
accept the terms of the IBM Certification Agreement.
8. Upon your acceptance, you receive an e-mail with the following deliverables:
– A Certification certificate in PDF format, which can be printed in either
color or black and white
– A set of graphic files containing the IBM Professional Certification mark
associated with the certification achieved
– Guidelines for the use of the IBM Professional Certification mark
9. To avoid an unnecessary delay in receiving your certificate, ensure that your
current e-mail is on file by keeping your profile up to date. If you do not have
an e-mail address on file, your certificate will be sent by postal mail.
After you receive a certificate by e-mail, you can also contact IBM at
mailto:certify@us.ibm.com to request that a hardcopy certificate be sent by
postal mail.
Note: When providing your name and address to the testing vendor, be
sure to specify your name exactly as you would like it to appear on your
certificate.
Note: After you take the test, the results and demographic data (such as
name, address, e-mail, and phone number) are sent from the testing
vendor to IBM for processing (allow two to three days for transmittal and
processing). After all the tests required for a certification are passed and
received by IBM, your certificate will be issued.
Note: IBM reserves the right to change or delete any portion of the program,
including the terms and conditions of the IBM Certification Agreement, at any
time without notice. Some certification roles offered through the IBM
Professional Certification Program require recertification.

Chapter 1. Certification overview 7
1.2 Access Manager for e-business V6.0 certification
In this section, we categorize the certification process for IBM Tivoli Access
Manager for e-business (Access Manager for e-business for short).
1.2.1 Job description and target audience
An IBM Certified Deployment Professional is a technical professional responsible
for planning, installation, configuration, data management, troubleshooting,
rollout to production, maintenance, and upgrade of an IBM Tivoli Access
Manager for e-business V6.0 solution. This person is expected to perform these
tasks without assistance, or with only limited assistance from peers, product
documentation, and support resources.
1.2.2 Prerequisites
Prerequisites needed to pass Certification Test 876 include knowledge of:
Basic operating system administrative skills for AIX®, Solaris™, Windows®,
HP-UX, and/or Linux®
Web server fundamentals
Web application server fundamentals
User registry installation
PKI fundamentals
Security policy management concepts
TCP/IP fundamentals
Security communication protocols
Networking concepts
Firewall concepts
Programming fundamentals
Directory services fundamentals
Basic Web page development fundamentals (including security issues)
Familiarity with industry standard reporting tools
C, Java™, XML and application server (for example, WebSphere Application
Server) skills
Important: IBM offers the following promotion code, which is good for a 15%
discount on the indicated Tivoli certification exams if taken at any Thomson
Prometric testing center:
Code: 15T876
Percentage off: 15%
Valid for exams: 000-876
Code is valid as long as the exam is available.

8 Certification Study Guide: IBM Tivoli Access Manager for e-business 6.0
1.2.3 Test 876 objectives
Let us take a closer look at the five objective areas for this test:
Planning
Installation
Configuration and customization
Programming
Maintenance and troubleshooting
Section 1: Planning
This section provides further information about the planning area of the test:
Given a Security Analysis Document, produce product deployment
recommendations that meet security requirements as verified via review
cycles.
With emphasis on performing the following steps:
– Interview administrators, users, and security team.
– Determine the type of user registry used for the secure domain.
– Determine authentication mechanisms—user IDs/passwords (basic or
forms-based), certificates, SecurID tokens, or custom authentication
mechanisms.
– Identify customization requirements such as External Authorization
Services, External Authentication C API, Policies, and so on).
– Identify auditing and logging requirements.
– Determine account and password management rules.
Given Access Manager for e-business deployment recommendations and the
customer's current network configuration, define an Access Manager for
e-business system layout and produce a deployment document containing a
network topology diagram with placement of Access Manager for e-business
user registry and servers.
With emphasis on performing the following steps:
– Identify capacity requirements (number of users, concurrent users,
junctioned Web servers, ACLs required).
– Identify Reliability and Serviceability (RAS) requirements (24 hours x 7
days; throughput and recovery capability).
– Identify current network and security aspects (geography of LANs,
firewalls, Internet, intranet, DMZ, and so on).

Chapter 1. Certification overview 9
– Create logical configuration (number and type of Access Manager for
e-business servers, number of load balancers, replicated Web servers,
secure domains) and integrate with other applications.
– Create physical configuration (location of Access Manager for e-business
servers, location of load balancers, and relationship to firewalls).
– Determine number and location of user registries.
Given an existing Access Manager for e-business environment, define a
migration strategy to maintain user data as well as security policy data.
With emphasis on performing the following steps:
– Create a roadmap defining the migration strategy.
– Identify required user registry migration or upgrade procedures.
– Identify migration and backup utilities required to perform migration.
– Identify Access Manager for e-business security policy data to be migrated
and determine procedures to perform.
Section 2: Installation
This section provides further information about the installation area of the test:
Given a PKI product, configure a valid client-side certificate so that a user can
successfully authenticate to Access Manager for e-business.
With emphasis on performing the following steps:
– Load Certificate Authority (CA) root certificate(s) into WebSEAL (CA root
comes from PKI product).
– Enable client-side certificate authentication.
– Configure client-side certificates.
Given the Access Manager for e-business packages and necessary
hardware, perform the Access Manager for e-business installation to produce
a working Access Manager for e-business system.
With emphasis on performing the following steps:
– Install Access Manager for e-business user registry if not installed.
– Complete Access Manager for e-business user registry customization.
– Install LDAP clients on the computers to be used for Access Manager for
e-business servers.
– Install the Access Manager for e-business server components.
– Complete advanced Access Manager for e-business customization.
Given user account information, create a registry usable by Access Manager
for e-business.

10 Certification Study Guide: IBM Tivoli Access Manager for e-business 6.0
With emphasis on performing the following steps:
– Identify existing user registries.
– Determine integration options and benefits/pitfalls.
– Determine migration options and benefits/pitfalls.
– Decide user registry approach.
– If integration: Design and code External Authentication C API or EAI (&
SYNC process), decide 1-1 or n-1, and validate results.
– If migration: Identify sources of information, build and run the migration
tool, and validate results.
Given an existing Access Manager for e-business environment, perform basic
system tests to validate the environment is functioning correctly.
With emphasis on performing the following steps:
– Check that all processes are running.
– Perform logon and user/group ACL template creation administrative tasks.
– Verify WebSEAL or Web server Plug-in works by attaching an ACL
template to an HTML file and validate using a browser.
Section 3: Configuration and customization
This section provides further information about the configuration and
customization area of the test:
Given a firewall environment, create the proper rule setup so that a user can
access Access Manager for e-business through the firewall.
With emphasis on performing the following steps:
– Identify where to install/configure Access Manager for e-business in a
firewall environment.
– Identify firewall changes for user registry and HTTP/HTTPS, and SSL
Access Manager for e-business traffic.
– Install/configure Access Manager for e-business in a firewall environment.
Given security requirements, define a security namespace that includes all
objects to be protected.
With emphasis on performing the following steps:
– Identify resources to be protected and identify explicit and default ACLs.
– Identify replication semantics.
– Identify non-static Web resources (JAVA, servlets, ActiveX®).
– Identify how to apply protected object policies (POPs).

Chapter 1. Certification overview 11
– Identify how to apply authorization rules.
Given an organization's security policy, complete each task so that the policy
database is configured successfully.
With emphasis on performing the following steps:
– Create extended ACL permissions and action groups.
– Create protected object policies (POPs).
– Identify how to apply POPs.
– Create authorization rules.
– Create secure domains.
– Create policy templates.
– Attach policy template to protected resource.
– Implement Delegated User Administration requirements.
Given a completed Access Manager for e-business deployment document
containing password rules, set up all Access Manager for e-business
administrators and users and configure the password rules for each.
With emphasis on performing the following steps:
– Define password policy options, including delegation of password reset.
– Configure the Access Manager for e-business password policies.
Given a Security Analysis Document and a Web application, configure
Access Manager for e-business to achieve a secure, working solution.
With emphasis on performing the following steps:
– Analyze application characteristics, plug-ins, applets, user registry, ACLs,
JavaScript™, absolute URLs, roles in use.
– Identify and analyze application security requirements.
– Design junctions (TCP, replication, encrypted, proxy, mutually
authenticated, tag value, portal, transparent, virtual host) and required
options.
– Design SSO (FSSO, GSO, LTPA, EAI, TAI).
– Describe junction mapping table usage.
– Populate namespace (query contents, DYNURLs, application objects).
– Design and create application security policy (EAS, ACLs, delegation,
authorization rules).
Given a business requirement to supplement the standard authorization
process, implement external authorization services (EAS) to impose
additional authorization controls and conditions.

12 Certification Study Guide: IBM Tivoli Access Manager for e-business 6.0
With emphasis on performing the following steps:
– Register the EAS server with the Access Manager for e-business
authorization service.
– Configure the attribute retrieval service plug-ins for connection to external
sources.
Given a deployment plan and details document, implement Web single
sign-on such that cross domain and single domain requirements are met.
With emphasis on performing the following steps:
– Ensure that e-community, cross domain and/or Web single sign-on has
been configured in Access Manager for e-business.
– Create appropriate junctions to the candidate Web servers.
– Add GSO resources and/or GSO resource groups.
– Implement LTPA SSO for WebSphere and Domino® targets.
– Implement TAI SSO for WebSphere.
– Implement FSSO and EAI.
– Implement Windows SPNEGO SSO for IIS or WebSEAL.
– Populate each user's resource credential information.
– Test Web SSO function (browser-to-Access Manager for
e-business-to-Web server).
– Test resource credential and change password via admin console and via
end user.
Given a requirement for dynamic URLs, configure dynamic URL control to
protect Web content.
With emphasis on performing the following steps:
– Create a single static protected object file for dynamic URLs.
– Map ACL namespace objects to dynamic URLs.
– Update WebSEAL or plug-ins for dynamic URLs.
Given a requirement for container-level integration, configure IBM Access
Manager for WebSphere Application Server (AMWAS) to manage J2EE™
role-based security.
With emphasis on performing the following steps:
– Migrate EAR files from WebSphere Application Server to Access Manager
for e-business environment.
– Install and configure AMWAS under WebSphere Application Server.
– Administer J2EE roles using AMWAS.

Chapter 1. Certification overview 13
Given an existing Tivoli Access Manager for e-business environment with
WebSphere Application Server, perform steps to validate that Common Audit
and Reporting Service server and client are functioning correctly.
With emphasis on performing the following steps:
– Examine directories for cached files.
– Check that required processes are running.
– Check that appropriate applications are running in the WebSphere
Application Server.
– Test connection from DB2® client to DB2 server.
– Establish connection with DB2 and query for event records.
– Perform administrative tasks in pdadmin to enable auditing.
– Create events that will be reported by the Common Audit and Reporting
Service.
– Stage reports into tables.
– Create a report using any reporting utility that is able to query DB2.
– Verify configuration logs.
Given an existing Tivoli Access Manager for e-business environment with
Session Management Server installed, gather requirements necessary for the
configuration of a Session Management Server environment.
With emphasis on performing the following steps:
– Gather system information necessary for configuration of participating
servers.
– Define configuration strategy (number and type of WebSEAL servers,
number of load balancers, replicated Web servers, network information,
physical and logical location of servers).
– Design replica sets and session realms.
– Define configuration parameters.
– Determine what roles will be delegated to specific users.
– Configure and test the configuration.
Section 4: Programming
This section provides further information about the programming area of the test:
Given an existing Access Manager for e-business environment with
WebSEAL, configure the external authentication C API to meet customer
requirements.

14 Certification Study Guide: IBM Tivoli Access Manager for e-business 6.0
With emphasis on performing the following steps:
– Configure WebSEAL to use external authentication C API.
Given a custom application that requires specific authorization checking,
evaluate and explain the authorization programming options via the Access
Manager for e-business authorization APIs available to the development
team, so they can design their application security architecture.
With emphasis on performing the following steps:
– Identify the application level resources needing protection.
– Define and use the application namespace.
– Identify available programming tools (such as Java2/JAAS and aznAPI).
– Describe entitlement services.
– Decide how to obtain optimum performance.
– Decide how the credential inside the application will be obtained.
Given requirements to programmatically manipulate the Access Manager
user and policy repositories, design, code, and deploy an application using
the administration API so that business requirements are met.
With emphasis on performing the following steps:
– Identify APIs by function.
– Identify types of Access Manager for e-business objects which can be
maintained using the administration APIs.
– Identify the components of the administration API.
Given custom password requirements that exceed built-in functionality,
design, code, and deploy a password strength module so that the custom
password requirements are met.
With emphasis on performing the following steps:
– Identify the APIs by function.
– Configure the password strength module to be used during authentication.
Given a deployment plan and details document, implement a secure external
authentication interface (EAI) to WebSEAL such that additional authorization
controls and conditions are met.
With emphasis on performing the following steps:
– Enable and configuring the EAI authentication mechanism in WebSEAL.
– Initiate the authentication process.
– Error handling.
– Write the EAI authentication module.

Chapter 1. Certification overview 15
Section 5: Maintenance and Troubleshooting
This section provides further information about the maintenance and
troubleshooting area of the test:
Given user and organization audit requirements, set up and configure auditing
so that log files are produced for events and authorizations.
With emphasis on performing the following steps:
– Structure and enable the Access Manager for e-business audit processes.
– Manage the size of audit files.
– Capture audit and statistical data with information gathering tool.
– Analyze and interpret log and audit reports.
Given user and organization logging requirements, set up and configure
logging so that log file entries are produced for events and authorizations.
With emphasis on performing the following steps:
– Structure and enable Access Manager for e-business logging functions;
tailor events logged.
– Manage the size of Access Manager for e-business log files.
– Capture log data with information gathering tool.
– Analyze log reports.
– Enable remote logging function.
Given a valid Access Manager for e-business problem, perform
troubleshooting tasks so that a successful problem resolution or workaround
is found.
With emphasis on performing the following steps:
– Qualify the problem.
– Collect debug information using Access Manager for e-business trace
facilities.
– Isolate the problem.
– Consult knowledge base.
– Solve the problem (if possible).
Given an existing Access Manager for e-business environment, use
command-line utilities to perform backup and recovery tasks.
With emphasis on performing the following steps:
– Commands and options for restoring data from an archive.
– Commands and options for backing up data to an archive.

16 Certification Study Guide: IBM Tivoli Access Manager for e-business 6.0
– Information and files collected by the default backup configurations.
1.3 Recommended educational resources
Courses and publications are offered to help you prepare for the certification
tests. The courses are recommended, but not required, before taking a
certification test. If you want to purchase Web-based training courses or are
unable to locate a Web-based course or classroom course at the time and
location you desire, contact one of our delivery management teams at:
Americas:
mailto:tivamedu@us.ibm.com
EMEA:
mailto:tived@uk.ibm.com
Asia-Pacific:
mailto:tivtraini[email protected]om
1.3.1 Courses
This section provides information about the currently available or planned Tivoli
Access Manager for e-business (ITAMeb) 6.0 courses. At the time of this writing
some of the courses are not yet being offered. Refer to the Tivoli software
education Web site to learn more about course availability and to find the
appropriate courses and education delivery vendor for each geography. The
Web site is:
http://www.ibm.com/software/tivoli/education
General training information is available at the following Web site:
http://ibm.com/training
You can also refer to the existing Education Roadmap for IBM Tivoli Access
Manager for e-business 5.1 at the following Web site:
ftp://ftp.software.ibm.com/software/tivoli/education/Roadmaps/TAM_51.pdf
(Although this document still refers to Access Manager for e-business V5.1, you
will find many helpful education guidelines.)
Note: Course offerings are continuously being added and updated. If you do
not see courses listed in your geographical location, contact the delivery
management team.

Chapter 1. Certification overview 17
ITAMeb 6.0 Overview
This course functions as a general overview and outline of the benefits and
functions of IBM Tivoli Access Manager for e-business.
Course duration
This is a two-hour, self-paced course.
Objectives
After taking this course, you will be able to:
Describe the IBM Tivoli Access Manager product family.
Describe the high-level architecture of IBM Tivoli Access Manager for
e-business.
Describe how IBM Tivoli Access Manager for e-business secures access to
business applications and resources.
Outline
The course follows this outline:
1. Introduction to IBM Tivoli Access Manager for e-business
2. Managing IBM Tivoli Access Manager for e-business
3. Securing access with IBM Tivoli Access Manager for e-business
ITAMeb 6.0 Installation
This Web-based course focuses on IBM Tivoli Access Manager for e-business
installation. An overview of the IBM Tivoli Access Manager for e-business
architecture will also be covered in this course.
Course duration
This is a four-hour, self-paced course.
Objectives
After taking this course, you will be able to:
Explain the architecture of IBM Tivoli Access Manager for e-business.
Describe how to install and configure IBM Tivoli Access Manager for
e-business and its prerequisites for a particular case study.
Describe how to install and configure Web Portal Manager to manage the
Access Manager environment.
Describe how to install and configure the IBM Tivoli Directory Server Web
Application Tool in order to simplify management of the IBM Tivoli Directory
Server user registry.

18 Certification Study Guide: IBM Tivoli Access Manager for e-business 6.0
Describe how to tailor a security environment with IBM Tivoli Access Manager
for e-business Web server plug-ins.
Troubleshoot Access Manager for e-business installations.
ITAMeb 6.0 Managing Users and Access Control
This Web-based course focuses on managing users, groups, and access control.
Course duration
This is a four-hour, self-paced course.
Objectives
After taking this course, you will be able to:
Describe the role of the user registry in IBM Tivoli Access Manager for
e-business implementation.
Create users, groups, access control lists, and protected object policies to
manage the authentication and authorization of users.
Use pdadmin commands and Web Portal Manager to manage users, groups,
and access control.
Describe authorization rules to customize access control.
Create Access Manager domains to unify the authentication and
authorization of users.
Create Access Manager delegated administrators to delegate domain
management responsibilities to lower-level administrators.
Use auditing to track users’ and administrators’ activities.
Implement the Access Manager common auditing and reporting systems
(CARS) for historical and operational reporting.
ITAMeb 6.0 WebSEAL
This Web-based course focuses on the Access Manager for e-business
WebSEAL.
Course duration
This is a four-hour, self-paced course.
Objectives
After taking this course, you will be able to:
Describe how WebSEAL secures Web-based resources.
Install and configure WebSEAL.

Chapter 1. Certification overview 19
Use pdadmin commands and Web Portal Manager to manage the WebSEAL
environment.
Describe and implement a variety of authentication methods including
forms-based single sign-on, cross domain single sign-on, Windows desktop
single sign-on (SPNEGO), and client-side certificates.
Install and configure Session Management Server (SMS), and use WebSEAL
shared session management to limit concurrent sessions and terminate or
inspect active sessions.
Create and manage WebSEAL junctions to unify the Web space of the
back-end servers with the Web space of the WebSEAL server.
Enable auditing to track user activities.
Enable logging to troubleshoot the WebSEAL environment.
ITAMeb 6.0 Deployment and Administration
This is a classroom course with hands-on labs for the IBM Tivoli Access
Manager for e-business 6.0 product. IBM Tivoli Access Manager is an
authentication and authorization solution for corporate Web, client/server, and
existing applications.
This product allows customers to control user access to protected information
and resources by providing a centralized, flexible, and scalable access control
solution. This course is targeted for System Administrators, Security Architects,
Application Programmers, and Identity Developers who are responsible for
maintaining large numbers of users, groups, and access to specific information
resources.
Course duration
This is a four-day, classroom course.
Objectives
After taking this course, you will be able to:
Describe how IBM Tivoli Access Manager for e-business secures access to
business applications and resources.
Explain the architecture of IBM Tivoli Access Manager for e-business.
Describe how IBM Tivoli Access Manager for e-business can integrate with
new or existing products to secure business applications and resources.
Describe how to install and configure IBM Tivoli Access Manager for
e-business and its prerequisites for a particular case study.
Describe how to install and configure Web Portal Manager to manage the
Access Manager environment.

20 Certification Study Guide: IBM Tivoli Access Manager for e-business 6.0
Describe how to install and configure IBM Tivoli Directory Server Web
Application Tool in order to ease management of the IBM Tivoli Directory
Server user registry.
Troubleshoot Access Manager for e-business installations.
Describe the role of the user registry in IBM Tivoli Access Manager for
e-business implementation.
Create users, groups, access control lists, and protected object policies to
manage the authentication and authorization of users.
Use pdadmin commands and Web Portal Manager to manage users, groups,
access control, and WebSEAL environment.
Describe authorization rules to customize access control.
Create Access Manager domains to unify the authentication and
authorization of users.
Create Access Manager delegated administrators to delegate domain
management responsibilities to lower-level administrators.
Use auditing to track users’ and administrators’ activities.
Implement the Access Manager common auditing and reporting systems
(CARS) for historical and operational reporting.
Describe how WebSEAL secures Web-based resources.
Install and configure WebSEAL.
Describe a variety of authentication methods including basic authentication,
forms authentication, client-side certificate authentication, and external
authentication interface.
Describe Session Management Server (SMS) and WebSEAL shared session
management to limit concurrent sessions and terminate or inspect active
sessions.
Create and manage WebSEAL junctions to unify the Web space of the
back-end servers with the Web space of the WebSEAL server.
Enable auditing to track user activities.
Enable logging to troubleshoot the WebSEAL environment.
Describe how to tailor a security environment with IBM Tivoli Access Manager
for e-business Web server plug-ins.
Outline
The course follows this outline:
1. IBM Tivoli Access Manager for e-business 6.0 Introduction and Overview
– Lesson 1: IBM Tivoli Access Manager for e-business

Chapter 1. Certification overview 21
– Lesson 2: Tivoli Access Manager for e-business Architecture
– Lesson 3: Authentication and Authorization
2. IBM Tivoli Access Manger for e-business Installation and Configuration
– Lesson 1: Planning a New Tivoli Access Manager Deployment
– Lesson 2: Installing Tivoli Access Manager
– Lesson 3: Tivioli Access Manager Prerequisites
– Lesson 4: Installation Methods
3. Tivoli Access Manager and the User Registry
– Lesson 1: Lightweight Directory Access Protocol
– Lesson 2: Setting up LDAP
– Lesson 3: Processing LDAP Requests
4. Managing Users and Groups
– Lesson 1: Tivoli Access Manager Administration
– Lesson 2: Tivoli Access Manager Users and Groups
5. Managing Access Control
– Lesson 1: Protected Object Space
– Lesson 2: Access Control Lists (ACLs)
– Lesson 3: Protected Object Policies (POPs)
– Lesson 4: IP Authentication
– Lesson 5: New to Tivoli Access Manager for e-business
6. Introduction to WebSEAL
– Lesson 1: WebSEAL
– Lesson 2: WebSEAL Features
– Lesson 3: WebSEAL Authentication Mechanisms
– Lesson 4: WebSEAL Junctions
– Lesson 5: Web Space Scalability
– Lesson 6: Single Sign-on
7. WebSEAL Installation and Configuration
– Lesson 1: WebSEAL Installation
– Lesson 2: WebSEAL Configuration
– Lesson 3: WebSEAL Instance Management

22 Certification Study Guide: IBM Tivoli Access Manager for e-business 6.0
8. WebSEAL Authentication
– Lesson 1: Authentication Overview
– Lesson 2: Authentication Methods
– Lesson 3: Basic Authentication
– Lesson 4: Forms Authentication
– Lesson 5: Client-side Certificate Authentication
– Lesson 6: Token Authentication
– Lesson 7: Reauthentication
– Lesson 8: External Authentication Interface
9. Standard WebSEAL Junctions
– Lesson 1: WebSEAL Junctions
– Lesson 2: URL Filtering
– Lesson 3: Junction Mapping Table
– Lesson 4: Transparent Path Junctions
– Lesson 5: Worker Thread Limits
10.Virtual Host Junctions
– Lesson 1: Virtual Host Junction Concepts
– Lesson 2: Managing Virtual Host Junctions
– Lesson 3: Multiple Listening Addresses and Ports
– Lesson 4: Junction Throttling
11.Single Sign-on
– Lesson 1: Single Sign-on Concepts
– Lesson 2: Basic Authentication Single Sign-on
– Lesson 3: Global Sign-on (GSO)
– Lesson 4: Forms Single Sign-on Authorization
12.Session Management Server
– Lesson 1: Session State Concepts
– Lesson 2: Session Management Server
– Lesson 3: SMS Administration
– Lesson 4: Installation
– Lesson 5: Configuration

Chapter 1. Certification overview 23
13.Domain and Policy Proxy Server
– Lesson 1: Domains
– Lesson 2: Policy Proxy Server
14.Delegated Administration
– Lesson 1: Delegated Administration
– Lesson 2: ACLs for User and Group
15.Logging and Auditing
– Lesson 1: Overview of Event Types and Logging Support
16.Common Auditing and Reporting Services (CARS)
– Lesson 1: Common Auditing and Reporting Services Overview
– Lesson 2: Installation and Configuration
– Lesson 3: CARS Reporting
Required skills
The following list contains the prerequisite general knowledge and Tivoli product
knowledge an attendee must have prior to attending the course:
Basic operating-system administrative skills for Linux
Basic knowledge of Lightweight Directory Access Protocol (LDAP)
TCP/IP fundamentals
Firewall concepts
Working knowledge of Web protocols (HTTP, XML)
Basic knowledge of IBM WebSphere Application Server
ITAMeb 6.0 Customization
This instructor-led course focuses on Access Manager for e-business
customization topics.
Course duration
This is a four-day, classroom course.
Objectives
After taking this course, you will be able to:
Create and manage authorization rules to customize access control.
Implement step-up authentication to control the method used to access a
protected resource.

24 Certification Study Guide: IBM Tivoli Access Manager for e-business 6.0
Describe performance tuning for Access Manager.
Describe how to develop a redundant Access Manager environment to
reduce down time.
Customize External Authentication Interface (EAI) to supply custom
authenticated identity information to WebSEAL.
Develop custom login pages for each junction to tailor the user experience.
Use the Java Authentication and Authorization Service (JAAS), and the
aznAPI to integrate Access Manager in custom applications.
Describe J2EE Application and Security
Configure Access Manager for a Java application framework.
Integrate Access Manager into a J2EE application framework such as
WebSphere.
Externalize roles from WebSphere to Access Manager.
Import users and groups from WebSphere to Access Manager.
1.3.2 Publications
IBM Tivoli Access Manager guides and Redbooks are useful tools for preparing
to take Test 876.
IBM Tivoli Access Manager product documentation
You might want to refer to the following guides:
Release notes
– IBM Tivoli Access Manager for e-business Version 6.0 Release Notes,
SC32-1702
Installation guides
– Tivoli Access Manager for e-business Version 6.0 Installation Guide,
SC32-1361
User and administration guide
– IBM Tivoli Access Manager Version 6.0 Administration Guide, SC32-1686
– IBM Tivoli Access Manager for e-business Version 6.0 WebSEAL
Administration Guide, SC32-1687
– IBM Tivoli Access Manager for e-business Version 6.0 Plug-in for Web
Servers Administration Guide, SC32-1690-01Other publications
– IBM Tivoli Access Manager for e-business Version 6.0 BEA WebLogic
Server Administration Guide, SC32-1688

Chapter 1. Certification overview 25
Developers guides
– IBM Tivoli Access Manager for e-business Version 6.0 Administration C
API Developer Reference, SC32-1692
– IBM Tivoli Access Manager Version 6.0 Administration Java Classes
Developer Reference, SC32-1692
Technical supplement
– IBM Tivoli Access Manager for e-business Version 6.0 Problem
Determination Guide, SC32-1701
To obtain the online publications for IBM Tivoli Access Manager for e-business,
visit the following Web site.
http://publib.boulder.ibm.com/tividd/td/IBMAccessManagerfore-business6.0.html
IBM Redbooks
Refer to the following IBM Tivoli Identity Manager-related Redbooks:
Enterprise Security Architecture Using IBM Tivoli Security Solutions,
SG24-6014
This redbook looks at Tivoli's overall Enterprise Security Architecture,
focusing on the integration of audit and compliance, access control, identity
management, and federation throughout extensive e-business enterprise
implementations. The available security product diversity in the marketplace
challenges everybody in charge of designing single secure solutions or an
overall enterprise security architecture. With Access Manager, Identity
Manager, Privacy Manager, Risk Manager, Federated Identity Manager,
Security Compliance Manager, Directory Server, and Directory Integrator,
Tivoli offers a complete set of products designed to address these
challenges.
This redbook describes the major logical and physical components of each of
the Tivoli products and it depicts several e-business scenarios with different
security challenges and requirements. By matching the desired Tivoli security
product criteria, it describes appropriate security implementations that meet
the targeted requirements.
Integrated Identity Management using IBM Tivoli Security Solutions,
SG24-6054
This redbook provides a solution-oriented overview of using Tivoli security
products to provide an implementation for integrated identity management
based on real-life customer experience.
When defining functional requirements for e-business-related projects, you
have to take into consideration a serious amount of security-related tasks and
disciplines. These disciplines are authentication and credential acquisition,

26 Certification Study Guide: IBM Tivoli Access Manager for e-business 6.0
use of directory infrastructures, session management, multiple tiers of single
sign-on, authorization, administration, users and policy, accountability, and
availability. Together they stand for the integrated identity management
approach, an approach that should be regarded as a holistic way of tying
security requirements into your projects.
Identity and Access Management Solutions Using WebSphere Portal V5.1,
Tivoli Identity Manager V4.5.1, and Tivoli Access Manager V5.1, SG24-6692
The identity and access management solutions described is this redbook
feature user provisioning, authentication, and authorization.
Part 1 of the redbook describes the key concepts, benefits, and architecture
of an identity and access management solution.
Part 2 contains an end-to-end working example scenario for an identity and
access management system. The example includes business requirements,
architecture, details for implementing the runtime and development
environments, creation of the Tivoli Identity Manager policies and workflow,
provisioning portlet development, deployment, and administration.
Part 3 provides procedures to deploy and run the human resources and
document management applications used in the working example.
The working example includes solutions for the following key areas:
– User provisioning: Develop a portlet interface for self-care (user and
account management), and approval of user provisioning requests by
using the Tivoli Identity Manager APIs, policies, and workflow. Tivoli
Directory Integrator assembly lines and connectors are used to provision
users to LDAP, DB2 Content Manager, and the HR application database.
In addition, Tivoli Identity Manager-provided security audit trail reports are
used.
– Authentication: Provide a user an integrated single sign-on (SSO) solution
using Tivoli Access Manager to authenticate once and access resources
or applications within the enterprise.
– Authorization: Manage user access control through Tivoli Identity Manager
provisioning policies and role mapping with products that have access
models such as Tivoli Access Manager, WebSphere® Portal, and DB2
Content Manager.

© Copyright IBM Corp. 2006. All rights reserved. 27
Chapter 2. Planning
This chapter gives an overview of IBM Tivoli Access Manager for e-business
(ITAMeb). It describes the major components and their position in a real network
environment. This description provides an overview of things important to
planning and architecting the design of an Access Manager system. It also
covers migration planning, tools, and issues.
2

28 Certification Study Guide: IBM Tivoli Access Manager for e-business 6.0
2.1 Access management overview
Access control management plays a very significant role in any security
architecture and implementation. The purpose of access control in an overall IT
security architecture is to enforce security policies by gating access to, and
execution of, processes and services within a computing solution via
identification, authentication, and authorization processes, along with security
mechanisms that use credentials and attributes. In security systems,
authentication is distinct from authorization.
Authentication is the process of
identifying an individual who is attempting to log in to a secure domain. It gives
the answer on the question: “Who are you?”.
Authorization is the act of
determining what resources an authenticated user can access. To put it simply,
authorization provides you with a yes or no answer to the question: “Are you
authorized (do you have permission) to access/manipulate the requested
object?”. Part of the authentication process involves the creation of a credential
that describes the identity of the user. Authorization decisions made by an
authorization service are based on user credentials.
Access control information, which generally evolves around authentication and
authorization mechanisms, is handled by IBM Tivoli Access Manager.
The following products make up the IBM Tivoli Access Manager family:
IBM Tivoli Access Manager for e-business (ITAMeb)
IBM Tivoli Access Manager for Business Integration (ITAMBI)
IBM Tivoli Access Manager for Operating Systems (ITAMOS)
This book focuses on IBM Tivoli Access Manager for e-business, which provides
robust, policy-based security to a corporate Web environment. Authentication of
users, control of access privileges, auditing, single sign-on, high availability, and
logging are all essential elements of any security management solution and are
provided by Access Manager for e-business.
2.2 Core components
Access Manager for e-business, like the whole Access Manager product family,
is based on two core components:
A user registry.
An
authorization service consisting of an authorization database and an
authorization engine that performs the decision-making action on the request.
A user registry and an authorization service are the fundamental building blocks
upon which Access Manager provides its security service capabilities. All other
Access Manager services and components are built upon this base foundation.

Chapter 2. Planning 29
Figure 2-1 shows the general authorization model.
Figure 2-1 General authorization model
Another component that is very close to the base components is called a
resource manager. It is responsible for applying security policy to resources. The
policy enforcer component directs the request to the authorization service for
evaluation. Based on the authorization service result (approval or denial) the
resource manager allows or denies access to the protected resources.
Access Manager authorization decisions are based upon the
Privilege Attribute
Certificate
(PAC), which is created for each user authenticated in an Access
Manager environment, regardless of the authentication mechanism used.
Figure 2-2 on page 30 shows the implementation of the general authorization
model for an Access Manager for e-business security solution. The major
components are:
User registry
Policy Server
WebSEAL, as a major resource manager
Those components are described in the following sections.
Authenticated Client
Authorization
Service
Resource Manager
Policy
Enforcer
Request for
Resource
Authorization
Check
Yes or No
Resource

30 Certification Study Guide: IBM Tivoli Access Manager for e-business 6.0
Figure 2-2 Access Manager for e-business basic components
Let us take a look at the basic logical flow for an authorization decisions:
1. After a user has authenticated, WebSEAL requests a Privilege Attribute
Certificate (PAC) to be created from the information in the user registry. This
certificate is bound to the specific user session and it is used as the basis for
querying the policy database during subsequent authorization decisions. This
certificate is important because authorization decisions are
context-dependent. That means, a user might be granted access to back-end
information for one type of transaction, but be rejected when attempting a
similar transaction from another application.
2. Whenever a user requests access to a back-end resource (application, data,
and so on), WebSEAL uses the PAC to query the authorization database,
which contains the protected object space maintained by the Access
Manager Policy Server, for any existing access control list (ACL), protected
object policy (POP), or authorization rule, in order to determine a
yes/no
answer whether the request can be granted or has to be denied. (Access
control lists, protected object policy, and authorization rules are discussed in
2.2.2, “Policy Server” on page 32
.)
3. If the answer is yes, the request is allowed to the Web resource.
4. The Web resource answers the request and the results are returned to the
user.
Policy Server
User
Browser
WebSEAL
Web
resource
request
PAC
request
Authorization
database
User registry
1
2
3
4

Chapter 2. Planning 31
Note that in a real situation this authorization process can be more complex. One
of the major differences is that WebSEAL caches an authorization database
replica locally and does not query the Policy Server for every user request.
2.2.1 User registry
Access Manager requires a user registry to support the operation of its
authorization functions. Specifically, it provides:
A database of the user identities that are known to Access Manager.
A representation of groups in Access Manager that users have membership
with.
A data store of metadata required to support additional functions.
Identity mapping
While it can be used to authenticate users, this is not the primary purpose of the
user registry. Access Manager can authenticate a user via a variety of methods
(ID/password, certificate, and so on), and then map the authenticated identity to
one defined in the user registry. For example, consider a user John who
authenticates himself to Access Manager using a certificate as dn=john123.
Access Manager can be configured to programatically map the distinguished
name (DN) in the certificate to a pre-defined value for many to one (n:1)
mappings, or an algorithm can be applied to manipulate the username based on
external attributes or data. When making subsequent authorization decisions,
the internal Access Manager user identity is passed between the application and
other components using various mechanisms, including a special credential
known as a Privilege Attribute Certificate (PAC).
User registry structure
The default user registry is LDAP-based, and Access Manager consolidates its
registry support around a number of LDAP directory products. Access Manager
can use the following directory products for its user registry:
IBM Tivoli Directory Server
Novell eDirectory
Sun™ Java™ System Directory Server
Microsoft® Active Directory
IBM Lotus® Domino Server
IBM z/OS® LDAP Server
The IBM Tivoli Directory Server is included with Access Manager and is the
default LDAP directory for implementing the user registry. For the latest list of
supported user registries refer to the IBM Tivoli Access Manager for e-business
Version 6.0 Release Notes, SC32-1702.

32 Certification Study Guide: IBM Tivoli Access Manager for e-business 6.0
An LDAP-based user registry stores its data as objects and organizes it
hierarchically in a tree structure called the
Directory Information Tree (DIT). An
LDAP-based user registry can have multiple DITs. The root of every tree starts
with a
suffix. Objects are described with various attributes. The user registry for
Access Manager contains three types of objects:
User objects, which contain basic user attributes.
Group objects, which represent roles that user objects may be associated
with.
Access Manager metadata objects, which contain special Access Manager
attributes that are associated with user and group objects. The metadata
includes information that helps linking an Access Manager user ID to its
corresponding registry user object.
Tivoli Access Manager v6 has altered the way it stores a user’s metadata objects
in the directory. It has migrated to a minimal data model that minimizes the
disruption to an existing DIT structure. All data for Tivoli Access Manager can
now be stored under a separate
secAuthority=Default suffix, leaving user and
group objects that are part of the existing suffix to co-exist in the directory
untouched.
Access Manager components support the use of directory replicas, peer-to-peer
(multi-master) replication, and directory partitioning. It is recommended that a
directory architecture be completed to ensure the directory environment will
perform as expected with Tivoli Access Manager and any other applications that
may wish to participate in directory services. Minimal functional and security
recommendations for the directory architecture in regard to a Tivoli Access
Manager deployment are a master-replica topology where Access Manager
resource managers (WebSEAL, Plug-in for Web servers) are configured to use
directory replicas and the Access Manager Policy Server is configured to use the
directory master(s).
2.2.2 Policy Server
The Access Manager Policy Server maintains the master authorization database
for the
secure domain. This server is primarily used for two types of
administrative activities:
Modifying the registry to define which objects participate in the secure
domain.
Updating the authorization database with policy definitions.
The Policy Server manages the master authorization database, which, in addition
to resource policies, contains location information about other Access Manager
servers in the secure domain. Local replicas of the master authorization
database are available for resource managers via a push/pull method initiated

Chapter 2. Planning 33
through the Access Manager runtime service. Each secure domain can only
have one Policy Server.
Authorization database
Separate from the user registry, Access Manager uses for its authorization
functions a special database containing a virtual representation of resources it
protects. Called the Tivoli Access Manager policy database, it uses a proprietary
format and contains object definitions for the
protected object space that may
represent logical or actual physical resources. Objects for different application
types may be contained in different parts of the object space, and the object
space may be extended to support new application types as required. The policy
database stores the following elements:
Protected objects in a hierarchical tree structure (these are abstract
representations of the real objects which Access Manager intends to protect)
Policies in 3 different forms: ACLs, POPs, and authorization rules
Actions and action groups
Relationships (attachments) between policies and objects
Management of the policy database is achieved with one of the following three
administration methods or a combination thereof:
pdadmin CLI
Web GUI Web Portal Manager (WPM)
Administration API (C or Java)
The security policy for these resources is implemented by applying appropriate
security mechanisms to the objects requiring protection. Security mechanisms
are also defined in the authorization database, and include:
Access control list (ACL) policy templates
Protected object policy (POP) templates
Authorization rules (Rules)
A security policy can be explicitly applied or inherited. The Tivoli Access
Manager protected object space supports inheritance of ACLs, POPs, and
authorization rules. This is an important consideration for the security
administrator who manages the object space. The administrator needs to apply
explicit policies only at points in the hierarchy where the rules must change, but
must be mindful that unless otherwise defined, child objects at points below will
inherit those policies.
Access control list (ACL) policy
ACLs are special Access Manager objects that define policies identifying user
types that can be considered for access, and specify permitted operations. In the
Access Manager model, ACLs are defined separately from and then attached to

34 Certification Study Guide: IBM Tivoli Access Manager for e-business 6.0
one or more protected objects, so an ACL has no effect on authorization until it
becomes associated with a protected object. The best practice, as with any type
of access control list, is to place users into groups and then assign specific
permissions to those groups.
Access Manager uses an inheritance model in which an ACL attached to a
protected object applies to all other objects below it in the tree until another ACL
is encountered.
Protected object policy (POP)
ACL policies provide the authorization service with information that results in a
yes or no answer on a request to access a protected object and perform some
operation on that object.
A POP specifies additional conditions governing the access to the protected
object, such as privacy, integrity, auditing, and time-of-day access.
POPs are attached to protected objects in the same manner as ACLs. Unlike
ACLs, which are dependent on what user or group is attempting the action,
POPs affect all users and groups.
Authorization rules (Rules)
Authorization rules are defined in XSL (eXtensible Stylesheet Language) to
specify further conditions that must be met before access to a resource is
permitted. Rules enable you to make authorization decisions based on the
context and the request environment, as well as who is attempting the access
and what type of action is being attempted. These conditions are evaluated as a
Boolean expression to determine whether the request should be allowed or
denied.
Multi-domain Policy Server
There can only be a single Policy Server in an Access Manager secure domain.
There can, however, be multiple secure domains contained within a single Policy
Server. Each domain has its own authorization database, resource managers,
administrative users and groups, and Global Sign-On (GSO) information. In
addition, domains can either share users and groups or each have their own set
of users and groups. Management tools may also be shared between domains or
allocated on a per-domain basis. Figure 2-3 illustrates the relationship between
Access Manager components in a multi-domain environment.
Note: In addition to ACL and POP, extended attributes are additional values
placed on an object that can be read and interpreted by third-party
applications (such as an external authorization service).

Chapter 2. Planning 35
Figure 2-3 Access Manager components in a multi-domain environment
In a single domain environment, the default domain is the only domain used. In a
multi-domain environment, the default domain becomes the management
domain. The Policy Server will always belong to this domain. All domains are
created and deleted from the management domain.
Figure 2-4 on page 36 illustrates the relationship between the Policy Server,
multiple domains, and their corresponding authorization databases.
User
Group
User Registry
Policy Server
User
Group
Administrative
User
User
Group
Management
Tools
Domain A
Domain B
Authorization
Database
Authorization
Database
GSO Data
GSO Data
Administrative
Groups
Administrative
User
Administrative
Groups
Access Manager
Resource Managers
Access Manager
Resource Managers

36 Certification Study Guide: IBM Tivoli Access Manager for e-business 6.0
Figure 2-4 Multiple domains with multiple authorization databases
There are many valid reasons why an enterprise might consider the multiple
domain model when developing their security architecture. One of the main
reasons is the need to segment security completely while still sharing the same
user base. When using multiple domains, completely separate policies can be
set up for each domain. There is no possibility that a security policy from one
domain can conflict with a security policy of another. Also, since the
administrative functionality is completely separated, an administrator from one
domain does not necessarily have rights in another domain. A real world
example of this would be a partnership of companies that wish to use Access
Manager and have different policies (and perhaps even laws that regulate them),
which prevent them from using the same security model. Another would be a
development environment in which each development organization is given their
own domain to prevent conflicts during the development cycle.
Standby Policy Server
To provide the redundancy for the shared data and for the functions that are
provided by the Tivoli Access Manager Policy Server, you can install and
configure a primary Policy Server and a standby Policy Server. The standby
server takes over Policy Server functions in the event of a system or primary
Policy Server failure. The standby Policy Server acts as the primary Policy
Server until the original primary Policy Server is up and running again, at which
time the standby server goes back to serving as the failover server.
Policy Server
Domain B
Domain A
Dom2 Domain
Dom1 Domain
Domain A
Domain B
Default
Default Domain
Default Domain
Domain A
Domain B
Access
Manager
Application
Access
Manager
Application
Access
Manager
Application

Chapter 2. Planning 37
2.2.3 WebSEAL
Access Manager for e-business has several resource managers that build upon
the core infrastructure to provide access control to Web-based applications.
WebSEAL is a high-performance, multi-threaded
reverse proxy that sits in front
of back-end Web applications. It applies a security policy to a protected object
space. WebSEAL can provide single sign-on solutions and incorporate back-end
Web application server resources into its security policy. Because it is
implemented on an HTTP server foundation, it is limited to enforcing policy for
applications communicating with HTTP and HTTPS protocols.
Junctions
The back-end services to which WebSEAL can proxy are defined via junctions,
which define a set of one or more back-end Web servers that are associated with
a particular URL. Access Manager for e-business 6.0 provides three types of
junctions, which are described in more detail in the following sections. The three
types are:
Standard junction
Virtual host junction
Transparent path junction
Replicated WebSEALs
It is possible to replicate WebSEAL servers for availability and scalability
purposes. There are specific configuration requirements for creating WebSEAL
replicas, and a front-end load balancing service must be used to distribute
incoming requests among the replicas. Also, since each WebSEAL replica, by
default, maintains active session states for its own authenticated users, when
front-end load balancing options for affinity are limited or not available, it is
recommended that the Access Manager Session Management Server (SMS) be
used to maintain state and avoid limitations for policy enforcement, management,
security, and the end user experience.
Note: Configuring a standby Policy Server requires the use of additional
software such as HACMP™ on AIX.
Note: Front-end load balancing metrics should be configured to keep users
sticky to individual instances of WebSEAL. Only when used with the Session
Management Server should metrics such as
round-robin be used.

38 Certification Study Guide: IBM Tivoli Access Manager for e-business 6.0
Single sign-on (SSO)
The concept of single sign-on (SSO) is fairly straightforward: When a user
accesses a Web application, the user is challenged for a password only once,
and from that point forward in the user experience with all Web content, no
additional passwords are requested. Tivoli Access Manager provides SSO
capabilities through WebSEAL with a software library that authenticates the
user-provided name and password against information stored within a user
registry. Access Manager for e-business SSO can be provided through several
authentication methods: Basic Authentication (BA), as provided via an HTML
standard authentication mechanism, X.509 certificates, biometrics, and so on.
Once authenticated via WebSEAL, there are techniques to configure the Access
Manager framework to pass certificate information to back-end Web resources
transparently to the user.
Virtual hosting
Multiple instances of WebSEAL can be created on a single machine using the
WebSEAL configuration utility. Also, a single WebSEAL instance can listen to
multiple interfaces and multiple ports. Different IP and SSL configuration
information can be associated with each interface.
2.2.4 Plug-In for Web servers
The Plug-In for Web servers architecture provides a solution where the customer
has decided to deploy a Web plug-in architecture rather than taking a reverse
proxy approach.
Figure 2-5 shows an architectural overview of the Plug-In for Web servers
implementation.

Chapter 2. Planning 39
Figure 2-5 Access Manager Plug-In for Web servers architecture
In most Web server environments, there are multiple server threads in operation
on the machine. These might be different threads of the same Web server
instance or threads of different Web server instances. Having a distinct
authorization engine for each thread would be inefficient, but would also mean
that session information would have to be shared between them somehow.
The architecture used contains two parts:
Interceptor
This is the real
plug-in part of the solution. Each Web server thread has a
plug-in running in it that gets to see and handle each request/response that
the thread deals with. The interceptor does not authorize the decisions itself;
it sends details of each request (via an inter-process communication
interface—IPC) to the Plug-In Authorization Server.
Plug-In Authorization Server
This is where authorization decisions are made and the action to be taken is
decided. There is a single Plug-In Authorization Server on each machine and
it can handle requests from all plug-in types. The Plug-In Authorization Server
is a local cache mode aznAPI application that handles authentication and
authorization for the plug-ins. The Authorization Server receives intercepted
requests from the plug-ins and responds with a set of commands that tell the
plug-in how to handle the request.
PDMGRD
ACL DB
Master
LDAP
Plug-in Auth Server
PDRTE
Web Server Instance
Plug
In
Web Server Instance
Plug
In
Web Server Instance
Plug
In
Web Server Instance
Plug
In
ACL DB
Replica
IPC
PDRTE

40 Certification Study Guide: IBM Tivoli Access Manager for e-business 6.0
2.2.5 Plug-In for Edge Server
The Access Manager Plug-In for Edge Server is a plug-in for the Edge Server
Caching Proxy component of the IBM WebSphere Edge Server. It adds Access
Manager authentication and authorization capabilities to the proxy, and in certain
scenarios it provides an alternative to WebSEAL for managing access to Web
content and applications.
While the Plug-In for Edge Server shares many of the same capabilities as
WebSEAL, its configuration is different. However, architecturally, it fits into most
Access Manager scenarios in the same manner as WebSEAL.
Among other differences is one key differentiator between the plug-in and
WebSEAL: the plug-in can be used in both forward and reverse proxy
configurations, while WebSEAL only supports a reverse proxy.
The plug-in also integrates with the IBM WebSphere Everyplace® Suite and
supports forms-based login and Access Manager WebSEAL fail-over cookies.
Figure 2-6 provides a simplified view of the Plug-In for Edge Server architecture
used as a reverse proxy (a forward proxy scenario is virtually identical, except
that the proxy operations are to the outside rather than back-end servers).
Figure 2-6 Plug-in for Edge Server architecture
Browser
Edge Server
Caching Proxy
Authentication
Services
Backend
servers
HTTP/HTTPS
Requests
HTTP/HTTPS
Responses
Authorization
Engine
Access
Manager User
Registry
Authorization
Database
Web
Server
Web
Server
Web
Server
Edge
Server
Plug-in

Chapter 2. Planning 41
2.3 Management components
Access Manager for e-business provides three management tools that can be
used for the administration of your Access Manager system. Those tools are:
The
pdadmin utility, which provides a command line interface (CLI) for
performing administrative functions such as adding users or groups. It is a
C-based application that is installed as part of the Access Manager run time
environment (PDRTE) client component.
The
Web Portal Manager (WPM), which provides a browser-based capability
for performing most of the same functions provided by the pdadmin utility.
The previous two utilities are built using the Tivoli Access Manager
administration API, which enables the CLI and WPM interfaces for
program-initiated administrative functions and queries. The administration API
may also be used by custom applications to perform various Access Manager
administrative functions.
2.3.1 Web Portal Manager
The Access Manager Web Portal Manager provides a browser-based graphical
user interface (GUI) for Access Manager administration.
A key advantage of the Web Portal Manager over the pdadmin command line
utility is the fact that it is a browser-based application that can be accessed
without installing any Access Manager-specific client components on the
administrator’s local machine or requiring special network configuration to permit
remote administrator access. In fact, the authorization capabilities of WebSEAL
can be used to control access to the Web Portal Manager. This means greater
flexibility for administrators’ locations with respect to the physical systems they
are managing.
Administrative functionality
The Web Portal Manager was designed to be an alternative to the pdadmin
command line interface (CLI) for many administrative functions. However, not all
pdadmin functions are supported (such as the retrieval of server statistics) and
the command line interface will still be required in certain cases. In other cases,
such as exporting Access Manager authorization data, Web Portal Manager is
required. Web Portal Manager also offers some key functional benefits over
pdadmin, such as cloning and cut/paste functionality.
Migration of data using WPM
Web Portal Manager allows for the migration of data from one Access Manager
environment to another. Data is exported from the master authorization database

42 Certification Study Guide: IBM Tivoli Access Manager for e-business 6.0
and placed into an XML file with optional encryption. It can then be transported to
a new Access Manager environment and imported.
This functionality allows for the export of one or more of the following items:
Access Control Lists (ACLs)
Protected Object Policies (POPs)
Authorization Rules (Rules)
Objects and object spaces including attached ACLs, POPs, and Rules
The export of data ensures a smooth transition from one Access Manager
environment to another, such as migrating from a test or staging environment to
production.
Delegated administration
The Web Portal Manager also provides a delegated user administration
capability. This enables an Access Manager administrator to create delegated
user groups and assign delegate administrators to these groups.
The initial aim of the Web Portal Manager delegate function is to enable multiple
independent enterprises to manage their own user population in a single Access
Manager secure domain. This functionality could be used when a service
provider that uses Access Manager to provide access control to Web resources
wants to allow its customers to define and manage their own user population.
Depending on their assigned roles, the delegated administrators can perform a
subset of the administration functions. There are four different levels of
administration in Access Manager, with the basic fields of action shown in
Table 2-1.
Table 2-1 Delegated administration roles in Access Manager
Action/role Domain
admin
Senior
admin
Admin Support Any other
View user X X X X X
Reset password X X X X
Add existing Access Manager user
as an administrator
XXX
Create domain user X X
Remove user X X
Domain control X

Chapter 2. Planning 43
Some design considerations
Other design considerations that should be kept in mind when deploying Web
Portal Manager:
Multiple instances of WPM can be deployed for remote administrators, and so
on.
It is possible to provide access to the Web Portal Manager via a WebSEAL
junction or the Access Manager Plug-in for Web servers component, and
implement SSO (single sign-on) to the WPM.
2.4 Additional components
Along with core and management components, Access Manager for e-business
has additional components that are not mandatory for implementation, but in
many real-life implementations they carry important roles. In this section we
provide a high-level description of those components.
2.4.1 Policy Proxy Server
The Policy Proxy Server enables Access Manager applications and authorization
servers to connect to a Policy Proxy Server rather than the Policy Server. The
addition of a separate physical machine running Policy Proxy Server enables an
architecture to be created where the only incoming SSL sessions to the Policy
Server come from the Policy Proxy Server. This facilitates increased security
because a firewall protecting the Policy Server only has to allow inbound
connections from the Policy Proxy Server(s) rather than from all Tivoli Access
Manager applications or authorization servers. The SSL session from Access
Manager applications to the Policy Proxy Server(s) is independent of the SSL
session from the Policy Proxy Server to the Policy Server.
The only exception to this rule is if you are using an application that requires use
of the administration API. Because administration API applications typically
perform functions requiring write access to both the policy database and the
master Access Manager LDAP, these applications should be configured for direct
communication with the Access Manager Policy Server.
Note: Domains referenced in this table do not correspond to Access Manager
secure domains. Domains in the delegate function of Web Portal Manager are
simply groups of users and functionality and have nothing to do with the
separation of security policy between groups of Access Manager servers.

44 Certification Study Guide: IBM Tivoli Access Manager for e-business 6.0
Figure 2-7 Communication flows using the Policy Proxy Server
Figure 2-7 shows the connections (and the direction of flow) between the Policy
Server, a Policy Proxy Server and an Access Manager application or
authorization server.
All requests inbound destined for the Policy Server go via the Policy Proxy
Server, except for applications using the administration API. All requests
outbound from the real Policy Server go directly to the Access Manager
application.
Policy Server database caching
In addition to providing a simple proxy service, the Tivoli Access Manager Policy
Proxy Server can also offload database replication tasks from the Policy Server
by caching the Policy Server databases that it serves to Access Manager
applications. If several Access Manager applications make requests for the same
database, then the database is only transferred from the Policy Server to the
Policy Proxy Server one time.
The ACL database is cached in memory for security. There is no authorization
database stored on the disk of the Policy Proxy Server that could be read (or
modified) if the Policy Proxy Server were compromised.
The currency of the ACL database in the Policy Proxy Server cache is checked
every time a replication request is made so that there is no chance of an Access
Manager application receiving an out-of-date cached version of the Policy Server
database.
Note: The Policy Proxy Server does not perform any Policy Server functions; it
simply forwards requests to the Policy Server. This means that the Policy
Server is still the authoritative source for Policy Server database and user
repository updates.
ACL database update notification
DB pull DB pull
Access Manager
Policy Server
Access Manager
application or
authorization
server
Access
Manager
Policy Proxy
Server
Server task commands
(includes objectspace query)
Admin API application

Chapter 2. Planning 45
2.4.2 Authorization service
The foundation of Access Manager is its authorization service, which permits or
denies access to protected objects (resources) based on the user’s credentials
and the access controls placed on the objects.
The Policy Server provides an authorization service that may be leveraged by
applications and other Access Manager components that use the IBM Tivoli
Access Manager Authorization Application Programming Interface (aznAPI).
Optionally, additional Authorization Servers may be installed to offload these
authorization decisions from the Policy Server and provide for higher availability
of authorization functions. The Policy Server provides updates for authorization
database replicas maintained on each Authorization Server.
The Access Manager authorization service can also be embedded directly within
an application. In this case, the functions of an Authorization Server are
contained in the application itself.
2.4.3 Access Manager Session Management Server
Access Manager Session Management Server (SMS) is an optional Tivoli Access
Manager component that runs as an IBM WebSphere Application Server service.
It manages user sessions across complex clusters of Tivoli Access Manager
security servers, ensuring that session policy remains consistent across the
participating servers. Using the Session Management Server allows Access
Manager WebSEAL and Access Manager Plug-in for Web Servers to share a
unified view of all current sessions and permits an authorized user to monitor and
administer user sessions. The Session Management Server permits the sharing
of session information, makes session statistics available, and provides secure
and high-performance failover and single sign-on capabilities for clustered
environments.
The Session Management Server provides a user interface from which
authorized persons can administer and monitor user sessions. Administration of
the Session Management Server is performed using either the pdadmin
command line utility, or the Session Management Server Web-based graphical
user interface that is run from within the Web Portal Manager.
Figure 2-8 on page 46 shows how multiple security servers can achieve a single
session by using a common Session Management Server that provides a unified
backing store for session data. Each Web security server maintains a local copy
of the session data in its own session cache for performance reasons. A backup
or master copy is also maintained on the Session Management Server and this
data can be accessed by other Web security servers when necessary. The Web
security servers work with the Session Management Server to create, retrieve,

46 Certification Study Guide: IBM Tivoli Access Manager for e-business 6.0
and update the shared session data. The Session Management Server provides
updates to Web servers that are participating in a given user session, alerting
them to urgent changes in the session data such as a user logging out.
Figure 2-8 Access Manager Session Management Server
Through the use of the Session Management Server, it is now possible to
present a consistent user experience across all Web security servers, as well as
providing the ability to strictly enforce security policy such as maximum number
of sessions.
The benefits of shared session management include that it:
Provides a distributed session cache to manage sessions across clustered
Web security servers
Provides a central point for maintaining login history information
Resolves session inactivity and session lifetime time out consistency issues in
a replicated Web security server environment
Provides secure failover and single sign-on among replicated Web security
servers
Provides controls over the maximum number of allowed concurrent sessions
per user
Provides single sign-on capabilities among other Web sites in the same DNS
domain
Provides performance and high availability protection to the server
environment in the event of hardware or software failure
Allows administrators to view and modify sessions on the WebSEAL server
www.abc.com
Load Balancer
WebSEAL replicas
replica1.abc.com
Session Data
Session Cache:
replica2.abc.com
Session Cache:
sales.abc.com
Session Cache:
Session Management Server
(SMS)
sales
replica2
Session
Data
participating servers
replica1
c
r
e
a
t
e
retrieve
u
p
d
a
t
e
Browser
Session Data
Session Data

Chapter 2. Planning 47
2.4.4 Access Manager for Microsoft .NET Applications
Tivoli Access Manager exposes the aznAPIs at the .NET Common Language
Runtime (CLR) level. This allows Access Manager functionality to be available to
all .NET languages such as Managed C++, C#, and Visual Basic® .NET.
Access Manager for Microsoft .NET provides single sign-on from Tivoli Access
Manager Web security servers (WebSEAL and Plug-In for Web servers) to ASP
.NET applications. Put simply, the .NET application can accept an Access
Manager user ID or credential and authenticate traffic origin.
Figure 2-9 illustrates how Access Manager provides single sign-on in a Microsoft
.NET environment.
Figure 2-9 Access Manager for .NET single sign-on
In addition, role membership is evaluated using Tivoli Access Manager policy in
one of two ways:
Declarative role security, where the ASP .NET container enforces roles
declared by the application
Programmatic role security, where the application makes an API call to
determine whether a user possesses a particular role
No code changes are required to use Access Manager authorization provided
that the application is using either the declarative security model or the
programmatic security model. Access Manager uses one of two approaches to
determine if the user possesses a given role:
User-to-role mapping via the user’s group membership
Windows Server OS
TAM Authentication Module
ASP.NET App
ASP.NET 1.1
IIS
Access
Manager
Web Security
Server
(WebSEAL or
Web Plug-In)
Legend
User
Access
Manager
Policy
Server
Access
Manager
Directory
User ID
or
Credential
IBM Tivoli
Tivoli Access Manager Authentication
Module
Access Manager
IPrincipal
(in context)
Tivoli Access Manager Authorization
Assembly
Microsoft
Customer

48 Certification Study Guide: IBM Tivoli Access Manager for e-business 6.0
User-to-role mapping via an Access Manager authorization check of an object
in the Access Manager protected object space that represents the role
Access Manager for Microsoft .NET also provides for Web services security in
one of two ways:
Client-side authorization and identity propagation via HTTP headers
Server-side authentication and authorization via HTTP header or SOAP
WS-Security header (Username Token)
There are two APIs that are exposed to .NET applications:
.NET Assembly for Tivoli Access Manager Administration Services
.NET Assembly for Tivoli Access Manager Authorization Services
Access Manager for Microsoft .NET allows for a user to change their role
dynamically without restarting the user’s session or the application. In addition,
Access Manager can use any directory for the security information that is
supported by the core components.
2.4.5 WebSphere Application Server integration
Starting with WebSphere Application Server 5.1.1 and above, WebSphere
Application Server ships with all the Access Manager Java Runtime Environment
and .jar files required for integration into a secure domain. This is not a separate
product, but an integration point between Access Manager and WebSphere that
can be used to centralize security for J2EE applications in one location, Access
Manager. In addition, a J2EE-to-Access Manager user/role migration utility is
provided to assist customers in populating the Access Manager policy database
with users and roles.
This enables enterprises to use a common security model across WebSphere
and non-WebSphere resources, leveraging common user identity and profiles,
Access Manager-based authorization, and using Access Manager’s Web Portal
Manager to leverage a single point of security management across J2EE and
non-J2EE resources.
Note: While the user-to-role mapping via group membership is the simpler of
the two models, it does have some limitations. Advanced authorization
policies, such as Protected Object Policies (POPs) and Authorization Rules
(Rules) cannot be used. Also, any change to a policy will not be effective until
the next time the user logs in. If a more advanced and dynamic security policy
is required, the user-to-role mapping via an Access Manager authorization
check should be used.

Chapter 2. Planning 49
The integration is transparent to the J2EE applications because no coding or
deployment changes are needed at the application level.
2.4.6 Access Manager for BEA WebLogic Server
Tivoli Access Manager for WebLogic Version 6.0 provides a full security
framework for BEA WebLogic Server using the Security Service Provider
Interface (SSPI).
BEA WebLogic Server provides SSPI for third-party security providers, such as
Tivoli Access Manager for WebLogic, to seamlessly integrate their security
functions into the BEA WebLogic Server architecture.
Access Manager Security Service Provider Interface components
Tivoli Access Manager for WebLogic replaces the default security realm created
with each BEA WebLogic Server secure domain and provides the following BEA
WebLogic Server Security Providers:
Authentication Provider
Authorization Provider
Role Mapping Provider
Tivoli Access Manager for WebLogic uses the default BEA WebLogic Server
Credential Mapping security provider and the default keystore.
Each of the providers listed also contains a Management Bean (MBean) that
enables configuration editing through the WebLogic console. The following
sections detail the functionality supplied by each of these providers and MBeans.
Tivoli Access Manager provides the following integration points with BEA
WebLogic Server:
Authentication Provider
The Tivoli Access Manager for WebLogic Authentication Provider implements
BEA WebLogic Server simple authentication. In simple authentication, a user
attempts to authenticate to a BEA WebLogic Server with a user name and
password combination. This user name and password are checked by Tivoli
Access Manager using the Tivoli Access Manager Java runtime component.
Tivoli Access Manager for WebLogic also provides its own Login Module that
is used to provide WebSEAL or Tivoli Access Manager Plug-in for Web
Servers single sign-on functionality.
Authorization Provider
Authorization Providers supply an interface between BEA WebLogic Server
and the external authorization service. The Authorization Provider determines

50 Certification Study Guide: IBM Tivoli Access Manager for e-business 6.0
whether access should be granted or denied to BEA WebLogic Server
resources. The access decision is made using the PDPermission classes that
are distributed with the Tivoli Access Manager Java runtime component.
Role Mapping Provider
Role Mapping Providers are used to supply an interface between BEA
WebLogic Server and the external authorization service that is being used to
manage roles. The Role Mapping Provider focuses on roles rather than on
policy, which is the responsibility of the Authorization Provider.
Policy and role deployment
Policy and roles can be defined in deployment descriptors or created through the
WebLogic console. Upon deployment of J2EE applications, roles and policy
defined within the application deployment descriptors are exported to the Tivoli
Access Manager protected object space.
Although possible, it is not expected that policy creation will be performed using
the Tivoli Access Manager administrative utility, pdadmin, or the Tivoli Access
Manager Web Portal Manager. Before starting a BEA WebLogic Server that is
using Tivoli Access Manager for WebLogic, some default policy must be created
in Tivoli Access Manager. This is performed during configuration of Tivoli Access
Manager for WebLogic.
Resources and roles
BEA WebLogic Server defines a number of different resource types, all of which
are supported by Tivoli Access Manager for WebLogic. All resource types are
considered the same within Tivoli Access Manager for WebLogic, so new
resource types, created for future releases of BEA WebLogic Server, will be
supported automatically.
The policies and roles defined for all resource types are stored in the Tivoli
Access Manager protected object space in a uniform way.
2.5 Interfaces
Access Manager supports a number of application programming interfaces that
permit direct application interaction with its components. While these interfaces
support a rich set of functionality and are useful in many situations, it is important
to point out that there is substantial product function that does not require their
use. Initially, many organizations do not need to utilize these interfaces, allowing
rapid deployment of security components such as WebSEAL. However, as the
needs of the organization evolve, these interfaces allow for a high level of

Chapter 2. Planning 51
security integration and customization. Tivoli Access Manager interfaces can be
divided into three large groups:
Tivoli Access Manager Authorization API (aznAPI)
Tivoli Access Manager Authentication API (External Authentication Interface)
Tivoli Access Manager Administration API
2.5.1 Tivoli Access Manager Authorization API (aznAPI)
The Access Manager aznAPI provides a standard programming and
management model for integrating authorization requests and decisions with
applications. Use of the aznAPI enables applications to utilize fine-grained
access control for application-controlled resources.
Application-specific resources may be individually defined and added to the
protected object space, and maintained in the authorization database in the
same manner that WebSEAL and other standard Access Manager blades define
their respective resources. ACLs, POPs, and authorization rules can be attached
to these application objects, and aznAPI calls can then be used to access the
Access Manager Authorization Service to obtain authorization decisions.
The authorization API provides common initialization and shutdown interface
calls for use by the service plug-ins. The authorization API also provides
additional interfaces that are specific to each of the service plug-ins.
Authorization service plug-ins
The Tivoli Access Manager authorization API supports a service plug-in model.
This model enables developers to write plug-in modules that extend the
capabilities of the Tivoli Access Manager authorization service. Developers of
third party applications can use authorization API functions that access the
service plug-in interface to perform authorization operations that are specific to
the Tivoli Access Manager secure domain.
Authorization service plug-ins are shared libraries written by application
developers. Developers create these libraries to implement a domain-specific
task for the domain-specific application. The types of data passed between the
service plug-in and the application are also domain-specific. This means that the
only restrictions on the data types are the parameter definitions in the
authorization API service functions. The data can be in a format that is unknown
to the Tivoli Access Manager authorization server. The data is passed
unchanged through the authorization service dispatcher to the authorization
service plug-ins.

52 Certification Study Guide: IBM Tivoli Access Manager for e-business 6.0
Authorization service plug-ins are identified by a unique identification number
(ID). The service dispatcher uses the unique ID number to load the service
plug-in. The service dispatcher can optionally pass initialization parameters to
the service plug-in. The service plug-in can optionally return service information,
such as the plug-in version number, to the service dispatcher.
This modular plug-in authorization service architecture is shown on Figure 2-10
on page 53. The authorization service plug-in architecture features the following
major objects:
Authorization service plug-in dispatcher
Service plug-in modules
Calling applications
When an external application needs authorization information, it sends a request
to the service dispatcher. The service dispatcher vectors the request to the
appropriate service plug-in.
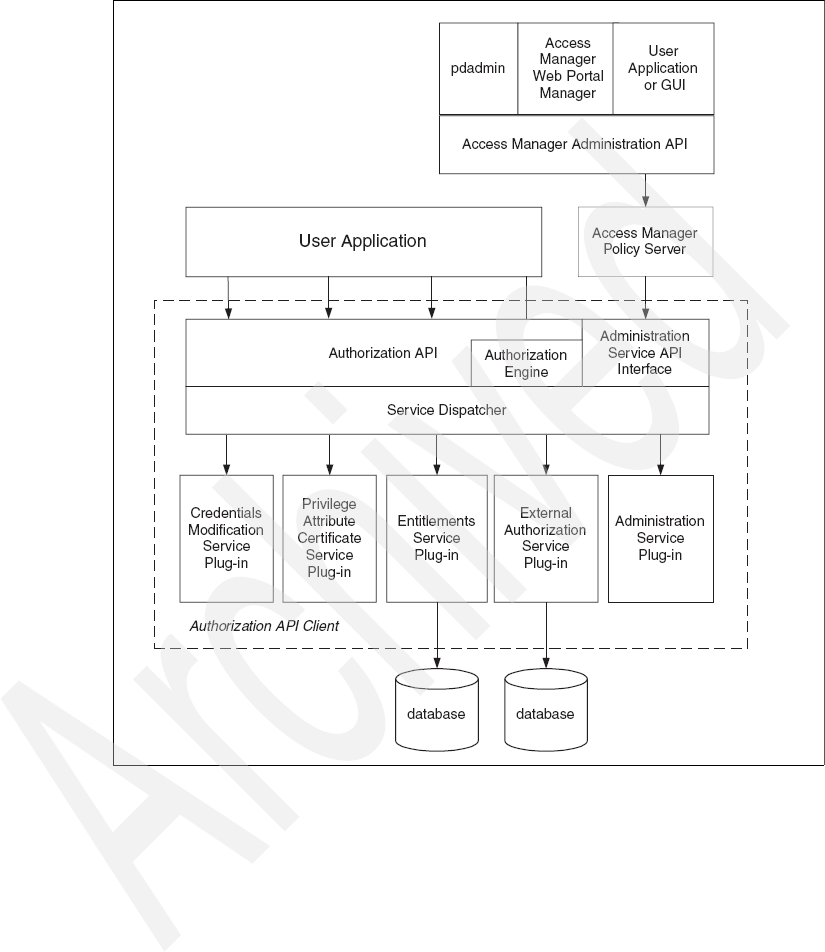
Chapter 2. Planning 53
Figure 2-10 Authorization service plug-in architecture
Figure 2-10 shows that the authorization service supports these types of service
plug-ins:
Entitlement service
Credentials modification service
Privilege attribute certificate (PAC) service
Administration service
External authorization service

54 Certification Study Guide: IBM Tivoli Access Manager for e-business 6.0
Entitlement services
An entitlement service plug-in enables domain-specific authorization API
applications to retrieve the entitlements for a user from a domain-specific policy
repository. The application can use this entitlements information as needed. For
example:
An application can allow or deny a user request for access to a protected
action or protected resource, based on the user’s entitlements.
A graphical user interface application can use entitlements information to
construct a graphical view of the Tivoli Access Manager secure domain that
contains only those protected objects that the user is authorized to view.
Tivoli Access Manager also supports two sub-classes of entitlement service
known as:
The dynamic ADI retrieval service
The credential attribute service
Credentials modification service
A credentials modification service plug-in enables domain-specific authorization
API applications to perform modifications on a Tivoli Access Manager credential.
Then, the credentials modification service can return this modified credential for
use by the calling application. Applications can use this service to add additional
information to a user’s credential. For example, this additional information could
include the user’s credit card number and the user’s credit limit.
Privilege attribute certificate service
A privilege attribute certificate (PAC) service plug-in gives domain-specific
authorization API applications the ability to move Tivoli Access Manager
credentials back and forth between the native Tivoli Access Manager credentials
format and an alternate format called privilege attribute certificates (PAC).
Applications can convert user credentials to PACs for use within other
authorization domains. Applications can then pass the PACs to a server in
another authorization domain and perform an operation. For example, customers
can write a PAC service implementation to transform the attributes in Tivoli
Access Manager credentials into a SAML assertion, an attribute certificate, or
some other standardized PAC format used by other elements of the business
model.
Administration service
An administration service plug-in enables applications to perform
application-specific administration tasks on protected object resources that are
secured in the Tivoli Access Manager secure domain. The administration service
provides functions that enable a plug-in to obtain the contents of a defined
portion of the protected object hierarchy. Additional functions enable a plug-in to

Chapter 2. Planning 55
define application-specific administration tasks, and to return commands that
perform those tasks.
The administration service plug-in is accessed by a calling application that sends
Tivoli Access Manager administration API calls. The calling application can be
either an administrative utility such as the Tivoli Access Manager pdadmin
command or the Tivoli Access Manager Web Portal Manager, or it can be a
custom-built application. The administration service maps the administration API
calls to the corresponding administration service API calls, and carries out the
requested action.
External authorization service
An external authorization service plug-in is an optional extension of the Tivoli
Access Manager authorization service that allows you to impose additional
authorization controls and conditions. You can use an external authorization
service plug-in to force authorization decisions to be made based on
application-specific criteria that are not known to the Tivoli Access Manager
authorization service.
2.5.2 Administration API
Also known as the administration API, the Management API provides C
language bindings and Java admin classes to the same functions supported by
the pdadmin command line utility. It can be used by custom applications to
perform various Access Manager administrative functions.
Do not confuse the Tivoli Access Manager administration API with the Tivoli
Access Manager authorization administration service described in
“Administration service” on page 54.
The administration API provides a series of programmatic interfaces that a
calling application can use to send requests to the Tivoli Access Manager policy
server. In most cases, applications can use the administration API independent
of any use of the authorization administration service. However, application
developers can use the authorization administration service plug-in to provide
“back-end” authorization functions that can leverage administration API functions
to execute application-specific administrative commands.
Most of the Tivoli Access Manager administration C API functions provide
programmatic equivalents to each of the pdadmin command line interfaces. The
names of the administration API functions begin with the ivadmin_ prefix.
Since Java is an object-oriented programming language, each Tivoli Access
Manager administration object that can be manipulated directly from a Java
application is represented by a corresponding Java class. The objects supported

56 Certification Study Guide: IBM Tivoli Access Manager for e-business 6.0
in this version of Tivoli Access Manager all have names that begin with a PD
prefix, for example:
PDUser class Represents a user in the Tivoli Access Manager Policy
Server.
PDGroup class Represents a group in the Tivoli Access Manager Policy
Server.
2.5.3 External authentication interface (EAI)
Tivoli Access Manager uses a flexible framework that allows the functions that
handle authentication operations to be easily modified or replaced.
In the previous versions of Access Manager, WebSEAL and the WebPI used the
CDAS infrastructure for all user authentication. The appropriate information was
gathered by the server (userid/password, userid/token, or client certificate
information) and then this was passed to the CDAS. The CDAS would then verify
the information and return a user identity.
The CDAS infrastructure is still available in Access Manager 6.0 and is still the
only way to perform authentication for non-HTTP authentication (for example,
client certificate authentication). Only the CDAS name has become obsolete and
is now called
external authentication C API. It is also still used for
inter-component authentication. All existing CDAS interfaces are also still
supported.
Access Manager for e-business 6.0 introduces a new
external authentication
HTTP interface
known as EAI. This interface enables you to extend the
functionality of the built-in authentication process to allow a remote service to
handle the authentication process. The identity information in the HTTP
response headers is used to generate user credentials. The EAI interface is an
alternative way to customize authentication when the authentication information
is passed in HTTP messages. It allows a back-end application server to perform
the authentication of the user (with the HTTP messages passing through
WebSEAL) and then, upon successful authentication, return an identity to
WebSEAL/WebPI using some pre-defined HTTP headers.
Allowing an application server to perform authentication provides a very flexible
solution. Almost any desired authentication strategy can be implemented using
this technique. Another potentially big advantage of using an external
authentication HTTP interface to perform authentication is that you are not
restricted to using C as the programming language.
Another benefit from implementing an external authorization interface is, the
restrictions on user registries for authentication are no longer applicable. In

Chapter 2. Planning 57
theory you could authenticate against any user registry you wish (directory,
database, and so on) provided that the interface you are writing supports it. In
addition, you could also authenticate against multiple user registries. Regardless
of where the external authentication interface authenticates a user or how it
authenticates them, the EAI must return a valid Access Manager user. This
means that user and groups must exist in the Access Manager user registry that
can represent users and groups in the foreign registry. There are three ways to
approach this problem:
Synchronize user registries
In this case, users in a foreign user registry are one-to-one mapped to users
in the Access Manager user registry. User and group objects could be
synchronized from the foreign user registry into the Access Manager user
registry. This allows for user-level authorization to still be performed within
WebSEAL. When the user ID is passed from the EAI to WebSEAL, group
information is pulled into the credential from the Access Manager user
registry, not the foreign user registry. Since authentication is not being
performed against the Access Manager user registry, there is no need to
synchronize user passwords or password policy information. Since the
synchronization would need to be constant because users and group could
be modified on both the Access Manager user registry and the foreign user
registry, IBM Tivoli Directory Integrator would be a good solution for user
registry synchronization in this situation.
Fixed user ID returned
User and group information is not synchronized between the Access Manager
user registry and the foreign user registry. The EAI returns a fixed user ID to
WebSEAL. That means that we have many-to-one mapping between the
foreign user registry and Access Manager user registry, since many users in
the foreign user registry are mapped to one Access Manager user. While
easier to implement, this solution has serious drawbacks in terms of enforcing
security policy. Since all users being authenticated by the EAI are returning
the same user ID to WebSEAL, there is no way to use ACLs for security. This
model simply allows for authenticated or unauthenticated access to
resources. Authorization Rules could be used to enforce policy, however, if the
EAI included the actual user ID in an extended attribute in the credential.
Using only authorization rules for security results in higher administrative
overhead due to the effort need to define the Rules. It also results in lower
system performance as evaluating Rules is more expensive than evaluating
ACLs.
Dynamic group assignment
This option only works if the EAI passes back a credential to WebSEAL (this
is also known as a Privilege Attribute Certificate or PAC). The EAI would
insert group membership information from the foreign user registry into the

58 Certification Study Guide: IBM Tivoli Access Manager for e-business 6.0
user’s credential. The groups could then be synchronized from the foreign
user registry into the Access Manager user registry. Another way to perform
this type of mapping is to have the EAI map the users into a specified set of
static groups in the Access Manager user registry. Using this technique,
authentication is performed against a foreign user registry and the group
memberships in the foreign user registry can be reflected in the Access
Manager credential. ACL authorization can now be performed at the group
level. It is important to be aware that user level authorization is still not
possible since the EAI is still returning a fixed user ID to WebSEAL.
2.5.4 Java API for Access Manager
The IBM Tivoli Access Manager Runtime for Java component includes the Java
language version of a subset of the Tivoli Access Manager API. The
authorization API consists of a set of classes that provide Java applications with
the ability to interact with Tivoli Access Manager to make authentication and
authorization decisions.
Java security
The Tivoli Access Manager authorization Java classes provide an
implementation of Java security code that is fully compliant with the Java 2
security model and the Java Authentication and Authorization Service (JAAS).
The Tivoli Access Manager authorization Java classes are built around JAAS
and the Java 2 security model. The Tivoli Access Manager API closely follows
the Java 2 permission model. The Tivoli Access Manager authorization API Java
classes also support a completely Java-compliant usage of the Tivoli Access
Manager authorization check that is outside of the Java 2 and JAAS framework.
2.5.5 Access Manager-based authorization for Microsoft .NET
IBM Tivoli Access Manager provides integration and support for implementing
Access Manager-based authorization for Microsoft .NET applications. Access
Manager APIs are exposed at the .NET Common Language Runtime level. This
exposes the functionality to all .NET languages such as Managed C++, C#, and
Visual Basic .NET.
2.6 Placing components in a network
There is no unique configuration of Access Manager components in a network.
No solution uses the same number of Access Manager components and some of
the components are not mandatory. The placement of Access Manager
components represents a set of choices, but in this book we show some general

Chapter 2. Planning 59
security guidelines. Keep in mind that you cannot simply separate network
configuration issues from Access Manager. While Access Manager components
perform their duties extremely well, good sense dictates that they must operate
in an environment that prevents them from being bypassed and protects them
from undue exposure to other forms of attack.
Today networks are divided into several zones. Network boundaries are used to
isolate networking zones with differing security policies. These boundaries are
created to implement restrictions on the type of traffic that is allowed in a zone. In
its simplest case, a firewall creates boundaries between two or more networks
and stands as a shield against unwanted penetrations into your environment.
Figure 2-11 Network zones and Access Manager components
The number of zones depends on the existing security policies and the level of
security that needs to be implemented. Typical network configurations consist of
three to five zones:
Internet, outside network (uncontrolled zone)
Internet DMZ (controlled zone)
Intranet (controlled zone)
No Access Manager
component should be
deployed in an uncontrolled
network. It is also generally
unsafe for Access Manager
components to
communicate with one
another across an
uncontrolled network
without using secure
communication
mechanisms (such as SSL).
Usually, only
WebSEAL or other
Access Manager
resource
managers (such as
the Web server
plug-in) should be
placed in a
controlled network
zone.
The specific level of
trust in an internal
network dictates what
Access Manager
components may be
deployed within them.
Organizations may set
up specialized
restricted zones for
production systems,
which could include
Web and application
servers, and various
Access Manager
components, such as
the user registry, the
Session Management
Server, Policy Proxy
Servers, or internally
used WebSEALs.
Some organizations
set up special
networks to separate
various management
components from
production systems.
The Access Manager
Policy Server and the
master LDAP server
might be installed in
such a network.
Internet
Uncontrolled
Zone
Internet DMZ Intranet
Controlled
Zone
Controlled
Zone
Production
Network
Restricted
Zone
Management
Network
Secured Zone
LESS SECURE MORE SECURE
Public Managed Trusted

60 Certification Study Guide: IBM Tivoli Access Manager for e-business 6.0
Production (restricted zone)
Management (secured zone)
The position of Access Manager components depends on the number of zones.
Figure 2-11 summarizes the general Access Manager component type
relationships to the network zones.
Since firewalls are usually deployed between zones to filter network traffic on
different ports, a thorough understanding of the communication ports used for all
Access Manager components is essential. The default listening ports for Access
Manager components (which can be changed in real implementations) are as
follows:
Policy Server port: 7135
Authorization Server port:
– Authorization request port 7136
– Administration request port: 7137.
Policy Proxy Server:
– Policy request port: 7138.
– Authorization request port: 7139.
WebSEAL listening 7234
Along with those listening ports, Access Manager also communicates with
additional ports like 389 for LDAP non-SSL communication, and 636 for LDAP
SSL communication. Also, all ports for HTTP and HTTPS transport should be
specified. Default ports are 80 for non-SSL and 443 for SSL. Note that HTTP(S)
traffic is not only used between WebSEAL and the client, but also between
WebSEAL and back-end servers (using junction), between WebSEAL and the
Session Management Server, and others.
2.6.1 IBM Global Security Kit (GSKit)
Tivoli Access Manager components communicate in a secure way over the
network. Tivoli Access Manager provides data encryption through the use of the
IBM Global Security Kit (GSKit) version 7.0.
The GSKit package also installs the iKeyman key management utility (gsk7ikm),
which enables you to create key databases, public-private key pairs, and
certificate requests. In other words, GSKit can be used to build a (somewhat
trivial) PKI infrastructure. You must install GSKit before installing most other
Tivoli Access Manager components. GSKit is a prerequisite to the Access
Manager Runtime component, which is required on all Tivoli Access Manager
systems with the exception of the Access Manager Attribute Retrieval Service,
Access Manager for WebLogic Server, Access Manager Runtime for Java, or
Access Manager Web Portal Manager.

Chapter 2. Planning 61
The GSKit tool is often used to manage certificates that are used for WebSEAL’s
HTTPS communication. For performance improvement, WebSEAL supports SSL
hardware acceleration. Utilizing the functionality of GSKit7, hardware
acceleration can minimize the CPU impact of SSL communications, improving
the overall performance of the system.
FIPS enablement
In Tivoli Access Manager 6.0, Federal Information Processing Standard 140-2
(FIPS 140-2) enablement is introduced. FIPS enablement means Tivoli Access
Manager uses only government-approved cryptography wherever cryptography
is required. Tivoli Access Manager uses cryptography in the following areas:
Creation and replacement of internal, self-signed certificates. These
certificates are used by Access Manager Runtime and Tivoli Access Manager
security servers to authenticate with each other.
Runtime and servers utilize a secure communication protocol to communicate
between each other.
Federal Information Processing Standard 140-2 (FIPS 140-2) is a standard that
describes U.S. Federal Government requirements that IT products should meet
for Sensitive but Unclassified (SBU) use. The standard defines the security
requirements that must be satisfied by a cryptographic module used in a security
system protecting unclassified information within IT systems. There are four
levels of security, from Level 1 (lowest) to Level 4 (highest). These levels are
intended to cover the wide range of potential applications and environments in
which cryptographic modules can be deployed. The security requirements cover
areas related to the secure design and implementation of a cryptographic
module. These areas include basic design and documentation, module
interfaces, authorized roles and services, physical security, software security,
operating system security, key management, cryptographic algorithms,
electromagnetic interference/electromagnetic compatibility (EMI/EMC), and
self-testing. For more information on FIPS 140-2, see:
http://csrc.nist.gov/cryptval/140-2.htm
Enablement of FIPS for Tivoli Access Manager is only meant to satisfy the
requirement of the Tivoli Access Manager’s cryptographic operations from an
application aspect. Tivoli Access Manager is not responsible for other products or
prerequisite products enablement of FIPS. If in FIPS mode, Transport Layer
Security version 1 (TLS v1) will be used as the secure communication protocol
instead of SSL v3. To communicate with the Tivoli Access Manager Policy
Server using a secure communication protocol, TLS is the required protocol. An
attempt to communicate using SSL v3 (non-FIPS mode) when the Policy Server
is configured in FIPS mode will result in a socket-closed exception.

62 Certification Study Guide: IBM Tivoli Access Manager for e-business 6.0
2.6.2 Sizing and availability
Availability is the major concern that a failing part of the infrastructure will cause
the overall solution to languish. This eventually leads to unsatisfied customers
and decreasing business success. Adding replicas of crucial servers increases
your site’s availability by avoiding single point of failure. All Access Manager
components can be replicated with the exception of the Policy Server, since
there can be only one Policy Server per secure domain. However, there can be a
second Policy Server in standby to provide manual fail-over capabilities as a first
aid response. If you want to assure 24x7 availability of your Access Manager
Policy Server you could implement a high-availability cluster solution such as
HACMP for AIX.
Before configuring a standby Policy Server, the files that it needs to operate must
be made available. To avoid synchronization problems, it is best to locate these
files on a shared file system.
In general, the most effective way to have a redundant Policy Server is to
configure an
original and standby Policy Server in an HACMP (or similar)
environment. This handles routing IP traffic to the active instance and can handle
(via scripting) the starting and stopping of the Policy Servers so that only one is
active at any time. IBM supports automatic failover only on the AIX platform.
Figure 2-12 shows a possible configuration that uses a network load-balancer to
direct SSL traffic to the active Policy Server. If it is not possible for the load
balancer to monitor the Policy Servers, then manual intervention (or custom
scripting) will have to be used to monitor the Policy Servers and switch to the
backup on failure.

Chapter 2. Planning 63
Figure 2-12 Standby Policy Server configuration using a load balancer
Access Manager is designed for scalability as well as availability. Scalability of
Access Manager enables good growth in size of future capacities by allowing you
to add additional components of the same sort and providing smart load
balancing mechanisms to perfectly utilize these new components.
2.7 Upgrade considerations
Access Manager is a complex solution that uses many components and relies on
many dependencies. The process of upgrading IBM Tivoli Access Manager to
Version 6.0 requires you to consider the interdependencies among the various
Tivoli Access Manager components and other software components on which
the system depends. There are many different ways to deploy Tivoli Access
Manager components. IBM Tivoli Access Manager for e-business Upgrade
Guide Version 6.0, SC32-1703 presents specific scenarios that cover a large
portion of Tivoli Access Manager deployments.
The following steps describe, at a high-level, the activities for upgrading an
Access Manager for e-business environment:
1. The first step in any upgrade or migration process is to back up all
components of the current system. A backup should be done for every server
that contains any Access Manager components using the standard Access
Primary
Policy Server
PDRTE PDRTE
Standby
Policy Server
Load Balancer
(Monitoring HTTPS on 7135)
Other AM
Components
PDRTE
Other AM
Components
PDRTE
Primary – OK
Standby- Down
Shared Storage
Primary
Policy Server
PDRTE PDRTE
Standby
Policy Server
Load Balancer
(Monitoring HTTPS on 7135)
Other AM
Components
PDRTE
Other AM
Components
PDRTE
Other AM
Components
PDRTE
Other AM
Components
PDRTE
Primary – OK
Standby- Down
Shared Storage

64 Certification Study Guide: IBM Tivoli Access Manager for e-business 6.0
Manager tool for backup and restore operations pdbackup. Along with this
step, it is very important to back up the user registry using appropriate backup
tools that come with the product. If you encounter a problem when migrating
to Tivoli Access Manager 6.0, you might need to restore the system to its prior
level.
2. Upgrade the user registry to the level that is supported by Access Manager
V6.0. IBM Tivoli Directory Server 6.0 is the only supported registry that does
not require additional configuration after upgrading. For all other supported
registries (including previous version of IBM Tivoli Directory Server), the
LDAP schema needs to be manually updated to support Access
Manager 6.0. Use the ivrgy_tool to update the schema. If your user registry
is Microsoft Active Directory, the upgrade needs to be performed in two steps:
a. Update the data model using the adreg_migrate utility. This tool adds and
modifies Microsoft Active Directory ACL/ACE for Tivoli Access Manager
users and groups.
b. Update the schema from the previous release to Tivoli Access Manager
6.0 using adschema_update.
3. Back up your Policy Server. Tivoli Access Manager supports an upgrade of
the Policy Server to version 6.0 either on the same system, or using two
separate systems — your current Policy Server system and a second, clean
system for the new 6.0 Policy Server. The two-system approach is not
supported if you are using Microsoft Active Directory or Lotus Notes® Server
as your user registry. The two-system approach provides the ability to keep
your current Policy Server functioning as you set up and test a new 6.0 Policy
Server system. This approach provides a shorter system downtime, but it is
more expensive since it requires additional hardware. If you encounter a
problem when upgrading using two systems, take the Access Manager 6.0
Policy Server offline.
4. The upgrade of Access Manager core components is now finished. We can
approach the upgrade of the remaining systems:
– WebSEAL
– Authorization Servers
– Policy Proxy Servers and so on
Note: If you did not perform the installation using the IBM Tivoli Directory
Server installation wizard, you need to manually perform a Directory
Server migration from the previous release. This can be done using the
Instance Administration Tool (started with the command idsxinst), or
using the idsimigr utility for command-line migration.

Chapter 2. Planning 65
If you want your aznAPI application to have minimum downtime, you must
install a second Authorization Server to ensure that your aznAPI application
can continue to make authorization decisions during the upgrade process. To
install the second Authorization Server, follow these steps:
a. Install another instance of the Authorization Server on your application
host. It should be the same software version as the Authorization Server
that is running on your current Authorization Server, just running on a
different machine.
b. Edit your aznAPI application configuration file on the application host,
comment out the replica entry for the original Authorization Server, and
add a new replica line for the new Authorization Server.
c. Restart the aznAPI application on the application host and verify that it
functions properly.
Proceed with the normal upgrade of the aznAPI application that also requires
unconfiguration steps.
If you have a load balancer in front of the WebSEALs and you plan to
upgrade your WebSEAL on a server while users are trying to access the
system, you must isolate each WebSEAL server before you upgrade it. To do
this, change the port on which the WebSEAL server listens or configure your
load balancer so that it does not route traffic to the WebSEAL server.
5. After you have updated all your Tivoli Access Manager systems, if you
upgraded the Policy Server using the two system approach, retire the original
Policy Server after its data and the Tivoli Directory Server client and server
are successfully migrated to the 6.0 Policy Server system.
Use the pdmgr_ucf command to retire the original Policy Server.
2.7.1 Additional upgrade considerations
Any server that has Access Manager components installed requires the following
two software components:
GSkit
IBM Tivoli Directory Server 6.0 client
This is necessary even if your upgrade strategy keeps a previously supported
version of the IBM Tivoli Directory Server (for example 5.2) in production. You
Important: Do not unconfigure the original Policy Server or the new Policy
Server at any time during the upgrade process. Unconfiguration of the
original Policy Server or the new Policy Server will destroy critical data
needed by the Policy Server.

66 Certification Study Guide: IBM Tivoli Access Manager for e-business 6.0
have to deploy the IBM Tivoli Directory Server client 6.0 on any machine that has
an Access Manager 6.0 component installed.
The IBM Tivoli Directory Server 6.0 client can coexist with previous client
versions but there can only be one server version at the same time on a machine.
For example, if you keep Tivoli Directory Server client and server 5.2, you can
upgrade to Tivoli Directory Server client 6.0 without any problems.
All communication between Access Manager components over the network is
encrypted using SSL/TLS. The GSKit tool provides SSL services between
Access Manager components. Every version of Access Manager requires a
certain level of GSKit as a prerequisite. If you do not watch out for these the
installation/upgrade may fail.
2.7.2 Useful commands for the upgrade process
We have previously mentioned several commands that we used for the upgrade
process, like:
pdbackup
ivrgy_tool
adreg_migrate
adschema_update
idsimigr
Besides these already mentioned commands, there are some other useful
commands that we can use during the upgrade process, and for everyday
administration.
For manipulating (checking the status, stopping and starting) of Access Manager
services installed on the server use:
pd_start {status | stop | start}
Verification of Access Manager environment
A useful tool for the verification of installed or upgraded Access Manager
software on any machine that has the Access Manager runtime component
deployed is:
pdversion
More basic verification of your Tivoli Access Manager environment can be
performed with the following utilities:
1. Verify whether the user registry is up and running.
You have to use different tools depending on what type of user registry is
installed. For example, if you are using an LDAP-based user registry like IBM

Chapter 2. Planning 67
Tivoli Directory Server, then you can use the ldapsearch command to verify
whether the server is responsive.
2. Verifying the Policy Server
The pdadmin command can be used to verify the proper operation of the
Policy Server. Use the pdadmin command to log in as a Tivoli Access
Manager administrator:
pdadmin –a sec_master –p password
This is the first step of your validation. After that you can execute a few
commands to validate your environment. For example, you could list users
with the user list command.
pdadmin> user list * 100
3. Verifying the runtime environment
Every machine with the Access Manager runtime installed can be tested with
the pdadmin tool just as the Policy Server is. The pdadmin utility is installed
along with the Access Manager runtime.
4. Verifying WebSEAL
You can use a browser to verify that WebSEAL is operating properly. To verify,
enter the following URL into your browser:
https://webseal-machinename
Because a port number is not specified, it is assumed that WebSEAL is
listening on port 443 (HTTPS). Your browser might give you the following
warnings:
a. The certificate received from this Web server was issued by a company
that you have not yet chosen to trust
b. The name within the certificate received from WebSEAL does not match
the name of the system from which it was received
If these warnings occur, they simply indicate that you have not yet purchased
your own server certificate for your WebSEAL server. Your browser is
complaining that it has received a default server certificate from WebSEAL
that contains default names for the issuing certificate authority and the name
of the Web server. Next, the browser prompts you to specify a Tivoli Access
Manager user name and password. Enter sec_master for the user name and
the password that you configured for sec_master during installation. If
authentication is successful, an image labeled Tivoli Access Manager for
WebSEAL appears.
If you are using Tivoli Access Manager Web Server plug-in the verification
process is the same, but as a result screen the default Web server page
appears.

68 Certification Study Guide: IBM Tivoli Access Manager for e-business 6.0

© Copyright IBM Corp. 2006. All rights reserved. 69
Chapter 3. Installation
An Access Manager system may contain many components and require careful
planning, as we discussed in the previous chapter. In this chapter we identify the
component dependencies and provide an overview of configuration tools and the
required PKI infrastructure.
3

70 Certification Study Guide: IBM Tivoli Access Manager for e-business 6.0
3.1 Installation overview
The environment based on IBM Tivoli Access Manager is called a secure
domain,
and it consists of many components. These components have specific
software dependencies and require prerequisites with respect to hardware and
operating system platforms that are supported. For hardware requirements like
disk size, memory, and so on, refer to the IBM Tivoli Access Manager for
e-business Version 6.0 Release Notes, SC32-1702. Access Manager is
supported on the following operating systems:
AIX 5.1
SLES 8
RHEL 3.0
Solaris 8
HP-UX 11i
Windows 2003
For details about minimum operating system fix pack levels review the Release
Notes document.
Access Manager 6.0 also supports the IPv6 protocol on those operating
systems.
3.1.1 User registry
The first core component of the Access Manager system is the user registry. The
installation of a user registry is product specific. Access Manager supports all
major user registries:
LDAP-based user registry
– IBM Tivoli Directory Server version 5.1, 5.2, and 6.0
– IBM z/OS LDAP Server 1.4, 1.5, and 1.6
– Novell eDirectory 8.6.x and 8.7.x
– Sun ONE™ Directory Server 5.1, 5.2, and 6.0
– Sun Java System Directory Server 6.1
Lotus Domino Enterprise Server 5.0.10, 6.0.2, and 6.5
With the following restriction: Tivoli Access Manager supports the use of IBM
Lotus Domino as a user registry only on the Windows platform.
Microsoft Active Directory 2003
With the following restriction: Tivoli Access Manager Policy Server needs to
be deployed on the Windows platform.

Chapter 3. Installation 71
IBM Tivoli Directory Server 6.0 overview
Although Access Manager supports a number of different user registries, IBM
Tivoli Directory Server is supplied with Access Manager, and the Directory
Server LDAP client is used by the Access Manager aznAPI implementation to
provide LDAP client services. IBM Tivoli Directory Server 6.0 is supplied with
IBM Tivoli Access Manager 6.0 and it is envisaged that this will be the Directory
Server version used with any new deployments of Access Manager 6.0. As we
mentioned in 2.7.1, “Additional upgrade considerations” on page 65, it is possible
to use older versions of the Directory Server with Access Manager 6.0 (for
migration purposes) but the Directory Server 6.0 client must always be used
whenever an LDAP client is required.
The user registry contains user information, additional Access Manager
information, and mappings between Access Manager users and users in the
registry. Access Manager information is stored under the suffix
secAuthority=default, which needs to be manually created in LDAP before you
can begin to configure the Policy Server. The only exception is the automatic
installer for IBM Tivoli Directory Server v6.0 shipped with the Access Manager
install set. This installer automatically creates the secAuthority=default suffix.
The installer also creates a suffix for user data (users are stored under a
separate DIT from the Access Manager configuration).
Also, when using this particular installer, the Directory Server instance created is
configured for SSL communication (using the LDAPS port 636 by default). In
order for this to happen, a private key and public certificate pair must be
available. In Tivoli Access Manager v5.1, the Access Manager Directory Server
installer supplied a static “test” certificate/key for the Directory Server to use SSL.
This was not useful for production because it was the same certificate for every
installation. In addition, the KDB file that contained this test certificate used a
fixed password (which was
key4ssl). For Tivoli Access Manager v6.0, the Access
Manager Directory Server installer generates a new self-signed certificate/key
pair every time. It prompts the user to specify a password and this password is
used to secure a new certificate database (KDB) file.
Directory Server 6.0 includes an optional proxy component. This component is
not part of the freely available Directory Server 6.0 distribution and is not part of
the bundle that is shipped with Access Manager 6.0. In order to make use of this
feature it must be independently licensed. The Directory Server Proxy can be
used for two purposes:
Provide a proxy component so that Directory Servers can be accessed from
the Internet but the Directory Servers (and their associated databases) are
not located in the DMZ.
Provide an entry point to a distributed directory that allows very large
registries to be set up. All client requests are routed to load-balanced proxies

72 Certification Study Guide: IBM Tivoli Access Manager for e-business 6.0
and they forward the request on to the backend cluster that holds the
information.
Configuration improvements for the user registry
When using previous versions of Access Manager with Directory Server, the
configuration of the Access Manager Policy Server overwrote all ACL entries
configured on existing suffixes. This means that if Access Manager was
configured into an existing LDAP server where other applications were already
configured, it could prevent them from functioning until the ACL entries were
manually reinstated. This behavior has been changed for Access Manager v6.0.
When configuring the Access Manager 6.0 Policy Server, new ACL entries are
added to existing suffixes (to allow the Access Manager services to read and
write data) but the existing entries are not modified. Those Access
Manager-specific ACL entries for any LDAP are:
cn=SecurityGroup,secAuthority=Default
cn=ivacld-servers,cn=SecurityGroup,secAuthority=Default
cn=remote-acl-users,cn=SecurityGroup,secAuthority=Default
The new data model (called the
minimal model) reduces the number of LDAP
objects created per user (from a minimum of three to a minimum of two) and also
removes all Access Manager-specific data from the
public part of the LDAP
directory (where the shared user and group objects are stored). The previous
data model (called the
standard model) is still supported and available and would
usually be used if migrating to Access Manager 6.0 from a previous version of
Access Manager (especially if the migration must be done with zero downtime).
The new minimal data model does not provide any significant performance
improvement over the standard data model used in Access Manager 5.1. All of
the reductions in number of queries that are possible with the minimal model are
also possible using the standard model.
3.1.2 Installation methods
The installation of the Access Manager security environment can be grouped into
three categories:
Tivoli Access Manager base systems
Tivoli Access Manager Web security systems
Tivoli Access Manager distributed sessions management systems
The following sections provide an installation overview of all Access Manager
components grouped by those categories. First, we describe the installation
methods.
All Access Manager components can be installed in the following ways:
Installation wizards

Chapter 3. Installation 73
Native installation utilities
Software Distribution installation method
Installation wizards
You can run a single program to set up one of a variety of Tivoli Access Manager
systems. Software prerequisites and product patches are automatically installed
in the appropriate order. Operating system patches are not installed
automatically. Use installation wizards to simplify installation and configuration of
Tivoli Access Manager systems. The Tivoli Access Manager components
support installation wizards running in:
Graphical mode
Text-based console mode
Response file (silent) mode
This flexibility of installation methods allows you to create multiple solutions for
deploying your software.
All installation wizards have the same prefix
install_ followed by component
name. For the list of all components wizards, refer to IBM Tivoli Access Manager
Version 6.0 Administration Guide, SC32-1686. If using an installation wizard to
install and configure a Tivoli Access Manager system, IBM Java Runtime 1.4.2
SR2 provided with Tivoli Access Manager is required.
Occasionally, there are times when there is no graphical display device available
or you want to run the installer without the graphical user interface when installing
the Tivoli Access Manager packages. Console mode is an interactive installation
without the use of a graphical user interface. To launch the installation wizard in
console mode, enter:
install_component_name - console
The installation wizard can also be used for the silent type of installation. All
answers to questions during the installation process of any component are
placed in a response file. The installation process reads the information from the
response file instead of prompting you to fill in the blanks. Each Tivoli Access
Manager component can be installed by using a response file. The installation
wizards use a template file, provided by Tivoli Access Manager, to create a file
known as an options file, which contains all possible responses. Response files,
created using these template files, are then used to perform the silent mode
installations. A response file streamlines installation and configuration of Tivoli
Access Manager components.
Native installation utilities
You can use platform-specific utilities to install Tivoli Access Manager
components. Unlike automated installation wizards, you must manually install

74 Certification Study Guide: IBM Tivoli Access Manager for e-business 6.0
each component and its prerequisite software in the appropriate order. The
platform-specific utilities used are:
installp for AIX
swinstall for HP-UX
rpm Linux
pkgadd for Solaris
setup.exe for Windows
After installing, the appropriate configuration commands have to be used. All
configuration commands are described later in this chapter.
Software Distribution installation method
IBM Tivoli Configuration Manager is required for this type of installation. IBM
Tivoli Configuration Manager controls software distribution and asset
management inventory in a multi-platform environment. It is designed for
configuration, distribution, change, version, and asset management in a
distributed computing environment. If you choose this installation method, you
should be familiar with using the Software Distribution installation method of IBM
Tivoli Configuration Manager. For more detail about this method refer to the Tivoli
Access Manager for e-business Version 6.0 Installation Guide, SC32-1361.
3.2 Base components
Almost all servers that are part of an Access Manager installation contain sets of
software that are common to any Access Manager component. This software is
like a framework that provides communication between Access Manager
services that run on top of it. Figure 3-1 on page 75 shows this framework that
comes as a part of the Access Manager base system installation CD set.

Chapter 3. Installation 75
Figure 3-1 Access Manager basic system and common software
The figure also shows all Access Manager components that are part of the base
system. The rest of this section provides an installation overview of those
components.
3.2.1 GSKit
The bottom layer of any Access Manager installation is GSKit, which provides a
set of tools for SSL communication between Access Manager components.
GSKit provides a C API command line tool gsk7ikm (and a Java API equivalent
ikeyman) that helps you set up and maintain a basic PKI environment. This tool
can create a new certificate database (it supports all types of standard certificate
databases), open an existing certificate database, create self-signed certificates,
submit certificate requests to another CA, revoke a certificate, and create a
certificate revocation list (CRL) list.
In addition to providing SSL communication between Access Manager
components, very often GSKit is utilized in the WebSEAL configuration for
setting up HTTPS communication between WebSEAL and clients, for example,
between WebSEAL and back-end servers (this communication is realized
through an SSL-junction). More details are presented in Chapter 4,
“Configuration and customization” on page 91.
Once installation of the GSKit package is complete, no configuration of the GSKit
is necessary.
PDMgr PDAcld PDProxy
PDAuthADK
Operating System
GSKit
LDAP Client
Tivoli Security Utilities
PDRTE
PD lic
Common Softare
Access Manager
Base
Components

76 Certification Study Guide: IBM Tivoli Access Manager for e-business 6.0
3.2.2 LDAP client
Any Access Manager component that requires communication with an LDAP
server needs the LDAP client. The client provides a set of tools and an API used
for communication with the LDAP server. The following components do not need
the LDAP client:
Access Manager Runtime for Java
Web Portal Manager
Access Manager Attribute Retrieval Service
Session Management Server
Session Management Web Interface System
Basically, all Java-based Access Manager components do not require an LDAP
client.
Most of the time the required LDAP client is the IBM Tivoli Directory Server client
version 6.0. The exceptions are:
If your Tivoli Access Manager system uses the Windows Active Directory
(AD) domain environment as the user registry, the required LDAP client is the
built-in Windows LDAP client required for AD.
If Lotus Domino is used as your user registry server, the Access
Manager-supported client is the Lotus Notes client.
After the installation of the LDAP client package no configuration is necessary.
3.2.3 Tivoli Security Utilities
The IBM Tivoli Security Utilities provides common utilities that are required by
Access Manager Runtime. Tivoli Security Utilities package must be installed
before you can install the Access Manager Runtime package. After the
installation of the Tivoli Security Utilities package no configuration is necessary.
3.2.4 Access Manager License (PDlic)
This component contains license information for Tivoli Access Manager. The
Access Manager License component is installed automatically when an
installation wizard is used to install either the Access Manager Runtime, Access
Manager Session Management Server, or the Access Manager Runtime for Java
component.

Chapter 3. Installation 77
3.2.5 Access Manager Runtime (PDRTE)
The Access Manager Runtime contains runtime libraries and supporting files that
applications can use to access Tivoli Access Manager servers. You must install
and configure the Access Manager Runtime component on each system that
runs Tivoli Access Manager, with the exception of Java-based Access Manager
components that require Access Manager Runtime for Java (PDJRTE).
In other words, components that do not require PDRTE are:
Access Manager Runtime for Java systems
Web Portal Manager
Access Manager Attribute Retrieval Service
Access Manager for WebLogic Server
Sessions Management Systems
One of the tools that is installed with the PDRTE environment is pdconfig. This
tool provides screens for the configuration of various Access Manager
components like the PDRTE itself.
The tool can also be used to unconfigure Access Manager components. This tool
utilizes the bassslcfg command in the background, which configures or modifies
the configuration information of the Tivoli Access Manager runtime.
3.2.6 Access Manager Policy Server (PDMgr)
There can only be one Policy Server for each secure management domain.
Optionally on AIX systems, IBM supports a secondary standby Policy Server.
This particular configuration requires additional software and hardware, including
High Availability Cluster Multiprocessing (HACMP) software.
Policy Server is part of the base system configuration; it gets installed on top of
the PDRTE as shown in Figure 3-1 on page 75.
During the installation of the Policy Server component, you are given the
opportunity to select what LDAP data format is to be used for user and group
tracking information. The two LDAP data formats available for user and group
information are:
Minimal LDAP data formats (default)
Standard LDAP data formats
Note: Yo u must not configure the Access Manager Runtime on the same
server that runs the Policy Server component until
after the Policy Server is
installed.

78 Certification Study Guide: IBM Tivoli Access Manager for e-business 6.0
The minimal LDAP data format is valid only for IBM Tivoli Access Manager
version 6.0 or later. Use of this format reduces the size of your user registry
information by storing minimal user and group tracking information. However,
previous versions of Tivoli Access Manager and Tivoli Access Manager products
do not support this format and cannot access the user and group tracking
information.
The
standard LDAP data format, which is the same format used in previous
versions of Tivoli Access Manager, permits any version of Tivoli Access Manager
to use the user and group information in the LDAP registry.
If there is no previous user registry information, as is the case with a new
installation, and minimal format is selected, fewer LDAP objects are used to
maintain the user and group tracking information. However, previous versions of
Tivoli Access Manager do not support this format and cannot access the user
and group information.
If upgrading all Tivoli Access Manager products to version 6.0, the existing user
registry information can be converted to use the minimal format for user and
group tracking information, if desired. Use the Tivoli Access Manager amldif2V6
tool for this LDAP data conversion. You can find technical support for the
amldif2V6 tool at the IBM Tivoli Access Manager for e-business Web site.
Initial configuration
After installation, you can use the pdconfig tool to configure the Access Manager
Runtime and Policy Server components. This tool prompts for answers to certain
questions and then configures the Access Manager components. The PDRTE
component is always configured before Policy Server (PDMGR), but not before
PDMGR is installed.
Initial configuration creates new key and stash files and generates new CA
certificates for the Policy Server called PDCA certificate. This certificate is stored
in the ivmgr.kdb certificate database. This certificate also is stored in the file
pdcacert.b64 on the Policy Server as a base-64 DER-encoded version of the
PDCA certificate. This file must be distributed to each machine in your secure
domain that utilizes SSL communication with the Tivoli Access Manager Policy
Server. If this certificate is for any reason compromised, it must be regenerated.
If this happens, each key file and each certificate in the domain needs to be
regenerated. Use mgrsslcfg to create or modify the SSL certificates of the Policy
Server. This tool is called in the background when you use the pdconfig tool.
3.2.7 Access Manager Authorization Server (PDAcld)
Access Manager Authorization Server is an optional component in the Access
Manager secure domain. The Access Manager Authorization Server provides

Chapter 3. Installation 79
access to the authorization service for third-party applications that use the Tivoli
Access Manager authorization API in remote cache mode. The Authorization
Server also acts as a logging and auditing collection server to store records of
server activity.
The Authorization Server is also part of the base install set and requires the
Access Manager Runtime as depicted in Figure 3-1 on page 75. Configuration of
PDAcld can be done using the pdconfig utility or using the svrsslcfg command.
This command configures, unconfigures, or modifies the configuration
information of a resource manager to use an SSL connection for communicating
with the Policy Server.
The svrsslcfg command is used to configure C-based application servers only.
For Java-based application servers, use the equivalent
com.tivoli.pd.jcfg.SvrSslCfg Java class.
3.2.8 Access Manager Policy Proxy Server (PDProxy)
The Access Manager Policy Proxy Server is used to set up a proxy server, which
acts as an intermediary between a less trusted network and a more trusted
network. This server ensures security and provides administrative control and
caching services. It is associated with, or part of, a gateway server that separates
the enterprise network from the outside network, and a firewall server that
protects the enterprise network from outside intrusion. In a Tivoli Access
Manager environment, the proxy server runs on behalf of the Policy Server for a
given number of authorization applications and administrative functions, such as
pdadmin commands.
The Tivoli Access Manager Policy Proxy Server is another base component that
can be configured using the pdconfig tool, which calls the pdproxycfg command
in the background. This command configures or unconfigures a Policy Proxy
Server.
3.2.9 Tivoli Access Manager development (PDAuthADK) system
The Access Manager Application Development Kit provides a development
environment that enables you to code third-party applications to query the
authorization server for authorization decisions. This kit contains support for
using both C APIs and Java classes for authorization and administration
functions. To run the Java program or to compile and run your own Java
programs, you must install and configure a Java runtime environment system.

80 Certification Study Guide: IBM Tivoli Access Manager for e-business 6.0
3.2.10 Access Manager Runtime for Java (PDJRTE)
The Access Manager Runtime for Java offers a reliable environment for
developing and deploying Java applications in a Tivoli Access Manager secure
domain. Use it to add Tivoli Access Manager authorization and security services
to new or existing Java applications. This Run Time environment is common for
all Java-based application. You can use the pdjrtecfg command to configure a
Java Runtime Environment (JRE) to use Tivoli Access Manager Java security.
Access Manager Runtime for Java requires that Java already is installed. Ensure
that either IBM Java Runtime 1.4.2 SR2 provided with Tivoli Access Manager or
the JRE provided with WebSphere Application Server 6.0.2 is installed before
running the installation program. Access Manager Runtime for Java configures
additional security features into the specified JRE and only these two JREs are
supported.
Note that this component does not require GSKit, the LDAP client or Tivoli
Security Utilities as a prerequisite.
If you plan to install the Web Portal Manager interface, this component is
required. It is also required with the Access Manager Application Development
Kit component if you are a developer using Access Manager Runtime for Java
classes.
3.2.11 Access Manager Web Portal Manager (PDWPM)
The Access Manager Web Portal Manager is a Web-based graphical user
interface (GUI) used for Tivoli Access Manager administration. The GUI
counterpart to the pdadmin command line interface, Web Portal Manager
provides management of users, groups, roles, permissions, policies, and other
Tivoli Access Manager tasks. A key advantage of using Web Portal Manager is
that you can perform these tasks remotely, without requiring any special network
configuration.
The Web Portal Manager interface also includes additional components that we
mentioned in “Delegated administration” on page 42. Both applications, the
standard pdadmin utility and the delegate application, come in single WAR
packages that are installed into the IBM WebSphere Application Server, but they
use different deployment descriptors.
To access the GUI version of the pdadmin command use the following URL:
http://<host name>/pdadmin

Chapter 3. Installation 81
To access the application for delegated administration that is integrated into
WPM use the following URL:
http://<host name>/delegate
Figure 3-2 Web Portal Manager components
Web Portal Manager is a Java-based application that is deployed in IBM
WebSphere Application Server. With the WebSphere Application Server
installation also comes the GSKit tool, but it is not a necessary part for PDWPM.
Since WPM is a Java-based application it requires PDJRTE components, as
shown in Figure 3-2.
3.3 Web security components
Tivoli Access Manager Web security components are a set of Access Manager
components that use different kinds of resource managers to protect Web
resources. These components are on the IBM Tivoli Access Manager Web
Security CD for the supported platforms. The components are:
Access Manager Attribute Retrieval Service
Access Manager for WebLogic Server
Access Manager Plug-in for Edge Server
Access Manager Plug-in for Web Servers
Access Manager Web Security Runtime
Access Manager WebSEAL Application Development Kit
Access Manager WebSEAL
These components use the same common set of software depicted in Figure 3-1
on page 75, with some additional components that we describe in the following
sections.
PDJRTE
Operating System
WebSphere
Application
Server + GSKit
Tivoli Security Utilities
PDlic
PDWPM

82 Certification Study Guide: IBM Tivoli Access Manager for e-business 6.0
3.3.1 Web Security Runtime (PDWebRTE)
The Access Manager Web Security Runtime contains shared authentication
library files used for Web Security systems. As a prerequisite, PDWebRTE
requires Access Manager RTE installed (and all other dependent software).
All other Web Security components run on top of PDWebRTE, as shown in
Figure 3-3.
Figure 3-3 Tivoli Access Manager Web Security components
3.3.2 WebSEAL (PDWeb)
Access Manager WebSEAL is a security manager for Web-based resources.
WebSEAL is a high-performance, multi-threaded Web server that applies
fine-grained security policy to the protected Web object space. WebSEAL can
provide single sign-on solutions and incorporate back-end Web application
server resources into its security policy.
As shown in Figure 3-3, WebSEAL runs on top of the Web Security Runtime
component. Like the other components, WebSEAL can be configured using the
pdconfig utility. In addition the configuration tool amwebcfg can be used for
configuration or unconfiguration of a WebSEAL server.
Operating System
GSKit
LDAP Client
Tivoli Security Utilities
PDRTE
PDlic
PDWebRTE
PDWeb
PDWebADK
PDPlgES +
IBM WebSphere
Edge
PDWebPI
PDWPIapa
PDWPIIHS
PDWPIiPlanet
PDIIS
PDAuthADK

Chapter 3. Installation 83
3.3.3 The Plug-in for Edge Server (PDPlgES)
The Access Manager Plug-in for Edge Server (PDPlgES) also runs on top of
PDWebRTE. The Access Manager Plug-in for Edge Server adds authentication
and authorization functionality to the IBM WebSphere Edge Server product. That
means IBM WebSphere Edge Server is an additional prerequisite for the
PDPlgES installation. We used pdconfig to configure PDPlgES. The
configuration utility performs the following tasks:
1. Creates registry objects for the server.
2. Adds the server to the security groups, ivacld-servers and SecurityGroup.
3. Creates an SSL certificate.
4. Obtains an SSL-signed certificate from the Tivoli Access Manager Policy
Server.
5. Configures the Edge Server caching proxy to use the Plug-in for Edge Server
by setting directives in the Edge Server caching proxy configuration file.
6. Restarts the Edge Server caching proxy process, ibmproxy.
7. Starts the Plug-in for Edge Server object space manager utility by using the
wesosm utility. This utility updates the Tivoli Access Manager object space to
create a new object space container for the Plug-in for Edge Server.
3.3.4 WebSEAL ADK (PDWebADK)
The Access Manager WebSEAL ADK contains development APIs for the Tivoli
Access Manager cross-domain authentication service (CDAS), the Tivoli Access
Manager cross-domain mapping framework (CDMF), and the Tivoli Access
Manager Password Strength Module. This ADK requires PDWebRTE as well as
the Access Manager ADK as an additional prerequisite component. This
component also requires configuration by running the pdconfig tool.
3.3.5 Plug-in for Web Servers (PDWebPI)
Access Manager Plug-in for Web Servers manages the security of your
Web-based resources by acting as the gateway between your clients and secure
Web space. The plug-in implements the security policies that protect your Web
object space. The plug-in can provide single sign-on solutions, support Web
servers running as virtual hosts, and incorporate Web application server
resources into its security policy.
Access Manager Plug-in for Web Servers depends on the operating system and
Web server in use. All Access Manager Plug-ins for Web Servers have common
components and additional Web-server-specific components, as illustrated in
Figure 3-3. The Web-server-specific components depend on the type of

84 Certification Study Guide: IBM Tivoli Access Manager for e-business 6.0
supported Web server and the supported operating system. The following
combination of Web servers and operating systems are supported:
Apache 1.3.27
– Solaris 8 and 9
– Linux Red Hat 3 and 4, SLES 8 and 9
Apache 2.0.48
–AIX 5.2
– Solaris 10
– Linux Red Hat 3 and 4, SLES-9
IBM HTTP Server 1.3.26
– AIX 5.1 and 5.2
– Solaris 8 and 9
– Linux Red Hat 3 and 4, SLES-8
IBM HTTP Server 2.0.47 and 6.0
– AIX 5.1, 5.2
– Solaris 10
– Linux Red Hat 3 and 4, SLES-9
Sun ONE Web Server 6.0
– AIX 5.1, 5.2
– Solaris 8 and 9
Sun Java System Web Server 6.1
– AIX 5.1 and 5.2
– Solaris 8 and 9
IIS 6.0
– Windows 2003 Server
3.3.6 Attribute Retrieval Service (PDWebARS)
The Access Manager Attribute Retrieval Service is used in conjunction with the
WebSEAL authorization decision information (ADI) feature. This service provides
communication and format translation services between the WebSEAL
entitlement service library and an external provider of authorization decision
information. Since this component is a Java application that runs as an IBM
WebSphere Application, the only prerequisite software component is the
PDJRTE and an installed WebSphere Application Server configured with the
Access Manager Runtime for Java. This is shown in Figure 3-4.

Chapter 3. Installation 85
Figure 3-4 Tivoli Access Manager Attribute Retrieval Service
After the installation of the product, we did not use the pdconfig tool, we just
deployed the application using the WebSphere Application Server Admin
console.
3.3.7 Access Manager for WebLogic Server (PDWLS)
Access Manager for WebLogic Server extends Tivoli Access Manager to support
applications written for BEA WebLogic Server. Using the BEA WebLogic Server
Security Service Provider Interface, Access Manager for WebLogic Server
authenticates users via a user registry administered by Tivoli Access Manager.
Group membership in the user registry can be used to affect authorization
decisions made by WebLogic Server. The only prerequisite software for the
installation is PDJRTE. This is shown in Figure 3-5.
Figure 3-5 Tivoli Access Manager for WebLogic Server
You can also install WebSEAL or the Access Manager Plug-in for Web Servers
to extend the security features of Access Manager for WebLogic Server to
provide support for an end-user single sign-on experience. This component
PDJRTE
Operating System
WebSphere
Application
Server + GSKit
PDlic
PDWebARS
PDJRTE
Operating System
WebLogic Server
PDlic
PDWLS

86 Certification Study Guide: IBM Tivoli Access Manager for e-business 6.0
enables WebLogic Server applications to use Tivoli Access Manager security
without requiring any coding or deployment changes.
3.4 Setting up a Session Management Server (PDSMS)
This section provides information about installing and configuring a Tivoli Access
Manager Session Management Server (SMS) system. The major role of the
Session Management Server is to manage and monitor sessions across
dispersed, clustered Web servers. The Session Management Server is an
optional component of Tivoli Access Manager. It runs as a service of the IBM
WebSphere Application Server, as show in Figure 3-6.
Figure 3-6 Tivoli Access Manager Session Management Server
The only prerequisite for the PDSMS installation is an installed and configured
WebSphere Application Server server. A Tivoli Access Manager environment
must exist before installing the Session Management Server. Access Manager
WebSEAL or Access Manager Plug-in for Web Servers must be installed,
configured, and running.
In addition, if you decide to enable WebSphere global security (to ensure that
administration actions are secured), you need to create three groups in
WebSphere Application Server that can be used to manage the Session
Management Server environment:
A group for administrators, for example: sms-administrators
A group for delegators, for example: sms-delegators
A group for clients, for example: sms-clients
The names of the groups must follow the naming conventions of the user registry
used by WebSphere Application Server. You can use existing groups for this
purpose, if desired.
As an installation option you can enable SSL for the communication between the
Access Manager servers in the replica set and the IBM WebSphere Application
Server where the Session Management Server is installed.
PDSMS
Operating System
WebSphere Application
Server + GSKit
PDlic

Chapter 3. Installation 87
If you plan to use Access Manager certificates to authenticate with PDSMS, or if
you want to use the Access Manager sec_master user (or other users and
groups defined in the secAuthority=Default suffix) to administer PDSMS using
either the session management command line or Web interface, then you must
unconfigure the base DN in the LDAP user registry used by WebSphere
Application Server.
An optional prerequisite component is a DB2 database. DB2 is required only if
you are intending to use a DB2 database to store login history information. Also,
an IBM DB2 JDBC™ driver must be available to the WebSphere Application
Server.
Setting up a Session Management Server system is a three-step process that
consists of installation, deployment to the application server or cluster, and
configuration. After installing the Session Management Server using native
installation utilities, the DSess.ear file must be deployed as a WebSphere
Application Server application.
After installing the Session Management Server you can configure the server
using the following command:
smscfg -action config
After installing the Session Management Server, you must reconfigure WebSEAL
or the Plug-in for Web Servers (or both) to use the Session Management Server
for managing sessions.
Along with the PDSMS installation, the structure of your session realms and
associated replica set must be planned and mapped. Determine whether you
want to have replicated Session Management Server instances that provide
failover capability and improved performance.
3.4.1 Session Management Server administrative interfaces
The Session Management Server offers two kinds of administration interfaces:
The session management Web interface (PDSMSWP)
The session management command line interfaces (PDSMSCLI)
Both interfaces and dependent software are shown in Figure 3-7 on page 88.
Note: After deployment, do not start the DSess.ear application until the
Session Management Server has been configured using the smscfg
command.

88 Certification Study Guide: IBM Tivoli Access Manager for e-business 6.0
Figure 3-7 Session Management Server administrative interfaces
You can administer the Session Management Server either by using the Tivoli
Access Manager pdadmin command line utility located on the participating Tivoli
Access Manager Authorization Server or by using a Web interface, which is part
of the Tivoli Access Manager Web Portal Manager.
Session Management Server command line interface
Before you install and configure the session management command line
interface, the following steps are required:
As you can see from the Figure 3-7, to administer the Session Management
Server from the command line, the Access Manager Command Line package
(PDSMSCLI) must be installed on the Authorization Server.
WebSEAL or the Plug-in for Web Servers component must be installed,
configured, and running before the Session Management Server can operate.
The Session Management Server and the Authorization Server components
must be installed and configured before configuring the Access Manager
session management command line component.
The configuration requires the name of the server that hosts the Session
Management Server and the port number to be used for communication
between the server where the Session Management Server is hosted and the
Authorization Server that is hosting the command line extension utility.
If more than one Session Management Server is installed for failover and
performance reasons, the host names and communication port numbers for
each Session Management Server must be configured.
Determine whether you want to enable SSL for session management
command line interface communications. You can enable SSL between the
Session Management Server and the Authorization Server so that all pdadmin
command communications are secure.
PDJRTE
Operating System
WebSphere
Application
Server + GSKit
Tivoli Security Utilities
PDlic
PDWPM
Operating System
GSKit
LDAP Client
Tivoli Security Utilities
PDRTE
PDlic
PDACL
PDSMSCLI
PDSMSWPM

Chapter 3. Installation 89
If you plan to use the Tivoli Access Manager sec_master user (or other users
and groups defined in the secAuthority=Default suffix) to administer PDSMS
using either the session management command line or Web interface, then
you must unconfigure the base DN in the LDAP user registry used by
WebSphere Application Server.
To configure (or unconfigure) the Session Management Server command line
interface, use the pdsmsclicfg utility. This utility can be run either interactively,
where the user is prompted to provide configuration information, or silently,
where the utility accepts input from a response file. During configuration, the
program prompts the user to specify the path to the configuration file for an
already configured aznAPI application. If the Authorization Server (PDAcld) is
installed and configured on the hosting system, the prompts default to the
ivacld.conf configuration file.
Run the command from the system hosting the Session Management Server.
The pdsmsclicfg utility writes to the host Authorization Server configuration file,
ivacld.conf.
The program prompts the user to specify the location of the Web service. The
location of the Web service is defined by a host name and port that are
separated by a semicolon. The user can specify multiple locations, when each
location is separated by a comma. If this Web service uses a secure connection,
the program prompts the user for the SSL options. The name of the configuration
file for the authorization application and SSL files are saved during configuration
to the
pdsmsclicfg.conf configuration file. This configuration information will be
used during unconfiguration to determine the location of the pdsmsclicfg.conf
configuration file. The SSL configuration information is used as input into the
backup utility. The presence of this configuration file is also used to determine
the configuration status of the plug-in.
Optionally this command can be executed in the background if you choose the
pdconfig utility for performing configuration task.
Session Management Server Web interface (PDSMSWPM)
Before you install and configure the session management Web interface system,
you must perform the following pre-installation tasks:
Figure 3-7 on page 88 shows that PDSMSWPM must be installed on the
system that hosts the Web Portal Manager (PDWPM). So, as a prerequisite
WPM (and all software that WPM requires) needs to be installed, and up and
running. The session management Web interface can run as a service in
WebSphere Application Server and it can be accessed through the WPM
Web interface.

90 Certification Study Guide: IBM Tivoli Access Manager for e-business 6.0
WebSEAL or the Plug-in for Web Servers component must be installed,
configured, and running before the Session Management Server can operate.
The Session Management Server component must be installed and
configured before configuring the session management Web Interface
component.
The configuration requires the name of the server that hosts the Session
Management Server and the port number to be used for communication
between the server where the Session Management Server is hosted and the
Authorization Server that is hosting the command line extension utility.
If more than one Session Management Server is installed for failover and
performance reasons, the host names and communication port numbers for
each Session Management Server must be configured.
Determine whether you want to enable SSL for session management Web
interface communications. You can enable SSL between the Web Portal
Manager and the IBM WebSphere Application Server hosting the Session
Management Server so that all communications between the Web interface
and the Session Management Server are secure.
Decide whether to use existing Web Portal Manager certificates for the SSL
communication between the Web Portal Manager and the server hosting the
Session Management Server, or to use the IBM WebSphere Application
Server trust store certificates.
If you plan to use the Tivoli Access Manager sec_master user (or other users
and groups defined in the secAuthority=Default suffix) to administer the
Session Management Server using either the session management
command line or Web interface, then you must unconfigure the base DN in
the LDAP user registry used by WebSphere Application Server.
The pdsmswpmcfg utility configures or unconfigures the Session Management
Server Web Portal Manager extensions. When configured, the Session
Management Server can be administered using Web Portal Manager.

© Copyright IBM Corp. 2006. All rights reserved. 91
Chapter 4. Configuration and
customization
This chapter discusses various configuration and customization tasks that are
optional or mandatory after the installation and initial configuration of the Access
Manager environment. Depending on your particular implementation, various
configuration steps can be performed, including enabling single sign-on (SSO)
with forms-based SSO (FSSO), LTPA, or TAI configuration, then e-community
SSO, and so on. Depending on your environment, various ACLs, POPs, and
authorization rules can be implemented. Besides the traditional junction, Access
Manager WebSEAL version 6.0 now supports two new types of junctions, the
transparent and virtual host junctions, and a set of new accompanying junction
options. These configuration tasks are discussed in this chapter, along with a
new Access Manager component: the Session Management Server.
4

92 Certification Study Guide: IBM Tivoli Access Manager for e-business 6.0
4.1 Basic customization tasks
After the installation and initial configuration of the Access Manager security
environment there are numerous additional configuration and customization
tasks that need to be performed on Access Manager components. What tasks
you need to perform will depend on how you have planned and architected your
Access Manager deployment. Since the Access Manager environment may
include additional non-mandatory components, their configuration will have to be
performed as well.
Two configuration tasks are related to major services that the Access Manager
system performs: authorization and authentication. Some of the basic
configuration tasks related to the authorization service are:
Configuration of additional secure domains.
Every new secure domain has its own policy database.
Customization of the policy database that includes:
– Configuration of the protected object space.
– Definitions of security policies through use of ACLs, POPs, and
authorization rules.
– Assigning users and groups to ACL, POPs, and authorization rules.
The customization of the authentication service depends on the type and number
of resource managers that are in use for the particular Access Manager secure
domain. Access Manager comes with some “out of the box” resource managers
that are introduced in Chapter 2, “Planning” on page 27. In this chapter, we
concentrate on the WebSEAL customization since this is the resource manager
offering the most customization options.
Some of the resource managers’ customization tasks (like, for example, creating
a WebSEAL junction) are again connected with the customization of the policy
database. Also in the policy database you can set up global user policies like
minimum password length, time of day access, and so on.
4.1.1 Secure domain
A secure domain consists of all the resources that require protection along with
the associated security policy used to protect those resources. The resources
that you can protect depend on the resource managers that are installed. The
concept of more than one secure domain is shown in Figure 2-4 on page 36. Any
security policy that is implemented in a domain affects only the objects in that
domain. Users with authority to perform tasks in one domain do not necessarily
have the authority to perform those tasks in other domains. For small and
moderately sized enterprises, one domain is usually sufficient. If only one

Chapter 4. Configuration and customization 93
domain is needed, no explicit action needs to be taken. Tivoli Access Manager
automatically creates a domain called
Default, referred to as the management
domain, as part of its initial configuration. This domain is used by Tivoli Access
Manager to manage the security policy of all domains and is available for
managing other protected resources as well. In large enterprises, however, you
might want to define two or more domains. Each domain is given a name and is
established with a unique set of physical and logical resources.
A domain can be created using the pdadmin CLI or WPM. An example of a
command that creates the RedBooks domain with domain administrator ID
book_master and password passw0rd is shown here:
pdadmin sec_master> domain create RedBooks book_master passw0rd -desc
"Test Domain"
All other domain-related functionality (listing, modifying, and deleting domains) is
supported in both administration interfaces. An administrator in the management
domain can create additional secure domains. A secure domain is given a
unique name, and a domain administrator must be specified when the domain is
created.
The security administrator can define the resources in a domain based on
geography, business unit, or major organizational division within the enterprise.
The security policy defined in the domain affects only the resources in that
domain, which allows data to be partitioned and managed completely
independently. A multiple domain environment can be invaluable when there is a
business need to keep a physical separation between different sets of data.
An administrator assigned to a specific domain has authority only within that
domain. Within a domain, an administrator can create users, groups, and other
objects. Users and groups are specific to their domain and are not allowed to
access resources that are contained in other domains. However, by default, an
administrator can view users and groups defined in the user registry that are not
necessarily Tivoli Access Manager users or groups. This is beneficial if, for
example, an administrator wants to import a user or group from a different
domain. Conversely, if you are the administrator of the management domain and
want to limit the registry data that a domain administrator can access, you can
add the allowed-registry-substrings stanza entry to the [domains] stanza in the
ivmgrd.conf configuration file for the Policy Server. Resources that are defined
and access controls for resources that are protected by Tivoli Access Manager
are maintained on a per domain basis. Resources and access controls for
resources cannot be shared among domains.
Additional Tivoli Access Manager components can be made a member of a
specific domain during their initial runtime component configuration since there is
an option to define a domain name for the PDRTE. Java applications, on the

94 Certification Study Guide: IBM Tivoli Access Manager for e-business 6.0
other hand, are configured into an Access Manager domain by specifying the
domain name during the configuration of the Java application.
4.1.2 Protected object space
Tivoli Access Manager represents resources within a domain using a virtual
representation called the
protected object space. The protected object space is
the logical and hierarchical portrayal of resources belonging to a domain.
The protected object space consists of two types of objects:
Resource objects Resource objects are the logical representation of actual
physical resources, such as files, services, Web
resources, message queues, and so on, in a domain.
Container objects Container objects are structural components that enable
you to group resource objects hierarchically into distinct
functional regions.
Security policy can be applied to both types of objects. Figure 4-1 shows a logical
representation of a protected object space with multiple container and resource
objects.
Figure 4-1 Access Manager protected object space
The structural top, or start, of the protected object space is the root container
object, which is represented by a forward slash (/) character. Below the root
container object are one or more container objects. Each container object
Root
(/)
Web ObjectsManagement Custom
HR Web
General
Web
Finance
Web
index.htmlcgi-bin ledger reports
1.html 2.html 3.html
1.exe 2.exe
Containter Objects
Resources Objects
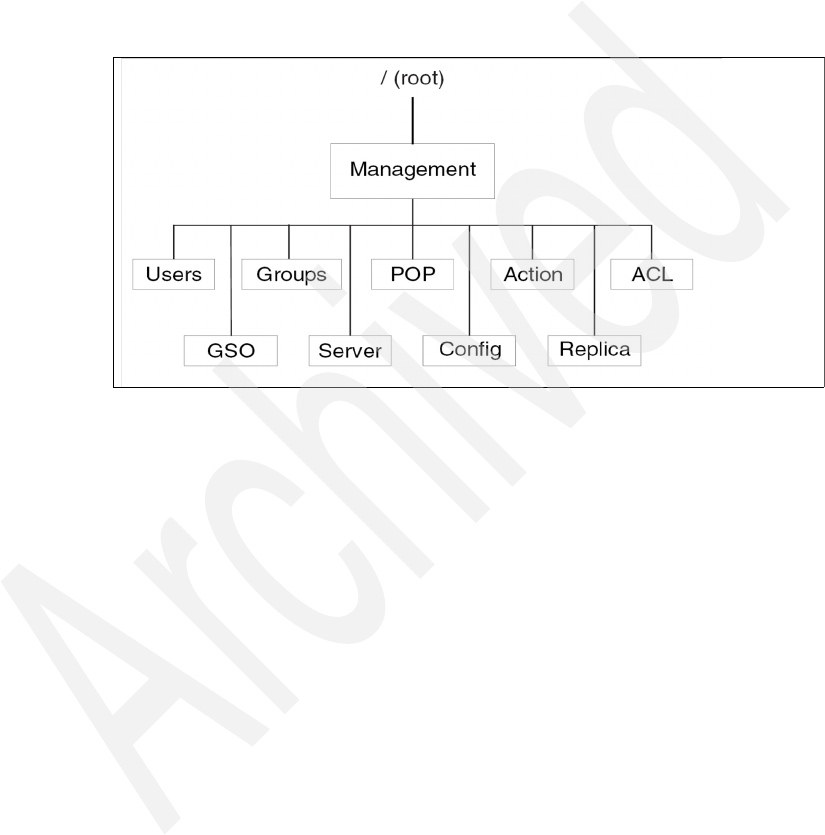
Chapter 4. Configuration and customization 95
represents an object space consisting of a related set of resources. These
resources can be resource objects or other container objects.
Tivoli Access Manager creates an object space called /Management that
consists of the objects used to manage Tivoli Access Manager itself. Figure 4-2
shows the complete /Management object space that is created during the
installation of Tivoli Access Manager.
Figure 4-2 Access Manager default object space
Each resource manager that protects a related set of resources creates its own
object space. For instance, the WebSEAL resource manager, which protects
Web-based information and resources, creates an object space called
/WebSEAL.
Using both administrative tools, you can perform the following actions on the
object space:
Create object space
List object space
Delete object space
Web Portal Manager can be used to perform some additional actions:
Copying object space
Importing object spaces
Exporting object spaces
In addition to object space actions, similar actions can be performed on the
objects:
Create object
List object

96 Certification Study Guide: IBM Tivoli Access Manager for e-business 6.0
Delete object
Import object
Export object
Again, only WPM can be used to import and export objects from the object
space.
4.1.3 Users and groups
Tivoli Access Manager maintains information about Tivoli Access Manager users
and groups in the user registry. Users and groups that already exist in the user
registry can be imported into Tivoli Access Manager. If a user or group does not
already exist in the user registry, it can be created directly within Tivoli Access
Manager.
When a user is authenticated to Tivoli Access Manager, a user credential is
returned. This credential is used by other Tivoli Access Manager functions to
uniquely identify the user making the request.
Tivoli Access Manager supports different types of users. When a domain is
created, a special user known as the
domain administrator is created. For the
management domain, the domain administrator is
sec_master. The sec_master
user and associated password are created during the configuration of the Tivoli
Access Manager Policy Server. For other domains, the user ID and password of
the domain administrator are established when the domain is created. The
domain administrator has nearly complete control of the domain. The domain
administrator is added as a member of the Tivoli Access Manager
iv-admin
group within the domain. The iv-admin group represents those users with domain
administration privileges. When adding users to the iv-admin group, ensure that
you do not compromise the security of your domain. Another predefined group,
ivmgrd-servers contains the Policy Servers and the Policy Proxy Servers. By
default, members of this group are authorized to delegate requests to other Tivoli
Access Manager servers on behalf of the requestor.
There are two more predefined (built-in) Access Manager groups:
any-other Represents all authenticated users.
unauthenticated Represents all users who have not been authenticated by
Access Manager.
Those two groups have a very important role in defining and applying ACLs, as
described in “Evaluating an ACL” on page 103.

Chapter 4. Configuration and customization 97
Managing users and groups
Users and groups in Access Manager can be managed using the WPM or the
pdadmin CLI. All standard actions on the groups and users can be performed,
including:
Create a user or group
Import users or groups
Modify existing users or groups
Delete users or groups
List users or groups
Show existing user properties
These actions on users begin with user followed by the type of action with
appropriate options in pdadmin.
pdadmin > user [create | import | list | modify | show | delete] options
The commands performed on groups begin with group:
pdadmin > group [create | import | list | modify | show | delete] options
Changing a password
There is no explicit command for managing user passwords. Since the user
password is actually one of the user attributes, the user modify command is
used to change (or set up) a user password.
pdadmin > user modify user_name password password
Every time you create a new user you need to set the password.
When setting or changing a password, the password must comply with the
following policies:
The defined Tivoli Access Manager password policy
The password policy for the underlying operating system
The password policy for the underlying user registry
When creating a new user you also need to enable the user in the Access
Manager domain:
pdadmin> user modify user_name account-valid yes
If the account is disabled (not explicitly enabled) a user cannot log in.
The other necessary step in setting up new users in Access Manager is to make
the password valid. This step is not necessary if the user does not need to supply
a password during authentication (for example, the user logs into the system with
a certificate).
pdadmin> user modify user_name password-valid yes

98 Certification Study Guide: IBM Tivoli Access Manager for e-business 6.0
If the value is no, the password will appear to be expired and the user will be
unable to log in using the password until an administrator sets the valid state to
yes.
Setting user policy
Besides the security policy that we describe later in 4.1.4, “Security policy” on
page 99, every user has to abide by user policies, such as password policies,
login-failure policies, access policies, and account expiration policies. Those
policies can be defined globally for all users in the Access Manager domain or
they can be specified for a single user. The format of the command is:
pdadmin > policy set options [-user user_name]
The options are the following:
account-expiry-date {unlimited|absolute_time|unset}
Sets the account expiration date. The default value is unset.
disable-time-interval {number|unset|disable}
Sets the time, in seconds, to disable each user account when the maximum
number of login failures is exceeded. The default value is 180 seconds.
max-login-failures {number|unset}
Sets the maximum number of login failures allowed. Tivoli Access Manager
does not impose an upper limit for the maximum number allowed. Instead,
use a range from zero to a number that represents the value that is most
logical for the parameter you are trying to set. If the number is too large, it
might render the login policy ineffective. The default value is 10.
max-password-age {unset|relative_time}
Sets the maximum time, in days, that a password will be valid. The
relative_time option is relative to the number of days since the last password
change occurred.
max-password-repeated-chars {number|unset}
Sets the maximum number of repeated characters allowed in a password.
The default value is 2.
min-password-alphas {unset|number}
Sets the minimum number of alphabetic characters required in a password.
The default value is 4.
min-password-length {unset|number}
Sets the minimum password length. Tivoli Access Manager does not impose
an upper limit for the minimum number allowed. The default value is 8.
min-password-non-alphas {unset|number}
Sets the minimum number of non-alphabetic characters required in a
password. The default value is 1.

Chapter 4. Configuration and customization 99
password-spaces {yes|no|unset}
Sets the policy of whether spaces are allowed in passwords. The default
value is unset.
tod-access {{anyday|weekday|day_list}:{anytime|time_spec-time_spec}
[:{utc|local}]|unset}}
Sets the time of day access policy.
user user_name
Specifies the user whose policy information is to be set. If this option is not
specified, the general policy is set.
For any given policy, if a user has a specific policy applied, this specific policy
takes precedence over any general policy that might also be defined. The
precedence applies regardless of whether the specific policy is more or less
restrictive than the general policy set.
Password strength default values
Table 4-1 lists the password strength policies and the default values.
Table 4-1 Default values for password strength policy
To display some of the user policy settings use the following command:
pdadmin > policy get options [–user user_name]
If the user name is omitted, the returned value gives the settings for all users at a
global level. The options are the same as in the policy set command.
4.1.4 Security policy
The goal of any security policy is to adequately protect business assets and
resources with a minimal amount of administrative effort. First, you must define
what resources should be protected. These could be any types of data objects
such as files, directories, network servers, messages, databases, or Web
resources. Then, you must decide what users and groups of users should have
access to these protected resources. You also need to decide what type of
Policy Default Value
min-password-length 8
min-password-alphas 4
min-password-non-alphas 1
max-password-repeated-chars 2
password-spaces not set

100 Certification Study Guide: IBM Tivoli Access Manager for e-business 6.0
access should be permitted to these resources. Finally, you must apply the
proper security policy on these resources to ensure that only the right users can
access them (we already explained that resources are represented as objects in
the Policy Server object space).
Access to objects within a domain is controlled by applying a security policy to
the container and resource objects in the protected object space. To secure
network resources in a protected object space, each object must be protected by
a security policy. A security policy can be explicitly applied to an object or
inherited from objects above it in the hierarchy. You need to apply an explicit
security policy in the protected object space only at those points in the hierarchy
where the rules must change.
Adopting an inherited security scheme can greatly reduce the administration
tasks for a domain. The power of security policy inheritance is based on the
following principle:
Any object without an explicitly attached security policy inherits the policy of
its nearest container object with an explicitly set security policy. The
inheritance chain is broken when an object has an explicitly attached security
policy.
Security policy inheritance simplifies the task of setting and maintaining access
controls on a large protected object space. In a typical object space, you need to
attach only a few security policies at key locations to secure the entire object
space. Therefore, it is called a
sparse security policy model.
Security policy is defined using a combination of:
Access control lists (ACLs)
An access control list specifies the predefined actions that a set of users and
groups can perform on an object. For example, a specific set of groups or
users can be granted
read access to the object.
Protected object policies (POPs)
A protected object policy specifies access conditions associated with an
object that affect all users and groups. For example, a
time-of-day restriction
can be placed on the object that excludes all users and groups from
accessing the object during the specified time.
Authorization rules
An authorization rule specifies a complex condition that is evaluated to
determine whether access will be permitted. The data used to make this
decision can be based on the context of the request, the current environment,
or other external factors. For example, a request to modify an object
more
than five times in an 8-hour period
could be denied.

Chapter 4. Configuration and customization 101
A security policy is implemented by strategically applying ACLs, POPs, and
authorization rules to those resources requiring protection. The Tivoli Access
Manager authorization service makes decisions to permit or deny access to
resources based on the credentials of the user making the request and the
specific permissions and conditions set in the ACLs, POPs, and authorization
rules.
ACL policy
The policy that defines who has access to an object, and what operations can be
performed on the object, is known as the
ACL policy. Each ACL policy has a
unique name and can be applied to multiple objects within a domain. An ACL
policy consists of one or more entries describing:
The names of users and groups whose access to the object is explicitly
controlled
The specific operations permitted to each user, group, or role
The specific operations permitted to the special any-other and
unauthenticated user categories
Using ACL policies with the authorization service
Tivoli Access Manager relies on ACL policies to specify the conditions necessary
for a particular user to perform an operation on a protected object. An ACL policy
consists of one or more ACL entries. An
ACL entry defines a user or group and
permissions that user or group has on a protected object. A domain administrator
can manage ACL entries before or after the ACL policy is attached to domain
resources.
A
permission is an action that is defined by an action bit in an action group. An
action group is a set of permissions. A domain administrator can add to or
remove from an ACL entry. When Tivoli Access Manager is installed, the primary
action group is created and contains 18 permissions. These permissions are
defined using action bits. Actions, or permissions, are represented by single
alphabetic ASCII characters (a-z, A-Z). The values are defined in Table 4-2 on
page 102.

102 Certification Study Guide: IBM Tivoli Access Manager for e-business 6.0
Table 4-2 Action bits and WPM category of the default primary action group
You can perform the following ACL policy tasks:
Create an ACL policy
Modify the description of an ACL policy
List ACL policies
View an ACL policy
Clone an ACL policy
Import ACL policies
Export all ACL policies
Export a single ACL policy
Export multiple ACL policies
Attach an ACL policy to an object
Locate where an ACL policy is attached
Action bit Description of permission Category
a Attach Base
AAdd Base
bBrowse Base
B Bypass protected object policy (POP) Base
c Control Base
d Delete Generic
g Delegation Base
l List directory Application
m Modify Generic
N Create Base
R Bypass rule Base
r Read Application
s Server administration Generic
tTrace Base
TTraverse Base
v View Generic
W Password Base
x Execute Application

Chapter 4. Configuration and customization 103
Detach an ACL policy from an object
Delete an ACL policy
These actions can be performed using either the pdadmin CLI or the WPM GUI.
Importing, exporting, or cloning ACL policies can only be performed with WPM.
For a detailed syntax of ACL commands refer to the IBM Tivoli Access Manager
Version 6.0 Administration Guide, SC32-1686.
Evaluating an ACL
Tivoli Access Manager follows a specific evaluation process to determine the
permissions granted to a particular user by an ACL. When you understand this
process, you can determine how best to keep unwanted users from gaining
access to resources. Access Manager distinguishes between authenticated and
unauthenticated requests.
Evaluating authenticated requests
Tivoli Access Manager evaluates an authenticated user request in the
following order:
a. Match the user ID with the ACL’s user entries. The permissions granted
are those in the matching entry.
Successful match: Evaluation stops here.
Unsuccessful match:
Continue to the next step.
b. Determine the groups to which the user belongs and match with the ACLs
group entries: If more than one group entry is matched, the resulting
permissions are a logical
or (most permissive) of the permissions granted
by each matching entry.
Successful match: Evaluation stops here.
Unsuccessful match: Continue to the next step.
c. Grant the permissions of the
any-other entry (if it exists).
Successful match: Evaluation stops here.
Unsuccessful match: Continue to the next step.
d. An implicit any-other entity exists when there is no any-other ACL entry.
This implicit entry grants no permissions.
Successful match: No permissions granted. End of evaluation process.
Evaluating unauthenticated requests
Tivoli Access Manager evaluates an unauthenticated user by granting the
permissions from the ACLs unauthenticated entry.
The unauthenticated entry is a mask (a bitwise “and” operation) against the
any-other entry when permissions are determined. A permission for

104 Certification Study Guide: IBM Tivoli Access Manager for e-business 6.0
unauthenticated is granted only if the permission also appears in the
any-other entry.
Because unauthenticated depends on any-other, it makes little sense for an ACL
to contain unauthenticated without any-other. If an ACL does contain
unauthenticated without any-other, the default response is to grant no
permissions to unauthenticated.
Protected object policies
A protected object policy (POP) specifies security policy that applies to an object
regardless of what user or what operation is being performed. Each POP has a
unique name and can be applied to multiple objects within a domain.
The purpose of a POP is to impose access conditions on an object based on the
time of the access and to indicate whether the access request should be audited.
Specifically, the conditions you can apply are:
POP attributes, such as warning mode, audit level, and time-of-day.
The authentication-strength POP allows for the configuration of step-up
authentication to enforce stronger security for certain parts of the object
space.
The quality-of-protection POP implements privacy and integrity mechanisms
such as encryption (SSL) and hash algorithms.
The network-based authentication POP makes it possible to control access to
objects based on the IP address of the client.
Tivoli Access Manager enforces the following POP attributes:
Name Specifies the name of the policy. This attribute relates to
the pop-name variable in the pop command
documentation.
Description Specifies the descriptive text for the policy. This attribute
appears in the pop show command.
Warning mode Provides to administrators a means to test ACLs, POPs,
and authorization rules. Warning mode provides a way to
test the security policy before it is made active. The
attribute has value yes or no.
Audit level Specifies the type of auditing: all, none, successful
access, denied access, or errors. Audit level informs the
authorizations service that extra services are required
when permitting access to the object.

Chapter 4. Configuration and customization 105
Time-of-day access Day and time restrictions for successful access to the
protected object. Time-of-day places restrictions on
access to the object.
Each resource manager or plug-in can optionally enforce one or more of the
following attributes:
IP endpoint authorization method policy
Specifies authorization requirements for access from
members of external networks. The IP endpoint
authentication method policy places restrictions on the
access to the object.
EAS trigger attributes Specifies an External Authorization Service (EAS)
plug-in that is invoked to make an authorization decision
using the externalized policy logic of the customer.
Quality of Protection Specifies the degree of data protection: none, integrity,
or privacy. Quality of Protection informs the
authorizations service that extra services are required
when permitting access to the object. Note, when the
quality of protection level is set to either integrity or
privacy, WebSEAL requires data encryption through the
use of Secure Socket Layer (SSL).
Similar to ACL management, the following tasks can be performed on a POP
policy:
Create a POP policy
Modify the description of a POP policy
List POP policies
View a POP policy
Clone a POP policy
Import POP policies
Export all POP policies
Export a single POP policy
Export multiple POP policies
Attach a POP policy to an object
Locate where a POP policy is attached
Detach a POP policy from an object
Delete a POP policy
All these actions can be performed using either the pdadmin CLI, or the WPM
GUI. Importing, exporting, or cloning POP policies can only be performed with
WPM. For a detailed syntax of POP commands refer to the IBM Tivoli Access
Manager Version 6.0 Administration Guide, SC32-1686.

106 Certification Study Guide: IBM Tivoli Access Manager for e-business 6.0
Authorization rules
Authorization rules are defined to specify conditions that must be met before
access to a protected object is permitted. A rule is created using a number of
boolean conditions that are based on data supplied to the authorization engine
within the user credential, from the resource manager application, or from the
encompassing business environment. The language of an authorization rule
allows customers to work with complex, structured data by examining the values
in that data and making informed access decisions. This information can be
defined statically within the system or during the course of a business process.
Rules can also be used to implement extensible, attribute-based authorization
policy by using attributes within the business environment or attributes from
trusted external sources.
A Tivoli Access Manager authorization rule is a policy type similar to an access
control list or a protected object policy. The rule is stored as a text rule within a
rule policy object and is attached to a protected object in the same way and with
similar constraints as ACLs and POPs.
How authorization rules differ from ACLs and POPs
ACLs take a given predefined set of operations and control which users and
groups have permission to perform those operations on a protected object. For
example, a user’s ability to read data associated with an object is either granted
or denied by an ACL policy. POPs apply to all users and groups and control
conditions that are specific to a particular protected object. For example,
time-of-day access excludes all users and groups from accessing an object
outside of the times set in the time-of-day policy.
Rules enable you to make decisions based on the attributes of a person or object
and the context and environment surrounding the access decision. For example,
you can use a rule to implement a time-of-day policy that depends on the user or
group. You also can use a rule to extend the access control capabilities that ACLs
provide by implementing a more advanced policy, such as one based on quotas.
While an ACL can grant a group permission to write to a resource, a rule can go
a step further by enabling you to determine whether a group has exceeded a
specific quota for a given week before permitting that group to write to a
resource.
When to use authorization rules
In the Tivoli Access Manager authorization process, all three policy objects—the
ACL, the POP, and the authorization rule—must permit access to a protected
object before access to the object is granted. Authorization rules provide the
flexibility needed to extend an ACL or POP by tailoring the security policy to your
needs.

Chapter 4. Configuration and customization 107
Although authorization rules can be used to extend the policy implemented by
other Tivoli Access Manager policy types, they are not simply extensions of the
existing policy types. An authorization rule is a policy type that is rich enough in
functionality to replace the ACL and POP. However, using ACLs and POPs
generally provides better performance. Therefore, use a rule to complement
these policies instead of replacing them.
Authorization rules detail
The Access Manager authorization rules engine is implemented using an XSL
parser. This defines how the inputs to the rules engine must be specified.
The two inputs to an XSL parser are:
Document An XML document. In the case of the Access Manager
authorization rules engine, this is a document, built
internally, that contains all of the required access decision
information (ADI).
Stylesheet An XSL document. In the case of the Access Manager
authorization rules engine, this is a document built from
the configured rule for the object being accessed.
The output from an XSL parser is a new version of the document formatted using
the stylesheet. In the case of the Access Manager authorization rules engine, the
rules must be written in such a way that this
formatting causes the output to be
the access decision.
Figure 4-3 shows how the logical components of the rules engine are
implemented using XML and XSL technology.
Figure 4-3 Authorization rules engine
XML processor
XML Document
XSL Document
!TRUE!
!FALSE!
!INDIFFERENT!
ADI
Rule
Rule Evaluation Engine
Result

108 Certification Study Guide: IBM Tivoli Access Manager for e-business 6.0
The XSL parser formats the XML document containing the authorization decision
information using an XSL formatted rule. The input XML document for the
transformation contains a definition for how the authorization engine can retrieve
one of the following sources for the ADI:
User credential entitlement that is requesting the authorization
Application context information that is passed in by the access decision call
(passed in by the resource manager)
Tivoli Access Manager authorization engine context
Dynamic ADI retrieval entitlement services
The rule must be written in such a way that the output is one of the following
string identifiers:
!TRUE! (permit access)
!FALSE! (deny access)
!INDIFFERENT! (no opinion)
These identifiers ensure uniqueness in the event that an XSL rule is written
incorrectly and the evaluation returns incorrect information. Delimiting the
identifiers with an exclamation point (!) enables the evaluator to identify errant
cases. The identifiers should be the only text in the output document; although
they can be surrounded by white space. If a value other than the defined valid
values or an empty document is returned, the access decision fails and an error
code is returned to the resource manager to indicate that the rule is not
compliant.
Similar to ACL and POP management, the following tasks can be performed on
an authorization rule policy:
Create an authorization rule policy
Modify the description of an authorization rule policy
List authorization rule policies
Clone an authorization rule policy
Import authorization rule policies
Export all authorization rule policies
Export a single authorization rule policy
Export multiple authorization rule policies
Attach an authorization rule policy to an object
Locate where an authorization rule policy is attached
Detach an authorization rule policy from an object
Delete an authorization rule policy
For the detailed syntax of authorization rule commands refer to the IBM Tivoli
Access Manager Version 6.0 Administration Guide, SC32-1686.

Chapter 4. Configuration and customization 109
Authorization flow
Figure 4-4 shows where ACLs, POPs, and authorization rules fall in the
authorization process.
When an authorization decision request is received, the access control list for the
object is checked first. If this does not allow access to the object then the request
is denied. No further processing is required and no rule is evaluated.
If the ACL is satisfied, then the POP is checked. If the POP returns a
deny
decision (for example, if the time-of-day check fails), then the overall access is
denied. No further processing is required and no rule is evaluated.
If both the ACL and POP allow access, then the rules engine is called, and the
engine’s output ultimately determines whether access is permitted or denied.
Figure 4-4 Authorization decision flow
Note:
1. There are no equivalent pdadmin commands for importing, exporting, or
cloning authorization rules.
2. When providing rule text with the pdadmin utility, enclose the rule text in
double quotation marks ("). Double quotation marks embedded within the
rule text must be escaped with a backslash so that they are ignored by the
pdadmin utility. The XSL processor treats single and double quotation
marks equally for the purpose of defining text strings so they can be used
interchangeably, but they must always be paired appropriately.
For example:
pdadmin sec_master> authzrule create testrule1 "<xsl:if
test='some_piece_of_ADI =\"any string\"'>!TRUE!</xsl:if>"
ACL
Satisfied?
POP
Satisfied?
Rule
Decision?
Request “Deny”
“Deny” “Permit” / “Deny”
no no
yes yes
Permit / deny

110 Certification Study Guide: IBM Tivoli Access Manager for e-business 6.0
The authorization engine uses the following algorithm to process the policy
attached to a protected object:
1. Check ACL permissions. Details of this process are described in “Evaluating
an ACL” on page 103.
The ACL is also checked to determine whether the user (for whom the
authorization check is being made) has the additional privilege of being
unaffected by POP or authorization rule policy. This privilege is bestowed
when the user’s effective ACL for access to the object contains the B
permission to denote that POP policy is ignored, or the R permission to
denote that authorization rule policy is ignored.
2. When an authorization rule is attached to the object and the user does not
have the privilege of being unaffected by authorization rules, verify that all of
the ADI
1
is present for the coming rule evaluation. If it is not, then find it by
querying one of the available sources.
3. When there is a POP attached, check the Internet Protocol (IP) endpoint
authentication method policy.
4. When there is a POP attached, check the time-of-day policy on the POP.
5. When there is a POP attached, check the audit-level policy on the POP, and
audit the access decision as directed.
6. When an authorization rule is attached to the object and the user does not
have the privilege of being unaffected by authorization rules, check the
authorization rule policy.
7. When an external authorization service (EAS) operation or POP trigger
applies to this access decision, invoke the external authorization services that
apply.
If any of the ACL, POP, or authorization rule evaluations fail, then the access
request is denied. The external authorization service can override this decision
on its own, if it has been designed to do so, or it might choose not to participate in
the authorization decision at all.
Every ACL, POP, or authorization rule can be thought of as a policy. Fill in the
policy, specifying the appropriate access conditions. After the policy is complete,
apply it to any number of resources within the domain. Subsequent changes to
the policy are automatically reflected across the domain.
1
The data and attributes that are used by the authorization engine to evaluate a rule. Authorization
API attributes are name-value pairs that form the basis of all ADI that can be referenced in a rule or
presented to the authorization engine.

Chapter 4. Configuration and customization 111
Action groups
Tivoli Access Manager provides 18 predefined permissions for immediate use.
These permissions are stored in the predefined action group named
primary.
Each permission is associated with an action bit. These predefined permissions
are described in “Using ACL policies with the authorization service” on page 101
As additional resource managers are installed, additional action groups might be
created. A domain administrator can create additional action groups and add
new actions to previously created action groups as needed.
Resource manager software typically contains one or more operations that are
performed on protected resources. Tivoli Access Manager requires these
applications to make calls into the authorization service before the requested
operation is allowed to progress. This call is made through the authorization
application programming interface (authorization API) for both Tivoli Access
Manager services and other applications.
The authorization service uses the information contained in the ACL to provide a
simple yes or no response to the question: Does this user (group) have the r
permission (for example) to view the requested resource?
The authorization service has no knowledge about the operation requiring the r
permission. It is merely noting the presence, or not, of the r permission in the
ACL entry of the requesting user or group. The authorization service is
completely independent of the operations being requested. This is why it is easy
to extend the benefits of the authorization service to other applications.
4.1.5 Default security policy
When initially installed, Tivoli Access Manager establishes a predefined default
set of ACL policies to protect all objects in a domain. Those policies are placed
on different parts of the default protected object space tree shown in Figure 4-2
on page 95. A typical object space begins with a single explicit security policy
attached to the root container object. The root ACL must always exist and can
never be removed. Normally, this is an ACL with very little restriction. All objects
located in the object space inherit this ACL. Table 4-3 shows default ACL policies
and their positions in the object space.
Table 4-3 Default ACLs
ACL policy Permissions Position in object space
default-root group iv-admin TcmdbvaBR
any-other T
unauthenticated T
/ (root)

112 Certification Study Guide: IBM Tivoli Access Manager for e-business 6.0
This table shows that the /Management region of the protected object space
contains multiple container objects that each require a specific set of
permissions. If you want to modify default permissions you need to be aware of
the impact of ACL options on the /Management region in the object space. For
example, if you want users who are members of the PolicyAudit group to have
permission to find where the ACL “salary” is placed in the object tree, they need
permission to execute the following command:
pdadmin > acl find salary
This command can only be executed if the PolicyAudit group has the v
permission on the /Management/ACL object space. If this group needs to be
allowed to create and modify ACLs, then the additional permission m needs to
be assigned to this group.
Table 4-3 shows that there is no default ACL policy, but the inherited
default-management policy describes that, by default, members of the iv-admin
group have permission to manipulate ACLs.
default-management group iv-admin TcmdbsvaBtNWAR
group ivmgrd-servers Ts
any-other Tv
/Management
default-replica group iv-admin TcbvaBR
group ivmgrd-servers m
group secmgrd-servers mdv
group ivacld-servers md
/Management/Replica
default-config Group iv-admin TcmdbsvaBR
Any-other Tv
Unauthenticated Tv
/Management/Config
default-gso group iv-admin TcmdbvaBNR
any-other Tv
unauthenticated Tv
/Management/GSO
default-policy group iv-admin TcmdbvaBNR
any-other Tv
unauthenticated Tv
/Management/Policy
default-domain group iv-admin TcmdbvaBNR
group ivmgrd-servers v
/Management/Domain
default-management-proxy group iv-admin Tcbv
group ivmgrd-servers Tg
/Management/Proxy
ACL policy Permissions Position in object space

Chapter 4. Configuration and customization 113
4.2 WebSEAL customization
Different approaches are needed to provide different types of user access (for
example, unrestricted access or restricted access with passwords, SecurID
tokens, or PKI certificates) to a variety of back-end applications. This flexibility
should be provided within one security solution, and the management of this
security solution must support both centralized and distributed security
administration groups, while maintenance of the Web applications can be done
by other individual groups.
WebSEAL can enforce a high degree of security in a secure domain by requiring
users to provide proof of their identity. The following conditions apply to the
WebSEAL authentication process:
WebSEAL supports several authentication methods by default, and can be
customized to use other methods.
When both server and client require authentication, the exchange is known as
mutual authentication.
The WebSEAL server process is independent of the authentication method.
The result of successful authentication to WebSEAL is a Tivoli Access
Manager user identity.
WebSEAL uses this identity to build a credential for that user.
The authorization service uses this credential to permit or deny access to
protected objects after evaluating the ACL permissions, POP conditions, and
authorization rules governing the policy for each requested resource.
This flexible approach to authentication allows the security policy to be based on
business requirements and not physical network topology.
Here are some of the technical requirements for authentication that WebSEAL
has to address:
Authentication
Enforce authentication of users, where the type of authentication depends on
the resources they want to access. Sometimes all users need to be
authenticated, sometimes only users that want to access some protected
URLs or applications need to identity themselves.
User-based authorization
Perform an initial user-based authorization check (such as, decide whether a
user should be allowed to initially contact any of the Web applications). This
step prevents certain users from accessing the system at all.

114 Certification Study Guide: IBM Tivoli Access Manager for e-business 6.0
Target-based authorization
Perform a resource-based authorization by deciding whether a user should be
allowed to contact a certain Web application.
Single sign-on
If user authentication and authorization was successful, forward the user’s
request and user’s credentials to a certain Web application server for further
processing.
Use of a separate component for authentication
It might be necessary to allow a separate and already existing authentication
application and repository to perform the initial user authentication. These
additional authentication methods should be usable without having to rewrite
any of the applications.
4.2.1 Authentication and single sign-on mechanisms
Authentication describes the process of exchanging credentials to identify the
communication partners. Authentication can be directional or mutual.
Single
sign-on
is the process of forwarding information about a user’s identity in a
secure way to another system. WebSEAL can enforce certain types of user
authentication and can use several single sign-on mechanisms to forward user
requests together with user information to a Web application server.
WebSEAL provides enough flexibility to support multiple authentication and
single sign-on mechanisms to act as a reverse Web proxy between different user
groups and different types of Web application servers in a secure way.
4.3 Supported WebSEAL authentication mechanisms
This section describes the authentication mechanisms that are supported by
WebSEAL to protect access to a Web environment. Some mechanisms in this
section can be combined with some of the single sign-on mechanisms in 4.9,
“WebSEAL single sign-on mechanisms” on page 154 to make the connection
between a user and a Web application. When WebSEAL examines a client
request, it searches for authentication data using some of the available
authentication methods in the following order:
1. Failover cookie
2. CDSSO ID token
3. Client-side certificate
4. Token passcode
5. Forms-based authentication (username and password)
6. SPNEGO (Kerberos)

Chapter 4. Configuration and customization 115
7. Basic authentication (username and password)
8. HTTP headers
9. IP address
10.External Authentication Interface (EAI)
HTTP and HTTPS authentication methods can be independently enabled and
disabled for both HTTP and HTTPS transports. The only exception is the
client-side certificate that requires an HTTPS type of connection (transport). If no
authentication methods are enabled for a particular transport, the authentication
process is inactive for clients using that transport.
WebSEAL uses the concept of authentication modules to use different
authentication methods. An authentication mechanism describes how an
authentication method is enabled and specifically refers to the configuration
stanza entry (such as passwd-ldap) used in the WebSEAL configuration file.
WebSEAL supports three types of authentication modules:
Built-in modules that ship with WebSEAL and that are fully supported
Support for custom external authentication solutions using the external
authentication interface (EAI)
Support for custom modules written using the external authentication C API
(know as CDAS in the previous release)
The following built-in modules exist in Access Manager:
passwd-ldap Password authentication via LDAP (Forms/BasicAuth)
passwd-uraf Password authentication using the Tivoli Access Manager
User Registry Adapter Framework (URAF) for Active
Directory or Domino (Forms/Basic Auth)
token-cdas Token authentication (SecureID)
cert-ldap SSL client certificate authentication
http-request HTTP header or IP address authentication
kerberosv5 Simple and Protected Negotiation (SPNEGO) authentication
with WebSEAL (Windows Desktop Single Sign-On)
4.3.1 Basic authentication with user ID and password
Basic authentication (BA) is part of the HTTP standard and defines a
standardized way in which user ID and password information is passed to a Web
server. When WebSEAL sends a BA challenge to the browser, the browser pops
up a dialog panel requesting user name and password from the user. When this
information is entered, the browser sends its original request again, but this time

116 Certification Study Guide: IBM Tivoli Access Manager for e-business 6.0
with the user name and password included in the BA header of the HTTP
request. WebSEAL extracts this information from the header and uses it to verify
the user’s identity. In this case, a specific library shipped with Access Manager
implements a built-in authentication service and performs a check against the
Access Manager user registry. If successful, a credential is created and cached.
After a user has authenticated an ID and password through the browser, the
browser caches this information in memory and sends it with each subsequent
request to the same server. Even by configuring a session log-out parameter,
which is possible for HTTPS sessions, the user will automatically log on to
WebSEAL with each new request the user sends. The only way to clear this
cache (and log the current user out) is to close all browser panels.
4.3.2 Forms-based login with user ID and password
The alternative to using basic authentication is to use forms-based login. Rather
than send a basic authentication challenge in response to a client request,
WebSEAL responds with a sign-in form in HTML format. The client browser
displays this and the user fills in a user ID and password. When the user clicks
the send or logon button, the form is returned to WebSEAL using an HTTP POST
request. WebSEAL extracts the information and uses it to verify the user’s
identity through the Access Manager authentication service, where it performs a
check against the Access Manager user registry.
Since the user ID and password information is not cached on the browser, it
becomes possible to perform a programmatic logout for the user. On a client
request, WebSEAL presents a customized logout form to a user. After the user
confirms the logout, the session is considered closed and the credential is
deleted from the WebSEAL cache.
Another benefit of using the forms-based login process is that you can enforce a
time-based logout for authenticated sessions. The time values can be
customized in the WebSEAL configuration files.
4.3.3 Authentication with X.509 client certificates
In response to a certificate request from WebSEAL, as part of the SSL Version 3
tunnel negotiation, the browser prompts the user to select a certificate from the
local certificate store or smartcard. The user is asked for a password to access
the private key. When the user has selected a certificate, it is passed to
WebSEAL, which uses the certificate authentication library to check the
signature of the client certificate. It also checks the validity period to ensure that
the certificate has not expired. Assuming that the certificate is valid, the identity
in the certificate is mapped (one-to-one) to an Access Manager identity. After the

Chapter 4. Configuration and customization 117
Access Manager identity is passed back to WebSEAL, WebSEAL pulls the user
information from the Access Manager user registry and builds the credential.
If you configure Access Manager to use X.509 client certificates for
authentication, but the user does not have a certificate available, WebSEAL can
fall back to basic authentication, if required.
4.3.4 Failover authentication
WebSEAL provides an authentication method that preserves an authenticated
session between a client and WebSEAL when the WebSEAL server becomes
unavailable in a replicated server (fault-tolerant) environment. The method is
called failover authentication.
The purpose of failover authentication is to prevent a forced login when the
WebSEAL server that has established the original session with the client
suddenly becomes unavailable. Failover authentication enables the client to
connect to another WebSEAL server, and creates an authentication session
containing the same user session data and user credentials. This is supported
through a failover cookie.
Failover cookie
The failover cookie is a mechanism for transparently re-authenticating the user,
and is not actually a mechanism for maintaining sessions. Failover cookies
contain encrypted user authentication data that a WebSEAL server can use to
validate a user’s identity. The cdsso_key_gen utility is used to generate a key
pair that can secure the cookie data.
A failover cookie maintains the following information:
User credential information
Session inactivity timeout value
Session lifetime timeout value
All other session state data, however, is not captured or maintained by failover
cookies. Failover cookie configuration requires the distribution of a shared secret
key to all of the WebSEAL servers in the cluster.
Failover cookies pose a greater security risk than normal session cookies. If an
attacker hijacks a session cookie, the session cookie is only valid until the
WebSEAL server deletes the associated session. Failover cookies are valid until
the lifetime or inactivity timeout in the failover cookie is reached. Failover cookies
do allow the enforcement of session lifetime timeouts, inactivity timeouts, and
pkmslogout. Failover cookies can also provide single sign-on across multiple
WebSEAL clusters in the same DNS domain.

118 Certification Study Guide: IBM Tivoli Access Manager for e-business 6.0
Failover cookies do not have to be implemented in an environment with a
Session Management Server since the failover cookie takes responsibility for
maintaining a user session.
4.3.5 Authentication with RSA SecurID token
Access Manager supports authentication of clients using user name and token
pass code information from an RSA SecurID token authenticator (TAR), a
physical device that stores and dynamically generates a piece of authentication
data (a token).
The TAR is used in tandem with an authentication server (the RSA ACE/Server),
which actually performs the authentication. During authentication to WebSEAL,
the client enters a user name and pass code. The pass code consists of:
The unique PIN number associated with the client’s SecurID TAR
The current number sequence generated by the SecurID TAR
The Ace/Server uses its own registry database to determine the PIN that the
user should be using, checks it, and strips it off of the pass code. It then checks
the remaining number sequence against its own internally generated number
sequence. A matching number sequence completes the authentication.
At this point, the role of the token passcode authentication is complete. The
token passcode authentication does not perform identity mapping, but simply
returns to WebSEAL an Access Manager identity containing the user name of
the client. This user name must match a user ID stored in the Access Manager
user registry.
4.3.6 Windows desktop single sign-on (SPNEGO)
Before describing Windows desktop single sign-on, there are some important
security considerations to point out:
In order for Microsoft Internet Explorer (IE) to be able to use the integrated
Windows authentication, it must recognize the Access Manager server as an
Intranet or Trusted site. The Internet Explorer client must be configured to use
the SPNEGO protocol and Kerberos authentication when contacting
WebSEAL or the Web Server Plug-in.
WebSEAL or the Web Server Plug-in must be able to access Active Directory
as its Kerberos Key Distribution Center (KDC). This may expose Active
Directory to new networks.
Therefore, it is important to only use SPNEGO authentication over a secure
network or over a secure transport. WebSEAL and the Web Server Plug-in
support the SPNEGO (Simple and Protected GSS-API Negotiation) protocol and

Chapter 4. Configuration and customization 119
Kerberos authentication for use with Windows clients to achieve Windows
desktop single sign-on. The SPNEGO protocol allows for a negotiation between
the client (browser) and the server regarding the authentication mechanism to
use. The client identity presented by the browser can be verified by WebSEAL or
the Web Server Plug-in using Kerberos authentication mechanisms.
WebSEAL SPNEGO support provides single sign-on from Internet Explorer
running on Windows client workstations configured into an Active Directory
domain.
For the WebSEAL SPNEGO configuration it is not necessary for Access
Manager to use Microsoft Active Directory as the user registry. When Active
Directory is
not the Tivoli Access Manager user registry, users must be replicated
between the client Active Directory registry and the Tivoli Access Manager user
registry.
Mapping an ID from Active Directory to Access Manager is an important part of
SPNEGO. Normally, WebSEAL will truncate the domain name portion of an
Active Directory ID in order to get the user ID. This can cause conflicts, however,
if two different users have the same ID in different Active Directory domains. In
this case, WebSEAL would need to be configured to keep the domain section of
the user ID attached in order to be able to resolve the conflict.
Multiple Active Directory domain support
Active Directory uses domains and forests to represent the logical structure of the
directory hierarchy. Domains are used to manage the various populations of
Important: The use of SPNEGO requires that a time synchronization service
be deployed across the Active Directory server, the WebSEAL server or the
Web Server Plug-in, and any clients that will authenticate using SPNEGO.
Note: SPNEGO single sign-on support is also available on other platforms,
including:
IBM AIX
Windows
Solaris
Linux x86
Linux for S/390®
More technical information on how to integrate Linux desktop single sign-on
and the Mozilla Firefox browser can be found in the IBM Redbook Federated
Identity Management and Web Services Security with IBM Tivoli Security
Solutions, SG24-6394.

120 Certification Study Guide: IBM Tivoli Access Manager for e-business 6.0
users, computers, and network resources in your enterprise. The forest
represents the security boundary for Active Directory. SPNEGO authentication
for users from multiple Active Directory domains is supported by Tivoli Access
Manager only if an appropriate trust relationship between the domains is
established. This trust exists automatically for domains that are part of the same
Active Directory forest. For SPNEGO authentication to work across multiple
forests, a forest trust relationship must be established.
4.3.7 Authentication using customized HTTP headers
Access Manager supports authentication via customized HTTP header
information supplied by the client or a proxy agent.
This mechanism requires a mapping function (a shared library) that maps the
trusted (pre-authenticated) header data to an Access Manager identity.
WebSEAL can take this identity and create a credential for the user.
WebSEAL assumes that custom HTTP header data has been authenticated
previously. For this reason, you should implement this method exclusively, with
no other authentication methods enabled. It is possible to impersonate custom
HTTP header data.
By default, this shared library is built to map data from trusted proxy headers.
4.3.8 Authentication based on IP address
Access Manager supports authentication via an IP address supplied by the
client. This mechanism is used best in combination with other mechanisms. For
example, you can use IP network addresses to identify a certain group of users,
give them access to a certain application, then use additional authentication
mechanisms to give access to more protected applications. Such a configuration
can be used to implement a two-factor authentication as well. It may be more
secure than plain password authentication.
4.4 Advanced WebSEAL authentication methods
In addition to the authentication methods described in the previous section,
WebSEAL provides advanced authentication functionality, which is described in
this section. Advanced authentication methods include:
Multiplexing proxy agents
Switch user authentication
Re-authentication
Authentication strength policy (step-up)

Chapter 4. Configuration and customization 121
External authentication interface (EAI)
4.4.1 MPA authentication
Access Manager provides an authentication mechanism for clients using a
multiplexing proxy agent (MPA). This is a special variation of the authentication
with customized HTTP headers that is often used for mobile phones and PDAs,
but is not limited to these devices.
Multiplexing proxy agents are gateways that accommodate multiple client
access. The IBM Everyplace Wireless Gateway (EWG) is an integrated part of
the IBM WebSphere Everyplace Suite that provides security-rich wired and
wireless connectivity between the IT network and the communications network;
for example:
Cellular networks, including GSM, CDMA, TDMA, PDC, PHS, iDEN, and
AMPS
Packet radio networks, including GPRS, CDPD, DatatTAC, and Mobitex
Satellite and wire environments, including DSL, cable modems, Internet
service providers, ISDN, dial, and LAN
In addition, the Everyplace Wireless Gateway provides protocol translation as a
Wireless Application Protocol (WAP) gateway, information push as a WAP push
proxy gateway, and support for short messaging services (SMS). EWG
establishes a single SSL channel to the origin server and “tunnels” all client
requests and responses through this channel.
To WebSEAL, the information across this channel initially appears as multiple
requests from one client. WebSEAL must distinguish between the authentication
of the MPA server over SSL and the additional authentication requests for each
individual client.
Because WebSEAL maintains an SSL session state for the MPA, it cannot use
SSL session IDs for each client simultaneously. WebSEAL instead authenticates
clients using HTTP authentication techniques over SSL.
If the user is authenticated at the EWG, for example, to a RADIUS Server, then
WebSEAL can be configured to receive an “authenticated ID” from the gateway
and not re-authenticate the user.
WebSEAL has support for the Entrust Proxy and the Nokia WAP gateway.

122 Certification Study Guide: IBM Tivoli Access Manager for e-business 6.0
4.4.2 Switch user authentication
The WebSEAL switch user function allows administrators to assume the identity
of a user who is a member of a Tivoli Access Manager secure domain. The
ability to assume a user’s identity can help an administrator in a Help Desk
environment to troubleshoot and diagnose problems. Switch user can also be
used to test a user’s access to resources and to perform application integration
testing.
The switch user implementation is similar to the su command in UNIX®
environments. In the WebSEAL environment, the administrator acquires the
user’s credentials and interacts with resources and back-end applications with
exactly the same abilities as the actual user. The administrator uses a special
HTML form to supply switch user information. WebSEAL processes the form and
calls a special authentication mechanism that returns the specified user’s
credential without the requirement of knowing the user’s password. WebSEAL
determines whether to allow the switch user request by performing the following
checks:
1. WebSEAL examines the membership of the Tivoli Access Manager
su-admins group to determine if the administrator has permission to invoke
the switch user function. Administrators requesting use of switch user
authentication must be members of the su-admins group. Membership in this
group must be configured before switch user can be used.
2. WebSEAL examines the membership of the Tivoli Access Manager
su-admins, securitygroup, and su-excluded groups to ensure that the user
identity supplied in the switch user form is not a member of one of these
groups. User identities that belong to any of these groups cannot be
accessed by the switch user function. The WebSEAL administrator must
configure memberships in these groups before administrators use the switch
user function.
For configuration instructions and more information on these groups refer to the
IBM Tivoli Access Manager for e-business Version 6.0 WebSEAL Administration
Guide, SC32-1687.
When WebSEAL decides to allow the switch user request, WebSEAL calls the
appropriate switch user module to perform the special switch user authentication.
WebSEAL supports a variety of authentication mechanisms. Each authentication
mechanism has a corresponding switch user authentication mechanism.
WebSEAL provides built-in modules that contain the special switch user function.
Before switch user authentication can be used, the WebSEAL administrator must
configure WebSEAL to use the appropriate modules.
When authentication of the designated user succeeds, the switch user module
returns a valid credential for the user—without requiring the user password for

Chapter 4. Configuration and customization 123
input. WebSEAL manipulates the contents of the appropriate entry in the
WebSEAL session cache by:
1. Removing the administrator’s WebSEAL session cache data and storing it in
a separate location
2. Inserting the switched-to user’s cache data, including the user’s credential, in
place of the administrator’s cache data
WebSEAL sends a
redirect to the browser for the destination URL supplied in the
switch user form. The request is processed normally, using the user’s credential.
The administrator can continue to make other requests. All authorization
decisions for these requests are based on the credential of the user. The
administrator ends the switch user session using the standard Tivoli Access
Manager
pkmslogout utility.
Upon successful logout:
1. The user’s cache data is deleted.
2. The administrator’s original cache data (and credential) is restored.
3. The administrator is returned to the original page from which the switch user
form was requested.
4.4.3 Re-authentication
Tivoli Access Manager WebSEAL can force a user to perform an additional login
(re-authentication) to ensure that a user accessing a protected resource is the
same person who initially authenticated at the start of the session. Forced
re-authentication provides additional protection for sensitive resources in the
secure domain. Re-authentication can be activated by:
A protected object policy (POP) on the protected object.
Expiration of the inactivity timeout value of a WebSEAL session cache entry.
Re-authentication is supported by the following WebSEAL authentication
methods:
Forms-based (user name and password) authentication
Token authentication
External authentication interface
In addition, a custom user name and password module can be written to support
re-authentication. Re-authentication assumes that the user has initially logged in
to the secure domain and that a valid session (credential) exists for the user.
During re-authentication, the user must log in using the same identity,
authentication method, and authentication level that generated the existing
credential. WebSEAL preserves the user’s original session information, including

124 Certification Study Guide: IBM Tivoli Access Manager for e-business 6.0
the credential, during re-authentication. The credential is not replaced during
re-authentication. During re-authentication, WebSEAL also caches the request
that prompted the re-authentication. Upon successful re-authentication, the
cached data is used to rebuild the request.
Creating and applying the re-authentication POP
Forced re-authentication based on security policy is configured by creating a
protected object policy (POP) with a special extended attribute named
reauth.
You can attach this POP to any object that requires the extra protection provided
by forced re-authentication. Remember that all children of the object with the
POP also inherit the POP conditions. Each requested child object requires a
separate re-authentication.
The following example illustrates creating a POP called
restricted with the reauth
extended attribute and attaching it to an object (salary.html):
pdadmin> pop create restricted
pdadmin> pop modify restricted set attribute reauth true
pdadmin> pop attach /WebSEAL/hostA/junction/salary.html secure
Anyone attempting to access salary.html is forced to re-authenticate using the
same identity and authentication method that generated the existing credential. If
the user requesting the resource is unauthenticated, the POP forces the user to
authenticate. No re-authentication is necessary for this resource after successful
initial login.
Re-authentication based on session inactivity
Re-authentication based on session inactivity is enabled by a configuration
stanza entry and is activated by the expiration of the inactivity timeout value of a
session cache entry. A user’s session is normally regulated by a
session
inactivity
value and a session lifetime value. When WebSEAL is configured for
re-authentication based on session inactivity, the user’s session cache entry is
flagged whenever the session inactivity timeout value expires. The session cache
entry (containing the user credential) is not removed. The user can proceed to
access unprotected resources. However, if the user requests a protected
resource, WebSEAL sends a login prompt. After successful re-authentication,
the inactive session
flag is removed and the inactivity timer is reset.
If re-authentication fails, WebSEAL returns the login prompt again. The session
cache entry remains
flagged and the user can proceed to request unprotected
resources until the session cache entry lifetime value expires. Two other
conditions can end a user session:
1. The user can explicitly log out.
2. An administrator can terminate a user session.

Chapter 4. Configuration and customization 125
4.4.4 Authentication strength policy (step-up)
WebSEAL supports many authentication methods that are described in 4.3,
“Supported WebSEAL authentication mechanisms” on page 114. WebSEAL
provides a feature that enables administrators to assign a ranking or level to
some of the supported authentication methods. Administrators can define an
ordered list that ranks each authentication method from lowest to highest. This
hierarchical ranking can be arbitrarily tailored to each individual WebSEAL
deployment.
This set of authentication levels can be used to implement an authentication
strength policy. Authentication strength is sometimes referred to as
step-up
authentication
. Step-up authentication is not a unique authentication method like
forms-based or certificate-based authentication. Instead, it is a defined process
for requiring users to change their current authentication method to another
authentication method.
There is no absolute ranking between the authentication methods. No one
authentication method is inherently better or stronger than another method. The
ranking is simply a method for an administrator to define a relative level for each
authentication method for use with a specific Tivoli Access Manager WebSEAL
protected object namespace. The only rule governing the assignment of levels is
that the unauthenticated level is always lower than all other authenticated levels.
The following authentication methods can be assigned an authentication level:
Unauthenticated
Password authentication
Password authentication is limited to forms-based authentication. Basic
authentication is not supported as a step-up authentication level.
Token authentication
Certificate authentication
External authentication interface
Authentication strength is supported over both HTTP and HTTPS, with the
exception of certificate-based authentication. Because certificates are valid only
over an SSL connection, it is not possible to step up to certificates over HTTP.
Note: When a user activates authentication strength by attempting to access
a protected object, the user does not have to log out first. Instead, the user is
presented with a login prompt, and simply logs in again to the higher level.

126 Certification Study Guide: IBM Tivoli Access Manager for e-business 6.0
Administrators apply an authentication level to a protected resource by declaring
and attaching a standard Tivoli Access Manager protected object policy (POP) to
the resource object. Authentication strength policy is set and stored in a POP
attribute called an
IP Endpoint Authentication Method. WebSEAL always checks
for this attribute before it performs the standard algorithm of ACL checking
followed by POP and authorization rule checking.
Configuration of step-up policy
To establish an authentication strength policy, the administrator does the
following:
1. Specify authentication levels.
2. Specify the authentication strength login form.
3. Create a protected object policy.
4. Specify network-based access restrictions.
5. Attach a protected object policy to a protected resource.
6. Enforce user identity match across authentication levels.
7. Control the login response for unauthenticated users.
Specifying authentication levels
To specify authentication levels you need to edit the [authentication-levels]
stanza in the WebSEAL configuration file. For each authentication method to be
used for authentication level step-up, add an entry to the stanza.
The supported authentication methods are described in Table 4-4.
Table 4-4 Authentication methods supported for authentication strength
The default entries are:
[authentication-levels]
level = unauthenticated
level = password
The following entry must always be the first in the list:
level = unauthenticated
Authentication Method Configuration File Entry
None level = unauthenticated
Forms authentication level = password
Token authentication level = token-card
Certificate authentication level = ssl
External authentication interface level = ext-auth-interface

Chapter 4. Configuration and customization 127
Additional entries can be placed in any order.
For example, to enable authentication strength levels for certificate authentication
at the highest level, the completed stanza entry would be:
[authentication-levels]
level = unauthenticated
level = password
level = ssl
In this example, SSL authentication needs to be configured in
delayed certificate
authentication mode
since the user is not required to authenticate with a
certificate at session start-up. The user can later initiate certificate authentication.
Delayed certificate authentication mode is enabled in WebSEAL by configuring
the following stanza:
[certificate]
accept-client-certs = prompt_as_needed
4.4.5 External authentication interface (EAI)
Tivoli Access Manager provides an external authentication interface that enables
you to extend the functionality of the WebSEAL authentication process. The
external authentication interface allows third-party systems to supply an
authenticated identity to WebSEAL and Web-server Plug-ins. The identity
information is then used to generate a credential. This extended authentication
functionality is similar to the existing custom authentication module capability
provided by the Web security external authentication C API (formerly known as
CDAS). However, the external authentication interface allows the user identity to
be supplied in HTTP response headers rather than through the authentication
module API interface.
EAI is described in more detail in Chapter 5, “Programming” on page 181.
4.4.6 No authentication
Any user who can reach WebSEAL belongs to the group of unauthenticated
users. This group can also get certain permissions.
Important: To successfully perform step-up authentication you need to
disable the use of SSL session IDs to track session state. Verify the default
no
value for the ssl-id-sessions for the [sessions] stanza entry in the
WebSEAL configuration file. In this case, SSL IDs cannot be used to maintain
user sessions because when the user is prompted for a certificate, the user’s
SSL ID will change.

128 Certification Study Guide: IBM Tivoli Access Manager for e-business 6.0
This group of unauthenticated users generally is used to define public Web
access. WebSEAL can force unauthenticated users to use another
authentication method when selecting certain protected URLs.
All users who can reach WebSEAL might already have enough permissions to
contact certain junctioned Web servers. For example, if WebSEAL is connected
to a VPN gateway, only authorized VPN users will be able to reach that server,
and additional authentication might not be needed. In this situation, you can
probably treat unauthenticated users as you would a group of
password-authenticated Internet users.
4.5 Standard junctions
A WebSEAL junction is an HTTP or HTTPS connection between a front-end
WebSEAL server and a back-end Web application server. Junctions logically
combine the Web space of one or more back-end servers with the Web space of
the WebSEAL server, resulting in a unified view of the entire Web object space.
Figure 4-5 WebSEAL junction
A junction allows WebSEAL to provide protective services on behalf of the
back-end server. WebSEAL performs authentication and authorization checks on
all requests for resources before passing those requests across a junction to the
back-end server. Junctions also allow a variety of single sign-on solutions
between a client and the junctioned back-end applications.
In addition, the junctions provide a scalable, secure environment that allows load
balancing, high availability, and centralized, state management capabilities—all
performed transparently to clients.
protected object space
/jct
junction
URL(s)
junction point
(mount point)
WebSEAL Application Server
Client

Chapter 4. Configuration and customization 129
You can create WebSEAL junctions with the pdadmin command-line utility or
with the Web Portal Manager. To create WebSEAL junctions, use the pdadmin
server task create command:
pdadmin> server task instance_name-webseald-host_name create options
/junction_name
You must address the following two concerns when creating any junction:
Decide where to junction (mount) the Web application server in the WebSEAL
object space.
Choose the type of junction.
You can create the following Standard WebSEAL junction types:
WebSEAL to back-end server over TCP connection
WebSEAL to back-end server over SSL connection
WebSEAL to back-end server over TCP connection using HTTP proxy server
WebSEAL to back-end server over SSL connection using HTTPS proxy
server
WebSEAL to WebSEAL over SSL connection
WebSEAL junction information is stored in XML-formatted database files. The
location of the junction database directory is defined in the [junction] stanza of
the WebSEAL configuration file.
The directory is relative to the WebSEAL server root (server-root stanza entry in
the [server] stanza):
[junction]
junction-db = jct
Each junction is defined in a separate file with an .xml extension. The XML format
allows you to manually create, edit, duplicate, and back up junction files, but the
best approach is to manage junctions with WPM or the pdadmin tool.
4.5.1 WebSEAL object space and authorization configuration
Every installation and initial configuration of WebSEAL creates a new object
container in the Policy Server object space. /WebSEAL/host-instance_name
represents the beginning of the Web space for a particular WebSEAL instance.
Along with the object space, default ACLs are created. The ACLs are attached to
the /WebSEAL container and named default-webseal. Default ACL entries for
this ACL are:
Group iv-admin Tcmdbsvarxl
Group webseal-servers Tgmdbsrxl
User sec_master Tcmdbsvarxl

130 Certification Study Guide: IBM Tivoli Access Manager for e-business 6.0
Any-other Trx
Unauthenticated T
The group webseal-servers contains an entry for each WebSEAL server in the
secure domain. The default permissions allow the servers to respond to browser
requests.
The creation of a junction causes the creation of a new junction object in the
Access Manager object space under the /WebSEAL/host-instance_name
branch. The name of the object is the same as the junction point name specified
in the junction creation command.
After creating a new junction it is always recommended to place an ACL on the
junction object that provides coarse-grained control over the back-end resources.
That ACL provides a general overall (coarse-grained) set of permissions for
every individual resource accessed through the junction.
After that you can provide additional fine-grained protection to the resources
accessed through the junction by explicitly placing ACLs on individual resource
objects or groups of objects. WebSEAL cannot automatically
see and understand
a back-end file system. The object space that WebSEAL protects needs to be
either manually defined, or the
query_contents program should be used.
WebSEAL ACL permissions
Table 4-5 describes the ACL permissions applicable for the WebSEAL region of
the object space.
Table 4-5 WebSEAL ACL permissions
ACL
permission
Operation Description
r read View the Web object.
x execute Run the CGI program.
d delete Remove the Web object from the Web space.
m modify PUT an HTTP object. (Place - publish - an HTTP object in the WebSEAL
object space.)
l list Required by policy server to generate an automated directory listing of the
Web space. This permission also governs whether a client can see the
directory contents listing when the default .index.html. page is not present.
g delegation Assigns trust to a WebSEAL server to act on behalf of a client and pass
requests to a junctioned WebSEAL server.

Chapter 4. Configuration and customization 131
Generating a back-end server Web space (query_contents)
A CGI program called query_contents scans the back-end Web space and
reports the structure and contents to WebSEAL. The query_contents program
searches the back-end Web space contents and provides this inventory
information to the Web Portal Manager on WebSEAL.
The program comes with the WebSEAL installation, but must be manually
installed on the back-end Web server. There are different program file types
available, depending on whether the back-end server is running UNIX or
Windows.
The Object Space manager of the Web Portal Manager automatically runs
query_contents any time the portion of the protected object space belonging to
the junction is expanded in the Object Space management panel. When the Web
Portal Manager knows about the contents of the back-end Web space, you can
display this information and apply policy templates to appropriate objects.
Securing the query_contents program
It is very important to secure this file to prevent unauthorized users from running
it. You must set a security policy that allows only the Policy Server (PDMgr)
identity to have access to the query_contents program.
The following example ACL (query_contents_acl) meets this criteria:
group ivmgrd-servers Tr
user sec_master dbxTrlcam
Use the pdadmin utility to attach this ACL to the query_contents.sh (UNIX) or
query_contents.exe (Windows) object on the junctioned servers. For example
(UNIX):
pdadmin> acl attach
/WebSEAL/host/junction-name/cgi-bin/query_contents.sh
query_contents_acl
Note: Certain Tivoli Access Manager permissions are not enforceable across
a junction. You cannot control, for example, the execution of a CGI script with
the x permission, or a directory listing with the l permission. WebSEAL has no
means of accurately determining whether or not a requested object on a
back-end server is, for example, a CGI program file, a dynamic directory
listing, or a regular HTTP object. Access to objects across junctions, including
CGI programs and directory listings, is controlled only through the r
permission.

132 Certification Study Guide: IBM Tivoli Access Manager for e-business 6.0
Object space and access control to dynamic URLs
Many Web applications dynamically generate Uniform Resource Locators
(URLs) in response to each user request. These dynamic URLs usually exist
only for a short time. Despite their temporary nature, dynamic URLs still need
strong protection from unwanted use or access.
Because dynamic URLs exist only temporarily, it is not possible to have entries
for them in a pre-configured authorization policy database. Tivoli Access
Manager solves this problem by providing a mechanism where many dynamic
URLs can be mapped to a single static protected object. Mappings from objects
to patterns are kept in a plain text configuration file called
dynurl.conf.
The default location of this file (relative to the server-root value) is defined by the
dynurl-map stanza entry in the [server] stanza of the WebSEAL configuration.
configuration file: [server]
dynurl-map = lib/dynurl.conf
This file does not exist by default. The existence of this file (with entries) during
WebSEAL startup enables the dynamic URL capability.
To specify access control of dynamic URLs, create the dynurl.conf configuration
file and edit the file to map resource objects to patterns. Entries in the file are of
the format:
object template
You can use the Tivoli Access Manager Web Portal Manager to edit this file
remotely. In Web Portal Manager, select the Dynamic URL Files link from the
WebSEAL menu. The Dynamic URL page allows you to select a WebSEAL
server and then view, edit, and save the dynurl.conf configuration file located on
that server. After making your changes, use the dynurl update command to
update the server:
pdadmin> server task instance_name-webseald-host_name dynurl update
After the file has been processed, the object name appears as a child resource in
the WebSEAL object space.
Tivoli Access Manager uses a subset of UNIX shell pattern matching (including
wildcard) to define the set of parameters that constitute one object in the object
space. Any dynamic URL that matches those parameters is mapped to that
object. The template can contain a subset of the standard pattern matching
characters. The template can also be an exact string with no pattern matching
characters.

Chapter 4. Configuration and customization 133
4.5.2 Creating a local type standard junction
One specific type of junction is a local type junction (-t local). It is a mount point
for specific content located locally on the WebSEAL server. Like the content from
junctioned remote servers, local junction content is incorporated into WebSEAL’s
unified protected object space view.
The following junction options are appropriate for local type junctions:
–t type Type of junction (local).
–d dir Local directory to junction. Required if the junction type is
local.
–f Force the replacement of an existing junction.
–l percent-value Defines the soft limit for consumption of worker threads.
–L percent-value Defines the hard limit for consumption of worker threads.
4.5.3 URL filtering
The challenges of URL filtering are specific to standard WebSEAL junctions. For
successful communication across standard junctions, WebSEAL must filter
absolute and server-relative URLs in HTML response documents returned from
the protected Web servers so that the URLs are correct when viewed as a part of
WebSEAL’s single host document space. The term
filtering is used to indicate
WebSEAL’s process of scanning Web documents (for absolute and
server-relative links) and modifying the links to include junction information. The
junction feature of WebSEAL changes the server and path information that must
be used to access resources on junctioned back-end systems. A link to a
resource on a back-end junctioned server can only succeed if the URL contains
the identity of the junction.
To support the standard junction feature and maintain the integrity of URLs,
WebSEAL must, where possible:
1. Modify the URLs (links) found in responses sent to clients
2. Modify requests for resources resulting from URLs (links) that WebSEAL
could not change
Figure 4-6 on page 134 summarizes the solutions available to WebSEAL for
modifying URLs to junctioned back-end resources.

134 Certification Study Guide: IBM Tivoli Access Manager for e-business 6.0
Figure 4-6 URL filtering solutions
Path types used in URLs
Any HTML page is likely to contain URLs (links) to other resources on that
back-end server or elsewhere. URL expressions can appear in the following
formats:
Relative
Server-relative
Absolute
Links containing URLs expressed in relative format never require any
modification by WebSEAL. By default, the browser handles relative URLs in links
by pre-appending the correct scheme (protocol), server name, and directory
information (including the junction) to the relative URL. The browser derives the
pre-appended information from the location information of the page on which the
link is located.
Links to back-end resources expressed in absolute or server-relative formats
succeed only if WebSEAL is able to modify the URL path expression to include
junction information. WebSEAL URL modification techniques apply to absolute
and server-relative URLs.
Options for modifying URLs in responses from junctioned back-end application
servers are the following:
Filtering tag-based static URLs
Script filtering for modifying absolute URLs
Filtering with configuring the rewrite-absolute-with-absolute option

Chapter 4. Configuration and customization 135
Filtering tag-based static URLs
WebSEAL uses a set of default rules to scan for (or filter) tag-based static URLs
contained in pages that are responses to client requests. This default filtering
mechanism examines static URLs located within tag-based content (such as
HTML or XML). An important requirement for this mechanism is that the URLs
must be visible to WebSEAL. For example, tag-based content filtering cannot
handle URLs that are dynamically generated on the client side.
Filter rules for server-relative URLs
WebSEAL must add the junction name to the path of server-relative URLs that
refer to resources located on junctioned servers. Server-relative URLs indicate a
URL position in relation to the document root of the junctioned server, for
example:
/dir/file.html
Server-relative URLs are modified by adding the junction point of the junctioned
server to the path name, for example:
/jct/dir/file.html
Filter rules for absolute URLs
WebSEAL must add the junction name to the path of absolute URLs that refer to
resources located on junctioned servers. Absolute URLs are modified according
to the following set of rules:
If the URL is HTTP and the host/port matches a TCP junctioned server, the
URL is modified to be server-relative to WebSEAL and reflect the junction
point. For example:
http://host-name[:port]/file.html
becomes:
/tcpjct/file.html
If the URL is HTTPS and the host/port matches an SSL junctioned server, the
URL is modified to be server-relative to WebSEAL and reflect the junction
point. For example:
https://host-name[:port]/file.html
becomes:
/ssljct/file.html
Modifying absolute URLs with script filtering
WebSEAL requires additional configuration to handle the processing of absolute
URLs embedded in scripts. Web scripting languages include JavaScript,
VBScript, ASP, JSP™, ActiveX, and others.

136 Certification Study Guide: IBM Tivoli Access Manager for e-business 6.0
The script-filter stanza entry in the [script-filtering] stanza of the
WebSEAL configuration file enables or disables filtering of embedded absolute
URLs. Script filtering is disabled by default:
[script-filtering]
script-filter = no
To enable script filtering, set the value of this stanza entry to yes.
The script filtering mechanism examines the entire contents of a response and is
not restricted to, for example, tag-based content. The script-filter mechanism
expects absolute URLs with a standard scheme, server, resource format:
http://server/resource
The script filter mechanism replaces the scheme and server portions of the link
with the correct junction information (as a relative pathname):
/junction-name/resource
This filtering solution parses a script embedded in HTML code and therefore
requires additional processing overhead that can negatively impact performance.
The setting applies to all junctions. Only enable the script-filter stanza entry when
your WebSEAL environment requires filtering of embedded absolute URLs.
Configuring the rewrite-absolute-with-absolute option
WebSEAL normally filters absolute URLs by adding the junction point and
changing the format to a server-relative expression. This rule for filtering absolute
URLs applies to tag-based filtering and script filtering.
You can optionally configure WebSEAL to rewrite the original absolute URL as an
absolute URL, instead of a relative URL. To enable this type of filtering, set the
value of the rewrite-absolute-with-absolute stanza entry in the
[script-filtering] stanza of the WebSEAL configuration file to equal yes:
[script-filtering]
rewrite-absolute-with-absolute = yes
When rewrite-absolute-with-absolute is enabled, the following example URL in a
response from a back-end server (connected to WebSEAL through jctA):
http://server/abc.html
is modified as follows:
http://webseal-hostname/jctA/abc.html

Chapter 4. Configuration and customization 137
Modifying URLs in requests
Difficulties arise when URLs are dynamically generated by client-side
applications (such as applets) or embedded in scripts in the HTML code. Web
scripting languages include JavaScript, VBScript, ASP, JSP, ActiveX, and others.
These applets and scripts execute when the page arrives at the client browser.
WebSEAL never has an opportunity to apply its standard filtering rules to these
URLs that are dynamically generated on the client side. Three options for
modifying URLs in requests are available to WebSEAL and are applied in the
following order of precedence:
1. Junction mapping table
2. Junction cookies
3. HTTP Referer header
This section describes the options for processing server-relative links (used to
make requests for resources located on junctioned back-end application servers)
that are dynamically generated on the client side. There are no solutions
available for handling absolute URLs generated on the client side.
Modifying server-relative URLs with junction mapping
Server-relative URLs generated on the client side by applets and scripts initially
lack knowledge of the junction point. WebSEAL cannot filter the URL because it
is generated on the client side. During a client request for a resource using this
URL, WebSEAL can attempt to reprocess the server-relative URL using a
junction mapping table.
A
junction mapping table maps specific target resources to junction names.
Junction mapping is an alternative to the cookie-based solution for filtering
dynamically generated server-relative URLs.
WebSEAL checks the location information in the server-relative URL with the
data contained in the junction mapping table. WebSEAL begins searching from
the top of the table and continues downward through the table. If the path
information in the URL matches any entry in the table during the top-down
search, WebSEAL directs the request to the junction associated with that
location. The table is an ASCII text file called
jmt.conf.
The location of this file is specified in the [junction] stanza of the WebSEAL
configuration file:
[junction]
jmt-map = lib/jmt.conf

138 Certification Study Guide: IBM Tivoli Access Manager for e-business 6.0
The format for data entry in the table consists of the junction name, a space, and
the resource location pattern. You can also use wildcard characters to express
the resource location pattern.
It is not necessary to restart the WebSEAL process, after you create the jmt.conf
file and add or change data in it. Use the jmt load command to load the data so
that WebSEAL has knowledge of the new information.
pdadmin> server task server-name jmt load
JMT table successfully loaded.
Any errors that occur while loading the mapping table result in serviceability
entries in the WebSEAL server log file (webseald.log). However, WebSEAL
continues to run.
This solution does not require the junction cookie described in the next section.
Modifying server-relative URLs with junction cookies
This section describes a cookie-based solution to modifying server-relative URLs
dynamically generated on the client side. When a client receives a page from a
junctioned server, and requests a resource using a dynamically generated
server-relative URL on this page, WebSEAL can attempt to reprocess the URL
using a special cookie. The cookie contains the appropriate junction information.
This solution requires that you initially create the junction to the back-end
application server using the -j junction option.
The following sequence of steps explains the process flow:
1. Client makes a request for an HTML page on a back-end junctioned
application server. In addition to other content, the page contains an
embedded applet that generates a server-relative URL once the page is
loaded on the client’s browser.
2. The page is returned to the client across the junction that was created with
the -j option. The -j option causes WebSEAL to append a JavaScript block at
the beginning of the HTML page. The purpose of the JavaScript is to set a
junction-identifying cookie on the browser.
3. When the page is loaded on the client’s browser, the JavaScript runs and sets
the junction-identifying cookie in the browser’s cookie cache. The cookie is a
session cookie containing the name of the junction.
4. The embedded applet on the page dynamically runs and generates the
server-relative URL.
5. The client makes a request for a resource using this server-relative URL. The
junction cookie information is sent as an HTTP header in this request:
IV_JCT = /junction-name

Chapter 4. Configuration and customization 139
6. Because the server-relative URL in the client request has not been filtered, it
appears to WebSEAL as a request for a local resource.
7. When it fails to locate the resource locally, WebSEAL immediately retries the
request using the junction information supplied by the cookie.
8. With the correct junction information in the URL expression, the resource is
successfully located on the back-end application server.
Figure 4-7 illustrates the junction cookie solution for filtering server-relative
URLs.
Figure 4-7 Processing server-relative URLs with junction cookies
Appending the junction cookie JavaScript block (trailer)
The -j junction option modifies HTML documents returned from junctioned
servers by inserting a JavaScript block that sets a junction identification cookie
on the browser interpreting the document.
By default, the JavaScript block is inserted at the beginning of the page, before
the <html> tag. This prepended location of the JavaScript on the page can cause
HTML rendering problems in some environments. If this type of problem is
encountered, you can configure WebSEAL to append the JavaScript block to the
end of the document instead. To configure WebSEAL to append the junction

140 Certification Study Guide: IBM Tivoli Access Manager for e-business 6.0
cookie JavaScript block to the end of pages returned by the back-end server, add
the -J option with the trailer argument when creating the -j junction. For example:
pdadmin> server task instance-webseald-host create ... -j -J trailer
...
The trailer argument can be used when compliance with HTML 4.01
specifications is not required.
Inserting the JavaScript block for HTML 4.01 compliance (inhead)
The HTML 4.01 specification requires <script> tags to be located within the
<head> </head> tags. To configure WebSEAL to insert the junction cookie
JavaScript block between <head> </head> tags (HTML 4.01 compliant), add the
-J option with the inhead argument when creating the -j junction. For example:
pdadmin> server task instance-webseald-host create ... -j -J inhead ...
The xhtml10 argument also addresses compliance with other HTML 4.01 and
XHTML 1.0 specifications.
Inserting an XHTML 1.0 compliant JavaScript block (xhtml10)
To configure WebSEAL to insert a junction cookie JavaScript block that is
compliant with XHTML 1.0 specifications (and HTML 4.01 specifications), add
the -J option with the xhtml10 argument when creating the -j junction. If you
create a junction using the xhtml10 argument, it is best practice to use the inhead
argument as well. For example:
pdadmin> server task instance-webseald-host create ... -j -J
xhtml10,inhead ...
Resetting the junction cookie for multiple -j junctions (onfocus)
In environments where multiple instances of a single client access multiple -j
junctions simultaneously, the most recent IV_JCT cookie created by the
JavaScript may erroneously refer to a different junction than the one being
currently accessed. In such a situation, WebSEAL receives the wrong junction
information and fails to correctly resolve links.
For example, consider a scenario where a user has two browser windows open,
each pointing to one of two junctions, jctA and jctB. Both junctions were created
with the -j junction option.
1. In the first browser window, the user requests a page from an application
server located on jctA. The IV_JCT cookie for jctA is set in the browser.
2. The user then leaves the first browser window open, switches to the other
browser window, and requests a page from an application server located on
jctB. The IV_JCT cookie for jctB is set in the browser (replacing jctA).

Chapter 4. Configuration and customization 141
3. If the user then returns to the first browser window and clicks a link to a
resource located on jctA, the wrong IV_JCT cookie is sent to WebSEAL.
To eliminate this problem, you can configure WebSEAL to use the onfocus event
handler in the JavaScript. The onfocus handler resets the IV_JCT cookie
whenever users switch the browser focus from one window to another. To use the
JavaScript onfocus event handler, add the -J option with the onfocus argument
when creating the -j junction. If you create a junction using the onfocus argument,
it is best practise to use the trailer argument as well.
For example:
pdadmin> server task instance-webseald-host create ...-j -J
trailer,onfocus ...
Modifying server-relative URLs using an HTTP Referer header
This section describes a solution for modifying server-relative URLs dynamically
generated on the client side. This solution involves use of the standard Referer
header in an HTTP request. WebSEAL uses this solution only if a junction cookie
cannot be found in a request or a junction mapping table entry does not match
the request. The information in the Referer header of an HTTP request can be
used to identify the junction point of the application server responsible for the
embedded applet or script. This solution assumes that the dynamically
generated links point to resources located on the same application server (and
therefore would require the same junction used by that application server).
A page returned from the back-end application server (and containing the links
generated by the embedded applet or script) would provide knowledge of the
junction name. The junction name will appear in the URL value of the Referer
header of a request that results when the user clicks on one of the
client-side-generated links located on this page. For example:
GET /back_end_app/images/logo.jpg
Referer: http://webseal/jctA/back_end_app ...
WebSEAL would not be able to find the resource using the request URL
(/back_end_app/images/logo.jpg). By using the information in the Referer header
of that request, WebSEAL can modify the request URL to additionally include the
junction name jctA. For example:
GET /jctA/back_end_app/images/logo.jpg
Using the modified URL, WebSEAL can successfully locate the resource. This of
course assumes the resource (logo.jpg) is located on the same server.

142 Certification Study Guide: IBM Tivoli Access Manager for e-business 6.0
If the environment results in client-side-generated links that point to resources
across multiple junctions, the Referer header method for modifying URLs will not
be reliable.
4.5.4 The challenges of URL filtering
WebSEAL acts as a single host Web server. To allow WebSEAL to protect many
back-end Web servers, and still act as a single host server, WebSEAL merges all
of the back-end server document spaces into a single document space. For
successful communication across junctions, WebSEAL must filter absolute and
server-relative URLs in HTML response documents returned from the protected
Web servers so that the URLs are correct when viewed as a part of WebSEAL’s
single host document space. The junction feature of WebSEAL changes the
server and path information that must be used to access resources on junctioned
back-end systems. A link to a resource on a back-end junctioned server can only
succeed if the URL contains the identity of the junction.
WebSEAL supports a number of solutions for filtering and processing URLs
returned in responses from back-end junctioned application servers. In all cases,
these solutions require WebSEAL to parse the HTML content in search of the
URLs. Because HTML is an evolving and complex specification, parsing HTML is
equally complex.
To overcome those and some other problems, Access Manager 6.0 introduced
two new type of junctions:
Virtual host junction
Transparent path junction
4.6 Virtual host junction
WebSEAL supports virtual hosting and, through virtual host junctions, can
eliminate the limitations of URL filtering. The term
virtual hosting refers to the
practice of maintaining more than one server on one machine, as differentiated
by their apparent hostnames. Virtual hosting allows you to run multiple Web
services, each with a different host name and URL, that appear to be completely
separate sites.
Virtual host junctions allow WebSEAL to communicate with local or remote
virtual hosts. WebSEAL uses the HTTP Host header in client requests to direct
those requests to the appropriate document spaces located on junctioned
servers or on the local machine. Access to resources using virtual hosting is
possible because the HTTP 1.1 specification requires client browsers to include,
in any request, the HTTP Host header. The Host header contains the host name

Chapter 4. Configuration and customization 143
of the server where the requested resource is located. WebSEAL uses the value
of the HTTP Host header, rather than the URL of the request, to select the
appropriate virtual host junction for dispatching the request. If the HTTP Host
header is present in the request and its value matches the host name of a
configured virtual host junction, then the virtual host junction is used. Otherwise,
a standard WebSEAL junction is used, based on the URL of the request.
In a case where there is no Host header in the HTTP request (such as in an
HTTP 1.0 request), WebSEAL again uses a standard junction.
Using virtual host junctions, a user can access resources directly using the host
name of the junctioned server (http://protected-server/resource), rather than
indirectly using the host name of the WebSEAL server with a potentially modified
resource path (http://webseal/junction/resource). Direct access to the resource
using the host name of the junctioned server does not require URL filtering.
Virtual host junctions preserve the content of response pages in the same form
as originally found on the junctioned Web servers. Clients can use the
unmodified absolute and server-relative URL links on these response pages to
successfully locate the resources. Configuration for virtual host junctions requires
that the external DNS maps all virtual host names to the IP address (or
addresses) of the WebSEAL server. When the user makes a request to the host
name of the junctioned server, the request is actually routed to WebSEAL.
This also has great value in the larger organizations that already have traditional
Web address space. By using virtual host junctions you can preserver this Web
address space from the user standpoint, just changing DNS mappings to point to
WebSEAL instead of real Web Servers. For example, a company may have
www.myhr.com for their HR system and www.mypayroll.com for their payroll
system. Since these applications already exist and their Web addresses are
known throughout the user community, application of the traditional WebSEAL
junction method would not benefit the corporation. Instead, resolving
www.myhr.com and www.mypayroll.com to WebSEAL’s IP address and allowing
it to decipher which server to direct traffic to would be the most beneficial.
4.6.1 Creating a remote type virtual host junction
Creating a virtual host junction is similar to creating a standard junction. A virtual
host junction can be created using either WPM or the standard server task
command in the pdadmin CLI. The following example specifies the syntax for the
pdadmin command for creation of a virtual host junction (entered as one line):
pdadmin> server task instance_name-webseald-host_name virtualhost
create options vhost-label
The virtual host label (vhost-label) is simply a name for the virtual host junction.
The junction label is used to indicate the junction in the display of the protected

144 Certification Study Guide: IBM Tivoli Access Manager for e-business 6.0
object space (Web Portal Manager). Here is some highlights regarding virtual
hosts labels:
Virtual host junctions are by default always mounted at the root of the
WebSEAL object space and are easily identified because they start with the
@ character followed by the host label defined during junction creation.
You can refer to a junction in the pdadmin utility using this label.
The virtual host junction label must be unique within each instance of
WebSEAL.
Because the label is used to represent virtual host junctions in the protected
object space, the label name must not contain the forward slash character (/).
Common and required options specified for creation of virtual hosts are:
–t type Type of junction. It can be one of: tcp, ssl, tcpproxy,
sslproxy.
–h host-name The DNS host name or IP address of the target back-end
server. The same host name can be used for a TCP
junction and an SSL junction. The port of each virtual host
differentiates one from the other so that they are each
considered unique.
–v vhost-name[:port]WebSEAL selects a virtual host junction to process a
request if the request’s HTTP Host header matches the
virtual host name and port number specified by the -v
option. The -v option is also used to specify the value of
the host header of the request sent to the back-end
server.
–g vhost-label If both HTTP and HTTPS protocols need to be supported
between the client and WebSEAL, then two junctions to
the same virtual host (-h) are required, one for each
protocol (-t). By default, each junction recognizes its own
unique protected object space, even though the junctions
(which are differentiated by protocol only) point to a single
object space. The -g option causes a second additional
junction to share the same protected object space as the
initial junction. This single object space reference allows
you to maintain a single access control list (ACL) on each
protected object. This option is appropriate for junction
pairs only (two junctions using complementary protocols).
The option does not support the association of more than
two junctions. Use of this parameter is optional.

Chapter 4. Configuration and customization 145
Additional junction options
Almost all junction functionality (SSO options, and so on) that is available for
traditional junctions is also available for virtual host junctions. The only
exceptions to this are the junction cookie options (-j , -J) and the cookie/path
modification options (-I, -n). They are not available for virtual host junctions
because they are not required. The problems that these options were introduced
to solve are no longer an issue when using virtual host junctions.
4.6.2 Defining interfaces for virtual host junctions
The multiple interface capability is important when setting up certificate support
(SSL) for multiple virtual host junctions. A digital certificate contains the name of
the host being accessed. Therefore, it is necessary to have a unique certificate
exchange for each virtual host configured for SSL. Browsers produce a warning
message when there is a name mismatch between certificate and host.
A default network interface is defined as the combined set of values for a specific
group of settings that include HTTP or HTTPS port setting, IP address, worker
threads setting, and certificate handling setting. The single default interface for a
WebSEAL instance is defined by the values for the following stanza entries in the
WebSEAL configuration file:
[server]
http
http-port
https
https-port
worker-threads
network-interface
[ssl]
webseal-cert-keyfile-label
[certificate]
accept-client-certs
WebSEAL can be configured to listen on multiple interfaces. To configure
additional interfaces, you define each custom-named interface within the
[interfaces] stanza of the WebSEAL configuration file. A custom interface
specification uses the following format:
[interfaces]
interface-name = property=value[;property=value[;...]]

146 Certification Study Guide: IBM Tivoli Access Manager for e-business 6.0
Example interface definition:
[interfaces]
support = https-port=444;certificate-label=WS6;
worker-threads=16;network-interface=9.0.0.8
This example (entered as one line) creates an interface named
support with the
following properties:
Allows WebSEAL to listen for requests at IP address 9.0.0.8.
Listens on HTTPS port 444.
The HTTP port defaults to
disabled.
WebSEAL authenticates to SSL clients using a server-side certificate named
WS6 stored in the WebSEAL key database file.
The interface uses its own pool of 16 worker threads to service requests.
The interface defaults to never requiring (prompting for) client-side certificates
during authentication.
4.7 Transparent path junctions
In order to combine the benefits of both a single URL space for session
management (which uses fewer certificates) and single sign-on, without the
problems of path filtering, Access Manager for e-business uses the concept of a
transparent path junction.
Transparent path junctions are really the same as standard junctions except that
the junction name, instead of being an addition to the URL path, is based on the
path already present on the back-end application. The junction creation
command is the same as for a standard junction and just includes one additional
option, -x.
Transparent path junctions allow WebSEAL to route requests to a junction based
on the URL path of the back-end server resources rather than based on a
junction name added to the path.
For example, if the configured junction name is /docs, all resources controlled by
this junction must be located on the back-end server under a subdirectory called
/docs.
The transparent path junction mechanism prevents WebSEAL from filtering the
path portion of links to the resources protected by this junction. The junction
name has now become part of the actual path expression describing the location
of a resource and no longer requires filtering. The junction name is not added to

Chapter 4. Configuration and customization 147
or removed from the path portion of URLs, as it is in junctions created without the
transparent path option.
WebSEAL must be configured with one transparent path junction for each unique
path that is held on each back-end server. This may mean that there are multiple
transparent path junctions to the same back-end server. When configuring
traditional junctions it is not recommended to have multiple junctions to the same
back-end server, but this restriction is lifted for transparent path junctions. The
restriction can be lifted because in the case of transparent path junctions, the
junction name is tightly linked to the resource path, so any absolute URL being
filtered can be matched uniquely to a transparent path junction.
In a case that we have two applications in the back-end server that do share a
common path we have two configuration options for the transparent path
junction:
1. Extend the transparent path junction name so it can be unique. A transparent
path junction name can contain more than one directory.
This technique is not going to work if you need to protect two instances of the
same application that are used for two different purposes. They will have the
exact same URLs in all cases, so there is no uniqueness in the paths at all to
distinguish them.
2. Use separate WebSEAL instances if you want to use transparent path
junctions for two applications that have the same URL paths.
In this case you are back to the issue of single sign-on, so perhaps virtual
host junctions would be more suitable for this application.
It is possible to use virtual host junctions, transparent path junctions, and
traditional path junctions all within the same WebSEAL instance.
1. WebSEAL will first check the Host header of requests to pick up the virtual
host junctions.
2. If the request doesn’t match a virtual host junction, it will then perform path
matching to discover if this is a transparent path or a traditional junction.
3. If none of the paths match any configured junctions, WebSEAL will assume
this is a traditional junction and will start looking for JMT matches or junction
cookies to identify the correct back-end server.
4.8 Advanced junction configuration
In this section we discuss some advanced junction configuration tasks, including:
Mutually authenticated SSL junctions
WebSEAL-to-WebSEAL junctions over SSL

148 Certification Study Guide: IBM Tivoli Access Manager for e-business 6.0
Stateful junctions
Junction throttling
Supporting not case-sensitive URLs
Junctioning to the Windows file systems
4.8.1 Mutually authenticated SSL junctions
If necessary, WebSEAL can authenticate itself to a junctioned server using either
server certificates or BA authentication. When using an SSL communication
channel for this junction (–t ssl or –t sslproxy), WebSEAL and the junctioned
server can also mutually authenticate each other. This is very important in order
to establish the trust relationships between WebSEAL and back-end Web
application servers.
The following outline summarizes the supported functionality for mutual
authentication over SSL:
1. WebSEAL authenticates the back-end server (normal SSL process).
a. WebSEAL validates the server certificate from the back-end server.
In order to do this, WebSEAL needs to have information about the
certificate from the back-end server. WebSEAL stores all certificates into
the pdsvr.kdb database. GSKit tool can be used to manage those
certificates. Use this tool to import the Certificate Authority (CA)
certificates that form the trust chain for the application server certificate.
b. WebSEAL verifies the distinguished name (DN) contained in the
certificate. (This step is optional.)
You can enhance server-side certificate verification through distinguished
name (DN) matching. To enable server DN matching, you must specify the
back-end server DN when you create the SSL junction to that server.
Although DN matching is an optional configuration, it provides a higher
degree of security with mutual authentication over SSL junctions.
During server-side certificate verification, the DN contained in the
certificate is compared with the DN defined by the junction. The
connection to the back-end server fails if the two DNs do not match.
To enable the server DN matching, specify the back-end server DN when
you create the SSL junction using the –D option.
2. Back-end server authenticates WebSEAL (two methods).
a. Back-end server validates client certificate from WebSEAL (–K).
Use the –K option to enable WebSEAL to authenticate to the junctioned
back-end server using its client certificate. The –K option uses an

Chapter 4. Configuration and customization 149
argument that specifies the key-label of the required certificate as stored
in the WebSEAL key database.
b. Back-end server validates WebSEAL identity information in a Basic
Authentication (BA) header (–B, –U, –W).
Use the –B –U username –W password option to enable WebSEAL
authentication using basic authentication. In this type of configuration the
–b option does not work, as internally the –B option uses –b filter.
4.8.2 WebSEAL-to-WebSEAL junctions over SSL
Tivoli Access Manager supports SSL junctions between a front-end WebSEAL
server and a back-end WebSEAL server. Use the –C option with the create
command to junction the two WebSEAL servers over SSL and provide mutual
authentication. Additionally, the –C option enables single sign-on functionality
provided by the –c option.
The –c option allows you to place Tivoli Access Manager-specific client identity
and group membership information into the HTTP header of the request destined
for the back-end WebSEAL server.
Both WebSEAL servers must share a common user registry. This configuration
allows the back-end WebSEAL server to authenticate the front-end WebSEAL
server identity information.
If the WebSEAL-to-WebSEAL junction and the back-end application server
junction both use the –j junction option (for junction cookies), a naming conflict
can occur between the two junction cookies created by each of the two
WebSEAL servers. In this case, an intermediary WebSEAL server changes the
following parameter to
yes in the WebSEAL configuration file:
[script-filtering]
hostname-junction-cookie = yes
4.8.3 Stateful junction
Back-end servers that run Web-enabled applications can be replicated in order
to improve performance through load sharing. By default, Tivoli Access Manager
balances back-end server load by distributing requests across all available
replicated servers. Tivoli Access Manager uses a
least-busy algorithm. This
algorithm directs each new request to the server with the fewest connections
already in progress.
However, when WebSEAL processes a request over a stateful junction,
WebSEAL must ensure that all subsequent requests from that client during that

150 Certification Study Guide: IBM Tivoli Access Manager for e-business 6.0
session are forwarded to the same server, and not distributed among the other
replicated back-end servers according to the load balancing rules.
Configuring stateful junction
To configure a stateful junction you need to use –s junction options. The –s
option is appropriate for a single front-end WebSEAL server with multiple
back-end servers junctioned at the same junction point. When a new junction is
created to a back-end Web application server, WebSEAL normally generates a
Unique Universal Identifier (UUID) to identify that back-end server. This UUID is
used internally and also to maintain stateful junctions. If the scenario involves
multiple front-end WebSEAL servers, all junctioned to the same back-end
servers, you must use the –u option to correctly specify each back-end server
UUID to each front-end WebSEAL server.
Figure 4-8 Stateful junction and load balancing mechanism
Multiple front-end servers require a load balancing mechanism to distribute the
load between the two servers. For example, an initial state could be established
to a back-end server through WebSEAL server 1 using a specific UUID.
However, if a future request from the same client is routed through WebSEAL
server 2 by the load balancing mechanism, the state will no longer exist, unless
WebSEAL server 2 uses the same UUID to identify the same back-end server.
Apply the following process for specifying a UUID during the creation of a
junction:
1. Create a junction from WebSEAL server 1 to each back-end server. Use
create –s and add.
2. List the UUID generated for each back-end server during step 1.

Chapter 4. Configuration and customization 151
3. Create a junction from WebSEAL server 2 to each back-end server and
specify the UUIDs identified in Step 2. Use create –s –u and add –u.
Handling an unavailable stateful server
You can use the use-new-stateful-on-error stanza entry in the [junction]
stanza of the WebSEAL configuration file to control how WebSEAL responds to a
stateful server that becomes unavailable.
When use-new-stateful-on-error is set to yes and the original server becomes
unavailable during a session, WebSEAL directs the user’s next request to a
new replica server on the same stateful junction. If a new replica server is
found on that stateful junction, and is responsive to the request, WebSEAL
sets a new stateful cookie on the user’s browser. Subsequent requests during
this same session are directed to this same new server.
When use-new-stateful-on-error is set to no (the default, to keep compatibility
with previous versions) and the original server becomes unavailable during a
session, WebSEAL does not direct the user’s subsequent requests to a new
replica server on the same stateful junction. Instead, WebSEAL returns an
error and attempts to access the same server for subsequent requests by the
user during this session.
4.8.4 Junction throttling
High demand WebSEAL environments usually rely on server clusters made up of
multiple machines hosting replicated content and applications. A replica server
environment allows you to take individual servers offline to perform regular
maintenance. The network load is redistributed across the remaining replicas,
allowing the user experience to proceed without disruption.
Junction throttling allows you to gradually take a junctioned back-end Web server
offline without interrupting the transactions of users with existing sessions. The
throttling action on a junction is particularly useful for allowing stateful sessions,
such as shopping cart transactions, to continue until completed.
Junction throttling accomplishes the following actions:
The throttled server continues to process current and subsequent requests
from users with sessions created before the throttle action was taken.
The throttled server blocks all requests from unauthenticated users and new
authenticated users and directs these requests to other available replica
servers on the same junction.
As the current users finish their sessions, the throttled server eventually
becomes idle and can be taken offline.

152 Certification Study Guide: IBM Tivoli Access Manager for e-business 6.0
Junction throttling does not require you to stop WebSEAL and does not
interrupt user access to other junctioned Web servers.
The Access Manager provides commands to place junctioned servers in one of
three operational states:
Throttle Server can only be used by users that logged in before
throttle. It shows as
throttle and will show a throttled at
timestamp. Only users that have sessions that started
before the throttle timestamp can access the server.
Offline Server cannot be used at this time even if available. It
shows as
offline.
Online Server can be used, and shows as running if it is
available.
Use of junction throttling with existing WebSEAL features
Junction throttling has an impact on the following WebSEAL functions:
Failover authentication
Failover authentication transparently supports failed over sessions that
continue to use a throttled junction if the original session was created before
the junction was throttled. The session creation time is added as an attribute
to the failover cookie so it can be restored when a failover cookie is used to
authenticate. When the failover cookie is used for authentication, the session
creation time from the cookie is set for the newly created failover session.
Session Management Server
Session Management Server makes the session creation time available to all
processes that are sharing the session. The session creation time is
important because only sessions created before a junction server is throttled
are allowed continued access to the throttled junction server.
Re-authentication
Re-authenticated sessions are allowed continued access to a throttled
junction server if the sessions are initially created before the junction was
throttled. The additional effect of session lifetime extensions or resets can
make it difficult for you to determine when the throttled junction is truly idle.
Switch user
When a switch user event occurs, a new session creation time is generated.
This new creation time is used to determine accessibility to a throttled junction
server. When the switch user logs out and returns to the original identity, the
original session creation time becomes effective again and is used to
determine accessibility to a throttled junction server.

Chapter 4. Configuration and customization 153
Stateful junctions
Stateful junctions allow requests from a specific session to always be sent to
the same server on a junction. If the junctioned server being used is throttled,
the stateful session is allowed to continue accessing that server. However,
new stateful sessions are blocked from using that server. If a junctioned
server is taken offline, then stateful sessions are no longer allowed to access
the server. These sessions must choose a new junctioned server and
possibly loose the original state information.
Step-up authentication
Step-up authentication does not create a new session. The session creation
time is therefore not affected, and the ability of the session to access a
throttled junction does not change.
Junction modification with Web Portal Manager (WPM)
When you modify a throttled junction using Web Portal Manager, you always
lose the
Throttled at time. A throttled junction modified by WPM is returned to
an online state. Because WPM has no ability to perform junction throttle
operations, you must use the pdadmin utility to return the junction to a
throttled state again.
4.8.5 Supporting not case-sensitive URLs
By default, Tivoli Access Manager treats URLs as case-sensitive when
performing checks on access controls. The –i junction option is used to specify
that WebSEAL treat URLs as not case-sensitive when performing authorization
checks on a request to a junctioned back-end server.
To correctly authorize requests for junctions that are not case sensitive,
WebSEAL does the authorization check on a lowercase version of the URL. That
means, object names must be lower case in order for WebSEAL to be able to find
any ACLs or POPs attached to those objects.
The –i option is also supported on virtual host junctions.
The –i option is automatically invoked if you select the –w option.
4.8.6 Junctioning to Windows file systems
When you create junctions in a Windows environments, it is important to restrict
access control to one object representation only and not allow the possibility of
“back doors” that bypass the security mechanism.

154 Certification Study Guide: IBM Tivoli Access Manager for e-business 6.0
The –w option on a junction provides the following measures of protection:
Prevents the use of the 8.3 file name format. When the junction is configured
with the –w option, a user cannot avoid an explicit ACL on a long file name by
using the short (8.3) form of the file name. The server returns a 403
Forbidden error on any short form file name entered.
Disallows trailing dots in directory and file names. If a file or directory contains
trailing dots, a 403 Forbidden error is returned.
The –w option automatically invokes the –i option (meaning it enforces
case-insensitivity).
4.9 WebSEAL single sign-on mechanisms
After a user has been authenticated by WebSEAL and an authorization decision
has been made, WebSEAL has to forward the user’s request to a back-end Web
application server. If needed, WebSEAL can include information about the user,
such as X.509 distinguished name, group memberships, or any other value.
The mechanisms to forward that information can vary. You can use standard
protocols such as the HTTP basic authentication header, or proprietary
mechanisms, when talking to specific server products. WebSEAL supports
several mechanisms for forwarding requests to Web application servers.
This section presents alternatives on how to pass information about the user and
the user’s request to the back-end application.
When a protected resource is located on a junctioned Web application server, a
client requesting that resource can be required to perform multiple logins: one for
the WebSEAL server and one for the back-end server. Each login may require a
different login identity. Often, the problem of administering and maintaining
multiple login identities can be solved with a single sign-on mechanism.
The Open Group defines single sign-on as a mechanism whereby a single action
of user authentication and authorization can permit a user to access all
computers and systems where that user has access permission, without the
need to enter multiple passwords
2
. WebSEAL’s realm is to provide this single
sign-on functionality for Web infrastructures. Acting as a Web reverse proxy to
the company’s Web environment, WebSEAL communicates with the junctioned
servers on behalf of the users. It enables the user to access a resource,
regardless of the resource’s location, using only one initial login. Any more login
requirements from back-end application servers are handled so that they are
transparent to the user.
2
From the security section of the Open Group Web site (http://www.opengroup.org/security/sso/).

Chapter 4. Configuration and customization 155
Depending on integration requirements, different data should be sent to the
WebSEAL-secured Web application using different formats. However, most of
the Web applications support standard HTTP-based mechanisms for the user
identification, which are exploited by WebSEAL.
4.9.1 Tivoli Global Sign-On (GSO) lockbox
Most Web applications support basic authentication or forms-based login for
checking authenticity and obtaining a user’s identity information. When using this
support, an application or the server the application is running on maintains a
database with user IDs and passwords (in the most simple case). After
challenging a user and obtaining a user ID and password, an application looks
up the matching entry and, if one is found, the user is considered authenticated
and his or her identity is associated with the provided user ID. In more
sophisticated environments’ relational databases, legacy applications or
LDAP-based repositories are targeting that scope.
Access Manager supports a flexible single sign-on solution that features the
ability to provide alternative user IDs and passwords to the Web application
servers in two ways:
By supplying user ID and password information via basic authentication
headers
By performing forms-based single sign-on
The integration is achieved by creating SSO-aware junctions between WebSEAL
and Web servers hosting the applications. GSO resources and GSO resource
groups must first be created in Access Manager for every application that
requires a different logon. When WebSEAL receives a request for a resource
located on the SSO-junctioned server, WebSEAL queries the Access Manager
user registry for the appropriate authentication information. The user registry
contains mappings for each user registered for using that application, which
provides alternative user IDs and passwords for specific resources. Evidently,
that information has to be in the repository prior to initial use. The values (user
IDs and passwords) should match those stored in the application home registry.
Note: Although junctions are set up on a Web server basis, it is possible to
provide different SSO data to different applications hosted on the same server.
In order to achieve this, multiple GSO junctions to the same Web server are
created. However, using access control lists, the access to the resources is
defined that way, so that only appropriate URLs can be requested through a
specified junction.

156 Certification Study Guide: IBM Tivoli Access Manager for e-business 6.0
The visible advantage of the solution is that no changes are supposed to be
made on the application side. However, synchronization of the user IDs and
passwords in the application’s home user registry and Access Manager user
registry is required. (Registry synchronization can be accomplished with IBM
Tivoli Directory Integrator.)
A special situation emerges if Access Manager and the secured application
share the same repository for storing user data, as shown in Figure 4-9 on
page 157. An LDAP directory is the most suitable platform for maintaining
application-specific information about users and groups. Given compatible LDAP
schemes, many applications may share the same LDAP directory. LDAP
provides a standardized way of authenticating users based on user ID and
password stored as user attributes. However, it provides no flexibility in defining
object classes to be used for authenticating a user rather than performing a call
based on primary identification attributes of a user (user ID and password).
While using an Access Manager GSO junction, Access Manager uses specific
LDAP attributes for storing GSO information for every GSO user. As a result, the
GSO user ID and password provided for a specific junction are not necessarily
the same as the primary ones. However, a junctioned application sharing the
same LDAP repository would then try to authenticate a user using these values
against primary ones (by doing LDAP bind or compare). The need arises to keep
the values of primary user IDs and passwords the same as GSO IDs and
passwords.

Chapter 4. Configuration and customization 157
Figure 4-9 LDAP shared by Access Manager and other applications
The following issues should be considered while looking for solutions for
integrating Access Manager and Web applications using the same LDAP
repository or even different user repositories:
Using a directory synchronization product such as IBM Tivoli Directory
Integrator to synchronize both the corporate tree and the Access Manager
tree within the same directory. IBM Tivoli Directory Integrator also allows for
the synchronization of a user’s password.
Since GSO passwords are encrypted, they can only be read by the Access
Manager GSO APIs.
GSO configuration
Support for GSO is configured at the junction between WebSEAL and a
back-end server. To create a junction that enables GSO, use the create
command with the –b gso option. The following example illustrates the syntax for
the create command (entered as one line):
pdadmin> server task instance_name-webseald-host_name create -t ssl -h
host-name -b gso -T resource jct-point
cn=John Doe
dc=YourCompany,dc=com secAuthority=Default
LDAP Directory Server
Attribute List
cn=John Doe
uid=john123
userPassword=Encrypted Data
cn=Users
principalName=john123
cn=ResCreds
secResCredsId=T:MyGSO
cn=Resources
secResourceID=MyGSO
Common
Attributes
Attribute List
secResCredsID=T:MyGSO
secUid=john123
secAuthnData=Encrypted Data
secAuthnLength=36
secAuthnType=2
Attribute List
secResourceID=MyGSO
secType=1
secValid=True
Description=My GSO Resource
Synchronize

158 Certification Study Guide: IBM Tivoli Access Manager for e-business 6.0
The important options for setting up GSO junctions are:
–b gso Specifies that GSO should provide authentication
information for all requests crossing this junction.
–T resource Specifies the GSO resource or resource group. The
resource name used as the argument to this option must
exactly match the resource name as listed in the GSO
database. Required for gso junctions.
To create a resource you can use WPM or pdadmin CLI:
pdadmin> rsrc create resource_name [–desc description]
At the end, you need to have mappings of resources to specific authentication
information. The authentication information is a user name and password
combination known as a resource credential. A resource credential is a
credential that is used to identify a user’s authentication information. A user’s
authentication information is used by WebSEAL when accessing a back-end
Web resource or resource group through a GSO-enabled junction on behalf of
that user.
For example, to create the Web resource credential named engwebs01 for the
resource user ID 4807ws01 and password pwd4lucas given to Access Manager
user dlucas, execute following command:
pdadmin sec_master> rsrccred create engwebs01 rsrcuser 4807ws01 rsrcpwd
pwd4lucas rsrctype web user dlucas
4.9.2 Forms-based single sign-on
Forms-based single sign-on authentication supports existing applications that
use HTML forms for authentication that cannot be modified to directly trust the
authentication performed by WebSEAL. Forms-based single sign-on is built on
the following process:
1. WebSEAL interrupts the authentication process initiated by the back-end
application.
2. WebSEAL supplies the data required by the login form and submits the login
on behalf of the user.
3. WebSEAL saves and restores all cookies and headers.
4. The user is unaware of the second login taking place between WebSEAL and
the back-end application.
5. The back-end application is unaware that the login form is not coming directly
from the user.

Chapter 4. Configuration and customization 159
The login form from the back-end application can be filled in with a variety of
information from WebSEAL, such as:
Static text
GSO user name and password (see 4.9.1, “Tivoli Global Sign-On (GSO)
lockbox” on page 155 for more information)
Values contained within a user’s credential
In order to use forms-based single sign-on, the back-end application’s login page
must be uniquely identifiable. Also, client-side scripting can be used to validate
input data, but it must not modify the input data. The junction where the
authentication request is directed must be the same junction where the login
page is returned.
Forms single sign-on (FSSO) configuration
Configuration of forms single sign-on (FSSO) is done in two steps:
1. Create a configuration file to specify how the login form is to be recognized,
completed, and processed.
The forms single sign-on configuration file is custom-created by the
administrator and can be saved in any location. The configuration file must
begin with the [forms-sso-login-pages] stanza and has the following format:
[forms-sso-login-pages]
login-page-stanza = xxxxx
#login-page-stanza = aaaaa
#login-page-stanza = bbbbb
[xxxxx]
login-page = regular-expression-page-match
login-form-action = regular-expression-form-match
gso-resource = gso-target argument-stanza = yyyyy
[yyyyy]
name = method:value
2. Enable forms single sign-on by configuring the appropriate junction with the
–S option (which specifies the location of the configuration file).
4.9.3 Single sign-on using HTTP BA headers
A junction can be set up to specify client identity information in BA headers. This
section discusses the possible solutions for creating single sign-on
configurations across WebSEAL junctions using the –b options. The –b option
allows four possible arguments: filter, supply, ignore, gso.

160 Certification Study Guide: IBM Tivoli Access Manager for e-business 6.0
Passing an unchanged basic authentication header
WebSEAL can be configured to pass the received basic authentication data
unchanged to the junctioned application. If Access Manager and the application
share the same LDAP registry, Access Manager authenticates a user against the
same LDAP attributes as an application performing a regular LDAP bind (that is,
using a main user ID and password). In this case, there is no need to maintain
the GSO attributes of a user, and the main password may be encrypted.
However, basic authentication is the only available authentication method used
by WebSEAL because WebSEAL has to obtain the BA header values in order to
pass them through.
The –b ignore option instructs WebSEAL to pass the original client basic
authentication (BA) header straight to the back-end server without interference.
Because sensitive authentication information (user name and password) is
passed across the junction, the security of the junction is important. An SSL
junction is most appropriate.
Junction without BA authentication information
This may be useful if WebSEAL does all of the authentication and authorization
and there is no need to forward any information to the back-end servers.
This scenario seems applicable either for servers without any reliable security
functions or where there is no need for extra back-end authentication and
authorization (for example, providing only static Web pages). Nevertheless, this
approach requires full trust toward WebSEAL, and the back-end servers should
be configured to accept only incoming requests from WebSEAL.
Junction needs to be configured with the -b filter option to remove all basic
authentication header information from any client requests before forwarding the
requests to the back-end server. In this scenario, WebSEAL becomes the single
security provider.
If the back-end server needs to have some client information, this option can be
combined with the –c option to insert Tivoli Access Manager client identity
information into HTTP header fields. This option is described in 4.9.4, “Supplying
identity information in HTTP headers” on page 161.
Providing client identity with a generic password
This scenario assumes that the back-end server requires authentication from a
Tivoli Access Manager identity. By mapping a client user to a known Tivoli
Access Manager user, WebSEAL manages authentication for the back-end
server and provides a simple domain-wide single sign-on solution.

Chapter 4. Configuration and customization 161
The –b supply option instructs WebSEAL to supply the authenticated Tivoli
Access Manager user name (client’s original identity) with a static, generic
(“dummy”) password. The original client password is not used in this scenario.
The dummy password is specified in the [junction] stanza under
basicauth-dummy-passwd and by default it is set to dummy.
In this solution the same Tivoli Access Manager dummy password is used for all
requests, which means that all users have the same password in the back-end
server registry.
The use of the common dummy password offers no basis for the application
server to prove the legitimacy of the client logging in with that user name. If
clients always go through WebSEAL to access the back-end server, this solution
does not present any security problems. However, it is important to physically
secure the back-end server from other possible means of access.
Because sensitive authentication information (user name and password) is
passed across the junction, the security of the junction is important. Therefore,
an SSL junction is appropriate.
Supplying user names and passwords from GSO
This mechanism requires -b gso junction option and it is described in 4.9.1,
“Tivoli Global Sign-On (GSO) lockbox” on page 155
The following conditions exist for this solution:
The back-end server applications require different user names and
passwords that are not contained in the WebSEAL registry.
Security is important for both WebSEAL and the back-end server.
4.9.4 Supplying identity information in HTTP headers
WebSEAL can be configured to provide information to a junctioned application
about user ID, groups, and resources the user has access to. That is
accomplished by supplying the values of defined HTTP variables:
iv-user For user ID
iv-user-l For user’s LDAP distinguished name (DN) of the client
iv-groups For groups a particular user belongs to
iv-creds For the user’s credentials in base64-encoded Privilege
Attribute Certificate (PAC) format

162 Certification Study Guide: IBM Tivoli Access Manager for e-business 6.0
To send those variables in HTTP headers, junction needs to be specified with the
-c option, followed with one or more arguments:
iv_user
iv_user_l
iv_groups
iv_creds
To pass all HTTP variables except iv_user_l use option all. For example:
-c all
You cannot use option all in a case that you need to send both headers iv_user
and iv_user_l. You must individually specify all four header options to pass all
four header types across the junction:
-c iv_user,iv_user_l,iv_groups,iv_creds
The variables supplied in the HTTP stream can be mapped easily to the CGI
environment variables that can be interpreted by a Web application. To support
CGI programming, header information is transformed into a CGI environment
variable format by replacing all dashes (-) with underscores (_) and adding
“HTTP” to the beginning of the header string. The Tivoli Access Manager-specific
HTTP header entries are available to CGI programs as the following environment
variables
HTTP_IV_USER
HTTP_IV_USER_L
HTTP_IV_GROUPS
HTTP_IV_CREDS
Supplying client IP addresses in HTTP headers (–r)
The –r junction option allows you to insert client IP address information into the
HTTP headers of requests destined for junctioned application servers. The HTTP
header information enables applications on junctioned third-party servers to
perform actions based on this IP address information. The option does not
require any arguments, and based on the type of IP protocol (version 4 or 6), one
of the following information is set up in HTTP headers:
1.
iv-remote-address, and CGI equivalent HTTP_IV_REMOTE_ADDRESS
2.
iv-remote-address-ipv6, and CGI equivalent HTTP_IV_REMOTE_ADDRESS_IPV6
Supplying server name into junction header
A header with the URI-encoded authorization API administration server name is
passed to all junction servers. When no header name is specified, the header will
not be sent to the junction.

Chapter 4. Configuration and customization 163
The value is set in the default WebSEAL configuration file:
[header-names]
server-name = iv_server_name
This setting controls the name of the header used to pass the name of the server
to junctioned applications.
For example, when server-name = iv_server_name, and the WebSEAL instance
is default-webseald-seal1.itso.ibm.com, WebSEAL passes the following
header to the junction:
iv-server-name:default-webseald-seal1.itso.ibm.com
4.9.5 Using LTPA authentication with WebSEAL
WebSEAL can provide authentication and authorization services and protection
to an IBM WebSphere or Lotus Domino environment. When WebSEAL is
positioned as a protective front end to WebSphere or Lotus Domino, accessing
clients are faced with two potential login points. Therefore, WebSEAL supports a
single sign-on solution to one or more IBM WebSphere or Lotus Domino servers
across WebSEAL junctions.
WebSphere provides the cookie-based lightweight third-party authentication
(LTPA) mechanism. You can configure WebSEAL junctions to support LTPA and
provide a single sign-on solution for clients.
When a user makes a request for a WebSphere or Lotus Domino resource, the
user must first authenticate to WebSEAL. Upon successful authentication,
WebSEAL generates an LTPA cookie on behalf of the user. The LTPA cookie,
which serves as an authentication token for WebSphere or Lotus Domino,
contains user identity and password information. This information is encrypted
using a password-protected secret key shared between WebSEAL and the
WebSphere or Lotus Domino server.
WebSEAL inserts the cookie into the HTTP header of the request that is sent
across the junction to WebSphere or Lotus Domino. The back-end WebSphere
or Lotus Domino server receives the request, decrypts the cookie, and
authenticates the user based on the identity information supplied in the cookie.
To improve performance, WebSEAL can store the LTPA cookie in a cache and
use the cached LTPA cookie for subsequent requests during the same user
session. You can configure lifetime timeout and idle (inactivity) timeout values for
the cached cookie using parameters in the WebSEAL configuration file.
The creation, encryption, and decryption of LTPA cookies basically introduces
processing overhead. The LTPA cache functionality enables you to improve the

164 Certification Study Guide: IBM Tivoli Access Manager for e-business 6.0
performance of LTPA junctions in a high load environment. By default, the LTPA
cache is enabled. Without the enhancement of the cache, a new LTPA cookie is
created and encrypted for each subsequent user request.
Having the LTPA cookie enabled is independent of the basic authentication
header. This means that with the LTPA cookie inserted into the request header, it
is still possible to have the BA header to carry any authentication information to
the back-end server, depending on the –b option specified during the junction
creation. The usage of the BA header depends on the configuration of the
back-end WebSphere or Lotus Domino server.
Configuring an LTPA junction
Enabling single sign-on to WebSphere using an LTPA cookie requires the
following configuration tasks:
1. Enable the LTPA mechanism in the WebSphere Administrative console.
2. Generate the LTPA key file used for encryption of the identity information.
3. Create an LTPA-aware junction with location of the LTPA key file and the
password to this key file.
The following options are necessary to the standard junction and virtual host
junction create commands:
-A Enables LTPA cookies. LTPA version 1 cookies (LtpaToken) and LTPA
version 2 cookies (LtpaToken2) are both supported. LTPA version 1
cookies are specified by default. LTPA version 2 cookies must be specified
with the additional -2 option.
-2 Specifies that LTPA version 2 cookies (LtpaToken2) are used.
-F The “keyfile” option and argument specifies the full path name location (on
the WebSEAL server) of the key file used to encrypt the identity
information contained in the cookie. The shared key is originally created on
the WebSphere server and copied securely to the WebSEAL server.
-Z The “keyfile-password” option specifies the password required to open the
key file. The password appears as encrypted text in the junction XML file.
Use these options in addition to other required junction options when you create
the junction between WebSEAL and the back-end WebSphere server. For
example (entered as one line):
pdadmin> server task default-webseald-webseal.ibm.com create ... -A -F
"/abc/xyz/key.file" -Z "abcdefg" ...

Chapter 4. Configuration and customization 165
Trust Association Interceptor Plus (TAI++)
Along with LTPA mechanism, WebSphere provides an additional SSO
mechanism called
Trust Association Interceptor (TAI). Since WebSphere 5.1.1.
this interceptor has been named TAI++. TAI++ implies that the WebSphere
security application recognizes and processes HTTP requests received from
WebSEAL. WebSphere and WebSEAL engage in a contract in which the former
gives its full trust to the latter, which means that WebSEAL applies its
authentication policies on every Web request that is dispatched to WebSphere.
When using Trust Association Interceptor Plus, WebSEAL authenticates the
user, acquires credentials for the user from the user registry, and possibly
authorizes the request at the URL level. With a successful authorization,
WebSEAL augments the request with an additional HTTP header (iv-creds) that
contains the user’s credentials. It also changes the password contained in the
Basic Authentication header so it matches a configured SSO user.
This request is sent to WebSphere Application Server, which calls a TAI method
to determine whether the request is from a perimeter authentication service that
has already authenticated the user, to establish trust with the perimeter
authentication server and retrieve the credentials. This method establishes trust
with WebSEAL by checking whether the Basic Authentication header contains
the correct password for the configured SSO user. This is done by calling Access
Manager Authorization Server to make this decision.
The
iv-creds header is then extracted from the request and used to construct a
PDPrincipal object. A credential object containing user and group information is
constructed from information contained in the PDPrincipal. The Principal and the
Credential objects are inserted into a JAAS Subject, which is returned from the
call. At this point WebSphere Application Server has valid credentials that it can
use for making authorization decisions in the usual J2EE manner. In addition, the
Subject now contains the PDPrincipal object, which application code can access
if needed.
Important points to note are:
WebSEAL needs to insert the iv-creds header into the request, not the iv-user
header.
TAI++ does not directly contact LDAP, unlike the previous TAI version. It
instead contacts the Access Manager Authorization Server, which validates
the SSO password to establish trust with WebSEAL. This means that
additional configuration is required on the WebSphere Application Server side
to ensure that the TAI can reach the Access Manager Authorization Server.
The Credential object inserted into the Subject by the TAI means WebSphere
Application Server does not have to perform any additional user registry
searches as part of the authentication process.

166 Certification Study Guide: IBM Tivoli Access Manager for e-business 6.0
The use of TAI++ needs to be configured/enabled in WebSphere. The easiest
way to perform this is by using the WebSphere Administrative console and
selecting Global Security → LTPA → Trust Association → Interceptors.
For additional information on how to configure TAI++, see:
http://www.ibm.com/developerworks/websphere/techjournal/0406_botzum/0406_bo
tzum.html
4.10 SSO across Access Manager domains
In a large environment, or in a segmented organization, it may be desirable to
have multiple Access Manager domains with separate user registries and
authorization databases. In this type of environment, it may be a requirement that
users can move between these domains without having to re-authenticate each
time they enter a different domain. This kind of domain crossing depends on trust
between the domains because one domain needs to accept the authenticated
entities being passed from another.
The ability for a user to access resources in a secure domain depends on the
user acquiring a credential in that domain. Normally a credential is built after the
user authenticates. In the cross-domain environment, some other way has to be
found for WebSEAL to build a credential for the user. WebSEAL supports two
types of cross-domain authentication to address such scenarios:
Cross-domain single sign-on (CDSSO)
e-community single sign-on (ECSSO)
For both of these types of single sign-on mechanisms to work, it is necessary
that the users participating in the single sign-on exist in the user registries of both
security domains.
4.10.1 Cross-domain mapping framework
The cross-domain mapping framework (CDMF) is a programming interface that
can be used in conjunction with WebSEAL e-community single sign-on and
cross-domain single sign-on. It enables a developer to customize the mapping of
user identities and the handling of user attributes when single sign-on functions
are used. You can use the cross-domain mapping framework C API to customize
the handling of user attributes and the mapping of user identities from different
secure domains.

Chapter 4. Configuration and customization 167
4.10.2 Cross-domain single sign-on
WebSEAL supports the ability to forward an authenticated identity from a user in
one secure domain to a WebSEAL server in another secure domain. The
receiving WebSEAL then maps the identity provided by the sending WebSEAL to
an identity that is valid in its secure domain. This functionality can also be viewed
as a
push model with respect to authentication.
This functionality is known as cross-domain single sign-sn (CDSSO). In CDSSO,
the user makes a request to a special link on a WebSEAL server, which then
initiates the process to forward the request, along with credential information, to
a WebSEAL server in a different Access Manager domain. If the user were to
instead directly access the link in the target domain, he would have to
authenticate to that domain.
The CDSSO process includes the following steps:
1. A user initially logs on to a WebSEAL server in one secure domain.
2. At some point the user accesses a link controlled by the user’s WebSEAL,
which contains a special directive (pkmscdsso). This directive results in
redirecting the user to a URL controlled by a WebSEAL server in another
secure domain and passing encrypted credential information to the new
WebSEAL.
3. The user is redirected to the other WebSEAL and this server decrypts the
credential information passed to it, maps the identity to one defined in its own
user registry, and then creates a secure session with the browser.
4. At this point the user has established secure sessions with two WebSEAL
servers in different domains, but has only had to log in once.
The tokens are encrypted using triple-DES. The symmetric key is generated by
the cdsso_key_gen utility and exchanged between all WebSEALS that
participate in CDSSO.
Another way of looking at CDSSO is that it provides a mechanism by which a
WebSEAL server in one secure domain can send something analogous to a
letter of introduction to a WebSEAL server in another secure domain.
Note: Cross-domain single sign-on requires that the back-end application is
aware of this functionality existing. It is required to generate the appropriate
URL when forwarding the request to another domain. If back end changes to
an application are not permitted or desired, or if application awareness of
WebSEAL’s single sign-on functionality is not possible, then e-community
single sign on should be used. See 4.10.3, “e-community single sign-on” on
page 169 for more information.
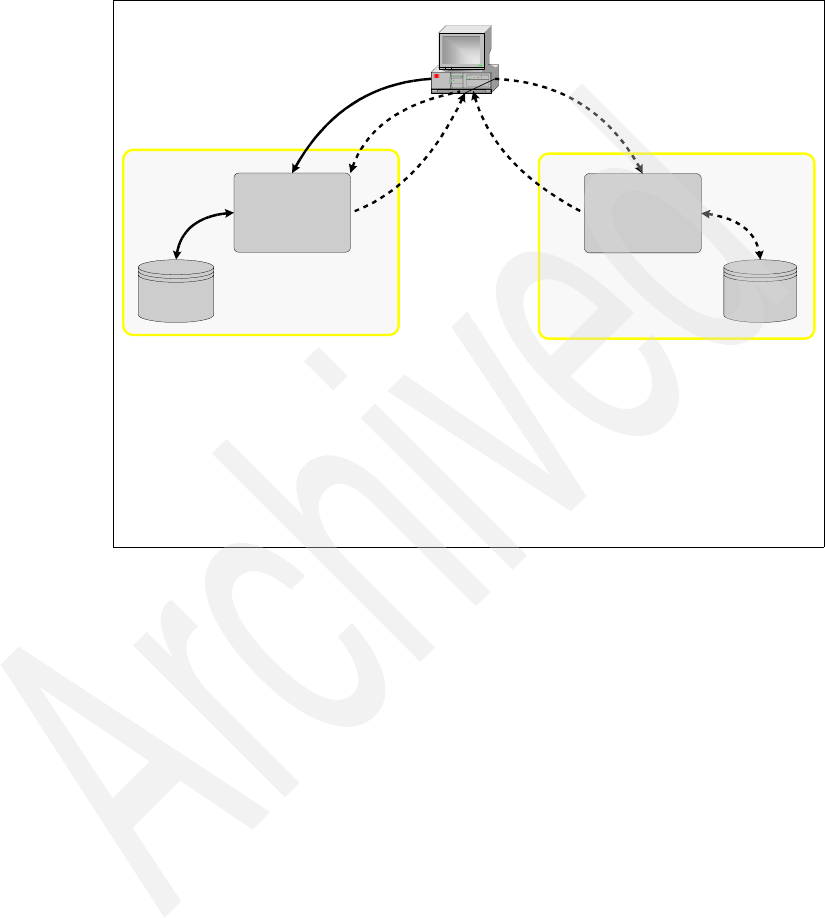
168 Certification Study Guide: IBM Tivoli Access Manager for e-business 6.0
Figure 4-10 summarizes a typical CDSSO flow.
Figure 4-10 CDSSO identity determination process
Another significant CDSSO implication for a given secure domain, in addition to
the need to potentially modify back-end applications, involves the mapping of
user identities. How this mapping is done is not really an architectural issue; it is
more a detailed design and implementation concern. The important thing to
remember is that the mapping must make sense for the specific situation.
It is possible (using the CDMF interfaces discussed in 4.10.1, “Cross-domain
mapping framework” on page 166) to map from an ID in one domain to a different
ID in another. However, if the IDs in both domains are the same, a direct mapping
may be done. This is the default and does not require the use of any special
programming interfaces.
User synchronization and CDSSO
The default mapping for CDSSO is to map a user from one domain exactly as it
appears into another domain. For example, if a user authenticates as user123
from
domain A and is forwarded to domain B, the user must also exist as
user123 in domain B even though they were never prompted to authenticate in
Secure
Domain A
Domain B
WebSEAL
Browser
Domain A
WebSEAL
1. User authenticates to Domain A WebSEAL.
2. At some point, user makes a request to a "pkmscdsso" link, which contains a Domain B URL.
3. The Domain A WebSEAL constructs an identity token, and redirects the browser to the Domain B
WebSEAL along with the token.
4. The Domain B WebSEAL receives the identity token, maps the user to a Domain B identity (4a),
and establishes a secure session with the browser.
5. The Domain B URL is processed and the result sent to the browser .
Once the identity is established with the Domain B WebSEAL, subsequent requests are processed
normally without need for authentication.
1
2
3
4
5
Secure
Domain B
Domain A
User Registry
Domain B
User Registry
4a1a

Chapter 4. Configuration and customization 169
domain B. This presents the challenge of synchronizing the user accounts that
need to participate in single sign-on between domains
If a custom written cross-domain mapping framework is used, then it is possible
to map a user from one domain to a different user in another domain. However, if
a one-to-one mapping is used, the problem of synchronizing users still would
exist regardless of whether or not the IDs matched from one domain to another.
Virtual hosts and CDSSO
Cross-domain single sign-on is not supported with virtual hosts and virtual host
junctions. If single sign-on is needed between separate DNS domains and/or
Access Manager domains, and either virtual hosts or virtual host junctions are
used, e-community single sign-on is the only technology supported for this type
of functionality.
4.10.3 e-community single sign-on
e-community single sign-on supports a cross-domain authentication capability.
However, it differs from CDSSO in a few key respects. Recall that in CDSSO,
authenticated identities are
forwarded. In an e-community scenario, identities
are instead retrieved—it is a
pull model. The use of e-communities has certain
advantages over CDSSO, yet it also has architectural impacts that are not
encountered in a CDSSO environment.
Instead of having to use special URLs to indicate the use of single sign-on as in
the CDSSO model, e-community allows for direct access to secured links. This
has a benefit over CDSSO in that users can bookmark links to resources but will
still be allowed to participate in e-community.
In this model, multiple Access Manager domains are defined to be part of a
single e-community. While each participating domain has its own user registry,
one of the domains is designated to be the
home domain. Users requesting
protected resources in any of the participating domains initially authenticate to a
Master Authentication Server (MAS) in the home domain. After the initial
authentication has taken place, the user has an e-community identity based on
the home domain’s user registry. A user’s e-community identity subsequently
can be mapped, as required, to local identities by WebSEAL servers in other
domains within the e-community.

170 Certification Study Guide: IBM Tivoli Access Manager for e-business 6.0
The e-community model is shown in Figure 4-11 on page 171. Some key points
to be aware of in the e-community model are:
The model supports access using direct URLs (bookmarks) to resources.
This feature contrasts with the CDSSO model that relies on a specially
configured pkmscdsso link.
All users who are participating in the e-community authenticate against a
single master authentication server (MAS) located in the home domain.
The e-community implementation allows for “local” authentication in remote
domains if the user does not have a valid account with the MAS (for example,
users who belong to domain B but do not participate in the domain A-domain
B e-community).
A user who fails authentication with the MAS when requesting a resource in a
non-MAS (but participating) domain is given the option to authenticate to the
local server where the request is being made.
The MAS (and eventually other selected servers in the remote domains)
“vouches for” the user’s authenticated identity.
Domain-specific cookies are used to identify the server that can provide
“vouch for” services. Domain cookies allow servers in a remote domain to
request “vouch for” information locally. The encrypted contents of
e-community cookies do not contain user identity or security information.
Special tokens are used to pass encrypted “vouched for” user identity. The
“vouch for” token does not contain actual user authentication information.
Integrity is provided by a shared secret key (triple-DES) generated by the
cdsso_key_gen utility. The token contains a timeout (lifetime) value to limit
the duration of the token validity.
Single sign-on with e-community can be used if there are two completely
separate Access Manager security environments (two different Policy Servers
and user registries) or in an Access Manager multi-domain environment where
there is one Policy Server and one user registry shared between domains (this
does not imply that the users and groups are shared between domains, though).
Note: Users who do not exist in the MAS home domain can still authenticate
to their own domain and access protected resources. This allows a company
to restrict who can essentially single sign-on to resources. Only users defined
to both the MAS domain and the domain where the protected resource is
defined can participate in e-community single sign-on.

Chapter 4. Configuration and customization 171
Figure 4-11 e-community single sign-on model
The e-community mechanism involves the following steps:
1. A user makes a request for a protected resource controlled by a WebSEAL
server in one of the e-community domains. This WebSEAL does not yet have
an established secure session with this user.
2. The WebSEAL server redirects the user to the MAS and sends with the
request a special directive (pkmsvouchfor), which requests that the MAS
provide identity information for the user.
3. The MAS checks to see whether the user has already been authenticated to
the e-community, and if not, the MAS authenticates the user.
4. The MAS sends a token back to the original WebSEAL server that contains
credential information that vouches for the user’s identity.
5. The WebSEAL server maps the identity provided to it by the MAS to an
appropriate Access Manager within its local domain and establishes a secure
session with the browser.
WebSEAL MAS
mas.domainA.com
WebSEAL 1
ws1.domainA.com
WebSEAL 2
ws2.domainA.com
WebSEAL 3
ws3.domainB.com
WebSEAL 4
ws4.domainB.com
DOMAIN A
DOMAIN B
Client
Home Domain
Domain A
User Registry
Domain B
User Registry

172 Certification Study Guide: IBM Tivoli Access Manager for e-business 6.0
Figure 4-12 summarizes the flow of an initial e-community user authentication.
Figure 4-12 e-community initial identity determination process
Within the home domain, unauthenticated requests are always vouched for via
the MAS. In other participating domains, after the user initially logs in to the MAS,
subsequent authentication activities to other WebSEAL servers in those domains
are handled locally. The first WebSEAL in the domain that validates the user’s
identity against the MAS then vouches
for that user’s identity within the local
domain. This is depicted in Figure 4-13 on page 173.
Secure
Domain A
MAS
WebSEAL
Browser
WebSEAL
1. User requests URL:
https://www.xyz.com/abc.html
2. WebSEAL redirects user to MAS WebSEAL with request for "voucher".
3. Browser forwards voucher request to MAS.
4. If a session has not yet been established, the user is authenticated and mapped to a Home Domain identity
(4a).
5. A voucher token is created (in a cookie), and the MAS redirects the user back to the original WebSEAL.
6. The browser forwards the request and voucher cookie to the original WebSEAL, which maps the user to an
appropriate Domain A identity (6a), establishes a secure session, and processes the request.
Once the session is established with the Domain A WebSEAL, subsequent requests are processed normally
without need for vouchering/authentication.
1
2
3
4
5
6
Home
Secure
Domain
Domain A
User Registry
Home
Domain User
Registry
4a6a

Chapter 4. Configuration and customization 173
Figure 4-13 e-community subsequent identity determination process
The key advantage of e-community single sign-on over CDSSO is that the initial
URL request can be made directly to the target WebSEAL server. Recall that
with CDSSO, the URL request must go through the WebSEAL to which the user
is currently authenticated. In an e-community configuration, the target WebSEAL
is specifically configured to
retrieve credential information through the vouching
mechanism, and the URL request itself need not be accompanied by special
processing or contain special characteristics, as in the CDSSO case.
User synchronization and e-community single sign-on
The default mapping for e-community single sign-on is to map a user from the
home domain exactly as it appears into another domain. For example, if a user
Secure
Domain A
Browser
WebSEAL 1
(User has authenticated to an e-community MAS in a previous request to WebSEAL 2. WebSEAL 2 now
will vouch for subsequent identity "voucher" requests by other WebSEALs for this user in this domain.)
1. User requests URL from WebSEAL 1:
https://www.xyz.com/abc.html
2. WebSEAL 1 redirects user to WebSEAL 2 with request for "voucher".
3. Browser forwards voucher request to WebSEAL 2.
4. WebSEAL 2 provides a voucher cookie token, and redirects the user back to WebSEAL 1.
5. The browser forwards the request and voucher cookie to WebSEAL 1, which maps the user to the correct
Domain A identity, establishes a secure session, and processes the request.
Once the session is established with the WebSEAL 1, subsequent requests are processed normally without
need for vouchering/authentication.
1
2
5
Domain A
User Registry
WebSEAL 2
3
4
New session is
established here
Identity is vouched for
here, where user
already has an active
session.

174 Certification Study Guide: IBM Tivoli Access Manager for e-business 6.0
authenticates as user123 to the home domain and is returned to domain B, the
user must also exist as user123 in domain B even though they were never
prompted to authenticate in domain B. This presents the challenge of
synchronizing the user accounts that need to participate in single sign-on
between domains.
If a custom written cross-domain mapping framework (CDMF) is used, then it is
possible to map a user from one domain to a different user in another domain.
However, if a one-to-one mapping is used, the problem of synchronizing users
still would exist regardless of whether or not the IDs matched from one domain to
another.
Virtual hosts and e-community single sign-on
Virtual hosts are also allowed to participate in an e-community single sign-on
environment. The same concepts apply to a virtual host WebSEAL environment
that apply to physical WebSEALs themselves.
For example, let’s take the following virtual host junctions:
www.abc.com:80
www.abc.com:443
www.xyz.com:80
www.123.com:80
There are three domains that would be participating in e-community single
sign-on in this environment:
abc.com
xyz.com
123.com
We could make the www.abc.com server the MAS server. That means whenever
authentication would need to occur for www.xyz.com, www.abc.com, or
www.123.com, all requests would first be forwarded to www.abc.com for
authentication and e-community token creation.
Note: www.abc.com:80 and www.abc.com:443 are a virtual host junction
protocol pair. They correspond to the same server and same objectspace in
Access Manager.

Chapter 4. Configuration and customization 175
4.11 Session Management Server
The Session Management Server solution is most commonly used in a scenario
where client requests are directed by a load balancing mechanism to two or
more replicated WebSEAL servers. The replicated servers are identical. They
contain replica copies of the WebSEAL protected object space, junction
database, and (optionally) dynurl database. The client is not aware of the
replicated front-end server configuration. The load balancing mechanism is the
single point of contact for the requested resource.
The Session Management Server is an independent service that acts as a
centralized session repository for a clustered WebSEAL server environment. The
major function of the Session Management Server is to act as a distributed
session cache.
There are two variations of server clusters:
Multiple servers that present the exact same content (Web site) to users.
The main users of the Session Management Server are replicated Web
security servers organized into groups called replica sets. A
replica set
consists of servers with identical configurations and protected Web spaces,
such that a client session created by one member of a replica set could be
used unmodified by another. Replica sets can provide performance benefits
such as load balancing and high availability.
Multiple servers that present differing, but related, content to users.
These Web sites do not present the same content but typically have single
sign-on requirements between each other and share the Tivoli Access
Manager user registry and Policy Server. A group of replica sets is called a
session realm. Certain policies, including maximum concurrent session policy
and policies affecting credential change, can apply consistently across a
session realm. From the user and administrator points of view, sessions exist
as a single entity across a session realm. All replica sets in a session realm
must use the same DNS domain.
In a case that the Session Management Server is configured to handle session
information for WebSEAL, it is obvious that WebSEAL needs to maintain a stable
connection with the Session Management Server. (WebSEAL returns HTTP
error 503 “Service unavailable” to the client when it does not have an active
connection to a Session Management Server.) In architecting a Session
Management Server solution, we need to consider a WebSphere cluster
environment to avoid a single point of failure for the Session Management Server
configuration.

176 Certification Study Guide: IBM Tivoli Access Manager for e-business 6.0
4.11.1 WebSEAL Session Management Server configuration
After the installation and initial configuration (using smscfg -action config), you
need to configure WebSEAL servers to work with the Session Management
Server.
WebSEAL configuration steps are the following:
1. Enabling and disabling the Session Management Server for WebSEAL
Use the dsess-enabled stanza entry in the [session] stanza of the WebSEAL
configuration file to enable and disable use of the Session Management
Server. To enable WebSEAL to use the Session Management Server to
maintain user sessions, enter a value of yes. For example:
[session]
dsess-enabled = yes
2. Specifying the Session Management Server location
Use the dsess-url stanza entry in the [dsess] stanza of the WebSEAL
configuration file to provide WebSEAL with the location (URL) of the session
management server. For example:
[dsess]
dsess-url = http://abc.example.com/DSess/services/DSess
If the dsess-url stanza entry specifies the HTTPS protocol in the URL, you
must configure WebSEAL for SSL communication with the Session
Management Server.
3. Retrieving the maximum concurrent sessions policy value
– You can use the maximum concurrent sessions policy to control the
number of sessions each user can have at one time within a distributed
session environment managed by the Session Management Server. By
default, this policy is enabled:
[session]
enforce-max-sessions-policy = yes
Setting the max-concurrent-web-sessions user attribute does not, by
itself, trigger policy enforcement.
– When this policy is enabled you have to use WPM or the pdadmin
command to set appropriate maximum value on global or user level. For
example, to allow every user to establish only one session with WebSEAL,
use the following command:
pdadmin> policy set max-concurrent-web-sessions 1
– The policy is stored in the Tivoli Access Manager user registry. To be
enforced by the authentication process in a Session Management Server

Chapter 4. Configuration and customization 177
environment, the policy must be retrieved from the registry and stored as
an extended attribute in each user’s credential. To store a policy value as
an extended attribute in a user credential, you must enable the built-in
credential policy entitlements service for Tivoli Access Manager using
cred-attribute-entitlement-services. The name of credential policy
attribute is: tagvalue_max_concurrent_web_sessions.
Managing session realms and replica sets
An authorized user can use WPM or the pdadmin CLI to display session realms,
list the participating replica sets, list current sessions, and search for specific
sessions.
After the initial configuration, you can add session realms and add replica sets to
a specific session realm. The following UNIX command is the minimal
requirement for this type of session management server configuration:
/opt/pdsms/bin/smscfg.sh -action config -was_host host_name -was_port
port \ -session_realm_add realm=set_name[,...][;realm=set_name[,...]...
Do not combine the –session_realm_add configuration parameters with any of
the following parameters:
–session_realm_remove
–replica_sets_add
–replica_sets_remove
After the initial configuration, you can add replica sets that are not assigned to a
specific session realm. The following UNIX command is the minimal requirement
for this type of session management server configuration:
/opt/pdsms/bin/smscfg.sh -action config -was_host host_name -was_port
port \ -replica_sets_add set_name[,...]
Do not combine the –replica_sets_add configuration parameters with any of the
following parameters:
–session_realm_add
–session_realm_remove
–replica_sets_remove
Replica set configuration
A replica set consists of servers with identical configurations and protected Web
spaces. A client session created by one member of a replica set can be used
unmodified by another.

178 Certification Study Guide: IBM Tivoli Access Manager for e-business 6.0
Each replica set name must be initially defined during the configuration of the
session management server.
You must specify each replica set name in the configuration file of each
WebSEAL instance that participates in those replica sets. Additionally, you must
assign each junctioned or virtual host to the appropriate replica set. There are
different procedures for assigning standard junctions and virtual hosts to a
replica set.
Each replica set that WebSEAL participates in must be listed in the
[replica-sets] stanza of the WebSEAL configuration file.
Assigning standard junctions to a replica set
By design, all standard junctions for a WebSEAL instance are assigned to one
replica set, as specified by the standard-junction-replica-set stanza entry in
the [session] stanza for the WebSEAL configuration file.
To use the Session Management Server, the standard-junction-replica-set
stanza entry value must also be listed in the [replica-sets] stanza. If the
standard-junction-replica-set value is not present in the [replica-sets] stanza,
WebSEAL will not start.
For example:
[session]
standard-junction-replica-set = www.example.com
[replica-sets]
replica-set = www.example.com
Assigning virtual hosts to a replica set
In contrast to standard junctions, virtual hosts can be individually assigned to
different replica sets by using the -z junction option during creation of virtual host
junction. The -z option specifies the replica set that sessions on the virtual host
junction are managed under.
Additionally, the name of the replica set used by this virtual host must be defined
by the replica-set stanza entry in the [replica-sets] stanza of the configuration
file for the WebSEAL instance:
[replica-sets]
replica-set = replica_set_name
Interactive displacement
If the maximum concurrent sessions policy is enabled, the
prompt-for-displacement stanza entry in the [session] stanza of the WebSEAL
configuration file determines whether or not a user is prompted for appropriate

Chapter 4. Configuration and customization 179
action when the max-concurrent-web-sessions displace policy has been
exceeded.
If prompt-for-displacement is set to yes and maximum concurrent sessions policy
is set to displace, when a second login is attempted, the user receives the
too_many_sessions.html response page.
You can customize the contents of this page. The default message on this page
states:
You are already logged in from another client. Do you want to
terminate your existing login or cancel this new login request?
Terminate existing login
Cancel this new login
Action descriptions:
Terminate existing login
The terminate action calls the WebSEAL
/pkmsdisplace function. This
function terminates the existing (original) login, creates a new session for the
user, logs the user in transparently, and redirects the user to the requested
URL.
Cancel this new login
The cancel action calls the WebSEAL
/pkmslogout function. This function
closes the current login attempt and returns the standard WebSEAL logout
page to the user. The original (older) login session can continue accessing
resources.
Non-interactive displacement
If prompt-for-displacement is set to no and maximum concurrent sessions policy
is set to displace, when a second login is attempted, the original (older) login
session is automatically terminated with no prompt. A new session is created for
the user and the user is logged in to this new session transparently. The original
(older) session is no longer valid.
This concludes the configuration and customization discussion for Access
Manager for e-business.

180 Certification Study Guide: IBM Tivoli Access Manager for e-business 6.0

© Copyright IBM Corp. 2006. All rights reserved. 181
Chapter 5. Programming
This section describes the application programming interfaces that were
introduced in Chapter 2, “Planning” on page 27. The major interfaces covered in
this chapter are:
External Authentication Interface (EAI)
External authentication C API
Entitlement service interface
External Authorization Service (EAS)
5

182 Certification Study Guide: IBM Tivoli Access Manager for e-business 6.0
5.1 External authentication interface
Tivoli Access Manager WebSEAL and Web Server Plug-in both support the
externalization of authentication through an HTTP interface. This technology is
known as the
external authentication interface (EAI). The EAI is an alternative
way to customize authentication when the authentication information is passed in
HTTP messages. It allows a back-end application server to perform the
authentication of a user (with the HTTP messages passing through
WebSEAL/Web Plug-in) and then, upon successful authentication, return an
identity to WebSEAL/Web Plug-In using some pre-defined HTTP headers. A
generic flow is depicted in Figure 5-1.
By allowing an application server to perform an authentication, virtually any
desired authentication strategy can be implemented. Since the interface is
HTTP, the back-end application can be written in any language that supports
communication via the HTTP protocol. This is an advantage over the external
authentication C API (previously known as CDAS) that must be written
exclusively in C. The external authentication C API interface is still, however, the
only method for performing non-HTTP authentication such as client certificate
authentication.
Figure 5-1 External authentication interface
The external authentication interface could return a Privilege Attribute Certificate
(PAC) which could then be used to build the credential.
There are some implications to externalizing authentication outside of the
standard WebSEAL/Web Plug-in password module. The password module in
WebSEAL/Web Plug-In provides for maximum failed login attempts, password
EAIWebSEAL/WebPI
Build
Credential
Gather
Authentication
Data
Session Cache
Verify/Process
Data
Return Access
Manager User
ID
HTTP
Browser
Access Manager
User ID
(Auth Level)
(Attributes)

Chapter 5. Programming 183
lifetime checks, and a password change function. All of these functions will need
to be duplicated if using an external authorization interface.
External authentication interface process flow
Figure 5-2 depicts the process flow for an EAI authentication.
Figure 5-2 External Authentication Interface process flow
As we already mentioned, this new interface allows authentication to be
performed by a back-end application being accessed over a junction using
HTTP(S), then the authenticated identity is sent to WebSEAL or WebPI server in
the header of an HTTP response. In detail, the process follows these steps:
1. The authentication process is initiated.
There are many possibilities for initiating the authentication process. A few
typical examples are:
a. An unauthenticated user requests a protected resource.

184 Certification Study Guide: IBM Tivoli Access Manager for e-business 6.0
b. WebSEAL intercepts the request and returns a redirect to a customized
login.html response page. The login.html page is customized to contain a
submit link to the external authentication application. Alternatively,
WebSEAL can be configured to redirect all requests for pages (including
the login page) directly to a page generator which is part of the EAI
application.
Note that the EAI application is assessed over a junction and must be
available to unauthenticated users. An appropriate Access Manager
security policy (for example, an ACL) needs to be configured to allow
unauthenticated users to access this page.
c. The user provides login information (user name and password) on the
form and clicks the submit link to send the data to the external
authentication application.
2. Authentication request.
The process of authentication might require a number of exchanges between
the external authentication application and the client. Exchanges are
streamed through (not intercepted) by WebSEAL.
The final authenticating request to the external authentication application
must be directed to a distinct URL. This POST URL is configured in
WebSEAL as an EAI
trigger URL because the EAI might return an
authenticated identity in response to this POST.
In this case, the EAI application does not return an EAI message. Instead it
has decided that this user must also provide some secondary authentication,
so it returns another form to the client. WebSEAL sees that this is not an EAI
message so it is forwarded to the client.
3. Authentication response.
The client completes the additional challenge and again POSTs it to the EAI
application (via WebSEAL). WebSEAL again matches a
trigger URL. This
time authentication is complete and so the EAI application responds with an
EAI message that contains the authenticated identity.
4. WebSEAL uses the authentication data to build a credential for the user.
WebSEAL spots the EAI message and processes the identity information it
contains to build an authenticated session. The user is now authenticated and
can be directed to the resource they originally requested.
5. WebSEAL sends a response to the user following the algorithm illustrated in
Figure 5-3.
a. If automatic redirection is enabled, the user is redirected to the location
specified in the WebSEAL configuration file.
b. If the initial request was cached, the request is reprocessed for the user.

Chapter 5. Programming 185
c. If the response from the external authentication application contains a
redirection URL header, the user is redirected to the location specified by
that URL.
d. Otherwise, WebSEAL responds with the standard login_success.html
page.
Figure 5-3 WebSEAL response to user after authentication with EAI
External authentication interface configuration
This section describes how to configure WebSEAL to use the external
authentication interface. At a high level, the steps are as follows:
1. Enable the external authentication interface.
In the [eai] stanza of the WebSEAL configuration file, specify the protocols
to support in your network environment.
[eai]
eai-auth = {http | https | both | none}
2. Initiate the authentication process.
In an EAI scenario, WebSEAL does not provide any built-in methods for
initiating the authentication process. WebSEAL does not provide any special
prompts or login pages. You can, however, modify WebSEAL’s existing
login.html form to include a custom link to the EAI application.
Modification of the login.html form is necessary to support re-authentication
and authentication strength (step-up).
3. Configure the external authentication interface trigger URL.
A trigger URL is a server-relative or absolute URL string configured in the
WebSEAL configuration file. The trigger URL usually requests authentication
from the external authentication application. For example, the trigger URL

186 Certification Study Guide: IBM Tivoli Access Manager for e-business 6.0
could be the URL to the external authentication application located in a
special link on a customized login page.
Use the trigger stanza entry, located in the [eai-trigger-urls] stanza of
the WebSEAL configuration file, to specify one or more trigger URL strings.
4. Specify HTTP header names for authentication data.
You must specify the names of the HTTP headers that contain the
authentication data returned from the external authentication application. Use
the [eai] stanza of the WebSEAL configuration file to specify the names of
the HTTP headers that contain the authentication data returned from the
external authentication interface server.
There are three categories of HTTP headers used to hold authentication data:
– Privilege Attribute Certificate (PAC) format
The PAC is an ASN.1 data structure used to express identity information.
Authentication data returned to WebSEAL in PAC format can be directly
converted to a credential.
– WebSEAL user identity structure
The WebSEAL user identity structure is the same structure generated by
WebSEAL’s default built-in authentication modules. When the user identity
format type is used, the information is processed by the eaiauthn
authentication module and a credential is built by the Tivoli Access
Manager authorization API.
–Common
The common header category holds additional information and can be
used with either the PAC or user identity formats.
5. Configuring the EAI mechanism
The built-in module is used to process the authentication data found in the
special HTTP headers. After WebSEAL extracts the authentication data from
the headers in the response, the data is passed to the eaiauthn module.
The eaiauthn module is not used to process PAC header data. The PAC
format allows WebSEAL to convert the authentication data directly to a
credential.
You can configure the EAI authentication mechanism by entering the
ext-auth-interface stanza entry with the platform-specific name of the
shared library file in the [authentication-mechanism] stanza of the WebSEAL
configuration file.
– On UNIX, the module that processes user identity type header information
is a shared library called
libeaiauthn.
– On Windows, the module that processes user identity type header
information is a DLL called
eaiauthn.

Chapter 5. Programming 187
5.1.1 External authentication C API
In previous releases, custom authentication modules were built using the Tivoli
Access Manager
cross-domain authentication services or CDAS. This term is no
longer used because its scope is not wide enough to cover all the functions
performed by Web security resource manager authentication modules. The
replacement term is
external authentication C API. The new term reflects only a
change in terminology.
The external authentication C API performs the following tasks:
Receives authentication data from the runtime.
Organizes the data into a standard format.
Passes the data to the authentication modules.
Receives statuses, identity structures, or both back from the authentication
modules.
Passes the statuses, identity structures, or both back to the runtime.
As shown in Figure 5-4 on page 188, the external authentication C API enables
you to substitute the default built-in WebSEAL authentication mechanism with a
highly flexible shared library mechanism that allows custom handling and
processing of client authentication information.
Every authentication module implements one or more of four functions defined
by the external authentication module interface. This is true for the built-in
authentication modules as well as for custom modules that you can develop
Note: EAI is configured for the Plug-in for Web Servers in the [ext-auth-int]
stanza. This stanza can be qualified by virtual host if necessary.
The configuration options are similar to those used for WebSEAL. However,
there are some differences:
–
auth-url is the “start” page of the EAI application. When the EAI
authentication module is selected for authentication it will return this
page to the client to start EAI authentication.
– When the
trigger-url is matched by the EAI authentication post-authn
module it will request access to the response from this page. Multiple
trigger URLs can be specified.
– When the EAI Authentication response module is called it will look for
the configured headers. If appropriate headers are found, it will trigger
the building of a credential and an authentication event. If the headers
are not found, the response will be sent back to the client. The EAI
headers are configured in the same way as for WebSEAL.

188 Certification Study Guide: IBM Tivoli Access Manager for e-business 6.0
using the external authentication C API. The complete programming reference
for the external authentication C API is described in detail in developers
manuals.
In summary, the four functions of the external authentication C API are:
xauthn_initialize() Initializes a specified authentication module
shared library.
xauthn_authenticate() Performs the authentication module
authentication tasks.
xauthn_change_password() Performs a password change.
xauthn_shutdown() Shuts down a specified authentication module
shared library.
Figure 5-4 WebSEAL authentication model with CDAS
Extending the built-in capabilities of authentication mechanisms provided by
Access Manager is another reason to build a custom EAI. This method enables
you to authenticate clients who are not direct members of the Access Manager
secure domain. In that case, the custom EAI can direct authentication data to be
processed by an external authentication mechanism and third-party registry (for
example, RACF®, One-Time Password Server, or authentication via personal
question). Ultimately, the EAI returns an Access Manager identity to WebSEAL
for querying the Access Manager user registry and creating a credential.
Authentication Service
Validate user identity
information and return Access
Manager user ID
1
Create Credential
Custom
Authentication
Library
WebSEAL
2
3
4
5
CDAS API
Access Manager
User Registry
Authentication
Service Registry
Browser

Chapter 5. Programming 189
5.2 Authorization API overview
Using the Tivoli Access Manager authorization application programming
interface (aznAPI), you can program Tivoli Access Manager applications and
third-party applications to query the Tivoli Access Manager authorization service
for authorization decisions. The Tivoli Access Manager authorization API is the
interface between the server-based resource manager and the authorization
service; it provides a standard model for coding authorization requests and
decisions. The aznAPI lets you make standardized calls to the centrally
managed authorization service from any developed application. The aznAPI
supports two implementation modes:
Remote cache mode
In remote cache mode, you use the aznAPI to call the Tivoli Access Manager
authorization server, which performs authorization decisions on behalf of the
application. The authorization server maintains its own cache of the replica
authorization policy database.
Local cache mode
In local cache mode, you use the aznAPI to download a local replica of the
authorization policy database. In this mode, the application can perform all
authorization decisions locally.
The aznAPI shields you from the complexities of the authorization service
mechanism. Issues of management, storage, caching, replication, credentials
format, and authentication methods are all hidden behind the aznAPI. The
aznAPI works independently from the underlying security infrastructure, the
credential format, and the evaluating mechanism. The aznAPI makes it possible
to request an authorization check and get a simple yes or no recommendation in
return.
5.2.1 Configuration of an aznAPI application
The aznAPI application must establish its own authenticated identity within the
IBM Tivoli Access Manager (Tivoli Access Manager) secure domain in order to
request authorization decisions from the Tivoli Access Manager authorization
service. Before you run the aznAPI application for the first time, you must create
a unique identity for the application in the Tivoli Access Manager secure domain.
In order for the authenticated identity to perform API checks, the application must
be a member of at least one of the following groups:
ivacld-servers This group membership is needed for applications using
local cache mode.
remote-acl-users This group membership is needed for applications using
remote cache mode.

190 Certification Study Guide: IBM Tivoli Access Manager for e-business 6.0
When the application wants to contact one of the secure domain services, it must
first log in to the secure domain.
Use the
svrsslcfg utility to accomplish this task. Run this utility before initializing
the aznAPI. The svrsslcfg utility performs the following tasks:
It creates a user identity for the application by combining the server name
with the local TCP/IP host name.
It creates an SSL key file for that user.
It adds the user to the ivacld-servers group for a server type of local, or to the
remote-acl-users group for a server type of remote.
Configuring a Java application into the secure domain
Java applications that use Tivoli Access Manager security must be configured
into a Tivoli Access Manager secure domain. Tivoli Access Manager provides a
utility class called com.tivoli.pd.jcfg.SvrSslCfg that can be used to accomplish the
necessary configuration and unconfiguration tasks.
The SvrSslCfg class is used to create a Tivoli Access Manager user account for
an application server and to store the server’s configuration and certificate
information in local configuration and keystore files. After obtaining the necessary
information, use the SvrSslCfg option -action config to create the Tivoli Access
Manager application name, the configuration file, and the keystore file.
Configuring an application server creates user and server information in the user
registry, and creates local configuration and keystore files.
Again, Tivoli Access Manager supports Java application servers in either remote
mode or local mode.
As we have already shown in Figure 2-10 on page 53, the Tivoli Access Manager
aznAPI supports a service plug-in model. The Tivoli Access Manager
authorization service recognizes and registers service plug-ins by reading entries
in the aznAPI client configuration file. When the application initializes the aznAPI,
the authorization server parses the configuration file. The dispatcher resolves the
location of each service plug-in, and loads each service plug-in. The
azn_svc_initialize() function returns an error if a service plug-in is not configured
correctly or if the service plug-in module cannot be located.
Note: The svrsslcfg command line interface and the SvrSslCfg Java utility are
not interchangeable. Do not use the svrsslcfg command line interface to
create configuration files that are to be used with Java applications. Do not
use the SvrSslCfg Java class to create configuration files for use by C
applications.

Chapter 5. Programming 191
Each type of service has a separate section within the configuration file. The
default configuration files for every plug-in are shown in Table 5-1.
Table 5-1 Stanza entries for authorization plug-ins
In the following sections we describe some of those interfaces in more detail.
5.2.2 Entitlement service interface
An entitlement service interface is a part of the aznAPI that is called during the
building of a credential. This entitlement service receives the basic user
credential being created and is able to specify a list of additional custom
attributes to be added to the credential before it is returned to the application.
The entitlement service interface is called from within the aznAPI, so the function
is available to all Access Manager applications regardless of the registry and
regardless of the authentication method used. Each entitlement service plug-in is
a standalone module that is dynamically loaded into the authorization service.
The Tivoli Access Manager authorization service recognizes and registers
entitlement service plug-ins with the service dispatcher by reading entries in the
aznapi.conf configuration file. Entitlement service plug-ins are declared in the
configuration file under the stanza entry called [aznapi-entitlement-services].
In this stanza, every entitlement service gets a unique ID. The value assigned to
this ID can be either the service, or an entirely different one written by an
authorization API application developer. (The Tivoli Access Manager
authorization service also recognizes and registers entitlement service plug-ins
through arguments passed to the init_data parameter of the azn_initialize()
function.)
Figure 5-5 on page 192 shows the architecture for adding attributes to a new
user credential. The main aspect is that the Resource Manager can be any
Access Manager aznAPI application — it is no longer limited to just WebSEAL
and the Web Server Plug-in.
Initially the application calls the aznAPI to request a credential. The aznAPI
builds a basic Access Manager credential for the user (1) and then calls the
Entry Service type
[aznapi-entitlement-services] Entitlement service plug-ins
[aznapi-pac-services] Privilege attribute certificate service plug-ins
[aznapi-cred-modification-services] Credentials modification service plug-ins
[aznapi-admin-services] Administration service plug-ins
[aznapi-extern-authzn-services] External Authorization Service plug-ins

192 Certification Study Guide: IBM Tivoli Access Manager for e-business 6.0
configured credential attribute entitlement services. These gather additional
attributes for the user (from the registry in this example) and return them to the
aznAPI (2). The aznAPI then adds these attributes to the basic Access Manager
credential before returning it to the calling application.
Figure 5-5 Entitlement service
An entitlement service is a very generic plug-in that can be called by the Access
Manager authorization service. It is possible to register multiple credential
attribute entitlement services with the aznAPI. These will all be called, and all of
the attributes are added to the user’s credential.
The input to an entitlement service is a user credential and an application
context. The output of an entitlement service is an attribute list. This is how the
entitlement service passes back its results.
Credential attribute entitlement service
The credential attribute service can obtain the custom credentials from any
source; they don’t have to come from the user registry. Custom entitlement
services can be written to obtain attributes from any desired source.
The credential attribute entitlement service extracts information from a user’s
LDAP entry and adds it to their credential. For example, a back-end application
requires a user’s department number in addition to their user ID in order to build
the application interface appropriately. By using the credential attribute
entitlement service, WebSEAL can pull the user’s department out of their entry in
LDAP, place it in the user’s credential, then use the information from the
credential to place the department value in an HTTP header.
Registry attribute entitlement service
The registry attribute entitlement service is a credential attribute entitlement
service that is supplied with the Tivoli Access Manager authorization runtime
package and that can be used to retrieve attributes from the Tivoli Access
Manager user registry.
Any
aznAPI
Resource
Manager
aznAPI
AM Registry
1.Build Credential
Entitlement Service(s)
2.Get Attributes

Chapter 5. Programming 193
The attributes retrieved by the credential attributes entitlement service do not
necessarily have to be placed directly into a user credential. These name/value
pairs from the user registry are placed into an attribute list, which can then be
used for purposes other than adding information to a user credential.
This built-in registry attribute entitlement service is a generic entitlement service
that can be used by many resource managers.
High-level configuration steps are the following:
1. As with any entitlement service plug-in, credential attribute entitlement
services are declared in the configuration file (for example webseald.conf)
under the stanza entry [aznapi-entitlement-services]. The value for the
registry attribute retrieval service that is part of the Tivoli Access Manager
runtime environment is
azn_ent_cred_attrs.
2. Along with the ID definition of an entitlement service we need to define
automatic loading of the service. Services to be automatically called by
azn_id_get_creds2() must also be listed in the [aznapi-configuration]
stanza. Services listed under this stanza are enabled and called
automatically. To specify that the service ID refers to a credential attributes
entitlement service, use the keyword
cred-attribute-entitlement-services.
3. At the end, we need to provide several stanzas that specify the attributes to
be added to the credential.
Dynamic ADI retrieval services
This class of entitlement service is designed to fulfill requests for access decision
information (ADI) that is needed for the Tivoli Access Manager authorization
engine to perform an authorization rule evaluation. To meet the classification of
attribute retrieval service the entitlement service needs to take a specific set of
inputs and return to the caller a specific set of outputs in XML format. Dynamic
ADI retrieval services are configured in the same way as other entitlement
services. To have the authorization rules evaluator call a dynamic ADI retrieval
service when ADI is required to complete a rule evaluation, you must specify the
service ID of the entitlement service as a value for the configuration file entry
dynamic-adi-entitlement-services or specified to the azn_initialize() application
interface using the initialization attribute
azn_init_dynamic_adi_entitlement_services. Multiple service IDs can be
specified in this way. They are called in the order in which they are specified in
the configuration setting or initialization parameter.
5.2.3 External Authorization Service (EAS)
The External Authorization Service (EAS) interface provides support for
application-specific extensions to the authorization engine. You can use an

194 Certification Study Guide: IBM Tivoli Access Manager for e-business 6.0
external authorization service plug-in to force authorization decisions to be made
based on application-specific criteria that are not known to the Tivoli Access
Manager authorization service. Each external authorization service plug-in is a
standalone module that is dynamically loaded into the authorization service. This
enables system designers to supplement Access Manager authorization with
their own authorization models. The external authorization service allows you to
impose additional authorization controls and conditions that are dictated by a
separate, external, authorization service module.
An EAS is accessed via an authorization
callout, which is triggered by the
presence of a particular bit in the ACL that is attached to a protected object. The
callout is made directly by the Authorization Service.
In the current release of Access Manager, the EAS interface is supported via a
simple Authorization Service plug-in capability. This allows an EAS to be
constructed as a loadable shared library. The EAS architecture is summarized in
Figure 5-6.
Figure 5-6 EAS architecture
Implementing an EAS
Two general steps are required to set up an External Authorization Service:
1. Write an external resource manager service plug-in module with an
authorization interface that can be referenced during authorization decisions.
2. Register the external authorization service with the resource manager so that
the resource manager can load the plug-in service at initialization time.
Resource
Manager
Authorization
Engine
EAS Shared
Library
Interface
EAS Module
Custom
Authorization
Engine/Logic
The EAS shared library provides the
application programming interface to
support the custom authentication
functions
The custom EAS Module provides the
authentication-method-specific functions
to interface with the authentication target
system or registry.
The user sends a request for a resource
To Resource Manager
The authorization subsystem forwards
the access request for the resource to
the custom EAS module
Resource Manager asks the authorization
engine whether the user is permitted to
access the requested resource
Client

Chapter 5. Programming 195
Registering the service sets a trigger condition for the invocation of the external
authorization service. When the trigger condition is encountered during an
authorization check, the external authorization service interface is invoked to
make an additional authorization decision.
Configuration of external authorization service plug-ins is performed in the same
way as other authorization service plug-ins. Initialization settings are specified
either through a configuration file or programmatically through the initialization
attribute list of the azn_initialize() function.
Initialization settings consist of a service definition that specifies a policy trigger
for which the external authorization service is invoked, a weighting that is
assigned in the access decision process to the particular external authorization
service, and the location of the dynamically-loadable library module that
performs the authorization work specific to the external authorization service.
The concepts of policy triggers and weightings are described later in this section.
Each external authorization service plug-in must expose three interfaces to the
authorization service:
azn_svc_intialize()
azn_svc_shutdown()
azn_svc_decision_access_allowed_ext()
Deployment strategies
Tivoli Access Manager allows you to implement an EAS in several ways:
Any number of external authorization services can be registered with
resource manager applications. Applications that can load external
authorization services include the authorization server, other Tivoli Access
Manager resource managers, and any other resource manager applications
that you create.
Remote-mode authorization API clients, which make requests to the
authorization server for authorization decisions, automatically make use of
any external authorization service that is loaded by the authorization server.
More than one external authorization service can be called for any single
trigger condition. In this case, the result of each external authorization service
is weighted accordingly, and then the results are combined with the result of
the Tivoli Access Manager authorization service.
Trigger conditions can be placed on objects, using a POP trigger, such that
any request to an object, regardless of the operation that is being requested,
triggers a call to the external authorization services that are configured for the
trigger.
Trigger conditions can also be placed on the operations requested by a user.
For example, an external authorization service can be triggered specifically

196 Certification Study Guide: IBM Tivoli Access Manager for e-business 6.0
when a user requests a Write operation to a protected resource, but not for
any other operation. It is then possible to develop sets of operations for which
one or more external authorization services in combination are triggered
according to the set of operations requested.
The external authorization services are implemented as dynamically loadable
library (dynamic link library (DLL)) modules. This greatly simplifies the task of
external authorization service development. There is no requirement to make
remote requests to the external authorization service and the overhead of
making the call is equivalent to the overhead of a function call.
The combination of the aznAPI and an EAS provides a highly extensible and
flexible solution for implementing a complex security policy.
This concludes the discussion on the programming interfaces for Access
Manager for e-business.

© Copyright IBM Corp. 2006. All rights reserved. 197
Chapter 6. Auditing and
troubleshooting
This chapter describes the auditing features and troubleshooting tools in Tivoli
Access Manager 6.0.
Tivoli Access Manager supports two types of auditing. Native auditing has been
used in previous versions of Access Manager and is still supported in Access
Manager 6.0. The auditing capability in Access Manager 6.0 has been enhanced
to send audit data to a new subsystem, the Common Auditing and Reporting
Service (CARS).
6

198 Certification Study Guide: IBM Tivoli Access Manager for e-business 6.0
6.1 Native auditing
Auditing is defined as the logging of audit records. It includes the collection of
data about system activities that affect the secure operation of the Tivoli Access
Manager server processes. Each Tivoli Access Manager server can capture
audit events whenever any security-related auditable activity occurs.
Auditing uses the concepts of a record, an audit event, and an audit trail. Each
audited activity is referred to as an audit event. The output of a specific server
event is called a
record.
An
audit trail is a collection of multiple records that document the server activity.
Audit trail files can capture authorization, authentication, and management
events that are generated by the Tivoli Access Manager servers. There are
multiple sources for auditing events that you want to gather. You can collect
either a combination or all of the different types of auditing events at the same
time. Some of the event types that can be used for native auditing are:
audit.authz Authorization events for WebSEAL servers
audit.azn Authorization events for base servers
audit.authn Authentication, credential acquisition authentication,
password change, and logout events
audit.authn.successful Successful authentication credential acquisition
authentication, password change, and logout events
audit.authn.unsuccessful Failed authentication credential acquisition
authentication, password change, and logout events
audit.http HTTP access events
audit.http.successful Successful HTTP access events
audit.http.unsuccessful Failed HTTP access events
audit.mgmt Management events
http HTTP logging information
http.clf HTTP request information in common log format (clf)
http.ref HTTP Referer header information
http.agent HTTP User Agent head information
http.cof HTTP information in NCSA combined output format
(cof) with timestamp and appends the quoted referer
and agent strings to the common log format

Chapter 6. Auditing and troubleshooting 199
6.1.1 Native auditing configuration
To enable logging, define the logcfg entry in any or all of the following locations:
The [ivmgrd] stanza of the Policy Server ivmgrd.conf configuration file.
The [ivacld] stanza of the authorization server ivacld.conf configuration file.
The [aznapi-configuration] stanza of a WebSEAL server
webseald.instance.conf configuration file.
The [aznapi-configuration] stanza of the Plug-in for Web Servers
pdwebpi.conf configuration file.
The [aznapi-configuration] stanza of the resource manager aznAPI.conf
configuration file.
For each entry, specify the following:
Type of audit event
Location of the audit log
Maximum file size
File flush interval
When defining the logcfg entry in a configuration file, use the following general
format (on a single line) to specify audit event logging:
logcfg = category:{stdout|stderr|file|pipe|remote}
[[parameter[=value]], [parameter[=value]]], ..., [parameter[=value]]]
To enable the recording of audit events, associate an event category with a log
agent (file, pipe, or remote) or associate an event category with a console
destination (stdout or stderr).
With event logging, the concept of a
log agent includes capturing events that are
redirected to destinations other than the local file system. Event logging uses the
following types of log agents, each agent representing an audit trail:
Sending events to the console.
Configuring file log agents.
Configuring pipe log agents.
Configuring remote log agents.
The available parameters for the logcfg stanza entry differ by log agent. The
console log agent does not support parameters.

200 Certification Study Guide: IBM Tivoli Access Manager for e-business 6.0
Configuring the event pool category
Events are passed to subscribed log agents asynchronously from the
application-level requests that construct the events. All events enter the common
propagation queue before being forwarded to the subscribed log agents. The
propagation queue is configurable. To configure the propagation queue, define
the logcfg stanza entry using
EventPool as the category name and specify the
configuration parameters without specifying a log agent. You should manage the
propagation queue to support the configuration of log agents. For example, to
limit the amount of memory used to queue events for a remote log agent, you
should constrain the propagation queue with the queue_size parameter:
[aznapi-configuration]
logcfg = EventPool queue_size=number,hi_water=number,
flush_interval=number_seconds
logcfg = category:remote buffer_size=number,path=pathname,
server=hostname,queue_size=number
Parameters for EventPool audit category
The following parameters can be defined for pipe log agents:
flush_interval Configure the flush_interval parameter to limit the amount
of time in seconds that events can remain in the
propagation queue. If the size of the queue does not
reach the high water mark within the specified interval,
events in the queue are forwarded to the log agents. The
default value is 10 seconds. Specifying a value of 0 is
equivalent to setting the value to 600 seconds.
hi_water Configure the hi_water parameter to indicate the
threshold where events in the propagation queue are
forwarded to the log agents. If the size of the queue does
not reach this high water mark within the defined flush
interval, events in the queue are forwarded to the log
agents. The default value is calculated as two-thirds of the
configured queue size. If the queue size is 0 (unlimited),
the high water mark is set to 100 events. If the high water
mark is 1 event, each event in the queue is forwarded
immediately to the log agents. Setting a low value for the
high water mark can have an adverse effect on
performance.
queue_size Because each event in the propagation queue consumes
memory, configure the queue_size parameter to define
the maximum number of events that the propagation
queue can hold. If the maximum size is reached, the
event-producing thread is blocked until space is available

Chapter 6. Auditing and troubleshooting 201
in the queue. Blocking has the effect of throttling back the
performance of the event-producing thread to a rate that
can be consumed by the logging threads. The default
value is 0. Specifying a value of 0 indicates that no size
limit is enforced on the propagation queue. When using
the default value and when the logging threads cannot
process events as they enter the propagation queue, the
propagation queue can grow to an unmanageable size.
Parameters for file log agents
The following parameters can be defined for file log agents:
buffer_size To reduce memory fragmentation and improve the
performance of writing to a file, rather than queuing many
small events individually to the file log agent, events can
be buffered into blocks of a nominated size before
queuing for writing. The buffer_size parameter specifies
the maximum size message that the program attempts to
construct by combining smaller events into a large buffer.
Buffers consist of only an integral number of events;
events are not split across buffers. If any individual event
exceeds that maximum configured size, the large event is
recorded in a buffer of its own, exceeding the configured
value. The default buffer size for logging to a file is 0
bytes. This value prevents buffering and each event is
handled individually. If a value is specified for the
buffer_size parameter, events are packed into buffers of
that size before queuing to the file log agent.
flush_interval The flush_interval parameter is a multiuse parameter. To
ensure that stream buffers are flushed to disk regularly,
the frequency with which the server asynchronously
forces a flush of the file stream to disk is configurable
using the flush_interval parameter. The value defined for
this parameter is 0, less than 0, or the flush interval in
seconds.
• Specifying a value of 0 results in the buffer being
flushed every 600 seconds.
• Specifying a value of less then 0 results in the absolute
value being used as the asynchronous flush
frequency, but a stream flush is also forced
synchronously after each record is written.
• If events are being consolidated into large buffers by
specifying a value for the buffer_size parameter, the
flush_interval parameter also might affect the size of

202 Certification Study Guide: IBM Tivoli Access Manager for e-business 6.0
buffer written. If there is a partially filled buffer in
memory when a flush is scheduled, that buffer is also
queued for writing before it completes the buffer fill.
The event queue is triggered for processing at the
flush interval rate. This process prevents events
waiting to be processed for longer than the scheduled
flush time when the queue high water mark is not
reached between scheduled flushes.
hi_water In addition to the description of this parameter in the
previous section, the following comment also applies: If
the event queue high water mark is set to 1, every event
queued is relayed to the log agent as soon as possible.
This setting is not optimal, although you might want to use
it if you want to ensure events get to disk as fast as
possible, at the expense of overall performance.
log_id An open log file is associated with a short name identifier
to facilitate the recording of events from different
categories to the same file. Use the log_id parameter to
set the log file identifier (ID) explicitly; otherwise, it is
given a default value. If the path parameter is specified,
the default value is the configured path name. If the path
parameter is not specified, the log ID defaults to the
domain component of the event category being captured.
For example: logcfg = audit.azn:file implies log_id=audit
mode Configure the mode parameter to open a file in either text
or binary mode. Text mode is deprecated on Linux and
UNIX operating systems and has no effect. On Microsoft
Windows 32-bit platforms, opening a file in text mode
enables end-of-line character translations in the log file.
Binary mode on a Windows operating system writes the
log file in a UNIX-compatible format.
path The path specifies the name and location of a log file.
There is no default value, because the value of the log_id
parameter takes precedence. The directory portion of this
path must exist. The log file is created if it does not
already exist.
queue_size There is a delay between events being placed on the
queue and the file log agent removing them. The
queue_size parameter specifies the maximum size to
which the queue is allowed to grow. If the maximum size
is reached when a new event is ready to be placed on the
queue, the requesting thread is blocked until space is
available in the queue. This process has the effect of

Chapter 6. Auditing and troubleshooting 203
throttling back performance of the event propagation
thread to the speed of the file logging thread if it cannot
keep up. Limiting the queue size for the log agent should
be configured in conjunction with setting the queue size
for the central event propagation queue. Unless the event
propagation defined by the queue_size parameter is
constrained appropriately, memory usage can still grow
without bounds. The default value is 0. Specifying a value
of 0 indicates that no limit is enforced on the growth of the
unprocessed event queue. Correspondingly, the event
propagation thread is not constrained by the speed of the
logging thread. Using the default can result in the
unrecorded event queue growing to an unmanageable
size, if events are being generated faster than they can be
recorded to file.
rollover_size Configure the rollover_size parameter to specify the
maximum size to which a log file can grow. The default
value is 2000000 bytes. When the size of a log file
reaches the specified value, known as its r
ollover
threshold
, the existing file is backed up to a file of the
same name with the current date and time stamp
appended. A new log file is then started. The various
possible rollover size values are interpreted as follows:
• If the rollover_size value is less than zero, a new log
file is created with each invocation of the process and
every 24 hours from that instance.
• If the rollover_size value is equal to zero, the log file
grows until it reaches 2 GB and then rolls over. If a log
file already exists at startup, new data is appended to
it.
• If the rollover_size value is greater than zero, the log
file grows until it reaches the lesser of the specified
value or 2 GB and then rolls over. If a log file already
exists at startup, new data is appended to it.
Parameters for pipe log agents
The parameters flush_interval, hi_water, and queue_size can be defined for pipe
log agents and are similar to those specified for file log agents. An additional
parameter can be configured for pipe log agents:
path Configure the path parameter to specify the location of the
program to receive the log output as standard input.
There is no default value.

204 Certification Study Guide: IBM Tivoli Access Manager for e-business 6.0
Parameters for remote log agents
Configure the remote log agent to send events to a remote authorization server
for recording. The following parameters can be defined for remote log agents:
buffer_size To reduce network traffic, events are buffered into blocks
of the nominated size before relaying to the remote
server. The buffer_size parameter specifies the maximum
size message that the local program attempts to construct
by combining smaller events into a large buffer. Buffers
consist only of an integral number of events; events are
not split across buffers. If any individual event exceeds
that maximum configured size, the large event is sent in a
buffer of its own, exceeding the configured value. The
default value is 1024 bytes.
compress Tivoli Access Manager events are principally text
messages. To reduce network traffic, use the compress
parameter to compress buffers prior to transmission and
expand on reception. The default value is no.
dn To establish mutual authentication of the remote server, a
distinguished name (DN) must be configured that can be
checked against the name returned in the remote servers
certificate. The default value is a null string. Explicitly
specifying an empty string or using the default value
enables the logging client to request a remote server
connection with any server that is listening. Specifying a
value for the dn parameter limits successful connection to
a specific server, such as:
dn="cn=ivacld/timelord.testnet.tivoli.com,o=policy
director,c=us" A distinguished name must be specified
as a string that is enclosed by double quotation marks.
error If a send to a remote service fails, it is retried after waiting
for the error retry time out in seconds. If the retry also
fails, the link is recorded and this event and future events
are saved in the local event cache file until the remote
service is rebound. The default value is 2 seconds.
flush_interval If events are being consolidated into very large buffers
and there is not much logging activity, events can sit in
memory for a long time before being forwarded to the
remote server or being written to the cache file. The
flush_interval parameter limits the time a process waits to
fill a consolidation buffer. The default value is 20 seconds.
A flush interval of 0 is not allowed. Specifying a value of 0
results in the buffer being flushed every 600 seconds.

Chapter 6. Auditing and troubleshooting 205
hi_water The hi_water parameter for a remote logging connection
is similar to that specified for logging to a file.
path Configure the path parameter to specify the location of a
cache file on the local host. The cache file name defaults
to ./server.cache, where server is the name of the
remote server being logged to. If the running process
cannot establish communication with the remote server,
or the link fails during operation, event recording switches
to storing events in the specified file until the server again
becomes available. When the server is available, events
are drained from the disk cache and relayed to the remote
server.
port Configure the port parameter to specify the port that the
remote authorization server listens on for remote logging
requests. The default value is port 7136.
queue_size The queue_size parameter for a remote logging
connection is similar to that specified for logging to a file.
rebind_retry If the remote authorization server is unavailable, the log
agent attempts to rebind to this server at this frequency in
number of seconds. The default rebind retry time out
value is 300 seconds.
server The remote logging services are offered by the
authorization service. The server parameter nominates
the hosts to which the authorization server process is
bound for event recording.
6.1.2 Auditing using logaudit
WebSEAL and Plug-in for Web Servers continue to support audit logging using
the logaudit entries and related entries in the [aznapi-configuration] stanza.
This approach uses the following stanza entries under [aznapi-configuration]:
logaudit Has value
yes or no. Yes enables auditing for the server.
auditlog Specifies the location of the audit trail file.
auditcfg Defines what event categories are captured in the logs.
logsize The value for the logsize stanza entry specifies the
maximum size to which each of the audit trail files can
grow and is initially configured with the value 2000000 (in
bytes). Depends on the value; behavior is similar to
rollover_size parameter in the log file agent.

206 Certification Study Guide: IBM Tivoli Access Manager for e-business 6.0
logflush Defines frequency with which the server forces a flush of
the audit trail file buffers. Depends of the value; behavior
is similar to flush_interval parameter in the log file agent.
This approach is comparable to the logcfg entry with a file agent. For example, to
capture authentication events, the configuration file entries could be set as
follows:
[aznapi-configuration]
logaudit = yes
auditcfg = authn
auditlog = /var/pdweb/log/audit.log
logsize = 2000000
logflush = 20
If you are still using the logaudit approach, consider using either the logcfg
approach or the Common Auditing Service. The logcfg approach provides
additional configuration options, such as buffer size and event queues, and the
ability to use the console, pipe, and remote log agents.
6.1.3 WebSEAL HTTP logging
WebSEAL maintains the following HTTP log files that record HTTP activity:
request.log The request.log records HTTP request information, such
as the URL that was requested and client data (for
example, IP address).
agent.log The agent.log file records the contents of the User_Agent:
header in the HTTP request. This log reveals information
about the client browser, such as architecture or version
number, for each request.
referer.log The referer.log records the Referer: header of the HTTP
request. For each request, the log records the document
that contained the link to the requested document. The
log uses the following format:
referer
→
object
This information is useful for tracking external links to
documents in your Web space. The log reveals that the
source indicated by referer contains a link to a page
(object). This log allows you to track stale links and to find
out who is creating links to your documents.
By default, these log files are located in the following directory:
Linux and UNIX operating systems /var/pdweb/www-default/log
Windows operating systems C:\Program Files\Tivoli\PDWeb\www-default\log

Chapter 6. Auditing and troubleshooting 207
Stanza entries for configuring traditional HTTP logging are located in the
[logging] stanza of the WebSEAL configuration file. By default, HTTP logging is
enabled in the WebSEAL configuration file and configuration looks like:
[logging]
requests = yes
referers = yes
agents = yes
Along with these options, there are a couple more that can be defined in the
[logging] stanza:
gmt-time The value can be
yes or no. Yes specifies that timestamps
in each HTTP log file be recorded in Greenwich Mean
Time (GMT) instead of the local time zone. By default, the
local time zone is used (value is set to
no).
max-size Specifies the maximum size to which each of the HTTP
log files can grow. Default value in bytes is 2000000.
Depends on the value; behavior is similar to the
rollover_size parameter in the log file agent.
flush-time Specifies the frequency with which the server forces a
flush of the log file buffers. Depends on the value;
behavior is similar to the flush_interval parameter in the
log file agent.
When using virtual hosts, you can use the following configuration parameters in
the [logging] stanza to distinguish between requests that are to different virtual
hosts:
[logging]
host-header-in-request-log = {yes | no}
absolute-uri-in-request-log = {yes | no}
When you enable the host-header-in-request-log entry in the configuration file,
the log contains the header at the front of each line in the request log and in the
combined log.
When you enable the absolute-uri-in-request-log entry in the configuration file,
the log contains the absolute URI. This information is included in the request log,
the combined log, and HTTP audit records.
Note: When you configure WebSEAL (or any other Access Manager
component) you are being asked if you want to use
Tivoli common logging. If
you decide to opt for this common logging feature your WebSEAL log files will
be located at C:\Program Files\IBM\tivoli\common\DPW\logs\www-default\log.

208 Certification Study Guide: IBM Tivoli Access Manager for e-business 6.0
6.1.4 XML output of native audit events
When using native Tivoli Access Manager auditing, audit events are captured in
the audit trail in a standard format using the Extensible Markup Language (XML)
elements. XML is only an intermediary step to delivering a presentation view of
the data. The XML file is in ASCII format and can be read directly or passed to
other external parsing engines for further analysis.
An entire audit trail does not represent a single XML document. Each audit event
within the file is written as an isolated XML data block. Each data block conforms
to the rules of standard XML syntax.
6.2 Common Auditing and Reporting Service
Access Manager can be configured to send audit data to existing file-based audit
subsystem, the Common Auditing and Reporting Service (CARS), or both. The
Common Auditing and Reporting Service subsystem transports and stores audit
events to a common audit database that can be used to support operational
reports from Crystal Enterprise or any other reporting tool. Common Auditing and
Reporting Service also provides the capability to stage audit data to
customizable report tables.
6.2.1 Audit infrastructure
An audit infrastructure provides the mechanisms to submit, centrally collect, and
persistently store and report on audit data, and it satisfies the previously
mentioned requirements to manage audit data. The IBM Tivoli Common Auditing
and Reporting Service component leverages the
Common Base Event and the
technologies to provide an audit infrastructure.
The Common Base Event is a common format for events proposed by IBM and
submitted to the Organization for the Advancement of Structured Information
Standards (OASIS) for standardization. (For more information on OASIS, see
http://www.oasis-open.org.)
The purpose of the Common Base Event is to facilitate effective
intercommunication among disparate components within an enterprise. In order
to effectively process audit data, it needs to be in a standard format, and the
Common Auditing and Reporting Service component requires the audit data to
be in the Common Base Event format.
The Common Event Infrastructure (CEI) is an IBM strategic event infrastructure
for submission, persistent storage, query, and subscription of Common Base
Events. The Common Auditing and Reporting Service component uses the CEI

Chapter 6. Auditing and troubleshooting 209
interfaces for submission of events. Such events can be denoted as auditable
using configuration options at the CEI server, in which case CEI stores them in a
CEI XML event store that meets the auditing requirements described previously.
The Common Auditing and Reporting Service component allows staging of data
from the CEI XML event store into report tables. IBM products and customers
can provide audit reports based on auditable events staged into such report
tables. The Common Auditing and Reporting Service component also supports
the lifecycle of auditable events, including archive, restore, and audit reports on
restored archives. It enables common reporting against auditable events from
different products and sources.
The first release of the Audit Infrastructure delivered by the IBM Tivoli Common
Auditing and Reporting Service is used by the Access Manager for e-business
product for submitting, storing, and reporting auditable security events.
Archiving and restoring audit data
The relational database schema of the CEI XML event store is externalized so
the audit data stored in it can be archived by customers using third-party archival
tools of their choice. The Common Auditing and Reporting Service provides an
XML store utility that aids customers in archiving and restoring audit data. Also,
the Common Auditing and Reporting Service supports staging of restored audit
data into report tables so that audit reports can be run against restored audit
data.
Securing audit data
CEI emitter event interfaces are protected using J2EE declarative security to
ensure that only authenticated and authorized entities are allowed to use them.
Transmission of the Common Base security events to the CEI server can be
secured using SSL. Customers can protect access to the audit reports by using
the access control mechanism supported by the reporting tools. Customers also
need to protect the Common Auditing and Reporting Service XML event store
and the report tables using the access mechanisms provided by the database.
6.2.2 Reporting
The operational reports feature of the Common Auditing and Reporting Service
provides a number of compiled reports that provide information about
security-related activities that occur on your system.
The compiled Crystal Reports provided with Common Auditing and Reporting
Service include audit event history, password change activity, authentication
event history, authorization event history, event details, resource access, and

210 Certification Study Guide: IBM Tivoli Access Manager for e-business 6.0
server availability reports. The compiled reports format allows you to run reports
without having the Crystal Reports Designer installed on the system.
The following out-of-the-box reports are available:
General Audit Event Details Report
Displays all information about a single auditable event denoted by the event
reference ID parameter. Typically a user will run this report after running other
reports and deciding an event drill down is desired.
General Audit Event History
Displays the total number of auditable events for each event type during a
specified time period. It also shows all events of the specified event type and
product name sorted by specified sort criterion and time stamp. This report
can be used for incident investigation and assuring compliance.
Audit Event History by User
Displays total number of events for a specified user during a specified time
period. It also presents a list of all events of the specified event type and
product name sorted by time stamp and grouped by session ID during the
time period. The purpose of this report is to investigate activity of a particular
user during a specified time period.
Failed Authentication History
Presents a list of all failed authentication events over the time period sorted
by specified sort criteria such as timestamp. This report can be used by an
administrator to investigate security incidents.
Failed Authorization History
Lists all of the failed authorizations events during a specified time frame.
Locked Account History
Displays all of the accounts that have been locked during a specified time
period.
User Password Change History
Displays events related to password changes done by the users themselves
during a specified time period.
Administrator and Self-Care Password Change History
Displays events related to password changes done by the user and the
administrator during a specified time period.

Chapter 6. Auditing and troubleshooting 211
Server Availability Report
Shows the availability status of Security servers on a specific machine. The
user can display all protected machines in the report or limit the report by
entering a single hostname as the subject of the report.
Certificate Expiration Report
Allows detection of soon-to-expire certificates and highlights the need to
replace the certificate to insure 24/7 operability. It shows the number of clients
that have server/SSL certificates that expire in ‘x’ days. It will also show a
table of client hostnames, the days until their certificates expire, and the
server they are configured to.
Most Active Accessors Report
Shows a list of users who are the most active in the system, and can lead the
administrators to investigate improper use of their resources.
General Authorization Event History
Displays the total number of authorization events, failed authorization events,
successful authorization events and unauthenticated events during the
specified time period. Additionally it shows list of all authorization events
sorted by specified sort criteria (timestamp, resource, or user name) during
the time period. The purpose of this report is to analyze authorization event
history for incident investigation and assuring compliance.
Authorization Event History by Action
Displays a list of all authorization events that contain the specified action
sorted by resource and then time stamp during the time period specified.
General Administration Event History
Shows the history of general management actions done over a specified time
interval. The administrator can use the report to track the actions of a user for
administrative events.
User Administration Event History
Can be used to investigate security incidents, and to track changes to users
by administrators.
Group Administration Event History
Can be used to investigate security incidents and to track changes to groups
by administrators.
Security Server Audit Event History
Presents a list of auditable events related to security servers that occurred
during the specified time period.

212 Certification Study Guide: IBM Tivoli Access Manager for e-business 6.0
Resource Access By Accessor Report
Shows the top resources in terms of access/authorization events during a
time period for each machine name identified. The report identifies who is
repeatedly accessing resources and what resource is being accessed.
Resource Access By Resource Report
Shows the top accessors in terms of access/authorization events during a
time period for each machine name identified. The report identifies which
resources are most heavily accessed and which user is accessing the
resource.
6.2.3 Common Auditing and Reporting Service configuration
Figure 6-1 on page 213 shows the major components of the Common Auditing
and Reporting Service model:
Common Event Infrastructure (CEI)
Clients
Operational reports
The Common Auditing and Reporting Service event infrastructure runs on top of
IBM WebSphere Application Server and contains three separate applications:
Common Audit Service
EventServer
EventServerMdb
When using the Common Auditing Service, you need to configure the
server-specific Common Auditing Service client to record specific audit events.
Depending on the type of Access Manager services, there are two auditing
clients, namely the Java client and C (or native) client. The Java client and C
client are referred to as the Java API and C API, respectively.
As part of the server installation you can install the operational reports. The
operational reports provide information that you can use to analyze security
events that might have occurred.

Chapter 6. Auditing and troubleshooting 213
Figure 6-1 Common Auditing and Reporting Service architecture
Installing the event server
At a high level, the steps to install the event server are the following:
1. Install the prerequisite products
– IBM DB2 Server
– WebSphere Application Server
2. Review the preinstallation checklist for UNIX, Linux, or Windows operating
system that includes verification of valid user and group permissions, and
validate the DB2 and WebSphere Application Server environment.
3. Determine the installation options.
4. Install the event server using either the interactive or silent installation.
After successful installation, the Common Auditing and Reporting Service event
server offers two utilities that can be executed:
The staging utility
The XML store utilities
PDRTE
PDWeb
...
PDAcld
PDMgr
Policy DB
Access Manager Audit Service
User registry
file
loger
pipe
loger
CARS
logger
remote
loger
CARS C
Client
CARS / WebSphere / CEI
Event Server
SMS
CARS JAVA
Client
Report
Tables
Reports
Crystal
Enterprise
Server
Web
Browser

214 Certification Study Guide: IBM Tivoli Access Manager for e-business 6.0
These utilities can be executed with a different set of options placed in the
ibmcars.properties configuration file. The ibmcars.properties file is located in
CARS_HOME\server\etc
As a prerequisite for these commands, the CLASSPATH environment variable
for the staging and event store utilities must be set.
Staging utility command
The staging utility provides staging of the data from the XML event store to the
staging tables. You can stage data in the following modes:
Incremental
Historical
Prune
Use the following command syntax for the staging utility:
java com.ibm.cars.staging.Staging -mode historical -starttime value
-endtime value
java com.ibm.cars.staging.Staging -mode incremental
java com.ibm.cars.staging.Staging -mode prune -prunetime value
These commands may contain additional optional parameters. For the
parameters that are not specified on the staging utility command line, their values
will be used according to what is set in the ibmcars.properties file. The
parameters that you set on the command line will override any value you have
set in the ibmcars.properties file.
XML data store utilities
The XML event store utilities provide tools to help you manage the XML event
store in preparation for archiving, and to clean up restored data that is no longer
needed. There are three types of operations that the XML utilities can perform:
Pre-archive
Post-archive
Clean restore table set
Use the following command syntax for each of the XML event store utilities:
java com.ibm.cars.xmlstoreutils.XmlStoreUtils -operation prearchive
java com.ibm.cars.xmlstoreutils.XmlStoreUtils -operation postarchive
[-mode force] [-copydir value]
java com.ibm.cars.xmlstoreutils.XmlStoreUtils -operation cleanrestore
[-mode force]
Again, for the optional parameters that are not specified on the XML event store
utility command line, their values will be used according to what is set in the

Chapter 6. Auditing and troubleshooting 215
ibmcars.properties file. The parameters you set on the command line will
override any value you have set in the ibmcars.properties file.
Pre-archive operation
Use the pre-archive operation prior to archiving data from the XML event store
tables. The pre-archive operation prints out the data needed for archiving, such
as:
The names of the XML event store tables to archive.
The first date contained in the table set to be archived. For example: Jan 1,
2005 5:30:00 AM.
The last date contained in the table set to be archived. For example: Jan 2,
2005 3:42:03 PM.
Post-archive operation
Use the post-archive operation after archiving from the XML event store tables is
completed. This operation removes the data from the inactive XML event store
tables. The post-archive operation prompts for confirmation that the data may get
purged from the XML event store table set. For silent mode operation, specify
–mode force, which will force the post-archive operation without a confirmation
prompt.
Post-archive performs the following actions:
Purges the data from the target XML event store table set.
Updates the cei_t_properties table with the current active bucket number,
wherein the value is swapped from 0 to 1 and vice versa.
The events that are purged from the XML event store table set are not available
for drill-down reporting. Prior to running the post-archive operation, the staging
utility prune operation should be used to remove the operational report table data
for events ranging within the begin date and the end date as provided by the
pre-archive operation.
Clean restore table set operation
Use the clean restore table set operation when the events in the restore table set
are no longer required. The clean restore table set operation prompts for
confirmation that the data in the restore table set will be cleaned and no longer
available.
For silent mode operation, specify –mode force, which will force the cleaning of
the restore table set without a confirmation prompt. If you need archived XML
event store events for reporting purposes, then restore the events into a restore
table set (cei_t_xmlre and cei_t_xmlxre). The restore table set is recognized by
the staging utility as a source for generating operational report tables.

216 Certification Study Guide: IBM Tivoli Access Manager for e-business 6.0
Common Auditing and Reporting Service client
When using the Common Auditing Service, you need to configure the
server-specific Common Auditing and Reporting Service client to record specific
audit events. The installation of the client involves the following steps:
1. Install the prerequisite products.
IBM Java Version 1.4.2 is required before installing the client.
The following software is required for the C client:
– Global Security Kit (GSKit)
– Tivoli Security Utilities
The WebSphere Application Server software is required for the Java client.
2. Review the pre-installation checklist.
3. Determine the installation options.
4. Install the client using either the interactive or silent installation.
Configuring the C client
To send events to the Common Auditing Service event server, the Common
Auditing Service client needs to be configured on the Tivoli Access Manager
server. To configure the Common Auditing Service client, use the
amauditcfg
utility. The amauditcfg utility generates the Access Manager server-specific
auditing configuration files. After these files are generated, you can use the
pdadmin config modify command to modify configuration settings. The following
invocation is the simplest way of using the amauditcfg utility to configure a Tivoli
Access Manager server:
amauditcfg -action config -srv_cfg_file configuration_file
-audit_srv_url url
Note: Make a note of the first and last time stamp because you will need this
information when you want to
prune the report tables. When you run the
XMLStoreUtils program for the first time, you will get an exception since there
is no data to archive.
The settings for the XML event store utility parameters are determined as
follows:
1. The XML event store utility settings specified on the command line.
2. The settings in the ibmcars.properties file.
3. The default settings in the code.

Chapter 6. Auditing and troubleshooting 217
Running the amauditcfg utilities generates the following configuration files to
control the configuration of the Common Auditing Service C clients:
pdaudit.pdmgr.conf Used to configure the Common Auditing Service for
the Tivoli Access Manager Policy Server
pdaudit.pdproxymgr.conf Used to configure the Common Auditing Service for
a Tivoli Access Manager Policy Proxy Server
pdaudit.pdacld.conf Used to configure the Common Auditing Service for
the Tivoli Access Manager authorization server
pdaudit.instance-webseald-host.conf
Used to configure the Common Auditing Service for
a specific instance of a Tivoli Access Manager
WebSEAL server
pdaudit.webpi.conf Used to configure the Common Auditing Service for
a Tivoli Access Manager Plug-in for Web Servers
pdaudit.appsvr.conf Template configuration file used to configure the
Common Auditing Service for any Tivoli Access
Manager resource managers
All those configuration files have a [cars-client] stanza with an appropriate set
of attributes. To change a setting in a configuration file, use the pdadmin config
modify command. Do not change the contents of any configuration file in an
ASCII editor.
To start Common Auditing Service auditing, set the
doAudit entry to yes in the
[cars-client] stanza of the server-specific configuration file:
pdadmin> config modify keyvalue set config_file cars-client doAudit yes
For example to enable Common Auditing Service auditing for an AIX-based
Policy Server, enter the following command:
pdadmin> config modify keyvalue set \
/opt/PolicyDirector/etc/audit/pdaudit.pdmgr.conf cars-client doAudit
yes
After enabling event auditing, you can add events to be forwarded to the
Common Auditing Service server. To add an event, append an auditevent entry
with the new event type to the [cars-filter] stanza of the server-specific
configuration file. Modification should be made using pdadmin CLI command:
pdadmin> config modify keyvalue append config_file cars-filter
auditevent type

218 Certification Study Guide: IBM Tivoli Access Manager for e-business 6.0
For example, to add runtime event auditing for an AIX-based Policy Server, enter
the following command:
pdadmin> config modify keyvalue append \
/opt/PolicyDirector/etc/audit/pdaudit.pdmgr.conf cars-filter auditevent
runtime
To remove an event, remove the auditevent entry for that event type from the
[cars-filter] stanza of the server-specific configuration file. To make the
modification use the pdadmin CLI command:
pdadmin> config modify keyvalue remove config_file cars-filter
auditevent
type
For example, to remove the authorization event auditing from an AIX WebSEAL
server, enter the following command:
config modify keyvalue \ remove
/opt/PolicyDirector/etc/audit/pdaudit.default-webseald-aix.ibm.com.conf
\ cars-filter auditevent authz
Configuring the Java Client
For Tivoli Access Manager, the only Java-based server is the Session
Management Server. To record audit events for the Session Management
Server, you send the events to the event server of the Common Auditing Service.
You cannot use native Tivoli Access Manager auditing with the Session
Management Server.
To use Common Auditing Service with the Session Management Server, you
need to perform the following tasks:
Modify the SMSAuditClient.properties file so that the Java client of the
Common Auditing Service can talk with the event server and know which
event to record.
When using Java 2 security, modify the WebSphere library.policy file.
Enable the DSess Session Management Server application on the
WebSphere node to use the shared libraries of the Common Auditing Service
using either the smscars utility or the WebSphere administrative console.
Running the smscars utility creates the SMSAuditClient.properties properties file.
The properties file is stored in one of the following operating system specific
locations as SMSAuditClient.properties.template:
Linux and UNIX operating systems
/opt/pdsms/etc
Windows
C:\Program Files\Tivoli\PDSMS\etc

Chapter 6. Auditing and troubleshooting 219
The Common Auditing Service library requires a number of permissions. The
Session Management Server cannot grant permissions to the Common Auditing
Service library through the was.policy file that is provided by the Session
Management Server. Because the Session Management Server accesses the
Common Auditing Service library as a shared library, the Session Management
Server needs to grant permission using the WebSphere library.policy file on each
cluster member. Because it is difficult to configure a Java 2 security file, use the
policytool utility that is provided by the Java Runtime Environment.
After installing the Common Auditing Service and the Session Management
Server, you can enable the Session Management Server to send auditing events
to the Common Auditing Service. You can enable the Session Management
Server to send events to the Common Auditing Service event server from either
the command line or with the WebSphere administrative console. For a
WebSphere single server deployment, use the command line smscars utility. For
a WebSphere cluster deployment, use the WebSphere administrative console.
Operational reports
Before you run the reports, you must have the operational reports feature of the
server installed and configured on the system that the reports will run on.
Before installing the operational reports, you need to install other software
products. The following software is required for the operational reports:
DB2 client
Crystal Enterprise Server
HTTP Server
Install the operational reports only on a machine that has Crystal Enterprise
Server installed. Also, verify that the Crystal Enterprise Server is running before
installing the operational reports. An IBM Java Version 1.4.2 is required to run
the Common Auditing and Reporting Service server installer.
The Common Auditing Service contains compiled reports created using the
Compiled Reports feature of the Crystal Reports Designer program. The
Compiled Reports format allows you to run reports without having the Crystal
Reports Designer installed on the system. Note that you must purchase and
install the Crystal Reports Designer if you want to create or edit Crystal Reports.
The compiled Crystal Reports provided with Common Auditing Service include
data related to:
Audit events
Authorization events
Certificate expiration
Administration events
Server availability

220 Certification Study Guide: IBM Tivoli Access Manager for e-business 6.0
Password changes
Resource access
Trust service and security token service
Running operational reports
After installing the operational reports, you can either run the reports on demand
or schedule one or more reports to run on a routine basis using the Crystal
Enterprise Launchpad. Before running any of the operational reports, verify that
you configured ODBC and the DB2 client.
Before running the General Audit Event Details Report, verify that you have
installed the Java stored procedure on the DB2 server.
Creating custom reports
The Common Auditing and Reporting Service provides a set of operational
reports created with Crystal Enterprise to analyze audit data in the XML data
store. The operational reports draw upon a specific subset of the audit data
which is staged into a set of reporting tables. These predefined reports may not
meet all user reporting requirements, so Common Auditing and Reporting
Service provides a procedure for defining the subset of data that is staged into
the reporting tables. Custom reports can then be created to analyze the custom
subset of data staged into the reporting tables.
Any reporting tool that queries data from a DB2 database is supported. As
custom reports are developed, the event types and specific elements of each
event type that are of interest need to be identified. This subset of the audit data
will be staged into the report tables by the Common Auditing and Reporting
Service staging utility, which relies on a configuration file,
CARSShredder.conf, to
determine exactly what data to stage. This configuration file must be replaced
and the CARSShredder.conf.custom.template updated to reflect the subset of
data needed for the custom reports. The event-specific report tables created
during Common Auditing and Reporting Service event server installation are
meant to support only the predefined operational reports. Additional report tables
may need to be created to hold data for custom reports. The staging utility can
stage custom data into these newly defined table.
6.3 Troubleshooting techniques
Problem determination, or troubleshooting, is a process of determining why a
product is not functioning in the expected manner. Tivoli Access Manager
provides ways to collect events that you can use for diagnostic and auditing
purposes of the servers. Events for diagnostics and auditing pertain to the
operations of the Tivoli Access Manager servers. These events do not pertain to

Chapter 6. Auditing and troubleshooting 221
the installation of these servers. During the installation of the Tivoli Access
Manager servers, the installation logs capture all messages for that specific
installation. When using the installation wizard, each server has its own log file.
When using a native installation, the installation uses its
operating-system-specific logs.
For diagnostics, you define which message events and which trace events to
capture. These events can help you troubleshoot problems. To configure
diagnostic events, you define statements in the server-specific routing files. Each
server has an associated routing file. The statements in these routing files are for
both message events and trace events. You define the statements for message
events by severity level. You define the statements for trace events by trace level
and optionally by component. This guide contains information about the
message and trace events.
6.3.1 Routing files
Routing files are ASCII files that you can use to customize the logging of
message and trace events for C-language-based servers, daemons, and other
C language programs and applications. The contents of routing files allow you to
control the following aspects of event logging:
Whether to enable logging for specific event classes
Where to direct the output for each event class
How many log files to use for each event class
How large each log file can be for each event class
Every Access Manager component has its own name for the routing file, and all
routing files are placed by default under:
<TAM_install_root>/etc/routing
Format of routing files
Each routing file contains entries that control the logging of message events and
trace events. However, the format of these entries differs by event type.
Message events
severity:destination:location [[;destination:location]...]
[;GOESTO:{other_severity | other_component}]
Trace events
component:subcomponent.level[[,subcomponent.level]...]
:destination:location [[;destination:location]...] [;GOESTO:{other_severity
| other_component}]

222 Certification Study Guide: IBM Tivoli Access Manager for e-business 6.0
The parameters in these entries have the following meanings:
component:subcomponent.level[[,subcomponent.level]...]
Specifies the component, subcomponents, and reporting levels of trace events to
log. For trace events only.
For the component portion, you can specify an asterisk (*) to log trace data for
all components.
For the subcomponent portion, you can specify an asterisk (*) to log trace
data for all subcomponents of the specified component.
For the level portion, specify the reporting level to log. This value is a number
between 1 and 9. A level of 1 indicates the least amount of details, and a level
of 9 indicates the greatest amount of details.
destination
Specifies where to log the events. For each destination, you need to specify a
location. When specifying multiple destination-location pairs, separate each pair
with a semicolon (;). The following destinations are valid:
DISCARD Discards the events.
FILE Writes the events as ASCII text in the current code page
and locale to the specified location. When using this
destination, you must specify a location for the file.
Optionally, you can follow the FILE destination by a period
and two numbers that are separated by a period (for
example, FILE.10.100). The first value indicates the
number of files to use. The second value indicates the
number of events each file can contain. If you do not
specify these values, there is only one log file that grows
without limit. The average size of an ASCII event is 200
bytes. Because the maximum size of a log file is 2 GB, the
maximum number of events should be limited to
approximately 10,000,000 events.
STDERR Writes the events as ASCII text in the current code page
and locale to the standard error device.
STDOUT Writes the events as ASCII text in the current code page
and locale to the standard output device.
TEXTFILE Same a FILE.
UTF8FILE It has similar behavior to FILE, but it writes the events as
UTF-8 text to the specified location. The average size of a
UTF-8 event is also 200 bytes. When the operating
system does not use a UTF-8 code page, the conversion
to UTF-8 can result in data loss. When data loss occurs,

Chapter 6. Auditing and troubleshooting 223
the log file contains a series of question mark (?)
characters at the location where the data conversion was
problematic.
XMLFILE Writes events to the specified location in the Tivoli XML
log format. When using this destination, you must specify
a location for the file. Optionally, you can follow the
XMLFILE destination by a period and two numbers that
are separated by a period (for example,
XMLFILE.10.100). The first value indicates the number of
files to use. The second value indicates the number of
events each file can contain. If you do not specify these
values, there is only one log file that grows without limit.
The average size of an XML message event is 650 bytes,
and the average size of an XML trace event is 500 bytes.
Because the maximum size of a log file is 2 GB, the
maximum number of events should be limited to
approximately 3,000,000 message events or 4,000,000
trace events.
XMLSTDERR Writes events to the standard error device in the Tivoli
XML log format.
XMLSTDOUT Writes events to the standard output device in the Tivoli
XML log format.
GOESTO:{other_severity | other_component}]
Specifies that events should additionally be routed to the same destination and
location as either message events of the specified severity or trace events of the
specified component.
location
Specifies the name and location of the log file.
When the destination is TEXT, TEXTFILE, UTF8FILE, or XMLFILE, you must
specify a location.
When the destination is DISCARD, STDERR, STDOUT, XMLSTDERR, or
XMLSTDOUT, you must specify a hyphen (-).
severity
Specifies the severity of the message events to log. For message events only.
The following message severities are valid:
FATAL
ERROR
WARNING

224 Certification Study Guide: IBM Tivoli Access Manager for e-business 6.0
NOTICE
NOTICE_VERBOSE
You can specify an asterisk (*) to log messages regardless of severity.
6.3.2 Java properties files
Java properties files are ASCII files that are used to customize event logging for
Java-based Tivoli Access Manager servers, daemons, and other Java-language
programs and applications.
Beyond customizing logging, these properties files are used to configure other
aspects of the application. The content of the properties file enables the user to
control the following aspects of message logging:
Whether event logging is enabled
Where the output should be directed
If the output is to a file, the number of files to use and the size of each file
The default locations for the Java properties files for Tivoli Access Manager
components are shown in Table 6-1.
Table 6-1 Location of Java properties files
To summarize, PDJLog.properties is used to define message and trace logging
properties in the following cases:
For non application-related Java commands, such as pdjrtecfg and
com.tivoli.pd.jcfg.SvrSslCfg.
Component Default file name
Java application configured using the
com.tivoli.pd.jcfg.SvrSslCfg class.
The output application configuration file as
specified in the com.tivoli.pd.jcfg.SvrSslCfg class.
Java-based Tivoli Access Manager commands, such
as the pdjrtecfg command and
com.tivoli.pd.jcfg.SvrSslCfg or applications not
explicitly configured.
$JAVA_HOME/PolicyDirector/
PDJLog.properties
a
a. pdjrtecfg command creates PD.properties file that stores the result of a successful configuration.
PDJlog.properties file is used just for logging purposes.
Web Portal Manager <TAM install root>\java\export\
pdwpm\pdwpm.properties
Tivoli Access Manager for WebLogic Server $JAVA_HOME/amwls/wls_domain_name/
wls_realm_name/amwlsjlog.properties

Chapter 6. Auditing and troubleshooting 225
If a Java application was not explicitly configured with the
com.tivoli.pd.jcfg.SvrSslCfg command.
If the application-specific properties file is inaccessible or does not exist.
If a required property in the application-specific properties file is not found.
Format of trace events with the Java properties file
To capture trace events for Java applications, you need to configure the Java
properties file defining trace loggers and file handlers.
Trace loggers
Each properties file contains properties for one or more trace loggers. The
isLogging property specifies whether trace logging is enabled.
To turn tracing on for a specific trace logger, use:
baseGroup.trace_logger_name.isLogging=true
To disable logging for a specific trace logger, use:
baseGroup.PDJapp_nameTraceLogger.isLogging=false
File handlers
Associated with each trace logger is at least one file handler. A file handler
specifies the destination for a specific class, or severity, of messages. After trace
logging is enabled by the trace logger, the file handler properties are examined to
determine if traces should be logged and, if so, how and where.
The properties for a file handler are:
baseGroup.PDJapp_nameTraceFileHandler.fileName=
baseGroup.PDJapp_nameTraceFileHandler.maxFileSize=
baseGroup.PDJapp_nameTraceFileHandler.maxFiles=
The meanings of the handlers are the following:
fileName Specifies the fully qualified file name to be used as the
base name for trace log files. The file can be in any
location accessible by the Java application.
maxFileSize Specifies the maximum size, in KB, of each trace log file.
Default is 512.
maxFiles Specifies the maximum number of files to be used for
trace logging. Default is 3.

226 Certification Study Guide: IBM Tivoli Access Manager for e-business 6.0
6.3.3 Message event logging
The contents of log files can be useful sources of information when monitoring or
troubleshooting Tivoli Access Manager servers. You can use log files to capture
any Tivoli Access Manager message. Message logging for the C language
portions of Tivoli Access Manager is controlled through routing files. Similarly,
message logging for the Java language portions is controlled through Java
properties files.
Use the statements within routing files to control which messages to log, the
location of the log files, and format of the messages. This chapter describes the
configuration syntax used in the routing files and defines the default file name
and location of the message log files. The directory location for message log files
can be different, depending on whether Tivoli Common Directory is configured.
Tivoli Common Directory
To provide a consistent mechanism for locating serviceability information, Tivoli
Access Manager provides the ability to use Tivoli Common Directory logging.
Tivoli Access Manager needs to be enabled during the installation of the product.
By default, serviceability information is stored in the /log subdirectory of the
product installation directory. If Tivoli Common Directory support is requested,
the installation wizard uses the existing Tivoli Common Directory as the default
location for serviceability information.
If no existing Tivoli Common Directory is in use, the directory specified during the
installation is identified as the Tivoli Common Directory and serviceability
information for Tivoli Access Manager and other Tivoli products is stored there.
When Tivoli Common Directory is enabled, all message log files are in this
central location. Other types of application log files continue to be located in their
installation directories. After enabling Tivoli Common Directory, Tivoli Access
Manager uses the /logs subdirectory to store message and trace logs. The logs
files can be found at the following default location:
common_directory/yyy/logs/
The syntax rules are as follows:
common_directory
Represents the parent directory for serviceability data. This directory is
usually defined by the first Tivoli product that uses Tivoli Common Directory.
The default values, if Tivoli Access Manager is the first Tivoli product, is one
of the following platform-specific directories:
– Linux and UNIX operating systems
/var/ibm/tivoli/common

Chapter 6. Auditing and troubleshooting 227
– Windows operating systems
c:\program files\ibm\tivoli\common\
yyy
Represents the 3-letter identifier to use for the product-specific message log
files. Tivoli Access Manager uses the identifiers described in Table 6-2.
Table 6-2 Tivoli Access Manager identifiers
logs
The subdirectory that is used for Tivoli Access Manager message and trace
log files. Only one subdirectory, /logs, is defined for these log files.
Severity of message events
In the message log file, each message event has an associated severity level.
The following message severities are valid:
FATAL The identifier for these messages uses the error (E)
message severity.
ERROR The identifier for these messages uses the error (E)
message severity.
WARNING The identifier for these messages uses the warning (W)
message severity.
NOTICE The identifier for these messages uses the information (I)
message severity.
NOTICE_VERBOSE The identifier for these messages uses the information (I)
message severity.
If Tivoli Common Directory is not used, the message logs are located in the
directories specified in Table 6-3 on page 228.
HPD The identifier for Tivoli Access Manager
DPW The identifier for Tivoli Access Manager WebSEAL
AMZ The identifier for Tivoli Access Manager Plug-in for Web Servers
AWL The identifier for Tivoli Access Manager for WebLogic Server
AWD The identifier for Tivoli Access Manager Plug-in for Edge Server
CTG Tivoli Access Manager Shared Session Management
Note: After defining the Tivoli Common Directory location, you cannot change
it. If Tivoli Access Manager is the first Tivoli product on this system to use
Tivoli Common Directory, you can change this location. However, if another
product already defined the location, this location is displayed and you cannot
change it.

228 Certification Study Guide: IBM Tivoli Access Manager for e-business 6.0
Table 6-3 Location of message log files without Tivoli Common Directory
Message types
Tivoli Access Manager is written in both the C and Java programming languages.
Applications that use the Tivoli Access Manager APIs are also written in these
programming languages.
Tivoli Access Manager produces the following types of messages:
Runtime messages
Messages that are generated by applications, commands, and utilities that
use the Tivoli Access Manager Runtime component, as well as messages
that are generated from the C language-based Tivoli Access Manager
components, such as WebSEAL. These messages are written to the runtime
message logs based on their severity levels.
Tivoli Access Manager Runtime for Java messages
Messages that are generated by applications, commands, and utilities that
use the Tivoli Access Manager Runtime for Java component, as well as
messages that are generated from the Java language-based Tivoli Access
Manager components. These messages are written to the Tivoli Access
Manager Runtime for Java message logs. These messages tend to provide
exception and stack trace information from the JRE.
Server messages
Messages that are generated by the Tivoli Access Manager daemons and
servers. Messages from the policy server, authorization server, WebSEAL
servers, and policy proxy server are written to the server message logs.
Component Default log location
Runtime environment Policy server
Authorization server Policy proxy server
Windows
base_install_dir\log
Linux and UNIX
/var/PolicyDirector/log
WebSEAL server $PD_WEB/log
Plug-in for Web Servers $PD_WEBPI/log
Attribute retrieval service $WAS_HOME
Plug-in for Edge Server Windows
edgepi_install_dir\cp\logs
Linux and UNIX
/var/ibm/edge/cp/server_root/logs
WebLogic Server $BEA_HOME/user_projects/server_name

Chapter 6. Auditing and troubleshooting 229
Installation and configuration messages
Messages that are generated by the InstallShield MultiPlatform installation
wizards as well as by the configuration utilities. Some of these messages
follow the message standard and have an associated ID.
WebSEAL HTTP messages
WebSEAL provides the capability of logging HTTP messages.
Message format
A message consists of:
A message identifier (ID)
A message text
An error code
The error code is a unique 32-bit value. The error code is either a decimal or
hexadecimal number and indicates that an operation was not successful.
A message ID consists of 10 alphanumeric characters that uniquely identify the
message. The message ID consists of the following parts:
A 3-character product identifier described in Table 6-2 on page 227
A 2-character component or subsystem identifier
A 4-digit serial or message number
A 1-character (W, E or I) type code indicating one of the message severities
described in “Severity of message events” on page 227.
6.3.4 Trace event logging
Tivoli Access Manager provides configurable tracing capabilities that can aid in
problem determination. Unlike message logging, trace logging (or tracing) is not
enabled by default. Messages from tracing are sometimes cryptic, are not
translated, and can severely degrade system performance.
Tracing can be activated when servers, daemons, and applications start by using
routing files and Java properties files.
In some cases, tracing can be activated dynamically using the pdadmin utility
server task trace command with the set option.
You can use the trace command to perform the following operations:
trace list List all available trace components.
trace set Enable the trace level and trace message destination for
a component and its subordinates.

230 Certification Study Guide: IBM Tivoli Access Manager for e-business 6.0
trace show Show the name and level for all enabled trace
components or for the specified component.
Enabling trace
The server task trace set command enables the gathering of trace information for
the specified component and level. The command has the following syntax:
pdadmin > server task server_name–host_name trace set component level \
[file path=file | log_agent]
component The trace component name. This required argument
indicates the component to be enabled. WebSEAL
components are prefixed with pdweb.
level Reporting level. This required argument must be in the
range of 1 to 9. The level argument specifies the amount
of details that are gathered by the trace command. Level
1 indicates the least detailed output, and level 9 indicates
the most detailed output.
file path The fully qualified name of the file to which trace data will
be written.
log_agent Optionally specifies a destination for the trace information
gathered for the specified component.
6.3.5 Troubleshooting WebSEAL servers
This section details how to enable the capture of events when using Tivoli
Access Manager WebSEAL. WebSEAL provides the following components to
trace HTTP requests:
pdweb.debug
pdweb.snoop
pdweb.debug component
The pdweb.debug component traces the HTTP headers for requests and
responses. The pdweb.debug component only operates at level 2. If you want to
enable logging of the message body, the pdweb.snoop component needs to be
enabled.
The following command invokes the trace utility for the pdweb.debug component
at level 2 and directs the output to a file:
pdadmin> server task webseald-instance trace set pdweb.debug 2 \
file path=/opt/pdweb/log/debug.log

Chapter 6. Auditing and troubleshooting 231
pdweb.snoop component
The pdweb.snoop component traces HTTP traffic. This component logs the
HTTP headers and the message body for requests and responses. The
pdweb.snoop component has the following subcomponents:
pdweb.snoop.client The trace subcomponent to trace data that is sent
between WebSEAL and clients.
pdweb.snoop.jct The trace subcomponent to trace data that is sent
between WebSEAL and junctions.
If you want to trace only the message headers, use the pdweb.debug
component.
The following command invokes the trace utility for the pdweb.snoop component
at level 9 and directs the output to a file:
pdadmin> server task webseald-instance trace set pdweb.snoop 9 \
file path=/tmp/snoop.out
6.3.6 Diagnostic utilities
Many of the commands, tools, scripts, and daemons associated with Tivoli
Access Manager are installed under the installation directory in the /bin and /sbin
subdirectories. The one exception is the Tivoli XML Log Viewer. This viewer is
installed separately and, by default, resides in its own directory.
Tivoli XML Log Viewer
The C-based components of Tivoli Access Manager support the generation of
message and trace information in a common XML format. This format is known
as the Tivoli XML log format and is used by a number of Tivoli applications.
A Java-based log viewer application is provided that allows these messages and
traces to be filtered in a number of ways, including by time window, severity,
thread ID, and component. Information that is produced by different products can
be analyzed and converted into ASCII or HTML that use the Tivoli XML Log
Viewer.
This log viewer is not installed as part of any Tivoli Access Manager installation.
You must explicitly install the Tivoli XML Log Viewer. Because the InstallShield
MultiPlatform installation program and the Tivoli XML Log Viewer are both Java
applications, a JRE must be installed prior to installing and using the viewer. The
Note: Java-language-based Tivoli Access Manager components and
applications cannot produce messages or traces in the Tivoli XML log format.

232 Certification Study Guide: IBM Tivoli Access Manager for e-business 6.0
same JRE that is used by Tivoli Access Manager can be used for the Tivoli XML
Log Viewer. If a different JRE is used, that JRE must be at version 1.2.2 or later.
The XMLFILE, XMLSTDERR, and XMLSTDOUT formats in the routing file are
used to produce XML message logs and XML trace logs.
Using Tivoli XML Log Viewer
To run the Tivoli XML Log Viewer, use the viewer script and specify the name of
one or more XML files. Output is directed to STDOUT in either HTML or text
format. The output can be redirected to a file for viewing with a Web browser or
text editor.
For example, to create an HTML file containing all of the messages from the
policy and authorization servers sorted into chronological sequence, enter the
following command:
viewer msg__pdmgrd.xml msg__pdacld.xml > msg_19Oct2003_report.html
To display the messages from the Policy Server in text format, do the following:
viewer -s text msg__pdmgrd.xm
Gathering version information
This section describes tools used to determine the version of the various
components and products that can be installed in a Tivoli Access Manager
environment.
Tivoli Access Manager
The pdversion command displays a list of Tivoli Access Manager components
and indicates the version number for any component that is installed on the
system.
IBM Global Security Kit
Secure Sockets Layer (SSL) communication in Tivoli Access Manager is
provided by the Global Security Kit (GSKit). Each version of Tivoli Access
Manager potentially provides a different level of GSKit. In addition, updates to
GSKit might be applied as a result of applying fix packs or other service. To
determine the version of GSKit that is installed, use the gsk7ver command.
User registries
The Tivoli Directory Server client is used by Tivoli Access Manager to
communicate with any LDAP user registry, not just with Tivoli Directory Server.
The client is not needed if Microsoft Active Directory or Lotus Domino server is
being used as the Tivoli Access Manager user registry. The Tivoli Directory

Chapter 6. Auditing and troubleshooting 233
Server client is installed on any system that communicates with an LDAP user
registry.
To determine the version of the Tivoli Directory Server client that is installed, use
the ldapsearch command:
ldapsearch –e
This command also reveals the version of the LDAP server software. The
following sample command is appropriate when the LDAP server is configured
for non-SSL communication:
ldapsearch -h ldapserver-hostname -p 389 -D "ldapadminDN" \ -w
ldapadmin-password -b "" -s base objectclass=*
The pdadmin utility
The pdadmin utility can be used for collecting information about the system. The
following commands can be helpful:
server list Lists all registered Tivoli Access Manager servers.
server task trace Enables the gathering of trace information for
components of installed Tivoli Access Manager servers or
server instances that support debug event tracing.
errtext Displays the error message of a given error number. This
command does not require a login or authentication to
use.
pdjservicelevel
Returns the service level of installed Tivoli Access Manager files that use the
Tivoli Access Manager Runtime for Java package.
pdservicelevel
Returns the service level of installed Tivoli Access Manager files that use the
Tivoli Access Manager Runtime package.
pdwebpi
Returns the current version of Tivoli Access Manager Plug-in for Web Servers.
Also, specifies whether to run Plug-in for Web Servers as a daemon or run it in
the foreground.
pdwpi-version
Lists the version and copyright information for the Tivoli Access Manager Plug-in
for Web Servers installation.

234 Certification Study Guide: IBM Tivoli Access Manager for e-business 6.0
pdbackup
Backs up, restores, and extracts Tivoli Access Manager data. The syntax is as
follows:
pdbackup –action backup –list list_file [–path path] [–file filename]
pdbackup –action restore –file filename [–path path]
pdbackup –action extract –file filename –path path
pdbackup –usage
pdbackup –?
pdacld_dump
The pdacld_dump command is a serviceability utility that can be used to validate
and maintain the Tivoli Access Manager policy database and database replicas.
This command is located under the installation directory in the /sbin subdirectory
and is installed as part of the policy server.
The pdacld_dump command provides the following functions:
Transform the binary content of the specified database file into readable text.
By default, the output is directed to standard output, but it can be redirected to
a file.
Create a summary report that describes the conditions of the specified
database.
Examine the specified database for any corrupted content, defragment the
structure of the database, and produce a valid, updated version of the
database.
Provide two levels of validation checking.
This concludes the auditing and troubleshooting discussion for Tivoli Access
Manager for e-business.

© Copyright IBM Corp. 2006. All rights reserved. 235
Appendix A. WebSEAL junction options
This appendix gives a list of all available options for your junction configuration.
Table A-1 defines the options you can utilize when setting up WebSEAL junctions
using either the pdadmin command line pdadmin> server task <webseal> create
...... /junction (for example, pdadmin> server task web1-webseald-cruz create -t
tcp -h doc.ibm.com /pubs) or the Web Portal Manager GUI.
Table A-1 Junction options
A
Junction types
–t type Type of junction. One of:
- tcp
- ssl
- tcpproxy
- sslproxy
- local. .
Host name
-h host-name The DNS host name or IP address of the target
back-end server.

236 Certification Study Guide: IBM Tivoli Access Manager for e-business 6.0
General options
TCP and SSL junction types
–f Forces the replacement of an existing junction.
–i WebSEAL server treats URLs as case insensitive.
–p port TCP port of the back-end third-party server.
Default is 80 for TCP junctions;
443 for SSL junctions.
–q location Provides WebSEAL with the correct name of the
query_contents program file and where to find the file.
By default, the Windows file is called
query_contents.exe and the UNIX file is called
query_contents.sh. By default, WebSEAL looks for the
file in the cgi_bin directory of the back-end Web server.
–R Allows denied requests and failure reason information
from authorization rules to be sent in the Boolean Rule
header (AM_AZN_FAILURE) across the junction.
–T resource/resource-group Name of GSO resource or resource group. Required
for and used only with –b gso option.
–w Windows 32-bit (Win32®) file system support.
Stateful junctions
–s Specifies that the junction should support stateful
applications. By default, junctions are not stateful.
–u UUID Specifies the UUID of a back-end server connected to
WebSEAL using a stateful junction (–s).
Mutual authentication over Basic Authentication and SSL certificates
–B WebSEAL uses BA header information to authenticate
to back-end server. Requires –U, and –W options.
–D “DN” Specifies the distinguished name of back-end server
certificate. This value, matched with actual certificate
DN enhances authentication.
–K “key-label” Key label of WebSEAL’s client-side certificate, used to
authenticate to back-end server.
–U “username” WebSEAL user name. Use with –B to send BA header
information to back-end server.
–W “password” WebSEAL password. Use with –B to send BA header
information to back-end server.

Appendix A. WebSEAL junction options 237
Proxy junction (requires –t tcpproxy or –t sslproxy).
–H host-name The DNS host name or IP address of the proxy server.
–P port The TCP port of the proxy server.
Supply identity information in
HTTP headers
–b BA-value Defines how the WebSEAL server passes client
identity information in HTTP basic authentication (BA)
headers to the back-end server. One of:
- filter (default),
- ignore,
- supply,
- gso
–c header-types Inserts Tivoli Access Manager-specific client identity
information in HTTP headers across the junction. The
header-types argument can include any combination
of the following Access Manager HTTP header types:
iv-user
iv-user-l
iv-groups
iv-creds
all
–e encoding-type Specifies the encoding to use when generating HTTP
headers for junctions. This encoding applies to
headers that are generated with both the –c junction
option and tag-value. Possible values for encoding are:
v utf8_bin v utf8_uri v lcp_bin v lcp_uri
–I Cookie handling: -I ensures unique Set-Cookie header
name attribute.
–j Supplies junction identification in a cookie to handle
script generated server-relative URLs.

238 Certification Study Guide: IBM Tivoli Access Manager for e-business 6.0
–J {trailer, inhead, onfocus,
xhtml10}
Controls the junction cookie JavaScript block.
Use –J trailer to append (rather than prepend) the
junction cookie JavaScript to HTML page returned
from back-end server.
Use –J inhead to insert the JavaScript block between
<head> </head> tags for HTML 4.01 compliance.
Use –J onfocus to use the onfocus event handler in the
JavaScript to ensure the correct junction cookie is used
in a multiple-junction/multiple-browser-window
scenario.
Use –J xhtml10 to insert a JavaScript block that is
HTML 4.01 and XHTML 1.0 compliant.
–k Sends session cookie to back-end portal server.
–n Specifies that no modification of the names of
non-domain cookies are to be made. Use when
client-side scripts depend on the names of cookies.
By default, if a junction is listed in the JMT or if the -j
junction option is used, WebSEAL prepends the
names of non-domain cookies that are returned from
the junction to with: AMWEBJCT_junction_point_
–r Inserts incoming IP address in HTTP header across
the junction.
Junction fairness
–l percent-value Defines the soft limit for consumption of worker
threads.
–L percent-value Defines the hard limit for consumption of worker
threads.
WebSphere single sign-on (LTPA) junctions
–A Enables junctions to support LTPA cookies (tokens).
LTPA version 1 cookies (LtpaToken) and LTPA
version 2 cookies (LtpaToken2) are both supported.
LTPA version 1 cookies are specified by default. LTPA
version 2 cookies must be specified with the additional
-2 option.
Also requires –F, and –Z options.
–2 Used with the -A option, this option specifies that LTPA
version 2 cookies (LtpaToken2) are used. The -A
option without the -2 option specifies that LTPA version
1 cookies (LtpaToken) are used.
–F “keyfile” Location of key file used to encrypt LTPA cookie data.
Only valid with -A option.

Appendix A. WebSEAL junction options 239
–Z “keyfile-password” Password for the key file used to encrypt LTPA cookie
data. Only valid with -A option.
WebSEAL-to-WebSEAL SSL junctions
–C Mutual authentication between a front-end WebSEAL
server and a back-end WebSEAL server over SSL.
Requires –t ssl or –t sslproxy type.
Forms based single sign-on
–S path Location of forms single signon configuration file.
Virtual hosts
–v virtual-host-name[:port] Virtual host name represented on the back-end server.
This option supports a virtual host setup on the
back-end server. You use –v when the back-end
junction server expects a Host header because you are
junctioning to one virtual instance of that server. The
default HTTP header request from the browser does
not know that the back-end server has multiple names
and multiple virtual servers. You must configure
WebSEAL to supply that extra header information in
requests destined for a back-end server set up as a
virtual host.
Transparent junctions
–x Creates a transparent path junction.
Local junction (use with –t local)
–d dir Local directory to junction. Required if the junction type
is local.
Junction Point
Name of the location in the WebSEAL namespace where the root of the back-end
application server namespace is mounted.

240 Certification Study Guide: IBM Tivoli Access Manager for e-business 6.0

© Copyright IBM Corp. 2006. All rights reserved. 241
Appendix B. Sample questions
This sample test is designed to give the candidate an idea of the content and
format of the questions that will be on the certification exam. Performance on the
sample test is
not an indicator of performance on the certification exam and this
should not be considered an assessment tool.
B

242 Certification Study Guide: IBM Tivoli Access Manager for e-business 6.0
Questions
1. Which registry server suffix is required by IBM Tivoli Access Manager for
e-business?
a. cn=root
b. o=tivoli,c=us
c. secAuthority=Default
d. cn=secAuthority,o=tivoli
2. Which two are prerequisites for installing the WebSEAL ADK? (Choose two).
a. GSKit
b. WebSphere fix pack 2
c. IBM Tivoli Access Manager for e-business ADK
d. Access Manager for e-business authorization server
e. IBM Tivoli Directory Server SDK
3. Which command is used to list the status of the IBM Tivoli Access Manager
for e-business processes on UNIX machines?
a. iv_status
b. am_status
c. pd_status
d. pd_start status
4. Which three entries are defined by default in the ACL of the IBM Tivoli
Directory Server suffix in order to manage users and groups from IBM Tivoli
Access Manager for e-business? (Choose three.)
a. default-webseal
b. cn=SecurityGroup,secAuthority=Default
c. cn=management,cn=SecurityGroup,secAuthority=Default
d. cn=users/groups,cn=SecurityGroup,secAuthority=Default
e. cn=ivacld-servers,cn=SecurityGroup,secAuthority=Default
f. cn=remote-acl-users,cn=SecurityGroup,secAuthority=Default
5. What is the default listening port for the authorization server?
a. 7135
b. 7136
c. 7234

Appendix B. Sample questions 243
d. 7235
6. Which syntax would prevent a user from logging in to pdadmin from outside of
the company network?
a. acl modify testacl set any-other Tr
b. acl modify testacl set any-other unauthenticated
c. pop modify testpop set ipauth add 9.0.0.0 255.0.0.0 0
d. pop modify testpop set ipauth anyothernw deny 9.0.0.0 255.0.0.0 0
7. Which two end-user authentication methods are supported by WebSEAL to
its junctioned Web servers for web SSO? (Choose two.)
a. basic authentication
b. kerberos authentication
c. SPNEGO authentication
d. forms-based authentication
e. SecurID token-based authentication
8. Which HTTP header value is passed by default to a back-end web server?
a. iv-user
b. iv-creds
c. iv-groups
d. iv-server-name
9. What occurs if the aznapi-configuration stanza of the IBM Tivoli Access
Manager for e-business WebSEAL configuration file contains the following
entry: logsize=-1?
a. No records are logged.
b. A configuration error message is displayed.
c. No rollovers are performed and the log grows indefinitely.
d. A new file is created each time the logging process starts and every 24
hours thereafter.
10.Given an IBM Tivoli Access Manager for e-business error message number,
which command returns the associated message text?
a. pdadmin errnum
b. pdadmin errtext
c. pdadmin server errnum
d. pdadmin server errtext

244 Certification Study Guide: IBM Tivoli Access Manager for e-business 6.0
Answer Key
1. C
2. AC
3. D
4. BEF
5. B
6. C
7. AD
8. D
9. D
10.B

© Copyright IBM Corp. 2006. All rights reserved. 245
Related publications
The publications listed in this section are considered particularly suitable for a
more detailed discussion of the topics covered in this redbook.
IBM Redbooks
For information on ordering these publications, see “How to get IBM Redbooks”
on page 246. Note that some of the documents referenced here may be available
in softcopy only.
Enterprise Security Architecture Using IBM Tivoli Security Solutions,
SG24-6014
Integrated Identity Management using IBM Tivoli Security Solutions,
SG24-6054
Identity and Access Management Solutions Using WebSphere Portal V5.1,
Tivoli Identity Manager V4.5.1, and Tivoli Access Manager V5.1, SG24-6692
Federated Identity Management and Web Services Security with IBM Tivoli
Security Solutions, SG24-6394
Other publications
These publications are also relevant as further information sources:
IBM Tivoli Access Manager for e-business Version 6.0 Release Notes,
SC32-1702
Tivoli Access Manager for e-business Version 6.0 Installation Guide,
SC32-1361
IBM Tivoli Access Manager Version 6.0 Administration Guide, SC32-1686
IBM Tivoli Access Manager for e-business Version 6.0 WebSEAL
Administration Guide, SC32-1687
IBM Tivoli Access Manager for e-business Version 6.0 Plug-in for Web
Servers Administration Guide, SC32-1690
IBM Tivoli Access Manager for e-business Plug-in for Edge Server
Administration Guide Version 6.0, SC32-1689

246 Certification Study Guide: IBM Tivoli Access Manager for e-business 6.0
IBM Tivoli Access Manager for e-business Version 6.0 Administration C API
Developer Reference, SC32-1692
IBM Tivoli Access Manager Version 6.0 Administration Java Classes
Developer Reference, SC32-1692
IBM Tivoli Access Manager for e-business Version 6.0 BEA WebLogic Server
Administration Guide, SC32-1688
IBM Tivoli Access Manager for e-business Version 6.0 Problem Determination
Guide, SC32-1701
IBM Tivoli Access Manager for e-business Upgrade Guide Version 6.0,
SC32-1703-00
Online resources
These Web sites and URLs are also relevant as further information sources.
To obtain the online publications for IBM Tivoli Access Manager for
e-business, visit the following Web site.
http://publib.boulder.ibm.com/tividd/td/IBMAccessManagerfore-business6.0.html
How to get IBM Redbooks
You can search for, view, or download Redbooks, Redpapers, Hints and Tips,
draft publications and Additional materials, as well as order hardcopy Redbooks
or CD-ROMs, at this Web site:
ibm.com/redbooks
Help from IBM
IBM Support and downloads
ibm.com/support
IBM Global Services
ibm.com/services

© Copyright IBM Corp. 2006. All rights reserved. 247
Index
Symbols
.NET integration 47, 58
A
access control 28
access control list
see ACL
access decision information
see ADI
ACE/Server 118
ACL 33, 100
default ACLs 129
evaluation 103
policy 101
policy task 102
action bit 101
action group 111
Active Directory
domain 119
forest 119
LDAP client 76
ADI 193
administration
delegation 42
service 54
administration API 41, 43, 55
allowed-registry-substrings 93
amauditcfg 216
amldif2V6 78
AMPS 121
any-other 96, 103
Application Development Kit
installation 79
application programming interface 50
Attribute Retrieval Service
installation 84
audit
reporting 209
audit level 104
policy 110
auditing 198
operational reports 219
XML output 208
authenticated request
evaluation 103
authentication 28
audit 198
basic 115
certificate based 116
failover 117
forms-based 116
HTTP header 120
IP address 120
IP endpoint based 110
IP endpoint meethod 105
Kerberos 118
mechanisms 114
modules 115
MPA 121
network-based 104
none 127
ranking 125
re-authentication 123
step-up 104, 125
strength 104
strength policy 125
token based 118
two-factor 120
user switching 122
WebSEAL process 113
authorization 28
audit 198
database 33
database caching 44
decision information 84
flow 109
rule 34, 100, 106
rule policy 110
rules 48
service 28, 45
service architecture 52
authorization API
see aznAPI
Authorization Server 45
auditing 199
installation 78
upgrade 65

248 Certification Study Guide: IBM Tivoli Access Manager for e-business 6.0
availability 62
aznAPI 45, 51, 79, 189
credential attribute service 192
dynamic ADI retrieval services 193
entitlement service interface 191
local cache mode application 39
B
base components
framework 74
basic authentication 115
bassslcfg 77
BEA WebLogic Server
see WebLogic
C
CDAS 56, 83, 187
CDMA 121
CDMF 83, 166, 168
CDSSO 167
user synchronization 168
cdsso_key_gen 117
certificate 75, 116
revocation list 75
certification
benefits 3
checklist 5
Certified Deployment Professional 7
Common Auditing and Reporting Service 208
client 216
Common Base Event 208
configuration 10
Configuration Manager 74
container object 94
cookie
failover 117
core components 28
credential attribute service 192
credentials modification service 54
Cross Domain Mapping Framework
see CDMF
Cross Domain Single Sign-On
see CDSSO
custom authentication 182
customization 10
D
declarative security 47
default ACLs 129
default security policy 111
delegated administration 42
directory
client installation 76
partitioning 32
Directory Information Tree
see DIT
Directory Integrator 57
DIT 32
DNS mapping 143
domain
Active Directory 119
administrator 96
home 172
dynamic ADI retrieval services 193
dynamic URLs 132
dynurl.conf 132
E
EAI 56, 115, 127, 182
configuration 185
process flow 183
EAS 110, 193
e-community single sign-on 166, 169
Edge Server
Caching Proxy 40
educational resources 16
entitlement service 54
interface 191
event logging 199
EventPool
audit category 200
Everyplace Wireless Gateway 121
external authentication C API 56, 115, 127, 182,
187
external authentication interface
see EAI
external authorization service 55
see EAS
F
failover authentication 117
Federal Information Processing Standard 140-2 61
file log agent 201
filtering

Index 249
static URL 135
FIPS 140-2 61
forest
Active Directory 119
forms-based
authentication 116
single sign-on 158
G
Global Sign-On 155
group management 96
gsk7ikm 75
GSKit 60
installation 75
GSM 121
GSO
lockbox 155
H
HACMP 77
hardware acceleration for SSL 61
high availability 175
Policy Server 36
WebSEAL 37
High Availability Cluster Multiprocessing 77
home domain 172
HTTP
BA header single sign-on 159
header authentication 120
Host header 142
logging 206
Referer header 141
variables 161
I
IBM Certified Deployment Professional 7
IBM Global Security Kit
see GSKit
IBM Tivoli Configuration Manager
see Configuration Manager
IBM Tivoli Directory Integrator
see Directory Integrator
IBM WebSphere Application Server
see WebSphere Application Server
IBM WebSphere Edge Server
see Edge Server
iDEN 121
ikeyman 60, 75
import
users and groups 96
inactivity timeout 117, 123–124
inheritance 33
of security policy 100
installation 9
wizard 73
IP address
authentication 120
IP endpoint authentication method 105, 110, 126
iv-admin 96
ivmgr.kdb 78
ivmgrd.conf 93
ivmgrd-servers 96
ivrgy_tool 64
J
J2EE
application security 48
JAAS 58
Java API 58
Java application
configration 190
Java Authentication and Authorization Service
see JAAS
junction 37, 128
advanced configuration 147
cookies 138
local type 133
mapping 137
mutually authenticated 148
stateful junction 150
throttling 151
transparent path junction 146
virtual host junction 142
WebSEAL to WebSEAL junction 149
Windows file system 153
K
Kerberos 118
key management utility 60
L
LDAP
client installation 76
data format 77

250 Certification Study Guide: IBM Tivoli Access Manager for e-business 6.0
license component
installation 76
lifetime timeout 117
load balancing 37, 175
local cache mode 189
local type junction 133
log-out function 116
Lotus Domino 164
Lotus Notes
LDAP client 76
LTPA 163
M
maintenance 15
management
domain 93, 96
object space 95
Master Authentication Server 169
message event logging 226
messages 228
metadata 32
Microsoft .NET integration 47, 58
migration
authorization database 41
minimal LDAP data format 78
MPA 121
multi-domain environment 34
multiple interface capability 145
Multiplexing Proxy Agent
see MPA
N
network zone 58
network-based authentication 104
O
object space 33, 37, 48, 92, 94, 100, 111
migration 42
Plug-in for Edge Server 83
objectives
for Test 887 8
planning 8
operational reports 219
P
PAC 29, 31, 54, 182, 186
service 54
password
change 97
policy 97
strength policy 99
Password Strength Module 83
PDAcld 78
pdadmin 41
PDAuthADK 79
pdbackup 64
PDC 121
pdcacert.b64 78
pdconfig 77, 79
PDJRTE 77, 80
pdjrtecfg 80
PDlic 76
PDMgr 77
PDPlgES 83
PDProxy 79
pdproxycfg 79
PDSMS 86
PDWeb 82
pdweb.debug 230
pdweb.snoop 231
PDWebADK 83
PDWebARS 84
PDWebPI 83
PDWebRTE 82
PDWLS 85
PDWPM 80
peer-to-peer directory 32
permission 101, 111
PHS 121
pipe log agent 203
PKI
environment 75
infrastructure 60
pkmscdsso 167
pkmsdisplace 179
pkmslogout 117, 123, 179
pkmsvouchfor 171
planning 8
Plug-in for Edge Server 40
installation 83
Plug-in for Web servers 38
installation 83
policy
inheritance 100
security 99
user 98

Index 251
Policy Proxy Server 43
installation 79
Policy Server 32, 43, 96
auditing 199
certificates 78
installation 77
multi-domain 34
standby 36
unconfiguration 65
upgrade 64
POP 33, 48, 100, 104
audit level 104
authentication strength 126
IP endpoint authentication method 126
re-authentication 123
step-up authentication 126
port configuration 60
prerequisites
for Test 887 7
Privilege Attribute Certificate
see PAC
problem determination 220
programmatic security 47
programming 13
propagation queue 200
protected object policy
see POP
protected object space 33, 37, 48, 92, 94, 100, 111
Q
quality of protection 104
query_contents 131
R
re-authentication 123
Redbooks Web site 246
Contact us x
registry attribute entitlement service 192
remote cache mode 79, 189
remote log agent 204
replica directory 32
replica set 175
reporting
audit data 209
resource manager 29
resource object 94
reverse proxy 37
routing files 221
RSA ACE/Server 118
RSA SecurID token 118
runtime component
installation 77
Runtime for Java
installation 80
S
SAML
assertion 54
script filtering 135
sec_master 96
secure domain 32, 70, 92, 122
SecurID token 118
security
policy 99, 111
policy inheritance 100
self-signed certificate 75
Session Management Server 37, 45, 175
audit client 218
availability 87
command line interface 88
configuring global WebSphere security 86
installation 86
junction throttling 152
Web interface 89
session realm 175
single sign-on 37–38, 114, 128, 154
across secure domains 166
e-community single sign-on 169
forms based 158
GSO lockbox 155
HTTP BA header 159
LTPA 163
Trust Association Interceptor 165
Windows 118
software distribution installation 74
sparse security policy model 100
SPNEGO protocol 118
SSL
hardware acceleration 61
staging utility 214
standard LDAP data format 78
standby Policy Server 77
static URL filtering 135
step-up authentication 104, 125
stylesheet 107
svrsslcfg 79, 190

252 Certification Study Guide: IBM Tivoli Access Manager for e-business 6.0
switch user 122
T
TAR 118
target
audience 7
target-based authorization 114
TDMA 121
Test 887
objectives 8
prerequisites 7
time based log-out 116
time-of-day policy 110
timeout value 117
Tivoli Common Directory logging 226
Tivoli Security Utilities
installation 76
Tivoli Software Professional Certification 4
TLS 61
token authenticator 118
trace events 225
tracing 229
training information 16
transparent path junction 146
Transport Layer Security
see TLS
troubleshooting 15, 122, 220
Java-based components 224
message event logging 226
messages 228
routing files 221
Tivoli Common Directory 226
trace events 225
tracing 229
WebSEAL 230
Trust Association Interceptor 165
two-factor authentication 120
U
unauthenticated 96, 127
request evaluation 103
upgrade consideration 63
URL filtering 133
challenges 142
user
management 96
modify 97
policy 98
registry 96
user registry 28, 31
installation 70
structure 31
upgrade 64
user-based authorization 113
user-to-role mapping 47
V
virtual host junction 142
DNS mapping 143
multiple interface capability 145
virtual hosting 38
W
WAP 121
Web Portal Manager
installation 80
query_contents 131
see WPM
Web security
installation 81
Web Security Runtime
installation 82
Web services security 48
WebLogic
Access Manager for installation 85
integration 49
WebSEAL 37
auditing 199
authentication mechanisms 114
authentication process 113
authorization decision information 84
CDMF 168
Cross Domain Single Sign-On (CDSSO) 167
customization 113
default ACLs 129
e-community single sign-on 169
high availability 175
HTTP logging 206
installation 82
junction 37, 128
junction throttling 151
junction to WebSEAL 149
load balancing 37, 175
LTPA 163
Master Authentication Server 169
mutually authenticated junction 148

Index 253
pkmscdsso 167
pkmsvouchfor 171
replication 37
single sign-on 154
stateful junction 150
transparent path junction 146
troubleshooting 230
Trust Association Interceptor 165
virtual host junctions 142
WebSEAL to WebSEAL junction 149
Windows file system junction 153
WebSEAL ADK
installation 83
WebSphere
Everyplace Suite 121
WebSphere Application Server
integration 48
Windows
file system junction 153
single sign-on 118
Wireless Application Protocol
see WAP
WPM 41
X
X.509 116
XML
document 107
event store utilities 214
Log Viewer 231
XSL 34
parser 107

254 Certification Study Guide: IBM Tivoli Access Manager for e-business 6.0

(0.5” spine)
0.475”<->0.875”
250 <-> 459 pages
Certification Study Guide: IBM Tivoli Access Manager for e-business 6.0


®
SG24-7202-00 ISBN 0738496030
INTERNATIONAL
TECHNICAL
SUPPORT
ORGANIZATION
BUILDING TECHNICAL
INFORMATION BASED ON
PRACTICAL EXPERIENCE
IBM Redbooks are developed by
the IBM International Technical
Support Organization. Experts
from IBM, Customers and
Partners from around the world
create timely technical
information based on realistic
scenarios. Specific
recommendations are provided
to help you implement IT
solutions more effectively in
your environment.
For more information:
ibm.com/redbooks
Certification Study Guide:
IBM Tivoli Access Manager
for e-business 6.0
Developed
specifically for
Access Manager for
e-business
certification
Explains the
certification path
and prerequisites
Includes sample test
questions and
answers
This IBM Redbook is a study guide for IBM Tivoli Access
Manager for e-business Version 6 and is meant for those who
want to achieve IBM Certifications for this specific product.
The IBM Tivoli Access Manager for e-business Certification,
offered through the Professional Certification Program from
IBM, is designed to validate the skills required of technical
professionals who work in the implementation of the IBM
Tivoli Access Manager for e-business Version 6 product.
This book provides a combination of theory and practical
experience needed for a general understanding of the subject
matter. It also provides sample questions that will help in the
evaluation of personal progress and provide familiarity with
the types of questions that will be encountered in the exam.
This publication does not replace practical experience, nor is
it designed to be a stand-alone guide for any subject. Instead,
it is an effective tool which, when combined with education
activities and experience, can be a very useful preparation
guide for the exam.
Back cover
