
1 | P a g e
Dotloop Training Guide for Dotloop Education Committee
November, 2013
Prerequisite to signing up and attending Dotloop: Start to Finish Class:
NOTE: Adobe Reader must be installed on your computer.
Each member must come into NALMLS > Tools > Dotloop and successfully sign into current
DotLoop
Each member may either call Elizabeth 256-536-3334 X37 or email Elizabeth@hbrmls.com if
they cannot login to Dotloop through NALMLS.
Each member must go to “My Account” and set up the following:
After clicking on My Account make sure
If changes are made be sure and Save (Save button at top and bottom right).
Call Elizabeth if above is incorrect.
Your current company
should show here.
Your current company
should show here.
NALMLS should show here.
You may have more than one Profile. If you
have changed offices you will continue to see
previous ones so you may access Loops from
that office.

2 | P a g e
Opening Page of DotLoop:
Secondary Menu:
How to Create a Loop with Electronic Signatures:
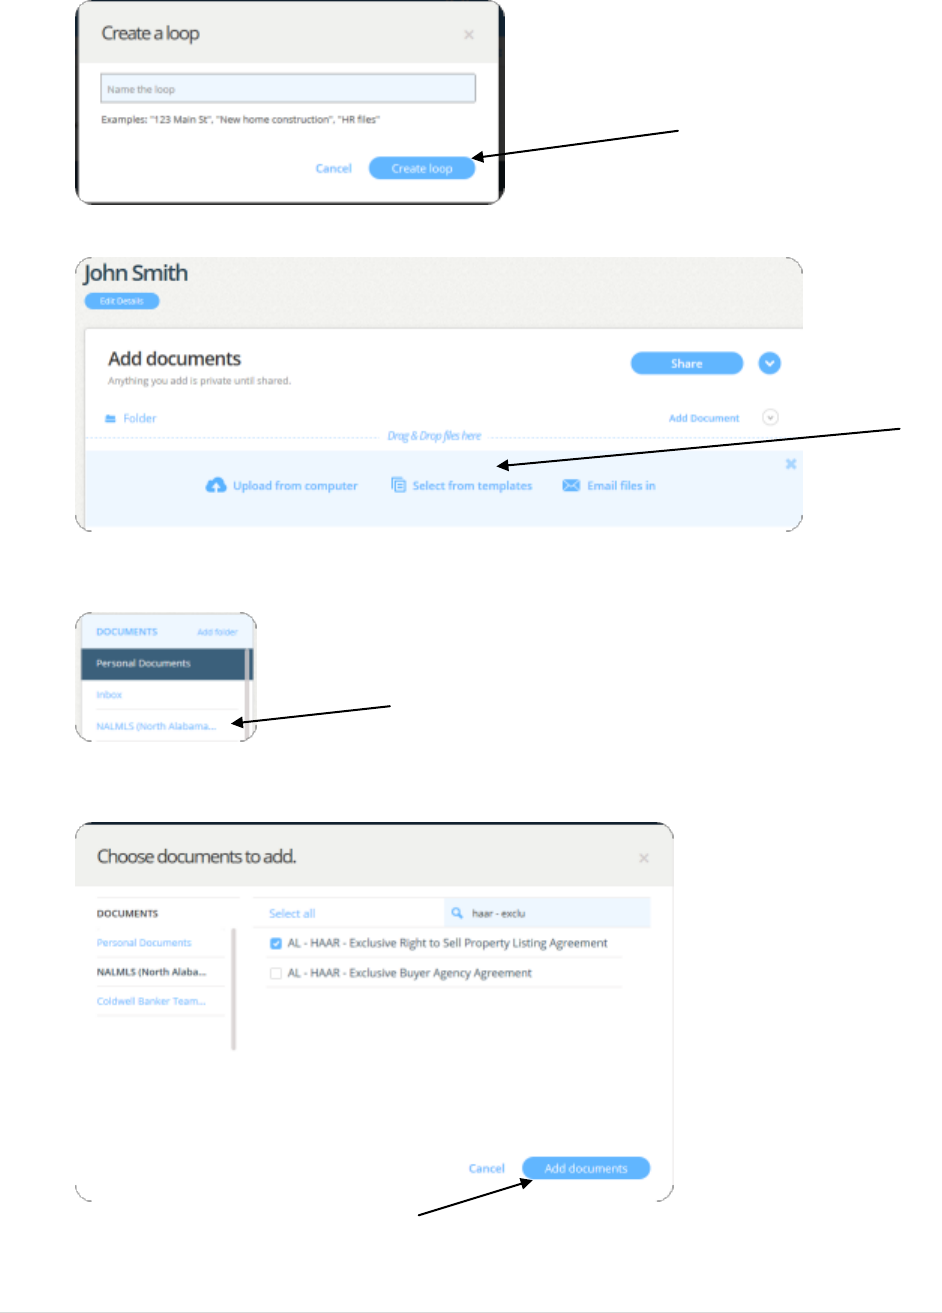
1. Form Home Page click on Create a loop.
2. Name Loop. Use either address or name or any combination that works for you. Click Create
Loop
3. Go to People. Click on Add Person. Add all parties currently in this loop. Each party must have
their own email address. Choose what role this party plays in this loop.
H
o
m
e
H
o
m
e
T
a
s
k
s
P
e
o
p
l
e
T
e
m
p
l
a
t
e
s
P
r
o
fi
l
e

3 | P a g e
4. Repeat this process if you have two names to enter.
5. Go to Edit Details. Fill out all fields applicable to your Loop. When you start filling out your
forms all of this information will auto fil and you will only have to enter one time. Be sure and
Save when finished.
(Click on Back to loops when finished)
6. Now it is time to select the forms you need for your Loop. Click on Select from your templates.

4 | P a g e
7. Click on NALMLS (North Alabama… under DOCUMENTS and then check forms needed in your
Loop. Click on Select All or you can click on each individual form.
8. Click Add Documents
9. Click on the first form name under your Documents and assign role of People in this transaction,
if you have not already done this when adding People.

5 | P a g e
10. Click Assign button.
11. Fill out all information on your form/s.
12. Explanation of tool bar above each form when filling in blank fields:
While filling out forms, you can assign roles to parties within Loop, but if you have assigned roles
when adding People this will not be necessary.
b
o
l
d
I
t
a
l
i
c
t
e
x
t
c
o
l
o
r
h
i
g
h
l
i
g
h
t
a
l
i
g
n
l
e
f
t
a
l
i
g
n
c
t
r
a
l
i
g
n
r
t
a
d
d
c
l
a
u
s
e
f
i
e
l
d
h
i
s
t
t
r
a
n
s
p
a
r
e
n
c
y

6 | P a g e
13. Once a form is completed click on Save: You will be prompted to share document after each
one. If you have only one this works fine, but if you have several, answer no and then Share all
together.
One Form, go ahead and share. More than one say No.
14. Complete this process until all forms are filled out.
15. Select all forms and click on the Share button.
16. Following screen opens after clicking on Share:
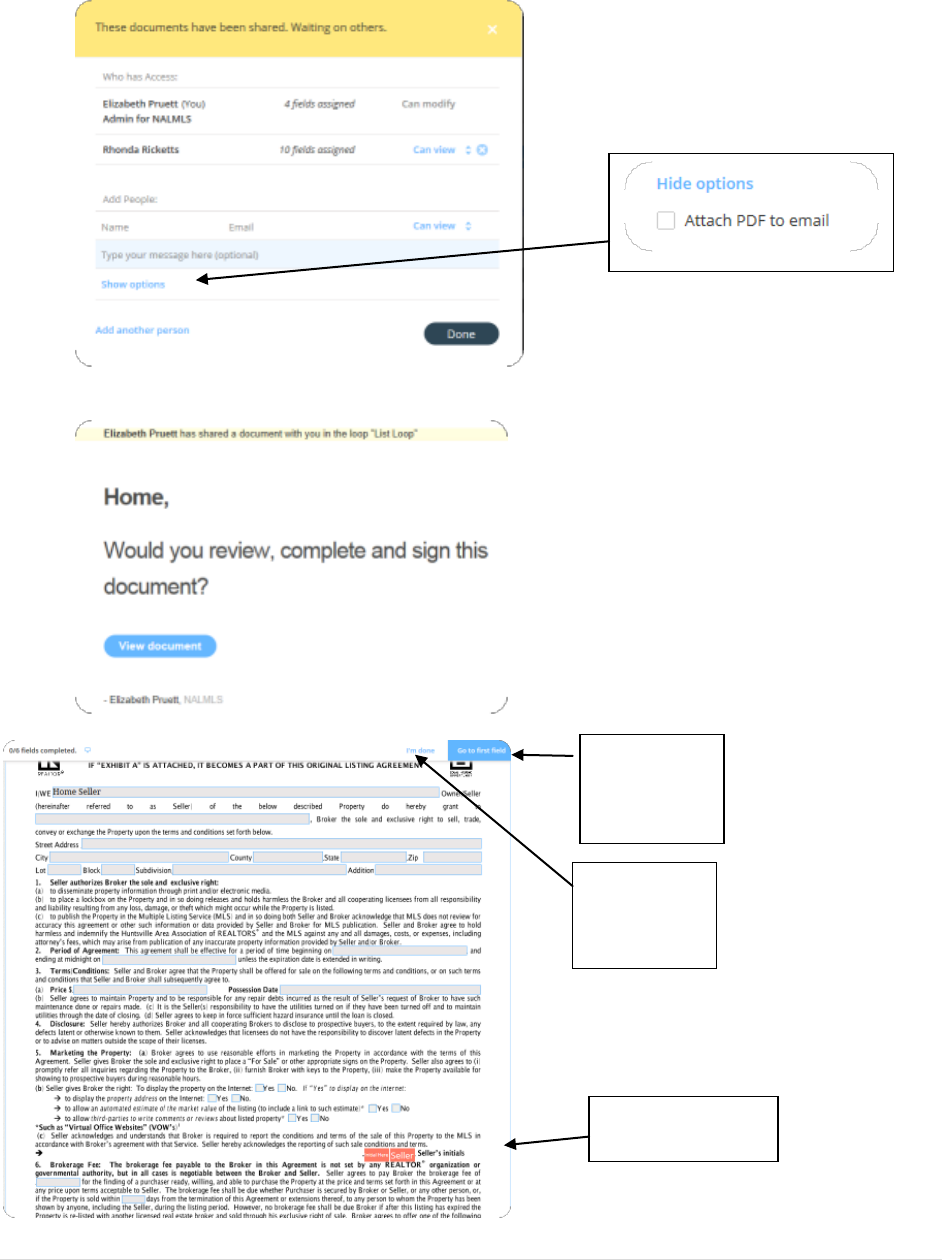
7 | P a g e
17. You have option to type a personal message to go with your shared forms:
18. What does the email look like going out to your seller?
After clicking on View Document this is what buyer sees:
This button is
handy to move
to fields to be
signed.
Fields to be signed
are colored coded.
When all fields
are signed,
Seller clicks on
I’m done.

8 | P a g e
When document is signed agent gets an email:
Continue to share as this transaction continues.
How to fill out Forms without using electronic signatures:
1. Click on Create Loop.
2. Name Loop. Use either address or name. Click Create Loop
As Seller initials/signs by clicking in
box, he can click on Jump to the
next field.
Examples of what signatures look
like.
9 | P a g e
3. Click Select from your templates.
4. Click NALMLS (North Alabama..) under DOCUMENTS. Some users may see Version Now Forms
and this is the same group of forms as NALMLS.
5. Select forms you wish to fill out by clicking in check box to left of form name.
6. Click Add Documents bottom right.

10 | P a g e
7. Click on Form Name.
8. Skip Assign signatures screen.
9. Fill out form in all applicable blue boxes.
10. Click Save.
11. When finished filling out forms, click Back to loops in upper left of screen.
12. Click in box to left of Form Name.
13. Click arrow at the end of the line where you see Form Name if there is only one form.

11 | P a g e
14. Click Download.
15. Click Open on bar at bottom of screen.
16. Click Printer icon and print forms.
NOTE: If you fill out multiple forms, check each form on left of form names. To the left of the
Share button, click on down arrow to download all forms at one time.
How to set up Form Sets:
1. Click on Templates on blue DotLoop Bar.
2. Click on Add Folder in left side column.
3. Name Folder and click Create Folder. Use a name that will make it easy to select when setting
up a listing or making an offer.
4. Click on Select from your templates.

12 | P a g e
5. Click on NALMLS (North Alabama Multiple….) under DOCUMENTS.
6. Click in box to left of each form you want in your set and the click Add documents.
How to Personalize Form Sets:
1. Click on Templates.
2. Click on Form Set you want to personalize.
3. Click on name of form you want to personalize.

13 | P a g e
4. Enter all fields that will always contain the same information each time you use the form set.
5. Click Save.
6. Click Back to templates to continue completing all forms.
How to use Form Sets when creating a Loop:
1. Click on Create Loop.
2. Name Loop. Use either address or name. Click Create Loop

14 | P a g e
3. Click Select from your templates.
4. Instead of having to select forms individually from the list, you simply select the form set
created for a listing and forms will open.
5. Choose Select All and Add Documents. You are now back to your Loop and ready to fill in
forms:

15 | P a g e
How to Create a Loop with Electronic Signatures:
19. Form Home Page click on Create a loop.
20. Name Loop. Use either address or name. Click Create Loop
21. Go to People. Click on Add Person. Add all parties currently in this loop. Each party must have
their own email address. Choose what role this party plays in this loop.
22. Repeat this process if you have two names to enter.
23. Go to Edit Details. Fill out all fields applicable to your Loop. When you start filling out your
forms all of this information will auto fil and you will only have to enter one time. Be sure and
Save when finished.

16 | P a g e
(Click on Back to loops when finished)
24. Now it is time to select the forms you need for your Loop. Click on Select from your templates.
25. Click on NALMLS (North Alabama… under DOCUMENTS or click on a Form Set you have set up
for Listing Loops. To use Form Set, simply click on Form Set you have created in your list of
Documents. If you are not using a Form Set, then click on NALMLS and choose forms needed in
your Loop. Click on Select All or you can click on each individual form.

17 | P a g e
26. Click Add Documents
27. Click on the first form name under your Documents and assign role of People in this transaction,
if you have not already done this when adding People.
28. Click Assign button.
29. Fill out all information on your form/s.

18 | P a g e
30. Explanation of tool bar above each form when filling in blank fields:
While filling out forms, you can assign roles to parties within Loop, but if you have assigned roles
when adding People this will not be necessary.
31. Once a form is completed click on Save: You will be prompted to share document after each
one. If you have only one this works fine, but if you have several, answer no and then Share all
together.
One Form, go ahead and share. More than one say No.
b
o
l
d
I
t
a
l
i
c
t
e
x
t
c
o
l
o
r
h
i
g
h
l
i
g
h
t
a
l
i
g
n
l
e
f
t
a
l
i
g
n
c
t
r
a
l
i
g
n
r
t
a
d
d
c
l
a
u
s
e
f
i
e
l
d
h
i
s
t
t
r
a
n
s
p
a
r
e
n
c
y

19 | P a g e
32. Complete this process until all forms are filled out.
33. Select all forms and click on the Share button.
34. Following screen opens after clicking on Share:
35. You have option to type a personal message to go with your shared forms:

20 | P a g e
36. What does the email look like going out to your seller?
After clicking on View Document this is what buyer sees:
This button is
handy to move
to fields to be
signed.
Fields to be signed
are colored coded.
When all fields
are signed,
Seller clicks on
I’m done.

21 | P a g e
When document is signed agent gets an email:
Continue to share as this transaction continues.
How to Print a Blank Form:
1. Click on Templates (icon second from right) on blue DotLoop Bar.
2. From DOCUMENTS, click on NALMLS (North Alabama Mul….).
3. Enter HAAR in the search box to display only HAAR forms.
4. Check boxes to left of Form Name you want to print.
Then if you have several forms, click on down arrow as shown in screen capture.
As Seller initials/signs by clicking in
box, he can click on Jump to the
next field.
Examples of what signatures look
like.

22 | P a g e
If only one form you can use the circle with check mark at the end of the form
name line.
Click download and open at the bottom of your screen.
5. Click on Printer icon on Adobe Reader.
