
Guardian warm roof conversion system
Installation Guide

2
www.guardianroof.co.uk

3
www.guardianroof.co.uk
Conservatory walls consist largely of glazed elements including windows and doors that
may include structural mullions or may be strengthened with internal structural
reinforcement inside hollow sections. Modern conservatories are likely to be marked in
accordance with BS EN 14351-1:2006 + A1:2010.
The Guardian Roof System is designed to be of similar weight to a glass roof of equal
size, so it follows that the existing glazed walls, if correctly specified for a the original
glazed roof, should be capable of supporting the replacement Guardian Roof System.
It is the sole responsibility of the installer to establish the structural suitability of the
existing conservatory wall system, to establish the location of any structural or
reinforcing elements, and to ensure that the Guardian Roof System is fixed to the existing
structural elements so that gravity and wind loads are transferred safely through the
existing walls to the conservatory foundations.
Timber battens72 mm high
performance insulated
plasterboard
Choice of tile finishes
Membrane
Rafter
40 mm high performance insulation
Guardian warm roof construction
Exterior grade plywood
25 mm high performance
insulation (timber batten
cut back for clarity)
The following guide has been created to assist in the fabrication and installation of the
Guardian Roof. Please note that each roof is individual and will be fabricated to suit
various shapes and sizes.
Each roof supplied will be accompanied by a roof layout plan and this guide.
Your fabricator will be available to provide installation technical support.
Roof Layout Plan
Please refer to the roof layout plan prior to commencing installation. It is very important
that the roof fits the windows layouts and that all the windows are fully reinforced. All
components are numbered to match the roof layout plan for ease of installation.
Tools required
Cordless drill, angle grinder, silicone gun, tape measure, hand saw, 10mm spanner
and 10mm nut spanner, 10mm ratchet, snips, staple gun, screwdriver, foam gun and
expanding foam.

Step 1: Box gutter
Step 2: Ringbeam
Fix box gutter to wall and seal using suitable
sealant. Place ringbeam on the side lip of the
box gutter and fix in place by screwing up
through the lip with a 25mm window screw.
Ensure not to puncture the box gutter itself.
For the best internal finish use insulated
plasterboard under box gutter using timber
battens.
Cleats to be inserted internally into the
ringbeam and fixed using 25mm stainless steel
window screws.
Ringbeam and packer should be installed
flush with inside of window frame.
Use 100mm stainless steel window screws
at 600mm centres.
Remove existing glazing and fix through packer
and eaves beam.
Cleats to be fixed at 32mm from the outside
angle of the ringbeam on die lines.
2a
1a
2b
4
www.guardianroof.co.uk

5
www.guardianroof.co.uk
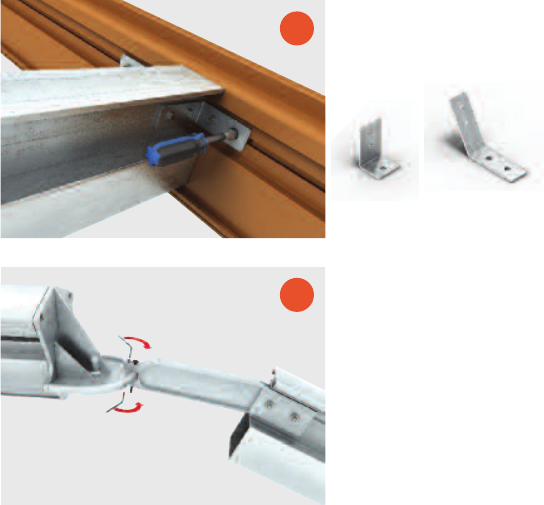
Step 3: Assemble rafters
Gable rafters to be bolted to house wall and
secured at 300mm centres using suitable
fixings determined by the wall construction.
Ensure Stainless Steel Cleats provided are
used when fixing to the house wall at
the top and bottom of wall rafter.
Stainless steel cleats must also
be used at gable front end.
Edwardian conservatory Victorian conservatory option
3a
3b
Fix rafter to ringbeam using pre-installed cleats
and bolts provided (loosely tighten at this stage).
Edwardian stainless
steel cleat
Victorian stainless
steel cleat

6
www.guardianroof.co.uk
Using location pin provided to temporarily fix
arm to spider.
Temporary fix remaining rafters including any
pre-engineered window framing (if required).
3d
3c
Step 3: Assemble rafters
7
www.guardianroof.co.uk
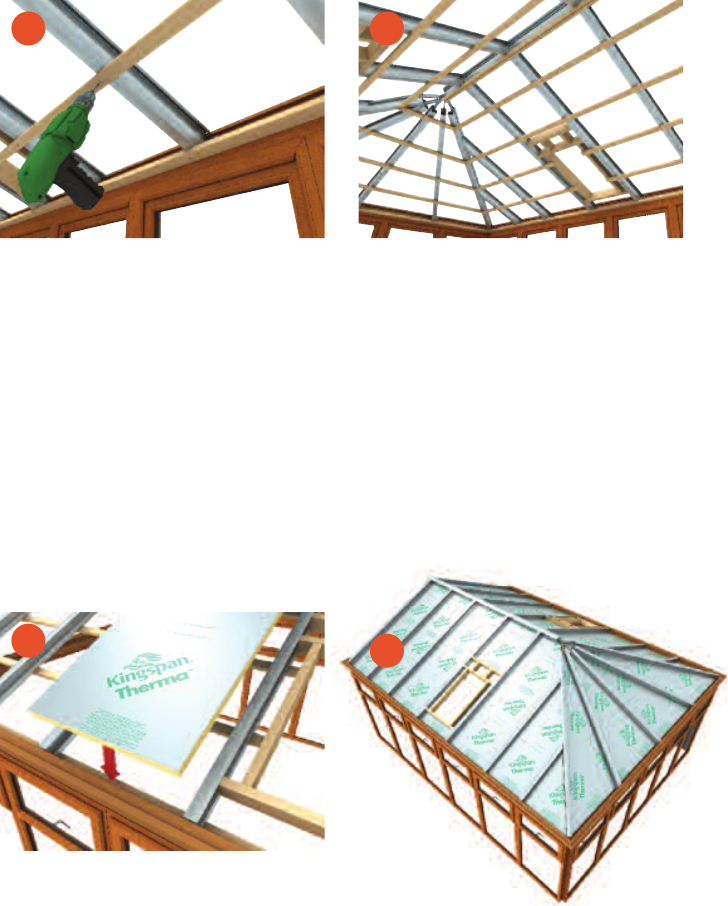
Ensure all roof sections are aligned to the pre-
engineered positions and tighten into place.
For edwardian/victorian hip cleats tighten bolts
on rafters first before tightening to ringbeam.
Tighten pre-installed grub screws using alan
key. Please ensure grub screws are not
overtightened.
3e
3f
Edwardian
aluminium cleat
Victorian
aluminium cleat
8
www.guardianroof.co.uk
Step 4: Timber battens
Fit 25mm timber battens at maximum 400mm
centres to underneath of rafters. Fixings are to
be 50mm window screws.
4a
Batten out entire roof structure. Batten over
window opening and cut back to suit.
4b
Step 5: Rafter Insulation
From outside insert 40mm insulation board
between rafters.
5a
Seal all gaps with
expanding foam.
5b

9
www.guardianroof.co.uk
Step 6:
Exterior
plywood
& window
frame
Install roof window frame into pre-formed
opening within rafters.
6d
Fix frame to timber ply through brackets using
screws supplied within roof window pack.
6e
Timber out roof as per schedule. Timber sheets
to be fixed at 200mm centres using 20/25mm
self drilling screws.
6b
Fix brackets to the V notch on roof window
frame prior to installation.
6c
Fix timber sheets to rafters.
6a

10
www.guardianroof.co.uk
Step 7: Membrane & roof tile
Cover with vapour permeable underlay with a
vapour resistance of less than 0.25MNs/gram as
required by BS5250: 2002. Overlap all joints of
underlay by 150mm and staple down to timber
sheets. Over run ringbeams by 100mm and up
outer wall by 50mm.
Torn underlay up window frame and staple to
topside.
Fix watercourse to outer wall.
Starting bottom right corner of the roof with a
full roof tile, fix to lip of ringbeam and into the
corner of the watercourse (allow 4 x 16mm
screw fixings per tile).
7b
All tiling is from right
to left. Complete one
row at a time.
For the second course always
start with half a tile.
7c
7a

11
www.guardianroof.co.uk
Dependant on height of roof window 1-3
tiles should be fitted below window before
bottom flashing is installed.
7d
Roof window flashing to be installed to roof
window pack instructions.
7e

12
www.guardianroof.co.uk
Step 8: Standard Ridge & end cap
Dress over hip, cut and bend
to shape at intersections
Optional small ridge
Optional end capping
Apply foam tape to underneath the 25mm
treated timber batten. Using the profile ridge
and hip for position fit timber battens and
screw into place.
8a
Follow instructions 8a and 8b for end capping.
Fix rafter cap over delta ridge profile at verge.
In cases of stretched Victorians and off angles
on ridges, a smaller ridge is available to allow
for angle adjustment. Paint cut edges with
touch-up kit.
8c
Position delta ridge over batten and fix
side on. Use touch up kit provided to hide
screw heads.
8b
3-way capping 5-way capping Rafter cap

13
www.guardianroof.co.uk
Step 9: Internal Insulation
Step 10:
Gutter adaptor
Fit box gutter adaptor into the box gutter and
seal using suitable wet sealant. Seal between
ringbeam/extension and window line with
appropriate sealer. Also seal against house wall.
25mm PIR Insulation to be used under Box
Gutter for insulating value and to avoid the
risk of condensation.
Install 25mm insulation between battens and
apply expanding foam to the spider assembly.
Please ensure elecrical wiring is in place before
25mm PIR is positioned.
9a
10a
Step 11: Gutter
Twist fit gutter brackets to ringbeam prior to
installing gutter and downpipe.
11a
Cut and mitre 72mm insulated plasterboard, fix
into position, tape all joints and seal against
window frame.
9b

14
www.guardianroof.co.uk
Step 12: Valley Gutter
Place valley tray on top of breather membrane
within the valley itself.
Fix flaps either side directly into membrane
and ply.
Tile into valley cutting at angle of roof.
Seal where necessary.
12a
Optional mansard ceiling
Use appropriate low voltage down
lighters with cowl.

15
www.guardianroof.co.uk
Notes:

call FREE: 0800 0665832
email: info@guardianroof.co.uk
www.guardianroof.co.uk
Important Guardian Roof have taken great care to ensure that the information in this installation guide is accurate and is supplied in good faith. However Guardian Roof issues
this guide without warranty or guarantee of any kind and accepts no responsibility as to how the information is interpreted. Health and safety regulations are the sole responsibility
of the installer and totally unconnected to Guardian Roof. The Guardian Roof is continually evolving and changes to product and specification can change at any time.
Updates to this guide will be posted on our website immediately and all customers will be informed by electronic mail. The website is www.guardianroof.co.uk
