1
Contents
Introduction .................................................................................................................................................. 2
A Primer on VBA ............................................................................................................................................ 2
Subroutines, Programs, and Macros ......................................................................................................... 3
Object Models ............................................................................................................................................... 4
Using the Visual Basic Editor (VBE) ............................................................................................................... 6
Introduction to the @RISK XDK .................................................................................................................... 7
Setting Library References ............................................................................................................................ 9
Writing Your First @RISK Program .............................................................................................................. 10
@RISK Automation Guidelines.................................................................................................................... 11
Getting Started: the “Root” Object ......................................................................................................... 11
Running a Simulation .............................................................................................................................. 12
Changing Simulation Settings ................................................................................................................. 12
Displaying Numeric Results of a Simulation ........................................................................................... 12
Displaying Graphical Results of a Simulation .......................................................................................... 13
Creating Reports ..................................................................................................................................... 22
Listing Inputs and Outputs, and Graphing Input Distributions ............................................................... 22
Fitting Distributions to Data .................................................................................................................... 23
Creating Filters ........................................................................................................................................ 26
Goal Seek Analysis................................................................................................................................... 28
Advanced Sensitivity Analysis ................................................................................................................. 29
Stress Analysis ......................................................................................................................................... 30
Automating RISKOptimizer ..................................................................................................................... 31
Some General VBA Tips ............................................................................................................................... 33
File Format (xlsm) ................................................................................................................................... 33
Running a Macro ..................................................................................................................................... 34
ThisWorkbook ......................................................................................................................................... 34
Worksheet Code Names ......................................................................................................................... 34
With Blocks ............................................................................................................................................. 35
Intellisense .............................................................................................................................................. 35
Object Browser ....................................................................................................................................... 36
Constants and Enumerations .................................................................................................................. 37

2
Appendix ..................................................................................................................................................... 39
Updating @RISK 6.x or 7.x Automation Code to Run in @RISK 8.x ........................................................ 39
Updating RISKOptimizer 6.x or 7.x Automation Code to Run in @RISK 8.x ............................................ 45
Demand-Loading @RISK ......................................................................................................................... 47
Automating @RISK from .NET ................................................................................................................. 48
Automating RISKOptimizer from .NET .................................................................................................... 49
Introduction
The purpose of this document is to introduce the @RISK Excel Developer Kit (XDK) and explain how you
can use VBA to automate @RISK.
1
The term “automate” simply means that you write a program in VBA
to make @RISK do what you normally do through the @RISK user interface. For example, suppose you
often need to modify a financial planning simulation model. Each time you do this, you will change some
inputs distributions or their parameters, run one or more simulations, request various reports, and
create useful graphs. This requires a considerable number of steps—the same steps—each time you do
it. Wouldn’t it be nice to click a button and have all of these steps magically happen? This is exactly the
type of thing you will learn how to do with the @RISK XDK. In fact, it is surprisingly easy.
A Primer on VBA
2
As stated above, VBA is the programming language for Excel. It is also the programming language for
other applications in Microsoft Office: Word, PowerPoint, and Outlook, for example. It is even the
programming language for some non-Microsoft products. To understand how this works, it helps to
separate the name VBA into two parts: “Visual Basic” and “for Applications.” You can think of Visual
Basic, or VB, as the “backbone” programming language. It contains programming elements that all
programmers use, regardless of programming language or the type of development task. For example, it
contains subroutines, variable types, logical constructs such as If-Then-Else, loops for repetitive tasks,
arrays for storing lists, and much more. Actually, there are non-VBA versions of VB. For example, you
might be familiar with VB.NET. All of these versions of VB, including VBA, are extremely popular because
VB is fairly easy to learn and quite powerful. In any case, to learn VBA for Excel or @RISK, you must first
learn the backbone VB language.
The following is a typical segment of VB code. Even if you know nothing about programming, you will
probably have little trouble understanding what this code accomplishes. Again, this is the attraction of
VB. It is relatively easy to learn and understand. Note the lines that begin with an apostrophe. These
lines are comments. They are ignored by VBA when the program runs, but they are very useful for
documentation.
1
You must have the Professional or Industrial Edition of @RISK to run any automation code. The Standard Edition of
@RISK does not support automation.
2
If you are already familiar with VBA for Excel, you can skip to the section “Introduction to the @RISK XDK” on
page 5.
3
Sub Invoice()
' Declare variables.
Dim nProducts As Integer, i As Integer
Dim total As Currency, subTotal As Currency
Dim nPurchased As Variant, unitPrice As Variant
' Define constants for this business.
Const taxRate = 0.06
Const cutoff1 = 50, cutoff2 = 100
Const discount1 = 0.05, discount2 = 0.1
' Enter information about this order
nProducts = 4
nPurchased = Array(5, 2, 1, 6)
unitPrice = Array(20, 10, 50, 30)
total = 0
' Loop over all products purchased.
For i = 1 To nProducts
' Calculate revenue, including possible discount, for this product.
subTotal = nPurchased(i) * unitPrice(i)
If subTotal >= cutoff2 Then
subTotal = (1 - discount2) * subTotal
ElseIf subTotal >= cutoff1 Then
subTotal = (1 - discount1) * subTotal
End If
' Add to total for this order.
total = total + subTotal
Next
' Add tax.
total = (1 + taxRate) * total
' Display result.
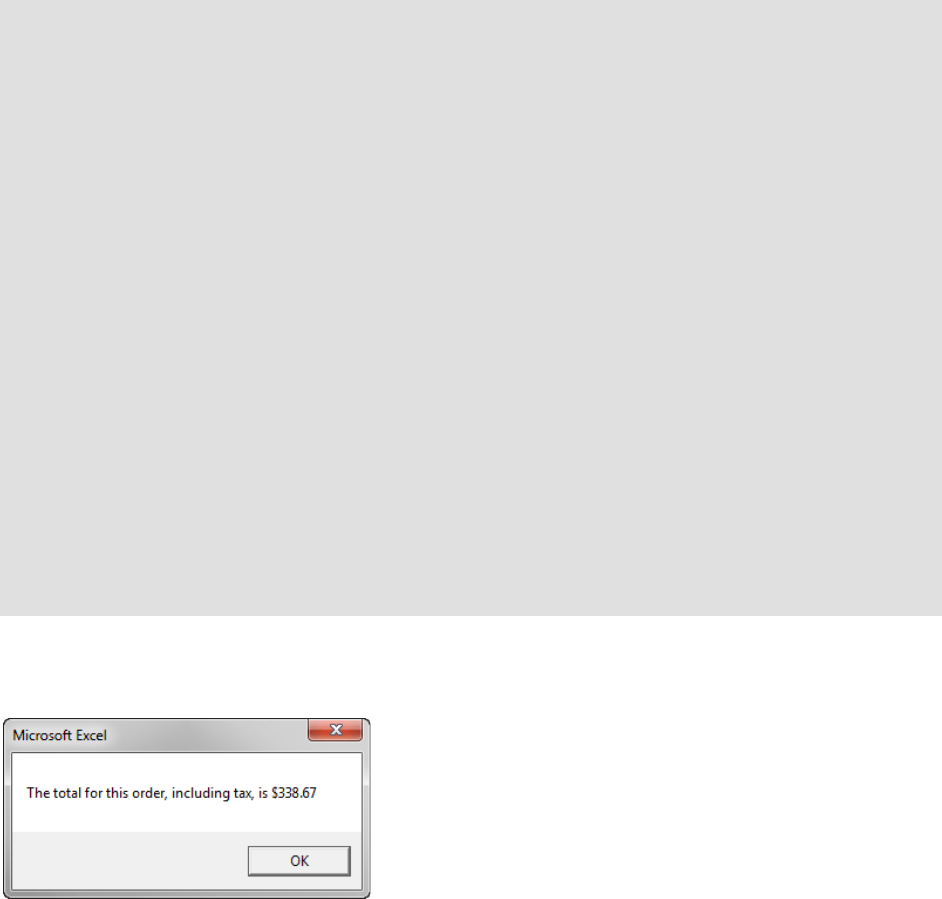
MsgBox "The total for this order, including tax, is " & Format(total, "$#,#00.00")
End Sub
If you run this code in Excel, you will see the display (a message box) in Figure 1.
Figure 1 Result of VBA Program
Subroutines, Programs, and Macros
Before proceeding, it is useful to discuss three terms you often hear: subroutine, program, and macro. A
subroutine is any section of code that begins with the keyword Sub and ends with the keyword End Sub.
Its purpose is typically to perform one specific task. A program is a collection of one or more related
subroutines that achieves an overall goal. In practice, long programs are often broken up into smaller
subroutines for enhanced readability and easier debugging. A macro is essentially the same as a
program, and it is the term favored by many Excel programmers. However, if your programs are
relatively short, consisting of a single subroutine, the terms subroutine, program, and macro are
practically synonymous and are often used interchangeably.
4
Object Models
The above Invoice subroutine can be run in Excel, but it really has nothing to do with Excel. There are no
references to ranges, formulas, worksheets, charts, or other items you use in Excel. The code is pure VB.
But now we come to the “for Applications” part of VBA. All of the familiar items in Excel, which will now
be called objects, are part of an object model that Excel provides to programmers through VBA. This
means that you as a programmer can reference these objects in your VBA code. In short, this object
model allows you to “make things happen” through VBA code, rather than through the usual Excel user
interface. In this way, you can automate Excel with VBA.
So what does an object model, or Excel’s object model in particular, look like? At the top level, it is
simply a list of things—objects—that the software contains. Excel’s object model is quite large because
everything you see in Excel is an object. One of the most common objects is the Range object: any range
of cells (including a single cell). But there are over a hundred more objects, including the Worksheet
object, the Chart object, the PivotTable object, and so on. There are also singular and plural objects. For
example, there is the plural Worksheets object, the collection of all worksheets in an Excel workbook,
and there is the singular Worksheet object, a particular worksheet in the workbook.
Figure 2 displays a partial list of the objects in Excel, plural (yellow) and singular (blue).

5
Figure 2 Excel Object Model
However, there is much more to an object model than the list of its objects. First, there is a hierarchy
among many objects. Basically, this means that you often need to “drill down” to get to the object you
want. A good example is a Range object, such as cell B3. The idea is that a range is contained in a
worksheet, which is contained in a workbook. So the hierarchy is Workbook→Worksheet→Range, and
the following line of code is typical:
ActiveWorkbook.Worksheets(“Costs”).Range(“B3”).Value = 10
You read this as: Starting in the active workbook, go to cell B3 of the worksheet named Costs, and enter
the value 10. This concept of hierarchy is crucial to learning VBA for Excel or @RISK.
6
Second, most objects have properties and methods.
(Methods are also called functions.) If you think of
objects as “nouns,” then you can think of properties as “adjectives” and methods as “verbs.” Properties
describe an object, and methods indicate what you can do to, or with, an object. For example, a Range
object has a Value property, which was used in the above line of code. Similarly, a Font object has a
Color property, a Size property, and many others. A typical object with methods is the Worksheet
object. It has a Delete method, a Move method, and a few others.
Although less common, many objects also have events that they respond to. A good example is the
Open event of a Workbook object. This event occurs—it “fires”—when you open the workbook. VBA
allows you to write event handlers for the event. This is code that is executed when the event fires.
As you begin VBA programming for Excel, you gradually learn the most common objects, the hierarchies
between them, their most common properties, methods, and events, and the syntax for using these in
VBA code. It takes practice and perseverance, but if you want to make Excel “sing and dance” with the
click of a button, this is time well spent.
By now, you should be starting to see the big VBA picture. Just as the Excel application can be
automated through its object model, other applications can be automated through their object models.
Microsoft Word is a typical example. Its objects are not the same as Excel’s. Instead of Worksheet,
Range, and other typical Excel objects, Word has Sentence, Paragraph, and other objects that are useful
in word processing, and these objects have their own hierarchies, properties, methods, and events.
Fortunately, if you already know VBA for Excel and you want to learn VBA for Word, all you need to
learn is the object model for Word. The backbone VB language is exactly the same in both applications.
Admittedly, it is not a trivial task to learn a new application’s object model, but knowing VB for one
application, like Excel, provides a big head start for learning VB for another application, like Word.
Using the Visual Basic Editor (VBE)
You will be doing all of your programming in the Visual Basic Editor (VBE). The easiest way is to open
VBE from Excel is to press Alt+F11. Alternatively, if the Excel Developer tab is visible, you can click the
Visual Basic button on its ribbon. The VBE window appears in Figure 3. In particular, the Project pane on
the left shows a list of all open workbooks. (To get back to the Excel window, you can click the Excel icon
on the toolbar below the menu bar.)

7
Figure 3 Visual Basic Editor
As you can see in the figure, the selected file contains a module. You will write all of your code in
modules. (Actually, there are exceptions to this, but they aren’t discussed here.) By default, a file
doesn’t contain a module, but you can insert one through the Insert menu. Then you will see a big white
space on the right where you can start typing your code. Some of the code for this particular module
appears in the figure.
Introduction to the @RISK XDK
Like Excel and Word, @RISK has its own object model, part of which is shown in Figure 4. It can be used
to change application or simulation settings, run simulations, generate summary statistics or graph of
inputs or outputs, create reports, and more. The details of these possibilities are discussed in some
detail later in this document and in the accompanying @RISK XDK example files.
Two questions probably come to mind. Do you really need to learn how to automate @RISK with VBA,
and, if you do, how do you learn the language?
There are at least two reasons why you might want to automate @RISK with VBA. First, it lets you
automate tasks that you perform repeatedly. For example, suppose you need to download the most
current data from a website, use @RISK to fit a distribution to the data, run an @RISK simulation, and
finally create some standard @RISK reports. If you do this once or twice, it is probably not worth the
effort to write a VBA program to automate the process. However, if you do this repeatedly, a VBA
program can replace many mouse clicks with a single click. Indeed, this is why VBA for Excel is so popular
among users—it lets them automate repetitive tasks with the click of a button. The same motivation
certainly applies to repetitive tasks in @RISK.

8
Figure 4 @RISK Object Model
Second, suppose you are developing models for colleagues or clients who have little experience with
@RISK. Instead of teaching them how the @RISK user interface works, it might be easier to develop a
VBA application that allows them to simply click a button, or possibly click a menu item from your own
customized menu, to make things happen. These “things” could include (1) entering @RISK distributions
into particular cells, (2) designating @RISK outputs, (3) changing @RISK settings, (4) running the
simulation, (5) displaying selected graphs and/or summary statistics, and other @RISK tasks.
Assuming you think VBA for @RISK is for you, how do you learn the language? First, you need some
facility in VBA for Excel. As discussed earlier, this requires you to learn the fundamentals of the VB
“backbone” language and the basics of the Excel object model. There are a number of reference books
on VBA for Excel, as well as Excel’s own online help. One recommendation is the first 11 chapters of VBA
for Modelers by Albright. This book provides concise explanations and plenty of example code to get you
up to speed in both the VB language and the Excel object model.
Once you are familiar with VBA for Excel, you have at least four options—which are not mutually
exclusive—for extending your knowledge to VBA for @RISK.
1. You can continue reading this document. It provides an overview of what can be done, and it
provides sample code for how to do it. Alternatively, you can watch the first two introductory videos
9
that cover much of the same material. They are available from the Developer Kit (XDK) item under
@RISK Help.
2. You can do what all good programmers do—mimic code written by others. Examples of programs
written for @RISK are provided in a number of @RISK XDK example files. (They can be found from
Developer Kit (XDK) item under @RISK Help.) Once you see how something is done, such as
changing an @RISK setting or creating an @RISK graph, you will probably have little difficulty
adapting the code for your own use.
3. You can open one of the Reference documents from the Developer Kit (XDK) item under @RISK Help
and start browsing. These documents are quite long, and no sane person would ever read them
from beginning to end, but they give you a quick sense of the @RISK object model (or the
RISKOptimizer object model), and they often enable you to find the specific details you need for
your program.
4. You can open the Object Browser that is part of the Visual Basic Editor. This is particularly useful if
you are in the midst of writing a program and need information on one specific detail. The Object
Browser is discussed later in this document.
By the way, if you are familiar with VBA for Excel, you might want to start by recording macros for
@RISK, just as you can do for Excel. Unfortunately, this doesn’t work. If you turn on the recorder and
start clicking @RISK buttons, you will get some recorded code, but it will be entirely irrelevant. To
automate @RISK, you have to write the code.
Setting Library References
Before you can access the @RISK XDK with VBA code, you must first set references to two @RISK
libraries (from References in the Tools menu of the Visual Basic Editor). These are the RiskXLA and
Palisade_Risk_XDK8 references, illustrated in Figure 5. (The former references the Risk.xla add-in file.
The latter contains the @RISK Object Model.) This should be the first step before writing any VBA
macros to automate @RISK. If you plan to automate RISKOptimizer, you will need to check Palisade
RISKOptimizer 8.x for Excel Developer Kit reference too; that reference is also listed in the screen shot.

10
Figure 5 @RISK References
Writing Your First @RISK Program
This section won’t teach you a lot about VBA for @RISK, but it will give you the thrill of developing a
simple @RISK application with VBA—and getting it to work! Here are the steps:
1. Launch @RISK. (This document assumes you are using version 8.x.)
2. Select the Tutorial (before Code Added) item from the Automating @RISK (XDK) menu under
the Resources ribbon item and save it to a folder on your hard drive. This file contains a simple
@RISK model with several revenue and cost inputs and a single NPV output.
3. Open the Visual Basic Editor (VBE) with left Alt+F11.
4. Make sure the correct item is selected in the Project pane. Then from the VBE’s Insert menu,
select Module.
5. From the VBE’s Tools menu, select References, check the two @RISK items shown in Figure 5,
RiskXLA and Palisade_Risk_XDK8, and click OK.
6. Copy the following code and paste it into the Module window.
3
Option Explicit
Sub FirstProgram()
' Obtain object representing the worksheet where we'll place the results.
Dim modelWorksheet As Worksheet
Set modelWorksheet = Worksheets("Model")
3
The top line, Option Explicit, forces you to declare all variables you use in your program, a highly recommended
programming practice. To make this line appear automatically at the top of all your modules, select Options from
the Tools menu in the Visual Basic Editor and check Require Variable Declaration in the Editor tab.

11
' Change some simulation settings
With Risk.Simulation.Settings
.NumSimulations = 1
.NumIterations = 5000
.AutomaticResultsDisplay = RiskAutomaticResultsDisplay_NoAutomaticResults
End With
' Run simulation
Risk.Simulation.Start
' Display results
With Risk.Simulation.Results
' Summary statistics of output
With .GetSimulatedOutput("NPV")
modelWorksheet.Range("C19").Value = .Mean
modelWorksheet.Range("C20").Value = .StdDeviation
modelWorksheet.Range("C21").Value = .PToX(0.05)
modelWorksheet.Range("C22").Value = .PToX(0.95)
End With
' Use cell E19 to define the location of the graph.
Dim left As Long
Dim top As Long
left = modelWorksheet.Range("E19").left
top = modelWorksheet.Range("E19").top
' Graph of output distribution
With .GraphDistribution("NPV")
.ImageToWorksheet modelWorksheet, RiskImageFormat_BMP, left, top, 300, 250
End With
End With
End Sub
7. From the VBE’s Run menu, select Run Sub/Userform (or press the F5 key). In seconds, your
active Model worksheet should fill up: the @RISK simulation will run and selected numerical and
graphical results will appear. Now you see what automation is all about!
This program should be fairly simple to read, even if you know very little about VBA. The results of this
exercise should be just like in the workbook that can be opened using the Tutorial (after Code Added)
menu item. The next “Guidelines” section explains many of the details, and the following “VBA Tips”
section provides some general tips on using VBA effectively.
@RISK Automation Guidelines
This section provides some guidelines for automating @RISK with VBA code. The guidelines in this
section are purposely kept brief and are intended only to get you started and alert you to a few
technical issues. To see complete applications of @RISK automation, you should look at the examples,
available in the Automating @RISK XDK menu under the Resources ribbon item. Also, you can always
visit the @RISK XDK Reference documents or the Object Browser in the Visual Basic Editor.
Getting Started: the “Root” Object
The “root” object that everything starts from is the Risk object, a reference to @RISK. All other @RISK
objects are down the hierarchy from it. For example, you will see Risk.Model, Risk.Simulation, and
others. Many of these will be discussed shortly.

12
Technical Note: Risk Function versus AtRisk Object
There is a subtle issue here you should be aware of. As it is used here, Risk is a function in the RiskXLA
library that returns an AtRisk object from the object library. To put it another way, if you did not
reference the RiskXLA library and wrote a typical line such as the following, Risk wouldn’t be recognized.
Risk.Simulation.Settings.NumIterations = 1000
However, if you do reference RiskXLA, as you should, you can simply write Risk, followed by any of its
properties or methods, and it will work fine. (In particular, you do not need to declare Risk as an object
variable.)
Running a Simulation
Risk.Simulation refers to the simulation model currently open. You can use it to run a simulation with a
single line of code:
Risk.Simulation.Start
Technical Note: What Is a Simulation?
It is important to realize what a “simulation” refers to, either in VBA or in the @RISK user interface itself.
It refers to everything that is currently open. For example, if you have logically distinct simulations in
multiple worksheets of a workbook, Risk.Simulation refers to all of them. Or if you have multiple
workbooks open, each with its own logically distinct simulation, Risk.Simulation again refers to all of
them. There is no way to refer to one specific simulation among many, so be careful!
Changing Simulation Settings
You get to the simulation settings with Risk.Simulation.Settings. Then you can have code such as the
following that changes a few settings. Of course, this code should come before the line that runs the
simulation.
With Risk.Simulation.Settings
.NumSimulations = 5
.NumIterations = 5000
.AutomaticResultsDisplay = RiskAutomaticResultsDisplay_NoAutomaticResults
End With
Risk.RefreshUI ‘ this line ensures that the Excel ribbon will update to show the changes
Displaying Numeric Results of a Simulation
Once you run a simulation, you can get to the results with Risk.Simulation.Results. This can be followed
by two functions, GetSimulatedInput and GetSimulatedOutput, which enable you to get summary
statistics such as the mean, the standard deviation, and percentiles of an input or output. For example,
the following line enters the mean of the Profit output in cell B20.
Range(“B20”).Value = Risk.Simulation.Results.GetSimulatedOutput(“Profit”).Mean
Alternatively, assuming multiple simulations are run, the following line enters the 5
th
percentile of the
Q1_Cost input for simulation #3 in cell B15.
Range(“B15”).Value = Risk.Simulation.Results.GetSimulatedInput(“Q1_Cost”,3).PToX(0.05)

13
The arguments of GetSimulatedOutput specify the output you want. The first argument is either the
name of the output, implicitly or explicitly defined in the RiskOutput function, or a cell reference. (It can
also be an integer, such as 3, meaning the third output, but this isn’t usually a good practice unless you
are sure of the ordering of the outputs.) An optional second argument when there are multiple
simulations is the index of the simulation. The arguments of GetSimulatedInput are similar, except that
if a name is used for the first argument, it must be the name specified in the RiskName property
function. For example, if the formula in an input cell is =RiskNormal(1000,100,RiskName(“Q1_Cost”)),
then the name “Q1_Cost” can be referenced.
Note that if you ask for the results of a simulation that has not yet been run, you will get an error. You
can check for this with the following line:
If Not Risk.Simulation.Results.Exist Then Risk.Simulation.Start
Alternatively, if this condition is true (no simulation results exist), you could display an error message,
informing the user that a simulation needs to be run, and then quit prematurely. The following code
illustrates what this might look like.
Sub RunWithErrorCheck()
If Not Risk.Simulation.Results.Exist Then
MsgBox "You need to run a simulation first.", vbInformation
Exit Sub
Else
Range("B20").Value = Risk.Simulation.Results.GetSimulatedOutput("Profit").Mean
End If
End Sub
Displaying Graphical Results of a Simulation
You can use the RiskGraph object to create a variety of graphs. Starting with Risk.Simulation.Results,
you can use a number of functions that return a RiskGraph object: GraphDistribution, GraphScatter,
GraphSensitivityTornado, etc. Because these functions return different types of graphs, their arguments
vary slightly, as will be explained shortly. However, you typically use the following three steps with all of
them.
1. Set a reference to a graph.
Dim rGraph As RiskGraph
Set rGraph = Risk.Simulation.Results.GraphDistribution(“Profit”)
2. Change one or more properties of the graph.
rGraph.TitleMainText = “Distribution of Profit”
3. Send the image of the graph to a worksheet, where the last four arguments determine the size and
position of the graph. (You can also send the image to the clipboard or to a file with the
ImageToClipboard or ImageToFile functions.)
rGraph.ImageToWorksheet ActiveSheet, RiskImageFormat_BMP, 100, 100, 300, 250
Equivalently, you can do all of these steps with the following With block, without requiring the rGraph
variable. Note that the first line creates an implicit RiskGraph object, so that you can refer to its
TitleMainText property and its ImageToWorksheet method in the next two lines.
With Risk.Simulation.Results.GraphDistribution(“Profit”)
.TitleMainText = “Distribution of Profit”
.ImageToWorksheet ActiveSheet, RiskImageFormat_BMP, 100, 100, 300, 250
End With

14
Should you use explicit object variables such as rGraph? This is a matter of personal preference, and it
sometimes depends on the situation. However, once you get used to programming with object models,
you will probably prefer to omit such variables whenever possible.
The following sections provide more information about the graph types. Of course, you can find detailed
information in online help or the Object Browser. Keep in mind that the graphs shown in the figures are
“plain vanilla” versions, which often suffice. However, you can change the many properties of a
RiskGraph object to fine-tune the graph as you like: the titles, the axes, the plot area color, and so on.
GraphDistribution Function
The GraphDistribution function is usually used to graph the distribution of an output, although it can
also be used to graph the distribution of an input. This function takes an output, an input, or an array of
inputs and/or outputs as its first argument and an optional second argument that can be a simulation
index or an array of simulation indexes.
4
Here is a simple example. The result appears in Figure 6.
Sub GraphDistribution_Histogram()
Risk.Simulation.Start
With Risk.Simulation.Results.GraphDistribution("Profit")
.ImageToWorksheet ActiveSheet, RiskImageFormat_BMP, 10, 300, 300, 250
End With
End Sub
By default, this code provides a histogram, but you can use the DistributionDisplayFormat property to
change the display type. For example, the following code changes the display type to a cumulative
ascending graph, as shown in Figure 7.
Sub GraphDistribution_CumulativeAscending()
Risk.Simulation.Start
With Risk.Simulation.Results.GraphDistribution("Profit")
.DistributionDisplayFormat = RiskDistributionDisplayFormat_CumulativeAscending
.ImageToWorksheet ActiveSheet, RiskImageFormat_BMP, 10, 300, 300, 250
End With
End Sub
4
Actually, if you are graphing an input, there is an optional third Boolean argument, indicating whether you want
to suppress an overlay of the theoretical distribution on the graph. It is False by default.

15
Figure 6 Graph of Profit Distribution
Figure 7 Cumulative Ascending Graph of Profit Distribution
The following code requests a graph of a Profit output, overlaid with a Q1_Cost input, for simulation #2.
The last argument, True, indicates that the theoretical distribution of the input should be suppressed.
The result is shown in Figure 8.
Sub GraphDistribution_HistogramOverlay1()
Risk.Simulation.Start
With Risk.Simulation.Results.GraphDistribution(Array("Profit", "Q1_Cost"), 2, True)
.ImageToWorksheet ActiveSheet, RiskImageFormat_BMP, 10, 300, 300, 250
End With
End Sub
As another example, the following code requests a graph of Profit for simulation #1, overlaid with a
similar graph for simulation #3, as shown in Figure 9.

16
Sub GraphDistribution_HistogramOverlay2()
Risk.Simulation.Start
With Risk.Simulation.Results.GraphDistribution("Profit", Array(1, 3))
.ImageToWorksheet ActiveSheet, RiskImageFormat_BMP, 10, 300, 300, 250
End With
End Sub
Figure 8 Graph of Profit Distribution with Q1_Cost Overlay for Simulation #2
Figure 9 Graph of Profit Distribution for Simulations #1 and #3

17
GraphSummaryBoxPlot/GraphSummaryTrend Functions
The GraphSummaryBoxPlot/GraphSummaryTrend functions are usually used to graph a time series of
outputs, such as monthly cash flows. Their arguments include a reference to the output range and an
optional simulation index. This last argument can be an array of simulation indexes, in which case the
curves are shown side-by-side. The following code generates the summary trend graph in Figure 10 for
the cash flows from simulation #3.
Sub GraphSummary_Trend()
Risk.Simulation.Start
With Risk.Simulation.Results.GraphSummaryTrend(Range("Cash_Flow"), 3)
.ImageToWorksheet ActiveSheet, RiskImageFormat_BMP, 10, 300, 300, 250
End With
End Sub
Similarly, the following code generates the summary box plot in Figure 11.
Sub GraphSummary_BoxPlot()
Risk.Simulation.Start
With Risk.Simulation.Results.GraphSummaryBoxPlot(Range("Cash_Flow"), 3)
.ImageToWorksheet ActiveSheet, RiskImageFormat_PNG, 10, 300, 300, 250
End With
End Sub
Figure 10 Summary Trend Graph of Cash Flows for Simulation #3

18
Figure 11 Summary Box Plot of Cash Flows for Simulation #3
GraphScatter Function
The GraphScatter function returns a scatter graph. It requires at least two arguments, the first for the X-
axis and the second for the Y-axis, and an optional third argument equal to a single simulation index (an
array isn’t allowed). Each of the first two arguments can be an output, an input, or an array of outputs
and/or inputs. (Note that if you try to create a scatter graph of a variable versus itself, you will get an
empty graph.) Here is a simple example of the Profit output versus the Q1_Cost input. It results in the
graph in Figure 12.
Sub GraphScatter_OneScatter()
Risk.Simulation.Start
With Risk.Simulation.Results.GraphScatter("Q1_Cost", "Profit")
.ImageToWorksheet ActiveSheet, RiskImageFormat_PNG, 10, 300, 300, 250
End With
End Sub
The following code creates two scatters (in the same graph) for simulation #2, as shown in Figure 13.
The first is of Profit versus Q1_Cost, and the second is of Profit versus Q1_Revenue.
Sub GraphScatter_TwoScatters()
Risk.Simulation.Start
With Risk.Simulation.Results.GraphScatter(Array("Q1_Cost", "Q1_Revenue"), "Profit", 2)
.ImageToWorksheet ActiveSheet, RiskImageFormat_PNG, 10, 300, 300, 250
End With
End Sub

19
Figure 12 Scatter Graph of Profit versus Q1_Cost
Figure 13 Scatters of Profit versus Q1_Cost and Profit versus Q1_Revenue for Simulation #2
GraphSensitivityTornado Function
The GraphSensitivityTornado function returns a tornado graph, which is used to see how sensitive an
output is to the inputs. It has two required arguments, a reference to an output and a
RiskSensitivitySettings object. Among the RiskSensitivitySettings properties is the CalculationMethod: for
example, we can calculate sensitivities using correlation coefficients or regression coefficients.

20
The following code generates a tornado graph for the Net Present Value using the
“RiskSensitivityTornadoFormat_ChangeInOutputStatistic” calculation method with a maximum of 4 bars,
as shown in Figure 14. To get any of the other tornado types, you simply change the second argument to
one of the constants listed above.
Sub GraphTornado_ChangeInMean()
Risk.Simulation.Start
Dim sensSettings As New RiskSensitivitySettings
sensSettings.CalculationMethod = RiskSensitivityTornadoFormat_ChangeInOutputStatistic
sensSettings.GraphMaxTornadoBars = 4
With Risk.Simulation.Results.GraphSensitivityTornado("NPV", sensSettings)
.ImageToWorksheet ActiveSheet, RiskImageFormat_PNG, 10, 300, 300, 250
End With
End Sub
GraphSensitivitySpider Function
The GraphSensitivitySpider function returns a spider graph, another type of graph for seeing how
sensitive an output is to the inputs. It has only one required argument, a reference to the output.
The following code generates a spider graph for Profit with a maximum of 4 lines, as shown in Figure 15.
Sub GraphSpider()
Risk.Simulation.Start
Dim sensSettings As New RiskSensitivitySettings
sensSettings.GraphMaxSpiderLines = 4
With Risk.Simulation.Results.GraphSensitivitySpider("NPV", sensSettings)
.ImageToWorksheet ActiveSheet, RiskImageFormat_PNG, 10, 300, 300, 250
End With
End Sub
Figure 14 Tornado Graph for NPV

21
Figure 15 Spider Graph for NPV
GraphScenarioTornado Function
The GraphScenarioTornado function returns a type of tornado graph for seeing which inputs are most
responsible for an output scenario. A typical example appears in Figure 16. The scenario is that the NPV
output is greater than its 90
th
percentile, and the question is which inputs are most responsible (in the
sense of being at their extremes) for these large NPV values. As you can see, the Product_lifetime input
is at the top of the list. Its “subset median,” the median of its values in the subset of iterations where
the scenario occurs, is at the 87.5
th
percentile of the median of this input for all iterations. The other
number listed, 1.33, is the difference between the input’s subset median and its overall median, divided
by the standard deviation of the input for all iterations. In other words, the input’s subset median for
the scenario is 1.33 standard deviations above its overall median.
The function has four required arguments: (1) a reference to the output, (2) a minimum scenario value,
(3) a maximum scenario value, (4) whether the minimum and maximum values are percentiles (as
opposed to actual values. The following code is typical and leads to the graph in Figure 16.
Sub GraphScenarioTornado()
Risk.Simulation.Start
With Risk.Simulation.Results.GraphScenarioTornado("NPV", 0.9, 1, True)
.ImageToWorksheet ActiveSheet, RiskImageFormat_PNG, 10, 300, 300, 250
End With
End Sub

22
Figure 16 Scenario Tornado Graph for NPV
Creating Reports
The standard @RISK reports found on the ribbon can also be created using code. The options available
in the dialogs used to generate reports are also available in code. The code below will make a report
showing all the outputs, save it to the specified location as a PDF file, and open the file.
With Risk.Simulation
' Generate a report using one of the built-in formats.
' Select to make it a PDF file on the desktop and to open it for the user to view.
.Results.Reports.CreateOutputReport RiskReportOutputsSubType_CompactOutput, _
RiskDistributionDisplayFormat_ProbabilityDensity, _
RiskReportDestinationType_PDF, _
"C:\Users\John\Desktop\AtRiskXDKReport.pdf", _
True
End With
Listing Inputs and Outputs, and Graphing Input Distributions
It is sometimes handy to list of all @RISK inputs and outputs in a worksheet. You can do this in VBA with
Risk.Model, as shown in the following code:
Sub ListInputsOutputs()
Dim i As Long
Dim left As Long, top As Long, width As Long, height As Long
Dim modelDefinition As RiskModelDefinition
Dim modelInput As RiskModelDefinitionInput
Dim modelOutput As RiskModelDefinitionOutput
‘Storing reference to this object in a variable is optional.
‘Passing True as the parameter will cause the workbooks to be rescanned for changes;
‘this will ensure that the information is up-to-date, reflecting the latest

23
‘changes made by the user.
‘Pass False for performance reasons, if you know changes have not occurred.
Set modelDefinition = Risk.Model.GetModelDefinition(True)
‘ Create worksheet where we will write the information about inputs and outputs.
Dim wsInputsOutputs As Excel.Worksheet
Set wsInputsOutputs = ActiveWorkbook.Worksheets.Add()
' Write information about all input functions
With wsInputsOutputs.Range("B3")
For i = 1 To modelDefinition.ModelInputs.Count
Set modelInput = modelDefinition.ModelInputs.Item(i)
.Offset(i, 0).Value = i
.Offset(i, 1).Value = modelInput.Location.Worksheet.Name
.Offset(i, 2).Value = modelInput.Location.Address
.Offset(i, 3).Value = modelInput.RiskFunction
.Offset(i, 4).Value = modelInput.Name
Next
End With
' Write information about all output functions
With wsInputsOutputs.Range("H3")
For i = 1 To modelDefinition.ModelOutputs.Count
.Offset(i, 0).Value = i
Set modelOutput = modelDefinition.ModelOutputs.Item(i)
.Offset(i, 1).Value = modelOutput.Location.Worksheet.Name
.Offset(i, 2).Value = modelOutput.Location.Address
.Offset(i, 3).Value = modelOutput.RiskFunction
.Offset(i, 4).Value = modelOutput.Name
Next
End With
' Graph theoretical input distributions
left = 10: top = 125: width = 300: height = 250
With Risk.Model
For i = 1 To modelDefinition.ModelInputs.Count
With .GraphDistribution(modelDefinition.ModelInputs.Item(i).Location)
.ImageToWorksheet wsInputsOutputs, RiskImageFormat_BMP, left, top, width, height
End With
If i < modelDefinition.ModelInputs.Count Then left = left + width + 5
Next
End With
wsInputsOutputs.Activate
End Sub
This code also illustrates another graph option, the GraphDistribution method of the RiskModel object.
(Don’t confuse this with the GraphDistribution function for simulated results discussed earlier). This
allows you to create the graph of a theoretical input distribution. Its argument can be a range, as in the
above code, an @RISK distribution function such as RiskNormal(100,10), or an array of these (for an
overlay).
Fitting Distributions to Data
If you have used @RISK’s fitting tools, either for fitting to a single column of data or for batch fitting to
several columns of data, you know that this can be done through the @RISK user interface with only a
few mouse clicks. However, this user interface has a lot of settings you can change, and this leads to a
fairly complex set of objects for fitting in the @RISK object model.

24
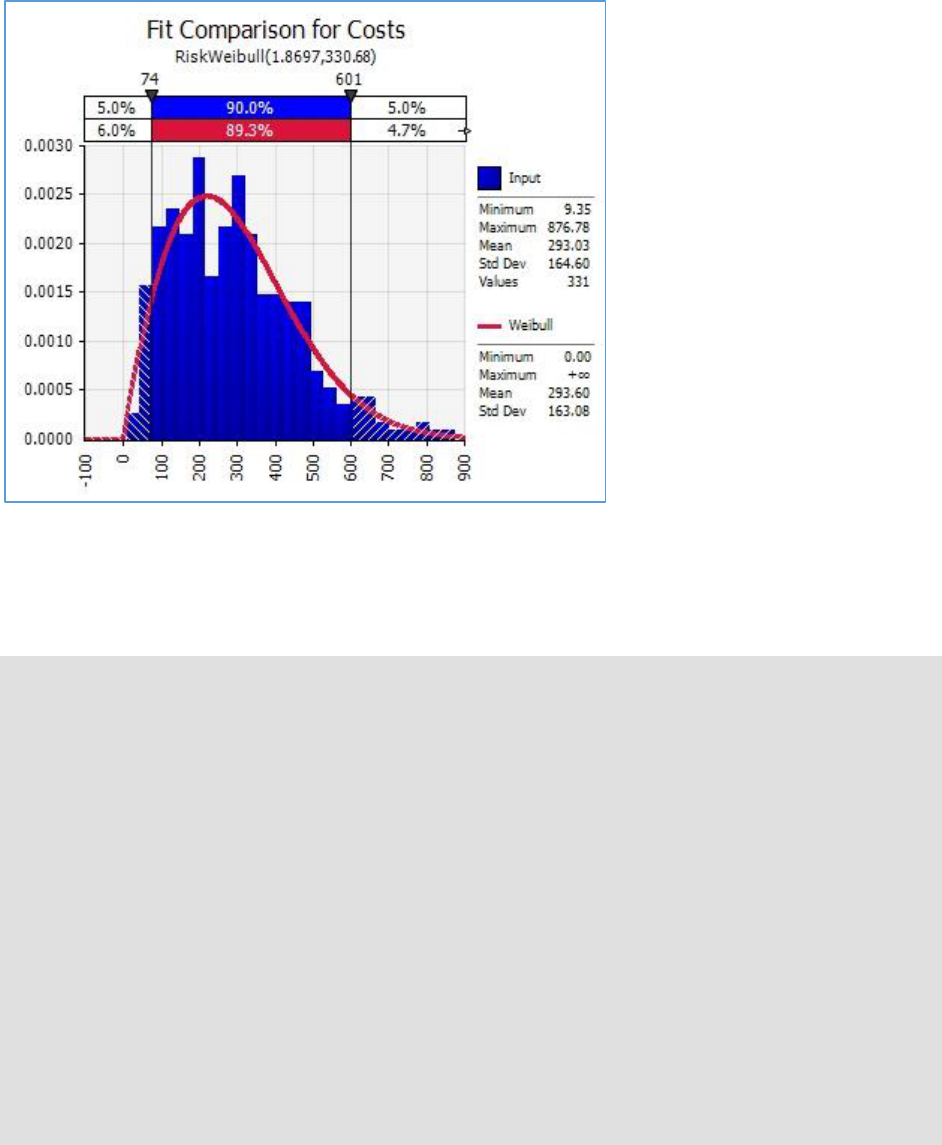
The following code illustrates the most basic features. This fits nonnegative distributions to historical
cost data. It first creates a fit definition and sets some of its properties. Then it performs the fitting, it
lists several summary statistics of the data, and it lists several summary statistics and graphs of the best-
fitting distribution. For example, the GraphFitComparison function creates the graph in Figure 17. This
shows the best-fitting distribution superimposed on the histogram of the cost data.
Sub FitTest()
Dim msg As String
' Delete graphs if any
DeleteGraphs wsData
' Delete named fit if it already exists
On Error Resume Next
Risk.Fits.Item("Costs").Delete
' Create fit definition
With Risk.Fits.Add(Range("Cost_Data"), RiskFitDataType_ContinuousSamples, "Costs")
.BestFitSelectorStatistic = RiskFitStatistic_AIC
.LowerLimitType = RiskFitLimitType_Fixed
.LowerLimitValue = 0
.UpperLimitType = RiskFitLimitType_Open
.SuppressQuestionableFits = True
With .PerformFit
With .FitInput
' Information about data
msg = "Summary stats of data:" & vbCrLf & vbCrLf
msg = msg & "Mean: " & Format(.Mean, "#,##0.00") & vbCrLf
msg = msg & "Std Dev: " & Format(.StdDeviation, "#,##0.00") & vbCrLf
msg = msg & "5th percentile: " & Format(.PToX(0.05), "#,##0.00") & vbCrLf
msg = msg & "95th percentile: " & Format(.PToX(0.95), "#,##0.00")
MsgBox msg
End With
With .BestFit(RiskFitStatistic_AIC)
' Information about best fit
msg = "Information about best fit:" & vbCrLf & vbCrLf
msg = msg & "Distribution: " & .DistributionFunction & vbCrLf
msg = msg & "Mean: " & Format(.Mean, "#,##0.00") & vbCrLf
msg = msg & "Std Dev: " & Format(.StdDeviation, "#,##0.00") & vbCrLf
msg = msg & "5th percentile: " & Format(.PToX(0.05), "#,##0.00") & vbCrLf
msg = msg & "95th percentile: " & Format(.PToX(0.95), "#,##0.00")
MsgBox msg
' Graphs of best fit
.GraphFitComparison.ImageToWorksheet wsData, RiskImageFormat_JPG, 100, 50, 300,
250
.GraphPP.ImageToWorksheet wsData, RiskImageFormat_JPG, 420, 50, 300, 250
.GraphQQ.ImageToWorksheet wsData, RiskImageFormat_JPG, 740, 50, 300, 250
End With
End With
End With
End Sub
25
Figure 17 Fit Comparison Graph
The following code, is typical for a batch fit. The fit definition is now created with the AddBatch function
(not the Add function as above), and the properties of the fit definition now include a few properties
that pertain only to batch fits. The code also illustrates how you can restrict the distributions to be fit
with the EstimatedFitsSetList function, followed by an array of distribution names.
Sub BatchFit()
Dim distList(1 To 4) As String
' Delete named fit if it already exists
On Error Resume Next
Risk.Fits.Item("Cost_Fits").Delete
' Distributions to try
distList(1) = "Gamma"
distList(2) = "LogLogistic"
distList(3) = "Weibull"
distList(4) = "Lognorm"
' Set up and run a batch fit
With Risk.Fits.AddBatch(Range("Cost_Data"), RiskFitDataType_ContinuousSamples, "Cost_Fits")
' Batch fit properties
.BatchFitReportIncludeCorrelations = True
.BatchFitReportIncludeDetailWorksheets = True
.BatchFitReportInNewWorkbook = False
.BatchFitReportStyle = RiskBatchFitReportStyle_Standard
.BestFitSelectorStatistic = RiskFitStatistic_AIC
' Try only the distributions in the distList array
.EstimatedFitsList_SetArray distList
.PerformFit
End With
End Sub

26
Programming Tip: Using "Add" in a line "With" line
The above FitTest and BatchFit macros illustrate a very handy VBA programming construction you might
have missed, one that you will see throughout the XDK example files. Consider the following line:
With Risk.Fits.Add(Range("Cost_Data"), RiskFitDataType_ContinuousSamples, "Costs")
This line not only adds an item to a collection—a RiskFitDefinition object to the collection of
RiskFitDefinition objects—but it implicitly returns this RiskFitDefinition object so that you can access its
properties and methods directly in the With block. As a beginning programmer, you might find it more
natural to define an explicit RiskFitDefinition object, “set” it, and then work with the explicit object, as
follows:
Dim rFit As RiskFitDefinition
Set rFit = Risk.Fits.Add(Range("Cost_Data"), RiskFitDataType_ContinuousSamples, "Costs")
With rFit
This is fine, but these three lines are equivalent to the single line above, and the latter is more compact.
There are indeed times when you will need an explicit object variable (like rFit), so that you can use it
later in your code. But if you don’t need it, you should consider using the more compact version. By the
way, this tip applies to VBA programming for Excel, not just for @RISK.
Creating Filters
The @RISK Filter tool lets you “filter out” results that don’t meet certain conditions. There are two types
of filters, standard and iteration. A standard filter is useful when we want to look at only those values of
an output that satisfy a certain condition. For example, the following code adds a standard filter on an
output named "NPV" (for Net Present Value) output. The filter conditions are essentially that NPV is
negative, and the resulting graph appears in Figure 18. As in the @RISK user interface for filters, you
must first “do” something, usually add one or more filters or clear the filters, and apply the changes. For
example, if the .Clear line were not followed by the .ApplyChanges line, the filters in effect wouldn’t be
cleared; they would still be in effect.
Sub FilterTest_Standard()
With Risk.Simulation
' Run simulation
.Start
With .Results
' Add standard filter to the Net Present Value output.
With .Filters
.Add "NPV", RiskFilterType_Standard, RiskNegativeInfinity, 0, False
.ApplyChanges
End With
With .GraphDistribution("NPV")
.TitleMainText = "NPV Distribution, Negative Values Only"
.ImageToWorksheet ActiveSheet, RiskImageFormat_PNG, 320, 245, 300, 250
End With
With .Filters
.Clear
.ApplyChanges
End With
End With
End With
End Sub

27
The key to this code is the Add line. This adds a filter to the collection of filters currently in effect. Its
arguments are a reference to an output (or input), the type of filter (standard or iteration), minimum
and maximum values, and whether these are actual values or percentiles. If you wanted the values to be
percentiles, you could change the Add line to something like the following.
.Add "NPV", RiskFilterType_Standard, 0.25, 0.75, True
Technical Note: Infinity Constants
Note that the filter on NPV in the above code is really “less than or equal to 0.” However, both a lower
bound and an upper bound are required when adding this filter. For the lower bound, you can use
@RISK’s built-in constant RiskNegativeInfinity. A RiskPositiveInfinity constant is also available.
Figure 18 Graph of an Output with a Standard Filter
The VBA code for an iteration filter is virtually identical, as shown below, with the resulting graph in
Figure 19. However, it is important to understand what it is doing. In this example, two iteration filters
are added: one where the year 1 cost input is above its median and one where the year 1 revenue input
is below its median. Each iteration where both of these conditions hold is “marked,” and the requested
graph for the NPV output uses only the marked iterations—in this case, about 25% of them. It turns out
that the unfiltered mean NPV for this model is about 800. Obviously, the filtered mean is much lower.
Sub FilterTest_Iteration()
With Risk.Simulation
' Run simulation
.Start
With .Results
' Add iteration filters to outputs
With .Filters
.Add "Year1_Cost", RiskFilterType_Iteration, 0.5, 1, True

28
.Add "Year1_Revenue", RiskFilterType_Iteration, 0, 0.5, True
.ApplyChanges
End With
With .GraphDistribution("NPV")
.TitleMainText = "NPV Distribution, Filters on Year 1 Inputs"
.TitleDescriptionText = “Year 1 cost above median, Year 1 revenue below median”
.ImageToWorksheet ActiveSheet, RiskImageFormat_PNG, 320, 245, 300, 250
End With
With .Filters
.Clear
.ApplyChanges
End With
End With
End With
End Sub
Figure 19 Graph of an Output with an Iteration Filter on Two Inputs
Goal Seek Analysis
The Goal Seek tool in @RISK is similar to the Goal Seek tool in Excel, which forces the value of a formula
to a specified value by changing the value in an “adjustable cell.” @RISK’s Goal Seek tool is more flexible
because it lets you force a summary measure of an output, such as the mean, the standard deviation, or
a percentile, to a specified value.
The following code illustrates the basic possibilities. From Risk.Simulation, you first create a new Goal
Seek analysis with the NewGoalSeekAnalysis function. Then you specify the adjustable cell
(VariationCell), the output cell, the type of output statistic, and required values. You can set the number
of iterations to any value, but because several simulations will be run to “sneak up on” the best value of
the adjustable cell, a very big number of iterations may result in an unacceptable runtime. Then you use
the RunAnalysis function to run Goal Seek. This function returns True if a solution is found and False

29
otherwise, so an error check should be included. For example, there might not be any value of the cost
factor that makes the 25
th
percentile of NPV equal to 800.
Sub RunGoalSeek()
' Create new Goal Seek analysis
With Risk.Simulation.NewGoalSeekAnalysis()
' Goal Seek settings
Set .VariationCell = Range("Cost_Factor")
Set .OutputCell = Range("NPV")
.OutputStatistic = RiskStatisticType_Percentile
.OutputPercentile = 0.25
.OutputTarget = 800
' Small number of iterations for Goal Seek
Risk.Simulation.Settings.NumIterations = 500
' Run Goal Seek and check if a solution is found
If Not .RunAnalysis() Then
MsgBox "Goal Seek couldn't find a solution.", vbInformation
Exit Sub
Else
MsgBox "Cost factor that makes 25th percentile of NPV equal to 800 = " _
& Format(Range("Cost_Factor").Value, "#,##0.000")
End If
End With
End Sub
Advanced Sensitivity Analysis
The @RISK Advanced Sensitivity Analysis tool provides more sensitivity options than the usual tornado
or spider graphs. For example, it allows you to perform sensitivity analysis on fixed inputs, not just on
inputs with distribution functions.
The following code is typical. It is fairly long but straightforward. From Risk.Simulation, you use the
NewAdvSensitivityAnalysis function to create a new advanced sensitivity analysis. Next, you specify an
output and an output statistic to monitor, and you specify as many inputs as you like. In this example,
the first input is a fixed value and the other four are distributions. After that, you specify how you want
the inputs to vary. In this example, the fixed input varies from 0.05 to 0.15 in 5 steps, with a base value
of 0.1. The distribution-based inputs also vary over 5 steps, but they use their 10
th
, 25
th
, 50
th
, 75
th
, and
90
th
percentiles for varying. (Note how the VariationPercentiles_SetArray function takes an array as its
argument. This explains why the percent array is created.) Finally, you specify the report placement and
the reports you want, and you run the analysis with the RunAnalysis function.
Sub AdvSensAnalysisTest()
Dim inputCellBased As RiskAdvSensInput
Dim inputDistBased(1 To 4) As RiskAdvSensInput
Dim percent(1 To 5) As Double
Dim i As Integer
' Specify output and inputs
With Risk.Simulation.NewAdvSensitivityAnalysis
' Output to analyze
Set .OutputCell = Range("NPV")
.OutputStatistic = RiskStatisticType_Mean
' Input that isn't a distribution
Set inputCellBased = .Inputs.Add(RiskAdvSensInputType_CellBasedInput, _
Range("Discount_Rate"))
' Properties of cell-based input

30
With inputCellBased
.VariationMethod = RiskAdvSensVariationMethod_MinMaxRange
.BaseValue = 0.1
.VariationMinimum = 0.05
.VariationMaximum = 0.15
.VariationNumSteps = 5
End With
' Inputs that are distributions
Set inputDistBased(1) = .Inputs.Add _
(RiskAdvSensInputType_DistributionBasedInput, Range("Fixed_Cost"))
Set inputDistBased(2) = .Inputs.Add _
(RiskAdvSensInputType_DistributionBasedInput, Range("Revenue_Year1"))
Set inputDistBased(3) = .Inputs.Add _
(RiskAdvSensInputType_DistributionBasedInput, Range("Annual_Revenue_Change"))
Set inputDistBased(4) = .Inputs.Add _
(RiskAdvSensInputType_DistributionBasedInput, Range("Variable_Cost_Percentage"))
' Percentages used in variation of distribution-based inputs
percent(1) = 0.1:percent(2) = 0.25:percent(3) = 0.5:percent(4) = 0.75:percent(5) = 0.9
For i = 1 To 4
With inputDistBased(i)
.VariationMethod = RiskAdvSensVariationMethod_DistributionPercentiles
.VariationPercentiles_SetArray percent
End With
Next
' ReportPlacement
.ReportPlacement = RiskExcelReportPlacement_ActiveWorkbook
' Reports to include
.IncludeSummaryReport = True
.IncludePercentilesGraph = False
.IncludeBoxWhiskerPlot = False
.IncludePercentChangeGraph = True
.IncludeTornadoDiagram = True
' Run sensitivity analysis
.RunAnalysis
End With
End Sub
Stress Analysis
@RISK's Stress Analysis tool allows you to compare the results from a "base" model to one where one or
more inputs are "stressed," that is, where the values of these inputs are sampled from conditional
probability distributions instead of the original distributions.
The following code illustrates a typical stress analysis. It is in an insurance context, where the input is the
random Damage and the output is the loss to the insurance company, assuming a deductible amount
near the 70
th
percentile of the damage distribution. (Any other deductible amount could be used.) The
insurance company wants to see the distribution of its loss when really large damages occur. Starting
with Risk.Simulation, you create a new stress analysis with the NewStressAnalysis function. Next, you
add one or more inputs and specify their parameters. In this example, the Damage input is constrained
to be above its 90
th
percentile, so that the stress analysis will sample damages from the top 10
percent
of the damage distribution. Then you specify the output cell to monitor, the report placement, and the
desired reports. Finally, you run the analysis with the RunAnalysis function.
Sub StressAnalysis()
' Create new Stress analysis
With Risk.Simulation.NewStressAnalysis

31
' Define input and its parameters
With .Inputs.Add(Range("Damage"))
.StressMethod = RiskStressMethod_PercentileRange
.PercentileMin = 0.9
.PercentileMax = 1
End With
' Define output
Set .OutputCell = Range("Insurance_Company_Loss")
' Specify report placement and reports, and run analysis
.ReportPlacement = RiskExcelReportPlacement_ActiveWorkbook
.IncludeSummaryReport = True
.IncludeComparisonGraphs = True
.RunAnalysis
End With
End Sub
One of the resulting graphs from this analysis appears in Figure 20. It shows the distribution of the loss
to the insurance company for the original baseline model and the model with stressing. Obviously, the
losses in the latter tend to be considerably larger. In the baseline model, the company pays nothing
about 70% of the time, and it pays a positive amount 30% of the time. In the stressed model, the
insurance company always pays.
Figure 20 Box Plots of Insurance Company Losses for Baseline and Stressed Version
Automating RISKOptimizer
RISKOptimizer is totally integrated into @RISK. Nevertheless, it has its own XDK, with its own object
model. For example, the names of most RISKOptimizer objects start with “RiskOptimizer,” whereas
@RISK objects start with “Risk.” When you automate RISKOptimizer with VBA code, you only need to set
the usual references to RiskXLA and Palisade_Risk_XDK8.

32
There are plenty of objects, properties, and methods in the RISKOptimization Object Model, but the
“flow” is fairly straightforward. You start with the object RiskOptimization which could be found as a
property of the root object Risk. You can simply type Risk.Optimization to reference the RISKOptimizer
root object. Then you create an RiskOptimizerModelWorkbook object, and from it, you define the goal,
the adjustable cells groups, the constraints, and the optimization settings. Finally, after optimizing with
the line Risk.Optimization.Optimize, you can report optimization results.
The following code is typical. Here are the basic steps.
1. It uses the outer With block to create the RiskOptimizerModelWorkbook object (implicitly).
2. It specifies that the goal is to maximize the 5
th
percentile of the Ending_Value output.
3. It removes any previous adjustable cell groups and constraints, just in case.
4. It adds an adjustable cell group of the budget type. The range for this cell group is the
Investment_Weights range, its lower and upper limits are in the Min_Weights and Max_Weights
ranges, respectively, the next three optional arguments are omitted, and the last optional argument
indicates a step size of 0.005 for a discrete search.
5. It adds a hard constraint that should be enforced on each iteration. The arguments indicate that the
“APPL_CSCO_Pct” range should be within minimum and maximum values.
6. It changes some optimization settings.
7. It changes some simulation settings.
8. It runs the optimization and reports some results.
Sub RunRiskOptimizer()
Dim msg As String
' Optimization Model
With Risk.Optimization.ModelWorkbook(ActiveWorkbook)
' Goal
With .Goal
Set .CellToOptimize = Range("Ending_Value")
.StatisticToOptimize = RiskOptimizerStatistic_Percentile
.StatisticParameter = 0.05
.GoalType = RiskOptimizerGoalType_Maximize
End With
' Remove adjustable cells and constraints if any
.AdjustableCellGroups.RemoveAll
.Constraints.RemoveAll
' Add budget adjustable cell group
.AdjustableCellGroups.AddWithBudgetSolvingMethod.AdjustableCellRanges _
.AddForBudgetSolvingMethod Range("Investment_Weights"), _
Range("Min_Weights"), Range("Max_Weights"), , , , 0.005
' Constraint (just for illustration)
.Constraints.AddHardInSimpleMode RiskOptimizerConstraintEvaluationTime_EachIteration, _
Range("Min_APPL_CSCO"), RiskOptimizerConstraintOperator_LessOrEqual,
Range("APPL_CSCO_Pct"), RiskOptimizerStatistic_Value, _
0, RiskOptimizerConstraintOperator_LessOrEqual, Range("Max_APPL_CSCO"), "Limits for
APPL plus CSCO"
' Optimization settings
With .OptimizationSettings
.Engine.OptimizationEngine = RiskOptimizerEngine_Automatic
.Runtime.TrialCountStoppingCondition = True
.Runtime.TrialCount = 1000
End With
' Simulation settings
With Risk.Simulation.Settings

33
.NumIterations = 100
.AutomaticResultsDisplay = RiskAutomaticResultsDisplay_NoAutomaticResults
End With
' Run optimization
Risk.Optimization.Optimize
' Report selected results
With .Results
msg = "Time to optimize (seconds): " _
& Format((.FinishTime - .StartTime) * 24 * 60 * 60, "#,#00.0")
msg = msg & vbCrLf & "Best result: " & Format(.BestValueWithoutPenalties, "$#,#00")
End With
MsgBox msg
End With
End Sub
You can also use the RISKOptimizer XDK inside macros to obtain information about an optimization in
progress and control it, even if the model is set up and the optimization is started through the graphical
interface, not through VBA. For example, the following macro will stop the optimization if there is no
progress after 100 trials. (To ensure that this macro is called during the optimization, you need to specify
its name in the Macros tab of the Optimization Settings dialog).
Sub MyAfterStorageRoutine()
With Risk.Optimization.ModelWorkbook(ActiveWorkbook).Results
If .NumTrials >= 100 Then
If .BestValueWithPenalties = .OriginalValueWithPenalties Then
Risk.Optimization.OptimizationManager.StopOptimization
End If
End If
End With
End Sub
Technical Note: Multiple CPUs
Anytime you have code that runs in the middle of a simulation (e.g. a user-defined function or a
simulation macro) and uses anything in the @RISK object model, it is a good idea turn off the multiple
CPUs option. This can be done through the @RISK user interface: using the Settings button in the
Simulation section on the ribbon for regular simulations, or using the Advanced Tab of the Optimization
Settings dialog for optimizations; this can also be done via code.
The reason is that when multiple CPUs are used by @RISK, multiple copies of Excel can be launched to
run your simulation. Only the original Excel has access to the @RISK object model, and if one of the
copies tries to access the Risk object, an error will occur. Keep in mind that this doesn’t affect any code
you run before or after the simulation. It also isn’t an issue if your simulation macro or user-defined
function doesn’t call anything in the @RISK object library.
Some General VBA Tips
This guide concludes with a few VBA tips that you should know regardless of whether you are
automating @RISK or Excel.
File Format (xlsm)
If you save a workbook that includes VBA code, you must save it as a macro-enabled (.xlsm) file. This is
true for any Excel file that contains VBA code; it is not specific to @RISK files. Then if you open this .xlsm
34
file later on, you will be warned that it contains macros. Make sure you elect to enable the macros;
otherwise the VBA macros won’t work.
Running a Macro
If you develop a VBA program for nontechnical users, you probably won’t want them to see your code,
either for proprietary reasons or because it would be too intimidating. However, it is easy to create a
simple user interface for running the program. To do so, activate a worksheet, insert a shape such as a
rectangle, right-click it, select Assign Macro, and select your macro. You can also insert descriptive text,
such as Run Program, in the shape. From then on, a user can simply click the shape to run the program.
ThisWorkbook
You can always reference a workbook by name, as in Workbooks(“My Example File.xlsm”). Alternatively,
you can refer to the active workbook with the built-in object ActiveWorkbook. However, an even safer
reference is to ThisWorkbook, which always references the workbook containing the VBA code. (It is
safer than ActiveWorkbook because the workbook containing the code might not be active when you
run your program.)
Worksheet Code Names
The code in the example files sometimes references worksheets by their “code” names. A worksheet
actually has two names, the name you see on its tab, and a code name, which can be set only in the
Visual Basic Editor. This is illustrated in Figure 21 (see the highlighted line in the Properties section). In
this example, the notation wsModel (Model) in the Project section indicates that Model is the name on
the tab and wsModel is the code name. (Any names can be used for code names, but a common practice
is to use the prefix ws.) One reason for using code names in VBA programs is that you don’t need to
create a Worksheet object variable; you can simply write wsModel.Range(“A1”), for example. A second
reason is that if your code refers to the worksheet by name, as in Worksheets(“Model”), and someone
changes the name on the worksheet tab, an innocent enough change to make, this will break your
program. However, because code names can be changed only through the Visual Basic Editor, it is much
less likely that anyone will change them.

35
Figure 21 Code Name for Worksheet
With Blocks
In the XDK example files, you will see a lot of With blocks, sections that start with the keyword With and
end with the keyword End With. These are used by all good VBA programmers, so you should get used
to them. They allow you to avoid a lot of repetitive code, as illustrated by the following block of code.
Inside the With Risk.Simulation block, anything that starts with a period really has Risk.Simulation to
the left of it. For example, . Settings is equivalent to Risk.Simulation.Settings. As you can see, these
With blocks can be nested to avoid even more repetitive code. For example, .NumSimulations is
equivalent to Risk.Simulation.Settings.NumSimulations. It is a very good idea to indent these blocks
appropriately, as has been done here, for easier reading.
With Risk.Simulation
' Change some simulation settings
With .Settings
.NumSimulations = 3
.NumIterations = 5000
.AutomaticResultsDisplay = RiskAutomaticResultsDisplay_NoAutomaticResults
End With
End With
Intellisense
The reference to the @RISK library mentioned earlier is not only required to make your @RISK code
work properly, but it provides you with an invaluable programming aid: Intellisense. As an example,
consider the following line:
Risk.Simulation.Settings.AutomaticResultsDisplay = RiskAutomaticResultsDisplay_NoAutomaticResults

36
Could you remember all of this? Fortunately, you don’t have to. As soon as you type Risk. (including the
period), you will see a list you can choose from. Then when you choose Simulation from the list and
type a period, you will see another list to choose from. And so on. To cap it off, when you have entered
everything to the left of the equals sign and then type the equals sign, you will see a list of the
appropriate @RISK constants for the AutomaticResultsDisplay property that you can choose from. If you
are already an Excel programmer, you undoubtedly appreciate the power of Intellisense, and you will be
happy to know that it extends to VBA for @RISK. If you are not yet familiar with Intellisense, you are in
for a big treat!
Object Browser
A great source of information is the VBA Object Browser. To see this, make sure a file with a reference to
the @RISK library is selected in Project pane. Then select Palisade_Risk_XDK8 from the libraries
dropdown list. This Object Browser shows all of the @RISK objects on the left and all of their properties
and methods on the right. Also, when you select an item on the right, you get some limited help, such as
the list of a function’s arguments, at the bottom of the window. Remember that such help is only a few
mouse clicks away as you are doing your programming. It often provides just the detail you need to get
you past a programming hurdle.
Figure 22 Visual Basic Object Browser

37
Constants and Enumerations
The line .AutomaticResultsDisplay = RiskAutomaticResultsDisplay_NoAutomaticResults contains one
of many built-in @RISK constants, in this case, RiskAutomaticResultsDisplay_NoAutomaticResults. All of
these constants begin with Risk, and they all have integer values, such as 3 or 445. However, because no
person could ever remember these values, they are instead given meaningful names that programmers
can use in their VBA code. You can find the names in the Object Browser. For example, Figure 23 lists the
constants (on the right) for the four possible settings of the AutomaticResultsDisplay property.
Together, this set of four constants is called an enumeration. (Strictly speaking, the
AutomaticResultsDisplay property returns the RiskAutomaticResultsDisplay enumeration. This is only
one of several enumerations available in @RISK, indicated by the double-yellow icons in the figure.
5
)
Figure 23 RiskAutomaticResultsDisplay Enumeration
5
Excel also has many enumerations. Its built-in constants all begin with xl, as in xlDown, xlToRight, and so on.

38
@Risk XDK also includes some stand-alone constants that do not belong to enumerations, for example
RiskAutoNumIterations in this code:
With Risk.Simulation
' Change some simulation settings
With .Settings
' non-enumerated constant
.NumIterations = RiskAutoNumIterations
' enumerated constant
.AutomaticResultsDisplay = RiskAutomaticResultsDisplay_NoAutomaticResults
End With
End With
To find the non-enumerated constants in the Object Browser, we need to select RiskXLA as the library to
view, and then click XDK in the list of classes, as shown in Figure 24.
Figure 24 @Risk XDK Non-Enumerated Constants
39
Appendix
The document to this point contains all of the information you need to get started with VBA for @RISK.
This appendix contains extra information, some of which is rather technical, that might come in handy.
Updating @RISK 6.x or 7.x Automation Code to Run in @RISK 8.x
Overview
Moving to version 8, Palisade has reviewed and improved the XDK interface, taking into account new
features and the needs of .NET programmers. This resulted in some changes to the Object Model,
method names and parameters, and names of enumerated constants. The major changes are described
here in reference to VBA code, but not every detail is covered. In some cases when code created for
earlier versions does not compile in version 8, one may need to review the new interface to identify a
new way of accomplishing the same objective. Usually it will be possible to identify a similarly named
method or property that accomplishes the same task; or in some cases changes to code will be forced by
a modified list of method parameters in version 8. However, every effort was made to not change the
interface unless necessary, and over 90% of the interface is the same as in previous versions.
Updating Library References
If you have @RISK automation code written for @RISK 6.x or 7.x, you'll need to change the references as
described before in this guide for that code to work with @RISK 8.x.
Changes to the Object Model
• The Risk.Simulation.Results.Reports object has been added, reflecting improved reporting
functionality in version 8
• The Risk.ApplicationSettings object was replaced by the Risk.Preferences object, corresponding the
new method of handling user settings in version 8. Some properties may no longer be found in the
new object, while new ones have been added.
• The Risk.Library object is no longer available, corresponding to the changed form of this
functionality in version 8.
New Interface for Generating the Standard Reports
Version 8 improved the reporting functionality significantly, with new report types, the option of
generating reports in the PDF format, and flexibility in specifying which inputs/output to include in the
reports. Consequently, the single Risk.GenerateExcelReports method in version 7 was replaced by a
number of methods in the Risk.Simulation.Results.Reports object.

40
New Format of Enumerated Constant Names
There is a new format for names of enumerated constants in version 8, requiring some changes in VBA
code wherever an enumerated constant was used. It should be straightforward to identify the new
name of a constant, particularly that the names of the enumerations generally have not changed. For
example, "RiskAutomaticResultsDisplay.RiskNoAutomaticResults" in versions 6/7 became
"RiskAutomaticResultsDisplay.RiskAutomaticResultsDisplay_RiskNoAutomaticResults". In general, the
names of enumerations are included as prefixes in the names of the constants.
New Method of Returning Arrays
In version 8 arrays are returned differently to client code. For example, in version 7 to obtain all the
values an output had during a simulation, one called the GetSampleData method, with the array of
values returned in the first parameter, as shown in the Figure 25. The return value from the method is
the length of the array.
Figure 25 Method of Returning Arrays in Version 7

41
Figure 26 shows the corresponding method in version 8. The name was changed to
GetSampleDataArray, to underscore the change to method parameters. The array is no longer returned
inside a parameter; it is now the return value from the function. The length of the array is not returned.
In general, the length of an array can be determined using VBA functionality. However, there is a
possibility of introducing bugs if one does not account properly for empty arrays. For this reason, the
XDK includes two utility methods for checking the size of an array, RiskArrayIsEmpty and RiskArraySize,
as seen in Figure 27.
Figure 26 Method of Returning Arrays in Version 8

42
Figure 27 XDK Utility Methods for Checking Sizes of Returned Arrays
New Method of Passing Arrays to the XDK
In a few instances in the XDK interface an array is passed by the client code to the XDK. For example,
Figure 28 shows the PredefinedFitsSetList method in version 7 (used to pass a list of theoretical
probability distributions to fit to data). In version 8 (Figure 29) this method has been separated into two
methods, PredefinedFitList_SetArray and PredefinedFitList_Clear. The second method should be used
to clear the array stored by the XDK; as opposed to passing an empty array. Important: passing empty
arrays to the XDK _SetArray methods can result in Excel crashes. This is due to a bug involving the
interaction between VBA and .NET when handling arrays, and is beyond Palisade’s control.

43
Figure 28 Passing Arrays to XDK in Versions Prior to 8

44
Figure 29 Passing Arrays to XDK in Versions 8
Changes to Methods for Graphing Results
The interface of methods for graphing sensitivity results has changed. Those methods had long lists of
arguments. Now there is a new RiskSensitivitySettings object. A programmer can create one of those
objects, specify some properties like GraphMaxTornadoBars, and pass the object as a parameter to the
graphing method:
• The GraphTornado and GraphTornadoEx methods have been merged into a single
GraphSensitivityTornado method (which takes a RiskSensitivitySettings object as an optional
parameter).
• The GraphSpider method has been renamed as GraphSensitivitySpider, and it also takes a
RiskSensitivitySettings object as an optional parameter.
Also, the GraphSummary method was replaced by two methods, GraphSummaryBoxPlot and
GraphSummaryTrend.
Risk.RefreshUI Method Added
This method was added to address the fact that some XDK calls should update the Excel interface, for
example by making changes to the items displayed in the @RISK tab in the ribbon. For instance, setting
Risk.Simulation.Settings.NumIterations should update the number of iterations shown on the ribbon.
45
However, refreshing the interface is time consuming, and setting individual properties no longer
refreshes the interface, to avoid multiple unnecessary and time-consuming updates. The RefreshUI
method should be called to update the ribbon when needed.
Item no Longer the Default Property
The Item property of collection classes is no longer the default property. So, for example a line deleting
a definition of a fit, "Risk.Fits("Costs").Delete" in version 7, becomes "Risk.Fits.Item("Costs").Delete in
version 8.
Different Initialization Method with the .NET Interface
See the section of this guide that covers the .NET interface.
Updating RISKOptimizer 6.x or 7.x Automation Code to Run in @RISK 8.3
Overview
The XDK interface for RISKOptimizer was improved making the access to its features easy for VBA and
.Net programmers. For that reason, the Object Model was updated to differentiate the classes,
properties and methods used to program @RISK and RISKOptimizer.
Library References
In comparison to code written for @RISK 6.x or 7.x, RISKOptimizer does not require any other reference
than the one used for programming @RISK; it means that it only requires a reference to RiskXLA and
Palisade_Risk_XDK8.
Access to the root object
Starting in version 8.3, the root object of RISKOptimizer could be accessed directly form the root object
of @RISK using the property called Optimization. That object contains all the properties and methods to
program RISKOptimizer.
Changes in the Object Model
The name of the classes and enumerators were updated, and its name has a prefix labeled as
RiskOptimizer:
Figure 30 – List of updated classes in RISKOptimizer

46
New Format of Enumerated Constant Names
As it was described before the names of the classes and enumerators were updated to include the prefix
“RiskOptimizer”, it means that the code requires to update its included enumerators. For example:
“OptConstraintEntryMode.OptEntryModeFormula” became
“RiskOptimizerConstraintEntryMode.RiskOptimizerConstraintEntryMode_Formula”.
New Method of Returning Arrays for Results Functions
As it was described in the previous appendix, in version 8 the arrays are returned differently. For
RISKOptimizer this change occurred for the following optimization results methods:
• GetAdjustableCellValuesArray
• GetBestValue_EfficientFrontierArray
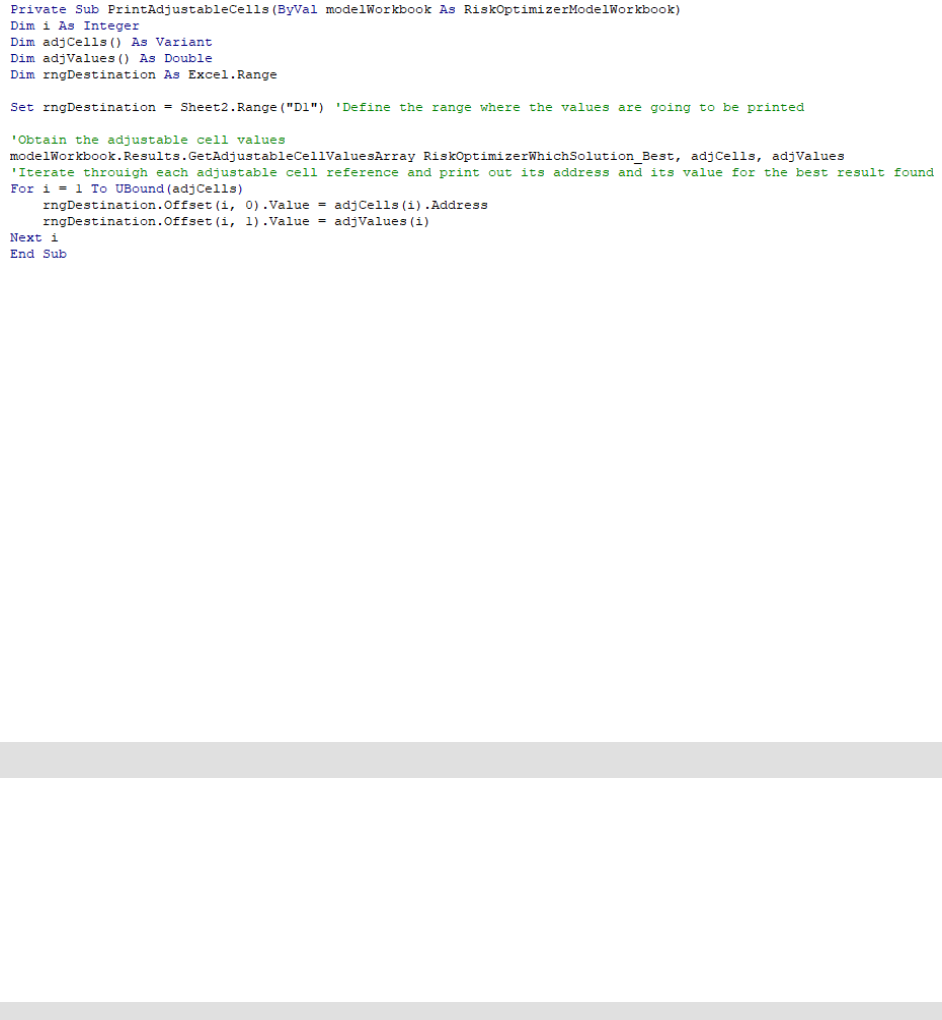
47
For example, the following VBA procedure list the adjustable cell address and its values that belongs to
the best solution found during the optimization:
Figure 31 – Example code showing the use of the GetAdjustableCellValuesArray
Demand-Loading @RISK
Usually, you want @RISK to load automatically when you open the file that contains the VBA for @RISK
code. By adding the reference to RiskXLA in the VBA references as described earlier, this will occur.
However, there are some instances where this is not the behavior you want. For example, you might
want to write an add-in that uses @RISK only part of the time, in which case requiring @RISK to always
be loaded is not appropriate. The programmer of an add-in that uses @RISK XDK, but has no reference
to RiskXLA, needs to arrange for @RISK to be loaded before the calls to @RISK XDK are made. This could
be done by displaying a message asking a user to launch @RISK, before they are allowed to access some
functionality of the custom add-in that depends on the programmatic interface of @RISK.
If you remove the RiskXLA reference, you can still automate @RISK, but you need to do some extra work
to obtain the root Risk reference object and to use any @RISK constants defined in that file. You can get
the root Risk object in a “late-bound” fashion—that is without an early-bound reference to RiskXLA—by
using Excel’s Application.Run command as follows:
Dim Risk As Palisade_Risk_XDK8.AtRisk
Set Risk = Application.Run(“Risk.xla!Risk”)
This code assumes @RISK is already loaded and calls the public property Risk in a late-bound fashion to
retrieve the root automation object. If you store Risk as a global (non-local) variable, it is a good practice
to set it to Nothing when you are finished using @RISK for automation. (Strictly speaking, you could call
this variable anything, but by using the variable name “Risk,” your code will be only minimally changed.)
Another purpose that the early-bound reference to Risk.xla serves is to provide all the automation
constants (RiskAutoNumIterations, RiskNaN, and so on) that you might need for your code. For example,
consider the following line of code:
Risk.Simulations.Settings.NumIterations = RiskAutoNumIterations
Here, the constant RiskAutoNumIterations is provided by the reference to RiskXLA. If you choose to
demand load @RISK, however, and thus do not have a reference to RiskXLA, these constants won’t be
available directly. Instead, you will need to access them from the Risk.Constants object, as
demonstrated below:

48
Risk.Simulations.Settings.NumIterations = Risk.Constants.RiskAutoNumIterations
The RISKOptimizer root object can also be accessed in the late-bound manner, as follows:
Dim RISKOptimizer As RISKOptOL8.RISKOptimizerRoot
Set RISKOptimizer = Application.Run(“Risk.xla!RISKOptimizer”)
Automating @RISK from .NET
Although the @RISK automation library is designed primarily for use from within Excel’s VBA language
(and all the code examples of this documentation, except for this section, are written for VBA), it is also
possible to use the .NET environment to control @RISK. Note the custom .NET code must run inside the
Excel process, after @RISK has been launched.
To automate @RISK from .NET, you must first add a reference to the Visual Studio project. Specifically,
you should browse to the "Program Files (x86)\Palisade\System" folder (or "Program
Files\Palisade\System" on 32-bit versions of Windows) and add a reference to the Palisade.Risk.XDK8.dll
assembly. The developers of custom applications need not concern themselves with the availability of
this or other Palisade assemblies at runtime; they will be loaded when @RISK is launched in Excel.
It may also be necessary to add a reference to the Excel automation library. Some methods in the XDK
return objects from the Excel automation interface, or take such objects as parameters; examples of
such objects are a Workbook or a Range. If those methods are used, then a "Microsoft Excel x.0 Object
Library" reference has to be added to the project from the COM tab of the Reference Manager dialog.
In the .NET interface all the functionality is available via methods of the Risk class in the
Palisade.Risk.XDK8.dll assembly; those methods will show as static to C# code as as shared to VB .NET
code. There is a required initialization call in the .NET interface, to be made before any other calls to the
XDK (unlike in the VBA interface). Assuming the Palisade.Risk.XDK namespace has been declared with
the "using" (C#) or the "Imports" (VB .NET) keywords, the call to make is:
C# Code
Risk.Initialize();
VB .NET Code
Risk.Initialize()
Programmers who need to convert existing .NET code that was written for version 7 of @RISK should
note some differences in the initialization process. In that version a root "Risk" object had to be
obtained using an Excel automation call (Application.Run); this code should be removed when
converting XDK code from version 7 to version 8. Also, the Initialize call needs to be added, as it was not
required in version 7.
The object model for the .NET interface is the same as the one for the VBA interface. Generally, the
documentation for the VBA interface should be sufficient when writing .NET code. Here is some sample
.NET code which changes the number of iterations to automatic and runs a simulation.

49
C# Code
//This code assumes "using Palisade.Risk.XDK;" line has been added, and the initialization call
// has been made.
public void RunSimulation()
{ Risk Risk;
Risk.Simulation.Settings.NumIterations = Risk.RiskAutoNumIterations;
Risk.RefreshUI(); // make sure the ribbon actually shows "Auto" for # of iterations
Risk.Simulation.Start();
}
VB .NET Code
'This code assumes that "Imports Palisade.Risk.XDK" line has been added, and the initialization
'call has been made.
Public Sub RunSimulation()
Risk.Simulation.Settings.NumIterations = Risk.RiskAutoNumIterations
Risk.RefreshUI() ' make sure the ribbon actually shows "Auto" for # of iterations
Risk.Simulation.Start()
End Sub
Automating RISKOptimizer from .NET
It is also possible automate RISKOptimizer from .NET. In this case, an additional reference called
"Microsoft Excel x.0 Object Library" should be added to the project from the COM tab of the Reference
Manager dialog.
The RISKOptimizer object can be accessed from the Risk root object, as shown in the following
examples. This code changes the number of trials to run to 500, and starts an optimization.
C# Code
// This code assumes "using Palisade.Risk.XDK;" line has been added.
public void RunOptimization(Microsoft.Office.Interop.Excel.Application ExcelApp)
{
RiskOptimizerModelWorkbook mwb= Risk.Optimization
.ModelWorkbook(ExcelApp.ActiveWorkbook);
mwb.OptimizationSettings.Runtime.TrialCountStoppingCondition = true;
mwb.OptimizationSettings.Runtime.TrialCount = 100;
Risk.Optimization.Optimize();
}
VB .NET Code
' This code assumes that "Imports Microsoft.Office.Interop" as well as "Imports
‘ Palisade.Risk.XDK" lines have been added
Public Sub RunOptimization(ByVal ExcelApplication As Excel.Application)
Dim mwb = Risk.Optimization.ModelWorkbook(ExcelApp)
mwb.OptimizationSettings.Runtime.TrialCountStoppingCondition = True
mwb.OptimizationSettings.Runtime.TrialCount = 500
Risk.Optimization.Optimize()
End Sub
