
sendQuick SMS Messaging
User Manual
Version 4.0
TalariaX Pte Ltd
76 Playfair Road
#08-01 LHK2 Building
Singapore 367996
Tel : +65 6280 2881 Fax : +65 6280 6882
Email : info@talariax.com
www.TalariaX.com

Strictly Private and Confidential
Copyright©2022 TalariaX Pte Ltd 2
SendQuick SMS Messaging User Manual 4.0
sendQuick SMS Messaging User Manual
Table of Contents
1.0 Introduction 3
2.0 Accessing the Portal 3
3.0 Main Menu Interface 4
3.1 Exploring the Interface 4
3.2 Changes to Profile 4
3.3 Menu Items 5
4.0 User Management 6
4.1 Department Management 6
4.2 Role Management 7
4.3 User Management 9
5.0 Address Book 13
5.1 Address Book 13
5.2 Address Group 14
5.3 Global Address Book 14
5.4 Global Address Group 15
6.0 Send SMS Messages 16
6.1 Send SMS via Web Interface 16
6.2 Send SMS via File Upload 17
7.0 Message Templates 20
7.1 Personal Message Template 20
7.2 Global Message Template 20
8.0 Scheduled SMS 22
9.0 Unsubscribe List 23
10.0 Common Inbox 24
11.0 Message Logs Management 25
11.1 Personal Logs 25
11.2 Global Logs 26
12.0 System Configuration 28
13.0 Quota Management 29
14.0 Keyword Management 31
15.0 Language Setup 34

Strictly Private and Confidential
Copyright©2022 TalariaX Pte Ltd 3
SendQuick SMS Messaging User Manual 4.0
SENDQUICK SMS MESSAGING
USER MANUAL
1.0 Introduction
Welcome to sendQuick SMS Messaging User Manual. This document is prepared for the User
administrator and Users, as a guide for using sendQuick Messaging Interface for sending and
receiving SMS. This is a different interface from the sendQuick Server Administration, which is
provided in Server Administration manual.
Before using the sendQuick Messaging Interface, the Server Administrator will configure the
sendQuick Server for it to work in your company’s network. The Administrator will need to work
on the network configuration first, or to assign the Domain Name to the system. Once the IP
address (or domain name) had been configured, you can access sendQuick Messaging from any
workstations using a web browser.
2.0 Accessing the Portal
To access the sendQuick Messaging Interface, open your web browser and type the following for
the URL:
- http://<sendQuickIPorDomainName>/
- http://<sendQuickIPorDomainName>/webapp/
Note:
Please check with your Server Administrator for the IP address or domain
name they have configured for sendQuick.
The web interface presented is as shown in Figure 1 below.
Figure 1: User Interface Login Page
Please refer to your System Administrator for the login details.

Strictly Private and Confidential
Copyright©2022 TalariaX Pte Ltd 4
SendQuick SMS Messaging User Manual 4.0
3.0 Main Menu Interface
3.1 Exploring the Interface
After logging in to the system, you will see the following main dashboard area. The home page is
set to be the same as “Send SMS” for quick access to that function.
Figure 2: sendQuick Main Dashboard
3.2 Changes to Profile
Your profile name is displayed at the top left-hand corner of the dashboard.
To change your password for this system, click on the name of your profile.
Figure 3: Change Personal Details

Strictly Private and Confidential
Copyright©2022 TalariaX Pte Ltd 5
SendQuick SMS Messaging User Manual 4.0
3.3 Menu Items
On the left-hand side of the interface, you can find the following menu items. In the following
sections, we will go into more details for each function.
The available items in the Main Menu are:
Menu Items
Description
User Management
To create, edit and delete users. Assign role and managing user
departments
Address Book
Create, edit and delete users in Personal and Global Address Book with
Grouping function
Message Template
Create, edit and delete message template for future usage
Send SMS Message
Send SMS by manual composition or File Upload
Scheduled SMS
SMS messages scheduled and waiting to sent
Common Inbox
Incoming SMS that did not match any keywords
Logs Management
Review Inbox, Outbox and Queue messages
Unsubscribe List
Users who requested not to receive any SMS messages
Quota Management
Add, delete and top-up of SMS quota for every users
Keyword Management
Routing for incoming/received SMS message
System Configuration
Configuration for time control and image upload

Strictly Private and Confidential
Copyright©2022 TalariaX Pte Ltd 6
SendQuick SMS Messaging User Manual 4.0
4.0 User Management
The User Management section is for the User Administrator (administrator) to create, edit and
delete user in the web system. In addition, there is also a department and role management
module in the system
The following describes the individual items in the User Management section.
The User Management section will include:
Department Management
This section creates the departments where the users will be assigned
for their web access.
Role Management
Role assignment where each role has different access rights for the
users.
User Management
Create users and assign them to the different department with different
access rights
4.1 Department Management
The purpose of Department Management is to organise the users into different departments. The
user administrator can create and delete departments.
Figure 4: Department Management Summary
To create a new department, select Add New Record button and enter the name of the department
as shown in Figure 5 below. Once ready, click the Save button and the new department is created.

Strictly Private and Confidential
Copyright©2022 TalariaX Pte Ltd 7
SendQuick SMS Messaging User Manual 4.0
Figure 5: Create New Department
4.2 Role Management
After creating department, the administrator should create the different roles that will be assigned
to different users in the organisation. The roles are defined as different access rights with respect
to using the sendQuick Messaging web interface. Hence, the different roles will have different
access rights to perform different functions.
To create a new role, select Add New Record and assign a User Role and select the different
access rights for the role.
In Figure 7, the roles can be assigned to All Departments or to specific department, by selecting
from the drop-down menu selection.
Figure 6: Role Management Summary

Strictly Private and Confidential
Copyright©2022 TalariaX Pte Ltd 8
SendQuick SMS Messaging User Manual 4.0
Figure 7: Create New Role (Assign Rights)
There numerous access rights items that can be assigned/selected for different roles. The
different access rights grouping will differentiate the access rights for the different roles. These
can be seen in Figure 7 and 8.
The access rights that are not selectable (not provided) under the role will not be shown on the
Main Menu bar of the user. Hence, if the access rights are not assigned, user will not be able to
use the feature. This serves as an access control function.
Figure 8: Create New Role (Rights Description)

Strictly Private and Confidential
Copyright©2022 TalariaX Pte Ltd 9
SendQuick SMS Messaging User Manual 4.0
Access Rights
Description
Department Administrator
Have the access rights to create and delete department information
User Management
Rights to create, edit, delete the user role, department management
and user accounts
Global Address Book
Rights to access, add, edit and delete global address book
Personal Address Book
Rights to access, add, edit and delete personal address book
Global Message Template
Rights to access, add, edit and delete global template
Personal Message Template
Rights to access, add, edit and delete personal template
Send SMS
Rights to send SMS
Change Personal Detail
Rights to change personal details
Unsubscribe List
Rights to access and manage unsubscribe list
Quota Management
Rights to assign, top-up, renew quota for individual users
System Configuration
Rights to configure the send SMS time control and other system
configuration features
4.3 User Management
The User management section is to create the users and assign roles and departments to
individual users.
Select Add New Record to create a new user. Insert the Username, Password and all other
information as required.
Figure 9: Summary of Users

Strictly Private and Confidential
Copyright©2022 TalariaX Pte Ltd 10
SendQuick SMS Messaging User Manual 4.0
Figure 10: Create New User
You can assign individual access rights to the new user or select the pre-defined roles and the
roles will be automatically assigned. You can also have a mixture with additional rights by
selecting on the check relevant box.

Strictly Private and Confidential
Copyright©2022 TalariaX Pte Ltd 11
SendQuick SMS Messaging User Manual 4.0
Figure 11: Access Rights Assignment
For downloading of users from LDAP, the administrator needs to define the following:
- LDAP Server
- Department
- User Role
Figure 12: Download Users from LDAP
The last item is the User Access Log. This is the access log of each user and the date, time, IP
address and browser type are documented.

Strictly Private and Confidential
Copyright©2022 TalariaX Pte Ltd 12
SendQuick SMS Messaging User Manual 4.0
Figure 13: User Access Log

Strictly Private and Confidential
Copyright©2022 TalariaX Pte Ltd 13
SendQuick SMS Messaging User Manual 4.0
5.0 Address Book
The Address Book section consists of Personal and Global Address Book. For both Personal and
Global, there is a contact management as well as group management. The address book data
can be used when sending SMS.
Personal Address Book is the contact list that is accessible by the user only. Global Address list
is access by all users, but only certain users have the access to add and edit the list, depending
on the access rights granted.
5.1 Address Book
The Personal Address Book is where all the contact list for the users are stored. Select Add New
Record to enter the name, mobile phone number and assigned group (s) to create new personal
contact.
Figure 14: Address Book List
Figure 15: Create New Personal Address Contact

Strictly Private and Confidential
Copyright©2022 TalariaX Pte Ltd 14
SendQuick SMS Messaging User Manual 4.0
5.2 Address Group
The individual contact list can be assigned to different groups. Select Address Group in the sub-
menu and a list of groups are displayed. To create a new group, select Add New Record.
Enter the group name and select Save
Figure 16: Personal Address Group
Figure 17: Create Personal Address Group
5.3 Global Address Book
The Global Address Book function the same way as Personal Address Book but the access rights
is for all users to use the contact list but editing rights are limited. The Global Address consists
of inserting new records as well as creating the groups.
Figure 18: Global Address Book

Strictly Private and Confidential
Copyright©2022 TalariaX Pte Ltd 15
SendQuick SMS Messaging User Manual 4.0
The creation of new global contact is similar to that of contact creation under personal address
list. Select the Add New Record and create the new record as shown
Figure 19: Create New Global Address Contact
5.4 Global Address Group
The global group management is similar to how personal group is managed. Select Add New
Record and enter the relevant group name and select Save.
Figure 20: Global Address Group
Figure 21: Create New Global Address Group

Strictly Private and Confidential
Copyright©2022 TalariaX Pte Ltd 16
SendQuick SMS Messaging User Manual 4.0
6.0 Send SMS Messages
Send SMS using sendQuick Messaging interface is the primary reason for the existence of
sendQuick. Therefore, this section will explain how a user can send SMS using sendQuick system.
There are two ways of sending SMS using sendQuick:
1. Send via web interface
2. Send using file upload.
6.1 Send SMS via Web Interface
This is the default interface for all users when they log-in to sendQuick.
The first section is to select the Send Mode. Next, insert the mobile number. The mobile number
can be manually inserted in the text box with one number for each line. If there are a few numbers
to send to, insert a few lines. The user can also insert the numbers from the address book
(personal and global) by selecting the Select From Address Book button. Once selected, the
contact list will appear in the mobile number text box.
Then, select Character Set, Priority and Schedule (if required to schedule the message on a later
date and time)
Compose the SMS (text) message in the text box provided. Similarly, the users can select pre-
defined messages from the templates by selecting the Select From Message Template button
and select the relevant template. The character count and number of SMS messages are shown
below the message box. before selecting the Send button to send the SMS message.
If the messages are sent immediately, these messages will be reflected in the SMS Queue Log
and Sent Log. If the messages are scheduled for a sending on a later date and time, the messages
will be stored in the Scheduled SMS.
Figure 22: Send SMS via Web Interface

Strictly Private and Confidential
Copyright©2022 TalariaX Pte Ltd 17
SendQuick SMS Messaging User Manual 4.0
6.2 Send SMS via File Upload
Another sending method is using file upload. This means creating the data file (in Excel,
OpenOffice or database) and save the file a Comma Separated Value (csv) or Tab Delimited file
(text) and us them to send bulk SMS to the recipients. This method does not require the contact
list to be saved in sendQuick server.
Figure 23: Send SMS via File Upload

Strictly Private and Confidential
Copyright©2022 TalariaX Pte Ltd 18
SendQuick SMS Messaging User Manual 4.0
After selecting the Send SMS By File Upload button, the interface for sending will appear. The
table below explains the various items in File Upload feature.
Item
Description
File Format
Select the file format type that is being used. Select between Comma
Separated Value or Tab Delimited format
Character Selection
Select either ASCII or UTF-8 (if sending chinese)
Contents of Uploaded File
The type of files to be uploaded:
• Mobile Number only
◦ The file will consist of mobile numbers only, with one number for
each line: eg, 91234567 (one number one line)
• Mobile Number and Data
◦ The file consists of mobile number and single/multiple data fields
used for mailmerge into the message content when sending
SMS. Each data set is one line: eg,
91234567,john,2:00pm (where John is the first data <data1> and
2:00pm is <data2>. The phone number is not a data set)
• Mobile Number and Message
◦ This is the format where the SMS message is in the file. When this
option is selected the SMS text box will disappear. The format
(one record one line) is as follow: eg, 91234567,this is a reminder
message for John
Specify the File
Browse and select the required file
Schedule SMS
Select (check) if the messages need to be scheduled. Select the desired
Date and Time to send the SMS
Priority
Select the desired priority setting
Message Text Box
If the text box appears, Type the message or insert the message from the
templates.
Select From Template
Select the relevant messages from any templates that had been created
before (see Section 7.0 on Message Templates)
Message Counter
This indicate the number of characters in the SMS message (each SMS is
160 characters) and how many SMS to be sent for the message (multi-part)
After the file and message has been selected, the messages are pre-processed and a preview (of
the messages) are presented. If there is any error, it will be indicated. Similarly, if the format is
correct in accordance with the selection, then the status will be indicated in the preview.
Once the preview data is satisfactory, select the Upload button and the messages will be sent. Do
understand that the preview and sending SMS process may take some time if the number of
records in the file (upload) is large, example more than 5000 records.
We do advise users to note the following practices when sending SMS using File Upload:
• Do use a smaller file (say 20 records) with some test records to test the file format and
the uploading process. You do not need to send the messages. Just reach the preview
stage to determine whether the file if processed correctly. Such practice session is highly
recommended to avoid accidently sending mass messages that errorneous.

Strictly Private and Confidential
Copyright©2022 TalariaX Pte Ltd 19
SendQuick SMS Messaging User Manual 4.0
• When it is ready to send, it is advisable to send multiple batches if you are planning to
send a large number of records. This will help to reduce error which may happen when
sending large files with large number of records
• When the sending process (after preview), please do not close the browser as the browser
technology is used to send the messages. Close the browser only when the Messages
Sent message appear.
Please refer to the Messages Log to review the message sent status as explained in Section 11.0

Strictly Private and Confidential
Copyright©2022 TalariaX Pte Ltd 20
SendQuick SMS Messaging User Manual 4.0
7.0 Message Templates
Message Templates are messages that are pre-defined for future use. Having message
templates allow the user to easily retrieve the messages, perform some simple edit (or no editing)
and use them to send SMS. Message template can be quickly retrieved in the Send SMS page
There are 2 Message Templates:
- Personal Template
- Global Template
7.1 Personal Message Template
When the Message Template link is selected, the Personal Message Template Listing is shown
Figure 24: Message Template Listing
Select Add New Record to add a template
Figure 25: Create New Message Template
7.2 Global Message Template
When the Global Message Template link is selected, the Global Message Template Listing is
shown

Strictly Private and Confidential
Copyright©2022 TalariaX Pte Ltd 21
SendQuick SMS Messaging User Manual 4.0
Figure 26: Global Message Template Listing
For global template, select Add New Record button or the Edit link and perform the addition and
changes
Figure 27: Create New Global Message Template

Strictly Private and Confidential
Copyright©2022 TalariaX Pte Ltd 22
SendQuick SMS Messaging User Manual 4.0
8.0 Scheduled SMS
The Scheduled SMS menu shows the list of SMS messages that has been scheduled to be sent
on a later date and time. Once the messages are sent, they will be shown in the Sent Log. The
messages in the scheduled list can be deleted by selecting and deleting the messages as long
as it has not been sent.
Figure 28: Scheduled SMS List
Strictly Private and Confidential
Copyright©2022 TalariaX Pte Ltd 23
SendQuick SMS Messaging User Manual 4.0
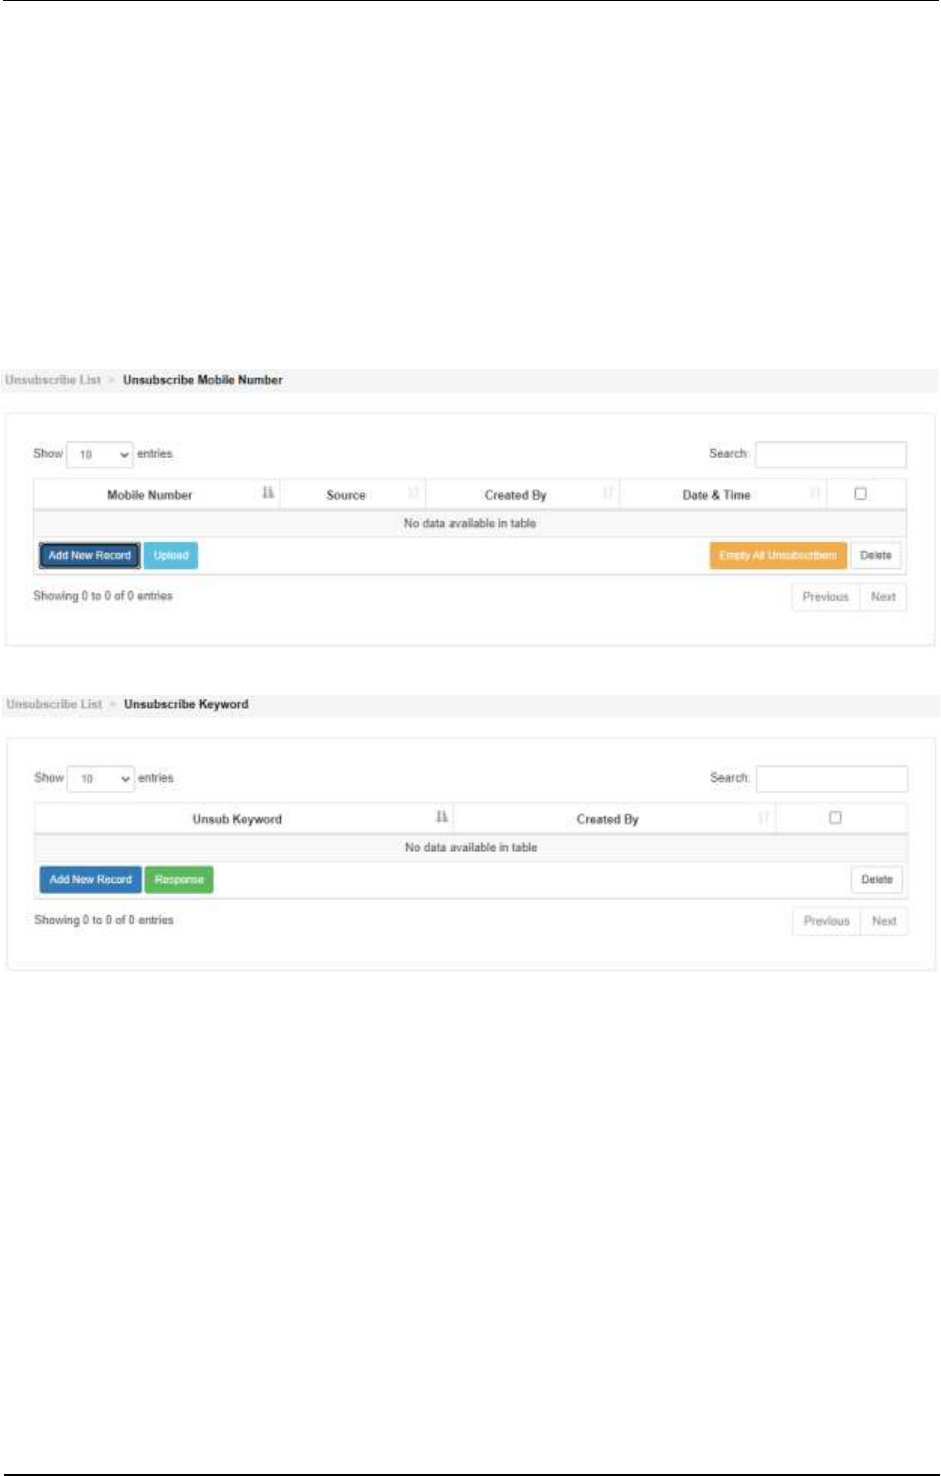
9.0 Unsubscribe List
The Unsubscribe List is a mobile phone list where the sender has requested not to receive any
messages from the sendQuick system. The mobile phone numbers can be inserted by sending a
SMS to the system with the unsubscribe keyword in the message. Keyword is defined as the first
word in the SMS message, followed by a space. E.g., unsub<space>john where “unsub” is the
keyword and “john” is the name of subscriber (optional).
If the number is removed from the unsubscribe list, it will receive SMS from sendQuick. Otherwise,
these phone numbers are filtered before messages are sent. This filter list applies to all users in
the system.
Figure 29: Unsubscribed Mobile Number List
Figure 30: Unsubscribed Keyword List
Strictly Private and Confidential
Copyright©2022 TalariaX Pte Ltd 24
SendQuick SMS Messaging User Manual 4.0
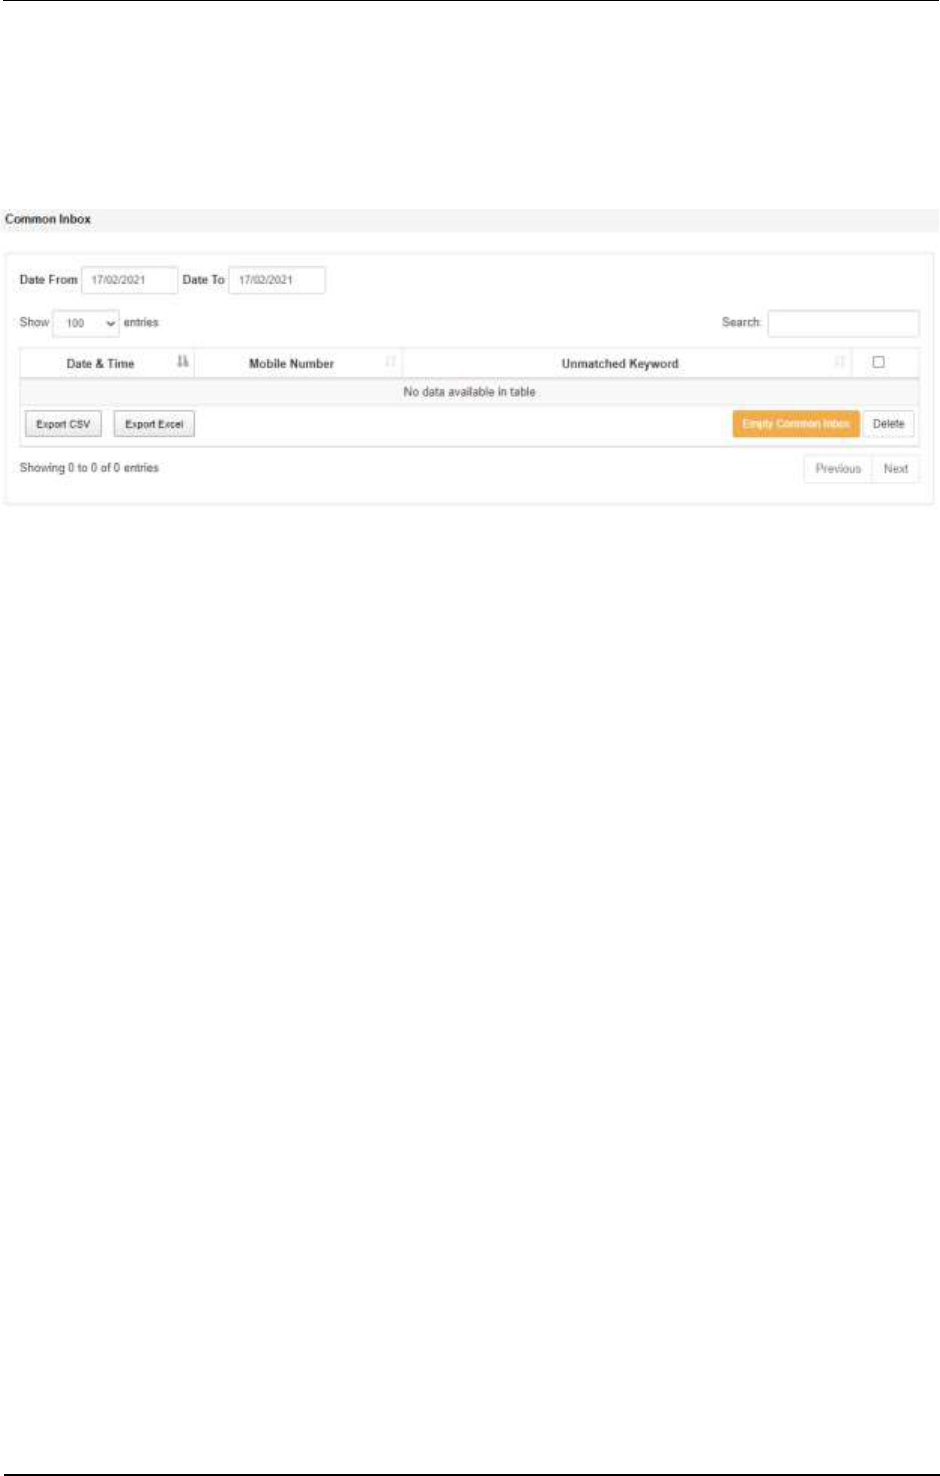
10.0 Common Inbox
In sendQuick, each user is automatically assigned a keyword. Keyword is defined as the first word
in the incoming SMS message. The login username is automatically a keyword in the system.
Other keywords can be defined in the Keyword Management section.
Figure 31: Common Inbox Management
If an incoming SMS match the keyword list, the SMS will be deposited in the respective user Inbox
and only the user can read the message. The incoming SMS that does not have a keyword will
be deposited in the Common Inbox and can be read by all users.

Strictly Private and Confidential
Copyright©2022 TalariaX Pte Ltd 25
SendQuick SMS Messaging User Manual 4.0
11.0 Message Logs Management
Message Logs has all the records of the SMS messages sent and received by sendQuick. There
are two types of messages recorded in sendQuick:
- Personal Logs
- Global Logs
In each category, there are four sets of logs:
Types of Logs
Description
Inbox
Inbox is for all incoming SMS. These are SMS received by the sendQuick
Sent
Outbox are for SMS messages sent by sendQuick.
Queue
Messages that are awaiting to send sent out or are in process
Unsent
Messages that failed to send
11.1 Personal Logs
Figure 32: Inbox Log
Figure 33: Sent Log

Strictly Private and Confidential
Copyright©2022 TalariaX Pte Ltd 26
SendQuick SMS Messaging User Manual 4.0
Figure 34: Queue Log
Figure 35: Unsent Log
11.2 Global Logs
Global Logs are logs for all the users in the sendQuick system. Global Logs may not be available
to all users, depending on the access rights to the users.
The search fields for Global Logs more extensive, including keyword, user name, department,
mobile number and date range
Figure 36: Global Inbox

Strictly Private and Confidential
Copyright©2022 TalariaX Pte Ltd 27
SendQuick SMS Messaging User Manual 4.0
Figure 37: Global Sent Log
Figure 38: Global Queue Log
Figure 39: Global Unsent Log

Strictly Private and Confidential
Copyright©2022 TalariaX Pte Ltd 28
SendQuick SMS Messaging User Manual 4.0
12.0 System Configuration
System Configuration allows the administrator to configure the global setting for sending SMS as
well as some of the configuration of the system.
The following figure shows the SMS Time Configuration. The settings here allows the company
to define the time range for each day when SMS message can be sent from the sendQuick
Messaging Interface. If messages are unsent by the expiry of the time range, the messages will
be 'held' and sent on the next available time period.
Figure 40: SMS Time Configuration
The following feature in Figure 41 is Web Interface Logo. It is to allow the administrator to upload
an image (eg, company's logo) that will be inserted before the sendQuick logo at the header
banner. Just browse, select and Upload the file.
Figure 41: Web Interface Logo

Strictly Private and Confidential
Copyright©2022 TalariaX Pte Ltd 29
SendQuick SMS Messaging User Manual 4.0
13.0 Quota Management
Quotas are credits where each user is allocated a certain number of messages which can be used
to send SMS. Quota does not apply to incoming (received) SMS. A user can only send the number
of SMS, limited by the quota value. A summary of users and quota is shown
Figure 42: Quota Setting for Users
When a new user a created, the quota is created at the same time. However, if it is not created,
the administrator can select Add New Record and select the UserID (username), SMS Quota, Auto
Quota Refresh and Auto Quota Refresh Value and select Save
Figure 43: Add New Quota Profile
The administrator can Edit and Top-Up the credit manually

Strictly Private and Confidential
Copyright©2022 TalariaX Pte Ltd 30
SendQuick SMS Messaging User Manual 4.0
Figure 44: Edit Quota Profile
Figure 45 shows the email address that will receive a notification when the credit value is low and
reached a triggering point, which is configurable.
Figure 45: Configure Quota Alert Email

Strictly Private and Confidential
Copyright©2022 TalariaX Pte Ltd 31
SendQuick SMS Messaging User Manual 4.0
14.0 Keyword Management
Keyword is defined is the first word in the incoming (received) SMS message. The keyword
management is used to configure the routing and functions of the incoming SMS message. This
is useful to convert and direct the incoming SMS to different supported formats (eg, email, HTTP
Post) to integrate to different backend applications. This is useful for data collation into backend
applications automatically.
Figure 46: Keyword Management Summary
This documents all the keywords assigned in the system. Keywords are unique and consists of
alphanumeric characters, up to 15 characters. There are no space or special characters in the
keyword.
Figure 47: Keyword Management Configuration (1)

Strictly Private and Confidential
Copyright©2022 TalariaX Pte Ltd 32
SendQuick SMS Messaging User Manual 4.0
Figure 48: Keyword Management Configuration (2)
The explanation for each function in a keyword as below:
Item
Description
Keyword
The assigned keyword (first word in SMS text message)
Keyword Description
The description for the keyword
Email
Insert email address in the text box (one line, one email). The incoming SMS
will be converted to emails, and sent to these email addresses listed in the
text box
Redirect Mobile Number
Insert mobile number to receive SMS. The incoming SMS will be redirected
to these mobile numbers
URL
Insert the receiving URL: for HTTP :Post. The incoming SMS will be converted
to HTTP Post and sent to the URL listed. Refer to sendQuick API for HTTP
Post specifications.
XML URL
Insert the receiving URL: for XML receipt. The incoming SMS will be
converted to XML and sent to the URL listed. Refer to sendQuick API for
HTTP Post specifications.
SOAP URL
Insert the receiving URL: for SOAP request The incoming SMS will be
converted to SOAP request and sent a request to the URL listed. Refer to
sendQuick API for HTTP Post specifications.
JSON URL
Insert the receiving URL: for JSON request. The incoming SMS will be
converted to JSON string and send a request URL listed. Refer to sendQuick
API for HTTP Post specifications.
Auto Reply Message
Select (check) to activate an auto-reply. This will send a reponse SMS to the
sender
Strictly Private and Confidential
Copyright©2022 TalariaX Pte Ltd 33
SendQuick SMS Messaging User Manual 4.0
Standard (Autoreply)
Message (Static)
The message that will be sent in the auto-reply message
Email Brochure
Select (check) to trigger an automated email if there is an email address in
the SMS message
Reply Email Address
The originating email address for the email
Email Subject
The subject for the email
Email Content
The actual email content to be sent
File Upload
If the email comes with an attachment, the file is uploaded here
Sender Mobile Checklist
This is to restrict the incoming SMS to designated mobile number only. Only
mobile number listed in the text box is allowed to trigger the various
functions (eg, email, XML, HTTP Post, JSON)
Once the Keyword is set, select Save and it will be saved and shown in the Keyword Management
Summary.

Strictly Private and Confidential
Copyright©2022 TalariaX Pte Ltd 34
SendQuick SMS Messaging User Manual 4.0
15.0 Language Setup
SendQuick support multi-lingual web interface. To change the language, just click the language
at the top left corner of the dashboard.
Figure 49: Language Setup
The default language is English. User can select between Traditional or Simplified Chinese. Once
selected, the interface will change to the desired language.
