Sterling Connect:Direct for z/OS
Administration Guide
Version 5.1.1
IBM
Sterling Connect:Direct for z/OS
Administration Guide
Version 5.1.1
IBM

Note
Before using this information and the product it supports, read the information in “Notices” on page 393.
This edition applies to version 5.1.1 of IBM Sterling Connect:Direct for z/OS and to all subsequent releases and
modifications until otherwise indicated in new editions.
© Copyright IBM Corporation 1999, 2015.
US Government Users Restricted Rights – Use, duplication or disclosure restricted by GSA ADP Schedule Contract
with IBM Corp.

Contents
Chapter 1. Basic System Administrative 1
Sterling Connect:Direct Native Command Structure . 3
Managing Tasks ............. 6
Displaying Task Status .......... 6
Removing Tasks from Execution ....... 9
Sterling Connect:Direct Secure Plus Commands .. 12
Certificate Validity Check Used by Sterling
Connect:Direct Secure Plus ........ 12
A TLS/SSL Environment Refresh ...... 13
Sterling Connect:Direct Secure Plus Display .. 13
Displaying Initialization Parameter Settings.... 13
Using the INQUIRE INITPARM Command from
the Batch Interface ........... 14
Issuing the INQUIRE INITPARM Command
through the IUI ............ 14
Modifying Initialization Parameter Settings while
Sterling Connect:Direct is Running ..... 15
Using the MODIFY INITPARMS Command from
the Batch Interface ........... 16
Issuing the MODIFY INITPARMS Command
through the IUI ............ 16
Backing up the Global and Local Initialization
Parameter Files ............ 17
Manually Backing Out or Restoring ..... 18
Displaying Sterling Connect:Direct/Plex Status .. 18
Using the INQUIRE CDPLEX Command from
the Batch Interface ........... 19
Issuing the INQUIRE CDPLEX Command
through the IUI ............ 19
Stopping Sterling Connect:Direct ....... 19
Stopping Sterling Connect:Direct through the
Batch Interface ............ 21
Stopping Sterling Connect:Direct through the IUI 21
Suspending and Resuming Quiesce and Trace
Settings................ 22
Suspending or Resuming Processing on a Node
through the Batch Interface ........ 24
Suspending or Resuming Processing on a Node
through the IUI ............ 24
Suspending or Resuming Processing on Nodes
through the Modify Nodes Screen ...... 25
Modify Nodes Screen .......... 26
Global Signon Defaults .......... 28
Chapter 2. Implementing Security ... 31
Security Exits .............. 32
SIGNON Command Sequence ........ 33
Security during Signon Command...... 33
Process Execution Sequence ........ 35
Implementing Security Exits ......... 36
Stage 1 Signon Security Exit ........ 36
Stage 2 Security Exit .......... 38
Run Job Security Exit .......... 56
Run Task Security Exit.......... 57
Sterling Connect:Direct Secure Point-of-Entry ... 57
Trusted Node Security ........... 59
Cross-Domain Signon Environment ..... 60
Data Direction Restriction ........ 60
Implementing a CA-ACF2 Environment ..... 61
Implementing an IBM RACF Environment .... 62
Providing Program Access to Data Sets (PADS) 63
Implementing a CA-TOP SECRET Environment .. 63
Configuring Firewall Navigation ....... 64
Firewall Navigation Rules Overview ..... 65
Session Establishment .......... 67
Troubleshooting Security Errors ....... 68
Chapter 3. Maintaining User
Authorization ............ 73
Authorization File ............ 73
INSERT USER and UPDATE USER Commands 74
Deleting Users from the Authorization File ... 81
Selecting User Information from the
Authorization File ........... 83
Chapter 4. Maintaining the Type File .. 87
Overriding File Attributes ......... 87
INSERT TYPE and UPDATE TYPE Commands .. 88
Inserting and Updating Type Files through the
Batch Interface ............ 94
Inserting and Updating Type Files through the
IUI ................ 94
DELETE TYPE Command ......... 96
Deleting Types Files through the Batch Interface 97
Deleting Type Files through the IUI ..... 97
SELECT TYPE Command.......... 97
Selecting Type Records through the Batch
Interface .............. 99
Selecting Type Records through the IUI .... 99
Chapter 5. Maintaining the Network
Map ............... 101
Local Node Entry ............ 101
Local Node Positional Parameters ..... 102
Local Node Keyword Parameters...... 102
When to Define the Local Node as the Adjacent
Node ................ 103
Adjacent Node Entry .......... 103
Positional Parameters for Adjacent Node Entries 105
Keyword Parameters for Adjacent Node Entries 107
Using Alternate Communications Paths.... 115
PNODE=SNODE Processing ....... 116
TCP/IP Considerations ......... 116
Channel-to-Channel Support ....... 121
API Signons .............. 122
Adjacent Node API Signon Definition Examples 122
Examples of Local and Adjacent Node Records .. 123
Alternate Communications Path Examples... 124
Sterling Connect:Direct for z/OS Adjacent Node
Examples.............. 124
© Copyright IBM Corp. 1999, 2015 iii
How to Update the Network Map ...... 129
Updating the Network Map while Sterling
Connect:Direct is Not Executing ...... 129
Updating the Network Map while Sterling
Connect:Direct is Running ........ 130
Using $$ACTION VERBS in the Network Map 131
Updating the Netmap through the Batch
Interface .............. 132
Updating the Netmap through the IUI Interface 132
$$ACTION Verb Examples ........ 133
Viewing the Network Map ......... 137
Chapter 6. Configuring a Sterling
Connect:Direct/Plex Environment... 139
A New Sterling Connect:Direct/Plex Environment 142
Setting Up a New Sterling Connect:Direct/Plex
Environment ............ 142
Advanced Sterling Connect:Direct:/Plex
Configuration Considerations ........ 145
Sterling Connect:Direct/Plex System File
Considerations ............ 145
Local Node Naming Considerations ..... 147
Strategies for Communicating with Non-Plex
Servers .............. 147
Converting an Existing Stand-Alone Server to a
Plex Environment ............ 149
Converting an Existing Production Server to a
Plex Environment ........... 149
Converting Two Existing Stand-Alone Server
Systems to a Plex Environment ....... 152
Converting a Standalone Server System into
One Sterling Connect:Direct/Plex Setup ... 154
Additional Sterling Connect:Direct/Plex
Configuration Examples .......... 157
Configuration Examples Using One Sterling
Connect:Direct for z/OS System ...... 158
Configuration Example Using Two Sterling
Connect:Direct for z/OS Systems ...... 161
Chapter 7. Configuring Extended
Recovery ............. 165
Setting Up Extended Recovery for a Sterling
Connect:Direct/Stand-Alone Server ...... 165
Setting Up Extended Recovery for a Sterling
Connect:Direct/Plex Environment ...... 166
Chapter 8. Configuring SNMP Support 169
Identifying Trap Variables ......... 169
Type Events ............. 170
Initialization Events .......... 170
Shutdown Events ........... 171
API Events ............. 171
Execution Events ........... 171
STATS Events ............ 173
Miscellaneous Events .......... 174
Setting Up SNMP ............ 175
After SNMP Setup........... 176
INQUIRE SNMP Command Displays the SNMP
Trap Table ............. 176
Issuing the INQUIRE SNMP Command through
the IUI .............. 176
Using the INQUIRE SNMP Command from the
Batch Interface ............ 177
Chapter 9. Sterling Connect:Direct
Exits ............... 179
Statistics Exit ............. 180
Sample Statistics Exits ......... 181
Statistics Exit Calling Conventions ..... 181
Statistics Records ........... 182
Submit Exit .............. 186
Sample Submit Exits .......... 186
Submit Exit Processing Flow ....... 187
Stage 1 Submit Exit .......... 188
Stage 2 Submit Exit .......... 188
Control Block Format.......... 188
Modifiable TCQE Fields ......... 191
Conversion of Parallel Session Values .... 193
ALLOCATION EXIT ........... 193
Sample Allocation Exits ......... 193
Restrictions and Requirements....... 195
How the Allocation Exit Executes ..... 196
How to Calculate Addresses and Values ... 197
Copy Control Block Definitions ...... 198
Copy Control Block Modifications ..... 198
DDESCR Control Block Format ...... 198
I/O Exit ............... 200
Sample I/O Exit ........... 200
Specifying the I/O Exit in the COPY Statement 200
Specify the I/O Exit in the TYPE File .... 201
I/O Exit Access to Control Blocks ..... 201
I/O Exit Requests ........... 202
Normal Input Calling Sequence ...... 203
Normal Output Calling Sequence...... 204
Data Exit ............... 205
Sample Data Exits ........... 206
Data Exit Access to Control Blocks ..... 207
Data Exit Requests .......... 207
Normal Input Calling Sequence ...... 209
Normal Output Calling Sequence...... 209
WLM Exit .............. 210
Exit Calling Convention ......... 210
Sample WLM Exit ........... 211
Tapemount Exit............. 211
Sample Tapemount Exit ......... 212
Process Exit for Testing (DGAXPRCT) ..... 212
Flow of the DGAXPRCT Exit ....... 213
Setting Up and Using the DGAXPRCT Exit .. 214
Sample Test Scenarios ......... 217
Reusing the DGAXPRCT Exit ....... 219
DGAXPRCT Output .......... 220
Chapter 10. Custom Messages in the
Message Library .......... 223
Message IDs.............. 224
Chapter 11. Customizing Submit
Screens .............. 225
Step 1 - Modify the Existing Menu DGA@SM03 225
iv IBM Sterling Connect:Direct for z/OS: Administration Guide

Step 2 - Define General Purpose Process .... 226
Step 3 - Provide a New Submit Screen ..... 226
Chapter 12. Administering Statistics 233
Tools to Monitor the Statistics Facility ..... 234
INQUIRE STATISTICS Command ..... 234
S2 Statistics Records .......... 234
SS Statistics Records .......... 235
Using the DGASSTAT Utility to Determine File
Usage ............... 235
Optimizing Statistics Files ......... 236
Change the File Pair Configuration ...... 237
File Pair Verification .......... 237
File Pair List Verification ........ 238
Archiving Statistics ........... 238
Archiving Using a Predefined Process .... 238
Timing the Archive .......... 239
Using the SELECT STATISTICS Command with
Archived Statistics........... 240
Maintaining an Archive File Directory .... 240
Archive-Related Utilities......... 241
Sample Archiving Setup ......... 245
Displaying the Status of the Statistics Logging
Facility ............... 248
Statistics Inquiry through the Batch Interface 249
Statistics Inquiry through the IUI Interface .. 249
Displaying the Statistics Archive File Directory .. 250
Viewing the Statistics Archive Directory through
the Batch Interface........... 252
Viewing the Statistics Archive Directory through
the IUI Interface ........... 252
Switching the Statistics File Pair ....... 253
Initiating a Statistics File Pair Switch through
the Batch Interface........... 253
Initiating a Statistics File Pair Switch through
the IUI Interface ........... 254
Recording Statistics for Specific Record Types .. 254
Excluding Statistics Logging through the Batch
Interface .............. 254
Excluding Statistics Logging through the IUI
Interface .............. 255
Notifying Sterling Connect:Direct of Statistics File
Archival ............... 255
Issuing Archive Notification through the Batch
Interface .............. 255
Issuing Archive Notification through the IUI
Interface .............. 256
Chapter 13. Managing the
Transmission Control Queue..... 257
Configure the TCQ ........... 257
How to Troubleshoot the TCQ........ 258
Using the TCQ/TCX Repair Utility
(DGADTQFX) ............ 258
DGADTQFX Examples ......... 260
DGADTQFX Output .......... 261
Chapter 14. Supporting DBCS and
MBCS............... 263
Overview of DBCS ........... 263
Translation Tables ............ 263
Customize Translation Tables ........ 264
DBCS ............... 264
END ............... 265
NAME=[tablename | XLATE] ....... 265
TITLE=[title name | DBCS TRANSLATION
TABLE] .............. 265
DEFAULT=nnnn ........... 266
RULES .............. 266
SBCS ............... 271
Comments ............. 272
Sample Preprocessor Input Data Stream ... 272
Sample JCL to EXECUTE the Preprocessor .. 272
Alternate Logic Applied to DBCS and SBCS
Translation (LOGIC =B | (B,RC) ) ...... 273
MBCS Conversions ........... 275
Chapter 15. Performance Tuning ... 277
Analyzing TCP/IP Performance ....... 277
General TCP/IP Problems ........ 277
Problems Involving Executing Sterling
Connect:Direct Processes ........ 279
How to Improve BSAM Data Transfer Rates ... 280
Troubleshooting BSAM Data Transfers .... 281
Increasing Throughput and Decreasing CPU
Utilization .............. 281
Compression Control Feature ....... 282
Using Extended Compression ....... 284
zIIP Exploitation Feature ........ 285
Considerations When Using Sterling
Connect:Direct Secure Plus ........ 287
Chapter 16. Isolating Problems .... 289
Providing Dumps to Customer Support .... 290
Sterling Connect:Direct Data Transmission
Facility (DTF) Dumps ......... 291
Sterling Connect:Direct IUI ABEND Dumps .. 293
DGADBATC Batch Dumps ........ 293
VSAM File Dumps .......... 294
Suppressing Dumps for Specific ABEND Codes 294
Resolving the Problem .......... 295
Reviewing Sterling Connect:Direct Messages and
Sense Codes .............. 295
Interactive Use of the Sterling Connect:Direct
Message Facility ........... 296
Examine Output from Select Commands .... 297
SELECT STATISTICS Command ...... 297
Verify File Attributes ........... 299
Common Errors ............ 299
Signon and IUI/API Errors........ 299
Sterling Connect:Direct DTF
Session-Establishment Errors ....... 304
Sterling Connect:Direct DTF Out-of-Storage
ABENDS .............. 305
Allocation and Open Errors ....... 306
Transmission Errors .......... 307
Operator Interface Errors ........ 309
Diagnostic Tools ............ 310
Security Traces ............ 310
Sterling Connect:Direct Function Traces.... 311
Contents v

Sterling Connect:Direct Automatic Traces ... 320
DD Statements in Startup JCL ....... 321
Chapter 17. Global Initialization
Parameters ............ 325
ABEND.CODES.NODUMP=(ABEND code list) .. 325
ABEND.RUNTASK = (DUMP |
ABEND.CODES.NODUMP) ........ 326
ALLOC.CODES = (allocation errors)...... 326
ALLOC.MSG.LEVEL = INFO | WARN | SEVERE 327
ALLOC.RETRIES = number of retries ..... 328
ALLOC.WAIT = hh:mm:ss ......... 328
ALLOCATION.EXIT = modname....... 328
CDPLEX = NO | YES .......... 328
CDPLEX.MAXSERVER = maximum number of
servers | 4 .............. 328
CDPLEX.TIMER = 5 | number of minutes.... 329
CDPLEX.WLM.GOAL = (NO | YES, exitname) .. 329
CHECK.CERT.EXPIRE = NO | YES ...... 329
CHECK.CERT.EXPIRE.TIME = 00:00:00 |
HH:MM:SS .............. 329
CHECK.CERT.EXPIRE.WARN.DAYS = 30 | nnn 330
CKPT = nK | nM ............ 330
CKPT.DAYS = number of days ....... 330
CKPT.MODE = (RECORD | BLOCK BLOCK |
RECORD PDS | NOPDS NOPDS | PDS VSAM |
NOVSAM VSAM | NOVSAM) ....... 330
COMPRESS.EXT = ALLOW | DISALLOW ... 331
COMPRESS.NEGO.FAIL = STEP | PROCESS... 332
COMPRESS.NETMAP.OVERRIDE = ALLOW |
DISALLOW .............. 332
COMPRESS.STD = ALLOW | DISALLOW ... 332
CONFIRM.COLD.START = YES | NO ..... 333
CRC = (OFF | ON, YES, No) ........ 333
CTCA = NO | YES ........... 333
CTCA.TIMER = number of seconds ...... 333
DATEFORM = (MDY | DMY | YMD | YDM) .. 334
DEBUG = nnnnnnnn ........... 335
DEFAULT.PERMISS = (text_permissions | 644,
binary_permissions | 755) ......... 335
DESC.CRIT = (descriptor code) ....... 336
DESC.NORM = (n,n,...) .......... 336
DESC.TAPE = (n,n,...)........... 336
DSNTYPE = YES | NO .......... 336
ECZ.COMPRESSION.LEVEL = 1 | n ..... 337
ECZ.MEMORY.LEVEL = 4 | n........ 337
ECZ.WINDOWSIZE = 13 | nn ....... 337
ESF.WAIT = hh:mm:ss .......... 337
EXPDT = (TT,DD,TD,DT) (if multiple values
EXPDT = TT | DD | TD | DT | ALL | NONE (if
only one value)............. 338
EXTENDED.RECOVERY = NO | YES ..... 339
FIPS = NO | YES ............ 339
GDGALLOC = GENERATION | DSNAME ... 339
GDGENQ = YES|NO .......... 341
IMMEDIATE.SHUTDOWN = I | R | (I, nnn | 60)
| (R, nnn | 60) ............. 341
INITPARM.BACKUP = member ....... 342
INVOKE.ALLOC.EXIT = SEND|RECV|BOTH .. 342
INVOKE.ALLOC.EXIT.ON.RESTART = NO|YES 342
INVOKE.SPOE.ON.SNODEID = NO|YES .... 343
MAX.AGE = (nnn , * | *(nnn) | ALL | ALL(nnn) |
status_type | status_type (nnn) , list) ..... 343
MAX.AGE.TOD = time .......... 345
MAXBATCH = number of users ....... 345
MAXPRIMARY = number of PNODE sessions .. 345
MAXPROCESS = number of executing PNODE
and SNODE Processes .......... 345
MAXRETRIES = number of retries ...... 345
MAXSECONDARY = number of SNODE sessions 346
MAXSTGIO = maximum storage used for
sequential data set transfers for system-determined
NCP, maximum I/O storage for user-specified
NCP) ................ 346
MAX.TAPE = number of tape Processes | NONE 347
MAXUSERS = number of users ....... 347
MCS.CLIST = console operator CLIST library file
name ................ 347
MCS.SIGNON = (SIGNON USERID = (user
ID,password) NETMAP = network map [optional
parameters]).............. 348
MULTI.COPY.STAT.RCD=not set | CT | MC | M2 348
NETMAP.CHECK = NO | (ALL | TCP, ALL |
BOTH | NODENAME, FAIL | WARN | PASS) .. 349
NETMAP.CHECK.ON.CALL= YES | NO .... 350
NODE.QUIESCE.OFF = NODENAME ..... 350
NODE.QUIESCE.ON = NODENAME ..... 351
NODE.TRACE.OFF = NODENAME ...... 351
NODE.TRACE.ON = (NODENAME,nnnnnnnn) 352
NON.SWAPABLE = YES | NO ....... 352
PDSE.SHARING = YES | NO ........ 352
PDSENQ = YES | NO .......... 354
PROCESS.RETENTION = YES | NO ..... 354
PRTYDEF = Process priority ........ 355
QUIESCE = YES | NO .......... 355
QUIESCE.NODE = node name ....... 355
REMOTE.DUMMY.PASSWORD = [ YES |
INTERNAL ] ............. 356
REQUEUE = YES | NO ......... 356
RESET.ORIGIN.ON.SUBMIT = YES | NO .... 357
REUSE.SESSIONS = YES | NO ....... 357
ROUTCDE.CRIT = (route code) ....... 358
ROUTCDE.NORM = (route code) ...... 358
ROUTCDE.TAPE = (route code) ....... 358
RUN.JOB.EXIT = modname ........ 358
RUNJOBID = USER | CD ......... 359
RUN.TASK.EXIT = modname ........ 359
RUNTASK.RESTART = YES | NO ...... 359
S+CMD.ENFORCE.SECURE.CONNECTION = YES
| NO ................ 360
SECURE.DSN = filename ......... 360
SECURE.SSL.PATH.PREFIX = prefix...... 360
SECURITY.EXIT | SECURITY ........ 360
SECURITY.NOTIFY = YES | NO | HOLD.... 361
SNA = YES | NO ............ 362
SNMP = YES | NO ........... 362
SNMP.DSN = data set name | data set name
(member)............... 362
SNMP.MANAGER.ADDR = hostname | IP address 362
SNMP.MANAGER.PORTNUM = port-number .. 363
STAT.ARCH.CONFIRM = YES | NO ..... 363
vi IBM Sterling Connect:Direct for z/OS: Administration Guide

STAT.BUFFER.ESDSDATA |
STAT.BUFFER.KSDSINDX |
STAT.BUFFER.KSDSDATA ......... 363
STAT.ERROR = ABEND | DISABLE...... 364
STAT.EXCLUDE = (record type list) ...... 364
STAT.INIT = WARM | COLD ........ 365
STAT.QUEUE.ELEMENTS = statistics record queue
size................. 365
STAT.SNODEID = (NO | YES,NO | YES) .... 366
STAT.SWITCH.SUBMIT = dsn [member] .... 366
STAT.SWITCH.TIME = (hh:mm:ss , ...) ..... 367
STAT.TPREC = (start_time, end_time,
snaps_per_hour) ............ 367
STAT.USER = (user ID, [password]) ...... 367
STATISTICS.EXIT = modname |
(modname[,MANAGER | SERVER | BOTH]) .. 368
STRNO.MSG = number | 5 ........ 368
SUBMIT.EXIT = modname ......... 369
SYSOUT = class ............ 369
TAPE.PREMOUNT = YES | NO | LIST .... 369
TAPEIO = EXCP | BSAM ......... 369
TAPEMOUNT.EXIT = modname ....... 370
TCP = OES | NO ............ 370
TCP.API.LISTEN = ((addr , port) , (addrn , portn)) 370
TCP.API.TIMER = 00:00:00 | hh:mm:ss ..... 371
TCP.CONNECT.TIMEOUT= 0 | number of seconds 372
TCP.FMH.TIMER=hh:mm:ss ........ 372
TCP.LISTEN = ((addr , port) , (addrn , portn)) .. 372
TCP.RUNTASK.TIMER = hh:mm:ss ...... 373
TCP.SRC.PORTS ............ 373
TCP.SRC.PORTS.LIST.ITERATIONS = number of
scans ................ 374
TCP.TIMER = wait time .......... 375
TCQ = WARM | COLD .......... 375
TCQ.THRESHOLD = NO | YES | nn ..... 375
THIRD.DISP.DELETE = YES | NO ...... 376
TRACE.BUFFER = nnn | 2 ......... 377
TRANS.SUBPAS = YES|NO ........ 377
UDP.SRC.PORTS ............ 377
UDP.SRC.PORTS.LIST.ITERATIONS = number of
scans ................ 378
UDT = YES|NO ............ 378
UDT.MAXPROCESS = 2 | number of executing
UDT Processes ............. 378
UDT33.LISTEN = ((ipaddr,port)[,(ipaddr,port)...]) 378
UPPER.CASE = YES|NO ......... 379
V2.BUFSIZE = (maximum transmission buffer size,
TCP/IP send/receive buffer size)....... 379
WTMESSAGE = NO | YES | (YES,nnn) .... 380
WTRETRIES = hh:mm:ss | 00:03:00 ...... 380
XCF.NAME = XCF group name ....... 380
ZIIP = NONE | EXTCOMP | SSLTLS | ALL |
PROJECT............... 381
Sterling Connect:Direct System File Initialization
Parameters .............. 381
AUThHDSN = dsn .......... 381
CKPTDSN = dsn ........... 381
MSGDSN = dsn ........... 381
NETDSN = dsn............ 382
STAT.ARCH.DIR = archive directory file name 382
STAT.DSN.BASE | STAT.FILE.PAIRS .... 382
TYPEDSN = dsn ........... 383
Chapter 18. Local Initialization
Parameters ............ 385
CDPLEX.INITPARM.BACKUP = member .... 386
CDPLEX.MANAGER = NO | YES ...... 386
CDPLEX.MSGID = NONE | xx ....... 386
CDPLEX.PLEXCLASSES = (*,plexclass,...,plexclass) 387
CDPLEX.REDIRECT ........... 387
CDPLEX.REDIRECT.EXCEPTION = ((Mgr-IP,
Ext_Svr-IP, Ext_Svr-port, Exception-IP,
Exception-port),...) ............ 388
CDPLEX.SERVER = Sterling Connect:Direct/Server
name ................ 389
CDPLEX.SERVER.JOBDSN = data set name ... 389
CDPLEX.SERVER.JOBMEM = ((member
name,server name),...) .......... 389
CDPLEX.SERVER.NODE = node name ..... 389
CDPLEX.TIMER = 5 | number of minutes.... 390
CDPLEX.VTAM = (VTAM-APPL,P/S-Node-APPL) 390
Chapter 19. Using the UDT Protocol 391
Initialization Parameters for UDT Connections .. 391
Network Map Parameters ......... 391
PROCESS Statement Parameter ....... 392
Notices .............. 393
Trademarks .............. 395
Terms and conditions for product documentation 396
Index ............... 397
Contents vii
viii IBM Sterling Connect:Direct for z/OS: Administration Guide

Chapter 1. Basic System Administrative
The Administrative Options Menu provides access to system administration
functions. To access this menu, do one of the following:
v Select ADMIN from the Primary Options Menu.
v Type =ADMIN on any IBM
®
Sterling Connect:Direct
®
screen command line and
press ENTER.
The following figure is an example of the Administrative Options Menu. To access
a function, type the function abbreviation on the command line and press ENTER.
Note: Various functions on the Administrative Options Menu may not be available
to all users. Access is controlled through the User Authorization file.
View Modify Control Delete Secure+
------------------------------------------------------------------------------
node.name Connect:Direct ADMINISTRATIVE OPTIONS MENU
CMD ==>
SELECT ONE OF THE FOLLOWING:
ST - VIEW TYPE RECORD ************************
IT - INSERT/UPDATE TYPE RECORD * *
DT - DELETE TYPE RECORD * TODAY: yyyy.mm.dd *
SU - VIEW USER AUTHORIZATION RECORD * TIME: hh:mm *
IU - INSERT/UPDATE USER AUTHORIZATION RECORD * *
DU - DELETE USER AUTHORIZATION RECORD ************************
TS - VIEW Connect:Direct TASKS
TF - FLUSH A Connect:Direct TASK
S - Execute Secure Plus Commands
MD - MODIFY Connect:Direct TRACE CHARACTERISTICS
C - ENTER A NATIVE Connect:Direct COMMAND
SN - TERMINATE Connect:Direct
ARS - ARS REPORTING FACILITY
NM - VIEW THE CONTENTS OF THE Connect:Direct NETWORK MAP
UNM - UPDATE THE Connect:Direct NETWORK MAP
INQ - INQUIRE ABOUT DTF INTERNAL STATUS
STAT - PERFORM STATISTICS FUNCTIONS
Execute Secure Plus Commands option is not displayed, unless you have
functional authority for Sterling Connect:Direct Secure Plus. See Functional
Authority Privileges (specifically the information in BYTE8 in the DGA$MFLG
macro).
Select the following options from the Connect:Direct Administrative Options Menu.
v To maintain the Type Defaults file with file attribute information used during
Process submission, use the following options.
Option Description
ST Displays the Select Type screen where you can examine a record in the Type
file and select the output to go to a file, table, or printer.
IT Displays the Insert/Update Type screen where you can add or change a
record in the Type Defaults file.
© Copyright IBM Corp. 1999, 2015 1

Option Description
DT Displays the Delete Type screen where you can remove a record from the
Type file.
v To maintain the User Authorization file that controls access to functions, use the
following options.
Option Description
SU Displays the Select User screen where you examine the user profile in the
Authorization file.
IU Displays the Insert/Update User screen where you can add a user to the
system or change user privileges on the system.
DU Displays the Delete User screen where you can remove a user from the
Authorization file.
v To select and flush tasks, use the following options:
Option Description
TS Accesses the Select Task screen where you determine the task ID, type, and task
number.
TF Displays the Flush Task screen where you can remove a task from the execution
queue.
v To perform Sterling Connect:Direct Secure Plus functions, use the following
options. You must first select the Execute Secure Plus Commands from the
Connect:Direct Administrative Options Menu.
Option Description
CR Executes the Certificate Expiration Validation Command on demand to let you
see warnings both for certificates that have expired and will soon expire.
RF Executes the Refresh Secure Plus Environment Command to update the SSL
and TLS environments after you have changed security-related information.
SA Executes the Sterling Connect:Direct Secure Plus Admin Tool and displays the
Sterling Connect:Direct Secure Plus Admin Tool Main Screen. See the IBM
Sterling Connect:Direct Secure Plus for z/OS Implementation Guide for more
information on using Sterling Connect:Direct Secure Plus.
v To initialize traces, suspend and resume sessions, modify initialization
parameters, type native commands, terminate Sterling Connect:Direct, and access
ARS, use the following options.
Option Description
MD Displays the Modify Command screen where you can request traces and
modify system functions. For information on the MODIFY command and trace
and debug settings, see Sterling Connect:Direct MODIFY Command. For
information on the MODIFY SESSIONS command, see Suspending and
Resuming Quiesce and Trace Settings . For information on the MODIFY
INITPARMS command, see Modifying Initialization Parameter Settings while
Sterling Connect:Direct is Running.
C Displays the Native Command screen where you can type and execute any
Sterling Connect:Direct for z/OS
®
command by providing it in native syntax.
For information, see Sterling Connect:Direct Native Command Structure .
2 IBM Sterling Connect:Direct for z/OS: Administration Guide

Option Description
SN Displays the Stop Sterling Connect:Direct screen where you stop the operation
of Sterling Connect:Direct. For more information, see Stopping Sterling
Connect:Direct.
ARS Displays the ARS REPORT OPTIONS menu. While Sterling Connect:Direct
produces statistics, the Activity Reporting System (ARS) gives you access to
more information and also provides sorting capabilities. For more information,
see the IBM Sterling Connect:Direct for z/OS Facilities Guide.
v To view and maintain the network map and translate TCP/IP names, use the
following options.
Option Description
NM Displays the Select Network Map screen, where you choose to display or
print, the defined Sterling Connect:Direct nodes from the network map file
and translation of TCP/IP host names and network addresses. For more
information on the SELECT NETMAP command and the SELECT TCPXLT
command, see The Network Map in IBM Sterling Connect:Direct for z/OS User
Guide.
UNM Enables you to update the network map dynamically. For more information,
see Updating the Netmap through the IUI Interface.
v To inquire about DTF internal status and perform statistics functions, use the
following options.
Option Description
INQ Displays the Inquire C:D Internal Status screen, from which you can request
information about the:
v Statistics archive file directory (see Viewing the Statistics Archive Directory
through the IUI Interface)
v Sterling Connect:Direct/Plex environment (see “Displaying Sterling
Connect:Direct/Plex Status” on page 18)
v Statistics logging facility (see Statistics Inquiry through the IUI Interface)
v SNMP Trap Table (see INQUIRE SNMP Command Displays the SNMP Trap
Table )
v TCP Listen Status (see Viewing a TCP Listen Status Report)
v Current DEBUG settings (see Displaying DEBUG Settings)
v Initialization parameters settings (see Displaying Initialization Parameter
Settings)
STAT Displays the Statistics Command screen from which you can request functions
related to the Statistics files, such as initiating statistics file pair switching,
confirm statistics file archival, enable statistics recording, and disable statistics
recording. For more information, see Retrieving Statistics with the SELECT
STATISTICS Command.
Sterling Connect:Direct Native Command Structure
You use the Native Command structure to build a more detailed list of parameters
than you can from the command panels. You can type any Sterling Connect:Direct
command or series of Sterling Connect:Direct commands using the Native
Command structure.
Chapter 1. Basic System Administrative 3

To access the Native Command Screen, select option C from the Administrative
Options Menu.
node.name NATIVE COMMAND SCREEN hh:mm
CMD ==>
ENTER COMMAND TEXT:
==> _______________________________________________________________
==> _______________________________________________________________
==> _______________________________________________________________
==> _______________________________________________________________
==> _______________________________________________________________
==> _______________________________________________________________
==> _______________________________________________________________
==> _______________________________________________________________
==> _______________________________________________________________
==> _______________________________________________________________
==> _______________________________________________________________
==> _______________________________________________________________
==> _______________________________________________________________
==> _______________________________________________________________
==> _______________________________________________________________
==> _______________________________________________________________
Observe the following rules when you type your command:
v Start keywords on the next line or break them by a separator (blank or comma).
v To use comments on the Native Command Screen, type an asterisk in the first
column of the input line. Typing an asterisk enables you to issue commands
without retyping them.
v You cannot continuously wrap commands across lines on the Native Command
Screen.
A command that creates a temporary file displays the temporary file for you to
browse after the command executes.
Examples
In the following example, when you press ENTER, you submit the Process called
TEST2.
4 IBM Sterling Connect:Direct for z/OS: Administration Guide

node.name NATIVE COMMAND SCREEN hh:mm
CMD ==>
ENTER COMMAND TEXT:
==> SUBMIT PROC=TEST2 _____________________________________________
==> _______________________________________________________________
==> *SELECT PROCESS WHERE (PNAME=TEST2) ___________________________
==> _______________________________________________________________
==> _______________________________________________________________
==> _______________________________________________________________
==> _______________________________________________________________
==> _______________________________________________________________
==> _______________________________________________________________
==> _______________________________________________________________
==> _______________________________________________________________
==> _______________________________________________________________
==> _______________________________________________________________
==> _______________________________________________________________
==> _______________________________________________________________
==> _______________________________________________________________
To monitor the progress of TEST2, type an asterisk in column 1 of the first input
line (before SUBMIT), delete the asterisk from the third input line (before SELECT),
and press ENTER.
You can also submit a Process from the command line. In the following example,
the Process TEST2 is submitted from the command line. The SELECT PROCESS
(line 3) takes place just as in the previous example. The screen sample follows.
node.name NATIVE COMMAND SCREEN hh:mm
CMD ==> SUBMIT PROC=TEST2
ENTER COMMAND TEXT:
==>________________________________________________________________
==> _______________________________________________________________
==> SELECT PROCESS WHERE (PNAME=TEST2) ___________________________
==> _______________________________________________________________
==> _______________________________________________________________
==> _______________________________________________________________
==> _______________________________________________________________
==> _______________________________________________________________
==> _______________________________________________________________
==> _______________________________________________________________
==> _______________________________________________________________
==> _______________________________________________________________
==> _______________________________________________________________
==> _______________________________________________________________
==> _______________________________________________________________
==> _______________________________________________________________
Chapter 1. Basic System Administrative 5

Managing Tasks
Sterling Connect:Direct tasks perform and manage work in a DTF. This section
describes how to display task information and remove (flush) tasks.
The following table lists the Sterling Connect:Direct tasks and their functions:
Type Task Function
System Master (M) Controls the dispatching and logon processing for
the DTF
Timer (T) Performs timer services for the master task and
Process-related timer functions
Operator interface (C) Enables you to communicate to the DTF through the
operator console
Extended Submit Facility
Scan (W)
Scans the TCQ at predefined intervals and moves
submitted Processes that are not on the current
processing queue (PCQ) to the PCQ
System Open/Close Task (O) Manages the VTAM ACB open/close and TPEND
exit
TCP Task (U) Monitors incoming TCP/IP session requests
XCF Communication (Q) Manages communications between Manager and
Servers in a Sterling Connect:Direct/Plex
TCP API Task (D) Monitors incoming TCP/IP Sterling Connect:Direct
API session requests
LOGON (L) Reserved for use during logon processing
Statistics (A) Controls status logging
Session Creation TCA
(F)
Manages Processes and tasks
Statistics Archive Submit
Task (Z)
Submits the Statistics File Archive Process
CTCA Server Task (Y) Manages the CTCA tasks
Sterling
Connect:Direct/Plex
Queue Manager Task
(Q)
Manages the VTAM ACB open/close and TPEND
exit
User PNODE Task (P) Manages the work related to a request that initiated
the current session
SNODE Task (S) Manages the work related to a partner PNODE task
IUI Task (I) Manages the requests from a session with an IUI
user
Background (Batch) Task
(B)
Manages the request from a batch user
Displaying Task Status
Use the SELECT TASK command to select and display the status of Sterling
Connect:Direct tasks. It has the following format and parameters.
Label Command Parameters
(optional) SELect TASK PRint | Operator Table | DISplay
6 IBM Sterling Connect:Direct for z/OS: Administration Guide

Label Command Parameters
WHERE (SERVER = server name)
The required SELECT TASK parameters are:
Parameter Description
PRint | Operator Table |
DISplay
PRint specifies the command is output in hard copy to a printer.
TABLE specifies the command is output to a table.
DISplay specifies the command is output to the screen.
The optional SELECT TASK parameters are:
Parameter Description
WHERE(SERVER
= server name)
This parameter specifies the name of the Sterling Connect:Direct/Plex
member where the SELECT TASK command is performed. The server
name parameter is the 1–8 character name assigned to a Sterling
Connect:Direct/Server by the CDPLEX.SERVER initialization
parameter.
This parameter only applies to a Sterling Connect:Direct/Plex
environment. If this parameter is not specified in a Sterling
Connect:Direct/Plex environment, the SELECT TASK is performed on
the Sterling Connect:Direct/Manager.
Examples
The following SELECT TASK command example sends output to the log printer:
SEL TASK PRINT
The following SELECT TASK example is performed on a Sterling
Connect:Direct/Server named SERVER3 and sends the output to your terminal in
operator table format.
SEL TASK O WHERE(SERVER=SERVER3)
Selecting a Task through the Batch Interface
About this task
To use the SELECT TASK command from the batch interface:
Procedure
1. Place your commands in a batch job stream.
2. Submit the job while Sterling Connect:Direct is running.
3. Verify your results.
Chapter 1. Basic System Administrative 7

Selecting a Task through the IUI
About this task
You must select the appropriate output for the SELECT TASK report. You can
either display (in report or operator table format) or print the report.
Procedure
1. Select option TS from the Administrative Options Menu.
The SELECT TASK screen is displayed.
node.name SELECT TASK hh:mm
CMD ==>
CMD: OPR
CMD: O ... OPERATOR TABLE
P ... PRINT REPORT D ... DISPLAY REPORT
SERVER => ________
2. Select one of the following display types.
Option Description
D Displays the report on your screen and is captured in the TMPDSN specified
in the SIGNON defaults of the user.
O or OPR Displays the report to your screen in the operator table format.
P Sends the report to a printer.
Note: If you are running in a Sterling Connect:Direct/Plex environment, type
the member name on which you want to perform the SELECT TASK in the
SERVER field. If you leave this field blank in a Sterling Connect:Direct/Plex
environment, the SELECT TASK is performed on the Sterling
Connect:Direct/Manager. If you are running in a Sterling Connect:Direct/
Stand-alone Server environment, leave this field blank.
3. Press ENTER.
v If you selected Display from the Select Task screen, the following screen is
displayed:
BROWSE--XXXXXXXX.XXXXXXX.XXXXX.XXXXXX.XXXXX--LINE 00000000 COL 001 080
COMMAND ===> SCROLL ===> CSR
******************************* TOP OF DATA *************************
===========================================================
SELECT TASK for C:D/Plex Manager
===========================================================
TASK TASK XMIT PNAME/
ID NUM STATE STATE PNUM
___________________________________________________________
M 001 INACTIVE
___________________________________________________________
T 002 TIMER
___________________________________________________________
A 003 INACTIVE
___________________________________________________________
Z 004 INACTIVE
___________________________________________________________
C 005 MISC I/O
___________________________________________________________
F 006 INACTIVE
___________________________________________________________
U 007 SUBTASK TCP MAIN TAS
8 IBM Sterling Connect:Direct for z/OS: Administration Guide

v If you selected the operator table format, the following screen is displayed:
-------------------------------OPERATOR TABLE-------------- Row 1 to 20 of 22
==> SCROLL ===> PAGE
OPTION TID TASKNO STATE SUB-STATE PNAM/UID PNUM
-------------------------------------------------------------------------------
M 1 INACTIVE
T 2 TIMER
A 3 INACTIVE
Z 4 INACTIVE
C 5 MISC I/O
F 6 INACTIVE
U 7 SUBTASK TCP MAIN TAS
U 8 ST RUNNG TCP ACCEPT
D 9 SUBTASK TCP MAIN TAS
D 10 API RUN TCP ACCEPT
O 11 INACTIVE
I 13 VTAM I/O RECEIVE SJONES2
I 14 RUNNING BSMITH1
W 12 TIMER
Q 37 WAIT4WRK
Q 38 WAIT4WRK
Q 39 WAIT4WRK
Q 40 WAIT4WRK
Q 41 WAIT4WRK
Q 73 WAIT4WRK
You can perform the following operations from the Operator Table:
v Type F next to the task ID to flush and suspend nonsystem tasks.
v Type P to suspend a task.
Refresh the OPERATOR TABLE screen by typing Q line and pressing ENTER.
Removing Tasks from Execution
Use the FLUSH TASK command to remove a task from execution. Identify the task
by its task number. You cannot flush system or IUI tasks.
Note: Only use the FLUSH TASK command if you cannot flush the Process using
the FLUSH PROCESS command.
The FLUSH TASK command has the following format and associated parameters.
Required parameters are in bold print.
Label Command Parameters
(optional) FLush TASK WHERE (
TASK = (tasknumber | (list),
SERVER = server name
)
FORCE
The required FLUSH TASK parameter is:
Chapter 1. Basic System Administrative 9

Parameter Description
WHERE (TASK = (tasknumber
| (list), SERVER=server name)
(tasknumber | (list) specifies the tasks to flush either by
task number or a list of task numbers.
This parameter is required. SERVER=server name
specifies the name of the Sterling Connect:Direct server
where the FLUSH TASK is performed. The server name
parameter is the 1–8 character name assigned to a
Sterling Connect:Direct/Server by the CDPLEX.SERVER
initialization parameter. This parameter is only valid in a
Sterling Connect:Direct/Plex environment. If you omit
this parameter in a Sterling Connect:Direct/Plex
environment, the FLUSH TASK is performed on a
Sterling Connect:Direct/Manager.
The optional FLUSH TASK parameter is:
Parameter Description
FORCE Specifies that flush task is forced. Do not use the FORCE
parameter when the task is executing on a LU6.2 session. The
session terminates immediately and statistics are not
exchanged between the two nodes.
If you do not specify the FORCE option for the FLUSH TASK
command, then an indicator notifies the program executing on
behalf of the task that a FLUSH TASK command was issued
for that task. If that program is not in control (for example, if
it is waiting on a request outside of Sterling Connect:Direct to
complete), then it does not recognize the FLUSH TASK
indicator, and the task is not flushed; otherwise, the program
recognizes for the FLUSH TASK indicator and takes the
appropriate action.
When you specify the FORCE option, then the action taken
depends on the STATE and SUBSTATE of the task for which
you issued the FORCE FLUSH. See Connect:Direct Process
Language for the actions taken for the specific STATE and
SUBSTATE.
Note: Use the SELECT TASK command to determine the
STATE and SUBSTATE of the task.
Examples
The following example shows the FLUSH TASK command force flushing three
tasks:
FLUSH TASK WHERE (TASK=(100,105,120)) FORCE
The following example shows the FLUSH TASK command flushing a task running
on a Sterling Connect:Direct/Server named OSGOOD:
FLUSH TASK WHERE (TASK=9,SERVER=OSGOOD)
10 IBM Sterling Connect:Direct for z/OS: Administration Guide

Removing Tasks from Execution through the Batch Interface
About this task
To use the FLUSH TASK command from the batch interface, perform the following
steps:
Procedure
1. Place your commands in the batch job stream.
2. Submit the job while Sterling Connect:Direct is running.
3. Verify your results.
Removing Tasks from Execution through the IUI
About this task
Refer to the example of the SELECT TASK Operator Table for information about
how to flush a task using the Operator Table.
To flush a task using the Flush a Task screen:
Procedure
1. Select option TF from the Administrative Options Menu to access the Flush a
Task screen.
node.name FLUSH A TASK hh:mm
CMD ==>
SERVER ==> ________
TASK NUMBERS:
==> ______ ==> ______ ==> ______ ==> ______
==> ______ ==> ______ ==> ______ ==> ______
FORCE: (’Y’-YES, ’N’-NO) FORCE FLUSH A TASK ON A LU 6.2 SESSION MAY
==> _ TERMINATE THE SESSION IMMEDIATELY AND NO
STATISTICS OF THE TASK WILL BE EXCHANGED
2. If you are running in a Sterling Connect:Direct/Plex environment, type the
Sterling Connect:Direct/Plex server name. If you leave this field blank, the
Flush Task is performed on the Sterling Connect:Direct Manager.
Leave this field blank if you are running in a Sterling Connect:Direct/Stand-
alone Server.
3. Type the numbers of the tasks you want to flush.
4. In the FORCE field, type Y to force the flush. Type N if you do not want to
force the flush. The default is N.
A list of the requested tasks is displayed to indicate a successful flush.
Chapter 1. Basic System Administrative 11

Sterling Connect:Direct Secure Plus Commands
When you select the Execute Sterling Connect:Direct Secure Plus Commands on
the Connect:Direct Administrative Options Menu, the following screen is
displayed:
node.name Execute Secure+ Commands hh:mm
CMD ==>
CR - Execute Certificate Expiration Validation Command
RF - Execute Refresh Secure Plus Environment Command
SA - Execute Secure Plus Admin Tool
Certificate Validity Check Used by Sterling Connect:Direct
Secure Plus
To check the validity of certificates using Sterling Connect:Direct Secure Plus,
define the following initialization parameters:
v SECURE.DSN - the name of the parameter file
v CHECK.CERT.EXPIRE to perform a certificate validation check
v CHECK.CERT.EXPIRE.TIME to perform certificate validation checks
v CHECK.CERT.EXPIRE.WARNING.DAYS to indicate how many days before
certificate expiration to issue a warning message
After certificate validation check is enabled, Sterling Connect:Direct automatically
monitors the status of the certificates as specified and whenever Sterling
Connect:Direct and Sterling Connect:Direct Secure Plus are initialized.
When the certificate validation checks are performed, Sterling Connect:Direct
verifies the label name and node name of all certificates in the Sterling
Connect:Direct Secure Plus parameter file. After verifying all trusted certificates in
the key store, Sterling Connect:Direct reads and validates each individual certificate
label. When a certificate expires, Sterling Connect:Direct displays a CSPA601E error
message indicating which certificate expired so that you can take appropriate
action to generate or obtain a new certificate. When a certificate is soon to expire,
Sterling Connect:Direct displays a CSPA600W warning message indicating the
specific certificate and the date it will expire.
In addition to issuing messages, Sterling Connect:Direct generates statistic records
to document the status of the certificate and which node name the certificate is
defined for. You can use IBM
®
Sterling Control Center or the SELECT STATS
command to audit the certificates and nodes that need attention. On the SELECT
STATISTICS panel, type Y in the CHANGE EXTENDED OPTS field, and then
specify CX as a RECORD TYPE on the SELECT STATISTICS EXTENDED
OPTIONS panel.
Note: If Sterling Connect:Direct cannot validate the contents of the Sterling
Connect:Direct Secure Plus parameter file, it displays a CSPA607W message
indicating that it could not retrieve the necessary information for a particular
certificate. Make sure that the certificate exists along with the correct label
name—note that the label is case-sensitive and must match exactly.
Note that expiration dates in certificates include both a date and time. Sterling
Connect:Direct uses both date and time to validate the exact expiration period
when checking a certificate's validity. For example, if the certificate is set to expire
12 IBM Sterling Connect:Direct for z/OS: Administration Guide

on 12/31/2010 at 10:00:00 and the validation check is performed on 12/01/2010 at
09:00:00 with CHECK.CERT.EXPIRE.WARN.DAYS=30, this certificate will not be
flagged with a warning message until a check is performed after 10:00:00 on
12/01/2010.
The Certificate Expiration Validation Command
To perform a certificate validation check upon demand, select the CR option,
Execute Certificate Expiration Validation Command, when the Execute Secure Plus
Commands menu is displayed.
Sterling Connect:Direct displays any warning or error messages related to
certificates should such a condition exist.
A TLS/SSL Environment Refresh
When you update security-related information effecting the SSL/TLS environment
or database, such as updating the path to the key database or key ring or a
certificate’s label, use the Execute Refresh Secure Plus Environment Command. By
updating the SSL and TLS environment, you ensure that all changes can take effect
immediately. To execute this on-demand command, type RF and press Enter when
the Execute Secure Plus Commands menu is displayed.
Sterling Connect:Direct Secure Plus Display
To display the Sterling Connect:Direct Secure Plus Admin Tool: Main Screen when
the Execute Secure Plus Commands menu is displayed, type SA and press Enter.
File Edit Key Management Help
--------------------------------------------------------------------------
Secure+ Admin Tool: Main Screen
Option ===> Scroll CSR
Table Line Commands are:
E Export pub. key H View History D Delete node
U Update node I Insert node
Secure
LC Node Name Type 123C Override Encryption Signature ExtAuth Autoupd
-- ---------------- ---- ------ -------- ---------- --------- ------- -------
******************************* BOTTOM OF DATA ********************************
Displaying Initialization Parameter Settings
Use the INQUIRE INITPARM command to view the current global and local
initialization parameter settings.
The INQUIRE INITPARM command has the following format and parameter.
Label Command Parameter
(optional) INQuire INITparm WHERE (SERVER=server name)
The INQUIRE INITPARM parameter is:
Chapter 1. Basic System Administrative 13

Parameter Description
WHERE
(SERVER=server
name)
This parameter is optional. This parameter specifies the Sterling
Connect:Direct/Plex server initialization parameters you want to
view. The server name parameter is the 1–8 character name assigned
to a Sterling Connect:Direct/Server by the CDPLEX.SERVER
initialization parameter. If you do not specify this parameter, the
Sterling Connect:Direct/Manager initialization parameters are
displayed. You do not need this parameter for a Sterling
Connect:Direct/Stand-alone Server.
Sample Report
The following figure shows a partial sample report.
==============================================================================
node.name *INQUIRE INITPARM* DATE: mm.dd.yyyy TIME: hh:mm:ss
C:D/Plex *** MANAGER ** in Group SDWGRP
==============================================================================
ABEND.CODES.NODUMP => (SX37 SX13 U0728 SXD9 S9FC)
ABEND.RUNTASK => ABEND.CODES.NODUMP
ALLOC.CODES => (020C 0210 0218 0220 0234)
ALLOC.RETRIES => 3
ALLOC.WAIT => 00:00:30
ALLOCATION.EXIT =>
CDPLEX => Yes
CKPT => 0
CKPT.DAYS => 4
CKPT.MODE => (RECORD BLOCK PDS NOPDS VSAM VSAM)
CTCA => No
DATEFORM => MDY
DEBUG => ’00003001’
DESC.CRIT => (2)
Using the INQUIRE INITPARM Command from the Batch
Interface
About this task
To use the INQUIRE INITPARM command from the batch interface:
Procedure
1. Place your commands in a batch job stream.
2. Submit the job while Sterling Connect:Direct is running.
Note: You must set the fifth character of the DGADBATC output parameter
specification to Y to print the result of the command that is in the temporary
data set.
3. Verify the results.
Issuing the INQUIRE INITPARM Command through the IUI
About this task
To display the DTF initialization parameters from the IUI:
14 IBM Sterling Connect:Direct for z/OS: Administration Guide

Procedure
1. Select option INQ from the Administrative Options Menu.
The Inquire DTF Internal Status screen is displayed.
2. If you are running in a Sterling Connect:Direct/Plex environment and want to
view the initialization parameters of a Sterling Connect:Direct/Server, type the
server name in the Server field. If you want to view the initialization
parameters of a Sterling Connect:Direct/Manager, leave the Server field blank.
If you are running in a Sterling Connect:Direct/Stand-alone Server, leave this
field blank.
3. Select the IPRM option.
4. Press ENTER.
The current DTF initialization parameter settings are displayed.
Modifying Initialization Parameter Settings while Sterling
Connect:Direct is Running
You can update certain initialization parameters in the initialization parameter
member, and then use the MODIFY INITPARMS command to update Sterling
Connect:Direct with the new initialization parameter settings without restarting,
using one of the following methods:
v Using the MODIFY INITPARMS Command from the Batch Interface
v Issuing the MODIFY INITPARMS Command through the IUI
v Performing Configuration Management of Initparms through Sterling Control
Center. For more information, refer to the documentation for Sterling Control
Center.
You cannot update local initialization parameters with the MODIFY INITPARMS
command using the first two methods listed above but you can using Sterling
Control Center.
To ensure continuity in operation, create backup copies of the global and local
initialization parameter members to use if Sterling Connect:Direct cannot initialize
after initparm updates. For information, see Backing up the Global and Local
Initialization Parameter Files.
The following list contains the initialization parameters that you can update while
Sterling Connect:Direct is running:
Note: The MODIFY INITPARMS command updates parameters in the following
list, after all parameters (global and local) are parsed for correct syntax. Since the
MODIFY INITPARMS command reads the entire global initialization parameter
member (and local INITPARM members), the entire global initialization parameter
member is used for the update (along with local INITPARM members). Therefore,
you cannot update individual parameters with the MODIFY INITPARMS
command.
ABEND.CODES.NODUMP ABEND.RUNTASK ALLOC.CODES
ALLOC.RETRIES ALLOC.WAIT CDPLEX.WLM.GOAL
CHECK.CERT.EXPIRE CHECK.CERT.EXPIRE.TIME CHECK.CERT.EXPIRE.WARN.
DAYS
CKPT CKPT.DAYS CKPT.MODE
Chapter 1. Basic System Administrative 15

COMPRESS.EXT COMPRESS.NEGO.FAIL COMPRESS.NETMAP.
OVERRIDE
COMPRESS.NETMAP.STD CRC DESC.CRIT
DESC.NORM DESC.TAPE ECZ.COMPRESSION.LEVEL
ECZ.MEMORY.LEVEL ECZ.WINDOWSIZE ESF.WAIT
EXPDT GDGALLOC GDGENQ
INVOKE.ALLOC.EXIT INVOKE.ALLOC.EXIT.ON.
RESTART
MAX.AGE
MAX.AGE.TOD MAXRETRIES MAXSTGIO
MULTI.COPY.STAT.RCD NETMAP.CHECK.ON.CALL PDSE.SHARING
PDSENQ PRTYDEF REQUEUE
RESET.ORIGIN.ON.SUBMIT REUSE.SESSIONS ROUTCDE.CRIT
ROUTCDE.NORM ROUTCDE.TAPE RUNTASK.RESTART
SNMP SNMP.DSN SNMP.MANAGER.ADDR
SNMP.MANAGER.PORTNUM STAT.EXCLUDE SYSOUT
TAPE.PREMOUNT TCP.API.TIMER TCP.CONNECT.TIMEOUT
TCQ.THRESHOLD THIRD.DISP.DELETE TRANS.SUBPAS
WTMESSAGE WTRETRIES
The MODIFY INITPARMS command has the following format.
Label Command Parameter
(optional) MODify INITparms
This command has no parameters.
Using the MODIFY INITPARMS Command from the Batch
Interface
About this task
To use the MODIFY INITPARMS command features from the batch interface: 1. 2.
Procedure
1. Update the initialization parameters in the initialization parameter data set.
2. Place the MODIFY INITPARMS command in a batch job stream.
3. Submit the job while Sterling Connect:Direct is running. A message is displayed
indicating the results of the refresh action.
Note: You must set the fifth character of the DGADBATC output parameter
specification to Y to print the result of the command that is in the temporary
data set.
Issuing the MODIFY INITPARMS Command through the IUI
About this task
To use the MODIFY INITPARMS command features through the IUI:
16 IBM Sterling Connect:Direct for z/OS: Administration Guide

Procedure
1. Update the initialization parameters in the initialization parameter data set.
2. Request option MD from the Connect:Direct Administrative Options Menu to
access the MODIFY COMMAND screen.
node.name MODIFY COMMAND 14:34
CMD ==>
Server ==> ________ 00000000 (Current DEBUG Settings)
MODIFY DEBUG ==> ________ (nnnnnnnn)
MODIFY BITS.ON ==> ________ (nnnnnnnn)
MODIFY BITS.OFF ==> ________ (nnnnnnnn)
MODIFY DDNAME ==> ___________ (ddname,nn)
MODIFY CLOSE ==> ________ (ddname)
MODIFY MODDIR.TRACE ==> ___ (YES)
MODIFY DYN ==> ____________________________________________________________
MODIFY SESSIONS ==> _ (Quiesce or Resume) NODE ==> ________________
MODIFY NODE.TRACE.ON ==> ( ________________ ________ )
MODIFY NODE.TRACE.OFF ==> ________________
MODIFY NODES ==> ___ (YES)
MODIFY INITPARMS ==> ___ (YES)
MODIFY ZIIP ==> _________ (ALL NONE EXTCOMP SSLTLS PROJECT)
3. Type YES in the MODIFY INITPARMS field.
4. Press ENTER. A report is displayed indicating the results of the action.
5. Review the report and perform any corrections if necessary.
6. Press ENTER to clear the report.
Repeat the procedure if you updated the initialization parameter data set.
Backing up the Global and Local Initialization Parameter Files
Sterling Control Center has the ability to configure global initialization parameters
for stand-alone Sterling Connect:Direct servers and local initialization parameters
for members of a Sterling Connect:Direct/Plex environment. As part of the possible
changes, the original INITPARM member is overwritten with the updates Sterling
Control Center makes.
About this task
You can save a copy of the global initialization parameter file and local
initialization parameter files using the INITPARM.BACKUP and
CDPLEX.INITPARM.BACKUP initialization parameters. These backup files protect
against inappropriate or failed updates from Sterling Control Center or other
facilities capable of updating initialization parameters. Sterling Connect:Direct will
use these members to complete a backout of failed updates. This also provides you
with the ability to manually back out using the specified backup members which
contain the last set of initialization parameters used to successfully start Sterling
Connect:Direct.
Note: If you commented out the members names for the backup initialization
parameters, specify new names.
Procedure
1. Specify the name of the backup member using the global initialization
parameter, INITPARM.BACKUP = member. In a Sterling Connect:Direct/Plex
environment, you also specify the local initialization parameter,
Chapter 1. Basic System Administrative 17

CDPLEX.INITPARM.BACKUP = member for the Sterling Connect:Direct
Plex/Manager and each Sterling Connect:Direct/Plex server.
2. Start Sterling Connect:Direct for z/OS.
When Sterling Connect:Direct initializes successfully, it places a copy of the
initialization parameter member in the backup member specified in the
INITPARM.BACKUP parameter (and does the same thing for each Sterling
Connect:Direct/Plex-related backup parameter). If ISPF STATS are ON for the
PDS, the statistics for the initparms are also copied to the backup member. If
ISPF STATS are not ON, the backup member will have ISPF statistics generated
based on the current date and time.
Space Requirements for Using the Backup Feature
The PDS containing the initialization parameters must have enough directory and
disk space for the following items:
v The backup members for the global initialization parameter file and local
initialization parameter files
v Changes to the global and local initialization parameters
v ISPF formatted statistics
If the initparm PDS runs out of space, an Sx37 (or similar) ABEND occurs and the
system attempts to back out the changes by copying the initparm backup file
(including the ISPF STAT information). To recover space inside the PDS, compress
the PDS prior to starting Sterling Connect:Direct.
Manually Backing Out or Restoring
About this task
In the event a manual backout or restore of the original initialization parameters is
required, follow this procedure:
Procedure
1. Restore the damaged global initialization parameter member using the backup
global initialization parameter member. Do the same thing for the backup
initialization parameter members for all Sterling Connect:Direct/Plex members.
2. Start Sterling Connect:Direct for z/OS.
Displaying Sterling Connect:Direct/Plex Status
The INQUIRE CDPLEX command displays Sterling Connect:Direct/Plex status
information. It has the following format.
Label Command Parameter
(optional) INQuire CDPLEX
The INQUIRE CDPLEX command has no parameters.
18 IBM Sterling Connect:Direct for z/OS: Administration Guide

Example
The following figure shows a partial sample report.
======================================================================
Inquire CDPLEX mm.dd.yyyy hh:mm:ss
======================================================================
XCF Group Name : TPXCFGRP When Activated : mm.dd.yyyy hh:mm:ss
SYSPLEX Sys Name : CSGB JOB/STC Name : CD$MGR
Active Servers : 1 Maximum Servers : 32
Server : SERVER1 When Activated : mm.dd.yyyy hh:mm:ss
SYSPLEX Sys Name : CSGB JOB/STC Name : CD$SRV1
Active Processes : 0 Maximum Processes : 250
Server Supports : CTCA SNA IPv4
Server PLEXCLASSES:(A B 1 * )
Using the INQUIRE CDPLEX Command from the Batch
Interface
Procedure
1. Place your command in a batch job stream.
2. Submit the job while Sterling Connect:Direct is running.
A report is displayed.
Note: You must set the fifth character of the DGADBATC output parameter
specification to a Y to print the result of the command that is in the temporary
data set.
Issuing the INQUIRE CDPLEX Command through the IUI
Procedure
1. Select option INQ from the Administrative Options Menu. The Inquire DTF
Internal Status screen is displayed.
2. Select the IPLX option.
3. Press ENTER.
A report is displayed.
Stopping Sterling Connect:Direct
The STOP CD command stops Sterling Connect:Direct through one of five types of
shutdowns:
v Force
v Immediate
v Step
v Quiesce
v Run Task Immediate
This command is usually used for system maintenance.
If you are running Sterling Connect:Direct/Plex, shut down the individual Sterling
Connect:Direct/Servers or the Sterling Connect:Direct/Plex environment. Specify if
the extended recovery standby system processes the work performed by the
system being shut down.
The STOP CD command has the following format and parameters.
Chapter 1. Basic System Administrative 19

Label Command Parameters
(optional) STOP CD [Force | Immediate | Quiesce | Runtaskimm | Step]
[CDPLEX | WHERE (SERVER=server name)]
RECOVER
The parameters for the STOP CD command are:
Parameter Description
Force Stops Sterling Connect:Direct through a user U4082 ABEND, and produces a dump. Use this
option only when problems occur.
Immediate Terminates all active transmissions immediately after any executing Run Task Processes
complete. Sterling Connect:Direct writes the statistics record, closes the files, and shuts down.
All Processes resume execution when Sterling Connect:Direct is reinitialized. If a Process is set
for checkpointing and Sterling Connect:Direct stops with this parameter, Sterling Connect:Direct
starts from the last checkpoint and resumes transferring data when the Process resumes.
Note: You can change how the Immediate parameter interprets the shutdown command by
using the IMMEDIATE.SHUTDOWN initialization parameter. If IMMEDIATE.SHUTDOWN=I
(the default), an immediate shutdown functions as described in the preceding paragraph.
However, if IMMEDIATE.SHUTDOWN=R, an immediate shutdown functions as a runtaskimm
shutdown, terminating any executing Run Task Processes before shutting down Sterling
Connect:Direct.
Refer to IMMEDIATE.SHUTDOWN = I | R | (I, nnn | 60) | (R, nnn | 60) for more
information.
Quiesce Enables all active transmissions to run until all executing Process steps complete. No new
transmissions are started, and no additional Processes are accepted. All interactive sessions are
terminated except for the issuer of the STOP CD command. All active Processes must complete
and then you must sign off before Sterling Connect:Direct stops. QUIESCE is the default.
Runtaskimm Terminates any Run Task Processes before stopping Sterling Connect:Direct. After the Processes
are terminated, Sterling Connect:Direct writes the statistics record, closes the files, and shuts
down. This parameter is provided because the Immediate parameter does not terminate a Run
Task until it reaches an interrupt point, such as a checkpoint. A long-running Run Task could
delay Sterling Connect:Direct shutdown until it completes. When Sterling Connect:Direct
restarts, if the RUNTASK.RESTART initialization parameter is YES, the checkpoint records for
the terminated Run Task restart the Run Task.
Step Enables active transmissions to run until the current step of each executing Process finishes.
Sterling Connect:Direct then writes the statistics records, closes the files, and shuts down. All
Processes resume execution when Sterling Connect:Direct is reinitialized.
CDPLEX Shuts down the entire Sterling Connect:Direct/Plex environment. You cannot use this parameter
in a Sterling Connect:Direct/Stand-alone Server.
WHERE
(SERVER=server
name)
Specifies which Sterling Connect:Direct/Server in a Sterling Connect:Direct/Plex environment to
shut down. The server name parameter is the 1–8 character name assigned to a Sterling
Connect:Direct/Server by the CDPLEX.SERVER initialization parameter. You cannot use this
parameter in a Sterling Connect:Direct/Stand-alone Server.
Use this parameter if you only want to shut down a particular Sterling Connect:Direct/Server,
but leave the rest of the Sterling Connect:Direct/Plex environment running. (Use the INQUIRE
CDPLEX command described in “Displaying Sterling Connect:Direct/Plex Status” on page 18 to
find the name of a server.)
Note: When you shut down a Sterling Connect:Direct/Plex environment, you must specify
CDPLEX. If you are shutting down a server, you must also specify WHERE(SERVER=).
RECOVER Specifies if the extended recovery standby system continues processing work from the system
that is shutting down.
20 IBM Sterling Connect:Direct for z/OS: Administration Guide

Examples
The following example stops Sterling Connect:Direct, and terminates all
transactions immediately.
STOP CD I
The following example stops an entire Sterling Connect:Direct/Plex environment
after all Processes are complete.
STOP CD Q CDPLEX
The following example force stops a Sterling Connect:Direct/Server named
WALTER, but continues processing on the extended recovery standby system.
STOP CD F WHERE(SERVER=WALTER) RECOVER
Stopping Sterling Connect:Direct through the Batch Interface
About this task
To use the STOP CD command from the batch interface:
Procedure
1. Place your command in the batch job stream.
2. Submit the job while Sterling Connect:Direct is running.
3. Verify the results.
Stopping Sterling Connect:Direct through the IUI
About this task
To issue the STOP CD command through the Sterling Connect:Direct IUI:
Procedure
1. Select SN from the Connect:Direct Administrative Options Menu.
node.name STOP Connect:Direct hh:mm
CMD ==>
Q ==> Continue active transmissions until the end of process
S ==> Continue active transmissions until the end of a step
I ==> Immediately stop all active transmissions
(wait for RUN TASKS to complete)
R ==> Immediately stop all active transmissions
(do not wait for RUN TASKS to complete)
F ==> Force Connect:Direct to stop via an ABEND
EXTENDED.RECOVERY and C:D/Plex Options:
Server ==> ________ (C:D/Plex server name or ’*’ for entire C:D/Plex)
Recover => ___ (Yes|No) Should EXTENDED.RECOVERY standby takeover?
Chapter 1. Basic System Administrative 21

2. Type one of the five options on the command line. Refer to “Stopping Sterling
Connect:Direct” on page 19 for a description of these options. Quiesce (Q) is
the default.
3. If you want to shut down a Sterling Connect:Direct/Server in Sterling
Connect:Direct/Plex environment, type the server name in the SERVER field.
If you want to shut down the entire Sterling Connect:Direct/Plex environment,
leave the SERVER field blank.
4. If you want the extended recovery standby system to continue processing
work, type Yes in the RECOVER field. Type No or leave the field blank if you
do not want the extended recovery standby system to continue processing
work.
5. Press ENTER.
A shutdown message is displayed for Immediate, Quiesce, and Step
shutdowns. No message is displayed for Force shutdowns.
Suspending and Resuming Quiesce and Trace Settings
Sterling Connect:Direct uses a node table to manage Quiesce and Trace settings for
the adjacent nodes in the Netmap. When Sterling Connect:Direct is initialized, it
adds all Netmap adjacent node records to a new node table. It applies the Quiesce
and Trace INITPARMs to the node table entries. After Sterling Connect:Direct is
initialized, node table entries are added or deleted by Netmap updates.
If a Netmap update adds a new node, the node is added to the node table with
TRACE OFF and QUIESCE OFF. If a Netmap update does a $$REPLACE or a
$$DELETE followed by a $$INSERT in the same run, any pre-existing node table
settings for that node are preserved. If a Netmap update does a $$DELETE and a
subsequent Netmap update run adds the node back, the node is added to the node
table with TRACE OFF and QUIESCE OFF.
The Modify Nodes screen and the output from the INQUIRE DEBUG command
list all of the adjacent nodes in the node table.
For information about Trace and Debug settings, refer to Sterling Connect:Direct
Function Traces.
Use the MODIFY SESSIONS command to suspend processing on a single node,
multiple nodes, or all nodes, and to resume processing on any or all suspended
nodes. For example, you can suspend processing on a node because of problems
but leave other nodes operating. Another example would be the suspension of a
node that you know will be down for some time.
Note: Node-level MODIFY commands only apply to existing nodes in the node
table. If you add a node using Netmap update, enter a node-level MODIFY
command to change that node's default settings.
The MODIFY SESSIONS command has the following format and parameters.
Label Command Parameters
(optional) MODIFY SESSIONS = Quiesce | Resume (WHERE(NODE=node name))
The following table describes the parameters of the MODIFY SESSIONS command.
22 IBM Sterling Connect:Direct for z/OS: Administration Guide

Parameter Description
SESSIONS = Quiesce |
Resume
(WHERE(NODE=node
name))
Controls the automatic establishment of DTF-to-DTF
sessions.
Quiesce specifies that no new DTF-to-DTF sessions are
started after executing Processes complete. Interactive users
can sign on. Any Processes that normally execute are placed
in the WAIT queue.
Resume terminates a quiesce state and returns to normal
operation.
The WHERE(NODE=) parameter enables you to suspend or
resume processing on a single node, multiple nodes, or all
nodes. You can use this parameter in the following
circumstances:
v To suspend processing on specific nodes because of
problems, but allow other nodes to continue processing.
v If you know that a node will be down for some time
v To suspend or resume processing on all nodes.
The node name subparameter is the 1–16 character local
node name specified in the network map of the affected
node. You can also use the * (for a string) and ? (for an
individual character) wildcard characters to specify a
generic node name. For example, the following command
suspends processing on all node names that begin with
NODE.CHICAGO.
SESSIONS=QUIESCE (WHERE(NODE=NODE.CHICAGO*))
Note: If you use the * wildcard, and it is not the last
character, you must put the entire node name in single
quotes. Otherwise, the node name is truncated at the first *,
and more nodes may be selected than was intended. For
example, node names starting with NODE.CHICAGO can
be specified either as NODE.CHICAGO* or
'NODE.CHICAGO*'. But node names containing
NODE.CHICAGO must be specified as
'*NODE.CHICAGO*', not *NODE.CHICAGO* which would
be functionally equivalent to all nodes since the first
character is *.
You can specify * as the node name to suspend or resume
processing on all nodes. For example, the following
command suspends processing on all nodes.
SESSIONS=QUIESCE (WHERE(NODE=*))
If you omit the WHERE(NODE=) parameter, the command
applies to the entire Sterling Connect:Direct system.
However, a system-wide RESUME command does not
override the processing of any individually suspended
nodes. You must issue the SESSIONS=RESUME command
with WHERE(NODE=*) to resume processing on
individually suspended nodes.
Note: If the command is issued on an SNODE to quiesce
processing with a PNODE, the session with the PNODE is
established. However, as soon as the PNODE node name is
determined, the session is terminated. No processing of data
occurs.
Chapter 1. Basic System Administrative 23

Suspending or Resuming Processing on a Node through the
Batch Interface
Procedure
1. Place the MODIFY SESSIONS command in the batch job stream.
2. Submit the job while Sterling Connect:Direct is running.
3. Verify the results by issuing an INQUIRE DEBUG command.
Note: For information about INQUIRE DEBUG, see Displaying DEBUG
Settings .
The following example suspends processing on all nodes that begin with
NODE.CHICAGO.
SESSIONS=QUIESCE (WHERE(NODE=NODE.CHICAGO*))
The resulting output from the INQUIRE DEBUG command follows.
======================================================================
NODE.NEWYORK *INQ DEBUG/QUIESCE* DATE: mm.dd.yyyy TIME: hh:mm:ss
SYSTEM INITIALIZED --------(0000)-------- mm.dd.yyyy hh:mm:ss
======================================================================
DEBUG => ’00000000’
QUIESCE => No
TCQ DSN => PROD.CD.ABC.TCQ
TCX DSN => PROD.CD.ABC.TCX
TCQ Threshold => No
TCQ File 0% Full. Max.# CI: 1000 # Used CI: 0
NODE TABLE => NODE NAME QUIESCE DEBUG
NODE ENTRY 1 => CD.BOSTON No B0BB0BB0
NODE ENTRY 2 => CD.CHICAGO1 Yes
NODE ENTRY 3 => CD.CHICAGO2 Yes
NODE ENTRY 4 => CD.DFW.LU0 No
NODE ENTRY 5 => CD.DFW.LU62 No
NODE ENTRY 6 => CD.DFW.UDT No
Suspending or Resuming Processing on a Node through the
IUI
Procedure
1. Request option MD from the Connect:Direct Administrative Options Menu to
access the MODIFY COMMAND screen.
2. Type Q in the MODIFY SESSIONS field to suspend processing.
Type R in the MODIFY SESSIONS field to resume processing on a suspended
node.
3. Type the 1–16 character node name in the NODE field. (If you use the *
wildcard, and it is not the last character, put the entire node name in single
quotes.)
4. Press ENTER.
The results will be displayed, for example, MODIFY SESSIONS QUIESCE
successful.
24 IBM Sterling Connect:Direct for z/OS: Administration Guide

Suspending or Resuming Processing on Nodes through the
Modify Nodes Screen
To suspend or resume processing on nodes through the Modify Nodes screen:
Procedure
1. Request option MD from the Connect:Direct Administrative Options Menu to
access the MODIFY COMMAND screen.
2. Type YES in the MODIFY NODES field.
3. Press ENTER. The Modify Nodes screen is displayed.
CD.PRD MODIFY NODES (Unsaved Changes) Row 1 of 1054
CMD ==> SCROLL ===> PAGE
(CMD commands: CLEAR DEBUG/TRACE QUIESCE RESUME; CANCEL END REFRESH SAVE)
(SEL commands: C=Clear Q=Quiesce R=Resume. Overtype Debug setting.)
SEL Node Name Quiesce Debug Chg
--- ---------------- ------- -------- ---
CD.PRD.CSGA OFF 11111111
CD.PRD.CSGB OFF 11111111
CD.PRD.CSGD OFF 11111111
CD.PRD.CSGE OFF 11111111
CD.PRD.CSGF ON 11111111 Y
CD.PRD.CSGG OFF 11111111
CD.PRD.VIPA OFF 11111111
CD.TST OFF FFFFFEFF
CD.TST.%%%%% OFF FFFFFEFF
CD.TST.CSGA ON Y
CD.TST.CSGB OFF FFFFFEFF
CD.TST.CSGD OFF FFFFFEFF
CD.TST.CSGG OFF FFFFFEFF
CD.TST.CTCA1 OFF FFFFFEFF
CD.TST.CTCA2 OFF FFFFFEFF
CD.TST.CTCA3 OFF FFFFFEFF
4. Use one of the following methods to suspend processing of specific nodes:
v Type Q in the SEL column next to the matching node names. The Chg field
for those nodes will display Y.
v From the CMD line, use the QUIESCE nodename command to turn the
Quiesce setting on for the rows with matching nodenames.
Note: You can use the * (for a string) and ? (for an individual character)
wildcard characters to specify a generic node name. Unlike the MODIFY
SESSIONS command, you do not have to enclose the node name in single
quotes if you use the * wildcard and it is not the last character. In fact, if you
do, as a result, there will probably not be any matches since quotes are treated
like any other character.
Use one of the following methods to resume processing of a specific node:
v Type R in the SEL column next to the matching node names. The Chg field
for those nodes will display Y.
v From the CMD line, use the RESUME nodename command to turn the
Quiesce setting off for the rows with matching nodenames. Refer to the
Suspending and Resuming Quiesce and Trace Settings for information about
the RESUME command.
5. Type SAVE in the CMD field and press ENTER to save your changes.
Chapter 1. Basic System Administrative 25

Modify Nodes Screen
Use the Modify Nodes screen to Quiesce or Resume processing for all nodes or
specified nodes. (To access the Modify Nodes screen, follow Steps 1 through 3 in
Suspending or Resuming Processing on Nodes through the Modify Nodes Screen.)
You can also use the Modify Nodes screen to modify debug and trace settings for
all nodes or specific nodes. See Modify Trace and Debug Settings Through the
Modify Nodes Screen for more information.
CMD Commands
CMD commands are entered in the CMD input field. Unknown commands and
syntax errors will result in error messages. CMD commands operate on all nodes
in the node table, not just the rows that are currently being displayed.
The CMD input field accepts the following commands:
CMD Description
CANCEL Unconditionally exits the Modify Nodes screen, discarding any
changes. You can abbreviate CANCEL to CAN, CANC or CANCE.
END Exits the Modify Nodes screen if there are no unsaved changes
outstanding. If there are unsaved changes, the END command causes
the dialog to issue an error message and redisplay the ISPF table.
SAVE Commits all changes en masse to the DTF. It then gets a new copy of
the node table from the DTF. Also, all the ISPF table change indicators
are cleared.
CLEAR
nodename
Clears the quiesce and debug settings for the rows with a matching
node name. It is equivalent to doing both a DEBUG OFF and a
RESUME against the node name.
The nodename operand can have any number of * or ? wildcard
characters in any position.
DEBUG nodename
ON debug-bits
Turns on debugging and completely replaces the Debug setting with
the debug-bits operand for the rows with a matching node name. This
overrides the global DEBUG setting for the individual nodes. 00000000
is a valid debug-bits value and is not the same as DEBUG OFF.
The nodename operand can have any number of * or ? wildcard
characters in any position.
DEBUG nodename
OFF
Turns off debugging and blanks out the debug setting for the rows with
a matching nodename. This allows the nodes to revert to using the
global DEBUG setting.
The nodename operand can have any number of * or ? wildcard
characters in any position.
DEBUG nodename
BITSON
debug-bits
Turns on the bits in the debug-bits operand without changing any other
bits in the row's debug setting, but only if the rows with a matching
node name have a non-blank debug setting. It does not turn debugging
on or off. Though 00000000 is a valid debug-bits value, if it is specified
in DEBUG BITSON, the command has no effect.
The nodename operand can have any number of * or ? wildcard
characters in any position.
26 IBM Sterling Connect:Direct for z/OS: Administration Guide

CMD Description
DEBUG nodename
BITSOFF
debug-bits
Turns off the bits in the debug-bits operand without changing any other
bits in the row's debug setting, but only if the rows with a matching
node name have a non-blank debug setting. It does not turn debugging
on or off. Though 00000000 is a valid debug-bits value, if it is specified
in DEBUG BITSOFF, the command has no effect.
The nodename operand can have any number of * or ? wildcard
characters in any position.
QUIESCE
nodename
Turns the Quiesce setting on for the rows with a matching nodename.
See the CLEAR command above for the description of the nodename
operand.
The nodename operand can have any number of * or ? wildcard
characters in any position.
REFRESH Discards any pending changes and gets a new copy of the node table
from the DTF. It is the equivalent of doing a CANCEL, and then
reentering the dialog.
RESUME
nodename
Turns the Quiesce setting off for the rows with a matching nodename.
See the CLEAR command above for the description of the nodename
operand.
The nodename operand can have any number of * or ? wildcard
characters in any position.
TRACE nodename
BITSOFF
debug-bits
TRACE is an alias of DEBUG. They have the same syntax and can be
used interchangeably.
SEL commands are entered in the SEL input field for each row. Change the Debug
field on each row by overtyping. You can update as many rows as are displayed
when you press Enter.
The SEL input field accepts the following line commands:
v C - Clear all settings for the node (same as Debug OFF plus RESUME)
v Q - Quiesce the node (turn Quiesce ON)
v R - Resume the node (turn Quiesce OFF)
Type over the Debug field in any row to change its value. The Debug field accepts
the same debug bits as the DEBUG command. Blanking out the Debug field in a
row is equivalent to issuing a DEBUG OFF on that nodename.
If you change the Debug field to a non-blank value in a specific row, issue a CMD
command for the same row, and press Enter, only the CMD command will take
effect.
If you enter a CMD command and one or more SEL commands, when you press
Enter, the SEL commands are processed before the CMD command.
Node Table Processing
When you issue a CMD command, a SEL command, or change the Debug field,
the node table is not updated until you enter the SAVE command. Until then,
MODIFY commands generated by these actions are stacked in first-in-first-out
(FIFO) order in a MODIFY command queue.
Chapter 1. Basic System Administrative 27

You can enter a SAVE command only if one or more nodes are flagged as changed.
If you change a node and then change it back before you issue the SAVE
command, the change flag is cleared. If you back out all node changes, the
MODIFY command queue is cleared. However, if any rows remain flagged as
changed, SAVE sends all MODIFY commands queued since the last time there
were no changed rows.
If multiple IUI users work on a copy of the node table simultaneously, it can be
difficult to determine what changes are in effect. If you suspect that another user
has changed the node table, discard your changes and retrieve a fresh copy of the
node table by issuing the REFRESH command.
Global Signon Defaults
The Sterling Connect:Direct administrator can define global signon defaults so that
users do not have to individually alter their signon default values to increase their
allocation. By implementing a global signon default, you can avoid insufficient
space being allocated for the temporary data set upon signon as well as SB37
ABENDs.
A temporary data set (TEMP DSN) is allocated at SIGNON to the IUI, which uses
the system default allocation parameters. At times, this allocation is insufficient
causing SB37 failures if a large amount of data is returned for a command request.
The facilities available via SIGNON defaults (SD) are not global and each
individual user must alter their default values to increase the allocation.
To change the default values, use member DGAXCXDF from $CD.SDGASAMP to
assemble and link module DGAXCXDF with the new values for TEMP DSN. You
can edit and submit $CD.SDGAJCL member DGAJCXDF to do the assembly and
link edit. Once the module is assembled and linked, all user who sign on via an
API will be subject to the new default global signon settings.
After you implement global signon defaults, allocation parameters during SIGNON
can come from the following three sources, which are listed from lowest to highest
precedence:
v Defaults from macro DGA$UICB specified by programs such as DGADBATC,
DGADCHLA, and DGADCMDP. This is considered a legacy source of SIGNON
allocation parameters.
Note: Users including the administrator, do not have control over these programs.
v The SIGNON command, whose parameters come from wherever the invoker of
the command decides, for example, the IUI can save SIGNON parameters in a
user's ISPF profile dataset. Like the DGA$UICB macro, this is considered a
legacy source of SIGNON allocation parameters.
v The DGAXCXDF load module, which the administrator can control.
DGA$XDEF Syntax and Parameters
$CD.SDGASAMP member DGAXCXDF consists of one statement, the macro
DGA$XDEF, in $CD.SDGAMAC and should not be changed. To modify the
DGAXCXDF member, first copy it and then alter it to suit your installation's
requirements.
The following shows the DGA$XDEF syntax and defaults:
28 IBM Sterling Connect:Direct for z/OS: Administration Guide

name DGA$XDEF OVERRIDE=ALLOW, /* SIGNON allowed to override? */ X
ALOCTYPE=CYL, /* ALLOCATION TYPE CYL,TRK */ X
ALOCPRI=1, /* ALLOCATION PRIMARY SPACE */ X
ALOCSEC=1, /* ALLOCATION SECONDARY SPACE */ X
ALOCUNIT=, /* ALLOCATION UNITNAME */ X
ALOCVOL= /* ALLOCATION VOLSER */
The following table lists the parameters that make up the DGA$XDEF load
module:
Parameter Description
OVERRIDE Specifies when a legacy source can override the global signon defaults
assigned by the DGA$XDEF load module. If not specified, defaults to
ALLOW (a null value is invalid).
Values are:
v DISALLOW— DGA$XDEF always supplies all allocation parameters.
v ALLOW—A legacy source can override DGA$XDEF parameter by
parameter.
v ALLOWGT—A legacy source can override DGA$XDEF if the maximum
space it would allocate is greater than the maximum space that
DGA$XDEF would allocate. Otherwise, DGA$XDEF overrides the legacy
source. With this setting, whichever source can supply more space will
be used. Note that, unlike ALLOW, the winning source in ALLOWGT is
required to supply all allocation parameters.
v ALLOWLT—A legacy source can override DGA$XDEF if the maximum
space it would allocate is less than the maximum space that DGA$XDEF
would allocate. Otherwise, DGA$XDEF overrides the legacy source.
With this setting, whichever source limits the maximum space more is
used. Note that, like ALLOWGT, the winning source in ALLOWLT is
required to supply all allocation parameters.
ALOCTYPE Specifies the allocation type. If not specified, defaults to space allocation by
cylinder–CYL (a null value is invalid).
ALOCPRI Specifies the primary allocation of storage. If not specified, defaults to a o1.
ALOCSEC Specifies the secondary allocation of storage. If not specified, defaults to a
o1.
ALOCUNIT Specifies the unit type of the TEMP DSN. If not specified, has no default.
ALOCVOL Specifies volume serial number of the TEMP DSN. If not specified, has no
default.
The other DGA$XDEF macro parameters are converted into the well known JCL
space parameters. All DGA$XDEF macro parameters other than OVERRIDE are
converted into the JCL SPACE parameters and can take any valid value that can be
specified in JCL. The one exception is that the ALOCTYPE parameter supports
only TRK (Track) and CYL (Cylinder).
ISPF Messages Displayed During Signon
If the DGAXCXDF load module was successfully located at IUI SIGNON, new
ISPF messages are displayed upon entry to the IUI Signon Defaults (SD) panel. (If
DGAXCXDF was not present at IUI SIGNON, no ISPF message is displayed.) Both
the short and long message components are generated. The exact text of the ISPF
messages is based on:
v Settings in the DGAXCXDF load module,at the time of SIGNON
Chapter 1. Basic System Administrative 29

v The user's ISPF profile variables for the temporary data set
The user will see one of the following ISPF short messages, which states what the
DGAXCXDF OVERRIDE setting was when they signed on:
v OVERRIDE=DISALLOW
v OVERRIDE=ALLOW
v OVERRIDE=ALLOWGT
v OVERRIDE=ALLOWLT
The ISPF long message component provides the following information:
v The values for the current temporary data set allocation
v An explanation of where the values came from and why
The following is an example of a typical ISPF long message example:
.------------------------------------------------------------------.
| The current Temporary Data Set space settings are: ALLOCATION |
| TYPE=CYL, PRIMARY SPACE=00000001, SECONDARY SPACE=00000001, UNIT |
| TYPE=, VOL=SER=. These are from the Global Signon Default |
| module DGAXCXDF, because OVERRIDE=ALLOWGT is specified, and the |
| maximum space specified by this panel/DGA$UICB was not greater |
| than that specified by DGAXCXDF. |
’------------------------------------------------------------------’
Note: In the message above, the phrase, this panel/DGA$UICB, is the same thing
as saying a legacy source of SIGNON allocation parameters.
30 IBM Sterling Connect:Direct for z/OS: Administration Guide

Chapter 2. Implementing Security
Sterling Connect:Direct provides a range of security options to meet diverse
security requirements. These options can be part of Sterling Connect:Direct, part of
interfaces to other security software, sample exits, or available from
user-customized exit routines.
Sterling Connect:Direct provides support for passwords and/or passphrases up to
64 characters. Password can also mean passphrase in most instances with exception
when referencing dataset passwords.
When PROCESSes supply PNODEID or SNODEID passwords, the passphrases can
not be used when the process is using PNODE=SNODE, SNA, or SNUF protocols.
Note: All sample exits define the proper AMODE and RMODE settings within the
source member themselves. All user exits should be link-edited with
AMODE=ANY and capable of executing in 31-bit mode. Each user exit should
preserve the mode in which it was invoked and return to the caller in the proper
mode. Modules written to execute in 31-bit mode can be link-edited with
RMODE=ANY or RMODE=24. Check the source for the sample exits to see how
Sterling Connect:Direct defines the proper AMODE and RMODE settings.
Sterling Connect:Direct for z/OS provides the following security features:
Security Option Description
Security exits Secures signon processing, job streams, and application programs.
Sterling Connect:Direct provides four security exits and includes
samples in the sample library. See Security Exits for more
information.
SECURITY.EXIT
initialization
parameter
Specifies a stage 2 security exit. This exit is invoked during signon
and Process start and data set access. Signon or file access requests
are passed directly to the security exit for authorization checking.
For more information, see “SECURITY.EXIT | SECURITY” on page
360.
Sterling
Connect:Direct
Authorization
Facility
Provides signon security and assigns Sterling Connect:Direct
functional authority if you do not specify or comment out the
SECURITY.EXIT initialization parameter. Use this facility if your
installation does not have a security package. See Sterling
Connect:Direct Functional Authority for information.
Note: The Sterling Connect:Direct Authorization Facility provides no
data set access security checking. Authorization File describes the
User Authorization file in detail.
Sterling
Connect:Direct
Secure
Point-of-Entry
Secures the entry of an outside user to your system. Point-of-entry
processing occurs before security exits are called. See Sterling
Connect:Direct Secure Point-of-Entry for more information.
Trusted Node
Security
Enables you to enforce more restrictive security parameters on
specific nodes in your network. For example, each adjacent node can
be defined as internal or external in its relationship to the local node
of that network map. See Trusted Node Security for more
information.
© Copyright IBM Corp. 1999, 2015 31

Sterling Connect:Direct supports the following security options:
Security Option Description
Sterling Connect:Direct
Secure Plus
Provides enhanced security for Sterling Connect:Direct. It uses
cryptography to secure data during transmission. You select the
security protocol, cipher suites, and other encryption options to
use with the Sterling Connect:Direct Secure Plus product. One
such option is Strong Password Encryption (SPE), which you can
use to secure passwords at rest within the TCQ and AUTH files.
SPE uses the TDESCBC112 encryption algorithm of Sterling
Connect:Direct Secure Plus so if you have the Sterling
Connect:Direct Secure Plus component configured, and then take
the necessary steps to enable the SPE feature, SPE will be in
effect. See the IBM Sterling Connect:Direct Secure Plus for z/OS
Implementation Guide for more information.
CA-ACF2 External security package that secures files, users, and Sterling
Connect:Direct functions.
IBM
®
Resource Access
Control Facility
(RACF
®
)
External security package that secures files, users, and Sterling
Connect:Direct functions.
CA-TOP SECRET External security package that secures files, users, and Sterling
Connect:Direct functions.
Firewall Navigation Enables you to control access to a Sterling Connect:Direct system
running behind a firewall. See Configuring Firewall Navigation.
Security Exits
Sterling Connect:Direct provides the following security exits:
v Stage 1 signon security exit
v Stage 2 security exit
v Run Job security exit
v Run Task security exit
The Sterling Connect:Direct sample library provides the following security exit
routines for use with CA-ACF2, IBM RACF, and CA-TOP SECRET. The High-Level
Assembler is required to assemble the sample security exits.
Exit Description
DGACXSIG Stage 1 signon security exit interface
DGAXACRJ RUN JOB security exit
DGAXACFT RUN TASK security exit
DGAXRACJ RUN JOB security exit for SAF or IBM RACF
DGAXRACT RUN TASK exit
DGAMGSAF Security Exit Stage 2
DGAXSAFT RUN TASK security interface
The DGA$SAFW macro in $CD.SDGAMAC provides maps of the security and
interface work area used by the security exits. This area allows for information that
can be passed between the exits. Sterling Connect:Direct has two major processing
32 IBM Sterling Connect:Direct for z/OS: Administration Guide

flows that invoke security exits, the SIGNON command sequence and the Process
execution sequence. This section describes how security exits are invoked during
these two Processes.
SIGNON Command Sequence
The SIGNON command sequence is the first flow through which a Sterling
Connect:Direct terminal user, console operator, or batch application gains access to
Sterling Connect:Direct functions. During this sequence, one or more of the
following control points is invoked:
v Stage 1 signon security exit
v Sterling Connect:Direct Authorization Facility
v Stage 2 security exit
Security during Signon Command
When you execute a SIGNON command through the batch, interactive, or operator
interface, security control points exist in the Sterling Connect:Direct user region (or
API) and the Sterling Connect:Direct DTF region.
The stage 1 signon security exit is the initial control point, as shown in the
following figure. This optional control point is a user exit that gains control in the
region of the user. The exit can inspect and modify the SIGNON command
parameters.
The next control point occurs in the DTF region and can be a stage 2 security exit
or the Sterling Connect:Direct Authorization Facility.
Chapter 2. Implementing Security 33
The following SIGNON command flow traces the security flow. The step numbers
correspond to the steps in the illustration.
1. When you issue a SIGNON command, the API SIGNON command processor
calls the stage 1 signon exit. If the stage 1 exit is not found, normal signon
processing continues.
When invoked, the stage 1 exit receives a pointer to the User Interface Control
Block (UICB) that contains information regarding the signon attempt. For a
listing of UICB fields, refer to the chapter on the application programming
interface in IBM Sterling Connect:Direct for z/OS User Guide.
If you specify a password on the SIGNON command, the stage 1 exit returns
control to Sterling Connect:Direct without making any modifications to the
UICB, and signon processing proceeds. The stage 2 exit verifies the USERID
and PASSWORD that are coded on the SIGNON command for system entry
validation and all subsequent security calls.
If you do not specify a password on the SIGNON command, Sterling
Connect:Direct extracts the USERID from the security system control block built
for this address space (when the TSO user logged on to TSO or when the
BATCH job began execution) and puts that USERID into the UICB.
Note: Stage 1 exit keys off the password, not the user ID. So, if you do not
specify a password but do specify a user ID, the stage 1 exit ignores that user
ID and overlays it with the address space user ID that is picked up from the
security system control block.
When the user ID is moved to the UICB, the exit fills in a special password of
IUI, BATCH, or STC, depending upon what environment the signon comes
from (Sterling Connect:Direct cannot access the password for the address space
user ID), and control returns to Sterling Connect:Direct.
The benefit of running with a stage 1 signon exit is that Sterling Connect:Direct
batch jobs do not need hardcoded passwords in their SYSIN data streams.
The sample stage 1 exit is shipped with the dummy passwords of IUI, BATCH,
and STC coded in the exit. Change these passwords for each installation to
avoid the chance that another site is using the same dummy passwords. You
can change these passwords by editing the source for DGACXSIG and the
appropriate validation in the macro DGASECUR (for the stage 2 exit). If a user
id has a security subsystem password that matches one of the dummy
passwords, that user id will be unable to sign on to Sterling Connect:Direct
under some circumstances until the password is changed.
2. If the stage 1 processing is successful, the API SIGNON command processor
passes the SIGNON command to the DTF where the DTF SIGNON command
processor is invoked.
3. The DTF SIGNON command processor calls the stage 2 security exit or the
Sterling Connect:Direct Authorization Facility. The stage 2 exit recognizes
special passwords of IUI, BATCH, and STC as being assigned by the stage 1
exit. All calls to the security system for verifications verify authorizations by
user ID only.
Regardless of how your system is implemented, this processing flow verifies the
authority of the requesting user to perform Sterling Connect:Direct functions by
checking the ABM (Authorization Bit Mask) for this user. The ABM is built
through the stage 2 security exit or through the Sterling Connect:Direct
Authorization Facility at signon and Process start.
34 IBM Sterling Connect:Direct for z/OS: Administration Guide

Process Execution Sequence
The Process execution sequence is the second flow through which Sterling
Connect:Direct services execute a user request. During this sequence, one or more
of the following control points is invoked:
v Process start invokes the stage 2 security exit.
v Copy statement invokes the stage 2 security exit.
v Run Task statement invokes the Run Task security exit.
v Process end invokes the stage 2 security exit.
v Run Job statement invokes the stage 2 security exit or the Run Job security exit.
When Sterling Connect:Direct executes a Process for a user, several DTF security
control points exist, as shown in the following figure:
Refer to the numbers in the illustration as you trace the following Process flow:
Chapter 2. Implementing Security 35

1. Process start—This point in the stage 2 security exit gains control whenever a
Process begins initial execution or restart execution, and enables verification of
the authority of the requesting user to perform the Sterling Connect:Direct
functions contained in the Process.
2. File access—This point in the stage 2 security exit gains control during Process
execution whenever a COPY or RUN JOB statement is encountered. It enables
verification of the access of the user to read or write the file defined in the
COPY statement.
With the RUN JOB statement, the exit enables verification of the user to read
the file containing the job stream to be submitted.
3. Run Job—This exit point enables job stream validation and gains control when
the following conditions exist:
v RUN JOB statement is encountered during Process execution
v RUN.JOB.EXIT initialization parameter is specified
4. Run Task—This exit point enables program validation and gains control when
the following conditions exist:
v RUN TASK statement is encountered during Process execution
v RUN.TASK.EXIT initialization parameter is specified
5. Process end—This point in the stage 2 security exit gains control whenever a
Process terminates, whether normally or abnormally. This exit point assists in
cleaning up the security resources involved in Process execution.
Note: Copy, Run Job, and Run Task exit functions are entered for every occurrence
of the associated statement in a Sterling Connect:Direct Process.
Implementing Security Exits
This section describes how to implement each type of security exit, and includes
information for specific security environments such as, IBM RACF, CA-ACF2, and
CA-TOP SECRET.
Note: You must have the High-level Assembler to assemble the sample exits.
CAUTION:
To avoid out-of-storage ABENDS in Sterling Connect:Direct for z/OS, examine
all user exits to verify that all obtained storage is freed. For each GETMAIN that
an exit issues, the exit must also issue a corresponding FREEMAIN to avoid
accumulating storage; also, if an exit opens a file, you may need to issue a
FREEPOOL after the file is closed.
Stage 1 Signon Security Exit
This control point enables verification of the format and contents of the SIGNON
command. The following requirements and restrictions apply:
v Implement the Sterling Connect:Direct stage 1 signon exit as an executable load
module.
v Name the load module DGACXSIG. To assemble, link-edit the appropriate name
with an alias of DMCXSIGN by using DGAJCXSG.
v Link-edit the module with the attribute AMODE=ANY.
v Link-edit the module as NORENT and NOREUS. Do not specify NCAL.
v Link-edit the module with an authorization code of 1.
v The module must come from an authorized library.
36 IBM Sterling Connect:Direct for z/OS: Administration Guide

v For the TSO IUI, the module must come from a library in the LNKLST or
ISPLLIB.
Note: Do not put the module in a STEPLIB. The only time a STEPLIB works under
ISPF is when ISPLLIB is not allocated.
v For DGADBATC and DGADCHLA, the module must come from a library in the
LNKLST or STEPLIB. Refer to Chapter 9, “Sterling Connect:Direct Exits,” on
page 179.
v The $CD.SDGASAMP library contains a sample source module exit called
DGACXSIG. Edit this module and modify the variable &SECTYPE to reflect the
security system in use. Assemble and link-edit the exit.
For IBM RACF or CA-TOP SECRET, use the character string RACF for
&SECTYPE. For CA-ACF2, use the character string ACF2.
All Sterling Connect:Direct nodes in cross-domain signon (or multi-session
signon) with a Sterling Connect:Direct node that uses the stage 1 signon exit
must also use the stage 1 signon exit.
Signon Errors
If you are receiving signon errors about the stage 1 exit, allocate the special
DDNAME APISECUR in the batch job for special diagnostic output using one of
the following methods.
If you are using the IUI to route trace output to the screen, issue the following TSO
command.
TSO ALLOC F(APISECUR) DA(*)
To route the output to a data set, issue the following TSO command.
TSO ALLOC F(APISECUR) SHR DSN(’data-set’)
To route the output to spool, issue the following TSO command:
TSO ALLOC F(APISECUR) SYSOUT(*)
You must preallocate the data set with the following DCB attributes.
DSORG=PS
RECFM=VBA
LRECL=121,
BLKSIZE=125 or greater
Sample SIGNON Panel
The $CD.SDGASAMP library contains a member called DGA@NPAN that you can
use to replace the existing signon panel (DGA@GNON) after you implement the
Stage 1 Signon Security exit. This sample panel in conjunction with the Stage 1
Signon Security exit allows you to bypass the Signon panel when starting the
TSO/IUI interface. Refer to $CD.SDGASAMP member called DGAUPAN for a
sample SMP/E USERMOD which contains instructions to implement this sample
panel.
Chapter 2. Implementing Security 37
Stage 2 Security Exit
This control point applies to all environments and is implemented as a
user-supplied exit. It provides a standard interface for user ID and password
verification and for establishing Sterling Connect:Direct functional authority and
file access verification. Although you can use it for many different purposes, the
stage 2 security exit is designed to provide the interface to your security system.
You can also use it to invoke an exit to test new applications and customer
connections. For more information, see Process Exit for Testing (DGAXPRCT).
The following requirements and restrictions apply:
v The stage 2 security exit is implemented as an executable load module.
v The name of the load module is user-defined, but it cannot conflict with any
Sterling Connect:Direct load modules.
v Specify the SECURITY.EXIT initialization parameter to activate the stage 2
security exit. This parameter also specifies whether the exit is used for ALL
security checking or just DATASET access validation.
v You must link-edit the module as re-entrant and reusable and place it in a load
library that the Sterling Connect:Direct DTF can access. Do not specify NCAL.
For more information, see Chapter 9, “Sterling Connect:Direct Exits,” on page
179.
v To prevent a remote node's security from using Signon dummy passwords, you
can use the initialization parameter, REMOTE.DUMMY.PASSWORD. See
REMOTE.DUMMY.PASSWORD=[ YES | INTERNAL ] for more details.
v Because information passed to the exit by Sterling Connect:Direct is located
above 16 megabyte line, you must link-edit the module with AMODE 31 to
make it capable of executing in 31-bit mode.
Considerations for Systems with z/OS UNIX System Services
The following considerations apply to systems with z/OS UNIX System Services:
v Access to HFS files is controlled by UNIX System Services. The user ID under
which the DTF runs must have UPDATE authority to the BPX.SERVER facility.
In addition, the submitter ID/password, the PNODEID/password, or
SNODEID/password must be valid. z/OS UNIX System Services enables or
denies access based on the UNIX permission rules.
v Sterling Connect:Direct can also check HFS access without requiring a password.
To use a password length of zero, you must set up an IBM ACF profile
BPX.SRV.userid in class SURROGAT and make sure that the Sterling
Connect:Direct started task userid has READ access to this profile. For more
information, see Defining a Surrogate for User IDs with No Password.
v UNIX System Service (BPX) calls are executed in the Sterling Connect:Direct IUI
under the TSO or Batch User ID. BPX calls require that a user ID has an OMVS
segment defined to it within the external security product, such as IBM RACF,
ACF2 or CA-TOP SECRET. The BPX calls are used to resolve the TCP/IP name
or address for reporting purpose in Select Statistics. See Special Considerations in
IBM Sterling Connect:Direct for z/OS Release Notes for more detailed information
on adding an OMVS segment to a user ID.
Sample Source Modules in the SDGASAMP Library
The $CD.SDGASAMP library contains sample source modules for several release
levels of z/OS security systems. These sample routines invoke a common macro
called DGASECUR. This macro is the actual source code for the sample exits and is
conditionally assembled based on the security system in use. Samples are provided
38 IBM Sterling Connect:Direct for z/OS: Administration Guide

for CA-ACF2, IBM RACF, and CA-TOP SECRET. You can accommodate other
systems by using the sample code as a model.
DGAMGSAF is a sample exit routine for all security software supporting the
RACROUTE interface. It uses the z/OS Security Access Facility (SAF). The TCB
Extensions Feature (TCBSENV) must be present for correct operation.
DGASECUR Parameters
You can edit the parameters in the DGASECUR macro to select the appropriate
parameters.
The parameters are described in each source module and summarized in the
following table. The parameters related to functional authority levels are listed
separately in Sterling Connect:Direct Functional Authority.
Parameter Description
TYPE=[SAF] Identifies the type of exit.
STAGE1=[YES,NO] Identifies whether the stage 1 signon exit is
implemented.
NOPASS=[YES,NO] Specifies if data set validity calls to the security
subsystem are to be made without using passwords.
SECSYS=[ACF,TSS,RACF] Identifies the security system package installed on your
z/OS system.
NEWPASS=[YES,NO] Specifies whether the security system password of a
user can be changed at signon time.
PNODEID=[YES,NO] Specifies if this exit enables security override of a
PNODE user ID if one is used in a Process statement.
SNODEID=[YES,NO] Specifies if this exit enables an incoming node to use a
SNODEID.
RESTRICT=[YES,NO] (ACF2 only) Indicates if a user can specify a restricted
ID (an ID with no ACF2 password) to access Sterling
Connect:Direct.
When running a stage 1 signon exit, this parameter has
no meaning. The stage 1 exit inserts a dummy
password into the user security record. In an
environment with a stage 1 exit, all data set validity
calls to the security subsystem are made with a
NOPASS option. Therefore, the security subsystem does
not differentiate between a restricted ID and an ID with
a valid password.
Chapter 2. Implementing Security 39

Parameter Description
PROTECTD=[NO,YES, AUTH] (IBM RACF only) Indicates if a user can specify a
protected ID (an ID with no IBM RACF password) to
access Sterling Connect:Direct. The User IDs are defined
to IBM RACF with the NOPASSWORD and
NOIDCARD parameters. A protected ID cannot be used
in situations requiring a password.
Specifying SECSYS=RACF, PROTECTD=YES, allows
users to access Sterling Connect:Direct using User IDs
without passwords when the Sterling Connect:Direct
DTF is started with a protected User ID. Therefore,
Processes may specify PNODEID=|SNODEID without
specifying a password.
Specifying SECSYS=RACF, PROTECTD=AUTH, works
like specifying PROTECTD=YES, except that the RACF
protected ID must be specified as the SEC ID in an
AUTH file entry for the USERID/NODE being verified.
Also, the initialization parameter
INVOKE.SPOE.ON.SNODEID must be YES.
Note: For PNODEID protected id processing, specifying
PROTECTD=AUTH is the same as specifying
PROTECTD=YES and no entry needs to be in the
AUTH file as no SPOE processing is performed for
PNODEID overrides.
Specifying SECSYS=RACF, PROTECTD=NO generates
no support for IBM RACF Protected User IDs.
NPFAIL=[YES,NO] Specifies whether to refuse a request to copy a file that
is not protected. This parameter is only valid for IBM
RACF and CA-TOP SECRET users.
TRACE=[NO,DEBUG] Specifies whether tracing will be turned on for this
security exit.
TRACE=NO corresponds to TEST=NO in releases prior
to 5.0. TRACE=DEBUG turns control of tracing over to
the DEBUG bit settings and/or the existence of the
SECURITY DD statement. You can direct the SECURITY
DD to SYSOUT or a disk file with attributes of
RECFM=VBA, LRECL=121, and BLKSIZE=125 or
greater.
For more information about starting a security trace, see
Security Traces.
TEST=
(leave this parameter blank or
delete it)
If anything is specified for TEST (other than "TEST= ,"),
TRACE=DEBUG will be assumed unless TRACE=NO is
explicitly specified.
Note: As of the 5.0 release of Sterling Connect:Direct
for z/OS, the TEST parameter is being retired. If
specified in Version 5.0 and later, an MNOTE 4 will be
generated causing the Assembler to end with RC4
(unless a more critical error is detected). This keyword
has been replaced by the TRACE keyword.
CICSID=name Specifies the dummy USERID name for establishing the
initial session between the CICS Interface and a Sterling
Connect:Direct DTF. Use this parameter for security
when using the CICS interface.
40 IBM Sterling Connect:Direct for z/OS: Administration Guide

Parameter Description
PASSTK=[YES|NO] Results in the generation of a routine in the Stage 2 exit.
This routine generates an IBM RACF PassTicket for
PNODE processing and receives a PassTicket for
SNODE processing. If PASSTK=NO is coded, no IBM
RACF PassTicket processing is done. For more
information, see Generating IBM RACF PassTickets.
PROCEXIT=[DGAXPRCT,NO] Specifies if the DGAXPRCT exit (Process Exit for
testing) is to be used or not. To invoke the exit, specify
DGAXPRCT. To prevent the DGAXPRCT exit from
being invoked, specify NO. For more information, see
Setting Up and Using the DGAXPRCT Exit.
UID=local ID Specifies the local identifier which appears in
NDMLOG output along with the PTF maintenance
listing.
CLASS=DATASET | FACILITY Provides ability to use the IBM RACF DATASET or
FACILITY class to define user authorization profiles
within Sterling Connect:Direct. For more information,
see Sterling Connect:Direct Functional Authority.
Generating IBM RACF PassTickets
An IBM RACF PassTicket is a temporary one-time password that is good for only
a short period of time. The generation of the PassTicket requires a Userid and an
Application Profile Name. To validate the PassTicket, the same Userid and same
Application Profile Name must be used. The Application Profile Name must be
defined to IBM RACF as the name of a PTKTDATA profile. Sterling Connect:Direct
allows the specification of a PassTicket Application ID in the AUTH file.
To identify a node as capable of generating PassTickets, the third parameter in the
SECURITY.EXIT initialization parm must specify PSTKT as shown in the following
example:
SECURITY.EXIT=(module name,DATASET|ALL,PSTKT)
If a session is established with another Sterling Connect:Direct for z/OS node that
also supports PassTicket generation, a PassTicket is generated under the following
conditions:
v The PNODE is PassTicket capable.
v The SNODE is PassTicket capable.
v SNODEID= is specified without a password.
v The AUTH file contains an entry for this SNODEID/SNODE and PassTicket
information is defined. The Application Profile Name is passed to the Stage 2
security exit to generate the PassTicket.
v The PassTicket is generated using the Application Profile Name and the
SNODEID userid.
A generated PassTicket is passed to the SNODE as the Security Password for the
SNODEID, along with an indication that a PassTicket is being used. When the
SNODE receives a session start with an indication that a PassTicket is being used,
it attempts to retrieve the Application Profile Name by looking in the AUTH file
for an entry for the SubmitterID/PNODE with the PassTicket information defined.
The Application Profile Name and SNODEID userid are used to validate the
PassTicket.
Chapter 2. Implementing Security 41

PassTickets can also be used to access HFS files.
Return Codes
The following table describes the valid return codes from the stage 2 exit for
signon, Process start, or security delete.
RC Description
0 No error
8 Insufficient access authority; an SAFB008I is issued
20 Security system inactive (ACF only); an SAFB020I is issued
If none of the return codes in the previous table are returned, Sterling
Connect:Direct issues the message SAFB003I.
Note: If SQMSGYES is on, Sterling Connect:Direct does not overlay the message
ID set by the exit, and the Process ends with the message set by the exit.
The valid return codes for the data set create security call are:
RC Description
0 No error
8 Insufficient access authority; an SVSA908I ABEND is issued
12 Invalid data in SQCB; a U2250 ABEND is issued
16 No storage available for GETMAIN; a U2251 ABEND is issued
20 Security system inactive; Sterling Connect:Direct performs a STOP
IMMEDIATE
24 ADJ node not allowed to send (RACF100I) or receive (RACF101I) and the
node executing the exit is PNODE
28 ADJ node not allowed to send (RACF100I) or receive (RACF101I) and the
node executing the exit is SNODE
After control is returned from the exit to the DTF, the return code is set to 8 if the
exit was run from PNODE and to 12 if the exit was run from SNODE.
If none of the return codes in the previous table are returned, Sterling
Connect:Direct ends abnormally with a U2252 ABEND.
Sterling Connect:Direct Functional Authority
When you sign on to a Sterling Connect:Direct running with security (or when a
Process you submit begins executing), you are assigned a 20-byte authorization bit
mask (ABM) based on a recommendation by the stage 2 security exit or the
Sterling Connect:Direct Authorization file. The ABM describes your unique
functional authority within Sterling Connect:Direct.
Sterling Connect:Direct provides four standard security levels in the DGAMGSAF
exit described in the table below. The ADMVOL, OPRVOL, DBAVOL, and
GENVOL parameters indicate the volumes on which these data sets reside. If you
do not specify volume names in the DGAMGSAF stage 2 security exit, the exit
provides default volume names for monitoring by your security subsystem.
42 IBM Sterling Connect:Direct for z/OS: Administration Guide

If the CLASS=DATASET is defaulted or specified, Sterling Connect:Direct uses the
four standard security levels described above. If the CLASS=FACILITY is specified,
Sterling Connect:Direct uses these same four standard security levels as defined in
the following table. However, the volser information is not needed or used by the
STAGE2 security exit (as provided with the installation media).
Note: To add new functional authority levels or change the privileges in the
standard functional authority levels, see Functional Authority Privileges.
Parameter Description
ADMDSN=file name
ADMVOL=volser
Specifies full administrator authority. The specified user is
authorized to execute all Process language statements and
commands.
DBADSN=file name
DBAVOL=volser
Specifies DB2 Data Base Administrator.
OPRDSN=file name
OPRVOL=volser
Specifies operator authority. The specified user is
authorized to delete, change, display, flush, and submit
Processes; stop Sterling Connect:Direct; start and stop
traces; and display, add, delete, and update type.
GENDSN=NULLFILE|
filename
GENVOL=volser
Specifies general authority. The specified user is authorized
to delete, change, display, and flush his own Processes,
submit Processes, and display, add, delete, and update
Type.
If NULLFILE is coded, a user who logs on to Sterling
Connect:Direct without specific administrator or operator
authorization is, by default, classified as a general user. The
following is a sample User Authorization screen, showing
commands available to a general user.
If a bit in one of these standard ABMs is set to one, you are authorized to perform
the Sterling Connect:Direct command that is associated with that bit, according to
the security levels.
For example, if you have the authority to read the ADMDSN, you are given the
administrator bit mask that enables you to perform administrator functions. If you
do not have ADMDSN authority, OPRDSN read authority is checked, and so on,
according to the sequence described in Functional Authority Validation Sequence.
To assign Sterling Connect:Direct functional authority, define four data sets or
resources on your system to correspond to the administrator, operator, database
administrator, and general user data sets.
You can specify Sterling Connect:Direct functional authority to individual users by
verifying access to one of the named resources. These resource names refer to
Sterling Connect:Direct functional authority grouped by the four categories.
Sterling Connect:Direct users are given access to the particular resource that
corresponds to their level of authority.
In addition, you can modify the standard ABMs provided by Sterling
Connect:Direct to changed the default privileges for a particular functional
authority level. See Functional Authority Privileges. In addition, you can expand
the number of functional authority levels by creating authorization bit masks for
new user-defined levels. See Defining Additional Levels of Functional Authority.
Chapter 2. Implementing Security 43

Example Functional Authority Profiles
In the sample screens below, YES next to a command means that the security level
is authorized to execute the command, NO means that the security level is not
authorized to execute the command, and SUB means that the security level is
authorized to execute the command only if the Process was submitted by the
particular user.
The following example shows the User Authorization screen for the administration
authority (ADMDSN=file name, ADMVOL=volser).
Note: You can access the User Authorization screen through the IBM Sterling
Connect:Direct Primary Options Menu. This menu and its options are discussed in
the chapter on the Interactive User Interface in IBM Sterling Connect:Direct for z/OS
User Guide. The User Authorization screen lists all the commands a particular user
is authorized and not authorized to execute.
.
node.name USER AUTHORIZATION 13:30
CMD ==>
AUTH COMMAND AUTH COMMAND
--------------------------- ---------------------------
1) YES - CHANGE PROCESS 15) YES - SELECT TASK
2) YES - DELETE PROCESS 16) YES - SELECT TYPE
3) YES - DELETE TYPE 17) YES - SELECT USER
4) YES - DELETE USER 18) YES - SUBMIT PROCESS
5) YES - FLUSH PROCESS 19) YES - SUBMIT WITHIN PROC
6) YES - FLUSH TASK 20) YES - SUSPEND PROCESS
7) Y/Y - INSERT/UPDATE TYPE 21) YES - STAT COMMAND
8) Y/Y - INSERT/UPDATE USER 22) YES - EVENT COMMAND
9) YES - MODIFY (TRACE) 23) YES - VIEW PROCESS
10) YES - STOP Connect:Direct 24) YES - PERFORM CRC OVERRIDES
11) YES - UPDATE NETWORK MAP 25) NO - CONFIRM DELETE
12) YES - SELECT NETWORK MAP 26) NO - CONFIRM DEL OFF
13) YES - SELECT PROCESS 27) YES - SECURE+ ADMIN
14) YES - SELECT STATISTICS 28) NO - UPDATE INITPARM
The following example shows the User Authorization screen for the DB2 data base
administrator authority (DBADSN=file name, DBAVOL=volser).
node.name USER AUTHORIZATION hh:mm
CMD ==>
AUTH COMMAND AUTH COMMAND
--------------------------- ---------------------------
1) SUB - CHANGE PROCESS 15) SUB - SELECT TASK
2) SUB - DELETE PROCESS 16) YES - SELECT TYPE
3) YES - DELETE TYPE 17) NO - SELECT USER
4) NO - DELETE USER 18) YES - SUBMIT PROCESS
5) SUB - FLUSH PROCESS 19) YES - SUBMIT WITHIN PROC
6) SUB - FLUSH TASK 20) SUB - SUSPEND PROCESS
7) Y/Y - INSERT/UPDATE TYPE 21) NO - STAT COMMAND
8) N/N - INSERT/UPDATE USER 22) NO - EVENT COMMAND
9) NO - MODIFY (TRACE) 23) SUB - VIEW PROCESS
10) NO - STOP Connect:Direct 24) YES - PERFORM CRC OVERRIDES
11) NO - UPDATE NETWORK MAP 25) NO - CONFIRM DELETE
12) NO - SELECT NETWORK MAP 26) NO - CONFIRM DEL OFF
13) SUB - SELECT PROCESS 27) NO - SECURE+ ADMIN
14) YES - SELECT STATISTICS 28) NO - UPDATE INITPARM
44 IBM Sterling Connect:Direct for z/OS: Administration Guide

The following example shows the User Authorization screen for the operator
authority (OPRDSN=file name, OPRVOL=volser).
node.name USER AUTHORIZATION hh:mm
CMD ==>
AUTH COMMAND AUTH COMMAND
--------------------------- ---------------------------
1) YES - CHANGE PROCESS 15) YES - SELECT TASK
2) YES - DELETE PROCESS 16) YES - SELECT TYPE
3) YES - DELETE TYPE 17) NO - SELECT USER
4) NO - DELETE USER 18) YES - SUBMIT PROCESS
5) YES - FLUSH PROCESS 19) YES - SUBMIT WITHIN PROC
6) YES - FLUSH TASK 20) YES - SUSPEND PROCESS
7) Y/Y - INSERT/UPDATE TYPE 21) NO - STAT COMMAND
8) N/N - INSERT/UPDATE USER 22) NO - EVENT COMMAND
9) YES - MODIFY (TRACE) 23) YES - VIEW PROCESS
10) YES - STOP Connect:Direct 24) YES - PERFORM CRC OVERRIDES
11) NO - UPDATE NETWORK MAP 25) NO - CONFIRM DELETE
12) NO - SELECT NETWORK MAP 26) NO - CONFIRM DEL OFF
13) YES - SELECT PROCESS 27) NO - SECURE+ ADMIN
14) YES - SELECT STATISTICS 28) NO - UPDATE INITPARM
The following example shows the User Authorization screen for the general user
authority (GENDSN=NULLFILE|filename, GENVOL=volser).
node.name USER AUTHORIZATION hh:mm
CMD ==>
AUTH COMMAND AUTH COMMAND
--------------------------- ---------------------------
1) SUB - CHANGE PROCESS 15) SUB - SELECT TASK
2) SUB - DELETE PROCESS 16) YES - SELECT TYPE
3) YES - DELETE TYPE 17) NO - SELECT USER
4) NO - DELETE USER 18) YES - SUBMIT PROCESS
5) SUB - FLUSH PROCESS 19) YES - SUBMIT WITHIN PROC
6) SUB - FLUSH TASK 20) SUB - SUSPEND PROCESS
7) Y/Y - INSERT/UPDATE TYPE 21) NO - STAT COMMAND
8) N/N - INSERT/UPDATE USER 22) NO - EVENT COMMAND
9) NO - MODIFY (TRACE) 23) SUB - VIEW PROCESS
10) NO - STOP Connect:Direct 24) YES - PERFORM CRC OVERRIDES
11) NO - UPDATE NETWORK MAP 25) NO - CONFIRM DELETE
12) NO - SELECT NETWORK MAP 26) NO - CONFIRM DEL OFF
13) SUB - SELECT PROCESS 27) NO - SECURE+ ADMIN
14) YES - SELECT STATISTICS 28) NO - UPDATE INITPARM
Functional Authority Validation Sequence
The security-checking sequence follows:
1. When the stage 2 security exit is called to determine Sterling Connect:Direct
functional authority for a user (at signon or Process start), it first checks with
the security subsystem (that is, CA-ACF2, IBM RACF, or CA-TOP SECRET) to
determine if that user is allowed to read the Administrator data set. If so, the
authority of the user is set as an Administrator.
2. If the user is not allowed to read the Administrator data set, the exit checks to
see if the user can read the Operator data set. If yes, the user is given Operator
authority.
3. If the user is not allowed to read the Operator data set, the exit checks to see if
the user can read the Data Base Administrator data set. If so, the user is given
Data Base Administrator authority.
Chapter 2. Implementing Security 45

4. If the user is not allowed to read the Data Base Administrator data set, and the
stage 2 exit includes GENDSN=NULLFILE, the user is given General User
authority. If you specify a data set name for GENDSN, the exit either assigns
the user General User authority if the user can read the data set, or disables the
Sterling Connect:Direct function requested (signon or Process execution) if the
user cannot read the data set.
Functional Authority Privileges
The privileges set for each of the four standard Sterling Connect:Direct functional
authority levels are the default privileges provided in the base product. This
section describes how to change the privileges in the standard functional authority
levels or add new functional authority levels.
You can modify the Sterling Connect:Direct stage 2 security exit macro,
DGASECUR, to change the functions a user can perform in a particular
authorization level. The $CD.SDGAMAC library contains a macro called
DGA$MFLG that describes each of the 20 bytes of functional authorization.
The following is the generic 20 byte mask that is mapped by a dummy section
(DSECT) in the DGA$MFLG macro along with a definition of each byte, the
general function that the bits represent, and the specific settings:
Byte Function Setting
BYTE00 Reserved for future use
BYTE01 Display, Add, Update, and Delete User
Commands
ADDUSR–Add user
UPDUSR–Update user
DELUSR– Delete user
DSPUSR–Display user
BYTE02 Reserved for future use
BYTE03 Reserved for future use
BYTE04 Display, Add, Update, and Delete
Network Map Commands
ADDNET–Add network map
UPDNET–Update network map
DELNET–Delete network map
DSPNET–Display network map
BYTE05 Change and Delete Process Commands CHGPRC–Change Process
DELPRC–Delete Process
BYTE06 Display Process, Statistics, and Traces,
Flush Process, and Use Stats commands
DSPPRC–Display Process
DSPSTA–Display Statistics
DSPTRC–Display Trace
FLSPRC–Flush Process
STATCMD–Use Statistics
Commands
46 IBM Sterling Connect:Direct for z/OS: Administration Guide

Byte Function Setting
BYTE07 Start/Stop Sterling Connect:Direct,
Start/Stop Traces, Modify Init parms,
Suspend/Resume Sessions, Use Event
Services, Update APKey commands, and
Update initialization parameters in
Sterling Control Center
STPNDM–Start/Stop Sterling
Connect:Direct
SSTRAC–Start/Stop Traces and
Modify Initparms
EVENTCMD–Use Event Services
Commands
REFSH–Update init parms
UPDKEY–Update license key
BYTE08 Perform Sterling Connect:Direct Secure
Plus Parm file and netmap administration
functions in Sterling Control Center
S#RNCR–Read Sterling
Connect:Direct Secure Plus parm
file
S#WNCR–Write to Sterling
Connect:Direct Secure Plus parm
file
DSPNCR–Display netmap control
functions in Sterling Control
Center
UPDNCR–Allow netmap update
functions in Sterling Control
Center
BYTE09 Display, Add, Update, and Delete Type
commands
ADDTYP–Add type
UPDTYP–Update type
DELTYP–Delete type
DSPTYP–Display type
BYTE10 Use COPY, RUN JOB, MODALS, and
SUBMIT Statements, and View Process
and CRC Override commands
GCOPY–Use COPY statement
GRUNJ–Use RUN JOB statement
GMODALS–Use MODAL
statement
GSUBMIT–Use SUBMIT
statement
VIEWPR–View Process
GOVCRC–Perform CRC overrides
BYTE11 Use Submit within a Process and RUN
TASK statements,
display Confirm Delete prompt, and turn
Confirm Delete
prompt off for a session.
Note: The Confirm Delete function also
includes the Flush and Suspend
commands, that is, the user is prompted
to confirm before the Flush and Suspend
Commands in addition to the Delete
command.
GSUB–Use Submit within a
Process statement
GRUNT–Use RUN TASK
statement
GCDEL–Display Confirm Delete,
Flush, and Suspend prompts
GCDELOFF–Turn off Confirm
delete
prompt off for session
Chapter 2. Implementing Security 47

Byte Function Setting
BYTE12 General User Functions– Select, Delete,
Flush, Change, and View Process, and
Display Statistics, and Display Plex
environment (the last command for an
Administrator only).
Note: The General User functions enable
you to restrict applying each command to
Processes associated with a submitter ID.
GDSPPRC–Display Process
GDELPRC–Delete Process
GDFLSPRC–Flush Process
GDSPSTA–Display Statistics
GCHGPRC–Change Process
GVIEWPR–View Process
DSPPLX–Display Plex
Environment
BYTE13 Reserved for future use
BYTE14 Reserved for future use
BYTE15 Reserved for future use
BYTE16 Reserved for future use
BYTE17 Reserved for future use
BYTE18 Reserved for future use
BYTE19 Reserved for future use
The sample exit macro DGASECUR contains authorization bit masks for the four
standard Sterling Connect:Direct authority groups. The default settings shown in
the following ABMs are in the DGASECUR macro in the $CD.SDGAMAC library.
The DGA$MFLG bit mask contains all possible functions for each byte whereas the
bit masks for a particular Sterling Connect:Direct authority group may contain only
a subset of the available functions. For example, BYTE 10 (DBA10) in the DB2 data
base authority level authorization bit mask (DBAABM) below does not contain the
View Process function (VIEWPR) while BYTE 10 in the ABM for the Operator
authority level does. (Bytes reserved for future use are not shown.)
DGASECUR Authorization Bit Mask Examples
The following example shows the authorization bit mask for the Administrator
authority level (ADMABM).
ABYTE1 DC AL1(ADDUSR+UPDUSR+DELUSR+DSPUSR)
ABYTE4 DC AL1(ADDNET+UPDNET+DELNET+DSPNET)
ABYTE5 DC AL1(CHGPRC+DELPRC)
ABYTE6 DC AL1(DSPPRC+DSPSTA+FLSPRC+STATCMD)
ABYTE7 DC AL1(STPNDM+SSTRAC+EVENTCMD+UPDKEY)
ABYTE8 DC AL1(UPDNCR+DSPNCR+S#WNCR+S#RNCR)
ABYTE9 DC AL1(ADDTYP+UPDTYP+DELTYP+DSPTYP)
ABYTE10 DC AL1(GCOPY+GRUNJ+GMODALS+GSUBMIT+VIEWPR+GOVCRC)
ABYTE11 DC AL1(GSUB+GRUNT)
ABYTE12 DC AL1(DSPPLX)
The following example shows the authorization bit mask for the Operator
authority level (OPERABM).
48 IBM Sterling Connect:Direct for z/OS: Administration Guide

OPER1 DC XL1(00) NULL - Not Set
OPER4 DC XL1(00) NULL - Not Set
OPER5 DC AL1(CHGPRC+DELPRC) DELETE/CHANGE PROCESS
OPER6 DC AL1(DSPPRC+DSPSTA+FLSPRC) DISPLAY/FLUSH PROCESS
* DISPLAY STATISTICS
OPER7 DC AL1(STPNDM+SSTRAC) STOP START-STOP TRACE
OPER9 DC AL1(ADDTYP+UPDTYP+DELTYP+DSPTYP)
* DISPLAY/ADD/DELETE TYPE
OPER10 DC AL1(GCOPY+GRUNJ+GMODALS+GSUBMIT+VIEWPR+GOVCRC)
* COPY/RUN JOB/MODALS/SUBMIT
OPER11 DC AL1(GSUB+GRUNT) REMOTE SUBMIT/RUN TASK
The following example shows the authorization bit mask for the DB2 data base
authority level (DBAABM).
DBA1 DC XL1(00) NULL - Not Set
DBA4 DC XL1(00) NULL - Not Set
DBA9 DC AL1(ADDTYP+UPDTYP+DELTYP+DSPTYP)
* DISPLAY/ADD/DELETE TYPE
DBA10 DC AL1(GCOPY+GRUNJ+GMODALS+GSUBMIT+GOVCRC)
* COPY/RUN JOB/MODALS/SUBMIT
DBA11 DC AL1(GSUB+GRUNT) REMOTE SUBMIT/RUN TASK
DBA12 DC AL1(GDSPPRC+GDELPRC+GFLSPRC+GDSPSTA+GCHGPRC+GVIEWPR)
* DISPLAY/CHANGE/FLUSH/STATS FOR
* SUBMITTERS PROCESS ONLY
The following example shows the authorization bit mask for the General User
authority level (GUSRABM).
GUSR1 DC XL1(00) NULL - Not Set
GUSR4 DC XL1(00) NULL - Not Set
GUSR9 DC AL1(ADDTYP+UPDTYP+DELTYP+DSPTYP)
* DISPLAY/ADD/DELETE TYPE
GUSR10 DC AL1(GCOPY+GRUNJ+GMODALS+GSUBMIT+GOVCRC)
* COPY/RUN JOB/MODALS/SUBMIT
GUSR11 DC AL1(GSUB+GRUNT) REMOTE SUBMIT/RUN TASK
GUSR12 DC AL1(GDSPPRC+GDELPRC+GFLSPRC+GDSPSTA+GCHGPRC+GVIEWPR)
* DISPLAY/CHANGE/FLUSH/STATS FOR
* SUBMITTERS PROCESS ONLY
To change the bits in any given authorization byte, locate the bit labels in the
DGA$MFLG macro and update the DGASECUR macro. To implement any changes
made and put your new exit into effect, you must stop and restart Sterling
Connect:Direct.
Example 1 - Broadening Privileges for General Users
To authorize general users to perform a SELECT PROCESS command and a
SELECT STATISTICS command for Processes submitted with any user ID rather
than just with the ID of the submitter, perform the following steps:
Procedure
1. Look in the DGA$MFLG macro for the bits that allow the user to perform these
two commands. These bits are located in BYTE06 of DGA$MFLG.
2. Find the bits that allow these two commands only for the ID of the submitter.
These bits are located in BYTE12 of DGA$MFLG.
Chapter 2. Implementing Security 49

3. Locate the label in the DGASECUR macro that indicates the General User
authorization bit mask (GUSRABM). General user BYTES 06 and 12 are
currently set to the following values.
GUSR6 DC XL1’00’
GUSR12 DC AL1(GDSPPRC+GDELPRC+GFLSPRC+GDSPSTA+GCHGPRC+GVIEWPR)
4. To allow general users to perform SELECT PROCESS and SELECT STATISTICS
commands for any user ID, remove GDSPPRC and GDSPSTA from BYTE12 and
copy the DSPPRC and DSPSTA bits from BYTE06 in the DGA$MFLG
authorization bit mask and put them in BYTE06 in the GUSRABM, changing
these bytes to the following values:
GUSR6 DC AL1(DSPPRC+DSPSTA)
GUSR12 DC AL1(GDELPRC+GFLSPRC+GCHGPRC+GVIEWPR)
5. Reassemble and link-edit your security module that uses the DGASECUR
macro.
6. To put the new exit into effect, stop and restart Sterling Connect:Direct.
Example 2 - Forcing the Confirm Prompt for General Users
If a user has the authority to delete, flush or suspend a Process, the default setting
allows the user to perform the action automatically. As soon as the user enters the
command, it is executed instantly. However, you can modify this default privilege
and require a user to confirm the action before it is executed. In addition, you can
specify whether a user can turn off the Confirm Delete/Flush/Suspend Command
prompt for a particular session after the prompt displays at least one time.
About this task
The following sample procedure shows you how to turn on the Confirm
Delete/Flush/Suspend Command prompt for users in the general user authority
category but at the same time allow them to turn off the prompt for a particular
session.
Procedure
1. Locate BYTE11 in the DGA$MFLG macro. Two of the four bits, GCDEL and
GCDELOFF, turn on the Confirm Delete/Flush/Suspend Command prompt
and if turned on, permit a user to turn off the Confirm Delete/Flush/Suspend
Command prompt temporarily for the current session. (The other two bits
pertain to the Submit within a Process and RUN TASK commands.)
2. Locate the label in the DGASECUR macro that indicates the General User
authorization bit mask setting (GUSRABM). General user BYTE 11 is currently
set to the following values.
GUSR11 DC AL1 (GSUB+GRUNT)
3. To ensure that the Confirm/Delete/Suspend Command prompt displays for all
users in the general user category, add GCDEL to change BYTE11 as follows:
GUSR11 DC AL1 (GSUB+GRUNT+GCDEL)
4. To let users in the general user category turn off the Confirm/Delete/Suspend
Command prompt for a particular session, add GCDELOFF to change BYTE11
as follows:
50 IBM Sterling Connect:Direct for z/OS: Administration Guide

GUSR11 DC AL1 (GSUB+GRUNT+GCDEL+GCDELOFF)
5. Reassemble and link-edit your security module that uses the DGASECUR
macro.
6. To put the new exit into effect, stop and restart Sterling Connect:Direct.
Example 3 - Defining Additional Levels of Functional Authority
Sterling Connect:Direct provides additional authorization bit masks (US0DSN
through US9DSN) that you can use to expand the number of functional authority
levels beyond the standard four levels.
About this task
The following example shows the authorization bit mask for the user-definable
ABM.
U0BYTE1 DC XL1(00) NULL - Not Set
U0BYTE4 DC XL1(00) NULL - Not Set
U0BYTE5 DC AL1(CHGPRC+DELPRC) DELETE/CHANGE PROCESS
U0BYTE6 DC AL1(DSPPRC+DSPSTA+FLSPRC) DISPLAY/FLUSH PROCESS
* DISPLAY STATISTICS
U0BYTE7 DC AL1(STPNDM+SSTRAC) STOP START-STOP TRACE
U0BYTE8 DC XL1’00’ NOT USED
U0BYTE9 DC AL1(ADDTYP+UPDTYP+DELTYP+DSPTYP)
* DISPLAY/ADD/DELETE TYPE
U0BYTE10 DC AL1(GCOPY+GRUNJ+GMODALS+GSUBMIT+VIEWPR+GOVCRC)
* COPY/RUN JOB/MODALS/SUBMIT
U0BYTE11 DC AL1(GSUB+GRUNT) REMOTE SUBMIT/RUN TASK
Procedure
1. To create your own authorization level, locate the user-definable ABM you
want to use, and change the bytes.
2. Add the data set and volume names to the DGAMGSAF stage 2 security exit.
3. Assemble and link-edit the DGAMGSAF exit.
4. To implement the new authorization level, into effect, you must stop and
restart Sterling Connect:Direct.
Example 4 - Assigning Read-Only Authority to a User
Authorization Level
To define a new security profile to allow read-only authority for users, follow this
procedure. After you implement it, when a user signs on to Sterling
Connect:Direct, they are assigned an authorization bit mask that allows them to
display and view Processes, and display statistics but they cannot submit or run a
Process.
Procedure
1. Modify the DGASECUR macro by locating the USR0ABM label and making the
following changes:
a. Delete both the CHGPRC and DELPRC bits in BYTE05.
b. Delete the FLSPRC bit in BYTE06.
c. Delete both the STPNDM and SSTRAC bits in BYTE07.
d. Delete all bits in BYTE09.
e. Delete all bits in BYTE10 except for VIEWPR.
f. Delete all bits in BYTE11.
Chapter 2. Implementing Security 51

The USR0ABM should look like the following:
USR0ABM DS 0XL20 DEFINES User Group Zero ABM Flags
U0BYTE0 DC XL1’00’ NOT USED
U0BYTE1 DC XL1’00’ NOT USED
U0BYTE2 DC XL1’00’ NOT USED
U0BYTE3 DC XL1’00’ NOT USED
U0BYTE4 DC XL1’00’ NOT USED
U0BYTE5 DC XL1’00’ DELETE/CHANGE PROCESS
U0BYTE6 DC AL1(DSPPRC+DSPSTA) Display Process
* DISPLAY STATISTICS
U0BYTE7 DC XL1’00’ STOP START-STOP TRACE
U0BYTE8 DC XL1’00’ NOT USED
U0BYTE9 DC XL1’00’ DISPLAY/ADD/DELETE TYPE
U0BYTE10 DC AL1(VIEWPR) View Process only
U0BYTE11 DC XL1’00’ REMOTE SUBMIT/RUN TASK
U0BYTE12 DC XL1’00’ NOT USED
2. Modify the DGAMGSAF example in the $CD.SDGASAMP library to assign a
file name to the new US0DSN parameter and indicate which volume it resides
on.
DGAMGSAF DGASECUR TYPE=SAF, X
. X
. X
ADMDSN=$CD.ADMIN, X
ADMVOL=VOLSER, X
OPRDSN=$CD.OPER, X
OPRVOL=VOLSER, X
DBADSN=$CD.DBA, X
DBAVOL=VOLSER, X
GENDSN=$CD.GUSER, X
GENVOL=VOLSER, X
US0DSN=$CD.NEW.USER.LEVEL, X
US0VOL=VOLSER
3. Assemble and link-edit the DGAMGSAF module using the sample JCL in
$CD.SDGAJCL(DGAJSAF).
52 IBM Sterling Connect:Direct for z/OS: Administration Guide

//ASM EXEC PGM=ASMA90,
// PARM=’OBJECT,NODECK,XREF(SHORT),RENT,USING(WARN(0),NOMAPX
// ),FLAG(NOCONT),SYSPARM(GEN),NOTEST’
//SYSIN DD DISP=SHR,DSN=connect.direct.SDGASAMP(DGA*****)
//SYSLIB DD DISP=SHR,DSN=connect.direct.samplib
// DD DISP=SHR,DSN=SYS1.MACLIB
// DD DISP=SHR,DSN=SYS1.AMODGEN
// DD DISP=SHR,DSN=SYS1.AMACLIB
// DD DISP=SHR,DSN=security.maclib
//SYSLIN DD DISP=(,PASS),DSN=&&OBJ,
// UNIT=SYSDA,SPACE=(CYL,(1,1)),
// DCB=(DSORG=PS,RECFM=FB,LRECL=80,BLKSIZE=3120)
//SYSPRINT DD SYSOUT=*
//SYSTERM DD SYSOUT=*
//SYSUT1 DD UNIT=SYSDA,SPACE=(CYL,(1,1))
//*************************
//* LKED *
//*************************
//LKED EXEC PGM=IEWL,COND=(0,LT,ASM),
// PARM=(’SIZE=(256K,13K),LIST,LET,XREF,RENT’,
// ’REUS’)
//SYSLIB DD DISP=SHR,DSN=connect.direct.SDGALINK
// DD DISP=SHR,DSN=security.loadlib
//SYSLIN DD DISP=(OLD,DELETE),DSN=&&OBJ
//SYSLMOD DD DISP=SHR,DSN=connect.direct.SDGALINK(DGA*****)
//SYSPRINT DD SYSOUT=*
//SYSUT1 DD UNIT=SYSDA,SPACE=(CYL,(1,1),,CONTIG)
4. If necessary, update the Sterling Connect:Direct initialization parameter,
SECURITY.EXIT, to specify the new exit.
SECURITY.EXIT = (mod-name,ALL)
5. Initialize Sterling Connect:Direct.
Example 5 - Defining a New Administrator Level
To define a new security profile giving the administrator all normal administrator
functions except the ability to run Processes, follow this procedure. Authorization
BYTES 10 and 11 represent the functions that are to be disallowed. If you have
used USR0DSN to define another level, use USR1DSN for this new profile.
Procedure
1. Modify the DGASECUR macro by locating the USR1ABM label and updating
the various bytes as follows:
ADMABM DC 0XL20
ABYTE0 DC XL1’00’ NOT USED
ABYTE1 DC AL1(ADDUSR+UPDUSR+DELUSR+DSPUSR)
ABYTE2 DC XL1’00’ NOT USED
ABYTE3 DC XL1’00’ NOT USED
ABYTE4 DC AL1(ADDNET+UPDNET+DELNET+DSPNET)
ABYTE5 DC AL1(CHGPRC+DELPRC)
ABYTE6 DC AL1(DSPPRC+DSPSTA+FLSPRC+STATCMD)
ABYTE7 DC AL1(STPNDM+SSTRAC+EVENTCMD+UPDKEY)
ABYTE8 DC AL1(UPDNCR+DSPNCR)
ABYTE9 DC AL1(ADDTYP+UPDTYP+DELTYP+DSPTYP)
ABYTE10 DC AL1(VIEWPR)
ABYTE11 DC XL1’00’
ABYTE12 DC AL1(DSPPLX)
ABYTE13 DC XL1’00’
ABYTE14 DC XL1’00’ NOT USED
Chapter 2. Implementing Security 53

2. Modify the DGAMGSAF example in THE $CD.SDGASAMP library to define
the new US1DSN parameter with the new security profile as follows:
DGAMGSAF DGASECUR TYPE=SAF, X
. X
. X
ADMDSN=$CD.ADMIN, X
ADMVOL=VOLSER, X
OPRDSN=$CD.OPER, X
OPRVOL=VOLSER, X
DBADSN=$CD.DBA, X
DBAVOL=VOLSER, X
GENDSN=$CD.GUSER, X
GENVOL=VOLSER, X
US0DSN=$CD.NEW.USER.LEVEL, X
US0VOL=VOLSER, X
US1DSN=$CD.NEW.ADMIN, X
US1VOL=VOLSER
3. Assemble and link-edit the DGAMGSAF module using the sample JCL in
$CD.SDGAJCL(DGAJSAF).
4. If necessary, update the initialization parameter, SECURITY.EXIT, to specify the
new exit.
5. Initialize Sterling Connect:Direct in the normal manner.
Example 6 - Defining a Surrogate for User IDs with No Password
Use the BPX.SERVER profile to set the scope of z/OS resources that the server can
access when acting as a surrogate for its clients. BPX.SERVER UPDATE access lets
the server establish a thread level (task-level) security environment for clients
connecting to the server. When the IBM RACF identity of the application server is
granted UPDATE authority to BPX.SERVER in the IBM RACF FACILITY class, the
server can act as a surrogate for the client.
About this task
This procedure contains sample IBM RACF commands. For more information, refer
to IBM RACF manuals. For more information about how to define SURROGAT in
other external security products, such as ACF2 or CA-TOP SECRET, refer to the
manuals of the specific vendor.
Procedure
1. Make sure that the Stage 2 Security exit can verify if Stage 1 has set the
dummy password in SQCB. The DGASECUR macro contains label STG1NPW
which includes the following instruction:
OI SQFLAG,SQDUMMY DUMMY PASSWORD USED P768101
2. Identify all user IDs that will access HFS without supplying their password.
3. To activate the SURROGAT class support in IBM RACF, if it has not already
been set up on your system, issue the following command:
SETROPTS CLASSACT(SURROGAT)
Note: You only have to activate this feature one time.
4. If you want to cache the SURROGAT profiles in storage to enable you to
refresh and immediately put all IBM RACF changes in effect immediately,
issue the following command:
54 IBM Sterling Connect:Direct for z/OS: Administration Guide

SETROPTS RACLIST(SURROGAT)
Note: If you do not use the RACLIST option, the changes made during this
procedure will not take effect until the next IPL.
5. To create the SURROGAT class profile for a particular user, issue the following
command:
RDEFINE SURROGAT BPX.SRV.UUUUUUUU UACC(NONE)
where UUUUUUUU is the user ID you are creating a profile for.
6. Repeat Step 5 for each user ID that requires HFS support without a password
with a SURROGAT profile.
Note: To define all users in one command, you can specify BPX.SRV.* .
7. To give a user the authority to create a thread-level security environment for
another user, issue the following command:
PERMIT BPX.SRV.UUUUUUUU CLASS(SURROGAT) ID(CDIRECT) ACCESS(READ)
where the DTF user called CDIRECT is the user you are granting permission
to create the security environment for another user called UUUUUUUU.
8. Repeat Step 8 for each user ID that requires HFS support without a password
with a SURROGAT profile.
Note: To define all users in one command, you can specify BPX.SRV.* .
9. Verify that the DTF User ID has sufficient access to HFS files along with both
IBM RACF access and z/OS UNIX System Services permissions.
10. If you are using the RACLIST option, issue the following command to refresh
and put your changes in effect for the SURROGAT class:
SETROPTS RACLIST(SURROGAT) REFRESH
11. To check whether the DTF Userid has been defined to the BPX.SRV.uuuuuuuu
SURROGAT class profile, use the following RLIST command:
RLIST SURROGAT BPX.SRV.uuuuuuuu AUTHUSER
where uuuuuuuu is the user ID whose requests Sterling Connect:Direct needs
to process.
The system displays the user ID (which should be the DTF Userid) and access
rights of the user ID that can act as a surrogate for uuuuuuuu.
Chapter 2. Implementing Security 55
CAUTION:
Be aware of the REMOTE.DUMMY.PASSWORD and Adjacent Node
settings for Node to Node communication.
SAFB022I – DGADABMB - Dummy password usage by Adjacent Node rejected.
An attempt was made by an Adjacent Node to use a dummy
password to authorize access to the Connect:Direct local
node. If the Init Parm REMOTE.DUMMY.PASSWORD setting is
INTERNAL, only Adjacent Nodes having the INTERNAL
attribute in the Netmap may use a dummy password for
this purpose.
Run Job Security Exit
The Run Job security exit control point provides a standard interface for security
verification of job streams before they are submitted to the job entry system.
Specific implementation details include the following:
v The Run Job exit is implemented as an executable load module.
v The name of the load module is user-defined and cannot conflict with any
Sterling Connect:Direct load module names.
v Specify RUN.JOB.EXIT=(modname) in the initialization parameters to activate
the Run Job exit.
v You must link-edit the module as re-entrant and place it in a load library that
the Sterling Connect:Direct DTF can access.
v Because information passed to the exit is located above the 16 megabyte line,
you must link-edit the module with AMODE ANY to make it capable of
executing in 31-bit mode.
For additional information about exits, see Chapter 9, “Sterling Connect:Direct
Exits,” on page 179.
Sample Run Job Security Exits
The $CD.SDGASAMP library contains a sample source module for the most used
z/OS security systems. Sample exit routines are:
v DGAXRACJ for IBM RACF and CA-TOP SECRET
v DGAXACRJ for CA-ACF2
The sample exits are designed to ensure that correct security information is coded
on each JOB statement in the job stream.
v For IBM RACF and CA-TOP SECRET, a check is made for a valid USER and
PASSWORD on each JOB card. If not found, a USER=submitter keyword is
added to each JOB card.
v For CA-ACF2, a JOBFROM=submitter keyword is added immediately following
each JOB card to ensure that the correct security information is transferred to
each submitted job:
If you use one of these exits without coding a value for the RUN.JOB.EXIT
initialization parameter, Sterling Connect:Direct does not use the default for the
RUNJOBID initialization parameter.
Note: Use the Run Job security exit to achieve user propagation for security checks
when the job that executes is submitted by the user ID assigned to Sterling
Connect:Direct rather than the user ID that submitted the job. In most
environments, this Exit is not needed.
56 IBM Sterling Connect:Direct for z/OS: Administration Guide

Run Task Security Exit
The Run Task security exit control point provides a standard interface to verify
that the user is authorized to run the specified program. Sterling Connect:Direct
passes the exit security information about the user, the program name, and the
parameters being passed to the program. Specific implementation details include
the following:
v The Run Task exit is implemented as an executable load module.
v The name of the load module is user-defined, but cannot conflict with any
Sterling Connect:Direct load module names.
v Specify RUN.TASK.EXIT=(modname) in the initialization parameters to activate
the Run Task exit.
v You must link-edit the module as re-entrant and place it in a load library that
the DTF can access.
v Because information passed to the exit by Sterling Connect:Direct is located
above the 16 megabyte line, you must link-edit the module with AMODE ANY
to make it capable of executing in 31-bit mode.
For additional information about exits, see Chapter 9, “Sterling Connect:Direct
Exits,” on page 179.
Sample Run Task Security Exit
The $CD.SDGASAMP library contains a sample source module for the most used
security systems. Sample exit routines are:
v DGAXRACT for IBM RACF and CA-TOP SECRET
v DGAXACFT for CA-ACF2
v DGAXSAFT for CA-ACF2 using the Security Access Facility
You can use the sample exit as a model to implement specific requirements.
Sterling Connect:Direct Secure Point-of-Entry
You need security on the local node because adjacent nodes need access to local
nodes in order to transfer files. Sterling Connect:Direct administrators have three
options for security on transfers initiated at a remote node:
v No security for either functional authority or data protection
v Matching user ID/password combinations for all adjacent nodes
v SNODEID/SNODE password overrides on incoming access requests
Point-of-entry security secures the entry of an outside user to your system. It
works with your current security setup (including all current exits) to provide
additional security that addresses concerns about users from other nodes knowing
a user ID and password combination on your system. Both data protection and
Sterling Connect:Direct functional authority are accomplished with exits.
Point-of-Entry Processing is internal within Sterling Connect:Direct, and happens
prior to calling the security exit for validations.
The following figure illustrates the flow of security checking for secure
point-of-entry:
Chapter 2. Implementing Security 57

Security checks are made automatically for every incoming Process, so no
parameter is needed to activate point-of-entry security. To implement
point-of-entry, add user ID and node name combinations to your Authorization
file. For instructions on manipulating the Sterling Connect:Direct Authorization
file, see Authorization File.
The security exit determines if a secure point-of-entry translation was performed
on a user ID by checking the bit SQIDXLAT of the SQCB control block
(DGA$SQCB macro in the $CD.SDGAMAC library).
Point-of-Entry Concept
When a Process is submitted by another node, the receiving Sterling Connect:Direct
node has access to the user ID of the person who submitted the Process and the
name of the node of the submitted Process.
For example, the local node is CD.HOUSTON, and a user SMITH submits a
Process on CD.CHICAGO to copy a file to CD.HOUSTON. By placing an entry of
SMITH/CD.CHICAGO into the local Sterling Connect:Direct authorization file, the
security administrator for CD.HOUSTON can associate this user with a valid user
ID and password on the local system. The Sterling Connect:Direct Authorization
file has the following values:
USERID = SMITH
NODE = CD.CHICAGO
SECURITY ID = JONES
SECURITY PSWD = DALLAS
In this scenario, when user ID SMITH on node CD.CHICAGO submits a Process to
run with node CD.HOUSTON, the functional authority and the data set validation
for that Process are done under the authority of user ID JONES, which is a valid
58 IBM Sterling Connect:Direct for z/OS: Administration Guide

user ID on CD.HOUSTON. The user from the Chicago node never needs to know
the related valid user ID and password on the CD.HOUSTON node.
USERID = SMITH
NODE = CD.HOUSTON
SECURITY ID = JONES
SECURITY PSWD = DALLAS
Secure Point of Entry Optional Variations
Note the following variations:
v If the CD.HOUSTON node enables SNODEID overrides and user SMITH puts
an SNODEID parameter in the Process, the Authorization file is not checked and
the translation of the user ID and password is not done.
Note: If the INVOKE.SPOE.ON.SNODEID initialization parameter is set to YES,
then the Authorization file is checked and the user ID and password are
translated.
For example, if the incoming Process in the previous example is coded with
SNODEID=(BROWN,PWB), even if it is submitted by SMITH from
CD.CHICAGO, the CD.HOUSTON node will send the user ID BROWN, not
user ID JONES to the security subsystem for validation.
Note: To produce a completely secure point-of-entry security system, disable
SNODEID overrides. To disable SNODEID overrides, specify SNODEID=NO in
your stage 2 security exit.
v Although the point-of-entry system requires some maintenance of the Security
ID and Security Password fields in the Authorization file, you can assign the
same user ID and password combination on your system to multiple incoming
users.
For instance, you can specify JONES/DALLAS as the user ID and password for
all users coming into your node from CD.CHICAGO. In addition, if you are
running a stage 1 signon exit, you can specify the security password for all users
as IUI, BATCH, or STC, and avoid the need to update the Authorization file as
the password changes.
v IBM
®
Sterling Connect:Direct
®
for OpenVMS is not able to pass an OpenVMS
password with the OpenVMS user ID. If you are using secure point-of-entry
with incoming OpenVMS nodes, you must leave the User Password field blank
in your z/OS authorization file, or all incoming OpenVMS Processes will fail.
Trusted Node Security
The Trusted Node Security feature enables you to enforce more restrictive security
parameters when dealing with specific nodes in your network, enabling you to
define each adjacent node in the network map as internal or external in its
relationship to the local node of that network map.
When a Process begins execution, the security exit gets control and a bit in the
Security Control Block (SQCB), SQEXTNOD, turns on if the adjacent node is
defined as EXTERNAL. If the adjacent node is defined as INTERNAL, the bit turns
off. Based on this information, the administrator can code the security exit to take
the appropriate action.
Chapter 2. Implementing Security 59

In the adjacent node definition, the fifth positional parameter is required for the
Trusted Node Security option. The parameter description follows:
Parameter Description
EXTERNAL|EXT Indicates that the node is external.
INTERNAL|INT Indicates that the node is internal. This value is the default.
Cross-Domain Signon Environment
The cross-domain signon environment is an extension of the Trusted Node Security
feature. This feature enables you to easily identify whether a signon is entering
from an internal or external node.
You can use the same network map parameters for cross-domain Trusted Node
Security as the node-to-node Trusted Node Security enhancement, for example,
EXTERNAL or INTERNAL in the adjacent node definition. The SQEXTSGN bit in
the security exit Control Block (SQCB) designates this feature.
When a cross-domain signon is entering from a node defined as EXTERNAL in the
local node network map definition, the SQEXTSGN bit is on when the security exit
gets control during signon processing. You can then modify the security exit to
take whatever action is appropriate for that installation.
The DGASECUR macro, included in the $CD.SDGASAMP library, contains the
code to implement this enhancement. The lines of code with 117200 identify the
Trusted Node Security feature in the cross-domain signon environment.
Data Direction Restriction
In addition to the Trusted Node feature, the Data Direction Restriction specifies
whether each adjacent node can initiate a RECEIVE, SEND, or RECEIVE and
SEND to or from the local node in the network map. The bits located in the SQCB,
SQRECV, and SQSEND indicate the sending and receiving status.
In the adjacent node definition, the sixth positional parameter enables you to
restrict the direction of data on a transfer with a specific adjacent node. This
security applies regardless of where the Process is submitted, for example, local or
remote node. The parameter descriptions follow:
Parameter Description
RECEIVE|RECV Indicates that when the adjacent node initiates a transfer, it is only
allowed to receive data from this node. It is never allowed to send data
to this node.
SEND Indicates that when the adjacent node initiates a transfer, it is only
allowed to send data to this node. It is never allowed to receive data
from this node.
BOTH Indicates that when the adjacent node initiates a transfer, it is allowed
to both send and receive data from this node. This value is the default.
NONE Indicates that when the adjacent node initiates a transfer, it is neither
allowed to send or receive data from this node.
The following example represents the Trusted Node Security and Data Direction
Restriction features defined in the network map. The parameters are the fifth and
sixth positional parameters in the adjacent node definition.
60 IBM Sterling Connect:Direct for z/OS: Administration Guide

LOCAL.NODE=(CD.LOCAL LOCAPPL,,SUPUSRPW) -
TCQ=(CD.TCX CD.TCQ))
ADJACENT.NODE=(PARSESS=(4 2) (CD.LOCAL LOCAPPL -
APPLIDS=(1011 1012 1013))
ADJACENT.NODE=(PARSESS=(4 2) -
(CD.REMOTE RMTAPPL , , , EXTERNAL,RECV) -
APPLIDS=(1011 1012 1013))
The following two bits are identified in the security exit:
Bit Description
SQSNODE Identifies if the node where the security exit is running is the SNODE
for this Process. The bit is on if the node is the SNODE and off if the
node is the PNODE.
SQIDXLAT Identifies if a point-of-entry security ID translation was performed prior
to calling the security exit. If a PNODEID/SNODEID is not specified
when the Process is submitted and a match is found in the
Authorization file for that USERID and NODE combination, then the
bit turns on when the security exit gets control.
Implementing a CA-ACF2 Environment
When assembling both the stage 1 signon exit and the stage 2 security exit, you
must provide the following data definition (DD) statements.
Procedure
1. For the assembly step, ensure that the SYSLIB concatenation contains the
following information:
//SYSLIB DD DSN=ACF.MACLIB
// DD DSN=$CD.SDGAMAC
// DD DSN=SYS1.MODGEN
// DD DSN=SYS1.MACLIB
2. Replace $CD with the high-level qualifier for your Sterling Connect:Direct data
sets.
3. For the link-edit step, provide the following DD statements.
//SYSLIB DD DSN=SYS1.ACFMOD
// DD DSN=SYS1.ACFAMOD
// DD DSN=$CD.SDGALINK
Note: You must have the High-Level Assembler for correct assembly. Do not
specify NOALIGN as an option. The correct option is ALIGN.
4. Specify the Sterling Connect:Direct DTF logon ID (LID) with the following
attributes:
LID Attribute Comment
MUSASS Required for ACF2.
NON-CNCL Only required if you are not running DGAMGSAF.
NO-SMC Required.
SECURITY Only required if NEWPASS=YES is specified for the stage 2 security exit.
ACCOUNT Only required if NEWPASS=YES is specified for the stage 2 security exit.
Chapter 2. Implementing Security 61

LID Attribute Comment
JOBFROM Only required if the Run Job statement is allowed and the Run Job exit
is active.
STC Required if Sterling Connect:Direct is run as a started task.
RESTRICT Optional.
PROMPT Optional. Enables Sterling Connect:Direct to receive prompts from the
operating system. For example, with the PROMPT attribute, Sterling
Connect:Direct receives a prompt for the password of a password
protected data set if it was not supplied in the COPY statement
DSN=filename/password.
If you are executing Sterling Connect:Direct as a started task, CA-ACF2
monitors started tasks and the Sterling Connect:Direct logon ID specifies
STC=YES. See the GSO OPTS field STC/NOSTC in the CA-ACF2
Administrator's Guide for more information.
If you are using the program-pathing facility of CA-ACF2 that requires that the
user logon ID be defined with the RESTRICT and SUBAUTH attributes, then
the program name specified in the PROGRAM attribute for the user logon ID
must be BPXPTATT for Sterling Connect:Direct authorization.
The SAF interface requires definitions (SAFDEF) for both BPXPTATT and
DGADRNT$.
Implementing an IBM RACF Environment
When assembling both the stage 1 signon exit and the stage 2 security exit, you
must provide the following DD statements.
Procedure
1. For the assembly step, ensure that the SYSLIB concatenation contains the
following information:
//SYSLIB DD DSN=$CD.SDGAMAC
// DD DSN=SYS1.MODGEN
// DD DSN=SYS1.MACLIB
2. Replace $CD with the high-level qualifier for your Sterling Connect:Direct data
sets.
3. For the link-edit step, provide the following DD statement.
//SYSLIB DD DSN=$CD.SDGALINK
Note: You must have Assembler H or the High Level Assembler for correct
assembly. Do not specify NOALIGN as an option. The correct option is ALIGN.
4. Observe the following restrictions or requirements:
v If the z/OS Task Control Block (TCB) Extension Feature is installed, give
Sterling Connect:Direct update authority to Sterling Connect:Direct system
files, such as the TCQ and network map. These prerequisites allow Sterling
Connect:Direct to use the Security Access Facility (SAF) of z/OS.
v If you are using the IBM RACF PROGRAM ACCESS authority to set up
access authority by program name and user ID, define the program name
DMGATTIS to IBM RACF for Sterling Connect:Direct.
62 IBM Sterling Connect:Direct for z/OS: Administration Guide

Providing Program Access to Data Sets (PADS)
If your system has z/OS UNIX System Services or if you use PADS functionality in
your security system, include all data sets in the Sterling Connect:Direct JCL
STEPLIB DD concatenation in your Program Control List (PCL). If any data set in
the STEPLIB concatenation is not in the PADS list, the “dirty bit” will be turned
on, and Sterling Connect:Direct initialization will fail and display message
SITA997I. Use the following procedure:
Procedure
1. Type the following command to display the data sets (libraries) in the PCL.
rlist program *
The access-controlled data sets are displayed.
CLASS NAME
----------- -----
PROGRAM *
MEMBER CLASS NAME
--------- ------ ------
PMBR
DATA SET NAME VOLSER PADS CHECKING
-------------------------- ------- ----------------
CEE.SCEERUN NO
TCPIP.SEZALINK NO
USER01.HOST4100.LOADLIB NO
2. Define the Sterling Connect:Direct libraries to IBM RACF PADS. The following
screen is an example of a definition.
RDEFINE PROGRAM ** UACC(READ) ADDMEM +
(’$CD.LOADLIB’//NOPADCHK)
SETROPTS WHEN(PROGRAM) REFRESH
Note: Refer to the IBM RACF documentation to verify IBM RACF command
formats and keywords.
Implementing a CA-TOP SECRET Environment
About this task
When assembling both the stage 1 signon exit and the stage 2 security exit, you
must provide the following DD statements.
Procedure
1. For the assembly step, ensure that the SYSLIB concatenation contains the
following information:
//SYSLIB DD DSN=$CD.SDGAMAC
// DD DSN=SYS1.MODGEN
// DD DSN=SYS1.MACLIB
2. Replace $CD with the appropriate high-level qualifier for your Sterling
Connect:Direct data sets.
3. For the link-edit step, provide the following DD statements.
Chapter 2. Implementing Security 63

//SYSLIB DD DSN=$CD.SDGALINK
Note: You must have Assembler H or the High-Level Assembler for correct
assembly. Do not specify NOALIGN as an option. The correct option is ALIGN.
4. Add Sterling Connect:Direct as a CA-TOP SECRET Facility.
5. Observe the following restrictions or requirements:
v If you are using CA-TOP SECRET Release 4 or later, issue the following
commands.
TSS CREATE(NDM) NAME(’...’) DEPT(...)
MASTFAC(NDM) FAC(STC) PASSWORD(NOPW)
TSS ADDTO(STC) PROC(NDM) ACID(NDM)
TSS PERMIT(NDM) DSN(NDM) ACCESS(ALL)
Issue TSS MODIFY commands to obtain the following list of attributes.
NDM PGM=DMG ID=your choice
ATTRIBUTES=ACTIVE, SHRPRF, ASUBM, MULTIUSER, NOXDEF,
SIGN(M) NORNDPW NOAUDIT, RES, NOABEND,
NOPROMPT, NOTSOC
v If you are using CA-TOP SECRET Release 4 or later, and if the z/OS TCB
Extension Feature is installed, Sterling Connect:Direct only needs update
authority to its system files, such as TCQ and network map. These
prerequisites allow Sterling Connect:Direct to use the SAF of z/OS.
Otherwise, the ACID referenced previously must provide full access
authority to all files Sterling Connect:Direct accesses. Alternatively, you can
identify Sterling Connect:Direct in the privileged program name table as
having access to all files by setting bit 6 (bypass password checking) in the
program properties table (IEFSDPPT) to 1.
Configuring Firewall Navigation
Firewall navigation enables controlled access to a Sterling Connect:Direct system
running behind a packet-filtering firewall without compromising your security
policies or those of your trading partners. You control this access by assigning a
specific TCP or UDT source port number or a range of source port numbers with a
specific destination address (or addresses) for Sterling Connect:Direct sessions.
About this task
Before you configure source ports in the Sterling Connect:Direct initialization
parameters, you need to review the information in this section, especially if you
are implementing firewalls for UDT.
Procedure
1. Coordinate IP address and associated source port assignment with the local
firewall administrator before updating the firewall navigation record in the
initialization parameters file.
2. Add the following parameters to the Sterling Connect:Direct initialization
parameters file as needed, based on whether you are using TCP or UDT:
v TCP.SRC.PORTS
v TCP.SRC.PORTS.LIST.ITERATIONS
v UDP.SRC.PORTS
64 IBM Sterling Connect:Direct for z/OS: Administration Guide

v UDP.SRC.PORTS.LIST.ITERATIONS
In a Sterling Connect:Direct/Plex environment, specify these parameters in
the local initialization parameters file of the Sterling Connect:Direct/Plex
member that communicates with an external firewall.
3. Reinitialize Sterling Connect:Direct for z/OS.
4. Coordinate the specified port numbers with the firewall administrator at the
remote site. These ports must also be available for Sterling Connect:Direct
communications on the firewall of your trading partner.
Firewall Navigation Rules Overview
Firewall rules need to be created on the local firewall to allow the local Sterling
Connect:Direct node to communicate with the remote Sterling Connect:Direct node.
A typical packet-filtering firewall rule specifies that the local firewall is open in one
direction (inbound or outbound) to packets from a particular protocol with
particular local addresses, local ports, remote addresses, and remote ports. Firewall
navigation differs between TCP and UDT; as a result, firewall rules for TCP and
UDT should be configured differently.
TCP Firewall Navigation Rules
In the following table, the TCP rules are presented in two sections: the first section
applies to rules that are required when the local node is acting as a PNODE; the
second section applies to rules that are required when the local node is acting as
an SNODE. A typical node acts as a PNODE on some occasions and an SNODE on
other occasions; therefore, its firewall will require both sets of rules.
TCP PNODE Rules
Rule Name Rule Direction Local Ports Remote Ports
PNODE session Outbound Local Sterling
Connect:Direct source
ports
Remote Sterling
Connect:Direct
listening port
TCP SNODE Rules
Rule Name Rule Direction Local Ports Remote Ports
SNODE session Inbound Local Sterling
Connect:Direct
listening port
Remote Sterling
Connect:Direct source
ports
UDT Firewall Navigation Rules
UDT firewall rules are applied to the UDP protocol. The recommended default
firewall rule for UDP packets is to block packets inbound to the local system and
outbound from the local system to prevent the confusion that could occur due to
the callback feature of UDT session establishment.
In the following table, the UDT rules are presented in two sections: the first section
applies to rules that are required when the local node is acting as a PNODE; the
second section applies to rules that are required when the local node is acting as
an SNODE. A typical node acts as a PNODE on some occasions and an SNODE on
other occasions; therefore, its firewall will require both sets of rules.
Chapter 2. Implementing Security 65

UDT PNODE Rules
Rule Name Rule Direction Local Ports Remote Ports
PNODE Session
Request
Outbound Local Sterling
Connect:Direct source
ports
Remote Sterling
Connect:Direct
listening port
PNODE Session Outbound Local Sterling
Connect:Direct source
ports
Remote Sterling
Connect:Direct source
ports
UDT SNODE Rules
Rule Name Rule Direction Local Ports Remote Ports
SNODE listen Inbound Local Sterling
Connect:Direct listening
port
Remote Sterling
Connect:Direct source
ports
SNODE session Inbound Local Sterling
Connect:Direct source
ports
Remote Sterling
Connect:Direct source
ports
Firewall Configuration Examples
In the firewall configuration examples for TCP and UDT, the following IP
addresses and source ports will be used:
Note: The IP addresses in the examples are samples and are not intended to be
valid IP addresses.
v The local node has IP address 222.222.222.222 and listening port 2264. Its source
ports for communicating with the remote node are 2000–2200.
v The remote node has IP address 333.333.333.333 and listening port 3364. Its
source ports for communicating with the local node are 3000–3300.
See Session Establishment for the differences between establishing a UDT or TCP
session.
TCP Firewall Configuration Example
The Sterling Connect:Direct administrator configures the local node to listen on
port 2264, and the following initialization parameter settings are used to configure
the local node's source ports:
v TCP.SRC.PORTS = (333.333.333.333, 2000–2200)
v TCP.SRC.PORTS.LIST.ITERATIONS = 1
This configuration specifies to use a source port in the range 2000–2200 when
communicating with the remote node's address 333.333.333.333 and to search the
port range one time for an available port. The local node will act as both a PNODE
and an SNODE when communicating with the remote node.
Based on this scenario, the firewall rules for the local node are the following:
Rule Name Rule Direction Local Ports Remote Ports
PNODE session request Outbound 2000–2200 3364
SNODE session Inbound 2264 3000–3300
66 IBM Sterling Connect:Direct for z/OS: Administration Guide

UDT Firewall Configuration Example
The Sterling Connect:Direct administrator configures the local node to listen on
port 2264, and the following initialization parameter settings are used to configure
the local node's source ports:
v UDP.SRC.PORTS = (333.333.333.333, 2000-2200)
v UDP.SRC.PORTS.LIST.ITERATIONS = 1
This configuration specifies to use a source port in the range 2000–2200 when
communicating with the remote node's address 333.333.333.333 and to search the
port range one time for an available port. The local node will act as both a PNODE
and an SNODE when communicating with the remote node.
Based on this scenario, the firewall rules for the local node are the following:
Rule Name Rule Direction Local Ports Remote Ports
PNODE session request Outbound 2000–2200 3364
PNODE session Outbound 2000–2200 3000–3300
SNODE listen Inbound 2264 3000–3300
SNODE session Inbound 2000–2200 3000–3300
Blocking Outbound Packets
The recommended default rule for outbound UDP packets from the local system is
to block the packets. If you do not follow this recommendation, port usage may, at
first sight, appear to violate the firewall's inbound rules.
An example will help illustrate this situation. Suppose that in the example in the
previous section:
v The local node is the SNODE.
v The default outbound rule allows all outbound UDP packets from the local
system.
v The “SNODE session” rule is accidently omitted.
Because of the callback feature of UDT session establishment, SNODE sessions are
still likely to succeed on ports 2000–2200. This may cause confusion because ports
2000–2200 are blocked to inbound UDP packets.
If you use the recommended default outbound rule and apply the PNODE and
SNODE rules described in the previous section, there will be no confusion about
which port to use, and the UDT callback feature will function as designed, thus
supporting reliability.
Session Establishment
Session establishment differs between TCP and UDT; these differences affect how
you set up firewall rules and configure the firewall navigation initialization
parameters in Sterling Connect:Direct.
TCP Session Establishment
A Sterling Connect:Direct TCP client contacts a Sterling Connect:Direct TCP server
on its listening port. The Sterling Connect:Direct client scans the list of ports
(specified using the TCP.SRC.PORTS initialization parameter) and looks for a port
Chapter 2. Implementing Security 67

to bind to. The number of times Sterling Connect:Direct scans the list is specified
using the TCP.SRC.PORTS.LIST.ITERATIONS initialization parameter. If Sterling
Connect:Direct finds an available port, communication with the remote node
proceeds.
UDT Session Establishment
When a Sterling Connect:Direct UDT client contacts a Sterling Connect:Direct UDT
server on its listening port to request a session, the UDT server responds with a
different server port to use for the session. The client attempts to contact the server
on the session port. The Sterling Connect:Direct client scans the list of ports
(specified in the UDP.SRC.PORTS initialization parameter) and looks for an
available port to bind to. The number of times Sterling Connect:Direct scans the list
is specified using the UDP.SRC.PORTS.LIST.ITERATIONS initialization parameter.
If the Sterling Connect:Direct client finds an available port, communication with
the remote Sterling Connect:Direct server proceeds. If a session cannot be
established after a certain time interval, the server atempts to contact the client.
Common Problems in Establishing a Session
The following message indicates that Sterling Connect:Direct cannot find an idle
port.
SCPA001I - TGT.ADDR=nnn.nnn.nnn.nnn, TCP.SRC.PORTS exhausted
If this message occurs frequently, increase the pool of available ports.
You may need to reserve ports in TCP/IP to ensure they are available for firewall
navigation. Reserve ports with the PORT statement in IBM TCP/IP. An example
follows:
PORT
5000 TCP connect-jobname NOAUTOLOG ; Connect:Direct Firewall pool
5001 TCP connect-jobname NOAUTOLOG ; Connect:Direct Firewall pool
5002 TCP connect-jobname NOAUTOLOG ; Connect:Direct Firewall pool
5003 TCP connect-jobname NOAUTOLOG ; Connect:Direct Firewall pool
5004 TCP connect-jobname NOAUTOLOG ; Connect:Direct Firewall pool
5005 TCP connect-jobname NOAUTOLOG ; Connect:Direct Firewall pool
A pool of available ports that is too small can affect performance because the
outbound connections are limited.
Troubleshooting Security Errors
Security errors can show up at signon, at Process start, or at any step of a Process.
In general, a return code of 8 means that the error occurred on the PNODE, and a
return code of C means the error occurred on the SNODE. This section tells you
how to determine the cause of security errors.
Many Sterling Connect:Direct security-related messages begin with the prefix
RACF. This fact does not mean that IBM RACF was necessarily involved with the
failure. It is merely a naming convention for Sterling Connect:Direct message
identifiers.
Often, it is helpful to run a security trace to determine exactly where and why a
security failure occurred. See Security Traces, for information on security traces.
68 IBM Sterling Connect:Direct for z/OS: Administration Guide

Condition: Signon Denied
When you sign on from either batch or the IUI, you receive the a message that
indicates the Stage 1 Signon Exit has failed.
Error Cause Action Collect
RACF097I The Stage 1 Signon
exit, DGACXSIG,
cannot be found.
In the Sterling
Connect:Direct for
z/OS IUI, verify that
DGACXSIG is in the
LINKLIST or in
ISPLLIB of your
signon CLIST and
not in a STEPLIB.
Review both the
short text and long
text Sterling
Connect:Direct
messages. If you are
receiving the
message during
signon to the IUI,
run a batch job after
verifying that
DGACXSIG is
available to the job
(through STEPLIBs,
the linklist, or
globals). For either
batch or interactive
signon, allocate
SECURITY as
described in Security
Traces . You will be
able to view the
progression of
BLDLs, along with
output showing
where Sterling
Connect:Direct
looked for
DGACXSIG and the
results from the
search.
v Output written to the
SECURITY DD when you
allocated SECURITY as
described in Security Traces.
Condition: Lack Authority to Perform a Sterling Connect:Direct
for z/OS Function
You attempt to perform a Sterling Connect:Direct for z/OS function but receive a
message that says you are not authorized to perform that function.
Error Messages
SCBB001I SCBC030I SCBD001I SCBE001I SCBF001I SCBF063I
SCBF064I SCBG001I SCBH001I SCBI001I SCBJ001I SCBK005I
SCBL001I SCBN001I SCBO001I SCBP001I SCBR002I SCBS001I
SCBT005I SCBU003I SCBV001I SCBW001I SCBX001I SCBY001I
SCPA008I SFIA002I SFIA003I SRJA014I SRTA008I SSUB100I
Chapter 2. Implementing Security 69

Cause Action Collect
If you are running a Stage 2
security exit, your user ID is
defined using an
authorization bit mask that
does not include the function
you are attempting. A security
trace will show you the
general category of Sterling
Connect:Direct user assigned
to your userid (administrator,
operator, or general user). See
Security Traces for more
information about how to
initiate a security trace. If you
are using the Sterling
Connect:Direct authorization
file, the functional authority of
your userid does not include
the function you are trying to
perform.
Review both the short text
and long text Sterling
Connect:Direct messages.
Have the Sterling
Connect:Direct
administrator at your site
ensure that your userid
has the authority necessary
to perform the function,
either by updating your
userid record in the
Sterling Connect:Direct
authorization file or by
assigning the authority.
within the Stage 2 security
exit
Output from a security trace
showing the validation of
your authority to perform the
Sterling Connect:Direct
function
Condition: Access Denied to File or Data Set on COPY Step
You are denied access to a data set or a file on a COPY step.
Error Cause Action Collect
RACF095I The security
subsystem either on
your node (RC=8) or
the remote node
(RC=C) has denied
your userid access to
the data set.
Review both the short
text and long text
Sterling Connect:Direct
messages. Ensure that
your userid has the
correct access to the
data set. If you
continue getting this
message, run a
security trace. See
Security Traces for
more information
about how to initiate a
security trace. It might
be necessary to use a
PNODEID or
SNODEID statement to
send a valid userid
and password to the
security system.
v Output from a security
trace
Condition: User Record not Found in the Authorization Data Set
When you sign on to Sterling Connect:Direct or submit a Process to another node,
you receive message SAFA002I, The user record was not found in the
Authorization Data Set.
70 IBM Sterling Connect:Direct for z/OS: Administration Guide

Error Cause Action Collect
SAFA002I If you are using the
Sterling
Connect:Direct
authorization file for
security, be aware
that the key to that
file is a combination
of userid and node
name. For example,
if you are signed on
to node CDA with
userid USERA and
transmitting to node
CDB (not using an
SNODEID override),
the authorization file
on CDB must have
an entry for the
userid USERA and
node CDA.
Review both the
short text and long
text Sterling
Connect:Direct
messages. Check the
appropriate Sterling
Connect:Direct
authorization file
and verify that the
correct userid/node
combination is
specified. User
records in the
Sterling
Connect:Direct
authorization file can
be added or
modified with the
Insert User or
Update User
commands.
None
Chapter 2. Implementing Security 71
72 IBM Sterling Connect:Direct for z/OS: Administration Guide

Chapter 3. Maintaining User Authorization
The Sterling Connect:Direct Authorization Facility controls access to Sterling
Connect:Direct functions. It is an alternative source of security information to the
Stage 1 Signon and Stage 2 Security exits. If you use the Authorization Facility, you
must identify all Sterling Connect:Direct users in all nodes that execute Processes.
The following example shows how the Sterling Connect:Direct Authorization
Facility is used. This example includes two Sterling Connect:Direct nodes, called
SYSTEMA and SYSTEMB. Joe has access to SYSTEMA under the Sterling
Connect:Direct user ID of JOEA and access to SYSTEMB under the Sterling
Connect:Direct user ID of JOEB.
Joe requires two entries in the Authorization Facility of each system, as illustrated
in the following tables. These entries give him access to Sterling Connect:Direct on
both systems and the authorization to move files between both systems.
SYSTEMA Authorization FIle
Node User ID Password Authorized Functions
SYSTEMA JOEA [pswd] Y,Y,N,Y . . . . .
SYSTEMB JOEB [pswd] N,Y . . . . .
SYSTEMB Authorization FIle
Node User ID Password Authorized Functions
SYSTEMA JOEA [pswd] Y,Y,N,Y . . . . .
SYSTEMB JOEB [pswd] N,Y . . . . .
The combination of logical node name and user ID is used to access the
Authorization file on the remote node to obtain the user ID, password, and
associated functional authority.
For example, if Joe sent a file from SYSTEMA to SYSTEMB, the combination of
SYSTEMA and JOEA enables him to access the authorization file on SYSTEMB.
This entry then determines what Sterling Connect:Direct functional authority Joe
has on SYSTEMB when coming from SYSTEMA.
Note: The password is optional, but if specified in the Authorization Facility, you
must specify it on the SIGNON command. Make the password available at Process
execution time through the signon or SNODEID override.
Authorization File
The Authorization file contains user attribute default records. Each record defines
which Sterling Connect:Direct features the user can access for each node.
Individual users can access the User Authorization screen to display information
about their own authorization record. The following table describes the User
Authorization file maintenance commands:
© Copyright IBM Corp. 1999, 2015 73

Command Description
INSERT USER Inserts a User record in the Authorization file.
UPDATE USER Updates a User record in the Authorization file.
DELETE USER Deletes a User record from the Authorization file.
SELECT USER Selects a User record from the Authorization file.
You can execute these commands through the batch interface, the Interactive user
interface (IUI), or the operator interface.
INSERT USER and UPDATE USER Commands
The INSERT USER and UPDATE USER commands add or update a user in the
Sterling Connect:Direct Authorization file. The commands have the following
format and parameters. The required parameters and keywords are in bold. (The
NAME parameter is required only for INSERT USER.) Default values for
parameters and subparameters are underlined.
Label Command Parameters
(optional) INSert USER | UPDate
USER
USERID = (nodename, user ID)
NAME ='username'
ADD TYPE = Y | N
ALTER TYPE = Y | N
READ TYPE = Y | N
REMOVE TYPE = Y | N
ADD USER = Y | N
ALTER USER = Y | N
READ USER = Y | N
REMOVE USER = Y | N
CASE = Y | N
CDEL = Y | N
Note: Valid only in the Interactive user interface.
CDELOFF = Y | N
Note: Valid only in the Interactive user interface.
CHange = Y | N
Note: The setting for this parameter overrides the
setting specified for the GEN.CHG.PROCESS
parameter.
COPY = Y | N
DELPR = Y | N
Note: The setting for this parameter overrides the
setting specified for the GEN.DEL.PROCESS
parameter.
EVENTCMD = Y | N
74 IBM Sterling Connect:Direct for z/OS: Administration Guide

Label Command Parameters
FLUSH = Y | N
Note: The setting for this parameter overrides the
setting specified for the GEN.FLS.PROCESS
parameter.
GEN.CHG.PROCESS = Y | N
Note: Valid only in the Interactive user interface.
GEN.DEL.PROCESS = Y | N
Note: Valid only in the Interactive user interface.
GEN.FLS.PROCESS = Y | N
Note: Valid only in the Interactive user interface.
GEN.SEL.PROCESS = Y | N
Note: Valid only in the Interactive user interface.
GEN.SEL.STATISTICS = Y | N
Note: Valid only in the Interactive user interface.
GVIEW = Y | N
Note: Valid only in the Interactive user interface.
MAXSA = max signon attempts
MODALS = Y | N
MODIFY = Y | N
NSUBMIT = Y | N
OVCRC = Y | N
PASSword = initial password
PHone = 'phone number'
PTKTDATA = (APPL profile name, secured signon
key)
RESETSA
RUNJOB = Y | N
RUNTASK = Y | N
SECURERD= Y | N
SECUREWR = Y | N
SECURITY = (security id, security pswd)
SELNET = Y | N
SELPR = Y | N
Note: The setting for this parameter overrides the
setting specified for the GEN.SEL.PROCESS
parameter.
SELSTAT = Y | N
Note: The setting for this parameter overrides the
setting specified for the GEN.SEL.STATISTICS
parameter.
STATCMD = Y | N
STOPCD = Y | N
SUBMIT = Y | N
Chapter 3. Maintaining User Authorization 75

Label Command Parameters
SUBMITTER.CMDS = ( Y | N, Y | N, Y | N, Y |
N, Y | N )
Note: This parameter is valid only in the batch
interface.
UPDNET = Y | N
REFSH = Y | N
Note: This parameter updates the INITPARM file.
VIEW PROCESS = Y | N
Note: The setting for this parameter overrides the
setting specified for the GEN.VIEW.PROCESS
parameter.
Required Parameters
The following parameters are required for the INSERT USER command. The
USERID parameter is required for the UPDATE USER command, but the NAME
parameter is not.
Parameter Description
USERID = (nodename,
user ID)
Specifies the user node and user ID of the record being added or
updated.
nodename specifies the user node of the User record. It is a 1–16
character alphanumeric string.
The following characters are allowed:
A-Z, 0-9, @, #, $, !, %, ^, &, _ , +, -, [, ], {, }, .
user ID specifies the user ID of the User record. The user ID can
contain 1–64 characters of any kind.
NAME = ‘username' Specifies the full name of the user. The NAME is a string of 1–20
characters. If blanks are embedded in the NAME parameter, you
must enclose the NAME in single quotation marks. This parameter
is not required by the UPDATE USER command.
Optional Authorization Record Parameters
Optional parameters for INSERT and UPDATE USER commands are separated into
two categories: authorization record parameters and functional authorization
parameters.
The following table describes the authorization record parameters for the INSERT
USER and UPDATE USER commands. You can authorize each user to add, alter,
read, or remove a record. Specify the authorization by indicating the action (ADD,
ALTER, READ, REMOVE) followed by the record type. If you do not specify an
action for a Type or User record, the action defaults to No.
Parameter Description
ADD TYPE = Y | N Specifies whether the user is allowed to insert new records into the
Type Defaults file.
76 IBM Sterling Connect:Direct for z/OS: Administration Guide

Parameter Description
ALTER TYPE = Y |
N
Specifies whether the user is allowed to update records in the Type
Defaults file.
READ TYPE = Y | N Specifies whether the user is allowed to read records from the Type
Defaults file.
REMOVE TYPE= Y |
N
Specifies whether the user is allowed to delete records from the
Type Defaults file.
ADD USER = Y | N Specifies whether the user can insert new records into the
Authorization file.
ALTER USER = Y |
N
Specifies whether the user is allowed to update records in the
Authorization file.
READ USER = Y | N Specifies whether the user is allowed to read records from the
Authorization file.
REMOVE USER = Y
| N
Specifies whether the user is allowed to delete records from the
Authorization file.
Optional Functional Authorization Parameters
Following are the functional authorization parameters for INSERT USER and
UPDATE USER:
Parameter Description
CASE = Y | N Specifies whether accounting data, user ID, password, and data set
name parameters are case sensitive. This choice overrides the case
designation selected at session signon, and is in effect only for this
command. The default is the designation made at session signon.
CDEL = Y | N Specifies whether the Confirm Delete/Suspend/Flush Command
prompt displays for a particular user.
CDELOFF = Y | N Specifies whether the user can turn off the Confirm
Delete/Flush/Suspend Command prompt for the current session. If
you do not change the default of No to Yes, the user will always
see the Confirm Delete/Flush/Suspend Command prompt and will
not be given this option.
CHange = Y | N Specifies whether the user is allowed to use the CHANGE
PROCESS command.
COPY = Y | N Specifies whether the user is allowed to use the COPY statement.
DELPR = Y | N Specifies whether the user is allowed to use the DELETE PROCESS
command.
EVENTCMD = Y | N Specifies whether the user is allowed to use the Event Services
Support commands.
FLUSH = Y | N Specifies whether the user is allowed to use the FLUSH PROCESS
and SUSPEND PROCESS commands.
GEN.CHG.PROCESS
= Y | N
Specifies whether the user can change any Processes or only
Processes that are submitted. If you specify GEN.CHG.PROCESS=Y,
the user can only change Processes that he or she submitted (valid
only in the IUI). Can be overridden by the CHange parameter
setting.
Chapter 3. Maintaining User Authorization 77

Parameter Description
GEN.DEL.PROCESS
= Y | N
Specifies whether the user can delete any Processes or only
Processes that are submitted. If you specify GEN.DEL.PROCESS=Y,
the user can only delete Processes that he or she submitted (valid
only in the IUI). Can be overridden by the DELPR parameter
setting.
GEN.FLS.PROCESS =
Y | N
Specifies whether the user can flush any Processes or only
Processes that the user submitted. If you specify
GEN.FLS.PROCESS=Y, the user can only flush Processes that he or
she submitted (valid only in the IUI). Can be overridden by the
FLUSH parameter setting.
GEN.SEL.PROCESS =
Y | N
Specifies whether the user can select any Processes or only
Processes that the user submitted. If you specify
GEN.SEL.PROCESS=Y, the user can only select Processes that he or
she submitted (valid only in the IUI). Can be overridden by the
SELPR parameter setting.
GEN.SEL.STATISTICS
= Y | N
Specifies whether the user can select any statistics or only statistics
for Processes that the user submitted. If you specify
GEN.SEL.STATISTICS=Y, the user can only select statistics for
Processes that he or she submitted (valid only in the IUI). Can be
overridden by the SELSTAT parameter setting.
GVIEW = Y | N Specifies whether the user can view only Processes submitted with
a matching USERID or all Processes regardless of who submitted
them. Can be overridden by the VIEW PROCESS parameter setting.
MAXSA = max
signon attempts
Specifies the maximum number of signon attempts the user is
allowed per hour. The range is 0–99. The default is 60. Zero (0)
indicates no maximum number. (See the RESETSA parameter to see
how to temporarily reset this value.)
MODALS = Y | N Specifies whether the user is allowed to use the modal statements
IF, ELSE, EIF, GOTO, and EXIT.
MODIFY = Y | N Specifies whether the user is allowed to request traces and modify
initialization parameters.
NSUBMIT = Y | N Specifies whether the user is allowed to use the SUBMIT statement
to submit a Process.
OVCRC = Y | N Specifies whether the user is allowed to use the CRC statement to
override the initial CRC settings.
PASSword = initial
password
Defines the initial password for the user ID. The password is a 1–64
character alphanumeric string.
PHone = 'phone
number'
Phone number of the user. Enclose the phone number in single
quotation marks. The quotation marks allow for a space after the
area code.
PTKTDATA=(APPL
prof name, secured
signon key)
Specifies the values required for the Stage 2 security exit to rewrite
an IBM RACF PassTicket password. APPL prof name is the value
specified when the profile is defined for the PTKTDATA class. The
secured signon key is the value associated with the PTKTDATA
class and the name specified in the APPL Prof name. See
Generating IBM RACF PassTickets .
RESETSA Specifies that the signon attempt count is reset to 0. (See the
MAXSA parameter to see how to set the signon attempt count.)
This parameter enables the user to try to sign on, even if he or she
has previously exceeded the maximum number of signon attempts.
This parameter is used in the UPDATE USER command only.
78 IBM Sterling Connect:Direct for z/OS: Administration Guide

Parameter Description
RUNJOB = Y | N Specifies whether the user is allowed to use the RUN JOB
statement.
RUNTASK = Y | N Specifies whether the user is allowed to use the RUN TASK
statement.
SECURERD = Y | N
or
SECURE.READ
=Y | N
Specifies whether the user can display (read) the Sterling
Connect:Direct Secure Plus Parameters file in Sterling Control
Center.
SECUREWR = Y | N
or
SECURE.WRITE = Y
| N
Specifies whether the user can update (write to) the Sterling
Connect:Direct Secure Plus Parameters file in Sterling Control
Center.
SECURITY =
(security ID, security
pswd)
Specifies the security ID and security password to identify the file
authorization of the user. Security support includes CA-ACF2,
CA-TOP SECRET, and IBM RACF.
Security ID specifies the 1–64 character security system ID for the
user. This ID must meet the standards of the security subsystem at
the location of the user. The security ID is required if this
parameter is specified.
Security pswd specifies the 1–64 character security system
password for the user. This password must meet the standards of
the security subsystem at the location of the user.
SELNET = Y | N Specifies whether the user is allowed to use the SELECT NETMAP
command.
SELPR = Y | N Specifies whether the user is allowed to use the SELECT PROCESS
command.
SELSTAT = Y | N Specifies whether the user is allowed to use the SELECT
STATISTICS command.
STATCMD = Y | N Specifies whether the user is allowed to use the STATISTICS
COMMAND command.
STOPCD = Y | N Specifies whether the user is allowed to use the STOP CD
command.
SUBMIT = Y | N Specifies whether the user is allowed to use the SUBMIT statement
to define and submit within a Process.
SUBMITTER.CMDS =
(Y | N Y | N Y | N
Y | N Y | N)
Specifies whether the user is allowed to issue certain commands
concerning the Processes that he or she submitted (valid only in the
batch interface). These commands are:
v SELECT PROCESS
v DELETE PROCESS
v FLUSH PROCESS
v CHANGE PROCESS
v SELECT STATISTICS
For more information, see the IUI definitions for these commands
in Functional Authorization Parameters for the INSERT and
UPDATE USER Command . (The IUI definitions begin with GEN
and the command name is abbreviated.)
REFSH = Y | N Specifies whether the user is allowed to update the initialization
parameters file in Sterling Control Center.
Chapter 3. Maintaining User Authorization 79

Parameter Description
UPDNET = Y | N Specifies whether the user is allowed to use UPDATE NETMAP.
VIEW PROCESS = Y
| N
Specifies whether the user is allowed to use VIEW PROCESS.
Inserting and Updating Users through the Batch Interface
To use the INSERT or UPDATE USER commands from the batch interface, follow
this procedure.
Procedure
1. Place your command in the batch job stream.
2. Submit the job while Sterling Connect:Direct is running.
3. Verify your results.
Example of Adding a User Record:
The following example shows a User record for user ID Smith being added to the
Authorization file:
SIGNON USERID=(user ID, password)
INSERT USER USERID=(DALLAS, SMITH) -
NAME='RB SMITH' PASS=XYZZY -
PH='214 555-5555' -
ADD USER=Y ALTER USER=Y -
READ USER=Y REMOVE USER=Y -
SUBMIT=Y -
SUBMITTER.CMDS=(Y Y Y Y N Y)
SIGNOFF
In the example definition, the user Smith can perform the following functions:
v Add users to the Authorization file
v Update and read User records
v Delete User records
v Define and submit Processes for execution
v Select, delete, flush/suspend, and change submitted Processes
In the example, Smith cannot perform the Select Statistics command on any
Processes, regardless of who submitted them. Smith’s initial password is XYZZY,
and Smith’s phone number is (817) 555-5555.
Example of Updating a User Record:
The following commands update the record of a user named Smith in the
Authorization file.
UPDATE USER USERID=(DALLAS, SMITH) -
NAME='RB SMITH' -
PASS=XYZZY -
PH='214 555-5555' -
ADD USER=Y ALTER USER=Y -
READ USER=Y REMOVE USER=Y -
CH=Y FLUSH=Y DELPR=Y
80 IBM Sterling Connect:Direct for z/OS: Administration Guide

With these updates, Smith can perform the following functions:
v Add Users to the Authorization file
v Update and read User records
v Delete User records
v Change a Process in the TCQ
v Delete an executing Process from the TCQ
v Delete an inactive Process from the TCQ
Inserting and Updating Users through the IUI
Use the Insert/Update/Select/Delete User Record screen (following) to insert,
update, select, or delete a record. Select option IU from the Administrative Options
Menu to access this screen.
node.name INSERT/UPDATE/SELECT/DELETE USER RECORD hh:mm
CMD ==>
FUNCTION ==> SEL (’I’-INS, ’U’-UPD, ’S’-SEL , ’D’-DEL)
ENTER USER INFORMATION: NAME ==> ____________________
USER ID ==> ________________________________________________________________
USERNODE==> node.name_____ PHONE ==> ______________
PASSWORD==>
SEC ID ==> ________________________________________________________________
SEC PASS==>
MAX SIGNON ATTEMPTS===> 60 PASSTICKET DATA ==> ( ________ , )
DO YOU WANT VALUES FOR THIS COMMAND TO BE CASE SENSITIVE? ==> NO_
DEFINE USER FUNCTIONS: (RESPOND WITH ’Y’-YES OR ’N’-NO)
FLUSH PROCESS => _ SELECT NETMAP => _ UPDATE NETMAP => _
INSERT USER => _ SELECT PROCESS => _ MODALS FUNCTION => _
DELETE USER => _ SUBMIT PROCESS => _ RUNTASK FUNCTION => _
SELECT USER => _ SUBMIT WITHIN PROC => _ INSERT TYPE => _
UPDATE USER => _ RUNJOB FUNCTION => _ DELETE TYPE => _
COPY FUNCTION => _ CONTROL TRACING => _ SELECT TYPE => _
CHANGE PROCESS => _ STOP Connect:Direct=> _ UPDATE TYPE => _
DELETE PROCESS => _ SELECT STATISTICS => _ GEN.FLS.PROCESS => _
STAT COMMAND => _ GEN.DEL.PROCESS => _ RESET SIGNON => N
GEN.SEL.PROCESS => _ GEN.SEL.STATISTICS => _ VIEW PROCESS => _
GEN.CHG.PROCESS => _ EVENT COMMAND => _ CRC OVERRIDES => _
GEN.VIEW.PROC => _ CONFIRM DELETE => _ CONFIRM DEL OFF => _
SECURE+ ADMIN => _ UPDATE INITPARM => _
The DEFINE USER FUNCTIONS portion of the screen is scrollable. More + or -
indicates additional data. Press PF8 to scroll forward. Press PF7 to scroll back. See
the description of the INSERT and UPDATE USER command parameters in
“Optional Functional Authorization Parameters” on page 77 for the valid values of
the fields, or press the PF1 key for Help.
Deleting Users from the Authorization File
The DELETE USER command removes a User record from the Authorization file.
Following is the command format and parameters. The required parameters and
keywords appear in bold print.
Label Command Parameters
(optional) DELete USER WHERE (
USERID = (nodename, user ID) | (list)
Chapter 3. Maintaining User Authorization 81

Label Command Parameters
)
CASE = YES | NO
Parameter Description
WHERE
(USERID = (nodename,
user ID) | (list) )
This parameter specifies which user records to delete.
USERID = (nodename, user ID) | (list)
This parameter specifies the record to delete from the Sterling
Connect:Direct Authorization file.
nodename specifies the node ID of the User record that is
searched. The nodename is a 1–16 character alphanumeric
string.
The following characters are allowed:
A-Z, 0-9, !, @, #, $, %, &, {, }, +, -, ^
The user ID parameter specifies the user ID of the User
record. The complete user ID consists of the nodename and
the user ID enclosed in parentheses and separated by a
comma.
The list parameter specifies a list of user IDs.
CASE is the only optional parameter.
Parameter Description
CASE = Yes | No This parameter specifies whether nodename and user ID parameters are
case sensitive. This choice overrides the case designation selected at
session signon and is in effect only for this command. The default is the
designation made at session signon.
Deleting Users through the Batch Interface
About this task
To use the DELETE USER command from the batch interface, follow this
procedure.
Procedure
1. Place your command in the batch job stream.
2. Submit the job while Sterling Connect:Direct is running.
3. Verify your results.
Example of Deleting a User Record: The following example shows how to delete
single and multiple User records:
* DELETES A SINGLE User record
DELETE USER WHERE (USERID=(MPLS, SMITH))
* DELETES MULTIPLE User records
DELETE USER WHERE (USERID=(DALLAS, JONES), -
(MPLS, SMITH), (CHICAGO, BROWN)))
82 IBM Sterling Connect:Direct for z/OS: Administration Guide

Deleting Users through the IUI
About this task
You can delete a user in the Sterling Connect:Direct IUI using the Delete A User
Record screen or the Insert/Update/Select/Delete User Record screen.
To delete a User record using the Insert/Update/Select/Delete User Record screen,
select the IU option from the Administrative Options Menu. See the description of
the DELETE USER command parameters for the valid values of the fields on this
screen, or pressthe PF1 key for Help.
You can delete up to four user records simulataneously on the Delete A User
Record screen.
To delete a user from the Delete A User Record screen, follow this procedure.
Procedure
1. Select option DU from the Administrative Options Menu to display the Delete
A User Record screen.
2. Type the user ID and user node of the records to delete.
3. Press ENTER.
4. Verify your results.
Selecting User Information from the Authorization File
The SELECT USER command displays a User record in the Authorization file. You
can specify the search criteria and the format in which the information is
presented.
The command has the following format and parameters. Required parameters and
keywords appear in bold. Default values for parameters and subparameters are
underlined.
Label Command Parameters
(optional) SELect USER WHERE (
USERID = (nodename, user ID) |
(generic | (list))
EXCLUDE = (AUTH)
)
PRint | TABle
CASE = YES | NO
WHERE is the only required parameter for the SELECT USER command and
USERID is the only required subparameter.
Chapter 3. Maintaining User Authorization 83

Parameter Description
WHERE
(USERID = (nodename, user ID) |
(generic | list))
EXCLUDE = (AUTH)
This parameter specifies which User records you want
to examine.
USERID = (nodename, user ID) | (generic | list)
This parameter specifies the record to search for in
the Authorization file. This subparameter of the
WHERE parameter is required. The complete user ID
consists of the nodename and the user ID enclosed in
parentheses and separated by a comma.
nodename specifies the node ID of the User record
that is searched. Type a 1–16 character alphanumeric
string. If the user node is not specified, nodename
defaults to the Sterling Connect:Direct system that
receives the command.
The following characters are allowed:
A-Z, 0-9, !, @, #, $, %, &, {, }, +, -, ^
user ID specifies the user ID of the User record.
generic specifies generic selection of user IDs. To
specify user nodes and user IDs generically, type a
1–7 character alphanumeric string with the first
character alphabetic, plus an asterisk (*). For instance,
if you specify a user ID of B*, examine records for
BLACK, BRADFORD, and BROWN.
list specifies a list of user IDs.
EXCLUDE = (AUTH)
This parameter specifies that the function-by-function
authorization description is not included in the
output. This subparameter of the WHERE parameter
is not required.
The following table describes the optional parameters for the SELECT USER
command:
Parameter Description
PRint | TABle This parameter specifies the output destination.
PRINT specifies that the output of the SELECT USER command is
printed rather than displayed. Printed output is in tabular format, the
same as that produced by the TABle parameter. Output is routed to the
destination specified in the PRINT keyword of the Sterling
Connect:Direct SIGNON command.
TABle specifies that the output of the SELECT USER command is
stored in a temporary file in tabular format and is displayed upon
successful completion of the command. The default for the output is
TABLE.
CASE = Yes | No This parameter specifies whether parameters associated with nodename
and user ID are case sensitive. This choice overrides the case sensitivity
designation selected for the session at signon and is in effect only for
this command. The default is the designation made at session signon.
84 IBM Sterling Connect:Direct for z/OS: Administration Guide

Selecting a User through the Batch Interface
About this task
To use the SELECT USER command from the batch interface, follow this
procedure.
Procedure
1. Place your command in the batch job stream.
2. Submit the job while Sterling Connect:Direct is running.
3. Verify your results.
Results
The following command searches for user BILL at the local (default) node.
SELECT USER WHERE (USERID=(, BILL))
Selecting a User through the IUI Interface
About this task
The Select a User Record screen enables you to simultaneously display user
information and authorized functions for up to four users. You can also use the
Insert/Update/Select/Delete User Record screen (option IU) to select users. See the
SELECT USER command parameters in “Selecting User Information from the
Authorization File” on page 83 for a description of the valid values for the fields
or press PF1 for Help.
Procedure
1. From the Administrative Options Menu, select option SU to display the Select a
User Record screen and press Enter.
2. Type the user ID and user node for the records you want to view.
3. Indicate the output destination, the case sensitivity, and whether you want to
exclude the function-by-function authorization description.
4. Press Enter.
Chapter 3. Maintaining User Authorization 85
86 IBM Sterling Connect:Direct for z/OS: Administration Guide

Chapter 4. Maintaining the Type File
The Type file contains file attribute records. Each record is associated with a Type
key. The key is used by the TYPE parameter in the COPY statement to create new
files or access existing files.
The following example illustrates a Copy Process using the TYPE parameter.
COPY1 COPY FROM (DSN=MYFILE) -
TO (DSN=YOURFILE TYPE=TEXT)
The Type file serves two purposes:
v Saves retyping parameters such as DCB, DISP, and SPACE within Processes for
files with common attributes.
v Facilitates the use of previously-defined attribute specifications of non-z/OS
systems. This usage is especially useful for remote users who are not familiar
with z/OS data set organizations and allocation parameters.
The Type key that is referenced in the TYPE= parameter must be in the Type file
on the destination system, which is the system responsible for allocating the new
file.
To maintain the Type file, use the INSERT TYPE, UPDATE TYPE, DELETE TYPE,
and SELECT TYPE commands. Type these commands through the IUI, Batch or
Operator interface.
Overriding File Attributes
If you specify file attributes in conjunction with the TYPE parameter on the COPY
statement, the parameters in the COPY statement override similar parameters in
the Type record. Use this functionality when you want to override a specific Type
record subparameter.
Type Keys
Four predefined Type keys are provided to communicate with other Sterling
Connect:Direct nodes:
v TEXT
v DF
v DF2
v BINARY
The four Type keys contain file allocation information as defined in the following
figure.
© Copyright IBM Corp. 1999, 2015 87

TYPE KEY => TEXT
DISP=(RPL,CATLG,DELETE)
DCB=(DSORG=PS,LRECL=255,BLKSIZE=2554,RECFM=VB)
SPACE=(TRK,(10,10))
UNIT=SYSDA
TYPE KEY => DF (Data File)
DISP=(RPL,CATLG,DELETE)
DCB=(DSORG=PS,LRECL=255,BLKSIZE=2554,RECFM=VB)
SPACE=(TRK,(10,10))
UNIT=SYSDA
TYPE KEY => DF2 (Data File 2)
DISP=(RPL,CATLG,DELETE)
DCB=(DSORG=PS,LRECL=80,BLKSIZE=3120,RECFM=FB)
SPACE=(TRK,(10,10))
UNIT=SYSDA
TYPE KEY => BINARY
DISP=(RPL,CATLG,DELETE)
DCB=(DSORG=PS,BLKSIZE=6144,RECFM=U)
SPACE=(TRK,(10,10))
INSERT TYPE and UPDATE TYPE Commands
Use the INSERT TYPE command to insert a new Type record into the Type file.
Use the UPDATE TYPE command to update an existing Type record. These
commands use the following format and parameters. The required parameters
appear in bold. Default values for parameters are underlined.
Label Command Parameters
(optional) INSert TYPE | UPDate TYPE TYPEKEY=typekey
DCB=(BLKSIZE = no. bytes
,DSORG = (DA | PS | PO | VSAM)
,LRECL = no. bytes
,RECFM = record format)
DISP=((NEW | OLD | MOD | RPL | SHR)
(,KEEP , CATLG , DELETE)
(,KEEP , CATLG , DELETE))
DSNTYPE=PDS|LIBRARY|BASIC|LARGE|EXTPREF|EXTREQ
AVGREC=(U|K|M)
DATACLAS=data_class_name
KEYLEN=bytes
KEYOFF=offset_to_key
LIKE=model_data_set_name
LRECL=bytes
MGMTCLAS=management_class_name
RECORG=(KS|ES|RR|LS)
SECMODEL=(profile_name [,GENERIC])
STORCLAS=storage_class_name
SPACE=(CYL | TRK | blk,
(prim, sec, (dir))
(,RLSE|,(CONTIG|,)(ROUND|))
(ave_rec_len,(primary_rcds,secondary_rcds))
88 IBM Sterling Connect:Direct for z/OS: Administration Guide

Label Command Parameters
UNIT=unit type
VOL=SER = volume serial number
IOEXIT=exitname|(exitname[,parameter,parameter...])
Following is the required parameter for the INSERT TYPE or UPDATE TYPE
command.
Parameter Description
TYPEKEY=typekey Name associated with the entry being added or updated. The Type key is a 1–8 character
alphanumeric string. The first character must be alphabetic.
Following are the optional parameters for the INSERT TYPE or UPDATE TYPE
command:
Parameter Description
DCB=
([BLKSIZE=no.bytes,
DSORG=[DA|PS|PO|
VSAM], LRECL=no.bytes,
RECFM=record format])
This parameter specifies DCB information associated with the data set name
on the COPY statement.
BLKSIZE specifies the length of the block in bytes.
DSORG specifies the file organization. File organizations supported are DA,
PS, PO, and VSAM.
LRECL specifies the length of the records in bytes.
RECFM specifies the format of the records in the file. Specify any valid
format, such as F, FA, FB, FBA, FBM, FM, U, V, VB, VBA, VBM, and VBS.
Any file attributes specified on the COPY statement take precedence over
those in the Type file. If you do not include attributes on the COPY
statement, attributes in the Type file take precedence. If attributes are
defined in the COPY TO or the Type file, the attributes are taken from the
FROM side (source).
Chapter 4. Maintaining the Type File 89

Parameter Description
DISP=
([NEW|OLD|MOD|RPL|SHR]
[,KEEP|,CATLG|,DELETE]
[,KEEP|,CATLG|,DELETE])
This parameter specifies the default destination file status on the receiving
node.
The first DISP subparameter specifies the status of the file. Only the OLD
and RPL dispositions apply to VSAM files.
NEW (default) specifies that the Process step creates the destination file.
OLD specifies that the destination file existed before the Process began
executing and that the Process is given exclusive control of the file. The
destination file can be a VSAM file, a SAM file, or a PDS (Sterling
Connect:Direct for z/OS).
MOD specifies that the Process step modifies the SAM file by adding data
to the end of the file. If a system failure occurs when MOD is specified, the
system is designed not to restart because data loss or duplication is difficult
to detect.
RPL specifies that the destination file replaces any existing file or allocates a
new file. You can specify DISP=RPL for SAM or VSAM files. If the file is
VSAM, you must define it with the REUSE attribute. You cannot specify
RPL if VOL=SER is specified.
SHR specifies that the source file existed before the Process began executing
and that the file can be used simultaneously by another job or Process.
The second subparameter specifies the normal termination disposition. It
does not apply to VSAM files.
KEEP specifies that the system keeps the file after the Process step
completes. If DISP=(NEW,KEEP), you must also specify a volume serial
number.
CATLG (default) specifies that the system keeps the file after the Process
step completes and places an entry in the catalog.
DELETE specifies that the system deletes the file after the Process step
completes.
The third subparameter specifies abnormal termination disposition. It does
not apply to VSAM files. This subparameter has no default.
KEEP specifies that the system keeps the file after the Process terminates
abnormally.
CATLG (default) specifies that the system keeps the file after the Process
step terminates abnormally and places an entry in the catalog.
DELETE specifies that the system deletes the file after the Process if Sterling
Connect:Direct terminates abnormally.
The third subparameter specifies abnormal termination disposition. It does
not apply to VSAM files. This subparameter has no default.
90 IBM Sterling Connect:Direct for z/OS: Administration Guide

Parameter Description
DSNTYPE = LIBRARY | PDS |
BASIC | LARGE | EXTPREF |
EXTREQ
Defines a specific data set organization for an SMS controlled data set of a
PARTITIONed type.
LIBRARY specifies a partitioned data set extended (PDSE).
PDS specifies a partitioned data set.
LARGE specifies specifies a sequential data set which can contain more than
65535 tracks per volume.
BASIC specifies a sequential data set which can have no more than 65535
tracks per volume.
EXTPREF specifies that the extended attribute is preferred. If an extended
format data set cannot be allocated, a data set is created without the
attribute.
EXTREQ specifies that the extended attribute is required. If an extended
format data set cannot be allocated, a data set is not created.
AVGREC=(U | K | M) Requests that Sterling Connect:Direct allocate the data set in records. The
primary and secondary space quantities represent the number of records
requested in units, thousands, or millions of records. This parameter is
mutually exclusive with the TRK, CYL, and ABSTR subparameters of the
SPACE keyword.
U specifies a record request where primary and secondary space quantities
are the number of records requested. It is a multiple of 1.
K specifies a record request where primary and secondary space quantities
are the number of records requested in thousands of records. It is a multiple
of 1024.
M specifies a record request where primary and secondary space quantities
are the number of records requested in millions of records. It is a multiple of
1,048,576.
DATACLAS=data_class_name Requests the data class for a new data set. The class selected must be
previously defined by the SMS administrator. You can use this keyword
with VSAM data sets, sequential data sets, or partitioned data sets.
data_class_name specifies the 1–8 character name of the data class to which
this data set belongs. The name of the data class is assigned by the SMS
administrator.
KEYLEN=bytes This parameter specifies the length of the keys in the file. This keyword is
not restricted as a subparameter of the DCB keyword to support use with
VSAM KS data sets.
bytes specifies the length in bytes of the keys used in the file. You must
specify this value with a decimal integer from 0–255 for non-VSAM data
sets or 1–255 for VSAM data sets.
KEYOFF=offset_to_key This parameter specifies the offset within the record to the first byte of the
key in a new VSAM KS data set. The relative first byte of the record is byte
0. The range is 0–32760.
offset_to_key specifies the position of the first byte of the key in the record.
Chapter 4. Maintaining the Type File 91

Parameter Description
LIKE=model_data_set_name Requests that allocation attributes for a new data set are copied from an
existing cataloged data set. Any or all of the following attributes are copied
to the new data set: RECORG or RECFM, LRECL, KEYLEN, KEYOFF,
DSNTYPE, AVGREC, and SPACE. Any attributes specified for the data set
override the values from the model data set. Neither EXPDT nor RETPD is
copied from the model data set.
model_data_set_name specifies the name of the data set from which the
allocation attributes are copied.
LRECL=bytes This parameter specifies the length in bytes of the records in the new data
set. This parameter is allowed outside of the DCB keyword to allow use
with SMS VSAM data sets. Do not specify LRECL with RECORG=LS type
data sets.
bytes specifies the length of the records in the data set. For a non-VSAM
data set, this length is 1–32760 bytes. For VSAM data sets, this length is
1–32761 bytes. The LRECL must be longer than the KEYLEN value for
VSAM KS data sets.
MGMTCLAS=
management_class_name
Determines to which of the previously defined management classes this new
data set belongs. The attributes in this class determine such things as when
a data set is migrated and when the data set is backed up.
management_class_name specifies the 1–8 character name of the
management class to which this data set belongs. The name of the
management class is assigned by the SMS administrator.
RECORG=(KS|ES|RR|LS) Defines the organization of records in a new VSAM data set. If RECORG is
not specified, then SMS assumes that the data set is either a physical
sequential (PS) data set or a partitioned (PO) data set.
KS specifies a VSAM key-sequenced data set
ES specifies a VSAM entry-sequenced data set
RR specifies a VSAM relative record data set
LS specifies a VSAM linear space data set
SECMODEL=
(profile_name,GENERIC)
Copies an existing IBM RACF profile as the discrete profile for this new
data set. The following information is copied along with the profile:
OWNER, ID, UACC, AUDIT/GLOBALAUDIT, ERASE, LEVEL, DATA,
WARNING, and SECLEVEL.
profile_name specifies the name of the model IBM RACF profile, discrete
data set profile, or generic data set profile that is copied to the discrete data
set profile created for the new data set.
GENERIC identifies that the profile_name refers to a generic data set profile.
STORCLAS=storage_class_name This parameter specifies the storage class to which the data set is assigned.
The SMS administrator must define the storage class name to the SMS
system by the SMS administrator. The storage class defines a storage service
level for the data set and replaces the UNIT and VOLUME keywords for
non-SMS data sets. You cannot use JCL keywords to override any of the
attributes in the storage class. You can use an Automatic Class Selection
(ACS) routine to override the specified class.
storage_class_name specifies the 1–8 character name of the storage class to
which this data set is assigned.
92 IBM Sterling Connect:Direct for z/OS: Administration Guide

Parameter Description
SPACE= (CYL | TRK | blk,
(prim, [sec],[dir]) [,RLSE |, ]
[,CONTIG |, ] [,ROUND]) |
(ave_rec_len,[primary_rcds,
secondary_rcds])
This parameter specifies the amount of storage allocated for new files on the
destination node. If SPACE is specified, the DISP of the destination file must
be NEW. If SPACE is not specified and the DISP is either NEW or CATLG,
space allocation defaults to the value obtained from the source file. The
default is blk (blocks) with the ROUND option, which provides
device-independent space allocation.
If the AVGREC keyword is specified, the allocation of the data set is done
on a record size basis instead of TRK, CYL, or BLK. This restriction is also
true when the AVGREC keyword is present in the COPY statement.
CYL specifies that space is allocated in cylinders.
TRK specifies that space is allocated in tracks.
blk specifies that space is allocated by the average block length of the data.
The system computes the number of tracks to allocate. If the subparameter
ROUND is also specified, the system allocates the space in cylinders.
ROUND is preferred because allocation is performed on cylinders in a
device-independent manner.
prim specifies the primary allocation of storage.
sec specifies the secondary allocation of storage.
dir specifies the storage allocated for the PDS directory.
RLSE releases the unused storage allocated to the output file.
CONTIG specifies that the storage for the primary allocation must be
contiguous.
ROUND specifies that the storage allocated by average block length be
rounded to an integral number of cylinders.
ave_rec_len specifies the average record length, in bytes, of the data. Sterling
Connect:Direct computes the BLKSIZE and the number of tracks to allocate.
The record length must be a decimal value from 1–65535.
primary_rcds specifies the number of records that the data set contains.
Sterling Connect:Direct uses this number and the value of the AVGREC
keyword to compute the primary space allocation.
secondary_rcds specifies the number of additional records to allocate space
for when the primary space is exhausted. Sterling Connect:Direct uses this
value and the AVGREC keyword to compute the number of tracks to
allocate.
UNIT = unit type This parameter indicates the unit address, device type, or user-assigned
group name that contains the data. For SAM-to-SAM copies, where the
destination file is new and the UNIT parameter is not coded with the TO
parameter, the device type from the source file is used.
VOL = SER = volume serial number This parameter specifies the volume serial number containing the file. If
VOL=SER is not specified with the FROM parameter, you must catalogue
the file.
Chapter 4. Maintaining the Type File 93

Parameter Description
IOEXIT = exitname | (exitname
[,parameter, parameter,...])
This parameter indicates that a user-written program is given control to
perform I/O requests for the associated data.
exitname specifies the name of the user-written program given control for
I/O related requests for the associated data. The character length for IOEXIT
is a variable of 1–510 characters.
parameter | (parameter,parameter,...) specifies a parameter, or list of
parameters, passed to the specified exit. A parameter consists of a data type
followed by the value in single quotes, for example C'ABC'. For a full
description of valid parameter formats, see the RUN TASK statement
parameters in the Connect:Direct Process Language help.
Inserting and Updating Type Files through the Batch Interface
About this task
To use the INSERT TYPE or UPDATE TYPE command from the batch interface,
perform the following steps:
Procedure
1. Place your command in the batch job stream.
2. Submit the job while Sterling Connect:Direct is running.
3. Verify your results.
The following example adds a Type record named NEWALLOC to the Type
file:
INSERT TYPE TYPEKEY=NEWALLOC -
DCB=(DSORG=PS) -
DISP=(NEW,CATLG) -
UNIT=3380
Sterling Connect:Direct users can then use the NEWALLOC Type key in a
COPY command to allocate a new physical sequential file on a 3380 unit device
that is cataloged on normal termination.
The following example updates a record in the Type file. When referring to the
NEWALLOC Type key, the destination file is an existing PS file allocated on a
3390 disk pack:
UPDATE TYPE TYPEKEY=NEWALLOC -
UNIT=3390
Inserting and Updating Type Files through the IUI
About this task
To access the Type Record Selection List to perform this procedure, follow these
steps.
Procedure
1. Select option IT from the Administrative Options Menu. The Insert/Update
Type Record screen is displayed.
The Insert/Update Type Record screen prompts you for the action to perform
(Insert or Update) and the Type key.
94 IBM Sterling Connect:Direct for z/OS: Administration Guide

2. Type the requested information and press ENTER. Sterling Connect:Direct
displays an error message if you attempt to insert an existing record or update
a nonexistent record.
3. From the Type Record Selection List screen, select either the General Dataset
Attributes, IOEXIT Parameters, or the SMS/VSAM Attributes option by typing
an S next to the appropriate entry and pressing Enter.
node.name Type Record Selection List hh:mm
CMD ==>
Operation ==> UPDATE
Type Key ==> X
_ General Dataset Attributes
_ IOEXIT Parameters
_ SMS/VSAM Attributes
Select the entries above to view and/or update the
respective parameters.
Enter the END command to perform the updates.
-or-
Enter the CANcel command to abandon your changes.
4. Type END from the Type Record Selection List or select another option to
perform the update.
5. From the Type Record General Dataset Attributes screen, define or update the
file attributes for the Type record. See “INSERT TYPE and UPDATE TYPE
Commands” on page 88 for a description of the fields on this screen you can
update.
node.name Type Record General Dataset Attributes hh:mm
CMD ==>
(DISP=) Initial file status ==> ___ (SHR,NEW,OLD,MOD,RPL)
Normal step termination ==> ______ (KEEP,CATLG,DELETE)
Abend step termination ==> ______ (KEEP,CATLG,DELETE)
(DCB=) DSORG ==> ____ LRECL ==> _____ BLKSIZE ==> _____ RECFM ==> ____
(SPACE=) Allocation type ==> __________ (CYL,TRK,Average blksize)
Primary extent ==> __________ (Required with CYL,TRK,BLK)
Secondary extent ==> ________ (Optional)
Directory storage ==> ________ (Optional)
RLSE,CONTIG,ROUND ==> ( _ , _ , _ ) (’Y’-Yes, ’N’-No)
(UNIT=) Unitname ==> ________
(VOL=SER=) Volume serial ==> ______
Type the END command to return to the Type Record Selection List.
6. The Type Record IOEXIT Parameters screen (a TSO edit screen) enables you to
define or update the IOEXIT parameters associated with the Type record. Refer
to the IOEXIT parameter description for valid values.
Chapter 4. Maintaining the Type File 95

node.name Type Record IOEXIT Parameters hh:mm
Cmd ==> Scroll ===> PAGE
IOEXIT Specifications (exitname,{parameter,parameter,...})
---------------------------------------------------------------------------------
****** ***************************** Top of Data *******************************
RIOEX01,(C’MAXLEN’,X’0120’)
****** **************************** Bottom of Data ******************************
After defining or updating the IOEXIT specifications, type the END command
to return to the Type Record Selection List.
7. The Type Record SMS/VSAM Parameters screen enables you to define or
update parameters related to SMS controlled data sets and VSAM files.
node.name Type Record SMS/VSAM Attributes hh:mm
CMD ==>
Operation ==> UPDATE
Type Key ==> NEWTYPE
(SMS=) Data Class ==> ________
Management Class ==> ________
Storage Class ==> ________
DSNTYPE ==> ________ (PDS, LIBRARY, LARGE, BASIC, EXTREQ,
EXTPREF)
(MODEL=) Like Data Set Name ==> ____________________________________________
Security Profile ==> ____________________________________________
Generic Profile ==> ___ (YES or NO)
(SPACE=) Average Record Value ==> _ (U, K or M)
(VSAM=) Organization ==> __ (ES - ESDS, KS - KSDS, RR - RRDS, LS - LDS)
Key Offset ==> _____ (0 - 32760)
Key Length ==> ___ (1 - 255)
After defining or updating the SMS/VSAM attributes, type the END command
to return to the Type Record Selection List.
DELETE TYPE Command
Use the DELETE TYPE command to delete a Type record from the Type file. Use
the following format and parameters. The required parameters and keywords are
in bold print.
Label Command Parameters
(optional) DELete TYPE WHERE (TYPEKEY = typekey | (list))
WHERE is the required parameter for the DELETE TYPE command. No optional
parameters exist for this command.
96 IBM Sterling Connect:Direct for z/OS: Administration Guide

Parameter Description
WHERE
(TYPEKEY =
typekey |
(list))
This parameter specifies which records in the Type file to delete. You can
specify one Type key or a list of Type keys.
typekey specifies the name associated with the record being deleted. The
Type key is a 1–8 character alphanumeric string, with the first character
alphabetic.
list specifies multiple Type keys. Specify a list of keys by enclosing them in
parentheses.
Deleting Types Files through the Batch Interface
About this task
To use the DELETE TYPE command from the batch interface, follow this
procedure.
Procedure
1. Place your command in the batch job stream.
2. Submit the job while Sterling Connect:Direct is running.
3. Verify your results.
For example, the following commands delete the records under the Type keys
MYALLOC, NEWALLOC, and RPLALLOC from the Type file.
/* DELETES A SINGLE TYPE RECORD */
DELETE TYPE WHERE (TYPEKEY=MYALLOC)
/* DELETES MULTIPLE TYPE RECORDS */
DELETE TYPE WHERE (TYPEKEY=(NEWALLOC RPLALLOC))
Deleting Type Files through the IUI
About this task
To issue the DELETE TYPE command from the Sterling Connect:Direct IUI, follow
this procedure.
Procedure
1. Select DT from the Administrative Options Menu.
2. Type in the names of the TYPE KEYs that you want to delete.
3. Press ENTER.
A list of the deleted records is displayed. If the delete is unsuccessful, a list of
the records not deleted is displayed.
4. Press PF3/END to return to the Delete Data Set Type Defaults screen.
5. Use the Delete Data Set Type Defaults message display to verify a successful
delete request.
SELECT TYPE Command
The SELECT TYPE command enables you to examine a record in the Type file. You
can specify the search criteria and the form in which the information is presented.
Chapter 4. Maintaining the Type File 97

The SELECT TYPE command uses the following format and parameters. The
required parameters and keywords are in bold print. Default values for parameters
and subparameters are underlined.
Label Command Parameters
(optional) SELECT TYPE WHERE (
TYPEKEY = typekey | generic |(list)
)
PRint | TABle
WHERE is the required parameter for the SELECT TYPE command.
Parameter Description
WHERE
(TYPEKEY =
typekey | generic
| (list))
This parameter specifies which records in the Type file to select.
TYPEKEY = typekey | generic | (list)
specifies the key or list of keys of the records to select.
typekey specifies the name associated with the record selected. You
created the typekey name when originally adding the entry to the Type
file. The typekey is a 1–8 character alphanumeric string, with the first
character alphabetic.
generic specifies generic selection of type keys. To specify type keys
generically, type a 1–7 character alphanumeric string, with the first
character alphabetic, plus an asterisk (*). For instance, if your network
includes the type keys SENDDAY, SENDMO, and SENDWK, a
specification of SEND* provides information about those keys.
list specifies multiple type keys. A list of keys is specified by enclosing
them in parentheses.
The optional parameter is described below.
Parameter Description
PRInt | TABle Parameters specify the method of display for the output of the select.
PRint specifies that the output to a printer in tabular format. Output is
routed to the destination specified in the PRINT keyword of the
SIGNON command.
TABle specifies that the output is stored in a temporary file in tabular
format and is displayed upon successful completion of the command.
This parameter is the default.
Example of Selecting a Type Record
The following command selects a record in the TYPE file.
SELREC SELECT TYPE WHERE (TYPEKEY=DF*)
The output follows.
98 IBM Sterling Connect:Direct for z/OS: Administration Guide

===========================================================
SELECT TYPE DEFAULTS
===========================================================
Type Key => DF Date Created => mm/dd/yyyy
DISP=(RPL,CATLG,DELETE)
DCB=(DSORG=PS,LRECL=255,BLKSIZE=2554,RECFM=VB)
SPACE=(TRK,(10,10))
UNIT=SYSDA
Selecting Type Records through the Batch Interface
About this task
To use the SELECT TYPE command from the Batch Interface, follow this
procedure.
Procedure
1. Place your command in the batch job stream.
2. Submit the job while Sterling Connect:Direct is running.
3. Use the output to verify your results.
Selecting Type Records through the IUI
About this task
To issue the SELECT TYPE command through the Sterling Connect:Direct IUI,
follow this procedure.
Procedure
1. Access the Select Data Set Type Defaults screen by selecting option ST from the
Administrative Options Menu.
2. Type the typekey for each member you want to select. Refer to the description
of parameters for the “SELECT TYPE Command” on page 97, or press PF1 to
view the Help.
3. Indicate the output destination in the Output Destination field.
4. Provide the requested information and press ENTER.
An output destination of DIS produces a display similar to the following figure.
Chapter 4. Maintaining the Type File 99

BROWSE -- XXXXXXXX.XXXXXXX.XXXXX.XXXXXX.XXXXXX ---- LINE 00000000 COL 001 080
COMMAND ===> SCROLL ===> CSR
********************************* TOP OF DATA ********************************
==============================================================================
SELECT TYPE DEFAULTS
==============================================================================
Type Key => BINARY Date Created => mm/dd/yyyy
DISP=(RPL,CATLG,DELETE)
DCB=(DSORG=PS,BLKSIZE=6144,RECFM=U)
SPACE=(TRK,(10,10))
__________________________________________________________________________
Type Key => DF Date Created => mm/dd/yyyy
DISP=(RPL,CATLG,DELETE)
DCB=(DSORG=PS,LRECL=255,BLKSIZE=2554,RECFM=VB)
SPACE=(TRK,(10,10))
UNIT=SYSDA
__________________________________________________________________________
100 IBM Sterling Connect:Direct for z/OS: Administration Guide

Chapter 5. Maintaining the Network Map
The network map (also known as the NETMAP) identifies the local Sterling
Connect:Direct node and the nodes it communicates with. It consists of one local
node entry and one or more adjacent node entries that identify the communication
name and protocol of each Sterling Connect:Direct node.
The network map source is generated during installation. The network map load
utility, DGADNTLD, uses this source to create a network map (a VSAM file).
See the IBM Sterling Connect:Direct for z/OS Configuration Guide for rules governing
the network map for cross-domain VTAM definitions.
Adjacent Node Syntax
The syntax of the ZFBA parameter on the Netmap Adjacent node entry is: ZFBA =
(Addr1, Addr2)
The ZFBA parameter has no default value; if it is not specified, the node will be
ineligible for ZFBA transfers. The range is specified as a pair of 4-hex-digit device
addresses separated by a comma or space; the second value must be greater than
the first value. Adjacent.node example defines 4 devices, 2000-2003 as the zFBA
device range:
ADJACENT.NODE=((CD.UNIX , 1364 , UNIXHOST , TCP ) -
ENVIRONMENT=UNIX PARSESS=(8,2) -
ZFBA=(2000,2003) -
APPLIDS=(M1CDI7P6 M1CDI7P7 M1CDI7P8) )
Local Node Entry
The local node entry specifies the logical name of the local Sterling Connect:Direct
and its associated communications name. The local node entry also contains the
name of the Transmission Control Queue (TCQ) and the SUPERUSR ID password,
if specified. The syntax is displayed in the following figure.
LOCAL.NODE=( -
(node name,communications name,,superuser password) -
TCQ=(tcxdsn, tcqdsn) -
CONTACT.NAME="name" -
CONTACT.PHONE="phone information" -
DESCRIPTION="description information" -
)
© Copyright IBM Corp. 1999, 2015 101

Local Node Positional Parameters
The network map local node entry contains the following positional parameters.
Parameter Description
node name The first positional parameter is the 1–16 alphanumeric character node
name. It specifies the logical name of the local Sterling Connect:Direct
DTF.
The z/OS operating system accepts the following characters for the
adjacent node:
A-Z, 0-9, @, #, $, !, %, ^, &, _ , +, -, [, ], {, }, .
The z/OS operating system does not accept the following characters for
the adjacent node:
(, ) =, \, “, ‘, <, >, |, ||
communications
name (for SNA
only)
The second positional parameter is the 1–8 character communications
name. It specifies the VTAM APPLID that Sterling Connect:Direct uses
to communicate over the network.
If the node uses only TCP/IP communications (SNA=NO is specified in
the initialization parameters), define this parameter as NO-VTAM.
Refer to Initializing Sterling Connect:Direct without SNA Support in the
IBM Sterling Connect:Direct for z/OS Configuration Guide for more
information.
null The third positional parameter is not used.
superuser
password
The fourth positional parameter is the 1–8 character SUPERUSR ID
password. The initial value for this parameter is specified during
installation.
The SUPERUSR ID is provided to bypass your usual security system at
signon. This bypass can be necessary if Sterling Connect:Direct is
configured improperly, resulting in the inability to signon. SUPERUSR
still goes through usual data set verification done by the Stage 2
security exit.
Local Node Keyword Parameters
The network map local node entry contains the following keyword parameters:
Parameter Description
TCQ=
(tcxdsn,tcqdsn)
The TCQ is a VSAM relative record data set (RRDS) that
holds all Processes submitted to Sterling Connect:Direct.
The TCQ parameter specifies the two files that comprise
the Transmission Control Queue (TCQ). This parameter is
required.
Note: Use the correct order (tcxdsn,tcqdsn) when you
specify the two files.
tcxdsn identifies the data set name of the TCQ index (TCX).
tcqdsn identifies the data set name of the TCQ.
102 IBM Sterling Connect:Direct for z/OS: Administration Guide

Parameter Description
CONTACT.NAME=”name”
CONTACT.PHONE=”phone
information”
DESCRIPTION=
”description information”
These are free-form text parameters, which provide
additional general information about an adjacent node
entry. The CONTACT.NAME and CONTACT.PHONE
parameters are limited to a maximum of 40 characters. The
DESCRIPTION parameter is limited to a maximum of 255
characters.
When to Define the Local Node as the Adjacent Node
You must also define the local node as an adjacent node to:
v Specify the VTAM application IDs that are used for IUI and batch sessions. The
APPLIDS match those defined during installation preparation as described in the
IBM Sterling Connect:Direct for z/OS Configuration Guide.
v Provide the ability to run Processes where the local node is both the initiating
and target node (PNODE and SNODE). The communications name matches the
APPLID defined during installation preparation.
v Supply the communication address for a TCP API, if it is not specified during
the user signon.
If you are using TCP/IP only and SNA is set to NO, refer to Initializing Sterling
Connect:Direct without SNA Support in the IBM Sterling Connect:Direct for z/OS
Configuration Guide.
Adjacent Node Entry
Adjacent node entries specify network nodes that the local Sterling Connect:Direct
can communicate with. Each entry specifies a locally used Sterling Connect:Direct
name, its associated network communications name, and session control
parameters for these nodes. The syntax in the following figure is for a typical
adjacent node entry.
Chapter 5. Maintaining the Network Map 103

ADJACENT.NODE=( -
(nodename, -
communications name | channel-range-start-addr, -
remote library name | IP address or Alias | addr-count, -
session type, -
security node type, -
data direction restriction) -
PARSESS=(max,default) -
COMPRESS.EXT=ALLOW | DISALLOW | FORCE -
COMPRESS.STD=ALLOW | DISALLOW | FORCE -
COMPRESS.STD.PRIMECHAR=C’x’| X’xx’ -
SOURCEIP=IP address -
SESS.SNODE.MAX = 255 -
LDNS=hostname -
ENVIRONMENT=operating environment -
LOGMODE=logmode entry name -
APPLIDS=(vtam applid1 [,vtam applid2,...] ) -
or
BATCHAPPLIDS=(batch.applid1 [,batch.applid2,...] ) -
TSO.APPLIDS=(tso.applid1 [,tso.applid2,...] ) -
INTERACTIVE.APPLIDS=(interactive.applid1 [,interactive.applid2,...] ) -
CICS.APPLIDS=(cics.applid1 [,cics.applid2,...] ) -
NETID=networkid | CTCA server name -
PNODE.LUS=(luname1 [,luname2,...] ) -
SNODE.LUS=(luname1 [,luname2,...] ) -
USE.SERVER.NODE = NO | YES -
TCPAPI= (port number, IP address) -
CRC= (OFF | ON | DEFAULT) -
PLEXCLASS= (* | plexclass, * | plexclass) -
BUFFER.SIZE= 3072–262144|3K-256K -
ALTernate.COMMinfo = (ALTernate.RESTART=YES | NO, -
ALTernate.DIRection=BALANCE | TOP, -
(ALTernate.ADDRess= | ALTernate.NODEDEF=, ALTernate.PORT=, -
SOURCEIP=IP address, -
ALTernate.TYPE=SNA | TCP | UDT33 | LU62 -
ALTernate.LOGmode=logmode entry name, -
ALTernate.USE.OUTbound=YES | NO) -
) -
CDFTP.PLUGIN="name or location of the plugin" -
CDFTP.TEMPFILE"fully qualified file path and name" -
CONTACT.NAME=”name” -
CONTACT.PHONE=”phone information” -
DESCRIPTION=”description information”)
In an environment when one Sterling Connect:Direct system (either a Sterling
Connect:Direct/Plex environment or Sterling Connect:Direct/Stand-alone Server)
communicates with a Sterling Connect:Direct/Plex environment, add the following
statement to each ADJACENT.NODE entry that defines the other Sterling
Connect:Direct/Manager.
ENVIRONMENT=ZOS
Note: When a Sterling Connect:Direct for z/OS system communicates with another
Sterling Connect:Direct system in a Sterling Connect:Direct/Plex environment and
ENVIRONMENT=ZOS|OS390 is not specified, Process redirection does not
function correctly.
See “TCP/IP Addressing” on page 117 for network map entry requirements for
TCP/IP nodes.
See Channel-to-Channel Support for a discussion of channel-to-channel support.
104 IBM Sterling Connect:Direct for z/OS: Administration Guide

Positional Parameters for Adjacent Node Entries
The network map adjacent node entry contains positional and keyword
parameters. Following are the positional parameters for the network map adjacent
node entry:
Parameter Description
nodename The first positional parameter is the 1–16 alphanumeric character node
name. This name represents the partner Sterling Connect:Direct and is
used in communications with the local Sterling Connect:Direct. This
parameter is required. The node name is always changed to upper case
in the network map, regardless of the remote platform.
The following characters are allowed:
A-Z, 0-9, @, #, $, !, %, ^, &, _ , +, -, [, ], {, }, .
Sterling Connect:Direct for z/OS does not accept the following
characters for the adjacent node:
(, ) =, \, “, ‘, <, >, |, ||
communications
name |
channel-range-
start-addr
The second positional parameter is the 1–8 alphanumeric character
communications name. It specifies the network name of the partner
Sterling Connect:Direct. It can be an SNA VTAM APPLID or a TCP/IP
port number. This parameter is optional.
For SNA, this field must contain the VTAM APPLID of the remote
Sterling Connect:Direct node that the local DTF uses for DTF-to-DTF
communications with the remote node.
This name is the same name that is defined for the communications
name in the network map of the remote Sterling Connect:Direct node.
For OpenVMS and HP NonStop, use the PNODE.LUS and SNODE.LUS
parameters and leave this field blank.
For TCP/IP, this field contains the TCP/IP port number of the remote
partner Sterling Connect:Direct. You do not need to use this field if the
partner Sterling Connect:Direct is initialized using the default TCP/IP
port number. This port number does not change the port number for
the host Sterling Connect:Direct that is defined at initialization. See
“Multiple Port TCP/IP Listen” on page 120 for more information about
the TCP/IP port number.
For CTCA, this field contains the CCUU of the first CTCA address used
by this node.
Chapter 5. Maintaining the Network Map 105

Parameter Description
remote library
name | IP
address or Alias
| addr-count
The third positional parameter is for the Host ID (DNS), or IP Address,
or Library name. This is for I5/OS or TCP/IP nodes only.
For I5/OS nodes, this parameter specifies the name of the library where
the IBM
®
Sterling Connect:Direct for I5/OS program SMMAIN resides
for the partner Sterling Connect:Direct.
For TCP/IP nodes, this parameter specifies the IPv4 address (1-15
dotted decimal characters), DNS alias name (1-16 alphanumeric
characters) or the IPv6 address (1-39 colon separated hexadecimal
characters) to establish the TCP/IP session.
For DNS alias names greater than 16 characters, leave this field blank
and use the LDSN parameter.
For CTCA, this parameter specifies the number of CTCA addresses
used by this node. Specify this with an even number value (a minimum
of 2).
session type The fourth positional parameter is the session type. It specifies the type
of session communications protocol to use for communications with
this adjacent node. This parameter is required for i5/OS adjacent nodes
and any node using a protocol other than LU0. Valid values are:
SNA (for LU0 protocol)
SNUF (for LU0 protocol for the i5/OS)
LU62 (for LU6.2 protocol)
TCP (for TCP/IP protocol)
UDT33 (for UDT protocol)
CTCA (for Channel to Channel connections)
security node
type
The fifth positional parameter is the security node type. It classifies the
node as an internal or external node. Specify this parameter for Trusted
Node security. It is optional if you do not use Trusted Node security.
For further information on Trusted Node security refer to Trusted Node
Security .
EXTERNAL|EXT specifies an external security classification for this
node.
INTERNAL|INT specifies an internal security classification for this
node. This is the default.
106 IBM Sterling Connect:Direct for z/OS: Administration Guide

Parameter Description
data direction
restriction
The sixth positional parameter is the data direction restriction. It
identifies the copy initiation abilities of this adjacent node with the
local node. For further information on data direction restriction, refer to
Data Direction Restriction. This parameter is optional. Valid data
direction values are:
RECEIVE|RECV indicates that when the adjacent node initiates a
transfer, it is only allowed to receive data from this node. It is never
allowed to send data to this node.
Note: For CTCA, RECEIVE|RECV indicates that the first address in
channel-range-start-addr is used for inbound traffic; the next address is
used for outbound traffic. For two Sterling Connect:Direct systems to
communicate through CTCA, one adjacent node must specify SEND
and the other must specify RECEIVE|RECV.
SEND indicates that when the adjacent node initiates a transfer, it is
only allowed to send data to this node. It is never allowed to receive
data from this node.
Note: For CTCA, SEND specifies that the first address specified in
channel-range-start-addr is is used for outbound traffic; the next
address is used for inbound traffic.
For two Sterling Connect:Direct systems to communicate through
CTCA, one adjacent node must specify SEND and the other must
specify RECEIVE|RECV.
BOTH indicates that when the adjacent node initiates a transfer, it is
allowed to both send and receive data from this node. This value is the
default.
NONE indicates that when the adjacent node initiates a transfer, it is
neither allowed to send or receive data from this node.
Keyword Parameters for Adjacent Node Entries
The network map adjacent node entry contains keyword parameters. The following
are the positional parameters for the network map adjacent node entry:
Chapter 5. Maintaining the Network Map 107

Parameter Description
PARSESS=(max,default) This is an optional parameter that defines two session control values for
parallel session-capable nodes. PARSESS controls the number of Processes
initiated by one node. PARSESS does not control the total number of
Processes submitted.
max specifies the maximum number of simultaneous DTF-to-DTF sessions
that the local Sterling Connect:Direct node can initiate with this adjacent
node. The range of this subparameter is 2–255. Each session is represented
by a corresponding class value. This class value determines the execution
eligibility of a Process. Leave this field blank if parallel sessions are not
available.
default specifies the class assigned to a Process if one is not specified on the
Process statement or when the Process is submitted. The range of this
subparameter is 1-the value coded for parallel sessions. If you do not code
this parameter, the node is not parallel session-capable, and the max and
default values are set to 1. This parameter is required if you do
PNODE=SNODE processing.
Note: If you do not specifically code the PARSESS parameter on an adjacent
node definition, a default of PARSESS=(1,0) is set by the system, which
allows only a single session. The default class 0 means no CLASS which
shows up as a CLASS of NONE in an executing Process. You cannot code
the default PARSESS=(1,0) on an ADJACENT.NODE definition—the
minimum value that can be coded is PARSESS=(2,1).
The following formula is a quick way to determine the number of parallel
sessions available when class is not defined for a Process (the default class is
used): Default Parsess value = (max – default) +1
For CTCA connections, this value is automatically set to 1/2 of the
addr-count. Do not try to reset this parameter for CTCA connections.
For best results when using Independent LU6.2, code PARSESS the same for
both the local and remote nodes.
Selecting a Class
Sterling Connect:Direct selects a class in which a Process is to run
by starting with the default class, or the coded class, and proceeds
upward in class values until an available class slot is found, or
until all possible class values are tested.
For more information on Process class, see the Connect:Direct Process
Language help.
For more information about parallel sessions, refer to Building,Modifying, and
Submitting Processes Queueing in the IBM Sterling Connect:Direct for z/OS User
Guide.
COMPRESS.EXT=ALLOW |
DISALLOW | FORCE
This is an optional parameter that can be used to control how extended
compression will be used on a node.
ALLOW specifies that extended compression may be used. In this case,
extended compression may be specified within the Process or by the other
node.
DISALLOW specifies that extended compression cannot be used.
FORCE specifies that extended compression is required.
108 IBM Sterling Connect:Direct for z/OS: Administration Guide

Parameter Description
COMPRESS.STD=ALLOW |
DISALLOW | FORCE
This is an optional parameter that can be used to control how standard
compression will be used on a node.
ALLOW specifies that standard compression may be used. Standard
compression may be specified within the Process or by the other node.
DISALLOW specifies that standard compression cannot be used.
FORCE specifies that standard compression is required.
COMPRESS.STD.
PRIMECHAR=C'x' | X'xx'
This is an optional parameter used for text data or single-character
repetitive data to specify the primary compression character. It is specified
as either two hex digits preceded by “X” or a single character preceded by
“C”, for example, COMPRESS.STD.PRIMECHAR=C'$', or this can also be
expressed as COMPRESS.STD.PRIMECHAR=X'4B'
Note: If COMPRESS.STD is specified and COMPRESS.STD.PRIMECHAR is
not specified, then the Process default for COMPRESS.STD.PRIMECHAR,
which is X'40' (an EBCDIC space), will be in effect.
SOURCEIP = IP address If an IPv6 or IPv4 address is required for the network map, this parameter
defines the source IP address that is bound to during outbound connection
requests. If the SOURCEIP parameter is not specified, the local or default
address is bound. The destination address is obtained from the network
map. The source port is obtained as assigned by TCP/IP, or through the
TCP.SRC.PORTS or UDP.SRC.PORTS table. If the address from the
SOURCEIP cannot be bound during Process execution, the Process is placed
in a TI RE state (Timer Queue Retry Status).
Note: If the network map adjacent node contains a IPv6 address, but
Sterling Connect:Direct is not enabled to support it, the submit of a Process
for that network map entry fails. For information about enabling Sterling
Connect:Direct for IPv6 support, refer to TCP/IP Addressing.
SESS.SNODE.MAX = nnn This is an optional parameter that can be used to control the number of
concurrent sessions that an adjacent node can initiate as the SNODE. The
range for SESS.SNODE.MAX is 1 to 255. The default value is 255. In a
Sterling Connect:Direct/Plex environment, this parameter controls the
number of sessions that an adjacent node can initiate with each Sterling
Connect:Direct/Plex server.
Note: For use with TCP/IP and LU6.2 only.
LDNS=hostname LDNS is an optional parameter that specifies the host name in the network
map adjacent node entry.
If you use this parameter, you can leave the third positional parameter (IP
address or alias) blank. You must also specify TCP as the fourth positional
parameter (session type).
hostname specifies the host name for this node. The host name length is
from 1–256 characters.
To see an example of a long DNS record, see The Network Map in the IBM
Sterling Connect:Direct for z/OS User Guide.
Chapter 5. Maintaining the Network Map 109

Parameter Description
ENVIRONMENT= operating
environment
The ENVIRONMENT parameter identifies the adjacent node operating
system environment. This parameter is required when the session type
positional parameter specifies LU6.2 protocol for i5/OS systems and when
one Sterling Connect:Direct system (either a Sterling Connect:Direct/Plex
environment or Sterling Connect:Direct/Stand-alone Server) communicates
with a Sterling Connect:Direct/Plex environment. Other protocols can use it
for documentation purposes.
Valid values are: GIS, HPNONSTOP, I5OS, LINUX, OPENVMS, OS400,
SELECT, VOS, STRATUS, UNIX, VM, VMS, VSE, WINDOWS, and ZOS.
Note: When an OS/390 or z/OS Sterling Connect:Direct system
communicates with another Sterling Connect:Direct system in a Sterling
Connect:Direct/Plex environment and ENVIRONMENT=ZOS|OS390 is not
specified, Process redirection does not function correctly.
LOGMODE=logmode entry name Identifies the VTAM logmode entry that defines the communication protocol
for this node.
This parameter is only required for LU6.2 nodes.
It is optional for LU0 connections. If you specify this parameter for LU0
connections, the RUSIZE defined within this LOGMODE is used for any
transfer with this node. For a host-to-host transfer, the LOGMODE entry in
the VTAM MODETAB of the SNODE determines the RUSIZE. For a
host-to-PC transfer, the LOGMODE entry in the host VTAM MODETAB is
used.
This parameter is not valid for TCP/IP nodes or CTCA connections.
Refer to Sample VTAM Definitions in the IBM Sterling Connect:Direct for z/OS
Configuration Guide for information about VTAM definitions.
APPLIDS=(vtam applid1 [,vtam
applid2,...] )
or
BATCHAPPLIDS=(batch.
applid1 [,batch.applid2,...] )
TSO.APPLIDS=(tso.applid1
[,tso.applid2,...] )
INTERACTIVE.APPLIDS=
(interactive.applid1
[,interactive.applid2,...] )
CICS.APPLIDS=(cics.applid1
[,cics.applid2,...] )
The APPLIDS parameter specifies the VTAM APPLIDs that establish a
session between the local Sterling Connect:Direct SNA LU0 API and the
Sterling Connect:Direct DTF. APPLIDs are defined on the local nodes
adjacent node record for LU0 sessions to this DTF and are defined on the
remote nodes adjacent node record for SNA LU0 multi-session signon to
those remote DTFs. This parameter is valid only for z/OS, VSE/ESA, and
VM/ESA nodes, and the actual VTAM APPLIDs must be defined and active
on the VTAM system where the SNA LU0 IUI / API signon is taking place.
To isolate or separate the VTAM pools to specific user interfaces, you can
use the following parameters to define special-purpose APPLIDS or just use
the APPLIDS parameter itself:
v BATCH.APPLIDS with the batch user interface
v INTERACTIVE or TSO APPLIDS with the ISPF user interface
v CICS.APPLIDS with the CICS user interface
110 IBM Sterling Connect:Direct for z/OS: Administration Guide

Parameter Description
NETID=networkid | servername The NETID parameter specifies the 1–8 character network ID for this node.
When a Process starts, the network ID provided at the session start is
verified against the network ID in the network map for the adjacent node. If
they do not match, the Process is terminated with an error.
For multiple session signons, the network ID of the node signing on is
verified against the network map network ID of the node being signed on
to. If they do not match, the signon fails.
If this keyword is not coded or the Sterling Connect:Direct initialization
parameter NETMAP.CHECK is set to NO, the network ID is not checked at
Process start or multiple session signon.
For a CTCA connection in a Sterling Connect:Direct/Plex environment, this
parameter specifies the 1–8 character name of the Sterling
Connect:Direct/Server.
PNODE.LUS=(luname1 [,luname2,...] )
)
The PNODE.LUS parameter specifies the logical units used by a remote
node to initiate a session with this local node. Do not specify the
communications name when you use this parameter.
Applies to OpenVMS nodes. It is not valid for CTCA connections.
SNODE.LUS=(luname1 [,luname2,...] )
)
For OpenVMS, the SNODE.LUS parameter specifies the logical unit names
used by the local node to initiate a session with this remote node. For all
other platforms, it specifies the logical units used for all communications
with the remote node.
Communications to nodes that cannot handle parallel sessions can require a
pool of logical units. If an adjacent node is defined in its host environment
to use more than one logical unit for communications, then each of the
logical unit names that can communicate with the local node must be
defined to the local node on the corresponding adjacent node network map
entry.
HP NonStop and i5/OS adjacent node entries use the SNODE.LUS keyword
only to define the LU pool.
OpenVMS nodes assign the logical units in the pool as either ACTIVE,
session initiating, PASSIVE, or listening for session requests. This distinction
in function is defined to the z/OS node by specifying the ACTIVE logical
units with the PNODE.LUS keyword and the PASSIVE logical units with the
SNODE.LUS keyword.
This parameter is not valid for CTCA connections.
USE.SERVER.NODE = YES | NO Setting this parameter to YES tells a Sterling Connect:Direct/Server to use
its CDPLEX.SERVER.NODE initialization parameter as identification when
communicating with this adjacent node. If this parameter is set to NO, the
Sterling Connect:Direct/Server identifies itself to this adjacent node as the
same local node as all other members of the Sterling Connect:Direct/Plex
environment. (See CDPLEX.SERVER.NODE = node name for more
information.)
This parameter is required if a remote Sterling Connect:Direct system, using
NETMAP checking, communicates with more than one Sterling
Connect:Direct/Server in a Sterling Connect:Direct/Plex environment.
This parameter is ignored in a Sterling Connect:Direct/Stand-alone Server.
Chapter 5. Maintaining the Network Map 111

Parameter Description
TCPAPI=(port number, IP address) This parameter defines the adjacent node communication address used by
an external API that uses TCP to communicate with the node. This value
must be the same as the TCP.API.PORTNUM initialization parameter of the
node that you are communicating with.
If the adjacent node is an SNA node, include both the port number and IP
address.
If the adjacent node is a TCP node, you must supply the port number, but
do not need to supply the IP address. If you do not supply the IP address,
you must define the IP address in the Adjacent node record. See API
Signons for more information.
CRC =(OFF|ON|DEFAULT) Determines if you will perform CRC checking for any TCP/IP Process
sending to this node. If overrides are allowed, this parameter enables you to
override the CRC setting in the initialization parameters for this node.
Note: Although DEFAULT is an acceptable value, it is the equivalent of not
specifying the network map parameter at all and would normally only be
seen in the output of the network map file unload when no CRC
specification had been supplied previously.
PLEXCLASS= (* | plexclass, * |
plexclass)
This parameter specifies a default PLEXCLASS for the PNODE (the first
parameter) and SNODE (the second parameter). This Sterling
Connect:Direct/Server checks this PLEXCLASS to determine if it can run the
Process. (See the initialization parameter, “CDPLEX.PLEXCLASSES =
(*,plexclass,...,plexclass)” on page 387, for more information.)
Each PLEXCLASS name is 1–8 characters long. An asterisk (*) is also an
acceptable entry, which indicates that the Sterling Connect:Direct/Server
supports any Process that does not specify a PLEXCLASS, or specifies a
PLEXCLASS of ‘*'.
BUFFER.SIZE=V2.buffer override V2.buffer override defines the buffer size for the adjacent node. It is only
valid for TCP and CTCA session types. Use it to dynamically override the
V2.BUFSIZE value of the local node during TCP buffer size negotiation. This
parameter is generally coded to reduce the V2.BUFSIZE value so that
Sterling Connect:Direct provides less data on each TCP send. Valid values
are 3072–262144 | 3K–256K.
112 IBM Sterling Connect:Direct for z/OS: Administration Guide

Parameter Description
ALTernate.COMMinfo=
(ALTernate.RESTART=YES | NO
ALTernate.DIRection=
BALANCE | TOP,
(ALTernate.ADDRess= |
ALTernate.NODEDEF=,
ALTernate.PORT=, SOURCEIP=,
.
.
.
This parameter enables you to specify multiple remote node addresses for
NETMAP checking.
ALTernate.RESTART indicates if an alternate communications path is
considered when a Process must restart.
Note: Do not specify ALT.NODEDEF if you use ALT.RESTART. All alternate
communications paths must use ALT.ADDR and the same protocol (all
Version 1 or Version 2). For example, if you use ALT.TYPE=SNA, specify all
alternate addresses as ALT.TYPE=SNA (Version 1 protocol). Since LU62,
TCP, and UDT33 are all Version 2 protocols, you can use LU62, TCP, or
UDT33 when specifying alternate addresses.
ALTernate.DIRection specifies the direction of the communications paths.
BALANCE (default) indicates a balanced approach; that is, all current
sessions are scanned for this same adjacent node and the least used path is
selected as the primary path for the Process. The list is processed forward
from there. TOP indicates the paths are processed from the top.
ALTernate.ADDRess specifies either a TCP/IP address or an SNA address as
appropriate.
If ALT.TYPE=SNA or ALT.TYPE=LU62, ALT.ADDR must be a 1–8 character
APPLID. If ALT.TYPE=TCP, ALT.ADDR must be a 15-character IPv4 or
39-character IPv6 TCP/IP address or a 1–256 character LDNS name. This
subparameter is required if you do not specify ALTernate.NODEDEF.
ALTernate.NODEDEF specifies an alternate node definition to use for
NETMAP checking. This subparameter references another entry in the
NETMAP. This subparameter is required if you do not specify
ALTernate.ADDRess.
ALTernate.PORT specifies the alternate address port number if the alternate
address is TCP/IP. This field is not required. This subparameter defaults to
the port of the adjacent node record. If not specified in the adjacent node
record, the default is 1364. You can only use this subparameter if
ALT.TYPE=TCP.
Note: If ALTernate.DIRection=BALANCE is specified, the value specified for
ALTernate.PORT is not used.
SourceIP, which has no short form, specifies an alternate IPv6 or IPv4
address that is bound to during outbound connection requests. The source
port is obtained as assigned by TCP/IP, or through the TCP.SRC.PORTS or
UDP.SRC.PORTS table. If the address from the SOURCEIP cannot be bound
during Process execution, the Process is placed in WA or WT state.
If SourceIP is specified for this ADJACENT NODE but not in the
ALT.COMM entry, the value specified for the ADJACENT NODE also
applies to this ALT.COMM entry.
Note: If the network map adjacent node contains a IPv6 address, but
Sterling Connect:Direct is not enabled to support it, the submit of a Process
for that network map entry fails. For information about enabling Sterling
Connect:Direct for IPv6 support, refer to TCP/IP Addressing.
Chapter 5. Maintaining the Network Map 113

Parameter Description
ALTernate.COMMinfo=
.
.
.
ALTernate.TYPE=SNA | TCP | LU62,
ALTernate.LOGmode=
logmode entry name,
ALTernate.USE.OUTbound=Yes | No)
(Continued from previous page)
ALTernate.TYPE specifies the protocol used for the alternate address. This
value defaults to that of the adjacent node record. Valid values are SNA,
TCP, UDT33, LU62. This subparameter is only used with
ALTernate.ADDRess. This subparameter is required if you do not specify
ALTernate.NODEDEF.
ALTernate.LOGmode specifies an SNA logmode used when
ALTernate.TYPE=SNA or LU62. This parameter is required for LU62 if the
adjacent node is not defined as LU62.
ALTernate.USE.OUTbound specifies whether the alternate communications
path is used for outbound Processes, providing session failover for Processes
sent to this adjacent node. Valid values are Yes (default) and No.
For more information on this parameter, refer to Using Alternate
Communications Paths.
CDFTP.PLUGIN=”fully qualified
installation directory of the Sterling
Connect:Direct FTP+ Plug-in”
Sterling Connect:Direct FTP+ for z/OS gets its configuration information
about remote systems it connects to from the Netmap.
Configure the CDFTP.PLUGIN parameter in your Netmap to specify where
the Sterling Connect:Direct FTP+ Plug-in is installed on each remote system
that Sterling Connect:Direct FTP+ for z/OS connects to.
This parameter is not required when the Netmap entry defines a z/OS
system.
CDFTP.TEMPFILE=”fully qualified
name of the Sterling Connect:Direct
FTP+ temporary file”
Sterling Connect:Direct FTP+ for z/OS gets its configuration information
about remote systems it connects to from the Netmap.
Configure the CDFTP.TEMPFILE parameter in your Netmap to specify the
fully qualified name of the Sterling Connect:Direct FTP+ temporary file for
each remote system that Sterling Connect:Direct FTP+ for z/OS connects to.
The FTP+ Plug-in creates a temporary file to store the results of a directory
command RUNTASK operation.
Note: If no variables are used in the CDFTP.TEMPFILE, then Sterling
Connect:Direct FTP+ for z/OS appends the job userid and the ASID and
CPUID to the CDFTP.TEMPFILE parameter as a further specification of
uniqueness.
Several variables are available for substitution in the CDFTP.TEMPFILE
specification. These variables are:
v &userid;—The remote userid (lower case)
v &USERID;—The remote userid (upper case)
v &lusrid;—The local userid padded to 8 characters with '$'
v &lcpuid;—The first 8 bytes of the local CPUID with "C" overlaying the
first byte
v &asid;—The 4 character Address Space ID prefixed with "AS"
For example, you can specify CDFTP.TEMPFILE= with a variable, such as
"&userid;". Sterling Connect:Direct FTP+ for z/OS inserts the remote userid
in place of the “&userid;”.
CONTACT.NAME=”name”
CONTACT.PHONE=”phone
information”
DESCRIPTION=”description
information”
These are free-form text parameters, which provide additional general
information about an Adjacent Node entry. The CONTACT.NAME and
CONTACT.PHONE parameters are limited to a maximum of 40 characters.
The DESCRIPTION parameter is limited to a maximum of 255 characters.
114 IBM Sterling Connect:Direct for z/OS: Administration Guide

Using Alternate Communications Paths
Use the ALT.COMM parameter to set up alternate communications paths. To see
an example of using alternate communications paths in a Sterling
Connect:Direct/Plex environment, see Strategies for Communicating with Non-Plex
Servers.
Note the following:
v The protocol and number of alternate communications paths depend on the
capability of the remote node.
v If you use alternate communications paths, the remote Sterling Connect:Direct
node must have the capability to support the ALT.COMM parameter and have a
defined method of performing network map checking for these alternate paths.
v If you are using the STS protcol with Sterling Connect:Direct Secure Plus for
z/OS, all communications paths must be LU6.2, TCP, or UDT. If you are using
either the SSL or TLS protocol, all communications paths must be TCP or UDT.
Alternate Communications Paths with Current Node as Primary
Node
The adjacent node record defines a communications path. You can use the
ALT.COMM parameter in the adjacent node record to define alternate
communications paths.
When a Process is submitted, the primary communications path is selected based
on the alternate.direction subparameter. If alternate.direction=BAL, all
communications paths are scanned to find the least used path, including the path
defined in the adjacent node record, and all paths defined in the alternate.address
subparameters. The least used path becomes the primary path. If
alternate.direction=TOP, the communications path defined in the adjacent node
record is used as the primary path.
If the Process fails to establish a session using the primary communications path,
the network map is processed to determine the next eligible communications path.
This is repeated until the session is successfully established or the number of
communications paths is reached. When this number is reached, the primary
communications path is restored and the Process is placed in timer retry (TI RE)
status. After all session retries (MAXRETRIES) are reached, the original
communications path is restored and the Process is placed in hold (HO WC) status.
Each failed attempt to establish a session produces the following result:
v Message SVTM310I SESSION NOT ESTABLISHED WITH SNODE=xxxx
v Session Begin statistics record that identifies the communications path used at
the time of the failure
v Diagnostics to RPLERRCK
v When the MAXRETRIES is reached and the Process is placed in the HOLD
queue, the following message is issued in addition to the previous message(s):
SVTM105I PNAME=pnam, PNUM=pnum MOVED TO Q=HOLD, QSTATUS=WC
When the Process establishes a session, the Session Begin statistics record identifies
the communications path that was successfully used. That communications path is
used for the life of the Process, unless ALTernate.RESTART is coded for the node,
in which case the communications path may change if the Process restarts. For
Chapter 5. Maintaining the Network Map 115
more information on ALTernate.RESTART, see the description for the
ALTernate.COMMinfo parameter.
Alternate Communications Paths with Current Node as
Secondary Node
When the current Sterling Connect:Direct node is the secondary node (SNODE),
the ALT.COMM parameter is used for network map checking purposes only.
Outbound Processes
The ALT.COMM parameter is used for outbound Processes when following
conditions are true:
v The current Sterling Connect:Direct is the PNODE.
v The Process is not in restart (the default ALT.RESTART=NO is in effect).
Note: If you specify ALT.RESTART=YES, Sterling Connect:Direct considers
alternate communications paths if the path used to establish a session fails and
the Process restarts. For an example, see Restarting Processes using an Alternate
Communications Path
v The Process is not PNODE=SNODE.
v The Process is not SNODE=TCPNAME=.
PNODE=SNODE Processing
Sterling Connect:Direct can initiate Processes where the local node is both the
initiating and target node (PNODE and SNODE). You enable PNODE=SNODE
processing by creating an adjacent node entry with the same node name as the
local node entry in the network map.
If the PNODE=SNODE connection is SNA, SNA=YES is specified in the
initialization parameters.
Observe the following rules when setting up the adjacent node:
v Define an LU0 communications name for the PNODE=SNODE network map
entry. Do not specify an LU6.2 logmode entry name for the common name of the
adjacent node entry.
v The communications name for the adjacent node must be different from the
communications name of the local node. If the names are the same,
PNODE=SNODE processing is disabled at initialization.
v Code the PARSESS=(max, default) parameter in the network map adjacent node
entry to govern the number of simultaneous PNODE=SNODE connections.
TCP/IP Considerations
A network map entry is not required for every TCP/IP node. A default entry
provides a standard set of parameters. If the standard set of parameters is not
adequate, you can code a network map entry for that node to override the default
entry. If network map entries are not used for TCP/IP, you must submit Processes
by using the SNODE=TCPNAME keyword. For more information, see Example -
Defining a TCP/IP Default Entry.
Note: If you set the NETMAP.CHECK=TCP initialization parameter, you must
define the TCP/IP node in the local network map.
116 IBM Sterling Connect:Direct for z/OS: Administration Guide

The APPLIDS and LOGMODE keywords and the remote library name positional
parameter are not used on any TCP/IP node and cannot be coded in the network
map. A warning is generated for any unnecessary keyword or subparameter, and
the coded value is ignored when the network map is loaded.
TCP/IP Addressing
Each host on a TCP/IP network is assigned a unique address known as an IP
address. Applications running on a TCP/IP host that connect to the network are
assigned one or more port numbers of the IP address.
Sterling Connect:Direct supports both IPv4 and IPv6 protocols, where IPv6 allows
a much larger address range than IPv4. During product initialization, Sterling
Connect:Direct determines if the TCP Stack is IPv6 or only IPv4. (IPv6 must be
enabled within TCP/IP itself.) If Sterling Connect:Direct initializes on a system
where IPv6 is not enabled, any function involving an IPv6 address fails, including
attempts to resolve an address or name using the DNS name resolution. For
information about enhancing and extending IPv6 through the TCP.LISTEN
parameter, see Multiple Port TCP/IP Listen.
Command Syntax for IPv4 AND IPv6 Addressing
The following examples demonstrate the command syntax for IPv4 and IPv6
addressing.
Note: The address must be specified on a single line. You cannot break the address
between lines.
The following example demonstrates how to break the command syntax over an
additional line:
(SC.DUB.MWATL3,4399, -
1111:2222:3333:4444:5555:6666:7777:8888,TCP)
The following example demonstrates the appropriate network syntax:
/* */
/* IPV6 ADDRESS */
/* */
ADJACENT.NODE=( -
(SC.DUB.MWATL3,4399,1111:2222:3333:4444:5555:6666:7777:8888,TCP) -
PARSESS=(00000255 00000001) -
APPLIDS=(M1CDI7P6 M1CDI7P7 M1CDI7P8) )
/* */
/* IPV4 ADDRESS */
/* */
ADJACENT.NODE=( -
(SC.DUB.MWATL3,4399,111.222.333.444,TCP) -
PARSESS=(00000255 00000001) -
APPLIDS=(M1CDI7P6 M1CDI7P7 M1CDI7P8) )
The following example demonstrates the appropriate command syntax for a
multiple listen for IPv6 addresses through the initialization parameter:
Chapter 5. Maintaining the Network Map 117

TCP.LISTEN=((10.20.201.2,4199), -
(fd00:0:0:20cc::2,4299), -
(10.20.201.2,4399), -
(10.20.201.2,4499) )
The following two examples represent a simple specification for a single listen for
either an IPv4 or IPv6 address through the initialization parameters:
/* */
/* IPV4 address */
/* */
TCP.LISTEN = (111.222.333.444,01364)
/* */
/* IPV6 address */
/* */
TCP.LISTEN = (1111:2222:3333:4444:5555:6666:7777:8888,01364)
The following example represents a simple specification for a single listen for
either an IPv4 or IPv6 address through the Process syntax:
/* */
/* IPV6 Address */
/* */
label PROCESS -
SNODE=TCPNAME=1111:2222:3333:4444:5555:6666:7777:8888;nnnnn
/* */
/* IPV4 Address */
/* */
label PROCESS SNODE=TCPNAME=111.222.333.444;nnnnn
(where nnnnn is the 5 digit port number)
Domain Name Resolution
Because IP addresses are difficult to remember and not descriptive of the host it is
assigned to, TCP/IP enables meaningful names to map to the IP address. TCP/IP
provides a function called Domain Name Resolution to map the name to the IP
address. Refer to your TCP/IP implementation documentation for information on
the setup and use of Domain Name Resolution.
Releasing Processes Serially from Sterling Connect:Direct for
Microsoft Windows
To support dial-up connections from a Sterling Connect:Direct for Microsoft
Windows node and release Processes serially, define the Sterling Connect:Direct for
Microsoft Windows node in an adjacent node entry using a null IP address of
0.0.0.0. You can let the port number default to 1364 on the node where the network
map resides since it will be resolved at connection time. Processes submitted to
nodes defined in this manner default to HOLD=CALL status and are not executed
since the connection cannot be resolved.
To release the HOLD=CALL Processes, create a NULL or ENABLE Process from
the Sterling Connect:Direct for Microsoft Windows SNODE. (A NULL Process is an
empty one with no steps and is only valid in Sterling Connect:Direct for Microsoft
Windows.) When the Sterling Connect:Direct for Microsoft Windows node
establishes a connection with Sterling Connect:Direct for z/OS and sends the
118 IBM Sterling Connect:Direct for z/OS: Administration Guide
NULL Process, Sterling Connect:Direct for z/OS uses the same session and runs
any HOLD=CALL Processes one at a time. Checkpoint restart is supported for
such nodes.
TCP/IP Port Number
The initialization parameters TCP.LISTEN and TCP.API.LISTEN provide the best
method for defining a single port or multiple ports for Sterling Connect:Direct to
listen to and accept incoming TCP/IP connection requests. You can define a single
port for establishing a listen task, or define multiple ports by establishing a list of
IP address and port number combinations. Multiple port listening allows Sterling
Connect:Direct to accept incoming traffic from a variety of addresses.
Single Port TCP/IP Listen
Sterling Connect:Direct implements a standard TCP client/server architecture. Each
Sterling Connect:Direct node in the TCP/IP network can function as both the client
and the server simultaneously.
The server establishes a connection with the TCP/IP network and waits for session
requests from other Sterling Connect:Direct clients. When a session request is
received and validated, the server accepts the connection to the client.
The Sterling Connect:Direct client requests a session that is established through the
TCP/IP network to a Sterling Connect:Direct server. When the session is accepted
by the server, a dynamic port is assigned by the network. This dynamically
assigned port is used for the actual data transfer. When the data transfer is
complete, the port is released back to the network and the session is terminated.
Sterling Connect:Direct uses a predefined TCP/IP port number for both client and
server. This port is defined in TCP/IP as a TCP service and requires the same port
for all Sterling Connect:Direct TCP/IP nodes in your network. Refer to your
TCP/IP implementation documentation for how to define TCP servers. If you
cannot use the predefined TCP/IP port, you can override it for both the client and
server.
This initialization parameter defaults to port number 1364.
Client Override Port Number
The client override port number is coded on the adjacent node record in the
second positional parameter. The Sterling Connect:Direct client requests sessions to
the Sterling Connect:Direct server through this port. The port number coded on the
adjacent node record is used by client functions only and does not change the port
number used by the server functions. You must code the network map entry in
your network map in order to use the override port number.
Server Override Port Number
The server override port number is coded in the TCP.LISTEN initialization
parameter. The Sterling Connect:Direct server waits for a Sterling Connect:Direct
client request on this port. The initialization port number is used by server
functions only and does not change the port number used by the client functions.
Chapter 5. Maintaining the Network Map 119

Multiple Port TCP/IP Listen
Sterling Connect:Direct accepts incoming traffic from a variety of addresses. The
initialization parameters TCP.LISTEN and TCP.API.LISTEN support both IPv4 and
IPv6 protocols. They also allow for a list of IP address and port number
combinations.
The first address defined in the parameter becomes the local or default address.
Up to eight different addresses/ports can be defined for each server.
For information about multiple port listening in a Sterling Connect:Direct/Plex
environment, refer to A New Sterling Connect:Direct/Plex Environment.
Viewing a TCP Listen Status Report
To view the TCP listening status through the IUI interface, follow this procedure.
Procedure
1. Access the INQUIRE TCP command by selecting option INQ from the
Connect:Direct Administrative Options Menu. The Inquire DTF Internal Status
screen is displayed.
2. Type ITCP and press ENTER to display the status report. The following report
is an example of the output.
CD.ZOS.NODE *INQUIRE TCP * DATE: yyyy.mm.dd TIME: hh:mm:ss
SYSTEM INITIALIZED ----------------- yyyy.mm.dd hh:mm:ss
======================================================================
Address Port Num Status Type Address Family
=================== =========== ========= ======= ===============
10.20.201.2 (Default) 1364 LISTEN NODE IPV4
10.20.129.3 4100 LISTEN NODE IPV4
10.20.129.3 4101 ERROR NODE IPV4
10.20.201.2 1363 LISTEN API IPV4
======================================================================
VTAM Independence
VTAM independence enables Sterling Connect:Direct to initialize without SNA
support. It also enables Sterling Connect:Direct to continue functioning if VTAM is
not available, and to reattach to VTAM when it is restored.
To use VTAM independence, you must specify SNA=YES in the initialization
parameters. You must also specify a valid VTAM APPLID in the network map
local node record.
If SNA= YES is specified in the initialization parameters and you try to start
Sterling Connect:Direct when SNA is not available, or if SNA becomes unavailable
during a session, the system prompts the operator for action.
See “SNA = YES | NO” on page 362 for more information about the SNA
initialization parameter. See API Signons for more information about operator
actions.
TCP/IP API Communications
The TCP.API.LISTEN initialization parameter enables an API to communicate with
a Sterling Connect:Direct using TCP/IP via OE sockets. Also, you can use the
TCPAPI keyword parameter in the adjacent node record to define a default
protocol for API communication.
120 IBM Sterling Connect:Direct for z/OS: Administration Guide

The API must also use the SIGNON command to specify a transport type and
communications address. See API Signons for more information. Additionally, refer
to Managing Sessions in IBM Sterling Connect:Direct for z/OS User Guide for more
information about the SIGNON command.
Example - Defining a TCP/IP Default Entry
The following example defines a TCP/IP default record using ADJACENT.NODE
entries.
/* */
/* The following entry is for the TCP/IP default entry */
/* */
ADJACENT.NODE=(PARSESS=(8,1) -
ENVIRONMENT=ZOS -
(TCP.IP.DEFAULT, 2048,, TCP))
Note: For a TCP/IP default entry, the nodename parameter must be
TCP.IP.DEFAULT and the session type must be TCP. A TCP/IP default entry is
required if any Process uses SNODE=TCPNAME=.
In the previous example, nodename=TCP.IP.DEFAULT, communications
name=2048, and session type=TCP. For information about adjacent node entries,
see Adjacent Node Entry.
When a Process is submitted, the port number value is determined in the following
order:
1. If the node name within a Process is defined in the network map, the port
number associated with the node name entry is used.
2. If the node name within a Process is not defined in the network map, the port
number associated with the default entry is used.
3. If no port number exists in the communications name field of the default entry,
the TCP.LISTEN initialization parameter is used.
4. If the TCP.LISTEN initialization parameter is not defined, the port number
defaults to 1364.
The PARSESS value for the SNODE is determined in the following order:
1. If the node name within a Process is defined in the network map, the PARSESS
value associated with the nodename entry is used.
2. If the node name within a Process is not defined in the network map, the
PARSESS value associated with the default entry is used.
3. If no PARSESS value is in the default entry, the PARSESS value defaults to (1,0).
A PARSESS value of (1,0) means that Processes to the nodes for which the
default entry is used are single-threaded.
Channel-to-Channel Support
Sterling Connect:Direct for z/OS provides channel-to-channel support for direct
channel links between z/OS platforms using the IBM ESCON CTCA or IBM 3088
CTCA support.
The syntax for creating a CTCA adjacent node follows.
Chapter 5. Maintaining the Network Map 121

ADJACENT.NODE=( -
(nodename, -
channel-range-start-addr, addr-count, CTCA,, -
SEND| RECV)) -
NETID=server name -
PARSESS=(max default) -
ENVIRONMENT=operating environment -
)
API Signons
The communication address used to establish a connection to Sterling
Connect:Direct is determined by the TRANSPORT parameter defined in the
SIGNON command. The default for the TRANSPORT parameter is NET
(NETMAP), which means that the protocol defined in the NETMAP adjacent node
entry is used.
Parameter Value Description
TRANSPORT =
NET
Default. When TRANSPORT is defined as NET, the signon process
retrieves the adjacent node entry to determine if the TCPAPI
parameter has been defined. If TCPAPI exists, then a TCP connection
is attempted using the communications address defined. The
communications port number is obtained from the TCPAPI parameter,
and if the IP address exists in the TCPAPI parameter, it is also used. If
the IP address does not exist in the TCPAPI parameter, it must be
obtained from either the adjacent node or the LDNS parameter.
If the TCPAPI does not exist, the APPLID parameter is retrieved, and
SNA is used as the protocol.
TRANSPORT =
SNA
When TRANSPORT is defined as SNA, the signon process retrieves
the adjacent node entry to determine the APPLID parameter, and
SNA is used as the protocol. If the APPLID parameter does not exist,
then an ESF SIGNON is performed.
TRANSPORT =
TCP
When the TRANSPORT is defined as TCP, the communications
address must be specified on the SIGNON command.
To initialize Sterling Connect:Direct without SNA support, refer to
Initializing Sterling Connect:Direct without SNA Support in the IBM
Sterling Connect:Direct for z/OS Configuration Guide.
Adjacent Node API Signon Definition Examples
To only allow SNA API signons:
/* PNODE=SNODE WITH SNA API SIGNON ONLY */
ADJACENT.NODE=(( CD.ZOS.NODE,M1DEV93C) PARSESS=(53 2) -
APPLIDS=(M1CDI701 M1CDI702 M1CDI703) -
)
To only allow TCP API signons using the IP address:
/* PNODE=SNODE WITH TCP API SIGNON ONLY USING IP ADDRESS */
ADJACENT.NODE=(( CD.ZOS.NODE,M1DEV93C) PARSESS=(53 2) -
TCPAPI=(4198,111.222.333.444) -
)
122 IBM Sterling Connect:Direct for z/OS: Administration Guide

To only allow TCP API signons using the LDNS parameter:
/* PNODE=SNODE WITH TCP API SIGNONON ONLY USING LDNS */
ADJACENT.NODE=(( CD.ZOS.NODE,M1DEV93C) PARSESS=(53 2) -
TCPAPI=(4198,) -
LDNS=long.domain.name -
)
To allow both SNA and TCP API signons:
/* PNODE=SNODE WITH BOTH SNA AND TCP API SIGNON */
ADJACENT.NODE=(( CD.ZOS.NODE,M1DEV93C) PARSESS=(53 2) -
TCPAPI=(4198,111.222.333.444) -
APPLIDS=(M1CDI701 M1CDI702 M1CDI703) -
)
or
/* PNODE=SNODE WITH BOTH SNA AND TCP API SIGNON */
ADJACENT.NODE=(( CD.ZOS.NODE,M1DEV93C) PARSESS=(53 2) -
TCPAPI=(4198,) -
LDNS=long.domain.name -
APPLIDS=(M1CDI701 M1CDI702 M1CDI703) -
)
Examples of Local and Adjacent Node Records
This section contains examples of local and adjacent node records for various
platforms.
Local Node and Corresponding Adjacent Node Record
The following is an example of a local node entry and its corresponding adjacent
node entry. Notice that the local and adjacent node names are the same
(CD.DALLAS), but the local and adjacent communications names (NDMAPP1 and
NDMAPP2) are different. The local node shows a superuser password of XYZZY.
LOCAL.NODE=((CD.DALLAS,NDMAPP1,,XYZZY) -
TCQ=(DSC.DALLAS.TCX DSC.DALLAS.TCQ))
/* */
/* THE FOLLOWING ENTRY IS FOR THE LOCAL NODE */
/* */
ADJACENT.NODE=(PARSESS=(12,2) (CD.DALLAS,NDMAPP2) -
APPLIDS=(NAI01 NAI02 NAI03 CDDD12 -
CDDD17 CDDD18 CDDD32 CDDD41 CDDD42))
The following is an example of a local node entry and its corresponding adjacent
node entry where TCPAPI is defined.
LOCAL.NODE=((CD.DALLAS,NDMAPP1,,XYZZY) -
TCQ=(DSC.DALLAS.TCX DSC.DALLAS.TCQ))
/* */
/* THE FOLLOWING ENTRY IS FOR THE LOCAL NODE WHERE TCPAPI IS DEFINED */
/* FOR USE BY Connect:Direct APIs TO SIGNON USING TCP/IP */
/* */
ADJACENT.NODE=(PARSESS=(12,2) (CD.DALLAS,NDMAPP2) -
TCPAPI=(1363,111.222.333.444) -
APPLIDS=(NAI01 NAI02 NAI03 CDDD12 -
CDDD17 CDDD18 CDDD32 CDDD41 CDDD42))
Chapter 5. Maintaining the Network Map 123

Alternate Communications Path Examples
The following examples show two different ways of using alternate
communications paths.
Specifying ALT.ADDR and ALT.NODEDEF
The following is an example of an adjacent node entry that has four alternate
communications paths that can be used if the main communication path specified
for the adjacent node (TCP/IP address of 199.1.4.1) cannot be used. Three of the
alternate communications paths are defined using the ALT.ADDR parameter while
one uses the ALT.NODEDEF parameter.
ADJACENT.NODE=((CD.NODE,1364,199.1.4.1,TCP) -
PARSESS=(6 2) -
ALT.COMM=((ALT.ADDR=1.1.1.2,ALT.TYPE=TCP), -
(ALT.ADDR=VTAMAPL1,ALT.TYPE=SNA), -
(ALT.NODEDEF=TEST.NODE), -
(ALT.ADDR=1.1.1.3,ALT.PORT=4374,ALT.TYPE=TCP)) -
)
Restarting Processes using an Alternate Communications Path
In the following example, the adjacent node in the previous example has been
redefined to allow an alternate communications path which only supports Version
2 flows. In this system, Sterling Connect:Direct is running on a machine with two
Network Interface Cards (NICs), which means that there are two IP addresses for
this machine. On the remote Sterling Connect:Direct system, both of these IP
addresses are included in the network map adjacent node entry for the original
Sterling Connect:Direct system.
In this example, assume a Process is started by the remote Sterling Connect:Direct
to this adjacent node with two NICs. The first path (TCP/IP address of
1364,199.1.4.1) is selected when the Process establishes its session. For some reason,
the NIC fails on the machine, and the Process fails and goes into retry.
If ALT.RESTART=NO (the default), this Process can never restart successfully
because it will always use the path used during initial session establishment (in
this case, the failed NIC). When ALT.RESTART=YES is specified, the Process will
try all ALT.COMM paths and will restart successfully because an additional path is
available (ALT.ADDR=1.1.1.3,ALT.PORT=4374). ALT.NODEDEF points to another
network entry and only uses the primary address for that node. Connection failure
using the primary address does not result in running that node's ALT.COMM
parameters (assuming it has any).
ADJACENT.NODE=((CD.NODE,1364,199.1.4.1,TCP) -
PARSESS=(6 2) -
ALT.COMM=(ALT.RESTART=YES,ALT.DIR=TOP,-
(ALT.ADDR=1.1.1.3,ALT.PORT=4374,ALT.TYPE=TCP)) -
)
Sterling Connect:Direct for z/OS Adjacent Node Examples
The following examples show how to define adjacent z/OS nodes.
124 IBM Sterling Connect:Direct for z/OS: Administration Guide

SNA LU0
The following example shows an adjacent z/OS node named CD.NYCZOS, with
the communications name (VTAM APPLID) of CDDD10. The APPLIDS parameter
indicates nine API sessions are possible.
ADJACENT.NODE=(PARSESS=(4,2) (CD.NYCZOS,CDDD10) -
APPLIDS=(CDAPI01 CDAPI02 CDAPI03 CDAPI04 -
CDAPI05 CDAPI06 CDAPI07 CDAPI08 CDAPI09))
CTCA
The following example shows an adjacent z/OS node named CD.DALLAS.ZOS1
which uses channel-to-channel adapter addresses E001-E008. The first address of
each pair is used for outbound traffic; the second address is used for inbound
traffic.
ADJACENT.NODE=(PARSESS=(4,1) -
ENVIRONMENT=ZOS -
(CD.DALLAS.ZOS1,E001,8,CTCA,,SEND))
In the network map entry of the adjacent node, an adjacent node entry for the
other side of the CTCA connection is in the following example. The z/OS node
named CD.DALLAS.ZOS2 uses channel-to-channel adapter addresses F001–F008.
The first address of each pair is used for inbound traffic. The second address of
each pair is used for outbound traffic.
ADJACENT.NODE=(PARSESS=(4,1) -
ENVIRONMENT=ZOS -
NETID=SERVER1 -
(CD.DALLAS.ZOS2,F001,8,CTCA,,RECV))
TCP/IP and UDT
The following example shows three adjacent node entries with session protocol
types of TCP/IP and UDT:
v The first, with a TCP/IP net name of ZOS.CD.CHICAGO, specifies the default
TCP/IP port number by leaving the communications name positional parameter
null.
v The second, with a TCP/IP net name of ZOS.CD.DALLAS, specifies a UDT port
number of 4444. The IP address will default to the node name, to be resolved by
domain name resolution.
v The third, with a TCP/IP net name of ZOS.CD.AUSTIN, specifies a TCP/IP port
number of 4443 and an IP address of 199.8.8.8.
v The fourth defines a TCPAPI to use port number 4442 and obtain the IP address
from the adjacent node record.
v The fifth defines the LDNS parameter.
Chapter 5. Maintaining the Network Map 125

ADJACENT.NODE=(PARSESS=(4,2) -
(ZOS.CD.CHICAGO,,199.1.4.51,TCP) -
ENVIRONMENT=ZOS)
ADJACENT.NODE=(PARSESS=(4,2) -
(ZOS.CD.DALLAS,4444,,UDT33) -
ENVIRONMENT=ZOS)
ADJACENT.NODE=(PARSESS=(4,2) -
(ZOS.CD.AUSTIN,4443,199.8.8.8,TCP) -
ENVIRONMENT=ZOS)
ADJACENT.NODE=(PARSESS=(4,2) -
(ZOS.CD.AUSTIN,4443,199.8.8.8,TCP) -
TCPAPI=(4442,) -
ENVIRONMENT=ZOS)
ADJACENT.NODE=(PARSESS=(4,2) -
(ZOS.CD.AUSTIN,4443, , TCP) -
LDNS=(TCP.AUSTIN.DOMAIN) -
TCPAPI=(4442, ) -
ENVIRONMENT=ZOS)
SNA LU6.2
The following example shows an adjacent node entry for a node named
CD.LAZOS with a communications name (APPLID) of APPLLAI and a session
protocol type of LU6.2. The operating environment of this adjacent node is z/OS,
and the VTAM logmode entry which defines the session protocol used when
communicating with this node is LU62MOD4. The LOGMODE parameter is
required for LU6.2.
ADJACENT.NODE=(PARSESS=(4,2) -
(CD.LAZOS,APPLLAI,,LU62) -
ENVIRONMENT=ZOS LOGMODE=LU62MOD4 -
APPLIDS=(CDDD2,CDDD3,CDDD4))
Trusted Node
The following example shows an adjacent node entry for a node named
SC.NODE.A with a security type of external (EXT) and data direction restriction of
SEND.
ADJACENT.NODE=(PARSESS=(4,2) -
(SC.NODE.A,NZOSD20,,,EXT,SEND) -
APPLIDS=(NZOSA36,NZOSA37,NZOSA38))
VM/ESA SNA LU0 Adjacent Node Example
The following example shows an adjacent node named CD.BOSTON.VM, with a
communications name (APPLID) of CDDD16.
ADJACENT.NODE=(PARSESS=(4,2) (CD.BOSTON.VM,CDDD16) -
APPLIDS=(CDAPI01 CDAPI02 CDAPI03 CDAPI04 -
CDAPI05 CDAPI06 CDAPI07 CDAPI08 CDAPI09))
VSE/ESA SNA LU0 Adjacent Node Example
The following example shows an adjacent node named CD.DALLAS.VSE, with a
communications name (APPLID) of CDDD22.
126 IBM Sterling Connect:Direct for z/OS: Administration Guide

ADJACENT.NODE=(PARSESS=(6,2) -
(CD.DALLAS.VSE,CDDD22) -
APPLIDS=(CDAPI01 CDAPI02 CDAPI03 CDAPI04 CDAPI05))
OpenVMS Adjacent Node Example
The following example shows an adjacent node named CD.DALLAS.VMS. The
SNODE.LUS parameter specifies the logical unit names used by the local node to
initiate a session with this remote node.
ADJACENT.NODE=((CD.DALLAS.VMS) -
PARSESS=(8,1) -
PNODE.LUS=(N91LU09 N91LU0A N91LU0B N91LU0C -
N91LU0D N91LU0E N91LU0F N91LU10) -
SNODE.LUS=(N91LU07 N91LU08))
Microsoft Windows Adjacent Node Example
The following example show how to define adjacent Microsoft Windows nodes.
ADJACENT.NODE=( -
(WIN.TCPIP.NODE,1364,123.4.5.67,TCP) -
PARSESS=(20,1) -
ENVIRONMENT=WINDOWS -
)
UNIX Adjacent Node Examples
The following examples show how to define adjacent UNIX nodes.
TCP/IP Adjacent Node Example
The following example shows two adjacent node entries with session protocol
types of TCP/IP:
v The first entry specifies the default TCP/IP port number by leaving the
communications name positional parameter null. The IP address will default to
the node name to be resolved by domain name resolution.
v The second entry specifies a TCP/IP port number of 5555 and an IP address of
199.5.5.5.
ADJACENT.NODE=(PARSESS=(6,2) -
(UNIX.CD.CHICAGO,,,TCP) -
ENVIRONMENT=UNIX)
ADJACENT.NODE=(PARSESS=(6,2) -
(UNIX.CD.DALLAS,5555,199.5.5.5,TCP) -
ENVIRONMENT=UNIX)
Notice that no APPLID or LOGMODE keywords are used for any TCP/IP node. A
warning is generated for any unneeded keyword or subparameter, and the coded
value is ignored.
LU6.2 Adjacent Node Example
The following example shows an adjacent UNIX node with a communications
name (APPLID) of D1UNIX and a session protocol type of LU6.2. The logmode
entry name is LU62MODE. The LOGMODE parameter is required for LU6.2.
Chapter 5. Maintaining the Network Map 127

ADJACENT.NODE=(PARSESS=(6,2) -
(UNIX.LU62.DALLAS,D1UNIX,,LU62) -
LOGMODE=LU62MODE -
ENVIRONMENT=UNIX)
Stratus VOS Adjacent Node Examples
The following examples show how to define adjacent Stratus VOS nodes.
TCP/IP
The following example shows an adjacent node entry with a session protocol type
of TCP/IP, a TCP net name of CD.STRAT, a TCP port number of 3333, and an IP
address of 199.1.1.11.
ADJACENT.NODE=(PARSESS=(12,1) -
(CD.STRAT,3333,199.1.1.11,TCP) -
ENVIRONMENT=STRATUS)
LU0
The following example shows an adjacent Stratus VOS node with a
communications name (APPLID) of M1T20404 and a session protocol type of LU0.
The logmode entry name is CDPCLU0. The LOGMODE parameter is optional for
LU0.
ADJACENT.NODE=(( CD.STRAT,M1T20404,,SNA) -
LOGMODE=CDPCLU0)
i5/OS Adjacent Node Examples
The following examples show how to define adjacent i5/OS nodes.
i5/OS SNUF
The following example shows an adjacent node named AS400.CD.TX with a
remote library name of LBNAME and session protocol type of LU0 (SNUF). The
SNODE.LUS parameter defines the dependent LU pool.
ADJACENT.NODE=(PARSESS=(4,2) -
(AS400.CD.TX,,LBNAME,SNUF) -
SNODE.LUS=(N11LU01,N11LU02,N11LU03,N11LU04))
LU6.2 with Independent LU
The following example shows an adjacent node named AS400.CD.LA with an
independent LU communications name of APPLLA1, a remote library name of
CDLIB1, a session protocol type of LU6.2, and a logmode entry name of
LU62MOD2. The ENVIRONMENT=OS400 parameter is required for i5/OS nodes
using the LU6.2 protocol. The LOGMODE parameter is required for the LU6.2
protocol.
ADJACENT.NODE=(PARSESS=(6,2) -
(AS400.CD.LA,APPLLA1,CDLIB1,LU62) -
ENVIRONMENT=OS400 LOGMODE=LU62MOD2)
128 IBM Sterling Connect:Direct for z/OS: Administration Guide

LU6.2 with Dependent LU
The following example shows an adjacent i5/OS node named AS400.CD.NY with a
remote library name of CDLIB1, a session protocol type of LU6.2, and a logmode
entry name of LU62MOD3. The SNODE=LUS parameter defines the dependent LU
pool. The ENVIRONMENT=OS400 parameter is required for i5/OS nodes using
the LU6.2 protocol. The LOGMODE parameter is required for the LU6.2 protocol.
ADJACENT.NODE=(PARSESS=(4,2) -
(AS400.CD.NY,,CDLIB1,LU62) -
ENVIRONMENT=OS400 LOGMODE=LU62MOD3 -
SNODE.LUS=(NYLU01,NYLU02,NYLU03,NYLU04))
TCP/IP
The following example shows an adjacent node entry with a node name of
OS400.TCP.NODE, session protocol type of TCP, a TCP port number of 1364, and
an IP address of 199.1.1.11.
ADJACENT.NODE=( -
(OS400.TCP.NODE,1364,199.1.1.11,TCP,INT,BOTH) -
CRC=DEFAULT -
PARSESS=(20,2))
How to Update the Network Map
The network map is created during installation, when the network map source is
input to the network map load program.
The network map source contains one local node entry and multiple adjacent node
entries. It can contain $$ACTION verbs added during previous maintenance.
You can update the network map source while Sterling Connect:Direct is not
executing or dynamically while Sterling Connect:Direct is executing.
Note: To test connectivity to an ADJACENT.NODE, use the DGAPHTBT Process
(see $CD.SDGASAMP). This Process makes a connection to the ADJACENT.NODE
and executes a RUN TASK at the local node. Be aware that the connection causes
both Sterling Connect:Direct nodes to search their TCQ files for Processes destined
for the other node.
Updating the Network Map while Sterling Connect:Direct is
Not Executing
About this task
You can update the network map using the network map source and the
DGAJLOAD JCL which loaded the source at initialization.
You can only update the local node by performing the following steps:
Procedure
1. Change the network map source. The network map source is loaded at
installation into $CD.SDGACNTL(NETMAP01)
2. Stop Sterling Connect:Direct.
Chapter 5. Maintaining the Network Map 129

3. Delete and redefine the network map. Refer to the JCL in
$CD.SDGAJCL(DGAJJDEF).
4. Reload the network map. Refer to the JCL in $CD.SDGAJCL(DGAJLOAD).
5. Restart Sterling Connect:Direct.
Updating the Network Map while Sterling Connect:Direct is
Running
You can update the network map without deleting and redefining it. In addition,
you can update the network map source without stopping Sterling Connect:Direct,
by using the UPDATE NETMAP command.
After updating the network map with UPDATE NETMAP, you can refresh the
network map for any Processes in the Wait queue with the Change Process
command. See the IBM Sterling Connect:Direct for z/OS User Guide for a description
of the Change Process command.
Note: Any changes to the CTCA definition do not take effect until Sterling
Connect:Direct is reinitialized.
As with most commands, you can execute the command through a batch job or
through the IUI. Both methods use $$ACTION verbs as part of the network map
source.
Note: This method of updating the network map is only available for adjacent
nodes.
The format of the UPDATE NETMAP command follows.
Label Command Parameters
(optional) UPDATE
NETMAP
WHERE (
NETINput= filename(member name)
NETLOG =[ddname | NONE]
)
DIS | PRT
Note: Reinitialize Sterling Connect:Direct before CTCA definition changes or
additions are effective.
130 IBM Sterling Connect:Direct for z/OS: Administration Guide

Required Parameter
WHERE is the only required parameter for the UPDATE NETMAP command.
Parameter Description
WHERE
(NETINput =
filename (member
name)
NETLOG =
[ddname | NONE] )
Network map source file and where the update activity is reported.
NETINput = filename (member name) specifies the name of the
network map source file. This file can be sequential or a PDS
member. The network map source can contain multiple basic action
verbs, multiple special purpose action verbs, or a combination of
both. The source that updates the network map can be the entire
network map source or a subset of it.
NETLOG = [ddname | NONE] specifies where the update activity is
reported.
ddname specifies the data definition name allocated to the Sterling
Connect:Direct DTF where the update activity is reported. The first
two characters of the ddname must be CD.
NONE specifies that no update activity is reported.
If the parameter is left blank the update activity is reported to the
CDLOG data set. Regardless of which option is selected the activity
is recorded in the Statistics file as WTO records.
Optional Parameter
Parameter Description
DIS | PRT Use the DIS or the PRT optional parameter to specify the output
destination.
DIS indicates that the activity is reported in display format, either to
the screen for IUI requests or to the DDNAME for batch requests.
PRT indicates that the output is routed to SYSOUT for batch requests
and to the print destination specified by the PRINT FILE
DESTINATION parameter in the signon defaults.
Using $$ACTION VERBS in the Network Map
Add $$ACTION verbs to the network map source as described in the description
of the NETINPUT parameter of the UPDATE NETMAP command. For more
information on the required parameter, NETINPUT, refer to “Updating the
Network Map while Sterling Connect:Direct is Running” on page 130. Each verb
defines the action to take for the node entry immediately following the action verb.
Three basic action verbs and three special purpose action verb pairs exist. The
following table describes the action verbs:
Action Verb Description
$$INSERT Inserts the following node entry into the network map.
Chapter 5. Maintaining the Network Map 131

Action Verb Description
$$UPDATE Updates the following existing network map node entry. Node entry
updates are performed as a replacement at the keyword level.
Therefore, updates of list-type keywords, like APPLIDS, require that
you specify the entire list.
Do not use $$UPDATE to update network map node entries which
already contain the LDNS parameter. Use $$DELETE and $$ INSERT to
change nodes which contain an LDNS parameter.
Note: You can use $$UPDATE to add the LDNS parameter to a node
which did not previously contain one.
$$REPLACE Replaces the present node entry with the one following the
$$REPLACE verb. This verb first does a $$DELETE and then a
$$INSERT. It can be used in place of $$UPDATE.
$$DELETE Deletes the following existing network map node entry.
$$SYNTAX and
$$ENDSYNTAX
Performs a syntax check of the network map control statements
following this verb.
$$VERIFY and
$$ENDVERIFY
Verifies that the node definitions following this verb match those in the
network map.
$$BLKxxxxxx and
$$ENDxxxxxx
Performs the basic action verb defined by xxxxxx for the block of node
entries following this verb. Replace xxxxxx with either INSERT,
UPDATE, or DELETE.
Updating the Netmap through the Batch Interface
About this task
To issue the UPDATE NETMAP command through the Sterling Connect:Direct
batch utility, follow this procedure.
Procedure
1. Change the network map source using the $$ACTION verbs.
2. Place the UPDATE NETMAP commands in the batch job stream.
3. Ensure that Sterling Connect:Direct is running.
4. Submit the job.
5. Correct any errors identified on the activity report and resubmit if necessary.
6. Verify the results.
Updating the Netmap through the IUI Interface
About this task
To issue the UPDATE NETMAP command through the Sterling Connect:Direct IUI,
perform the following steps.
Note: Updating the network map through the IUI can take significant time. For
mass updates, consider batch processing.
Procedure
1. To change or create a new member with your updates, change the network
map source to use the $$ACTION verbs.
2. Ensure that Sterling Connect:Direct is running.
132 IBM Sterling Connect:Direct for z/OS: Administration Guide

3. Access the Update network map screen by selecting option UNM from the
Administrative Options Menu.
node.name UPDATE NETWORK MAP hh:mm
CMD ==>
WARNING: THIS COMMAND CAN TAKE SIGNIFICANT TIME. FOR MASS
UPDATES, BATCH PROCESSING SHOULD BE CONSIDERED!
ENTER NETMAP INPUT FILE NAME:
==> ____________________________________________
ENTER MEMBER NAME: (OPTIONAL)
==> ________
ENTER DDNAME FOR LOG FILE OR "NONE": (DEFAULTS TO "CDLOG",
==> ________ FIRST TWO CHARACTERS MUST BE “CD”)
OUTPUT DESTINATION ==> DIS (DIS-DISPLAY,PRT-PRINT)
4. Type the network map source file name and appropriate optional parameters
and press ENTER. Unless you select PRINT on the Update NETMAP screen,
the report routes to your terminal.
5. Verify the results on the activity report.
6. Correct any errors identified on the activity report and re-type if necessary.
$$ACTION Verb Examples
The following are examples of updating the network map through the use of
action verbs.
$$INSERT Example
The following $$INSERT command inserts an adjacent node into the network map.
$$INSERT
ADJACENT.NODE=((CD.NODE2 APPLID2 ) -
PARSESS=(5,2) -
APPLIDS=(RAPPL1))
The output follows.
= = > * * * START NETMAP UPDATE * * *
= = > DATE: 02/27/2003 TIME=14:59:26
= = > SMUPNLGI NETLOG=NONE REQUIRED, LOGGING INACTIVE
==============================================================
*INSERT THE FOLLOWING NODE DEFINITION
$$INSERT
ADJACENT.NODE=(( CD.NODE2 APPLID2 ) -
PARSESS=(5,2) -
APPLIDS=(RAPPL1 ))
= = > SMUP032I APPLIDS RECORD INSERTED
= = > SMUP034I ADJACENT.NODE RECORD INSERTED
= = > SMUP008I REQUEST SUCCESSFUL FOR NODE=CD.NODE2
============================================================
The first message, SMUPNLGI, shows that logging is not requested; therefore,
Sterling Connect:Direct does not keep a record of the transaction (except in the
Chapter 5. Maintaining the Network Map 133

statistics file). The last messages indicate that the information for the specified
adjacent node was successfully inserted.
$$UPDATE Example
The following $$UPDATE command updates an adjacent node in the network map
by adding the RAPPL2 APPLID and changing the maximum parallel sessions to
four.
$$UPDATE
ADJACENT.NODE=(( CD.NODE2 APPLID2 ) -
PARSESS=(4,2) -
APPLIDS=(RAPPL1 RAPPL2 ))
The output follows.
= = > * * * START NETMAP UPDATE * * *
= = > DATE: 02/27/2003 TIME=14:59:26
= = > SMUPNLGI LOGGING ACTIVE - LOG DDNAME=CDLOG
===============================================================
*UPDATE THE FOLLOWING NODE DEFINITION ADDING RAPPL2
*CHANGING MAXIMUM PARALLEL SESSIONS TO FOUR (4).
$$UPDATE
ADJACENT.NODE=(( CD.NODE2 APPLID2 ) -
PARSESS=(4,2) -
APPLIDS=(RAPPL1 RAPPL2))
= = > SMUP032I APPLIDS RECORD UPDATED
= = > SMUP034I ADJACENT.NODE RECORD UPDATED
= = > SMUP008I REQUEST SUCCESSFUL FOR NODE=CD.NODE2
================================================================
The first message, SMUPNLGI, shows that logging is requested and that a record
of the transaction is recorded in CDLOG. The last messages indicate that the
adjacent node information was successfully updated.
$$REPLACE Example
The following $$REPLACE command deletes then inserts an adjacent node in the
network map.
$$REPLACE
ADJACENT.NODE=((CD.NODE2 APPLID2) -
PARSESS=(4,2) -
APPLIDS=(RAPPL1 RAPPL2))
The output follows.
134 IBM Sterling Connect:Direct for z/OS: Administration Guide

==> * * * S T A R T N E T M A P U P D A T E * * *
==> DATE: 04.02.2010 TIME=14:18:47
==> SMUPLOGI LOGGING ACTIVE - LOG DDNAME=CDLOG
======================================================================
$$REPLACE
ADJACENT.NODE=( -
(CD.NODE2,APPLID2) -
PARSESS=(6 2) -
APPLIDS=(RAPPL1 RAPPL2) -
)
==> SMUP034I ADJACENT.NODE record "DELETED ".
==> SMUP032I APPLIDS record "INSERTED".
==> SMUP034I ADJACENT.NODE record "INSERTED".
==> SMUP008I Request successful for Node=CD.NODE2
======================================================================
==> SMUP000I C:D Network Map processing completed.
==> DATE: 04.02.2010 TIME=14:18:47
==> * * * E N D N E T M A P U P D A T E * * *
$$DELETE Example
The following $$DELETE command deletes an adjacent node from the network
map.
$$DELETE
ADJACENT.NODE=((CD.NODE2 APPLID2) -
PARSESS=(4,2) -
APPLIDS=(RAPPL1 RAPPL2))
The output follows.
= = > * * * START NETMAP UPDATE * * *
= = > DATE: 02/27/2003 TIME=15:09:36
= = > SMUPNLGI NETLOG=NONE REQUIRED, LOGGING INACTIVE
=================================================================
$$DELETE
ADJACENT.NODE=((CD.NODE2 APPLID2) -
PARSESS=(4,2) -
APPLIDS=(RAPPL1 RAPPL2 ))
= = > SMUP032I APPLIDS RECORD DELETED
= = > SMUP034I ADJACENT.NODE RECORD DELETED
= = > SMUP008I REQUEST SUCCESSFUL FOR NODE=CD.NODE1
================================================================
The first message, SMUPNLGI, indicates that logging is not requested, so Sterling
Connect:Direct does not keep a record of the transaction. The last messages
indicate that the APPLIDs and adjacent node records are successfully deleted.
Chapter 5. Maintaining the Network Map 135

$$SYNTAX Example
The following $$SYNTAX command performs a syntax check on the specified
nodes.
$$SYNTAX
LOCAL.NODE=((CD.NODE1 APPLID1 ,, SUPERUSR) -
TCQ=( TCQ TCX ))
ADJACENT.NODE=((CD.NODE1 APPLID1) -
PARSESS=(5,2) -
APPLIDS=(LAPPL1 LAPPL2 LAPPL3))
ADJACENT.NODE=((CD.NODE2 APPLID2) -
PARSESS=(5,2) -
APPLIDS=(RAPPL1 ))
$$ENDSYNTAX
The output follows. The messages are numbered in the example for clarification;
they are not numbered on the actual output.
= = > * * * START NETMAP UPDATE * * *
= = > DATE: 02/27/2003 TIME=13:49:16
(1) = = > SMUPNLGI NETLOG=NONE REQUIRED, LOGGING INACTIVE
=====================================================================
$$SYNTAX
(2) = = > SMUP011I ’SYNTAX ’ ACTION STARTED
=====================================================================
LOCAL.NODE=(( CD.NODE1 APPLID1 ,, SUPERUSR) -
TCQ=( TCQ TCX ))
(3) = = > SMUP005I LOCAL.NODE RECORD PROCESSING NOT ALLOWED
BYPASSED
=====================================================================
ADJACENT.NODE=(( CD.NODE1 APPLID1 ) -
PARSESS=(5,2) -
APPLIDS=(LAPPL1 LAPPL2 LAPPL3))
(4) = = > SMUP008I REQUEST SUCCESSFUL FOR NODE=CD.NODE1
=====================================================================
ADJACENT.NODE=(( CD.NODE2 APPLID2 ) -
PARSESS=(5,2) -
APPLIDS=(RAPPL1))
(4) = = > SMUP008I REQUEST SUCCESSFUL FOR NODE=CD.NODE2
=====================================================================
$$ENDSYNTAX
(5) = = > SMUP012I ’SYNTAX ’ ACTION STOPPED
=====================================================================
The numbers in parentheses indicate:
1. Logging is not requested; therefore, no record is kept of the transaction.
2. Syntax check of network map control statements starts.
3. No processing is allowed against the local node record.
4. Requests for syntax checking on nodes are successful.
5. Syntax checking completes.
$$VERIFY Example
The following $$VERIFY command verifies the definition of the specified adjacent
node record prior to updating the network map.
136 IBM Sterling Connect:Direct for z/OS: Administration Guide

$$VERIFY
ADJACENT.NODE=((CD.NODE2 APPLID2) -
PARSESS=(5,2) -
APPLIDS=(RAPPL1))
$$ENDVERIFY
The output follows. The messages are numbered in the example for clarification;
they are not numbered on the actual output.
= = > * * * START NETMAP UPDATE * * *
= = > DATE: 02/27/2003 TIME=15:35:16
(1) = = > SMUPNLGI NETLOG=NONE REQUIRED, LOGGING INACTIVE
=====================================================================
$$VERIFY
(2) = = > SMUP011I ’VERIFY ’ ACTION STARTED
=====================================================================
ADJACENT.NODE=(( CD.NODE2 APPLID2 ) -
PARSESS=(5,2) -
APPLIDS=(RAPPL1 ))
(3) = = > SMUP092I APPLIDS RECORD DID NOT MATCH
= = > SMUP094I ADJACENT.NODE RECORD DID NOT MATCH
= = > SMUP096I RECORDS DO NOT MATCH - VERIFICATION FAILED
FOR NODE
=CD.NODE2
=====================================================================
$$ENDVERIFY
(4) = = > SMUP012I ’VERIFY ’ ACTION STOPPED
=====================================================================
The number in parentheses indicate the following steps:
1. Logging is not requested; therefore, no record is kept of the transaction.
2. Verification of the node definition to the network map file has started.
3. The APPLIDs and adjacent node records did not match the network map file
definitions.
4. Verification is complete.
Viewing the Network Map
You can view the network map online through the IUI interface or view the
contents of the network map by unloading the network map VSAM file source.
Viewing the Netmap through the IUI Interface
To view the network map using the Sterling Connect:Direct IUI, select option NM
from the Primary Options Menu to display the SELECT NETMAP OR TCP
INFORMATION screen. For more information, see The Network Map in the IBM
Sterling Connect:Direct for z/OS User Guide.
Unloading the Network Map to the Source Format
Sterling Connect:Direct provides a utility to unload the network map to its source
format. You can then view the source format to see network map settings. This
utility is provided in the DGAJUNLD member in the $CD.SDGAJCL data set.
Chapter 5. Maintaining the Network Map 137

To unload the network map, submit the DGAJUNLD member. You can unload the
network map while Sterling Connect:Direct is running.
An example of the JCL follows.
//STEP EXEC PGM=DGADNTLD,PARM=’UNLOAD’
//NETMAP DD DSN=NETMAP.DATASET,DISP=SHR
//UNLOAD DD DSN=NETMAP.UNLOAD,DISP=(NEW,CATLG),
// DCB=(DSORG=PS,RECFM=FB,BLKSIZE=0,LRECL=80),
// UNIT=SYSDA,SPACE=(TRK,(4,2,))
The network map source is unloaded to the data set specified in the JCL.
138 IBM Sterling Connect:Direct for z/OS: Administration Guide

Chapter 6. Configuring a Sterling Connect:Direct/Plex
Environment
Sterling Connect:Direct runs in two configurations:
v Sterling Connect:Direct Stand-alone Server, which is a single Sterling
Connect:Direct system operating within an IBM z/OS environment.
v Sterling Connect:Direct/Plex, which is a Sterling Connect:Direct system
operating in an IBM z/OS sysplex or parallel sysplex environment consisting of
a Sterling Connect:Direct Manager and one or more Sterling Connect:Direct
Servers.
Differences Between Stand-Alone and Plex Environments
A Sterling Connect:Direct Stand-alone Server and a Sterling Connect:Direct/Plex
environment have the following configuration differences:
v Initialization parameters
The two sets of initialization parameters in Sterling Connect:Direct are global
and local.
A Sterling Connect:Direct Stand-alone Server uses only global initialization
parameters to set system-wide values, as shown in the following illustration.
A Sterling Connect:Direct/Plex environment uses both global and local
initialization parameters. Global initialization parameters apply to each member
of the Sterling Connect:Direct/Plex environment. Local initialization parameters
apply to specific members of the Sterling Connect:Direct/Plex environment and
can override some global initialization parameters affecting that member. Each
Sterling Connect:Direct/Plex member must have its own local initialization
parameter member with the parameter, “CDPLEX.MANAGER = NO | YES” on
page 386, as the first statement in the member.
Note: You can save a copy of a local initialization parameters member to have as a
backup in case Sterling Connect:Direct cannot start up successfully after initparm
updates have been applied. Specify the name of the backup file using the local
initialization parameter, CDPLEX.INITPARM.BACKUP = member. Be sure to
specify this parameter for each Sterling Connect:Direct/Plex member.
If an update of the global and local initialization parameter files is performed
using Sterling Control Center and fails during the process, Sterling Connect:Direct
will use the backup members to restore the parameters. Sterling Connect:Direct
© Copyright IBM Corp. 1999, 2015 139

will never use the backup members to initialize the DTF unless you explictily
instruct the system to do so by updating the JCL to use the backup members as the
initparm members.
Global initialization parameters are stored in a file shared by all Sterling
Connect:Direct/Plex members. In the EXEC statement (Sterling Connect:Direct
Stand-alone Server and Sterling Connect:Direct/Plex), the PARM= keyword
specifies the name and location of the global initialization parameters file.
The local initialization parameters of each Sterling Connect:Direct/Plex member are
stored in a unique PDS member for each system (one for the Plex Manager and
one for each server). The location of the local initialization parameters file is
specified by the //CDPLEX DD in the startup JCL of each member.
In a Sterling Connect:Direct/Plex environment, you can override only the
initialization parameters allowed in the local initialization parameters member by
using the PARM= keyword in the EXEC statement at system startup.
In a Sterling Connect:Direct Stand-alone Server environment, however, you can
override global initialization parameters with the PARM= keyword in the EXEC
statement.
The following illustration shows how global and local initialization parameters are
used in a Sterling Connect:Direct/Plex environment.
v VTAM APPLIDs
A Sterling Connect:Direct Stand-alone Server obtains its VTAM APPLIDs from
the network map.
In a Sterling Connect:Direct/Plex environment, the Sterling Connect:Direct/
Manager obtains its VTAM APPLIDs from the network map, but each Sterling
Connect:Direct Server obtains its VTAM APPLIDs from its local initialization
parameters file.
v TCP/IP addresses and ports
A Sterling Connect:Direct Stand-alone Server obtains its TCP/IP listen ports
from the global initialization parameters file.
In a Sterling Connect:Direct/Plex environment, the Sterling Connect:Direct
Manager and Sterling Connect:Direct Servers obtain their TCP/IP addresses and
listen port numbers from their local initialization parameters members. However,
if the TCP port number is not specified in the local initialization parameters
140 IBM Sterling Connect:Direct for z/OS: Administration Guide
member of the Sterling Connect:Direct Manager, the Sterling Connect:Direct
Manager obtains its listen port number from the global initialization parameters
member.
Each server overrides the global initialization parameters by specifying those
parameters in that server's local initialization parameters. The first address
defined in the parameter becomes the local or default address. For more
information about defining TCP/IP listening tasks, see TCP/IP Port Number.
The CDPLEX.REDIRECT local initialization parameter is used by the Sterling
Connect:Direct/Plex Manager in the Sterling Connect:Direct/Plex environment
to determine the redirection address that is presented to the remote node. This
parameter allows you to specify redirection addresses based on the security
node type (internal or external) and session type (TCP/IP or UDT) of the
adjacent node in the network map.
When an address is specified, an internal address and external address is
defined and each can have a specified redirection port defined. When the
adjacent node entry is defined with the INT flag, the appropriate internal
address is returned. Conversely, when the EXT flag is defined, the appropriate
external address is returned.
Note: If your environment requires additional external redirection addresses to
enable a remote Sterling Connect:Direct server to run Processes, see the local
initialization parameter, CDPLEX.REDIRECT.EXCEPTION = ((Mgr-IP, Ext_Svr-IP,
Ext_Svr-port, Exception-IP, Exception-port),...).
Up to eight different addresses or ports can be defined for each server. However,
in the Sterling Connect:Direct/Plex server that defines CDPLEX.REDIRECT only
two are effectively used when Process redirection occurs. To use the additional
port in the Sterling Connect:Direct/Plex servers, those servers must be contacted
directly by the remote node.
Note: A special consideration exists if the Sterling Connect:Direct/Plex Manager
is initialized on a system that is not IPv6 enabled, and one or more of the
servers supports IPv6. When the Sterling Connect:Direct/Plex is the SNODE, the
Sterling Connect:Direct/Plex Manager accepts connection requests for IPv4 only.
However, if the Sterling Connect:Direct/Plex is the PNODE, the Sterling
Connect:Direct/Plex Manager can assign outbound processes to a Sterling
Connect:Direct Server that supports IPv6.
v System files
In a Sterling Connect:Direct Stand-alone Server, the system files (network map,
Statistics Pairs, CKPT, AUTH, Message, TCQ and TCX files) are stored in one
location and apply to the entire DTF. If two Sterling Connect:Direct Stand-alone
Server systems operate in a sysplex environment, each system must have its
own system files.
In a Sterling Connect:Direct/Plex environment, the system files are also stored in
one location and are shared by all Sterling Connect:Direct/Plex members, as in
the earlier illustration. Only one set of system files is needed for all Sterling
Connect:Direct/Plex members.
Note: In a Sterling Connect:Direct/Plex environment, the LU6.2 connection
protocol does not enable the Sterling Connect:Direct Manager to redirect work to
one of its servers. The remote node must address the server on which you want
to run an LU6.2 Process. To do this, specify the node name and VTAM address
of the Sterling Connect:Direct Server on which the Process is to run in the
remote server's network map. Use the same CDPLEX.SERVER.NODE and
Chapter 6. Configuring a Sterling Connect:Direct/Plex Environment 141

CDPLEX.VTAM specified for the local initialization parameters for the Sterling
Connect:Direct Server you are trying to address.
Another stipulation related to the LU6.2 protocol involves a situation where one
of the Sterling Connect:Direct servers in a Sterling Connect:Direct/Plex
environment is communicating with a stand-alone Sterling Connect:Direct DTF.
In this case, all LU62 processes for this specific node must be directed to the
same server and you can use a PLEXCLASS to accomplish this.
A New Sterling Connect:Direct/Plex Environment
Use this setup for a new installation. The setup in this section assumes the
following:
v You have installed and started a single Sterling Connect:Direct DTF.
v You are changing a Sterling Connect:Direct Stand-alone Server into a Sterling
Connect:Direct/Plex environment with three members: the Sterling
Connect:Direct Manager and two Sterling Connect:Direct Servers. The Sterling
Connect:Direct Servers are named SERVER1 and SERVER2. SERVER1 has tape
drive access for copy Processes requiring tapes.
v The global and local initialization parameters files are located in
$CD.PLEX.INITPARM (a PDS, not a PDSE, that you have built). The JCL to
bring up the Sterling Connect:Direct/Plex environment is located in
$CD.PLEX.JCL. You can either allocate these data sets or use existing data sets in
their place. Do not use Sterling Connect:Direct's SMP/E target PDSes for these
data sets.
Setting Up a New Sterling Connect:Direct/Plex Environment
To set up a Sterling Connect:Direct/Plex environment:
Procedure
1. Create a PDS (which will be referred to as $CD.PLEX.INITPARM in this
procedure) to hold the initialization parameters for the Sterling Connect:Direct
Plex environment, with sufficient directory space to handle ISPF Statistics.
Create a PDS (which will be referred to as $CD.PLEX.JCL) to hold the JCL.
2. Copy your current DTF's INITPARM member into $CD.PLEX.INITPARM as
member CDPLX.
3. Copy your current Sterling Connect:Direct Stand-alone Server startup JCL into
$CD.PLEX.JCL as member CDMGR.
4. Add the following initialization parameters to the CDPLX member in
$CD.PLEX.INITPARM. This member becomes the Sterling Connect:Direct/Plex
global initialization parameters file.
CDPLEX=YES
CDPLEX.MAXSERVER = number of servers | 4
XCF.NAME=8-char-name
The CDPLEX=YES parameter indicates a Sterling Connect:Direct/Plex
environment. It also directs the DTF to read its local initialization parameters
from the file specified in the //CDPLEX DD statement in the startup JCL.
The CDPLEX.MAXSERVER parameter specifies the maximum number of
servers the Connect:Direct/Plex Manager will manage. For more information,
see Storage Requirements in a Sterling Connect:Direct Environment in the IBM
Sterling Connect:Direct for z/OS Configuration Guide.
142 IBM Sterling Connect:Direct for z/OS: Administration Guide

The XCF.NAME parameter specifies a unique name used by the z/OS Cross
Systems Communication Facility (XCF) to assist communications among
Sterling Connect:Direct/Plex members. This name indicates that the Sterling
Connect:Direct Manager and Sterling Connect:Direct Servers are part of the
same XCF group.
5. Add the following optional parameters to the CDPLX member in
$CD.PLEX.INITPARM.
v CDPLEX.TIMER specifies the time-out value for XCF communications in
minutes.
v CDPLEX.WLM.GOAL specifies whether IBM Workload Manager (WLM)
Goal Mode queries are made. This parameter is optional.
6. Create a local initialization parameters file for the Sterling Connect:Direct
Manager:
a. Copy the MANAGER sample local initialization parameters member from
the Sterling Connect:Direct installation $CD.SDGAPARM(DGAIPMGR) into
$CD.PLEX.INITPARM.
b. Change the TCP.LISTEN parameter of the MANAGER member to specify
the TCP/IP stack address used by the Sterling Connect:Direct Manager.
CDPLEX.MANAGER=YES
TCP.LISTEN=(nnn.nnn.nnn.nnn,port)
CDPLEX.SERVER.JOBDSN=$CD.PLEX.JCL
CDPLEX.SERVER.JOBMEM=((CDSRV1,SERVER1), -
(CDSRV2,SERVER2))
7. Create a local initialization parameters file for Sterling Connect:Direct
SERVER1:
a. Copy the sample local initialization member
$CD.SDGAPARM(DGAISRV1), into $CD.PLEX.INITPARM as member
SERVER1.
b. Change the CDPLEX.VTAM parameter in the SERVER1 member as
follows:
v Replace the applid11 value with the VTAM APPLID used by this
Sterling Connect:Direct Server for SNA (Node to Node/PROCESS use,
as opposed to API use).
v Replace the applid12 value with the PNODE-SNODE APPLID.
These APPLIDs must be unique across the Sterling Connect:Direct/Plex
environment and cannot be the same as those specified in the network
map.
CDPLEX.MANAGER=NO
CDPLEX.SERVER=SERVER1
CDPLEX.VTAM=(applid11,applid12)
CDPLEX.PLEXCLASSES=(TAPE,*)
TCP.LISTEN=(nnn.nnn.nnn.nnn,port)
UDT33.LISTEN=(nnn.nnn.nnn.nnn,port)
The TCP.LISTEN and UDT33.LISTEN initialization parameters specify
the TCP and UDT listen address and port number combinations. Use a
different listen port number than the one used in the existing
initialization parameters file.
Note: The CDPLEX.PLEXCLASSES parameter in SERVER1 specifies a
‘TAPE' PLEXCLASS. For Processes that require tape drives, specify the
‘TAPE' PLEXCLASS in their Process definitions. These Processes run on
Chapter 6. Configuring a Sterling Connect:Direct/Plex Environment 143

SERVER1. (See the chapters about building Processes and controlling
Processes in the TCQ in IBM Sterling Connect:Direct for z/OS User Guide for
more information on using PLEXCLASS in a Process.)
8. Create a local initialization parameters file for Sterling Connect:Direct
SERVER2:
a. Copy the sample local initialization member
$CD.SDGAPARM(DGAISRV2), into $CD.PLEX.INITPARM as member
SERVER2.
b. Change the CDPLEX.VTAM parameter in the SERVER2 member as
follows:
v Replace the applid21 value with the VTAM APPLID used by this
Sterling Connect:Direct Server for SNA copy Processes.
v Replace the applid22 value with the PNODE-SNODE APPLID.
These APPLIDs must be unique across the Sterling Connect:Direct/Plex
environment and cannot be the same as those specified in the network
map.
CDPLEX.MANAGER=NO
CDPLEX.SERVER=SERVER2
CDPLEX.VTAM=(applid21,applid22)
CDPLEX.PLEXCLASSES=(*)
TCP.LISTEN=(nnn.nnn.nnn.nnn,port)
UDT33.LISTEN=(nnn.nnn.nnn.nnn,port)
9. Add the CDPLEX DD statement in the following example to the CDMGR
member in $CD.PLEX.JCL.
This statement directs the startup JCL to the global initialization parameters
file.
//DTF EXEC DGADINIT,
// PARM=’$CD.PLEX.INITPARM(CDPLX)’
//CDPLEX DD DISP=SHR,DSN=$CD.PLEX.INITPARM(MANAGER)
10. Create CDSRV1 in $CD.PLEX.JCL and copy the CDMGR member into it.
11. Make the following changes to the CDSRV1 member:
a. Change the job name so that this job can run simultaneously with the
CDMGR JCL.
b. Change the member name in the CDPLEX DD statement to SERVER1, as
follows. This change directs the CDSRV1 JCL to its local initialization
parameters file.
//CDPLEX DD DISP=SHR,DSN=$CD.PLEX.INITPARM(SERVER1)
12. Create a CDSRV2 member and copy CDSRV1 into it.
13. Make the following changes to the CDSRV2 member:
a. Change the job name so that this job can run simultaneously with the
CDMGR JCL and CDSRV1 JCL.
b. Change the member name in the CDPLEX DD statement to SERVER2, as
follows. This change directs the CDSRV2 JCL to its local initialization
parameters file.
//CDPLEX DD DISP=SHR,DSN=$CD.PLEX.INITPARM(SERVER2)
144 IBM Sterling Connect:Direct for z/OS: Administration Guide

Note: Route jobs to a different z/OS image by specifying the local node
name of the other system in an XEQ statement in the Sterling
Connect:Direct Manager or Server startup JCL, as follows:
/*XEQ njenode
[JES2]
//*ROUTE XEQ njenode [JES3]
This example routes the job to the z/OS image identified by the local node
name NJENODE.
14. Submit the CDMGR JCL to bring up the Sterling Connect:Direct/Plex server.
After the Sterling Connect:Direct Manager initializes, it submits the CDSRV1
JCL and CDSRV2 JCL to bring up the two Sterling Connect:Direct Servers.
15. After Sterling Connect:Direct Manager initializes, use the IUI to signon.
You can then submit Processes and perform other functions through the IUI.
Advanced Sterling Connect:Direct:/Plex Configuration Considerations
Examples of complex configurations include:
v Converting an Existing Stand-Alone Server to a Plex Environment
v Converting Two Existing Stand-Alone Server Systems to a Plex Environment
Before attempting a complex configuration, be aware of the following issues.
Sterling Connect:Direct/Plex System File Considerations
All Sterling Connect:Direct:/Plex members share a single set of Sterling
Connect:Direct system files. If you combine multiple existing Sterling
Connect:Direct systems into one Sterling Connect:Direct/Plex environment, you
may need to merge some Sterling Connect:Direct system files from the individual
systems.
Do not merge system files that are listed in the following table.
File Comment
CKPT file You cannot merge the CKPT files from multiple Sterling Connect:Direct
images. You must either:
v Define a new CKPT file using the DGAXCKPD JCL in the
$CD.SDGASAMP library, or
v Use the CKPT file from one of the existing Sterling Connect:Direct systems.
However, the existing CKPT file size may not be sufficient for a Sterling
Connect:Direct/Plex environment.
Message
file
You can use any existing Sterling Connect:Direct Message file. You do not
need to combine Message files from the individual Sterling Connect:Direct
systems.
Statistics
files
You cannot merge statistics files from multiple Sterling Connect:Direct images.
You can reference them using a Sterling Connect:Direct/Plex environment as
archived statistic files. You can create new statistics file pairs by using the
DGAXSTAD JCL in the $CD.SDGASAMP library.
Chapter 6. Configuring a Sterling Connect:Direct/Plex Environment 145

File Comment
TCQ and
TCX files
You cannot merge TCQ and TCX files from multiple Sterling Connect:Direct
images. You must either:
v Define new TCQ and TCX files using the DGAXTCQD JCL in the
$CD.SDGASAMP library, or
v Use the TCQ and TCX files from one of the existing Sterling Connect:Direct
systems. However, the existing TCQ and TCX file sizes may not be
sufficient for a Sterling Connect:Direct/Plex environment.
The following table lists system files that you need to merge.
File Comment
AUTH file If unique entries exist in the existing Sterling Connect:Direct systems' AUTH
files:
1. Define a new AUTH file using the DGAXAUTD JCL found in the
$CD.SDGASAMP library.
2. Copy the existing AUTH files into the new AUTH file using the
DGAXAUTC JCL found in the $CD.SDGASAMP library.
PLEXAUTC is an IDCAMS REPRO that specifies NOREPLACE. If any
duplicate records exist, only the first one is saved.
If unique entries do not exist, use one of the existing AUTH files.
NETMAP
file
You need to create a new network map source file.
The new network map source file uses information from the existing systems'
network maps. (If the existing Sterling Connect:Direct systems' network map
source is not available, create the source files by performing network map
unloads for the existing systems' network map files. See Unloading the
Network Map to the Source Format for more information.)
To create a new network map source file:
1. Copy the network map source from an existing Sterling Connect:Direct
system as NETMAPLX.
2. Copy the remote definitions from all other existing network map source
files into NETMAPLX.
3. Remove all duplicate entries.
4. Define the new network map file using the DGAXNETD JCL found in the
$CD.SDGASAMP library.
5. Load the new network map file using the DGAXNETL JCL found in the
$CD.SDGASAMP library.
6. Check the output from network map load and correct any errors.
7. Rerun the network map load if necessary.
TYPE file If unique entries exist in the existing Sterling Connect:Direct systems' TYPE
files:
1. Define a new TYPE file using the DGAXTYPD JCL found in the
$CD.SDGASAMP library.
2. Copy the existing TYPE files into the new TYPE file using the DGAXTYPC
JCL found in the $CD.SDGASAMP library.
The PLEXTYPC is an IDCAMS REPRO that specifies NOREPLACE. If any
duplicate records exist, only the first one is saved.
If unique entries do not exist, use one of the existing TYPE files.
146 IBM Sterling Connect:Direct for z/OS: Administration Guide
Local Node Naming Considerations
The network map contains the local node name for the Sterling
Connect:Direct/Plex environment. The node name used in the network map varies
according to the type of configuration:
v Installing a new Sterling Connect:Direct/Plex environment
If you are installing a new Sterling Connect:Direct/Plex environment, you must
create a new local node name. You must provide the new node name, along
with the APPLID and/or TCP/IP address and port number to all Sterling
Connect:Direct partner nodes. The partner Nodes must provide you the same
information for use in your local network map.
v Replacing an existing Sterling Connect:Direct system with a Sterling
Connect:Direct/Plex environment
If you are replacing an existing Sterling Connect:Direct system with a Sterling
Connect:Direct/Plex environment, use the existing system node name as the
Sterling Connect:Direct/Plex local node name, you must provide new APPLIDs
for the Sterling Connect:Direct Manager. One Sterling Connect:Direct Server uses
the existing APPLIDs in its local initialization parameters. Any additional servers
require new APPLIDs.
v Replacing multiple existing Sterling Connect:Direct systems with a Sterling
Connect:Direct/Plex environment
If you are replacing multiple Sterling Connect:Direct systems with a Sterling
Connect:Direct/Plex environment, create a new local node name for the Sterling
Connect:Direct/Plex. Use the existing node names in the
CDPLEX.SERVER.NODE initialization parameter of the Sterling Connect:Direct
Server. All adjacent node entries in the network map must include
USE.SERVER.NODE=YES. You must provide new APPLIDs for the Sterling
Connect:Direct Manager. Each Sterling Connect:Direct Server uses the existing
APPLID from its corresponding Sterling Connect:Direct Stand-alone Server
image in its local initialization parameters.
Refer to the setup procedure in “Converting Two Existing Stand-Alone Server
Systems to a Plex Environment” on page 152 for more details.
Strategies for Communicating with Non-Plex Servers
A Sterling Connect:Direct/Plex environment can perform workload balancing
among the Sterling Connect:Direct Servers. However, if the Sterling
Connect:Direct/Plex environment communicates with an external non-Sterling
Connect:Direct/Plex system, the other Sterling Connect:Direct system may have
problems with Processes from the same Sterling Connect:Direct adjacent node, but
with a different VTAM APPLID or TCP/IP address than specified in their network
map.
Sterling Connect:Direct/Plex offers three ways of avoiding this problem.
Using Alternate Communication Paths to Define the Sterling
Connect:Direct/Plex
The advantages to this approach are you only have to define one entity, the
Sterling Connect:Direct/Plex, and then copy that same definition to the network
maps of the non-Plex Servers and you can still use the NETMAP-checking feature.
About this task
To define a Sterling Connect:Direct/Plex that has servers running on several hosts,
you can use the ALT.COMM parameter in the network map of each non-Plex
Chapter 6. Configuring a Sterling Connect:Direct/Plex Environment 147

Server that will communicate with the Sterling Connect:Direct/Plex.
Procedure
1. Specify USE.SERVER.NODE=NO in the Sterling Connect:Direct/Plex network
map entry of each non-Plex Server so that all servers in the Sterling
Connect:Direct/Plex environment appear as one node.
2. Define the Sterling Connect:Direct/Plex node as an adjacent node with all
possible IP addresses of the hosts that the Manager can run on specified using
the ALT.COMM definition.
The following is an example of the ALT.COMM parameter:
ADJACENT.NODE=( -
(CDMGR,1366,10.1.1.1,TCP,EXT,BOTH) -
ENVIRONMENT=ZOS -
PARSESS=(00000010 00000002) -
ALT.COMM=(ALT.DIR=TOP -
(ALT.ADDR=10.1.1.2,ALT.PORT=1366,-
ALT.TYPE=TCP , ALT.USE.OUT=NO )
(ALT.ADDR=10.1.1.3,ALT.PORT=1366,-
ALT.TYPE=TCP , ALT.USE.OUT=NO )
(ALT.ADDR=10.1.1.4,ALT.PORT=1366,-
ALT.TYPE=TCP , ALT.USE.OUT=NO )) -
3. Copy this ALT.COMM definition and put it in the network map of each
non-Plex Server that will communicate with the Sterling Connect:Direct/Plex.
Forcing All Processes to One Sterling Connect:Direct Server
This approach does not take advantage of Sterling Connect:Direct/Plex workload
balancing. To direct all Processes between the Sterling Connect:Direct/Plex
environment and the external Sterling Connect:Direct to one Sterling
Connect:Direct Server, follow this procedure.
Procedure
1. Specify a default PLEXCLASS parameter in the Sterling Connect:Direct/Plex
network map adjacent node entry for the external Sterling Connect:Direct
system.
2. Specify that PLEXCLASS parameter in only one local initialization parameter of
the Sterling Connect:Direct Server.
3. Specify the VTAM APPLID or TCP/IP address of the specific Sterling
Connect:Direct Server all Processes are being forced to in the network map of
the external non-Plex Sterling Connect:Direct system.
Define a Unique Node Name for Each Sterling Connect:Direct
Server
By defining a node name for each Sterling Connect:Direct Server, the Sterling
Connect:Direct/Plex environment can initiate Processes to the external Sterling
Connect:Direct system through any available Sterling Connect:Direct/Plex server.
For each Sterling Connect:Direct server, you must define a USE.SERVER.NODE
network map parameter and a CDPLEX.SERVER.NODE initialization parameter.
To avoid making your Sterling Connect:Direct/Plex configuration more complex
than necessary, use the USE.SERVER.NODE and CDPLEX.SERVER.NODE
parameters only if your system meets all of the following conditions:
v The external Sterling Connect:Direct system must connect to two or more
Sterling Connect:Direct Servers in the Sterling Connect:Direct/Plex environment.
v The external Sterling Connect:Direct system uses network map checking.
148 IBM Sterling Connect:Direct for z/OS: Administration Guide

v The external Sterling Connect:Direct system has non-Plex servers, which cannot
communicate directly with the Sterling Connect:Direct Manager.
The disadvantages of this approach are you must manually direct Processes
initiated by the external Sterling Connect:Direct system to each Sterling
Connect:Direct Server and you may need to create additional network map entries
for remote systems.
Converting an Existing Stand-Alone Server to a Plex Environment
You can convert an existing production Sterling Connect:Direct Stand-alone Server
into a Sterling Connect:Direct/Plex environment with two servers. This
configuration takes advantage of the Sterling Connect:Direct/Plex single image and
workload balancing capability for Processes initiated by this Sterling
Connect:Direct/Plex environment. This configuration also supports external
Sterling Connect:Direct systems without requiring any changes to the external
systems.
The following illustration shows how the network map and initialization
parameter values from the existing stand-alone Sterling Connect:Direct system map
to the new Sterling Connect:Direct/Plex environment for this configuration.
The setup example assumes the following:
v You are currently running a production Sterling Connect:Direct Stand-alone
Server.
v The global and local initialization parameter files for the Sterling
Connect:Direct/Plex environment are located in $CD.PLEX.INITPARM (a PDS
that you set up for this purpose). The JCL to bring up the Sterling
Connect:Direct/Plex environment is located in $CD.PLEX.JCL (a PDS that you
set up for this purpose).
You can either allocate these data sets or use existing data sets in their place.
v The Sterling Connect:Direct/Plex environment identifies itself to external
systems with the same node name as the production Sterling Connect:Direct
Stand-alone Server.
Converting an Existing Production Server to a Plex
Environment
To convert an existing production Sterling Connect:Direct Stand-alone Server into a
Sterling Connect:Direct/Plex environment:
Chapter 6. Configuring a Sterling Connect:Direct/Plex Environment 149

Procedure
1. Copy the existing INITPARMs member into $CD.PLEX.INITPARM as member
CDPLX.
2. Copy the existing Sterling Connect:Direct Stand-alone Server startup JCL into
$CD.PLEX.JCL as member CDMGR.
3. Change the network map source to specify new APPLIDs for the
LOCAL.NODE and the PNODE/SNODE ADJACENT.NODE.
The existing APPLIDs are used for the Sterling Connect:Direct SERVER1,
which means that you do not need to change the connections to external
Sterling Connect:Direct systems.
4. Add the following initialization parameters to the CDPLX member in
$CD.PLEX.INITPARM. This member becomes the Sterling Connect:Direct/Plex
global initialization parameters file.
CDPLEX=YES
CDPLEX.MAXSERVER = number of servers | 4
XCF.NAME=8-char-name
The CDPLEX=YES parameter indicates a Sterling Connect:Direct/Plex
environment. It also directs the DTF to read its local initialization parameters
from the file specified in the //CDPLEX DD statement in the startup JCL.
The CDPLEX.MAXSERVER parameter specifies the maximum number of
servers the Connect:Direct/Plex Manager will manage. For more information,
see Storage Requirements in a Sterling Connect:Direct Environment in the IBM
Sterling Connect:Direct for z/OS Configuration Guide.
The XCF.NAME parameter specifies a unique name used by the z/OS Cross
Systems Communication Facility (XCF) to assist communications among
Sterling Connect:Direct/Plex members. This name indicates that the Sterling
Connect:Direct Manager and Sterling Connect:Direct Servers are part of the
same XCF group.
5. You can add the following optional parameters to the CDPLX member in
$CD.PLEX.INITPARM.
v “CDPLEX.TIMER = 5 | number of minutes” on page 329 specifies the
time-out value for XCF communications in minutes.
v “CDPLEX.WLM.GOAL = (NO | YES, exitname)” on page 329 specifies
whether IBM Workload Manager (WLM) Goal Mode queries are made. This
parameter is optional.
6. Create the local initialization parameter files for each Sterling
Connect:Direct/Plex member:
a. Copy the DGAITMGR, DGAISRV1, and DGAISRV2 sample local
initialization parameters members from the Sterling Connect:Direct
$CD.SDGAPARM library into $CD.PLEX.INITPARM as members
MANAGER, SERVER1, and SERVER2.
b. Change the TCP.LISTEN parameter (following in bold) to specify the
TCP/IP stack address that is used by the Sterling Connect:Direct Manager.
You do not need to change any other parameters in the MANAGER
member.
CDPLEX.MANAGER=YES
TCP.LISTEN=(nnn.nnn.nnn.nnn,port)
UDT33.LISTEN=(nnn.nnn.nnn.nnn,port)
CDPLEX.SERVER.JOBDSN=$CD.PLEX.JCL
CDPLEX.SERVER.JOBMEM=((CDSRV1,SERVER1), -
(CDSRV2,SERVER2))
150 IBM Sterling Connect:Direct for z/OS: Administration Guide

c. Change the CDPLEX.VTAM parameter in the SERVER1 member as
follows:
v Replace the applid11 value with the VTAM APPLID that is defined in
the existing network map for SNA copy Processes.
v Replace the applid12 value with the VTAM APPLID that is defined in
the existing network map for the PNODE-SNODE APPLID.
These APPLIDs must be unique across the Sterling Connect:Direct/Plex
environment and cannot be the same as specified in the new network
map.
CDPLEX.MANAGER=NO
CDPLEX.SERVER=SERVER1
CDPLEX.VTAM=(applid11,applid12)
CDPLEX.PLEXCLASSES=(TAPE,*)
TCP.LISTEN=(nnn.nnn.nnn.nnn,port)
UDT33.LISTEN=(nnn.nnn.nnn.nnn,port)
d. The TCP.LISTEN and UDT33.LISTEN initialization parameters specify the
TCP and UDT listen address and port number combinations. Use a
different listen port number than the one used in the existing initialization
parameters file.
Note: The CDPLEX.PLEXCLASSES parameter in SERVER1 specifies a
‘TAPE' PLEXCLASS. For Processes that require tape drives, specify the
‘TAPE' PLEXCLASS in their Process definitions. These Processes run on
SERVER1. (See Building, Modifying, and Submitting Processes in the IBM
Sterling Connect:Direct for z/OS User Guide for more information on using
PLEXCLASS in a Process.)
e. Change the CDPLEX.VTAM parameter in the SERVER2 member as
follows:
v Replace the applid21 value with a new VTAM APPLID you have
defined for SNA copy Processes.
v Replace the applid22 value with a new VTAM APPLID you have
defined for the PNODE-SNODE APPLID.
These APPLIDs must be unique across the Sterling Connect:Direct/Plex
environment and cannot be the same as specified in the new network
map or used for SERVER1.
CDPLEX.MANAGER=NO
CDPLEX.SERVER=SERVER1
CDPLEX.VTAM=(applid21,applid22)
CDPLEX.PLEXCLASSES=(*)
TCP.LISTEN=(nnn.nnn.nnn.nnn,port)
UDT33.LISTEN=(nnn.nnn.nnn.nnn,port)
f. The TCP.LISTEN and UDT33.LISTEN initialization parameters specify the
TCP and UDT listen address and port number combinations. Use a
different listen port number than the one used in the existing initialization
parameters file.
7. Add the CDPLEX DD statement in the following example to the CDMGR
member in $CD.PLEX.JCL (this JCL is the startup JCL copied earlier).
//DTF EXEC DGADINIT,
// PARM=’$CD.PLEX.INITPARM(CDPLX)’
//CDPLEX DD DISP=SHR,DSN=$CD.PLEX.INITPARM(MANAGER)
Chapter 6. Configuring a Sterling Connect:Direct/Plex Environment 151

8. Create the CDSRV1 member and copy CDMGR into it.
9. Make the following changes to the CDSRV1 member:
a. Change the job name so that this job can run simultaneously with the
CDMGR JCL.
b. Change the member name in the CDPLEX DD statement to SERVER1, as
follows. This change directs the CDSRV1 JCL to its local initialization
parameters file.
//CDPLEX DD DISP=SHR,DSN=$CD.PLEX.INITPARM(SERVER1)
10. Create the CDSRV2 member and copy CDSRV1 into it.
11. Make the following changes to the CDSRV2 member:
a. Change the job name so that this job can run simultaneously with the
CDMGR JCL and CDSRV1 JCL.
b. Change the member name in the CDPLEX DD statement to SERVER2, as
follows. This change directs the CDSRV2 JCL to its local initialization
parameters file.
//CDPLEX DD DISP=SHR,DSN=$CD.PLEX.INITPARM(SERVER2)
Note: You can route jobs to a different z/OS image by specifying the local
node name of the other system name in an XEQ statement in the Sterling
Connect:Direct Manager or Server JCL as follows:
/*XEQ njenode
[JES2]
//*ROUTE XEQ njenode [JES3]
This example routes the job to the z/OS image identified by the local node
name NJENODE.
12. Submit the CDMGR JCL to bring up Sterling Connect:Direct/Plex.
After the Sterling Connect:Direct Manager initializes, it submits the CDSRV1
JCL and CDSRV2 JCL to bring up the two Sterling Connect:Direct Servers.
13. After the Sterling Connect:Direct Manager initializes, use the IUI to signon to
the Sterling Connect:Direct Manager.
You can then submit Processes and perform other functions through the IUI.
Converting Two Existing Stand-Alone Server Systems to a Plex
Environment
This section illustrates how to convert existing production Sterling Connect:Direct
Stand-alone Server systems into a Sterling Connect:Direct/Plex environment with
two servers. This configuration takes advantage of the Sterling Connect:Direct/Plex
single image and workload balancing capability for Processes initiated by this
Sterling Connect:Direct/Plex environment. This configuration also supports
external Sterling Connect:Direct systems without requiring any changes to the
external systems.
In the following illustration, two separate Sterling Connect:Direct Stand-alone
Server systems run in a z/OS sysplex environment.
152 IBM Sterling Connect:Direct for z/OS: Administration Guide

The procedure in this section combines the separate systems into the single Sterling
Connect:Direct/Plex environment as follows.
In this configuration, the original CD.PROD1 system becomes the Sterling
Connect:Direct Manager and Sterling Connect:Direct Server1. The CD.PROD2
system becomes the Sterling Connect:Direct Server2. The Sterling
Connect:Direct/Plex environment is given the node name CD.PROD1. No changes
are made to the remote nodes' network maps. The remote nodes communicate
with the Sterling Connect:Direct/Plex environment as if they communicated with a
single Sterling Connect:Direct image.
To create this configuration you must:
v Define new APPLIDs for the Sterling Connect:Direct/Plex environment
v Use the APPLIDs from the existing CD.PROD1 system in the Server1 local
initialization parameters
v Use the APPLIDs from the existing CD.PROD2 system in the Server2 local
initialization parameters
The following illustration shows how the network map and initialization
parameter values from the existing Sterling Connect:Direct systems map to the
Sterling Connect:Direct/Plex environment.
Chapter 6. Configuring a Sterling Connect:Direct/Plex Environment 153

This example assumes the following:
v You are running two production Sterling Connect:Direct Stand-alone Server
systems: CD.PROD1 and CD.PROD2.
v The global and local initialization parameter files are located in
$CD.PLEX.INITPARM. The JCL that brings up the Sterling Connect:Direct/Plex
environment is located in $CD.PLEX.JCL. You can either allocate these data sets
or use existing data sets in their place.
v The Sterling Connect:Direct/Plex environment identifies itself to external
systems with a new node name. Each Sterling Connect:Direct Server identifies
itself to external systems with the same node name it used as a Sterling
Connect:Direct Stand-alone Server.
Converting a Standalone Server System into One Sterling
Connect:Direct/Plex Setup
To convert two existing Sterling Connect:Direct Stand-alone Server systems into
one Sterling Connect:Direct/Plex environment:
Procedure
1. Copy the the INITPARMs member for CD.PROD1 into $CD.PLEX.INITPARM
as member CDPLX.
2. Resolve any differences (other than data set names) between the new
INITPARMS member and the CD.PROD2 INITPARMS member.
3. Copy the CD.PROD1 Sterling Connect:Direct/Plex startup JCL into
$CD.PLEX.JCL as member CDMGR.
4. Resolve any differences, such as trace DDs, with the CD.PROD2 startup JCL.
5. Merge the existing AUTH and TYPE files from both systems as described in
Sterling Connect:Direct/Plex System File Considerations, using the same files
names used for CD.PROD1.
6. Create new TCQ/TCX, CKPT, and statistics file pairs as discussed in CKPT
file, using the same file names used for CD.PROD1.
7. Merge the source from the individual network map files as described in
NETMAP file.
154 IBM Sterling Connect:Direct for z/OS: Administration Guide

8. Change the new network map source (created from the merged network map
files) as follows:
a. Specify new APPLIDs and a new LOCAL.NODE name for the
LOCAL.NODE and the PNODE/SNODE ADJACENT.NODE.
Because the existing APPLIDs are used for SERVER1, you do not need to
change the external Sterling Connect:Direct connections.
b. Specify USE.SERVER.NODE=YES on all ADJACENT.NODE records.
c. Use the same local node name that is used for CD.PROD1.
d. Load the network map.
9. Add the following initialization parameters to the CDPLX member in
$CD.PLEX.INITPARM. This member becomes the Sterling Connect:Direct/Plex
global initialization parameters file.
CDPLEX=YES
CDPLEX.MAXSERVER = number of servers | 4
XCF.NAME=8-char-name
The CDPLEX=YES parameter indicates a Sterling Connect:Direct/Plex
environment. It also directs the DTF to read its local initialization parameters
from the file specified in the //CDPLEX DD statement in the startup JCL.
The CDPLEX.MAXSERVER parameter specifies the maximum number of
servers the Connect:Direct/Plex Manager will manage. For more information,
see Storage Requirements in a Sterling Connect:Direct Environment in the IBM
Sterling Connect:Direct for z/OS Configuration Guide.
The XCF.NAME parameter specifies a unique name used by the z/OS XCF to
assist communications among Sterling Connect:Direct/Plex members. This
name indicates that the Sterling Connect:Direct Manager and Sterling
Connect:Direct Servers are part of the same XCF group.
10. You can add the following optional parameters to the CDPLX member in
$CD.PLEX.INITPARM:
v “CDPLEX.TIMER = 5 | number of minutes” on page 329 specifies the
time-out value for XCF communications in minutes.
v “CDPLEX.WLM.GOAL = (NO | YES, exitname)” on page 329 specifies
whether IBM Workload Manager (WLM) Goal Mode queries are made. This
parameter is optional.
11. Create the local initialization parameters files for each Sterling
Connect:Direct/Plex member:
a. Copy the DGAITMGR, DGAISRV1, and DGAISRV2 sample local
initialization parameters members from the Sterling Connect:Direct
$CD.SDGAPARM library into $CD.PLEX.SDGAPARM as members
MANAGER, SERVER1, and SERVER2.
b. Change the TCP.LISTEN parameter of the MANAGER member to specify
the TCP/IP stack address used by the Sterling Connect:Direct/Plex
Manager.
You need not change any other parameters need in the MANAGER
member.
CDPLEX.MANAGER=YES
TCP.LISTEN=(nnn.nnn.nnn.nnn,port)
CDPLEX.SERVER.JOBDSN=$CD.PLEX.JCL
CDPLEX.SERVER.JOBMEM=((CDSRV1,SERVER1), -
(CDSRV2,SERVER2))
Chapter 6. Configuring a Sterling Connect:Direct/Plex Environment 155

c. Change the CDPLEX.VTAM parameter in the SERVER1 member as follows:
v Replace the applid11 value with the VTAM APPLID from CD.PROD1 for
SNA copy Processes.
v Replace the applid12 value with the VTAM APPLID from CD.PROD1 for
the PNODE-SNODE APPLID.
These APPLIDs must be unique across the Sterling Connect:Direct/Plex
and cannot be the same as those specified in the new network map.
CDPLEX.MANAGER=NO
CDPLEX.SERVER=SERVER1
CDPLEX.VTAM=(applid11,applid12,applid13)
CDPLEX.PLEXCLASSES=(TAPE,*)
TCP.LISTEN=(nnn.nnn.nnn.nnn,port)
d. Change the TCP.LISTEN parameter in the SERVER1 member to specify the
TCP/IP stack address used by this Sterling Connect:Direct/Plex server.
e. Change the TCP.LISTEN parameter in SERVER1 member to the
TCP.LISTEN value from CD.PROD1.
Note: The CDPLEX.PLEXCLASSES parameter in SERVER1 specifies a
‘TAPE' PLEXCLASS. For Processes that require tape drives, specify the
‘TAPE' PLEXCLASS in their Process definitions. These Processes run on
SERVER1. (See Building, Modifying, and Submitting Processes in IBM Sterling
Connect:Direct for z/OS User Guide for more information on using
PLEXCLASS in a Process.)
f. Add the following statement to the SERVER1 member.
CDPLEX.SERVER.NODE=CD.PROD1
g. Change the CDPLEX.VTAM parameter in the SERVER2 member as
follows:
v Replace the applid21 value with the VTAM APPLID from CD.PROD2 for
SNA copy Processes.
v Replace the applid22 value with the VTAM APPLID from CD.PROD2 for
the PNODE-SNODE APPLID.
These APPLIDs must be unique across the Sterling Connect:Direct/Plex
and cannot be the same as those specified in the new network map or
used for SERVER1.
CDPLEX.MANAGER=NO
CDPLEX.SERVER=SERVER2
CDPLEX.VTAM=(applid21,applid22)
CDPLEX.PLEXCLASSES=(*)
TCP.LISTEN=(nnn.nnn.nnn.nnn,port)
h. Change the TCP.LISTEN parameter in the SERVER2 member to specify the
TCP/IP stack address used by this Sterling Connect:Direct/Plex server.
i. Change the TCP.LISTEN parameter in the SERVER2 member to the
TCP.LISTEN value from CD.PROD2.
j. Add the following statement to the SERVER2 member.
CDPLEX.SERVER.NODE=CD.PROD2
12. Add the CDPLEX DD statement in the following example to the CDMGR
member in $CD.PLEX.JCL. (This JCL is the startup JCL copied earlier.)
156 IBM Sterling Connect:Direct for z/OS: Administration Guide

//DTF EXEC DGADINIT,
// PARM=’$CD.PLEX.INITPARM(CDPLX)’
//CDPLEX DD DISP=SHR,DSN=$CD.PLEX.INITPARM(MANAGER)
13. Create the CDSRV1 member and copy CDMGR into it.
14. Make the following changes to the CDSRV1 member:
a. Change the job name so that this job can run simultaneously with the
CDMGR JCL.
b. Change the member name in the CDPLEX DD statement to SERVER1 as
follows. This directs the CDSRV1 JCL to its local initialization parameters
file.
//CDPLEX DD DISP=SHR,DSN=$CD.PLEX.INITPARM(SERVER1)
15. Create the CDSRV2 member and copy CDSRV1 into it.
16. Make the following changes to the CDSRV2 member:
a. Change the job name so that this job can run simultaneously with the
CDMGR JCL and CDSRV1 JCL.
b. Change the member name in the CDPLEX DD statement to SERVER2 as
follows. This directs the CDSRV2 JCL to its local initialization parameters
file.
//CDPLEX DD DISP=SHR,DSN=$CD.PLEX.INITPARM(SERVER2)
Note: You can route jobs to a different z/OS image by specifying the local
node name of the other system name in an XEQ statement in the Sterling
Connect:Direct Manager or Server JCL as follows:
/*XEQ njenode
[JES2]
//*ROUTE XEQ njenode [JES3]
This example routes the job to the z/OS image identified by the local node
name NJENODE.
17. Submit the CDMGR JCL to bring up the Sterling Connect:Direct/Plex.
After the Sterling Connect:Direct Manager initializes, it submits the CDSRV1
JCL and CDSRV2 JCL to bring up the two Sterling Connect:Direct Servers.
18. After the Sterling Connect:Direct Manager initializes, use the IUI to signon to
the Sterling Connect:Direct Manager.
You can then submit Processes and perform other functions through the IUI.
Additional Sterling Connect:Direct/Plex Configuration Examples
This topic illustrates additional Sterling Connect:Direct/Plex configuration
examples. While your site configuration can vary due to the number of external
nodes, use this topic as a guide in determining the best way to configure a Sterling
Connect:Direct/Plex.
Note: The examples in this section are high-level descriptions for use as a
configuration model. They do not describe all configuration changes to set up a
Sterling Connect:Direct/Plex. See A New Sterling Connect:Direct/Plex
Environment for detailed information.
Chapter 6. Configuring a Sterling Connect:Direct/Plex Environment 157

Configuration Examples Using One Sterling Connect:Direct for
z/OS System
This section assumes the following Sterling Connect:Direct environment exists.
In this environment, two Sterling Connect:Direct for UNIX nodes (UNIX.CD and
UNIX.CD2) communicate with a Sterling Connect:Direct for z/OS system
(ZOS.CD). The ZOS.CD system uses the APPLID “AP1.” The UNIX.CD system
uses the APPLID “UN1”, while the UNIX.CD2 system uses the APPLID “UN2.”
The network map entries define the adjacent nodes.
Although this example uses Sterling Connect:Direct for UNIX as the external
nodes, the relationship is the same when any Sterling Connect:Direct platform is an
external node.
Scenario 1 – External Nodes Communicate with One Sterling
Connect:Direct Server
This section describes the simplest Sterling Connect:Direct/Plex configuration –
both external nodes communicate with the same Sterling Connect:Direct Server.
In the following illustration, the ZOS.CD system is configured as a Sterling
Connect:Direct/Plex consisting of a Sterling Connect:Direct Manager and two
Sterling Connect:Direct Servers. Both external Sterling Connect:Direct for UNIX
systems communicate only with SERVER1.
158 IBM Sterling Connect:Direct for z/OS: Administration Guide

To accomplish this setup, assign the APPLID from the original Sterling
Connect:Direct system (AP1) to SERVER1 through the local initialization
parameters of SERVER1 (callout 1 in the preceding illustration). Note that you
must create new APPLIDs for the SERVER2 (AP2) and the Sterling Connect:Direct
Manager (AP3).
Then, specify SERVER1 as the default PLEXCLASS in the Sterling
Connect:Direct/Plex network map (callout 2). This routes all work and
communication among the nodes through SERVER1.
The advantage of this approach is that the Sterling Connect:Direct for UNIX nodes
do not need to change any initialization parameter or network map definitions.
They do not have any knowledge of the change to the z/OS node.
The disadvantage of this approach is that you cannot use Sterling
Connect:Direct/Plex workload balancing to its full potential. You cannot perform
workload balancing on Processes received from or sent to the external nodes.
However, work originating and done entirely on the Sterling Connect:Direct for
z/OS system can use Sterling Connect:Direct/Plex workload balancing.
Scenario 2 – External Nodes Communicate with Individual
Sterling Connect:Direct Servers
In this configuration, each external Sterling Connect:Direct node communicates
with a specific Sterling Connect:Direct Server. This configuration makes better use
of the Sterling Connect:Direct/Plex environment by spreading the work from the
external nodes between the Sterling Connect:Direct Servers.
Chapter 6. Configuring a Sterling Connect:Direct/Plex Environment 159

To accomplish this configuration, change the UNIX.CD2 network map to point to
the APPLID for SERVER2 (callout 1).
Then, make the following changes to the Sterling Connect:Direct/Plex network
map (callout 2):
v Route all Processes from UNIX.CD to SERVER1 by defining SERVER1 as the
default PLEXCLASS in the adjacent node definition for UNIX.CD.
v Route all Processes from UNIX.CD2 to SERVER2 by defining SERVER2 as the
default PLEXCLASS in the adjacent node definition for UNIX.CD2.
The advantage of this approach is that work from each UNIX node runs on a
different Sterling Connect:Direct Server, so work from one node does not interfere
with work from the other. You do not need to change Processes submitted from
either node to run on the specified servers (unless the Process itself specifies a
TCP/IP address).
The disadvantage of this approach is that you still cannot use the Sterling
Connect:Direct/Plex workload balancing to its full potential. You cannot perform
workload balancing on Processes received from or sent to the external nodes. Work
originating and done entirely on the Sterling Connect:Direct for z/OS system can
use Sterling Connect:Direct/Plex workload balancing.
Scenario 3 – External Nodes Communicate with Both Sterling
Connect:Direct Servers
This configuration uses the Sterling Connect:Direct/Plex workload balancing
capability. In this environment, both external nodes can communicate with either
Sterling Connect:Direct Server.
160 IBM Sterling Connect:Direct for z/OS: Administration Guide

In this configuration, the network map of each Sterling Connect:Direct for UNIX
node is changed to point to both Sterling Connect:Direct Servers. However, because
the Sterling Connect:Direct/Plex normally is displayed as a single node to external
systems, you must first create a unique node name for SERVER2. To create a
unique node name, specify:
v CDPLEX.SERVER.NODE = ZOS.CD2 in the SERVER2 local initialization
parameters (callout 1)
You do not need to specify the CDPLEX.SERVER.NODE initialization parameter
for SERVER1 because it uses the local node (ZOS.CD).
v USE.SERVER.NODE=YES in the Sterling Connect:Direct/Plex network map
adjacent node definitions (callout 2)
The ZOS.CD2 node name is then added to the external nodes' network maps
(callouts 3 and 4).
The advantage of this configuration is that you can perform workload balancing on
outgoing Processes from the Sterling Connect:Direct/Plex. However, you cannot
perform automatic workload balancing on Processes received from the external
nodes; you must manually balance them by changing the SNODE.
Configuration Example Using Two Sterling Connect:Direct for
z/OS Systems
This configuration describes a more complex Sterling Connect:Direct/Plex
configuration. It assumes that the following Sterling Connect:Direct environment
exists.
Chapter 6. Configuring a Sterling Connect:Direct/Plex Environment 161

In this environment, two Sterling Connect:Direct for UNIX nodes (UNIX.CD and
UNIX.CD2) communicate with two different Sterling Connect:Direct for z/OS
systems (ZOS.CD and ZOS.CD2).
To change this setup to a Sterling Connect:Direct/Plex, the ZOS.CD and ZOS.CD2
systems are merged into a single Sterling Connect:Direct/Plex. ZOS.CD is
designated as the Sterling Connect:Direct Manager and SERVER1, while ZOS.CD2
is designated as the Sterling Connect:Direct Server SERVER2. (See Converting Two
Existing Stand-Alone Server Systems to a Plex Environment for more information.)
162 IBM Sterling Connect:Direct for z/OS: Administration Guide

The initialization parameter CDPLEX.SERVER.NODE=ZOS.CD2 is added to the
SERVER2 local initialization parameter (callout 1). USE.SERVER.NODE=YES is
added to the Sterling Connect:Direct/Plex network map adjacent node definitions
(callout 2).
The advantages of this approach are:
v Changes to the z/OS nodes have no affect on the Sterling Connect:Direct for
UNIX nodes. Therefore, no changes are required to the Sterling Connect:Direct
for UNIX nodes.
v You can perform workload balancing on Processes sent from ZOS.CD to the
Sterling Connect:Direct for UNIX nodes.
v The Sterling Connect:Direct/Plex provides a single administrative and operating
environment.
The disadvantage of this approach is that you must manually balance Processes
coming from the Sterling Connect:Direct for UNIX nodes.
Chapter 6. Configuring a Sterling Connect:Direct/Plex Environment 163
164 IBM Sterling Connect:Direct for z/OS: Administration Guide

Chapter 7. Configuring Extended Recovery
Sterling Connect:Direct uses the IBM Extended Recovery Facility (XRF) to quickly
recover and resume processing after an abnormal termination. This recovery is
accomplished by using a standby Sterling Connect:Direct system that waits to
resume processing if the active Sterling Connect:Direct system fails.
Both the Sterling Connect:Direct/Stand-alone Server and Sterling
Connect:Direct/Plex configurations support extended recovery. This chapter
describes how to set up extended recovery in either environment.
Setting Up Extended Recovery for a Sterling Connect:Direct/Stand-
Alone Server
About this task
To configure a Sterling Connect:Direct/Stand-alone Server to use extended
recovery, follow this procedure.
Procedure
1. Specify the XCF.NAME in the initialization parameters file. The XCF.NAME is a
unique 8-character string that identifies a Sterling Connect:Direct/Stand-alone
Server using extended recovery.
The following example shows a Sterling Connect:Direct/Stand-alone Server
assigned the XCF.NAME of MNPLS.
XCF.NAME=MNPLS
Note: XCF group names cannot begin with the letters A through J or with the
letters SYS because these are reserved by IBM.
2. Add the following parameter to the initialization parameters file.
EXTENDED.RECOVERY=YES
3. Add the XRFJOB DD statement to the Sterling Connect:Direct startup JCL as
follows.
//XRFJOB DD DISP=SHR,DSN=$CD.SDGAJCL(CDJOBX)
$CD.SDGAJCL is the PDS where the active (current) Sterling Connect:Direct
startup JCL is located. The CDJOBX member is the standby Sterling
Connect:Direct startup JCL or startup command to run as a started task, which
will be created later.
4. To run as a started task, use one of the following, or skip to step 5 if you are
not running as a started task.
v To run the Sterling Connect:Direct standby image as a started task on the
same z/OS image as the Sterling Connect:Direct active image, use the
following as the first statement in the JCL.
START=membername,parms
© Copyright IBM Corp. 1999, 2015 165

In this example, START= indicates to issue a START command. When the
START command is issued, the equal sign (=) is replaced with a blank, and
the entire statement is passed to z/OS as a command.
For example, if START=HOSTJCL,X is the first statement, then START
HOSTJCL,X is issued to z/OS.
v To run the Sterling Connect:Direct standby image as a started task on an
z/OS image in the sysplex that is not the Sterling Connect:Direct active
image, use the following as the first statement in the JCL.
/*$VS,'command’
Where command is the command you want the Job Entry Subsystem (in this
case, a JES2 environment) to send to z/OS. Because the statement does not
begin with START=, Sterling Connect:Direct submits the statement to JES. JES
identifies the /*$VS and issues the command to z/OS rather than placing it
in the job queue.
For example, if /*$VS,‘RO CSGB,S CDICOMB' is submitted in the JCL, the
RO CSGB,S CDICOMB command is issued rather than placed in the job
queue.
5. Copy the Sterling Connect:Direct startup JCL to the CDJOBX member if you are
submitting the JCL.
6. Change the job name in CDJOBX so that it runs simultaneously with the active
Sterling Connect:Direct image. (Both the active Sterling Connect:Direct image
and the standby Sterling Connect:Direct image run at the same time.)
7. Change the XRFJOB DD statement in the standby Sterling Connect:Direct
startup JCL to reference the Sterling Connect:Direct startup JCL or command to
run as a started task, as in the following example (where CDJOB is replaced by
the member name that actually has your Sterling Connect:Direct JCL).
//XRFJOB DD DISP=SHR,DSN=$CD.SDGACNTL(CDJOB)
8. Submit the CDJOB JCL to bring up Sterling Connect:Direct using extended
recovery.
After Sterling Connect:Direct initializes, the JCL specified in the startup JCL
initializes the standby Sterling Connect:Direct system. The standby Sterling
Connect:Direct image partially initializes, then begins monitoring the active
Sterling Connect:Direct image.
If the active Sterling Connect:Direct image terminates abnormally, the standby
Sterling Connect:Direct image resumes initialization, becomes the active Sterling
Connect:Direct image, and submits the JCL in its XRFJOB DD statement. This
JCL initializes the original active Sterling Connect:Direct image, which now
becomes the standby system.
If the active Sterling Connect:Direct image shuts down normally, the standby
Sterling Connect:Direct image also terminates normally.
Setting Up Extended Recovery for a Sterling Connect:Direct/Plex
Environment
About this task
This section describes how to configure the Sterling Connect:Direct/Plex
environment to use extended recovery.
166 IBM Sterling Connect:Direct for z/OS: Administration Guide

Procedure
1. Add the following parameter to the initialization parameters file.
EXTENDED.RECOVERY=YES
2. Add the XRFJOB DD statement to the Sterling Connect:Direct startup JCL as
follows:
//XRFJOB DD DISP=SHR,DSN=$CD.PLEX.JCL(CDMGRX)
$CD.PLEX.JCL is the PDS where the active (current) Sterling Connect:Direct
startup JCL is located. The CDMGRX member is the standby Sterling
Connect:Direct startup JCL or command to run as a started task, which will be
created later.
3. To run as a started task, use one of the following, or skip to step 4 if you are
not running as a started task.
v To run the Sterling Connect:Direct standby image as a started task on the
same z/OS image as the Sterling Connect:Direct active image, use the
following as the first statement in the JCL.
START=membername,parms
In this example, START=indicates to issue a START command. When the
START command is issued, the equal sign (=) is replaced with a blank, and
the entire statement is passed to z/OS as a command.
For example, if START=HOSTJCL,X is the first statement, then START
HOSTJCL,X is issued to Sterling Connect:Direct for z/OS.
v To run the Sterling Connect:Direct standby image as a started task on a
different z/OS image in the sysplex as the Sterling Connect:Direct active
image, use the following as the first statement in the JCL.
/*$VS,'command’
Where command is the command you want JES to send to z/OS (in this
case, a JES2 environment). Because the statement does not begin with
“START=”, Sterling Connect:Direct submits the statement to JES. JES
identifies the /*$VS and issues the command to z/OS rather then placing it
in the job queue.
For example, if /*$VS,‘RO CSGB,S CDICOMB' is submitted as JCL, the
RO CSGB,S CDICOMB command is issued rather than placed in the job
queue.
4. Create the CDMGRX member from the member that contains your
MANAGER's JCL..
5. Change the job name in CDMGRX so that it runs simultaneously with other
Sterling Connect:Direct/Plex members.
6. Change the XRFJOB DD statement in CDMGRX to point to the CDMGR
member, as in the following example.
//XRFJOB DD DISP=SHR,DSN=$CD.PLEX.JCL(CDMGR)
7. Add the following DD statement to the CDSRV1 member (the SERVER1
startup JCL) in $CD.PLEX.JCL.
//XRFJOB DD DISP=SHR,DSN=$CD.PLEX.JCL(CDSRV1X)
Chapter 7. Configuring Extended Recovery 167

8. Copy the changed CDSRV1 JCL member to CDSRV1X.
9. Change the job name in CDSRV1X so that it runs simultaneously with other
Sterling Connect:Direct/Plex members.
10. Change the XRFJOB DD statement in CDSRV1X to point to CDSRV1, as in the
following example.
//XRFJOB DD DISP=SHR,DSN=$CD.PLEX.JCL(CDSRV1)
11. Add the following DD statement to the CDSRV2 member (the SERVER2
startup JCL) in $CD.PLEX.JCL.
//XRFJOB DD DISP=SHR,DSN=$CD.PLEX.JCL(CDSRV2X)
12. Copy the changed CDSRV2 member to CDSRV2X.
13. Change the job name in CDSRV2X so it can run simultaneously with other
Sterling Connect:Direct/Plex members.
14. Change the XRFJOB DD statement in CDSRV2X to point to CDSRV2, as in the
following example.
//XRFJOB DD DISP=SHR,DSN=$CD.PLEX.JCL(CDSRV2)
15. Submit the CDMGR JCL to bring up the Sterling Connect:Direct image using
extended recovery.
Each Sterling Connect:Direct member initializes using extended recovery and
submits the JCL specified in its XRFJOB DD statement. This JCL starts the
standby Sterling Connect:Direct members. Each standby Sterling
Connect:Direct member partially initializes, then begins monitoring its active
Sterling Connect:Direct member.
If the active member terminates abnormally, or is shut down with a STOP CD
CDPLEX RECOVER command, the standby member resumes initialization,
becomes the active member, and submits the JCL in its XRFJOB DD statement.
This JCL initializes the original active Sterling Connect:Direct/Plex member,
which now becomes the standby member.
Note: If you want the standby member to run on a different z/OS image in
the sysplex, you must define the VTAM APPLID as dynamic in both z/OS
images, and you must define TCP/IP addresses as dynamic VIPA addresses.
168 IBM Sterling Connect:Direct for z/OS: Administration Guide

Chapter 8. Configuring SNMP Support
The Simple Network Management Protocol (SNMP) defines a set of protocols that
describe management data and the protocols for exchanging that data between
systems. This management data is a set of defined variables called the
Management Information Base (MIB).
Three primary functional entities are defined for SNMP: managers, agents, and
subagents. A manager is a network management application, like Netview or HP
OpenView. The agent is a server that responds to request for management data
from a network manager. Subagents provide support for particular MIBS to the
agent.
The primary function of an SNMP environment and the communication between
these functional entities is to enable the network manager to poll a device or
application to inquire about specific management data that the device or
application is monitoring. The device or application can alert the network manager
of certain conditions by sending traps to reflect the status of that condition. Traps
are asynchronous, unsolicited messages sent to the network manager, when the
agent and/or subagent detect certain conditions.
Sterling Connect:Direct provides support for an SNMP agent to send SNMP traps
to alert a network manager of certain events. An event is any Sterling
Connect:Direct message that is written to the console using Sterling Connect:Direct
members. Each event is triggered by the Sterling Connect:Direct message ID and
the trap text (short message text of that Sterling Connect:Direct message). The
Sterling Connect:Direct events generated are defined by category and type.
The Sterling Connect:Direct Trap Table can hold up to 127 entries. It is built using
the input from the data set specified by the SNMP.DSN initialization parameter.
One entry is generated for each message that can trigger a SNMP trap. The
predefined Sterling Connect:Direct traps are triggered by 61 messages. A maximum
of 66 additional user messages can be used to trigger SNMP traps. To see
information about each SNMP trap defined in the table along with its status, see
INQUIRE SNMP Command Displays the SNMP Trap Table.
Define message traps using the SNMP.DSN initialization parameter and a data set
that contains the variables associated with traps.
Identifying Trap Variables
Traps are defined as alarm or status alerts which enable the network manager to
display the trap in the appropriate color on the network manager console. Alarm
trap variables signal events that are critical to the operation of Sterling
Connect:Direct. Status trap variables signal events that are not critical to the
operation of Sterling Connect:Direct, but show valuable information. The tables in
the following sections describe the predefined traps, the message that triggers the
trap, and a description of the trap and associated text.
Following are the six categories for trap variables:
v Type events
v Initialization events
© Copyright IBM Corp. 1999, 2015 169

v Shutdown events
v API events
v Execution events
v STATS events
v Miscellaneous events
Valid values for all events is YES to enable and NO to disable.
Type Events
Use the events in the following table to enable or disable all alarm events or all
status events.
Trap Event Description Event
sendAlarmTraps NO disables all Alarm Trap Variables regardless of
settings. YES enables all Alarm Trap Variables,
allowing you to disable individual Alarm Trap
Variables
Alarm
sendStatusTraps NO disables all Status Trap Variables regardless of
settings. YES enables all Status Trap Variables,
allowing you to disable individual Status Trap
Variables
Status
Initialization Events
The following table details alarm and status events that occur at initialization.
Trap Event Description Trap Trigger
Short Message
Text Event
Initializationcomplete The initialization of this node
completed successfully. In a Sterling
Connect:Direct Plex environment,
the member is named in the
message text.
SITA036I Sterling
Connect:Direct
rel-level for z/OS
Initialization
Complete.
Status
snaNotAvailable The SNA support is temporarily
unavailable, because the SNA=NO
initialization parameter is specified,
the VTAM ACB is inactive and
could not be opened, the VTAM
ACB is disabled during Sterling
Connect:Direct processing or the
Sterling Connect:Direct VTAM
APPLID is already used.
SVTJ018I SNA Support is
Not Available.
Status
snaNowAvailable The VTAM ACB is successfully
opened and Sterling Connect:Direct
now supports all SNA functions.
SVTJ019I SNA Support is
Now Available.
Status
tcpNotAvailable The TCP support is temporarily
unavailable either because the
TCP=NO initialization parameter is
specified, the TCP/IP connection
cannot be established, or the
connection to TCP/IP is terminated.
STCP103I TCP Support is
Not Available.
Status
tcpNowAvailable The connection to TCP/IP is
successful and all TCP functions are
now supported.
STCP104I TCP Support is
Now Available.
Status
170 IBM Sterling Connect:Direct for z/OS: Administration Guide

Shutdown Events
The following table details alarm and status events that occur at shutdown.
Trap Event Description Trap Trigger
Short Message
Text Event
abnormalShutdown An abnormal termination occurred. SSHA021I Abnormal
termination of
Sterling
Connect:Direct.
Alarm
shutdownRequest A Sterling Connect:Direct Stop
command issued.
SSHA002I Sterling
Connect:Direct
QUIESCE
shutdown begun.
Status
SSHA003I Sterling
Connect:Direct
Run Task
IMMEDIATE
shutdown begun.
SSHA004I Sterling
Connect:Direct
IMMEDIATE
shutdown begun.
SSHA019I Sterling
Connect:Direct
STEP shutdown
begun.
normalShutdownComplete Sterling Connect:Direct normal
shutdown completed successfully.
SITB001I Sterling
Connect:Direct
Termination
Complete.
Status
API Events
The following table details alarm and status events that occur from the API.
Trap Event Description Trap Trigger
Short Message
Text Event
maxBatchReached MAXBATCH is reached. STAA009I Task not created,
MAX BATCH task
count reached
Status
maxUserReached MAXUSER is reached. STAA004I Task not created,
MAX IUI/API
task count
reached.
Status
Execution Events
The following table details alarm and status events that occur when a Process
executes.
Chapter 8. Configuring SNMP Support 171

Trap Event Description Trap Trigger
Short Message
Text Event
processFailure A Sterling Connect:Direct Process
failed with a return code greater
than 0, due to abnormal session
termination, NETMAP check failure,
or FM72 Security failure.
SVTM024I &var1
EXECPROC:
FMH-72
¬RECEIVED;
Alarm
SVTM026I SESSION (&class)
NOT
ESTABLISHED
WITH
&node=&snode
SVTM030I &var1 FMH-74
¬RECEIVED
AFTER STEP
ERROR:
SVTM050I &var1 PROCESS
INTERRUPTED:
RECOVERY
INITIATED
SVTM052I &stpnm &func
&pname(&pnum)
&node=&snode
&var1
SVTM054I &var1 SNODE
REQUESTING
SESSION
SHUTDOWN
F/END_OF_STEP
SVTM063I PASSWORD NOT
MATCHED IN
C:D AUTH
FILE--
MSG=SAFB005I
SVTM102I MSGID=&mgid
&msgtext,NODE=
&snode
SENSE=&sense
LUNAME=&slu
sessionRetryExceeded The Sterling Connect:Direct Process
exceeded the session retry threshold
and is placed in the Hold queue.
SVTM505I Session Retry
exceeded for
&pname &pnum
Alarm
processRetryExceeded The Sterling Connect:Direct Process
exceeded the process retry threshold
and is placed in the Hold queue.
SVTM506I Process Retry
exceeded for
&pname &pnum
Alarm
maxProcess MAXPROCESS value is reached. STAA010I Task not created.
Max Process
count reached.
Alarm
maxPnode The maximum number of PNODE
Processes is reached.
STAA006I Task not created.
Max primary task
count reached.
Alarm
172 IBM Sterling Connect:Direct for z/OS: Administration Guide

Trap Event Description Trap Trigger
Short Message
Text Event
ProcessNotStarted Process was not started because
Sterling Connect:Direct quiesced and
a task could not be created.
STAA011I SNODE task not
created, Session
Quiesce in
progress
Alarm
STAA012I PNODE task not
created, Session
Quiesce in
progress
STAA008I Task not created.
No free TCA
available.
STAA003I Task not created.
Sterling
Connect:Direct is
quiescing.
maxSnode The maximum number of SNODE
Processes is reached.
STAA005I Task not created.
Max secondary
task count
reached.
Alarm
tcpCloseFailure A TCP Close failed leaving the
TCP/IP socket in use and
unavailable.
STCP105I TCP Close Socket
Failure
Alarm
userMessageAlarm A user-defined Sterling
Connect:Direct message is issued.
User-defined message text Alarm
tcqMovement A Sterling Connect:Direct Process is
moved to the Hold queue due to
errors during Process execution.
SVTM105I PNAME=
&pname,
PNUM=&pnum
MOVED TO
Q=&q,
QSTATUS=&qstat
Status
tcqMovement A Sterling Connect:Direct Process is
moved to the Process Retain queue.
SVTM105I PNAME=
&pname,
PNUM=&pnum
MOVED TO
Q=&q,
QSTATUS=&qstat
Status
processFlushed A Sterling Connect:Direct Process is
flushed.
SOPD049I Sterling
Connect:Direct
Process,&pnam
&pnum, flushed
by &userid.
Status
userMessageStatus A user-defined Sterling
Connect:Direct message is issued.
User-defined message text Status
STATS Events
The following table details alarm and status events that occur due to the STATS
queue.
Chapter 8. Configuring SNMP Support 173

Trap Event Description Trap Trigger
Short Message
Text Event
statsDisabled An error occurred that caused the
STATS logging to be disabled.
SSTL001I Statistics logging
function is
disabled.
Alarm
statsStress Sterling Connect:Direct STATS queue
is under stress.
SSTL041I Statistics facility
under stress,
waiting on queue
elements.
Alarm
statsStressResolved The STATS Queue stress is resolved. SSTL042I Statistics facility
stress resolved.
Alarm
statsSwitchOccurred A Sterling Connect:Direct STATS file
switch has occurred.
SSTL013I Statistics file pair
switch from &a to
&b
Status
Miscellaneous Events
The following table details other alarm and status events.
Trap Event Description Trap Trigger
Short Message
Text Type
tracesEnabled A Sterling Connect:Direct MODIFY
DEBUG command is issued.
STRA028I Sterling
Connect:Direct
Traces enabled.
Status
netmapUpdate Dynamic update of the Sterling
Connect:Direct NETMAP occurred.
SMUP191I Sterling
Connect:Direct
NETMAP file
updated.
Status
authUpdate Dynamic update of the Sterling
Connect:Direct AUTH file occurred
SAFC005I Sterling
Connect:Direct
AUTH file
updated.
Status
typeUpdate Dynamic update of the Sterling
Connect:Direct TYPE file occurred
SAFI013I Sterling
Connect:Direct
TYPE file
updated.
Status
initparmRefresh Dynamic update of the Sterling
Connect:Direct INITPARM file
occurred
SITA992I INITPARM
Refresh by
&userid
completed
Status
changeProcess A CHANGE PROCESS command
occurred.
SOPB017I Change Process
command by
&userid
completed.
Status
deleteprocess A DELETE PROCESS command
occurred.
SOPC011I Delete Process
command by
&userid
completed
Status
tcqFull TCQ file is full. SPQL001I TCQ File Full Alarm
tcqThreshold TCQ file becoming full. SPQL002I TCQ Full
&VAR1% Full.
Max.# CI: &VAR2
# Used CI:
&VAR3
Alarm
174 IBM Sterling Connect:Direct for z/OS: Administration Guide

Trap Event Description Trap Trigger
Short Message
Text Type
tcqThresholdResolved TCQ is now below the defined
threshold.
SPQL003I TCQ File is now
below the user
defined Threshold
of%%.
Status
Setting Up SNMP
About this task
Use the following procedure to set up SNMP Support.
Note: Before performing this procedure, migrate the CDMIB and Sterling
Connect:Direct Trap Configuration files to HP OpenView. Refer to Customizing
SNMP in Installing Sterling Connect:Direct in the IBM Sterling Connect:Direct for z/OS
Configuration Guide for more information.
Procedure
1. Specify SNMP=YES in the initialization parameters file.
2. If you want to exclude or disable any trap event or define additional trap
triggers described in Identifying Trap Variables, create a data set containing all
the trap events that you want to disable. Following is an example.
Note: All traps are enabled by default.
sendStatusTraps = N
statsDisabled = N
statsStress = N
statsStressResolved = N
userMessageAlarm = ( SVTM100I , SVTM101I )
A sample SNMP.DSN file is in the $CD.SDGASAMP data set, member
DGAXSNMP.
If you do not want to exclude any trap events, go to step 4.
3. Set the SNMP.DSN initialization parameter to the data set name created in step
2.
SNMP.DSN=data set name
4. Set the SNMP.MANAGER.ADDR initialization parameter. This parameter is the
TCP/IP address or hostname of the host where the SNMP Network Manager is
initialized. By default, this address is the same as the TCP/IP address that
Sterling Connect:Direct is using or the local hostname. In a Sterling
Connect:Direct/Plex environment, the default is the TCP/IP address of the
Sterling Connect:Direct Manager. This parameter is required if the network
manager resides on a different host or is required to use a different TCP/IP
address. Following is an example.
SNMP.MANAGER.ADDR=123.4.5.6
5. Set the SNMP.MANAGER.PORTNUM initialization parameter. This port is the
TCP/IP port that is defined for UDP traffic to the network manager. The
Chapter 8. Configuring SNMP Support 175

default is 162. This parameter is required if the defined UDP port number is
something other than 162. Following is an example.
SNMP.MANAGER.PORTNUM=163
After SNMP Setup
At Sterling Connect:Direct installation, the SNMP trap table is initialized and
whenever any event occurs after the SITA628I message is issued, Sterling
Connect:Direct determines if the event is a trap trigger and issues the appropriate
trap to a network manager. The following messages are common at initialization:
v SITA001I Connect:Direct for z/OS initialization has begun.
v SITA002I Connect:Direct parameter file allocated and open.
v SITA022I Loading Connect:Direct modules.
v SITA601I The TCP server modules are loaded.
v SITA067I MESSAGE file is open.
v SITA628I SNMP Trap Agent Initialization Complete.
If any error occurs during initialization of SNMP, the appropriate message is issued
to indicate that the SNMP Trap Agent is disabled or that the initialization will
terminate.
You can refresh and modify the SNMP initialization parameters after initialization
completes by using the MODIFY INITPARM command.
INQUIRE SNMP Command Displays the SNMP Trap Table
The INQUIRE SNMP command displays the contents of the SNMP trap table. The
INQUIRE SNMP command has the following format.
Label Command Parameter
(optional) INQuire SNMP
Issuing the INQUIRE SNMP Command through the IUI
About this task
To display the contents of the SNMP trap table from the IUI, follow this procedure.
Procedure
1. Select option INQ from the Connect:Direct Administrative Options Menu.
The Inquire DTF Internal Status screen is displayed.
2. Select the ITRP option.
3. Press ENTER.
The contents of the SNMP trap table are displayed, as in the following sample.
176 IBM Sterling Connect:Direct for z/OS: Administration Guide

**************************************************************************************************
BROWSE SYS11069.T114309.RA000.MWATL1.NDMAPI.H01 Line 00000056 Col 001 132
Command ===>
Scroll ===> CSR
==============================================================================
SC.DUB.MWATL3 *SNMP TRAP TABLE* DATE: 2011.03.10 TIME: 11:43:22
==============================================================================
TRAP TRIGGER TRAP NAME TRAP STATUS TRAP TYPE
==============================================================================
SVTM506I PROCESSRETRYEXCEEDED ENABLED STATUS
SVTM105I TCQMOVEMENT ENABLED STATUS
SOPD049I PROCESSFLUSHED ENABLED STATUS
SSTL013I STATSSWITCHOCCURRED ENABLED STATUS
STRA028I TRACESENABLED ENABLED STATUS
SMUP191I NETMAPUPDATE ENABLED STATUS
SAFC005I AUTHUPDATE ENABLED STATUS
SAFI013I TYPEUPDATE ENABLED STATUS
SITA992I INITPARMREFRESH ENABLED STATUS
SOPB017I CHANGEPROCESS ENABLED STATUS
SOPC011I DELETEPROCESS ENABLED STATUS
SPQL003I TCQTHRESHOLDRESOLVED ENABLED STATUS
******************************************** Bottom of Data **************************************
Using the INQUIRE SNMP Command from the Batch Interface
About this task
To use the INQUIRE SNMP command from the Batch interface, follow this
procedure.
Procedure
1. Place your commands in a batch job stream as demonstrated in the IBM
Sterling Connect:Direct for z/OS User Guide.
2. Submit the job while Sterling Connect:Direct is running. The settings are
displayed.
Note: You must set the fifth character of the DGADBATC output parameter
specification to Y to print the result of the command that is in the temporary
data set.
Chapter 8. Configuring SNMP Support 177
178 IBM Sterling Connect:Direct for z/OS: Administration Guide

Chapter 9. Sterling Connect:Direct Exits
Note: APARs and PTFs from IBM have "HOLD for ACTION" directives that
identify if reassembly of exits is required. Reassemble exits accordingly. If you
upgrade, reassemble your exits to pick up any macro or control block changes.
Sterling Connect:Direct provides several sample exits some of which can be used to
customize the online execution of Sterling Connect:Direct. One of these exits, the
Stage 2 Security exit, can be used to test new applications and customer
connections. For more information, see Process Exit for Testing (DGAXPRCT).
Before coding or using an exit, read the Special Considerations section below to
ensure that the exit executes properly.
Note: All sample exits provided in Sterling Connect:Direct define the proper
AMODE and RMODE settings within the source member themselves. All user exits
should be link-edited with AMODE=ANY and capable of executing in 31-bit mode
(calls to user code will have the parameter list passed using 31-bit addresses). Each
user exit should preserve the mode in which it was invoked and return to the
caller in the proper mode. Modules written to execute in 31-bit mode can be
link-edited with RMODE=ANY or RMODE=24. Check the source for the sample
exits to see how Sterling Connect:Direct defines the proper AMODE and RMODE
settings.
To notate modifications by user in the the module maintenance history section of
NDMLOG, include the local user ID by specifying the &UID SETC 'xxxx' local
identifier in Sterling Connect:Direct exits as part of the SCENTER macro. This
value can contain up to 8 characters.
Sample JCL for assembling user exits is provided in $CD.SDGASAMP library
members DGAXSTG1 and DGAXSTG2.
Special Considerations
The following special considerations apply to Sterling Connect:Direct for z/OS
exits:
v Avoiding Out-of-Storage ABENDS
– To avoid out-of-storage ABENDS in Sterling Connect:Direct, examine all user
exits to verify that all obtained storage is freed. For each GETMAIN that an
exit issues, the exit must issue a corresponding FREEMAIN to avoid
accumulating storage. If an exit opens a file, a FREEPOOL may need to be
issued after the file is closed.
v Using Exits in 31-Bit Addressing Environments
– Because information passed to the exit by Sterling Connect:Direct is located
above the 16 megabyte line, you must link-edit the module with AMODE
ANY to make it capable of executing in 31-bit mode. Refer to the section in
this chapter describing the particular exit to see if this requirement applies.
– Sterling Connect:Direct honors the addressing mode (AMODE) and residence
mode (RMODE) attributes of user exits. The exit modules are loaded based on
the RMODE specification and given control in the addressing mode specified
in the AMODE attribute. Link exits that run above 16 megabytes in 31-bit
mode to AMODE=ANY, RMODE=ANY.
© Copyright IBM Corp. 1999, 2015 179

– Verify that your exits are coded to receive control and execute in the AMODE
with which they are linked.
– Exits must return control to Sterling Connect:Direct in the AMODE in effect
when Sterling Connect:Direct invokes the exit. Sterling Connect:Direct calls
your exit through Branch and Save and Set Mode (BASSM), and you return to
Sterling Connect:Direct through Branch and Set Mode (BSM).
Note: For security exit links, you may need to provide access to a load library
containing the modules for the security system in use.Linkage Editor Attribute
Requirements
v Linkage Editor Attribute Requirements
– You must create all exits that execute in the DTF address space and link-edit
them as RENT and REUS. Only the Stage 1 exits (DGACXSIG and
DMCXSUBM) do not require re-entrancy.
Statistics Exit
Sterling Connect:Direct generates and logs statistics to an online journal, then
writes the information to the Sterling Connect:Direct statistics log as individual
records.
Each record contains information about a single event, and is identified by a
2-character record type. For example, type CT is a copy termination record and FP
is a flush Process record.
Sterling Connect:Direct provides a statistics exit that gives a user-written program
access to the statistics records as they are generated. This exit can:
v Output the records or data generated from the records to a user-defined journal,
including an SMF log
v Include or exclude the logging of any record to Sterling Connect:Direct by return
codes
CAUTION:
Statistics records are often essential in debugging Sterling Connect:Direct
problems. Excluding records from the statistics log makes problem
determination more difficult or even impossible.
The statistics exit runs as a subtask in the Sterling Connect:Direct DTF address
space. Sterling Connect:Direct uses the STATISTICS.EXIT initialization parameter to
specify the exit module name. You define this name, but it cannot conflict with the
name of any Sterling Connect:Direct module. If a user-defined journal is required,
you must add the necessary data definition (DD) statements to the Sterling
Connect:Direct startup job stream.
Note: In a Sterling Connect:Direct/Plex environment, the statistics exit, by default,
only runs on the Sterling Connect:Direct/Manager. See “STATISTICS.EXIT =
modname | (modname[,MANAGER | SERVER | BOTH])” on page 368 for more
information on how to cause the statistics exit to run on the Sterling
Connect:Direct/Plex server.
The statistics exit indicates if a record is logged by setting a return code set in the
SQUSER field of the SQCB. The return code is initialized to zero before the exit is
invoked.
180 IBM Sterling Connect:Direct for z/OS: Administration Guide

You do not have to rewrite existing exits if you do not want to exclude records.
Existing exits do not alter the SQUSER field and operate the same as before.
Sample Statistics Exits
Sterling Connect:Direct provides the following sample statistics exits in
$CD.SDGASAMP library:
Exits Description
DGAXSMF This sample exit logs Sterling Connect:Direct statistics records to the SMF
log. It logs records to the SMF log by prefixing each statistics record with an
SMF record header, and then uses the SMFWTM macro to write to the SMF
log. The SMF record is type 132.
DGAXEV01 This sample exit provides a means for an application to access event data.
For more information on how to use the Event Services Support (ESS)
facility with this exit, see the IBM Sterling Connect:Direct for z/OS Facilities
Guide.
This exit writes each event record to a predefined data set. You must modify
DGAXEV01 to specify the name of your event exit data set, and define the
data set to accommodate records up to 2048 bytes in length.
DGAXSACC This exit documents the path to log user accounting data from the copy
termination (CT) records.
This exit is invoked for every Sterling Connect:Direct statistics record
written to the statistics file, but only processes CT records.
DGAXSXIT This sample exit simply checks for copy termination records. When Sterling
Connect:Direct encounters a copy termination, the system issues a WTO.
DGAXSXMC This sample exit precludes the logging of PDS member copy (MC) records
that have good return codes. It enables the logging of records of this type
only when they have non-zero return codes. It also enables the logging of
all other record types regardless of their return codes.
DGAXSCPU This exit retrieves CPU time for Process steps and adds it to the end of the
statistics record for later reporting or other usage.
The sample exit executes the TIMEUSED macro which returns total time
since the beginning of TCB execution. Since each Process executes under a
separate TCB, this can provide the CPU time from the beginning of the
Process. To determine the time for each step, you must subtract out time
from preceding steps. Such reporting and calculation is best done in a batch
routine outside of Sterling Connect:Direct after the Statistics Records have
been archived.
Statistics Exit Calling Conventions
Sterling Connect:Direct calls the statistics exit once for each statistics record
generated. Standard linkage conventions apply.
The exit is given control with register 1 pointing to a list of two parameters. They
are:
v The first parameter is a pointer to the statistics record.
v The second parameter is a pointer to an SQCB that you need for setting a return
code if record exclusion is appropriate.
Chapter 9. Sterling Connect:Direct Exits 181

The first 2 bytes of the record contain the record length in binary format. The third
and fourth bytes of the record contain the 2-chharacter record identifier. Refer to
“Statistics Records” to see a table containing a list of the record type identifiers.
The second word of the record contains the time of day that the record is
generated. The third word contains the date the record is generated.
Additional information in the records depends on the record type.
Assembler macros are provided in $CD.SDGAMAC library to generate dummy
sections (DSECTS) to map all the record types. The exit program includes the
DSECTS that map the record types to the exit processes.
A return code of 0 indicates that the record is logged. A return code of 4 indicates
that the record is not logged.
The following figure depicts the information passed to the exit.
Statistics Records
Sterling Connect:Direct calls the statistics exit once for each statistics record
generated in the DTF. The input to the exit is a pointer to the statistics record that
is ready to be logged and a pointer to an SQCB. The record can be any record
type. The exit must examine the record type identifier at a displacement of X'02'
bytes from the beginning of the record to determine the record type and the
DSECT that describes its contents.
Record Types
The following table lists the statistics record types, their corresponding record type
identifiers, and the name of the assembler macro in $CD.SDGAMAC library that
generates the DSECT describing the record contents. For information about
selecting, displaying, and printing statistics information for Sterling Connect:Direct
activities, see IBM Sterling Connect:Direct for z/OS User Guide.
The statistics records in this section also apply to Event Services Support.
182 IBM Sterling Connect:Direct for z/OS: Administration Guide

Record ID Description Macro
CE Copy I/O Start DGA$STEP
CH Change Process DGA$CPTR
CI Copy Step Start DGA$STEP
CS Statistics Command DGA$SCMD
CT Copy Termination DGA$CTR
CX Check Certificate Validity DGA$XCR
DC Directory Commands DGA$DTR
DP Delete Process DGA$DPTR
DT Select Task DGA$DTR
DU Delete User DGA$AER
EI Event Services Start Command DGA$EVR
ET Event Services Stop Command DGA$EVR
EV Event Services Command DGA$EVR
FA IGWFAMS Message DGA$FAMS
FI Long File Name Record DGA$FIR
FP Flush Process DGA$FPTR
FS Suspend Process DGA$FPTR
FT Flush Task DGA$DTR
GO Process Modal - GOTO, ELSE, or EXIT Statement DGA$MODL
HW High Concurrent Session Count DGA$HWR
IA Inquire Statistics DGA$DTR
IB Inquire Debug DGA$DTR
ID Inquire STATDIR DGA$DTR
IF Process Modal - IF Statement DGA$MODL
IK Inquire APKey File DGA$DTR
IP Inquire Initialization parameters DGA$DTR
IT Inquire SNMP Trap Table DGA$DTR
IU Insert User DGA$AER
IX Inquire Sterling Connect:Direct/Plex DGA$DTR
JI Run Job Start DGA$STEP
LF ICO Log File Record DGA$FRER
M2 Multiple Copy Record DGA$MCR
MC PDS Member Copy DGA$MCR
NL Process modal - EIF or PEND statement DGA$MODL
NM NETMAP Updated DGA$NMR
PE Sterling Connect:Direct/Plex Error Record DGA$PER
PI Process Start DGA$PIR
PR Performance Measurement Record DGA$PRRB
PS Process Submit DGA$PSSR
PT Process Termination DGA$PTR
Chapter 9. Sterling Connect:Direct Exits 183

Record ID Description Macro
PX Sterling Connect:Direct/Plex Activity (Leave or Join
Sterling Connect:Direct/Plex)
DGA$PXR
QE Queue Change to EXEC Queue DGA$QCR
QH Queue Change to HOLD Queue DGA$QCR
QT Queue Change to TIMER Queue DGA$QCR
QW Queue Change to WAIT Queue DGA$QCR
RE ICO Report Record DGA$FRER
RF Refresh/Update initialization parameters DGA$AER
RJ Run Job DGA$RJTR
RO ICO Event Record DGA$OEVT
RT Run Task DGA$RTTR
S2 Statistics Logging Statistics DGA$S2R
SB Session Begin DGA$SSCR
SC Statistics Control Record DGA$SCR
SD Start Sterling Connect:Direct DGA$SDC
SF Statistics Format DGA$SFRC
SI Signon DGA$SFR
SN Select Netmap DGA$DTR
SO Signoff DGA$SFR
SP Select Process DGA$DTR
SS Select Statistics DGA$DTR
ST Stop Sterling Connect:Direct DGA$STDC
SU Select User DGA$AER
SW Submit within a Process DGA$PSSR
SY SYSOPTS DGA$SYR
TF TCQ Threshold Full DGA$TXR
TI Run Task Start DGA$STEP
TL TCQ Threshold Low DGA$TXR
TP Throughput Record Statistics DGA$TPR
TR Trap Event Record DGA$TRP
TS Suspend Task DGA$FPTR
TW TCQ Threshold Warning DGA$TXR
UM Update Network map DGA$AER
UU Update User DGA$AER
VP View Process DGA$DTR
WO WTO DGA$FWTO
WS Select Stat Command DGA$DTR
XO Trace On/Off DGA$XOR
ZI SNODE Process Start DGA$PIR
ZT SNODE Process Terminated DGA$PTR
184 IBM Sterling Connect:Direct for z/OS: Administration Guide

Record Control Block Maps
The following table lists the statistics record control block maps.
Macro Name Description
DGA$AER Authorization Event Statistics Record
DGA$CPTR Change Process Statistics Record
DGA$CTR Copy Termination Statistics Record
DGA$DPTR Delete Process Statistics Record
DGA$DTR Display Termination Record
DGA$EVR Event Services Command Statistics Record
DGA$FAMS IGWFAMS (File and Attribute Management Services) Macro Statistics
Record
DGA$FIR Long File Name Statistics Record
DGA$FPTR Flush and Suspend Process Statistics Record
DGA$FRER InterConnect Report Record containing text line from SYSPRINT (Record
Type is RE)
DGA$FRER InterConnect Log File Records produced if LOG=YES is specified for
ADD and EXTRACT operations (record type is LF)
DGA$FWTO WTO Statistics Record
DGA$HWR High Concurrent Session Count Statistics Record
DGA$LSR Log Swap Statistics Record
DGA$MCR PDS Member Copy Record
DGA$NMR NETMAP Updated
DGA$OEVT InterConnect Report Event Record containing one record per report
written (Record Type is RO)
DGA$PER XCF Error Message Statistics Record (from Sysplex)
DGA$PIR Process Initiation Statistics Record
DGA$PRRB Performance Measurement Statistics Record
DGA$PSSR Submit Process Statistics Record
DGA$PTR Process Termination Record
DGA$PXR Sysplex (Sterling Connect:Direct/Plex) Statistics Record
DGA$QCR Process Queue Change Statistics Record
DGA$RJCB Run Job exit
DGA$RJTR Run Job Termination Record
DGA$RTTR Run Task Termination Record
DGA$S2R Statistics Logging Record
DGA$SCMD Statistics Command Record
DGA$SCR Statistics ESDS Control Record
DGA$SDC Start Sterling Connect:Direct Statistics Record
DGA$SFR Signon/Signoff Statistics Record
DGA$SFRC Statistics Format Record
DGA$SGNB Sterling Connect:Direct Secure Plus Statistics Record
DGA$SSCR Session Begin Record
Chapter 9. Sterling Connect:Direct Exits 185

Macro Name Description
DGA$STDC Stop Sterling Connect:Direct Statistics Record
DGA$STEP Step Start/Copy Start Statistics Record
DGA$SYR SYSOPTS Record
DGA$TPR Throughput Record Statistics
DGA$TQGT GOTO Statement
DGA$TQIF If Statement
DGA$TQNL NULL Statement
DGA$TRP Trap Event Record
DGA$TXR TCQ Threshold Warning
TCQ Threshold Full
TCQ Threshold Low
DGA$WRP Statistics File Wrap Record
DGA$XOR TRACE On/Off Statistics Record
Submit Exit
The Submit exit provides an interface to a user-written program when you submit
a Process. With this interface, the user program can change Process information,
such as Process name, priority, class, and secondary node, and copy step
information such as data set name.
Sample Submit Exits
Sterling Connect:Direct provides the following sample submit exits in
$CD.SDGASAMP library.
Exits Description
DGAXSUBC This exit sets a 0 return code to pass back to the calling program. It also
locates and increments the Process class by 1. It runs either as a stage 1 or
stage 2 exit.
DGAXSUBD This exit documents the control block path to locate the source and
destination data set names specified in the Process. It sets a 0 return code to
pass back to the calling program. It also locates and increments the Process
class by 1. It runs either as a stage 1 or stage 2 exit.
DGAXSUBX This exit sets a return code of 0 to pass back to the calling program. It runs
either as a stage 1 or stage 2 exit.
DGAXSUBN This exit turns off all compression flags in the Process for a node defined as
EXTernal, which is a function of the Stage2 Security exit and indicated in
the NETMAP.
If it is named DMCXSUBM, it is invoked as a Stage1 submit exit for normal
submits as well as a Stage2 submit exit for submits within a Process.
DGAXSUBP This exit determines if the submitted Process contains a RUN JOB
statement. If the Process contains a RUN JOB statement and the exit
encounters a stage 1 password, the exit returns an error. You must then
provide either a PNODEID or an SNODEID, depending on which node the
Process is executing. Use the PNODEID or SNODEID to validate the RUN
JOB submitted job stream through the user=uid, password=pwd parameter
built by the RUN JOB exit.
186 IBM Sterling Connect:Direct for z/OS: Administration Guide

Exits Description
DGAXORR This exit documents the control block path to determine whether the
Process is performing a send or receive. It sets a return code of 0 to pass
back to the calling program. It runs either as a stage 1 or stage 2 exit.
DGAXACCT This exit is a Stage 1 SUBMIT exit example that shows how to update the
Primary and Secondary Node accounting (PACCT and SACCT) information
in the submitted Process.
Note: To update accounting information, you must also update your
SUBMIT exit.
Submit Exit Processing Flow
The following figure illustrates the execution order of the SUBMIT command:
The Submit exit processing flow is:
1. After you issue a Sterling Connect:Direct SUBMIT command or SUBMIT
statement, the API SUBMIT command processor calls the stage 1 Submit exit.
2. If the submit is successful, the API SUBMIT command processor calls the DTF
SUBMIT command processor.
3. The DTF SUBMIT command processor calls the stage 2 Submit exit.
Sterling Connect:Direct provides a sample Submit exit in $CD.SDGASAMP library,
called DGAXSUBX, which you can use as a model for either the stage 1
(DMCXSUBM) or stage 2 (SUBMIT.EXIT = modname) exit. In most cases, you only
need to run the stage 1 Submit exit.
Chapter 9. Sterling Connect:Direct Exits 187
Stage 1 Submit Exit
The stage 1 Submit exit control point executes in the API address space when a
SUBMIT command is processed and in the DTF address space when a SUBMIT
statement is encountered in a Process. Observe the following restrictions and
requirements:
v The Sterling Connect:Direct stage 1 Submit exit is implemented as an executable
load module.
v You must name the load module DMCXSUBM.
v You must link-edit the module as NORENT and NOREUS.
v You must link-edit the module with an authorization code of 1.
v The module must come from an authorized library.
v For the TSO IUI, the module must come from a library in the LNKLST or
ISPLLIB. Do not put the module in a STEPLIB. The only time a STEPLIB works
under ISPF is when ISPLLIB is not allocated.
v For DGADBATC and DGADCHLA, retrieve the module from a library in the
LNKLST or STEPLIB.
v Because information passed to the exit by Sterling Connect:Direct is located
above the 16 megabyte line, you must link-edit the module with AMODE ANY
to make it capable of executing in 31-bit mode.
Stage 2 Submit Exit
The stage 2 Submit exit control point executes in the DTF address space when a
SUBMIT command or a SUBMIT statement is encountered. Observe the following
restrictions and requirements:
v The stage 2 Submit exit is implemented as an executable load module.
v The name of the load module is user-defined, but cannot conflict with any
Sterling Connect:Direct load module names.
v Activate the stage 2 Submit exit by specifying SUBMIT.EXIT=(modname) in the
Sterling Connect:Direct initialization parameters.
v You must link-edit the module as re-entrant and place it in a load library that
the Sterling Connect:Direct DTF can access.
v The module must come from an authorized library.
v Because information passed to the exit by Sterling Connect:Direct is located
above the 16 megabyte line, you must link-edit the module with AMODE ANY
to make it capable of executing in 31-bit mode.
Control Block Format
Because Submit exits are invoked before a Process is submitted, some control block
fields may not be filled in. This section presents control blocks used with Process
statements and NETMAP entries.
Upon entry to the Submit exit, Register 1 points to a parameter list (PLIST) as
shown in the following figure. This list contains the addresses of the following
components:
v TCQE
v SQCB
v Composite NETMAP record
v A full-word that contains 1 or 2 indicating whether this is a Stage 1 or Stage 2
exit
188 IBM Sterling Connect:Direct for z/OS: Administration Guide

Note: The SQCB and composite NETMAP record addresses may be zero.
If the Process submission is rejected, the exit must set a positive non-zero value in
Register 15 and the return code field (TQRTNCD) of the TCQE. A message ID in
the TQMSGID field in the TCQE should also be set.
The following figure illustrates the layout of the TCQE. In the Process contained in
the Statement Control Block, DMxxxxxx represents the macro name for the
statement (COPY, RUN JOB, RUN TASK, SUBMIT, etc.).
TCQ Header macro= DMTCQE
DSECT= TCQE
Command Statement Header Section macro= DGA$TQSH
DSECT= TCQSH
Statement Control Block macro= DMxxxxxx
Displacement values found in the TCQE and pointers in the TCQSH to the next or
previous TCQSH are from the top of the TCQE and may need to be multiplied by
16 (if the Process is larger than 64K). Displacement values found in the statement
control blocks are from the top of the TCQSH associated with that statement
control block.
The following figure illustrates the layout of the composite NETMAP record.
Chapter 9. Sterling Connect:Direct Exits 189

COMPOSITE NETMAP RECORD
$$NN - displacement to ADJACENT NODE
Record
$$AA - displacement to ALT.COMM Record
$$BA - displacement to BATCH.APPLI Record
$$CA - displacement to CICS.APPLID
$$DN - displacement to LDNS Record
$$NA - displacement to APPLIDS Record
$$ND - displacement to LUPOOL Record
$$NT - displacement to TCP.API Record
$$TA - displacement to TSO.APPLIDS Record
$$N6 - displacement to IPv6 Record
$$NU - displacement to UDT Record
$$CM - displacement to COMMENT 13 Record
macro= DGA$NETE
DSECT= $$REC
ADJACENT NODE Record macro= DGA$NETD
DSECT= NNODEREC
ALT.COMM Record macro= DGA$NETL
DSECT= ALTADDRH
LDNS Record macro= DGA$NET$
DSECT= DNREC
APPLIDS Record macro= DGA$NETA
DSECT= NAAPLREC
LUPOOL Record macro= DGA$NET@
DSECT= NDLUPREC
TCP.API Record macro= DGA$NETT
DSECT= NTAPIREC
IPv6 Record macro= DGA$NET6
DSECT= N6TCPREC
Displacement values found in the composite network map record are from the top
of the composite network map.
Note: Modifying fields in the composite network map record is prohibited.
Example of Created Control Block
This sample section shows how a Process is submitted and the control block that is
created when the Submit exit is invoked. The following figure shows the submitted
Process.
190 IBM Sterling Connect:Direct for z/OS: Administration Guide

TEST01 PROCESS SNODE=THERE
STEP01 COPY FROM (DSN=THIS.DATA.SET) -
TO (DSN=THAT.DATA.SET DISP=OLD)
IF01 IF (STEP01=0) THEN
STEP02 RUN JOB (DSN=Z99.CONTROL(RUNJ))PNODE
ELSE
STEP03 RUN TASK -
(PGM=RTEXAMPL,PARM=(CL44’THIS.DATA.SET’)) -
PNODE
EIF
STEP04 SUBMIT DSN=Z99.PROCLIB(TEST02) HOLD=Y
The following figure illustrates the resulting layout of the Process control block
after submitting the Process named TEST01.
Modifiable TCQE Fields
The following table describes TCQE fields that you can examine or modify using
the Submit exit.
Chapter 9. Sterling Connect:Direct Exits 191

TCQE Field Content
TQCBHLNG contains the length of the entire TCQE header. This length added to the
address of the TCQE gives the address of the TCQSH.
TQSTMTN contains the number of statements in this Process.
TQUNODE contains the symbolic node name for the submitter of this Process.
TQUID contains the user ID for the submitter of this Process.
TQUPAS contains the password for the submitter of this Process.
TQPUID contains the security user ID at the primary node.
TQOPPAS contains the old security password at the primary node.
TQNPPAS contains the new security password at the primary node.
TQSUID contains the security user ID at the secondary node.
TQOSPAS contains the old security password at the secondary node.
TQNSPAS contains the new security password at the secondary node.
TQRTNCD contains the Process completion code. The user exit changes this field when
an error is encountered in the exit or if the Process is no longer submitted
upon return from the exit.
TQMSGID contains the Process message ID. The user exit includes a message ID related
to any return codes set in the exit.
TQCSPRD contains the displacement to the first Process statement from the TCQE. This
length added to the address of the TCQE gives the address of the TCQSH.
Note: If TQGT64K in TQFLAGA is 1, this displacement must be multiplied
by 16.
TQPARSES contains the value of the maximum number of parallel sessions allowed for
the SNODE when submitting a Process.
TQPRSBYT contains parallel session class. See the following section for details.
TQPRSBIT contains parallel session class. See the following section for details.
TQPROCNM contains the name of the submitted Process.
TQSCHDTE contains the Julian date the Process is scheduled to submit.
TQSCHTME contains the time of day the Process is scheduled to submit.
TQSCHDAY contains the day of the week that the Process is scheduled to submit.
TQPRTY contains the priority for Process selection.
TQRETAIN contains the retain status for the Process.
TQTODFLG contains the following interval control flags:
- If TQTODTD is on, a Process has a scheduled time and date it is
submitted.
- If TQTOTME is on, a Process has a scheduled time it is submitted.
- If TQTODDAY is on, a Process has a scheduled day of the week it is
submitted.
- If TQTODINT is on, a Process is scheduled to run when a specified
interval expires.
TQPNODE contains the symbolic node ID of the primary node.
TQSNODE contains the symbolic node ID of the secondary node.
TQSTATUS contains the Process status.
192 IBM Sterling Connect:Direct for z/OS: Administration Guide

An exception to the table entry TQPARSES occurs in the stage 1 Submit exit. The
stage 1 exit runs in the user address space (API) and the network map associated
with that address space is where this information is retrieved. The network map
used by the API may not be the same network map used by the DTF. The stage 2
Submit exit runs in the DTF address space and is invoked for every submit that
takes place; therefore, the stage 2 Submit exit is more reliable.
Conversion of Parallel Session Values
The session class value is stored in two bytes (TQPRSBYT and TQPRSBIT) in the
TCQE. The specified class can be derived from these values. The following table
shows a sample of the two bytes for the first 16 classes (maximum is 256).
TQPRSBYT TQPRSBIT CLASS
00 80 1
00 40 2
00 20 3
00 10 4
00 08 5
00 04 6
00 02 7
00 01 8
01 80 9
01 40 10
01 20 11
01 10 12
01 08 13
01 04 14
01 02 15
ALLOCATION EXIT
The Sterling Connect:Direct allocation exit provides an interface to a user-written
program. If you supply a user exit in the initialization parameters, Sterling
Connect:Direct invokes the exit prior to any allocation activity by the receiving
Sterling Connect:Direct. Through the exit, you can change information that Sterling
Connect:Direct uses during the allocation Process. You can examine or modify
information such as data set name (DSN) and type record name or set fields to
terminate the copy step prior to allocation.
Sample Allocation Exits
Sterling Connect:Direct provides the following sample allocation exits in the
$CD.SDGASAMP library.
Exits Description
DGAXADSN This exit documents the path of the data set name and unit that receives data during a COPY. It
runs just prior to data set allocation. It is invoked for every COPY step on the receiving end of a
transfer.
Chapter 9. Sterling Connect:Direct Exits 193

Exits Description
DGAXUNIQ This exit creates a unique z/OS PDS member name, if the data set name specified in the COPY
TO statement is found in the PDS directory.
Each request can only specify one member name. The COPY TO statement must specify the
member name. The COPY TO statement must also specify SYSOPTS=”UNIQUE=YES”.
The exit only supports copying sequential files to a PDS member.
DGAXALOX This exit enables a Data exit to be invoked for any or every copy performed by Sterling
Connect:Direct.
DGAXA390 This exit converts UNIT=3390 to UNIT=SYSDA.
DGAXALEX This exit shows how to access the VSAMPL and the TCQSH, and both the source and destination
description in the TCQSH. It shows how to change a value in the Data Set Description Control
Blocks (DGA$DDSR or DGA$SDCR) and set a return code and message ID before return.
194 IBM Sterling Connect:Direct for z/OS: Administration Guide

Exits Description
DGAXARCL In a COPY Process, this exit checks if a data set is archived or migrated. If the data set is
archived, the exit requests retrieval and tells the COPY Process to go to the Timer Retry queue
(TI RE), from which it is retried based on the ALLOC.WAIT and ALLOC.RETRIES initialization
parameters. To ensure that the serially reusable operating system SYSZTIOT resource is freed up
for subsequent users and does not cause the Sterling Connect:Direct region to hang in a wait
condition, use the DMGALRCL exit and specify ARCH as the value for the ALLOC.CODES
initialization parameter. Change the setting of the INVOKE.ALLOC.EXIT global initialization
parameter to BOTH if using this exit. If running with the CA-DMS product, you must modify the
sample exit code as described in the comments at the beginning of the sample code. If you use
this exit, add the following DD Statement to the DTF JCL:
//READER DD SYSOUT=(A,INTRDR)
Note: This exit is not necessary to process migrated or archived data sets. Sterling Connect:Direct
processes recalled data sets synchronously and the COPY Process remains in the Execution queue
instead of being diverted to the Timer Retry queue and potentially to the Hold queue should
retry limits be exceeded.
In releases prior to Version 4.7, when the DGAXARCL (alias of DMGALRCL) allocation exit
attempted to recall a migrated or archived data set offline, the Process went into fail state and
was taken out of the Execution queue and put into the Timer Retry (TI RE) queue. As Sterling
Connect:Direct waited for the allocation and recall to be performed asynchronously, it would
retry the Process based on the ALLOC.WAIT and ALLOC.RETRIES initialization parameters. If
the Process exceeded the maximum time limit specified for retrying it (number of retries as
specified by the ALLOC.RETRIES initialization parameter multiplied by the amount of time that
Sterling Connect:Direct waits between retries as specified by the ALLOC.WAIT initialization
parameter), the Process was put into the Hold queue requiring manual intervention.
In Version 4.7 and later, when Sterling Connect:Direct executes a COPY Process without the
DMGALRCL exit being present, it will use the ARCHRCAL macro synchronously, which means
that the Process stays in the Execution queue not having to loop between the Execution, Timer,
and Hold queues. The Process does not terminate while the recall operation is being performed
but if the recall is unsuccessful, the COPY step produces a return code indicating the
unsuccessful data set recall and instructs the user to correct the error and resubmit the Process.
Although it is not needed for data recall, the DGAXARCL exit will continue to be supported and
invoked prior to any allocation activity if the ALLOCATION.EXIT=DGAXARCL initialization
parameter is specified. However, this exit is no longer required to process migrated or archived
data sets.
Caution: If the sample exit is not being used and a migration/recall product is not active,
installed, or is temporarily down, the following messages are displayed:
ARC0050A DFSMSHSM IS NOT ACTIVE - START DFSMSHSM
ARC0051A JOB xxxxxxxx WAITING FOR DFSMSHSM TO RECALL DSN=dsname
*73 ARC0055A REPLY ’GO’ OR ’CANCEL’
To proceed with the allocation, you must reply. Please refer to IBM documentation regarding the
ARCxxxxA messages. If you reply CANCEL to the ARC0055A message, the Process completes
with MSGID=SDE021CI. If 21C is in the ALLOC.CODES= list, the Process retries; otherwise, the
Process terminates.
DGAXPALL This exit provides %PNUM substitution in a Process.
Restrictions and Requirements
Observe the following restrictions and requirements:
v The name of the allocation exit load module is user-defined, but it must not
conflict with any other Sterling Connect:Direct load module names.
Chapter 9. Sterling Connect:Direct Exits 195

v Because the control blocks provided by Sterling Connect:Direct that the exit
must access are located in storage requiring 31-bit addressability, you must
link-edit the module with AMODE ANY to make it capable of executing in
31-bit mode.
v To activate the exit, specify ALLOCATION.EXIT=modname in the Sterling
Connect:Direct initialization parameters file. You must link-edit the allocation
exit as re-entrant and place it in a load library that the Sterling Connect:Direct
DTF can access.
v If an exit is not working, check the setting of the INVOKE.ALLOC.EXIT global
initialization parameter. The default setting is RECV, which invokes the
allocation exit upon receiving a file. If you are implementing an exit that should
be invoked when a file is sent, change the setting to SEND, and to invoke the
exit when both sending and receiving a file, change the setting to BOTH.
How the Allocation Exit Executes
The allocation exit executes in the DTF address space when the following
conditions exist:
v The allocation exit is specified in the initialization parameters.
v A file is being received, and the Process step that initiated the copy is not in
restart mode.
The following figure illustrates the structure of the parameter list for the allocation
exit.
The following table is a list of the allocation exit parameters.
Parameter Explanation
R1 Register 1 that contains the address of a standard parameter list upon entry
into the user-written allocation exit
PLIST Stands for standard parameter list
SQCB Security control block
VSAMPL Stands for VSAM parameter list, whose address is the first full word in the
PLIST
VSCCBADR Address of the Process step header and is contained in VSAMPL
TCQSH Process step header portion of the Copy control block (each step of a Process
generates a TCQSH)
SDESCR Source data set descriptor portion of the Copy control block
DDESCR Destination data set descriptor portion of the Copy Control Block (a sample
of the DDESCR Control Block is included in this section)
The following macros map the control block structures.
196 IBM Sterling Connect:Direct for z/OS: Administration Guide

Macro Explanation
DGA$VSMP Macro that defines the VSAMPL control block
DGA$TQSH Macro that defines the TCQSH portion of the Copy control block
DGA$SDCR Macro that defines the SDESCR portion of the Copy control block
DGA$DDSR Macro that defines the DDESCR portion of the Copy control block
How to Calculate Addresses and Values
Upon entry into the user-written allocation exit, register 1 contains the address of a
standard parameter list. The first entry in the PLIST contains the address of the
VSAMPL. The second entry in the PLIST contains the address of the SQCB, if
available. The VSCCBADR field in the VSAMPL contains the address of the
Process step header, TCQSH. The SDESCR and DDESCR following the TCQSH is
found by adding displacements to the TCQSH address.
v To calculate the location of SDESCR, add the length of TCQSH (TSHCBHLN) to
the TCQSH address (VSCCBADR).
v To calculate the location of DDESCR, add the length of SDESCR (S1SVSLNG) to
the SDESCR address.
All displacement values in the Copy control block are referenced from the
beginning of the TCQSH control block.
SDESCR and DDESCR contain both fixed length fields and offsets to variable
length fields. The allocation exit modifies any fixed length field in DDESCR.
The fields that are referenced in SDESCR and DDESCR using displacement values
are variable in length. Do not modify them with the allocation exit.
The DSN field is created with enough space to hold a 100-character name only if
the TSEXPDSN bit is on (set) in the TCQSH. If the TSEXPDSN bit is off in the
TCQSH, then the Copy control block does not contain the room to expand the
DSN. This lack of expansion room means that this copy originated from a Sterling
Connect:Direct node that did not build the copy control block with an expandable
DSN field.
You can find the DSN field by adding D1DDSN to the address of the TCQSH. The
DSN field contains a 2-byte length field followed by the DSN. Even though the
field can be up to 100 bytes long, the 2-byte length field contains the actual length
of the DSN. If you change the length of the DSN, you must modify the 2-byte
length field accordingly. The other variable length fields are created with their
current values and cannot be lengthened. Do not modify the D1DDSN field.
When allocating the destination file, Sterling Connect:Direct first uses values from
DDESCR, as specified in the Sterling Connect:Direct COPY statement. Any values
needed, but not set in DDESCR, are taken from the Type record, if one was
specified. Any remaining values are taken from the SDESCR portion of the copy
control block.
Note: If the D1DTYPE field is modified by the allocation exit, the exit must clear
fields in the DDESCR portion of the copy control block that overrides the
corresponding Type fields from the Type record.
Chapter 9. Sterling Connect:Direct Exits 197

Copy Control Block Definitions
Copy control block definitions are generated in the allocation exit program by
including the macro name followed by DSECT=YES, as follows:
v DGA$VSMP DSECT=YES
v DGA$TQSH DSECT=YES
v DGA$DDSR DSECT=YES
v DGA$SDCR DSECT=YES
Copy Control Block Modifications
Modify only the VSAMPL and DDESCR control blocks. For the VSAMPL control
block, you are required to modify the VSRTNCD and VSMSGID fields as follows:
v Set the VSRTNCD field (and R15) to 0 to allow the Copy step to execute.
v Set the VSRTNCD field (and R15) to a nonzero value to fail the Copy step.
v Insert a message ID into the VSMSGID field, if the VSRTNCD is set to a nonzero
value. Take precaution to avoid duplicating existing message IDs.
v Place the message text corresponding to these message IDs in the Sterling
Connect:Direct message file.
DDESCR Control Block Format
The DGA$DDSR member of the $CD.SDGAMAC library lists the DDESCR control
block format. You can modify the control block fields listed in the following table.
Do NOT modify any displacement fields listed in the member.
Note: Turning a flag on means setting the bit in the byte where the flag is located
to one. Turning a flag off means setting the bit in the byte where the flag is located
to a zero.
Attention:
Do not modify the fields D1DMEMB, D1DDSN, and D1DVOLN. These fields
represent displacements to their corresponding values. However, after calculating
the address of the values (by adding the displacement to the address of the
TCQSH) Sterling Connect:Direct can change the actual values. At the calculated
address, you will find a halfword field representing the length of the data that
follows. If you change the length of the data, you must also change this halfword
to reflect the new length. If the displacement to one of these fields is 0, do not
insert a value or displacement. For example, if D1DMEMB=0, no member name
was specified and a member name cannot be inserted. Do not set on the
D1MEMNAM flag if D1DMEMB=0.
The same applies to D1DDSN. For D1DVOLN, if the displacement is 0, you cannot
modify this field or turn on the D1DVOLSER flag. Also, you cannot add volume
serial numbers to this list. You can delete volume serial numbers from the list or
change the volume serial number. If volume serial numbers are deleted, decrement
the length field by 6 for each one deleted. If all volume serial numbers are deleted,
make D1DVOLN=0 and turn off the D1VOLSER bit.
Field Explanation Use Instructions
D1DTYPE entry in the Sterling
Connect:Direct type
defaults file
N/A
198 IBM Sterling Connect:Direct for z/OS: Administration Guide

Field Explanation Use Instructions
D1BLKSIZ block size To use the block size in the destination data set
description portion of the copy control block, set
D1BLKSZE flag on. To use the block size in the Type
record, set the D1BLKSZE flag off.
D1DEN tape density To use the tape density indicated in the destination
data set portion of the Copy control block, set the
D1DENSTY flag on.
D1DSORG data set
organization
To use this value, set the D1DSORGN flag on. To use
the value indicated in the type record, set the
D1DSORGN flag off.
D1LRECL logical record
length
To use this value, set the D1LRECLN flag on. To use
the value indicated in the type record, set the
D1LRECLN flag off.
D1RECFM record format To use this value, set the D1RECFMT flag on. To use
the value indicated in the type record, set the
D1RECFMT flag off.
D1RKP relative key
position
To use this value, set the D1RKYP flag on.
D1TRTCH 7-track recording
mode
To use this value, set the D1TRKTCH flag on.
D1LABTYP label type To use this value, set the D1LABEL flag on.
D1RETPD retention period To use this value, set the D1RETPRD flag on. To use
the value indicated in the D1EXPDT field, set the
D1RETPRD flag off.
D1EXPDT retention period To use this value, set the D1EXPDTE flag on.
D1PRILOC primary allocation
amount
All of the following bits must be set off to use the
space allocation values specified in the type record:
D1TRK, D1CYL, D1BLK.
D1SECLOC secondary
allocation amount
To use this value, set the D1SECALL flag on. Set all of
the following bits to off to use the space allocation
values specified in the type record: D1TRK, D1CYL,
D1BLK.
D1DIRBLK number of directory
blocks
To use this value, set the D1DIRBLK flag on. Set all of
the following bits to off to use the space allocation
values specified in the type record: D1TRK, D1CYL,
D1BLK.
D1UNIT unit type or group
name
To use this value, set the D1GRPTYP flag on. To use
the value indicated in the type record, set the
D1GRPTYP off. Set all of the following bits to off to use
the UNIT value specified in the type record:
D1UNCNT, D1P, D1DEFER, D1GRPTYP.
D1VOLSEQ volume sequence
number
To use this value, set the D1VOLSQ flag on.
D1VOLCT volume count To use this value, set the D1VOLCNT flag on.
D1PASSWD data set password To use this value, set the D1PWD flag on.
D1DMEMB displacement to the
member name
field†
N/A
D1DDSN displacement to the
data set name field†
N/A
Chapter 9. Sterling Connect:Direct Exits 199

Field Explanation Use Instructions
D1DVOLN displacement to the
volume serial
number†
N/A
† See the Caution that precedes this table.
I/O Exit
The Sterling Connect:Direct I/O exit provides an interface to user-written
programs, allowing them to read and write data to or from a file whose
organization Sterling Connect:Direct does not support or would improperly access.
Examples are internal format access to CA-LIBRARIAN or CA-PANVALET files.
Note: Checkpoint/restart is not supported for I/O exits.
If you plan to use an I/O exit, consider the following items:
v All I/O exits must be re-entrant, AMODE 31, follow IBM Assembler linkage
standards, and reside in an authorized load library on the node where they are
referenced. These exits must not alter any Sterling Connect:Direct control block
fields (except in the EXTCB as indicated in I/O Exit Access to Control Blocks). If
other Sterling Connect:Direct control block fields are altered, the results are
unpredictable.
v If an ALLOCATION EXIT is specified, it is not given control when the COPY
statement contains an IOEXIT keyword.
v Add any message IDs specified by an I/O exit to the Sterling Connect:Direct
Message file. See Custom Messages in the Message Library for instructions.
v Return from the I/O exit in the AMODE under which it was called. For
example, if the I/O exit is called in 31-bit mode, the return must be in that
mode. Therefore, if Sterling Connect:Direct is running on an XA system, return
from an I/O exit through a Branch Set Mode (BSM) instruction rather than a
Branch (BR) instruction.
After you write the I/O exit to satisfy your specific data set requirements,
implement it by specifying the exit name on the IOEXIT keyword on a COPY
statement, or on the INSERT and UPDATE TYPE file commands.
Sample I/O Exit
The following sample I/O exit is provided in $CD.SDGASAMP library.
Exits Description
DGAXIOX1 This exit processes external data sets whose formats are not supported. It
allocates, opens, reads, closes and deallocates a sequential data set.
Note: The I/O exit, DGADSIOX, enables you to copy SMS-compressed data
without decompressing and also provides support for copying wildcard-named
files. However, you cannot modify this I/O exit. For more information, see Utility
Programs in IBM Sterling Connect:Direct for z/OS User Guide.
Specifying the I/O Exit in the COPY Statement
Include the IOEXIT keyword on the COPY statement to indicate that an I/O exit is
used. The IOEXIT format on the COPY statement follows.
200 IBM Sterling Connect:Direct for z/OS: Administration Guide

Statement Parameters
COPY FROM (
IOEXIT= exitname |
(exitname[,parameter,...])
)
TO (
IOEXIT= exitname |
(exitname[,parameter,...])
)
The subparameters of the IOEXIT parameter of the COPY statement are:
Parameter Description
exitname Name of the user-written program to receive control for I/O-related
requests.
parameter Parameter or list of parameters passed to the exit. Their format is the
same format as those parameters which you can specify on the RUN
TASK statement.
The IOEXIT keyword is valid in either the FROM or TO areas of the COPY
statement. This capability enables you to specify a different user-written I/O exit
on each side as illustrated in following example.
COPY FROM (PNODE, -
IOEXIT=(INEXT01,C’DB0A05’,X’0E’)) -
TO (SNODE, -
IOEXIT=OUEXT03)
If you specify an exit, it can ignore the values of other parameters in the COPY
statement (the DCB information). This issue is beyond the control of Sterling
Connect:Direct. For information on using the I/O exit through the COPY
statement, see the Connect:Direct Process Language help.
Specify the I/O Exit in the TYPE File
Another method of specifying an I/O exit is to include the IOEXIT keyword on the
INSERT and UPDATE Type file commands. The format is the same as the COPY
statement. If you specify an IOEXIT parameter on the COPY statement, it overrides
any IOEXIT in the Type file entry. The type defaults record must reside on the
copy side (source or destination) that references it.
I/O Exit Access to Control Blocks
On entry to the exit, register 1 (R1) contains the address of the pointer to the
EXTCB (Exit Control Block). The parameter list addresses point to a 2-byte length
followed by the value.
All parameter lists end with the high order bit on in the last address in the list.
The macro DGA$XTCB generates the EXTCB. DGA$XTCB is supplied in the
$CD.SDGAMAC library.
Chapter 9. Sterling Connect:Direct Exits 201
I/O Exit Requests
The I/O exit is called with Sterling Connect:Direct requests that are found in
EXTOPER, which is a field in EXTCB. The following are the requests that the input
and output I/O exits receive:
BEGIN Request
Sterling Connect:Direct makes a BEGIN request to an I/O exit when it
begins communication with the exit. The BEGIN is when the exit must
allocate work areas in preparation for future requests and is the first
request that an I/O exit receives.
OPEN Request
Sterling Connect:Direct makes an OPEN request to an I/O exit when the
exit allocates and opens the file. EXTDIR contains either S (Send) or R
(Received) to indicate whether the file is to be read or written. The I/O
exit uses EXTWKARA to anchor any storage obtained and set EXTMAXLN
to the maximum record length.
INFO Request
Sterling Connect:Direct makes an INFO request to an I/O exit when it
wants the exit to retrieve the file attributes and place them into the INFO
area (mapped by the DMINFO macro) which is pointed to by EXTVSWRK.
These data set attributes are required by Sterling Connect:Direct.
Set the following fields in the INFO control block. The values listed are an
example of those needed for a sequential data set.
INBLKSZ = F'80' block size
INLRECL = F'80' record size
INTYPE = CL4'PS' data set organization
INRECFM = CL4' ' blank
INUNIT = CL8' ' blank
INBLKS = F'0' nulls
INUSEBLK = F'0' nulls
INBLKTRK = F'0' nulls
INTRKCYL = F'0' nulls
IN2NDRY = 8C'0' character zeros
INLOCTYP = CL3' ' blanks
GET Request
Sterling Connect:Direct makes a GET request to an I/O exit when it wants
a record/block read into the buffer. EXTINLNG is set to the length of the
data. EXTINARA points to the record obtained.
The exit must indicate normal END-OF-DATA condition to Sterling
Connect:Direct by returning a value of EXTRCEOD in EXTRTNCD. You
may indicate other conditions by providing other values in the previously
mentioned fields. The EXTRCEOD in EXTRTNCD values enable Sterling
Connect:Direct to issue messages that are added to the Sterling
Connect:Direct message file.
The IOEXIT must allocate a buffer for the input record/block. To
determine if Sterling Connect:Direct is expecting a record or block, the
IOEXIT must examine the source LRECL, BLKSIZE, RECFM and
destination LRECL, BLKSIZE, RECFM fields in the EXIT control block. If
the source and destination data set attributes match, then Sterling
Connect:Direct is expecting a physical block from the IOEXIT, otherwise a
logical record is expected.
ADD Request
202 IBM Sterling Connect:Direct for z/OS: Administration Guide
Sterling Connect:Direct makes an ADD request to an I/O exit when it
wants a record/block to be inserted. EXTOTLNG is set to the length of the
data. EXTOTARA points to the new record/block.
Sterling Connect:Direct always sends RECFM=VS and RECFM=VBS files in
segments rather than records. If EXTSPAN is set to Y, the data pointed to
by EXTOTARA has two segments. Refer to the IBM library of manuals for
information on the format of spanned records. The buffer referenced by
EXTOTARA contains a physical block if the source and destination data set
attributes match; otherwise, it contains a logical record.
CLOSE Request
Sterling Connect:Direct makes a CLOSE request to an I/O exit when the
file closes. Errors returned by the exit on this request are ignored. The
EXTABN flag is activated if the CLOSE request is due to abnormal
termination.
END Request
Sterling Connect:Direct makes the END request to an I/O exit to end
communication with the exit. The exit releases any work areas allocated
when it received the BEGIN request. This request is the last request an I/O
exit receives.
Normal Input Calling Sequence
The following figure illustrates the normal call sequence for an I/O exit used for
input.
Chapter 9. Sterling Connect:Direct Exits 203

Normal Output Calling Sequence
The following figure illustrates the normal calling sequence of an I/O exit used for
output.
204 IBM Sterling Connect:Direct for z/OS: Administration Guide

Data Exit
The Data exit functions similarly to the I/O exit; however, the Data exit does not
require the I/O management that the I/O exit requires. The Data exit provides an
interface to user-written programs, allowing them to add, delete, change, or insert
records.
The Data exit is called through the DATAEXIT parameter in the COPY statement
or a keyword parameter supplied within the SYSOPTS string.
Note: Checkpoint/restart is supported for Data exits.
DATAEXIT Format
The DATAEXIT format in the COPY statement follows.
Statement Parameters
COPY FROM (DATAEXIT= exitname|(exitname[,parameter,...]))
TO (DATAEXIT= exitname|(exitname[,parameter,...]))
The DATAEXIT subparameters are:
Chapter 9. Sterling Connect:Direct Exits 205

Parameter Description
exitname The name of the user-written program that receives control for data
requests.
parameter A parameter or list of parameters passed to the exit. See the RUN TASK
statement.
The following example shows the DATAEXIT parameter in the COPY statement.
COPY01 COPY FROM (PNODE DSN=GJONES1.FROM.DSN -
DATAEXIT=(CD$DGAXDXX01,CL6’WEEKLY’) -
) -
TO (SNODE DSN=GJONES1.TO.DSN -
DCB=(DSORG=PS,LRECL=80,BLKSIZE=32000) -
DISP=(NEW,DELETE,DELETE) -
SPACE=(CYL,(1,0,0)) -
DATAEXIT=(CDDATAEX,CL44’GJONES1.TO.DSN’) -
UNIT=SYSDA)
The following example shows DATAEXIT used as a SYSOPTS parameter.
COPY01 COPY FROM (PNODE DSN=GJONES1.FROM.DSN -
SYSOPTS="DATAEXIT=(CD$DXX01,CL6’WEEKLY’)" -
) -
TO (SNODE DSN=GJONES1.TO.DSN -
DCB=(DSORG=PS,LRECL=80,BLKSIZE=32000) -
DISP=(NEW,DELETE,DELETE) -
SPACE=(CYL,(1,0,0)) -
DATAEXIT=(CDDATAEX,CL44’GJONES1.TO.DSN’) -
UNIT=SYSDA)
Sample Data Exits
The following DATAEXIT samples are provided in $CD.SDGASAMP library.
Exits Description
DGAXDXX1 This sample Data exit examines or changes records from a COPY Process
based on input data. You can use it to insert, replace, or delete records.
DGAXDXX2 This sample Data exit converts data from EBCDIC to ASCII if sending a file,
or from ASCII to EBCDIC if receiving a file.
If you plan to use a Data exit, consider the following items:
v All Data exits must be re-entrant, follow IBM Assembler linkage standards, and
reside in an authorized load library on the node where they are referenced.
These exits must not alter any Sterling Connect:Direct control block fields
(except in the EXTCB as indicated in Data Exit Access to Control Blocks). If
other Sterling Connect:Direct control block fields are altered, the results are
unpredictable.
v Add any message IDs specified by a Data exit to the Sterling Connect:Direct
Message file. See Custom Messages in the Message Library for instructions.
v Return from the Data exit in the AMODE under which it was called. For
example, if the Data exit is called in 31-bit mode, the return must be in that
mode. Return from a Data exit through a Branch Set Mode (BSM) instruction
rather than a Branch (BR) instruction.
206 IBM Sterling Connect:Direct for z/OS: Administration Guide

After you write the Data exit to satisfy your specific data set requirements,
implement it by specifying the exit name on the DATAEXIT keyword on a COPY
statement.
Data Exit Access to Control Blocks
On entry to the exit, register 1 (R1) contains the address of the pointer to an 8-byte
parameter list. The address consists of:
v +Pointer to a 4K storage area that is constant throughout the Data exit step. This
area is mapped using the DXPARM label within the DGA$VSMP macro in
$CD.SDGAMAC library.
v +Pointer to the EXTCB (mapped by the DGA$XTCB macro in $CD.SDGAMAC
library).
If parameters are passed to the Data exit, the EXTPARML field in EXTCB points to
a standard z/OS parameter list, pointing to the parameters (half-word length
followed by the parameter itself) passed to the Data exit. If no parameters are
passed to the Data exit, EXTPARML points to a full-word field of binary zeros.
For example, if two parameters are passed to the Data exit, EXTPARML in EXTCB
points to two full word pointers (the second pointer will have the high order bit
on indicating the last parameter). Each of the pointers point to a half-word length
followed by the parameter value as follows.
As another example, assume the following Data exit call.
DATAEXIT= = (MYTASK,CL44’DATA.BASE.PI’ -
F’0010’,XL8’FFAB’)
Based on this call, the information passed to the exit program is displayed as
follows.
To adhere to common linkage standards, Sterling Connect:Direct sets the list
termination bit (X'80') in the Parameter 3 address.
Data Exit Requests
The Data exit is called with Sterling Connect:Direct requests that are found in
EXTOPER, which is a field in EXTCB. Input and output Data exits receive the
following requests:
Chapter 9. Sterling Connect:Direct Exits 207

Note: Upon return from the Data exit, any nonzero value in EXTRTNCD causes
the Process to terminate with RC=8 and an SCPA049I message.
BEGIN Request
Sterling Connect:Direct makes a BEGIN request to a Data exit when it
begins communication with the exit. The exit is passed to a 4K work area
that remains constant throughout this step in the Process. If additional
storage is required, it can be obtained and anchored in the 4K work area.
OPEN Request
Sterling Connect:Direct makes an OPEN request to a Data exit after the file
is open and before the first data record is read.
GET Request
Sterling Connect:Direct makes a GET request to a Data exit before adding
the record to the buffer for transmission to the remote. At this point, the
Data exit instructs Sterling Connect:Direct to pass the record unchanged,
change the record, delete the record, or insert records by setting the
appropriate flag bit in EXTEAI in the EXTCB.
Flag bit setting Action
All bits off Pass the record unchanged
EXTEAIRR Replace the record. Update EXTINARA to point to the new record and
EXTINLNG with the new record length.
EXTEAIRD Delete the record.
EXTEAIRI Insert a new record. (The next call present the original record again and
you can continue to insert records.) If pointing to a new record, set
EXTEAIRR. Update EXTINARA to point to the new record and
EXTINLNG with the new record length.
If records are inserted in place of an original record, the original record
delete the original record after the inserted records are passed.
PUT Request
Sterling Connect:Direct makes a PUT request to the Data exit before
sending the record to the z/OS I/O system (IOS). At this point, the Data
exit instructs Sterling Connect:Direct to pass the record unchanged, change
the record, delete the record, or insert records by setting the appropriate
flag bit in EXTEAI in the EXTCB.
Flag bit setting Action
All bits off Pass the record unchanged.
EXTEAIRR Replace the record. Update EXTOTARA to point to the new record
and EXTOTLNG with the new record length.
EXTEAIRD Delete the record.
EXTEAIRI Insert a new record. (The next call presents the original record again
and you can continue to insert records.) If pointing to a new record,
set EXTEAIRR. Update EXTOTARA to point to the new record and
EXTOTLNG with the new record length.
If records are inserted in place of an original record, delete the
original record after the inserted records are passed.
CLOSE Request
208 IBM Sterling Connect:Direct for z/OS: Administration Guide

Sterling Connect:Direct makes a CLOSE request to a Data exit when the
file is to close.
END Request
Sterling Connect:Direct makes the END request to a Data exit to end
communication with the exit. The exit releases any work areas allocated
when it received the BEGIN request. This request is the last request a Data
exit receives.
Normal Input Calling Sequence
The following figure illustrates the normal call sequence for a Data exit used for
input.
Normal Output Calling Sequence
The following figure illustrates the normal calling sequence of a Data exit used for
output.
Chapter 9. Sterling Connect:Direct Exits 209
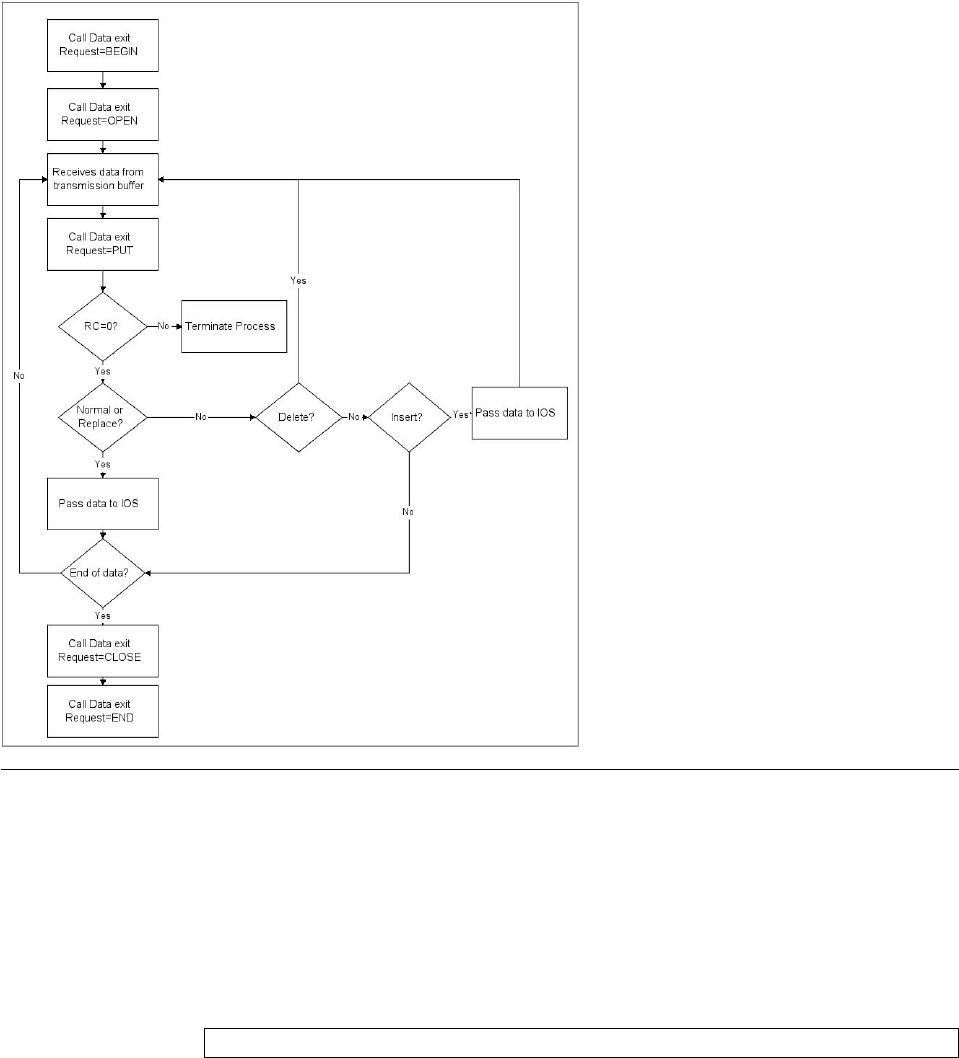
WLM Exit
If you code the initialization parameter CDPLEX.WLM.GOAL=YES, Sterling
Connect:Direct invokes the IWMWSYSQ macro when necessary to query the status
of systems in a sysplex. Sterling Connect:Direct uses the information returned from
the query to determine which system can best handle additional Process work. If
you want to override the decision Sterling Connect:Direct makes, you can specify a
different choice with the WLM exit.
Activate the WLM exit by coding the following initialization parameter:
CDPLEX.WLM.GOAL=(YES,exitname)
Where exitname is the name of the WLM exit.
Exit Calling Convention
Three parameters are passed to the WLM exit by Sterling Connect:Direct.
v The first parameter points to the WLM System Capacity Information Area
(IWMWSYSI).
210 IBM Sterling Connect:Direct for z/OS: Administration Guide

v The second parameter points to a list of system names that were found in goal
mode by the WLM query. At least one of these systems must have a Sterling
Connect:Direct/Plex server active.
v The third parameter is used for the WLM exit return code. The following
describes the possible return codes:
Return Code Description
0 This indicates all systems are considered equal and no choice is made.
Negative value This indicates that no systems are selected.
1-n This indicates the chosen system by an index into the eligible system
list.
The following figure depicts the information passed to the WLM exit:
Sample WLM Exit
The following sample WLM exit is provided in $CD.SDGASAMP library.
Exit Description
DGAXWLMX This exit analyzes the IWMWSYSI info returned from an IBM Workload
Manager query and indicates the least busy system with a return code.
Tapemount Exit
The Sterling Connect:Direct tapemount exit provides an interface to StorageTek
Tape Silo Software. If you supply a user exit in the initialization parameters,
Sterling Connect:Direct invokes the exit prior to a tape VOLSER mount request.
Using the return codes resulting from this exit, you can obtain the status of the
volumes needed to satisfy the mount request prior to the Tape premount message
being displayed. (The TAPE.PREMOUNT = YES | NO | LIST parameter
determines if a tape premount message will be displayed or not.) If any volume is
not available for the Silo to process, the tape mount request is automatically
cancelled and an exit return code of 8 or higher is issued to indicate that the
Process is being held in error.
Chapter 9. Sterling Connect:Direct Exits 211

Exit Return
Code Explanation
0 The Tape Premount message will be suppressed.
4 The Tape Premount message will be issued.
8 or higher The Mount Process will be “Held in Error.”
Sample Tapemount Exit
Sterling Connect:Direct provides the following sample tapemount exit in the
$CD.SDGASAMP.
Exits Description
DGAXTAPX This exit interfaces with the StorageTek Tape Silo via SLA macro calls. You
can modify this member to work with other vendors' Tape Silo products.
You can use the sample JCL, DGAXATAP located in $CD.SDGASAMP, to assemble
and link-edit the exit.
Observe the following restrictions and requirements:
v The name of the tapemount exit load module is user-defined, but it must not
conflict with any other Sterling Connect:Direct load module names.
v Because the control blocks provided by Sterling Connect:Direct that the exit
must access are located in storage requiring 31-bit addressability, you must
link-edit the module with AMODE ANY to make it capable of executing in
31-bit mode.
v To activate the exit, specify “TAPEMOUNT.EXIT = modname” on page 370 in
the Sterling Connect:Direct initialization parameters file. You must link-edit the
tapemount exit as re-entrant and place in a load library that the Sterling
Connect:Direct DTF can access.
The TAPEMOUNT.EXIT parameters are:
Parameter Explanation
NOVOLS Used to define the return code if all volumes for a tape mount request are not
in the silo. Code with a value of 00, 04, or 08.
VIRTVOL Tell the exit how to treat a virtual tape VOLSER. Code with a value of OKAY
or ERROR.
TEST Used to supply diagnostic test messages to a DD statement named to match
the assembled program name. Code with a value of YES or NO.
UID Optional local identifier which appears in NDMLOG output with the PTF
maintenance listing.
Process Exit for Testing (DGAXPRCT)
The Process Exit for Testing (DGAXPRCT) allows you to perform the following
functions:
v Test new applications and customer connections
v Prevent future production work from executing until testing is complete after
you have terminated all active production work using the Flush Process
command
212 IBM Sterling Connect:Direct for z/OS: Administration Guide
v Resume regular production work after testing
v Control individual file transfers by application
v Enable and disable individual nodes and applications
While testing is being conducted, only Processes, particularly file transfers,
involved with the testing activity are executed. No production data is transferred
to applications being tested while at the same time no test data is transferred to
production applications.
Flow of the DGAXPRCT Exit
First you tell DGAXPRCT which Sterling Connect:Direct Processes to run and not
run by storing your preferences as text records in a parameter table stored as a
Partitioned Data Set (PDS) member. You can specify the following criteria for
DGAXPRCT to use to find matches for one or more Processes to include (using the
“I” command code) or exclude (“X” command code) from execution:
v A partial or full Process name
v A partial or full remote node name
v A partial or full Sterling Connect:Direct submitter ID and submitter node
combination
v A combination of Process name, remote node name and submitter ID/submitter
node, all of which must match
In addition to telling Sterling Connect:Direct which Processes to run, you tell the
system what to do with the Processes which do not get executed. You can specify
the following dispositions for Processes not permitted to run:
v Place the Process in the Hold queue
v Place the Processes in the Timer queue for session retry
v Flush the Processes from the queue
To see different ways the DGAXPRCT exit can be used, see Sample Test Scenarios.
The DGAXPRCT exit is invoked by the Stage 2 Security exit before the security
checks for a Sterling Connect:Direct Process about to be executed have been
performed. For information on how the Stage 2 Security exit is processed, see Stage
2 Security Exit.
The Process Exit for Testing reads and validates the DGAXPRCT parameter table
each time it is invoked when a Process is executed. If a syntax or other error
occurs, Sterling Connect:Direct places the Processes in the hold queue and returns
a non-zero return code and error message ID. If the table is valid, DGAXPRCT
scans the parameter table looking for a pattern that matches the Process that is
about to be executed. If a match is found, the Process is permitted to execute if the
"I" (Include) command code is in effect. If command code "X" (Exclude) is in effect,
the process is not permitted to execute. If a match is not found in the table,
DGAXPRCT performs the opposite processing from the case where a match is
found, that is, if no match is found and command code "I" is in effect, the Process
is not permitted to execute, whereas if command code "X" is in effect, the Process
is permitted to execute.
Note: To reverse an action taken, use the “R” (Reverse) command code. If a match
is found in an Include list and the “R” command code is also in effect, the Process
is excluded. Conversely, if a match is found in an Exclude list and the “R”
command code is also in effect, the Process is included.
Chapter 9. Sterling Connect:Direct Exits 213
If a Process is not to be permitted to execute, DGAXPRCT uses the disposition
specified in the DGAXPRCT parameter table to either hold, retry, or flush the
Process after the DGAXPRCT exit returns with a non-zero return code.
Note: For Processes initiated on remote nodes, the DGAXPRCT exit functions in
the same manner as it does for Processes submitted on the local Sterling
Connect:Direct node. The DGAXPRCT Parameter Table is searched for a matching
entry and the remotely initiated Process is either permitted to execute or excluded
from execution. However, because the local node is the SNODE for this type of
transfer, it cannot enforce the Process disposition setting in the DGAXPRCT
Parameter Table. The remote PNODE determines how the Process is handled.
Typically, the remote node places the Process in the Hold queue with a status of
"HE" (Held in Error) if SECURITY.NOTIFY=HOLD is specified or the DGAXPRCT
exit is supported on the remote node. If the remote node does not support
SECURITY.NOTIFY=HOLD or the DGAXPRCT exit, the Process terminates.
When both the PNODE and the SNODE invoke the DGAXPRCT exit and the
SNODE excludes a Process from executing, the PNODE automatically places the
Process in the Timer queue for session retry regardless of the disposition setting in
the DGAXPRCT Parameter Table on the PNODE. This processing is necessary
because of technicalities in the handling of an SNODE error at the point in the
Sterling Connect:Direct protocol.
Setting Up and Using the DGAXPRCT Exit
To set up and use the DGAXPRCT Exit, complete the following steps. This
roadmap is a high-level view of the procedure. For more information on each step,
go to the section referenced in that step.
Procedure
1. Review Overview of Security Options for information on security including
interfaces to other security software and sample exits.
2. Assemble the DGAXPRCT member in $CD.SDGASAMP library.
3. To activate the stage 2 security exit which invokes the DGAXPRCT exit, specify
SECURITY.EXIT=modname in the Sterling Connect:Direct initialization
parameters file (see SECURITY.EXIT = (module name, DATASET | ALL,
PSTKT) | OFF SECURITY = (module name, DATASET | ALL, PSTKT) | OFF
for information). You can modify the sample security exit, DGAMGSAF,
provided in the $CD.SDGASAMP library, to use as the base code for your stage
2 security exit.
4. Change the PROCEXIT parameter in the DGASECUR macro to DGAXPRCT.
See Enable the DGAXPRCXT Exit.
5. Create a PDS member to store parameters specifying how you want to
implement the DGAXPRCT Exit, that is, preferences such as which Processes to
run and not run and which queue to place unexecuted Processes. See Edit the
DGAXPRXCT Parameter Table.
6. Add DD statements to allocate the DGAXPRCT table and log information. See
Include Required DD Statements.
7. Reassemble and link-edit the Stage 2 exit source code. Because the control
blocks provided by Sterling Connect:Direct that the exit must access are located
in storage requiring 31-bit addressability, you must link-edit the module with
AMODE 31 to make it capable of executing in 31-bit mode. You must also
link-edit the stage 2 security exit as re-entrant and place in an authorized
library that the Sterling Connect:Direct DTF can access.
214 IBM Sterling Connect:Direct for z/OS: Administration Guide
8. Submit the startup jobstream to start Sterling Connect:Direct.
Note: It is not necessary to restart Sterling Connect:Direct when you modify
the DGAXPRCT parameter table. The new settings are automatically in effect
the next time a Process begins executing and invokes the DGAXPRCT exit,
which reads the new values in the table. See Reusing the DGAXPRCT Exit for
more information.
Enable the DGAXPRCXT Exit
The Stage 2 Security Exit executes the DGAXPRCT exit before it performs the
necessary security checks for a Sterling Connect:Direct Process about to be
executed. To enable the Security Exit to invoke the DGAXPRCT exit, you must
change the PROCEXIT parameter in the DGASECUR macro from NO to
DGAXPRCT, and reassemble the exit. See DGASECUR Parameters for more
information on this and all parameters in the DGASECUR macro.
Include Required DD Statements
Make sure your startup JCL includes the following DD statements:
//NDMPXTBL DD DSN=$CDPREF..PRCXTLIB(&NDMPXMEM),DISP=SHR
//USRINFO DD SYSOUT=*
The first DD statement allocates the parameter table PDS member while the second
DD statement allocates a SYSOUT data set to which user-defined information from
User Exits, such as error messages for parameter records incorrectly formatted and
matching entries for Processes which run, is logged.
The CONNECTX JCL startup member contains these DD statements. For more
information on the startup JCL members, see DD Statements in Startup JCL.
Edit the DGAXPRXCT Parameter Table
You can use the ISPF text editor to create the DGAXPRXCT Parameter Table which
defines which Sterling Connect:Direct Processes can and cannot run. This table is
stored as a Partitioned Dataset (PDS) member.
You must preallocate the data set with the following attributes:
DSORG=PO
LRECL=80
RECFM=FB
BLKSIZE=multiple of 80
Each table entry or record consists of a single-character command code in column
one. Most command codes have a parameter which begins in column two and
varies according to the command code function.
Note: The order of the entries in the table is important; the first match stops the
table scan and the action requested is taken (allow the process to execute, flush the
process, etc.).
Command
Code Description Subparameters/Examples
* Comment line. * Only run the following processes.
Chapter 9. Sterling Connect:Direct Exits 215

Command
Code Description Subparameters/Examples
E Enables DGAXPRCT. This command code must be
the first non-comment entry in the table.
The second column in this entry must contain
one of the following values which indicates
the disposition of a process if it is not allowed
to run.
H – Places the Process in the Hold queue with
a status of HE (Held in Error)
R – Places the Process in the Timer queue in
session retry until number of retries is
exceeded. Once this number is exceeded, the
Process is placed in the Hold queue with a
status of RH (Restart Hold).
F – Flushes the process from the queue
D Disallows DGAXPRCT execution and fails Process
execution with a non-zero (error) return code and
message NPRX003E.
You can also leave the disposition code in
column two to make it easier to change from
"E" to "D" and vice versa without having to
change column two to a blank for command
code “D.”
P Matches Processes based on a full or partial Process
name. Supports the wild card trailing asterisk (*).
Can be used to enable or disable Process execution
for a particular application by using naming
conventions to match an application.
In addition, remote node and/or
submitter@submitter-node can be specified to
further qualify the match.
The combined format is:
Pprocnam[,remote-node[,submitter@submitter-
node]]
PCOPY – Matches a single Process
PEOM* – Matches all Processes beginning
with “EOM” for the End of Month Processing
application
P* – Matches all Processes\
PCOPY,RNODE,SUE@NODE1 – Matches
Process COPY that was submitted by SUE on
NODE1 and whose remote node is RNODE.
PCOPY,,SUE@NODE1 – Matches Process
COPY that was submitted by SUE on NODE1.
PCOPY,RNODE – Matches Process COPY
whose remote node is RNODE.
P*,*,SUE@NODE1 – Matches all Processes
submitted by SUE on NODE1.
R Reverses the action to be taken on a match.
If the match is found in an include list, the Process
is excluded.
If the match is found in an exclude list, the Process
is included.
The combined format is:
Rprocnam[,remote-node[,submitter@submitter-
node]]
The syntax is the same as for the "P"
command code.
In this example, all Processes whose remote
node begins with RNODE are excluded from
execution except those whose remote node is
RNODE3.
X
R*,RNODE3
NRNODE*
L
216 IBM Sterling Connect:Direct for z/OS: Administration Guide

Command
Code Description Subparameters/Examples
N Matches Processes based on a full or partial remote
node name. Supports the wild card trailing asterisk
(*).
NCD.NODE1 – Matches a single remote node
name
NCD.NODEA* – Matches all remote node
names beginning with "CD.NODEA"
N* – Matches all remote node names
Note: P*,CDNODE1 is equivalent to
NCDNODE1 and can be specified as
R*,CDNODE1 to reverse the action.
S Matches Processes based on a full or wild card
Sterling Connect:Direct submitter ID and a full or
partial submitter node combination. The format is
<id>@<node>.
SACTQ0ACD@TPM002 – Matches a specific
submitter ID and node combination.
S*@TPM002 – Matches all submitter IDs from
node TPM002
SACTQ0ACD@* – Matches submitter ID
ACTQ0ACD from all nodes
SACTQ0ACD@TPM* - Matches submitter ID
ACTQ0ACD from all nodes beginning with
"TPM"
S*@* – Matches all submitter IDs from any
node. This is another way to match all
Processes.
Note: P*,*,SUE@NODE1 is equivalent to
SSUE@NODE and can be specified as
R*,*,SUE@NODE1 to reverse the action.
I Includes Processes for execution that match the
patterns in the table which follow this command
code. Either “I” or “X” must be the second
non-comment entry in the table. Processes which do
not match a pattern in the table are not executed.
Note: To choose which command code to use to
select Processes, determine which group is smaller
and use the corresponding command Code. For
example, if the number of Processes to be executed
is smaller than the number of Processes to exclude
from execution, specify “I” as the command code
and add patterns to match that group of Processes.
ER
I
NCD.BOSTON
Includes for execution only those Processes
whose remote node is CD.BOSTON. Excluded
Processes are placed in the Timer queue in
session retry
X Excludes from execution those Processes that match
the patterns in the table which follow this
command code. Either “X” or “I” must be the
second non-comment entry in the table. Processes
which do not match a pattern in the table are
executed.
EH
X
SDALLASOPS@*
Excludes Processes for execution submitted by
DALLASOPS from any node
L Last entry in table.
Sample Test Scenarios
The following examples show different applications of the DGAXPRCT exit using
DGAXPRCT Parameter Tables to define which Sterling Connect:Direct Processes to
run and not run.
Chapter 9. Sterling Connect:Direct Exits 217

Specify Which Processes Run
In this example, Sterling Connect:Direct executes all Processes that start with ACH
or are named DITEST01 or DITEST02. All other Processes are placed in the Hold
queue.
* Enable processing. Only permit processes matching one of the patterns
* to execute. Hold processes that don’t execute.
EH
I
PACH*
PDITEST01
PDITEST02
L
Specify Which Processes to Exclude
In this example, Sterling Connect:Direct does not execute any Process that starts
with ACH or is named DITEST01 or DITEST02. All other Processes are executed.
* Exclude matching processes. Permit all others to execute.
EH
X
PACH*
PDITEST01
PDITEST02
L
Permit Process Execution by Remote Node and Submitter User
ID/Node
In this example, Sterling Connect:Direct executes all Processes that match one of
the following criteria:
v The remote node name is DI.NODE1
v A remote node whose name starts with DI0017
v Any Sterling Connect:Direct submitter ID from node DI0049
v The specific Sterling Connect:Direct submitter ID ACHAPP from any node
All Processes not matching one of the above criteria are flushed from the queue.
* Only permit matching processes to execute. Flush those that do not.
EF
I
NDI.NODE1
NDI0017*
S*@DI0049
SACHAPP@*
L
Combine Matching Criteria for a More Specific Match
In this example, Sterling Connect:Direct executes all Processes that match one or
more of the following criteria:
v Processes that begin with XYZ
v Processes that begin with ABC whose remote node is NODE1
218 IBM Sterling Connect:Direct for z/OS: Administration Guide

All Processes not matching one of the above criteria are flushed from the queue.
* Only permit matching processes to execute. Flush those that do not.
EF
I
PXYZ*
PABC*,NODE1
L
Use the "R" (Reverse) Matching Criteria
In this example, Sterling Connect:Direct performs the following actions:
v Executes all Processes that begin with XYZ
v Executes all Processes that begin with ABC whose remote node is NODE1
v Excludes all Processes that begin with ABC and whose remote node is NODE1
when submitted by JOE@NODE2 from execution
All other Processes are flushed from the queue.
* Only permit matching processes to execute. Flush those that do not.
EF
I
PXYZ*
RABC*,NODE1,JOE@NODE2
PABC*,NODE1
L
Note: When using the "R" (Reverse) matching criteria, always specify the most
specific matching criterion first and the most generic matching criterion last.
Stop the DGAXPRCT Exit
In this example, the DGAXPRCT Exit will exclude Processes from being executed,
and display a non-zero return code signifying an error along with message ID
NPRX003E . The remainder of the table is ignored (including the “F” code to flush
Processes from the queue) and all Processes are placed in the Hold queue.
To resume testing and use the DGAXPRCT exit again, change the "D" command
code to an "E."
* Execute no processes at all. Put them in the hold queue and return.
DF
I
PACH*
PDITEST01
PDITEST02
L
Reusing the DGAXPRCT Exit
To facilitate the use of different testing scenarios, you can maintain multiple
members in the DGAXPRCT Parameter Table PDS. To reuse the basic DGAXPRCT
Parameter table but modify it to change the Processes which run and do not run,
follow this procedure. It is not necessary to restart Sterling Connect:Direct; the next
time a Process begins executing, the new settings will be in effect when the
DGAXPRCT exit reads the table.
Chapter 9. Sterling Connect:Direct Exits 219

About this task
CAUTION:
To control the execution of the DGAXPRCT exit, make sure that only authorized
operators can modify the DGAXPRCT Parameter Table PDS member using your
security system.
Procedure
1. Open the DGAXPRCT Parameter Table using the ISPF text editor.
2. Delete the current contents of the table member.
3. Copy another member for the next testing scenario you want to use and
modify it as needed.
4. Save the DGAXPRCT Parameter Table PDS member.
The next time the DGAXPRCT exit is invoked when a Process begins executing,
the DGAXPRCT exit uses this updated table.
DGAXPRCT Output
This topic contains example JOBLOG and USRINFO data set output resulting from
the execution of the DGAXPRCT exit.
Example JOBLOG Output
This example shows JOBLOG output when the DGAXPRCT exit is executing.
SVTM055I SESSION (001) ESTABLISHED WITH SNODE=WWW_TCP
NPRX000I ### Permitted: TSTRUN (00000007) SNODE=WWW_TCP
SVTM036I PROCESS STARTED TSTRUN ( 7) SNODE=WWW_TCP
IGD103I SMS ALLOCATED TO DDNAME NDM00027
SVTM052I CO01 COPY TSTRUN ( 7) SNODE=WWW_TCP
SVTM052I COMPLETED 00000000/SCPA000I
SVTM052I FROM /u/output/testfile7
SVTM052I TO DALLAS.O.TESTFILE.BENCH.M50
SVTM052I COMPLETED 00000000/SCPA000I
SVTM037I PROCESS ENDED TSTRUN ( 7) SNODE=WWW_TCP
SVTM056I SESSION (001) TERMINATED WITH SNODE=WWW_TCP
SVTM055I SESSION (001) ESTABLISHED WITH SNODE=WWW_TCP
NPRX109E ### Not executed: XSTRUN (00000009) SNODE=WWW_TCP
SVTM056I SESSION (000) TERMINATED WITH PNODE=WWW_TCP
Example USRINFO Output
These examples show USRINFO output that is written to the USRINFO dataset
while the DGAXPRCT exit is executing. Each line of output has a timestamp and
the hexadecimal address of the Sterling Connect:Direct Task Control Area (TCA)
under which the DGAXPRCT exit is executing. The TCA address permits
correlating output lines when Processes execute concurrently.
The following example shows DGAXPRCT output based on matching the specific
Process name, TSTRUN.
220 IBM Sterling Connect:Direct for z/OS: Administration Guide

965630E0 DGAXPRCT V1.14 ENTERED: SQCB@=16987688
965630E0 ############ APPLID TABLE ############
965630E0 EF
965630E0 I
965630E0 PTSTRUN
965630E0 L
965630E0 ############ END APPLID TABLE ############
965630E0 SETTING DISPOSITION TO FLUSH.
965630E0 TABLE MATCH: PNAME,PNUM=TSTRUN ,00000007
965630E0 ENTRY=PTSTRUN
NPRX000I ### Permitted: TSTRUN (00000007) SNODE=WWW_TCP
965630E0 DGAXPRCT EXITED: SQCB@/RC/MSGID 16987688 /00000000 /NPRX000I
96561D60 DGAXPRCT V1.14 ENTERED: SQCB@=16990688
96561D60 ############ APPLID TABLE ############
96561D60 EF
96561D60 I
96561D60 PTSTRUN
96561D60 L
96561D60 ############ END APPLID TABLE ############
96561D60 SETTING DISPOSITION TO FLUSH.
96561D60 NO TABLE MATCH: PNAME,PNUM=XSTRUN ,00000009
NPRX101E ### No entry: XSTRUN (00000009) SNODE=WWW_TCP
96561D60 DGAXPRCT EXITED: SQCB@/RC/MSGID 16990688 /00000004 /NPRX101E
The following example shows DGAXPRCT output based on matching the names of
all Processes that begin with TSTRUN using the wildcard *.
96562720 DGAXPRCT V1.14 ENTERED: SQCB@=16990688
96562720 ############ APPLID TABLE ############
96562720 EF
96562720 I
96562720 PTSTRUN*
96562720 L
96562720 ############ END APPLID TABLE ############
96562720 SETTING DISPOSITION TO FLUSH.
96562720 TABLE MATCH: PNAME,PNUM=TSTRUN ,00000010
96562720 ENTRY=PTSTRUN*
NPRX000I ### Permitted: TSTRUN (00000010) SNODE=WWW_TCP
96562720 DGAXPRCT EXITED: SQCB@/RC/MSGID 16990688 /00000000 /NPRX000I
96561D60 DGAXPRCT V1.14 ENTERED: SQCB@=16990688
96561D60 ############ APPLID TABLE ############
96561D60 EF
96561D60 I
96561D60 PTSTRUN*
96561D60 L
96561D60 ############ END APPLID TABLE ############
96561D60 SETTING DISPOSITION TO FLUSH.
96561D60 TABLE MATCH: PNAME,PNUM=TSTRUN2 ,00000011
96561D60 ENTRY=PTSTRUN*
NPRX000I ### Permitted: TSTRUN2 (00000011) SNODE=WWW_TCP
96561D60 DGAXPRCT EXITED: SQCB@/RC/MSGID 16990688 /00000000 /NPRX000I
The following example shows invalid entries in the DGAXPRCT Parameter Table.
96562720 DGAXPRCT V1.14 ENTERED: SQCB@=16990688
96562720 ### INVALID TABLE ENTRY:XTSTRUN*
NPRX005E ### Table format error encountered.
96562720 DGAXPRCT EXITED: SQCB@/RC/MSGID 16990688 /00000008 /NPRX005E
Chapter 9. Sterling Connect:Direct Exits 221
222 IBM Sterling Connect:Direct for z/OS: Administration Guide

Chapter 10. Custom Messages in the Message Library
You can load special user-defined messages into the Sterling Connect:Direct
message library. The sample format for the Sterling Connect:Direct message source
in the following figure is in the DGAXMSGC member of the Sterling
Connect:Direct sample library, $CD.SDGASAMP.
Note: Use the exact format as follows. You cannot use comments.
DELETE =MSG00001
INSERT =MSG00001
MODULE =MSGSOURC
STEXT= This is an example of the short text message (one).
L01 = This is an example of the long text message (one). As
L02 = many as 12 lines may be used for the long text message.
L03 =
L04 =
L05 =
L06 =
L07 =
L08 =
L09 =
L10 =
L11 =
L12 =
Observe the following rules for variables and message IDs:
v The DELETE and INSERT variables are 1–8 characters.
v The MODULE variable is 1–64 characters.
v The STEXT and L01 through L12 variables are 1–63 characters.
v To insert a message ID, the INSERT, MODULE, STEXT, and L01 through L12
variables are required.
v To delete a message ID, the DELETE variable is required.
v To replace a message ID, the DELETE, INSERT, MODULE, STEXT, and L01
through L12 variables are required.
The job stream in the following figure is in the DGAJMSGL member of the Sterling
Connect:Direct $CD.SDGAJCL library. After copying the message source into your
message source library and making changes as needed, run this job stream to add
your messages to the Sterling Connect:Direct message library.
//JOBNAME JOB (ACCT),'NAME',CLASS=A,NOTIFY=TSOID,MSGCLASS=X
//MSGBUILD EXEC PGM=DMMSGLOD,PARM='$CDHLQ.MSGFILE'
//STEPLIB DD DSN=$CDHLQ.SDGALINK,DISP=SHR
//SYSOUT DD SYSOUT=*
//INPUT DD DSN=$HLQ.SDGAMSGS,DISP=SHR
Note: For SMP/E installations, add the message source to the NMSGSRC target
library as an SMP/E USERMOD. MSGLOAD JCL can then process it.
Make the following changes to the job:
© Copyright IBM Corp. 1999, 2015 223

v Change the PARM statement to reference the file name of the Sterling
Connect:Direct VSAM message file. This value is the same value specified in the
MSGDSN initialization parameter.
v Change the STEPLIB DD card to reference the SDGALINK.
v Change the INPUT DD card to reference the message source text. A sample
format is in the member DGAXMSGC in the Sterling Connect:Direct sample
library, $CD.SDGASAMP.
Message IDs
In a Sterling Connect:Direct/Plex environment, messages can originate from any
Sterling Connect:Direct/Server or from the Sterling Connect:Direct/Manager so
you should define a 2-character message ID that identifies which Sterling
Connect:Direct/Plex member originated the message. This message ID is displayed
after the message number.
Define the message ID using the CDPLEX.MSGID initialization parameter.
The following example shows a message if the CDPLEX.MSGID value is set to S1.
The message ID is highlighted in bold.
SVTM055I S1 SESSION (001) ESTABLISHED WITH SNODE=SC.DUB.TPYLA2
SVTM055I S1 SESSION (001) ESTABLISHED WITH PNODE=SC.DUB.TPYLA2
SVTM036I S1 PROCESS STARTED MVSMVST3( 1) PNODE=SC.DUB.TPYLA2
SVTM036I S1 PROCESS STARTED MVSMVST3( 1) SNODE=SC.DUB.TPYLA2
224 IBM Sterling Connect:Direct for z/OS: Administration Guide

Chapter 11. Customizing Submit Screens
About this task
When you type variables into a submit screen, the IUI builds a SUBMIT command,
and the command goes to a dialog for handling. As delivered on the installation
tape, the primary IUI panel, DGA@PRIM, directly invokes the IUI submit panel,
DGA@UBMT, when the SB option is selected. You can construct a customized
submit screen to contain customized submit options. All menus can contain as
many choices as screen space permits. To customize the submit function, modify
DGA@PRIM to invoke DGA@SM03 instead of DGA@UBMT, when the SB option is
selected, and perform the following procedure.
The following general steps are illustrated in an example which describes how to
create a custom SUBMIT screen that copies a file to the existing file at another site
at noon every day. You are notified when the Process is complete.
Procedure
1. DGA@SM03 is a submit menu panel which contains only one menu option that
invokes DGA@UBMT. You can modify DGA@SM03 to include new menu
selections to invoke the new customized submit panels. This step is explained
in Step 1 - Modify the Existing Menu DGA@SM03.
2. Define at least one general purpose Process to be invoked by the new custom
submit screen. This step is explained in Step 2 - Define General Purpose
Process.
3. Provide custom submit screens. These screens:
v Process variables that are resolved as SUBMITS occurs.
v Build a command on each screen that communicates with the IUI dialog
routines.
This step is explained in Step 3 - Provide a New Submit Screen.
Step 1 - Modify the Existing Menu DGA@SM03
To modify the Sterling Connect:Direct Submit Menu, add the following in Submit
Menu (DGA@SM03):
v A line in the BODY section to specify the new option (+ 2 = => COPY TO
EXISTING FILE AT ANOTHER SITE EVERYDAY AT NOON)
v A line in the PROC section to specify what to do when that option is selected
(2,’PANEL(CUSTSUBM)’)
The following figure shows the menu displayed after you add information. Only
the elements necessary to modify an existing menu are displayed. If the user
selects Option 2 on the command line, Sterling Connect:Direct gives control to the
screen with the name CUSTSUBM and displays that screen.
© Copyright IBM Corp. 1999, 2015 225

)ATTR
"
)BODY
#UNODE + SUBMIT MENU +&ZDATE
+CMD%= = > _ZCMD +&ZTIME
#STEXT
+
%PROCESSES:
+
+ 1 = = > SUBMIT A PROCESS
+ 2 = = > COPY TO EXISTING FILE AT ANOTHER SITE EVERYDAY AT NOON
+
)INIT
"
)PROC
"
&SEL = TRANS(TRUNC(&ZCMD,'.')
"
"
1,'PANEL(DMISUBMT)'
2,'PANEL(CUSTSUBM)'
*,'?'
"
)END
Note: For SMP/E installation, implement all ISPF panel changes as SMP/E
USERMODs to the NISPPLIB target library.
Step 2 - Define General Purpose Process
The second step in creating a customized submit screen is to define a Process that
the custom Submit screen invokes. The following Process is named APROC.
APROC PROCESS SNODE=&SNODE NOTIFY=%USER
STEP1 COPY FROM (PNODE DSN=&DSN1 DISP=SHR) -
TO (DSN=&DSN2 DISP=(SHR,KEEP))
The SNODE, source file name, and the destination file name specified in the BODY
section of the custom submit screen are substituted into the symbolic fields
currently in the PROCESS (SNODE, DSN1, and DSN2).
Step 3 - Provide a New Submit Screen
A new submit screen processes variables resolved during submission and builds a
command to communicate with the dialog routines. Although the customized
submit screen can have any appearance, use the following information to help you
design your screens.
Procedure
1. Use the generic submit screen (DGAXCUST) found in the sample library,
$CD.SDGASAMP, as a base for creating the custom screen.
2. Use the least number of input fields necessary when creating the screen to
accomplish Process submission.
3. Use existing variables from DGAXCUST, if possible. You can use any variable
name, but fewer changes are necessary when you use the existing code. The
following ISPF variables are used in the Sterling Connect:Direct submit
processing.
226 IBM Sterling Connect:Direct for z/OS: Administration Guide

Variable Explanation
&PNAME1 Name of Process to be submitted
&DSN File name containing Process to be submitted
&SNODE Secondary node name
&H HOLD specification
&R RETAIN specification
&PR Priority of the Process
&NEWNAME New name for the Process being submitted
&CLS Process class
&NOTIFY Notify Sterling Connect:Direct user ID
&PNODEID Security user ID at PNODE
&PNODEPW Current security password at PNODE
&PNODENPW New security password at PNODE
&SNODEID Security user ID at SNODE
&SNODEPW Current security password at SNODE
&SNODENPW New security password at SNODE
&DSYMBPARM Symbolic variable specification
&STIME Start time value
&SDATE Start day/date value
&CMD1 Used in constructing command string
&CMD2 Used in constructing command string
&CMD3 Used in constructing command string
&CMD4 Used in constructing command string
Note: Do not change the &CMD1, &CMD2, &CMD3, and &CMD4 ISPF
variables. The SUBMIT command string is built into these four variables.
The following figure shows the ATTR and BODY sections of the customized
submit screen CUSTSUBM. The ATTR section is the same as in the sample base
screen, DGAXCUST. As seen in the BODY section, FROMDSN and TODSN are
variables that are symbolically substituted when the general purpose Process
APROC is submitted.
Chapter 11. Customizing Submit Screens 227

)ATTR
+ TYPE(TEXT) INTENS(LOW) SKIP(ON)
: TYPE(INPUT) INTENS(NON)
# TYPE(OUTPUT) INTENS(HIGH) JUST(ASIS) CAPS(OFF)
@ TYPE(OUTPUT) INTENS(LOW) JUST(ASIS)
¢ PAD(_)
)BODY
#UNODE + CUSTOMIZED SCREEN
+CMD%= = > _ZCMD
#STEXT + TIME-&ZTIME
% COPY TO EXISTING FILE AT ANOTHER SITE + DATE-&ZDATE
% EVERY DAY AT NOON + JULIAN-&ZJDATE
+ FILE TO BE SENT FROM HERE
% = = > ¢FROMDSN +
+
+ NODE TO RECEIVE THE FILE
% = = > ¢SNODE +
+
+ RECEIVING FILE ON ABOVE NODE
+ = = > ¢TODSN
+
4. Make the necessary changes in the INIT section after deciding how you want to
set up the screen. Initialize all INIT section variables to the appropriate default
value. For CUSTSUBM, the INIT section is in the following figure.
)INIT
.ZVARS = ’(V@SEC)’
&NXTHELP = DMJSBMT1
.CURSOR = &FROMDSN /*CHANGED */
&UNODE1 = &UNODE1
&SPC = ’’
..&V@SEC = ’N’
..IF (&PROC ~= ’Y’)
&STEXT = ’’
/* &PNAME1 = ’’ DELETED */
/* &DSN = ’’ DELETED */
&SNODE = ’’
/* &Q = ’’ DELETED */
/* &H = ’’ DELETED */
&R = ’Y’ /*CHANGED */
/* &PR = ’’ DELETED */
/* &NEWNAME = ’’ DELETED */
/* &CLS = ’’ DELETED */
&STIME = ’12:00’ /*CHANGED */
/* &SDATE = ’’ DELETED */
/* &SYMBPARM = ’’ DELETED */
&FROMDSN = ’’ /* ADDED */
&TODSN = ’’ /* ADDED */
/* IF (&UNODE = &LNODE) DELETED *
&NOTIFY = ’%USER’
/* IF (&UNODE ~= &LNODE) DELETED */
/* &NOTIFY = ’’ DELETED */
IF (&PROC = ’Y’)
IF (&PROC# ~= ’NONE’)
.MSG = IUSB000I
IF (&STEXT = ’’)
.HELP = &NXTHELP
IF (&STEXT ~= ’’)
.HELP = DMI@MSG
The following changes are made in the INIT section:
v The cursor field is changed to FROMDSN.
v &R is changed to Y to indicate RETAIN=YES.
228 IBM Sterling Connect:Direct for z/OS: Administration Guide

v &STIME is changed to 12:00 to indicate STARTT=(,12:00).
v &FROMDSN and &TODSN are added and initialized to blanks.
v Lines which carry a DELETED comment are removed because they are no
longer necessary.
5. Make the necessary changes in the PROC section after deciding how you want
to set up the screen. Verify PROC section field values and build the command
string to submit the Process. For CUSTSUBM, the PROC section is in the
following figures.
)INIT
)PROC
&PROC# = ’NONE’
&CMD = &ZCMD
&SEL = TRANS( TRUNC (&ZCMD,’.’)
SPF,’PANEL(ISR@PRIM) NEWAPPL(ISR)’
WHO,’PANEL(DMI@WHO)’
SW,’PGM(DMICMD) PARM(&CB@)’
M,’PANEL(DMI@MSG)’
AUTH,’PANEL(DMI@AUTH)’
’ ’,’PGM(DMICMD) PARM(&CB@)’
*,’?’ )
&ZTRAIL = .TRAIL
IF (&ZCMD = ’SW’)
&SPC = ’SLN’
IF (&CMD = ’ ’)
VER(&FROMDSN,NONBLANK) /* ADDED */
VER(&SNODE,NONBLANK) /* ADDED */
IF (&TODSN= ’’) /* ADDED */
&TODSN=&FROMDSN /* ADDED */
/* VER(&PNAME1,NAME,MSG=IUSB001I) DELETED */
/* IF (&PNAME1 ~= ’ ’) DELETED */
/* IF (&DSN ~= ’ ’) DELETED */
/* .MSG = IUSB002I DELETED */
/* .CURSOR = PNAME1 DELETED */
/* IF (&DSN = ’ ’) DELETED */
/* VER(&PNAME1,NONBLANK,MSG=IUSB003I) DELETED */
/* VER(&Q,LIST,Y,N,MSG=IUSB022I) DELETED */
/* VER(&H,LIST,Y,N,C,MSG=IUSB005I) DELETED */
VER(&R,LIST,Y,N,I,MSG=IUSB006I)
/* VER(&V@SEC,LIST,Y,N,I,MSG=IUSB006I) DELETED */
/* VER(&PR,RANGE,0,15,MSG=IUSB007I) DELETED */
/* VER(&NEWNAME,NAME,MSG=IUSB008I) DELETED */
/* VER(&CLS,RANGE,1,255,MSG=IUSB009I) DELETED */
&USER = TRUNC(&NOTIFY,1)
IF (&USER ~= %)
VER(&NOTIFY,NAME,MSG=IUSB010I)
&PROC = ’Y’
Chapter 11. Customizing Submit Screens 229

&CMD1 = ’ SUB PROC=APROC’ /*CHANGED */
&CMD2 = ’’
&CMD3 = ’’
&CMD4 = &SYMBPARM
IF (&PNAME1 ~= ’ ’) /*CHANGED */
&CMD1 = ’&CMD1 PROC=&PNAME1’ /*CHANGED */
IF (&DSN ~= ’ ’) /*CHANGED */
&CMD1 = ’&CMD1 DSN=&DSN’ /*CHANGED */
IF (&SNODE ~= ’ ’)
&CMD1 = ’&CMD1 SNODE=&SNODE’
/* IF (&Q ~= ’ ’) DELETED */
/* &CMD1 = ’&CMD1 REQUEUE=&Q’ DELETED */
/* IF (&H ~= ’ ’) DELETED */
/* &CMD1 = ’&CMD1 HOLD=&H’ DELETED */
IF (&R ~= ’ ’)
&CMD1 = ’&CMD1 RETAIN=&R’
/* IF (&PR ~= ’ ’) DELETED */
/* &CMD1 = ’&CMD1 PRTY=&PR’ DELETED */
/* IF (&NEWNAME ~= ’ ’) DELETED */
/* &CMD1 = ’&CMD1 NEWNAME=&NEWNAME’ DELETED */
IF (&NOTIFY ~= ’ ’)
&CMD2 = ’ NOTIFY=&NOTIFY’
&PARMX = ’’
&PARMX2 = ’’
/* IF (&SDATE ~= ’ ’) DELETED */
/* &PARMX = ’Y’ DELETED */
/* &CMD2 = ’&CMD2 STARTT=(&SDATE,’ DELETED */
IF (&STIME ~= ’ ’)
IF (&PARMX ~= ’Y’)
&PARMX = ’Y’
&PARMX2 = ’Y’
&CMD2 = ’&CMD2 STARTT=(,&STIME’
IF (&PARMX2 ~= ’Y’)
&CMD2 = ’&CMD2 &STIME’
IF (&PARMX = ’Y’)
&CMD2 = ’&CMD2’
/* IF (&CLS ~= ’’) DELETED */
/* &CMD2 = ’&CMD2 CLASS=&CLS’ DELETED */
/* IF (&V@SEC = ’Y’) DELETED */
/* &ZSEL = ’PANEL(DMIUSRID)’ DELETED */
&CMD3= ’&&DSN1=&FROMDSN’ /*ADDED */
&CMD3= ’&CMD3 &&DSN2=&TODSN’ /* ADDED */
)END
The following changes are made in the PROC section:
v A verify is added for the &FROMDSN variable. It must be non-blank.
v A verify is added for the &SNODE variable. It must be non-blank.
v A test for blanks in &TODSN is added. If &TODSN is blank, it is set to
&FROMDSN.
v &CMD1 is changed to contain the string SUB PROC=APROC, the command
default.
v &CMD3 is added to contain the string &&DSN1=&FROMDSN. Symbolic
substitution is accomplished with this addition. When APROC is submitted,
&DSN1 is translated to whatever value is in the &FROMDSN file.
v The next-to-last line is added to concatenate the string &&DSN2=&TODSN
to the contents of &CMD3. When APROC is submitted, &DSN2 is translated
to the value in &TODSN.
v Lines which carry a DELETED comment are removed because they are no
longer necessary.
230 IBM Sterling Connect:Direct for z/OS: Administration Guide

If Y12.FROMHERE is the file to be sent, CD.THERE is the node to receive the
file, Z12.TOHERE is the receiving file, and the Process is APROC, then the
command string is built as follows.
SUB PROC=APROC SNODE=CD.THERE RETAIN=Y NOTIFY=%USER -
STARTT=(,12:00) &DSN1=Y12.FROMHERE &DSN2=Z12.TOHERE
When the Process APROC is submitted, it is resolved as follows.
APROC PROCESS SNODE=CD.THERE NOTIFY=%USER
STEP1 COPY FROM (SNODE DSN=Y12.FROMHERE DISP=SHR) -
TO (DSN=Z12.TOHERE DISP=(SHR,KEEP))
Chapter 11. Customizing Submit Screens 231
232 IBM Sterling Connect:Direct for z/OS: Administration Guide

Chapter 12. Administering Statistics
The Sterling Connect:Direct for z/OS statistics facility logs statistics to a series of
VSAM file pairs. Each pair consists of an entry-sequenced file and a key-sequenced
file, both with the REUSE attribute.
File Pair Configuration
The minimum configuration is two file pairs, or four files, however you can
configure more than two file pairs. Specify the file pairs in the initialization
parameters, STAT.DSN.BASE and STAT.FILE.PAIRS, as data set name high level
qualifiers and the number of pairs. This specification determines the configuration
of the statistics file pair list.
Within each file pair, Sterling Connect:Direct writes the statistics records to the
entry-sequenced file, while the key-sequenced file maintains index information
about the records. On average, Sterling Connect:Direct writes records to the
key-sequenced file at the rate of about one for every two records written to the
entry-sequenced file.
Retrieving Statistics with the SELECT STATISTICS Command
When you issue SELECT STATISTICS commands, the system locates the requested
records by using the key-sequenced file as an index to the entry-sequenced file. All
the file pairs defined to the DTF are available to SELECT STATISTICS command
processing. Sterling Connect:Direct searches any file pair that contains records
satisfying the SELECT STATISTICS command, not just the files currently being
written.
How Records Are Written
Sterling Connect:Direct writes the statistics records to the entry-sequenced VSAM
files in chronological order, starting at the beginning of the file and proceeding
until the file or its paired key-sequenced file is full. The oldest record is always at
the beginning of the file and the newest record is last. The system records each
statistics record as a single VSAM record. The system does not compress the
records or add control information.
When a file pair is full, the system switches to the next in the sequence, and begins
writing to it. When the last file pair in the list is full, the system wraps back to the
first pair in the sequence.
You can also specify the time of a file switch by using the STAT.SWITCH.TIME
initialization parameter. For example, you can specify that statistics files switch at
midnight every day, which limits a file pair to records from a single day. Sterling
Connect:Direct also provides a statistics switch API command that directs the DTF
to perform a switch at any time.
When the system has written to all the pairs in the list, the system reuses the pairs.
When a switch is made, the system closes the active pair and makes the pair with
the oldest data the new active pair. When the system switches to a file, or a file
becomes active, Sterling Connect:Direct for z/OS does a VSAM RESET. This VSAM
RESET erases any records and index information in the active file. The system then
© Copyright IBM Corp. 1999, 2015 233

writes new records starting at the beginning of the file.
Tools to Monitor the Statistics Facility
Sterling Connect:Direct provides the following tools for monitoring the statistics
facility:
v INQUIRE STATISTICS command
v S2 statistics records
v SS statistics records
v DGASSTAT utility
INQUIRE STATISTICS Command
The INQUIRE STATISTICS command gives a snapshot of the status of the facility.
INQUIRE STATISTICS produces a report that includes the following:
v List of any currently EXCLUDEed record types
v File pair list configuration that includes which file pair is active
v Date and time range covered by each file pair
v Size of each file
v Utilization percentage of the entry-sequenced files
v Count of SELECT STATISTICS commands active against each file pair
v Indication if logging is waiting for SELECT STATISTICS to finish so a file pair
can be reset
v Indication if logging is waiting for archive to finish so a file pair can be reset
v Reason for the last switch from each file pair
v Most recent file access return code and message ID for each file
v Utilization percentage of the nonactive key-sequenced files
v Indication of whether archive notification was received for the nonactive files
S2 Statistics Records
The S2 statistics records contain information about the statistics logging function.
The system writes the records about once per hour when activity exists in the DTF.
Each S2 record contains statistics about the period of time since the prior S2 record.
The S2 statistics records include the following information:
v Beginning time and length of the period covered
v Count of records written in the period
v Count of ESDS control intervals written in the period
v Count of total bytes written to the ESDS
v Average statistics record length
v Average records per control interval
v Average ESDS writes per second
v Average KSDS writes per second
v Average logging service time
v Total waits for logging queue element
v Each indexed field including max keys and average keys per control interval
Use the TYPE parameter of the SELECT STATISTICS command to view the S2
records. The system writes the S2 records with the user ID specified in the
STAT.USER initialization parameter. If you code a unique ID for STAT.USER and
234 IBM Sterling Connect:Direct for z/OS: Administration Guide

you specify the USER parameter on the SELECT STATISTICS request, you greatly
reduce the search time because the user ID is an indexed field. See the IBM Sterling
Connect:Direct for z/OS User Guide for more information on how to use the SELECT
STATISTICS command.
For example, if you code STAT.USER=statuser, a SELECT STATISTICS request to
display all S2 records looks like the following figure.
SELECT STATISTICS WHERE (USER=statuser, TYPE=(S2)) TABLE
SS Statistics Records
The SS statistics records contain information about SELECT STATISTICS
processing. One SS record is written for each SELECT STATISTICS command that
executes. The SS record includes information such as the index that Sterling
Connect:Direct uses to search the files and the number of requests issued to the
keyed and entry-sequenced clusters. The record also includes the number of
records examined and rejected.
Use the SELECT STATISTICS command with the TYPE parameter to view the SS
record.
Using selection criteria with the SELECT STATISTICS request improves the
performance by efficiently locating the requested records. For example, you can
include the ID of the user that issued the SELECT STATISTICS command or the
approximate time the request was issued, using the STARTT, STOPT, and USER
parameters. The following figure shows an example using this selection criteria.
SELECT STAT WHERE -
(TYPE=(SS) USER=USER1 STARTT=(,NOON) STOPT=(,13:00)) TABLE
Using the DGASSTAT Utility to Determine File Usage
Use the DGASSTAT utility to find out the rate at which the system generates
statistics records. DGASSTAT also performs an analysis of the contents of the
statistics file showing what percentage of the records are of each record type. This
utility runs as a batch job step, and analyzes a single statistics entry-sequenced file.
Use the DGASSTAT JCL to report on the statistics files. It calculates the average
number of CIs used per day at one DTF.
The job stream example in the following figure, DGAJSTAT , is found in the
$CD.SDGAJCL distribution library.
//JOBNAME JOB (ACCT),CLASS=A
//************************************************************
//* *
//* Connect:Direct *
//* *
//* This JCL will invoke the utility to produce *
//* a report for a Statistics File. *
//* *
//* Change "$CD" to the high-level qualifier(s) *
//* appropriate for your installation. *
//* *
//* Change "$CDVSAM.STAT.ESDS01" to match the name *
//* of the Statistics file to be analyzed. *
//* *
//************************************************************
Chapter 12. Administering Statistics 235

//STEP1 EXEC PGM=DGASSTAT
//STEPLIB DD DISP=SHR,DSN=$CD.SDGALINK
//SYSOUT DD SYSOUT=*
//ESDS DD DISP=SHR,DSN=$CDVSAM.STATS.ESDS01 (ESDS of file pair)
Optimizing Statistics Files
Use this information to determine the most efficient use of Statistics file space.
About this task
Note: Sterling Connect:Direct does not support extended-format,
extended-addressing ESDS Statistics data sets.
In this example, the Sterling Connect:Direct software is installed using the default
statistics installation of two file pairs with a total capacity of 13,500 records. After
running Sterling Connect:Direct for a time, you determine that the records log for
about 2.5 days before the file pair list wraps. The administrator wants to provide
space for 7 days worth of records to be available at any given time. The
administrator does the following:
Procedure
1. Use DGASSTAT to determine the number of records written daily.
Run the DGASSTAT utility against the statistics entry-sequenced clusters to
determine the rate at which the system generates the statistics records.
For example, DGASSTAT shows that records per day is approximately equal to
5,400.
2. Determine the total capacity of the statistics file.
capacity = (records per day) * days
Determine the total capacity in this example by multiplying the 5,400 records
per day by seven days. In this case, the total capacity of the statistics file is
37,800 records.
3. Determine the number of records per file pair.
In this example, the administrator decides to define four file pairs, so each are
given a capacity of 9,500 records, for a total capacity of 38,000 records.
4. Determine the RECORDS parameter value for the key-sequenced clusters.
KSDS-records = 0.75 * (ESDS-records)
Determine the number of KSDS records by multiplying 75% by 9,500, the
number of records per file pair. The RECORDS parameter value for the
key-sequenced clusters is 7,125.
Results
Based on these calculations, the administrator allocates four file pairs. The
entry-sequenced cluster (ESDS) of each pair is defined with RECORDS(9500). The
key-sequenced clusters (KSDS) are defined with RECORDS(7125).
236 IBM Sterling Connect:Direct for z/OS: Administration Guide

Change the File Pair Configuration
Make changes to the statistics files or to the configuration of the file pair list when
the DTF is not running. During DTF execution, the files remain allocated by
Sterling Connect:Direct.
The restrictions that Sterling Connect:Direct places on changes to the configuration
maintain the integrity of the facility. At DTF initialization time, Sterling
Connect:Direct checks the usability, validity, and accessibility of the statistics files
data.
File Pair Verification
Sterling Connect:Direct performs a verification procedure at initialization, as
follows:
v Within each file pair, Sterling Connect:Direct verifies the appropriate sizing,
relative to each other, of the entry-sequenced cluster and the key-sequenced
cluster. If the file pair is not relatively sized, then Sterling Connect:Direct issues
a warning message and initialization continues.
v If either of the files of a pair has data, Sterling Connect:Direct attempts to verify
that the two files are actually a statistics file pair. Sterling Connect:Direct verifies
that the key-sequenced file really does contain index information for the
associated entry-sequenced file.
Sterling Connect:Direct uses control information maintained in the key-sequenced
file to perform the verification. The software keeps a control record in the KSDS
which contains the data set name and the control interval size of the paired
entry-sequenced file. If this information does not match, statistics initialization
fails.
Changing the File Pair
Following are the implications of changing the file pair.
v Changing the control interval size of the ESDS or renaming the clusters causes
initialization to fail because the control record in the KSDS no longer matches
the files. The two ways to resolve this statistics initialization failure are:
– First, you can use the DGADBKEY utility to rebuild the key-sequenced
cluster. This utility recreates the KSDS control record so that it matches the
new names or control interval size. The records in the file pair remain
accessible when the DTF is available again.
– The second solution is to empty the files. The file pair is available for logging
new records. However, the old records are no longer available. You may want
to archive the files before emptying them.
v Changing the size of a file pair is not a problem. The sizes of both files of a pair
change together so that the relative sizes do not change.
– If the files are made larger and the names remain the same, then copy the
records from the old smaller entry and key-sequenced clusters to the new
larger ones.
– Use the same procedure to make a file pair smaller if all the existing records
from both files will fit into the smaller space of the new files. If the existing
records do not fit, then the new smaller file pair must be left empty initially,
and the old records become unavailable.
Chapter 12. Administering Statistics 237

File Pair List Verification
Sterling Connect:Direct generates the statistics file pair list from the initialization
parameters STAT.DSN.BASE and STAT.FILE.PAIRS. See STAT.DSN.BASE = dsname
base STAT.FILE.PAIRS = number for an example of a file pair list.
The Sterling Connect:Direct statistics facility processes the statistics file pair list in a
circular, or wrap-around fashion. The system maintains statistics records in strictly
chronological order both within each file pair, and with regard to the file pairs in
the list.
At DTF initialization, unless STAT.INIT=COLD is specified in the initialization
parameters, Sterling Connect:Direct verifies that the order of the file pairs is valid.
This verification is done by examining the date and time range of each non-empty
file pair in the list. These must be in strictly ascending order throughout the list,
except across the wrap point. Empty file pairs may appear anywhere in the list.
Changing the Number of File Pairs
It can be useful to periodically change the number of file pairs in the list. To
change the number of file pairs, change the STAT.FILE.PAIRS initialization
parameter which specifies the number of file pairs. This action adds to or removes
from the end of the list.
v Add empty file pairs to the end of the list unless you specify STAT.INIT=COLD.
v Remove records from the end of the list by reducing the STAT.FILE.PAIRS value.
When you remove these records, they become unavailable and can in some cases
leave gaps in the statistics data. You may want to archive these records before
removing them.
Archiving Statistics
Archiving refers to the process of copying the records from a statistics
entry-sequenced cluster to another data set for long-term storage. The output of
this process is an archived statistics file. You can write the archive file to a VSAM
entry-sequenced cluster with the same characteristics as a statistics ESDS, or to a
non-VSAM sequential file on DASD. The system does not store the statistics
records in the ESDS in any special format. The system records each statistics record
as a VSAM record in an ordinary VSAM ESDS. You can also write the archive file
to a magnetic tape or a database table.
Archiving Using a Predefined Process
Using the DTF initialization parameter STAT.SWITCH.SUBMIT, you can specify
that when the DTF switches from one statistics file pair to another, Sterling
Connect:Direct submits a predefined Process to archive the records in the
previously active ESDS. Sterling Connect:Direct submits this archive Process with a
symbolic parameter indicating the data set name of the ESDS of the pair.
v The Process can then use Sterling Connect:Direct to copy the data to another
location. A sample archive Process, DGAPSTAT, is in the $CD.SDGAPROC
distribution library.
v Alternatively, the Process can submit a batch job to archive the data using
IDCAMS REPRO, or some other utility. Use the DGADTSUB utility to substitute
the file data set name into the submitted job stream. You can invoke
DGADTSUB through the RUN TASK statement. A sample archive Process,
DGAPSTRJ, that submits a batch job using DGADTSUB.
238 IBM Sterling Connect:Direct for z/OS: Administration Guide

Timing the Archive
The archive must complete before Sterling Connect:Direct needs to reuse the file
being archived, that is, at the time of wrap-around of the file pair list. The
completion of the archiving Process is important because Sterling Connect:Direct
erases the contents of the statistics file when the system switches to that file. In
other words, archiving must complete within the time required for the file pair list
to wrap. Normally, this condition does not present a problem.
Require Confirmation of Archival
The STAT.ARCH.CONFIRM initialization parameter specifies whether or not to
ensure that data is archived before the system erases the file. If you do not want
archiving, Sterling Connect:Direct simply resets the files when the switching
occurs, and begins writing. If you want archiving, Sterling Connect:Direct verifies
that the archive is complete before proceeding. In this case, Sterling Connect:Direct
requires notification of archival. Sterling Connect:Direct is notified in several ways:
v If the archive is done using the COPY statement in a Sterling Connect:Direct
Process, then the Process can also invoke the DGADARRT utility when the
COPY successfully completes. Sterling Connect:Direct invokes DGADARRT
through a RUN TASK statement, and notifies Sterling Connect:Direct that the
data is archived.
v If you use a batch job to archive, then the job can send the notification by
including a step to execute the DGADARBT utility.
v Also, you can issue the API command STATISTICS ARCHIVED to inform
Sterling Connect:Direct to reuse a file pair.
If no indication regarding the completion of the archive exists when Sterling
Connect:Direct needs to reuse the files, the system issues a message, similar to the
example shown below, to the operator console and waits for a reply indicating
permission to reuse the file.
10.00.01 JOB82592 SSTL013I Statistics file pair switch from 02 to 01, code:TIMER
10.00.02 JOB82592 SSTL009I Arch notification required but not received for file pair 01
10.00.02 JOB82592 *93 SSTL008I Reply "GO" when file available, or "DISABLE" logging.
In this situation, all activity in the DTF ceases until a response to the message from
the operator exists indicating that the statistics file can now be overwritten. This
safeguard occurs as a result of the request that the DTF not erase statistics data
unless it is certain that archiving the statistics is complete.
If you have not been requiring archival notification and decide to begin requiring
it, you can avoid getting these messages by using the IUI command STAT, CF
option and forcing all pairs not in use to indicate they have been archived.
Not Requiring Confirmation of Archival
Sterling Connect:Direct does not require archive confirmation before reusing a
statistics file pair when you specify or default to the DTF initialization parameter,
STAT.ARCH.CONFIRM=NO. If you specify this initialization parameter, you are
responsible for ensuring that the archive successfully completes before Sterling
Connect:Direct resets the file. If the file is reset before copying the records, the data
is lost.
Chapter 12. Administering Statistics 239
If the records are in the process of being copied when Sterling Connect:Direct
needs to reset the file, then Sterling Connect:Direct must wait for the copy to
complete. This operation is because Sterling Connect:Direct must have exclusive
access to the file to do the VSAM reset. In this situation, Sterling Connect:Direct
also issues a message to the operator console and waits for a reply indicating that
the file can be reset.
Using the SELECT STATISTICS Command with Archived
Statistics
Sterling Connect:Direct for z/OS provides a means of issuing the SELECT
STATISTICS command against archived statistics. To make archived statistics
available to SELECT STATISTICS, you must put the archived statistics in the
format of a statistics file pair. You must make available a VSAM entry-sequenced
cluster with a paired VSAM key-sequenced cluster containing the index
information.
For example, if the records are archived to a magnetic tape file, you must first copy
the archived records to a VSAM ESDS. Then you can run the DGADBKEY utility
to build the required associated VSAM KSDS. Refer to Program Directory for IBM
Sterling Connect:Direct for z/OS and Planning DASD Requirements in IBM Sterling
Connect:Direct for z/OS Configuration Guide for information about the characteristics
and relative sizes of the keyed and entry-sequenced clusters of a file pair. See
“DGADBKEY” on page 245 for an explanation and example of the DGADBKEY
utility.
Use the ARCHDSN parameter of the SELECT STATISTICS command to search
archive files. The ARCHDSN parameter names only the key-sequenced clusters of
the archive pairs; Sterling Connect:Direct locates the associated entry-sequenced
clusters using control information in the key-sequenced clusters.
Sterling Connect:Direct does not examine the statistics file pair list of the DTF
when using the ARCHDSN parameter. Sterling Connect:Direct only searches the
archive files. SELECT STATISTICS processing does not let you name files currently
in the file pair list of the DTF in the ARCHDSN parameter or combine archive files
with files in the file pair list. Refer to the IBM Sterling Connect:Direct for z/OS User
Guide for a description of the SELECT STATISTICS command and the ARCHDSN
parameter.
Maintaining an Archive File Directory
Sterling Connect:Direct also provides the capability of maintaining a directory of
statistics archive files. The directory is a VSAM key-sequenced file that contains a
record for each archive file. Information in the record includes the data set name of
the archive file and the range of dates and times covered by the archived records.
Refer to VSAM Files DASD Requirement and Description in the IBM Sterling
Connect:Direct for z/OS Configuration Guide for estimating space requirements when
allocating the directory file.
To use the directory feature, you must allocate the directory file and specify its
name in the STAT.ARCH.DIR initialization parameter. Sterling Connect:Direct
provides a means of viewing the directory contents using the INQUIRE STATDIR
command.
The archive notification utilities, DGADARRT and DGADARBT, write the directory
records. If you want to use the directory feature, you must execute one of these
utilities from the Process or batch job that archives the records. This condition is
240 IBM Sterling Connect:Direct for z/OS: Administration Guide
true even if you do not specify STAT.ARCH.CONFIRM=YES in the DTF
initialization parameters. You must also use these utilities to send archive
notification when you are not using the directory feature, but specify
STAT.ARCH.CONFIRM=YES in the Initialization Parameters file.
Archive-Related Utilities
This section explains the archiving related utilities: DGADARRT, DGADARBT, and
DGADBKEY.
DGADARRT
The DGADARRT utility (ARchive Run Task) has the following functions:
v Notifies Sterling Connect:Direct of the availability of a statistics file pair for
reuse due to the completion of archiving
v Optionally adds an entry to the directory of archive files
v By default, removes the oldest record from a full archive directory to make room
for the newest record.
You can invoke DGADARRT from within a Process through the RUN TASK
statement. Use this utility when submitting a Process at statistics file pair switch
time that archives the statistical data using Sterling Connect:Direct to copy the
statistics to another file. When the copy operation successfully completes, the
system can update the directory and send the archive notification.
The program accepts three parameters through the RUN TASK statement.
v The first parameter is required and is the data set name of the statistics
entry-sequenced cluster that is archived.
v The second parameter is optional, and is the data set name of the archive file.
v The third parameter is optional, and specifies whether to age the archive
directory.
DGADARRT always sends archive notification to the DTF. If you specify
STAT.ARCH.CONFIRM=NO and no notification requirement exists, the notification
has no effect.
The addition of the entry in the directory of archive files depends on the
specification of the second parameter string. If the second parameter is present,
then the system updates the directory to contain an entry for the new archive file.
The following is an example of an archive Process. This Process copies a statistics
file to a sequential tape file and then invokes DGADARRT to send archive
notification to the DTF and update the directory of archive files. Sterling
Connect:Direct passes the data set name of the statistics file to the Process in the
form of the symbolic parameter &EDSN.
Chapter 12. Administering Statistics 241

DGAPSTAT PROCESS PNODE=primary.node -
SNODE=secondary.node -
PRTY=10 -
STARTT=(TODAY) -
&EDSN=
ARC COPY FROM (DSN=&EDSN) -
TO (DSN=stat.archive.dsn(+1) -
DISP=(NEW,CATLG,DELETE) -
DCB=(DSORG=PS,RECFM=VB,LRECL=2048) -
UNIT=CART -
LABEL=(1,SL) )
IF (ARC EQ 0) THEN
RUN TASK (PGM=DGADARRT,PARM=("&EDSN", -
"stat.archive.dsn(+0)"))
EIF
Whether the archive directory ages off the oldest record to make room for the
newest depends on the third parameter, ARCAGE.
ARCAGE=Y - Requests that if the archive directory is full, the oldest record is
deleted to make room for the newest. The user receives notification that the record
is aged off the archive directory. The amount of time it takes to add a record to the
archive directory is insignificant. But the amount of time it takes to age off the
oldest record is noticeable and increases with the size of the archive directory,
because all of the records in the ESDS must be rewritten. This is the default.
ARCAGE=N - Requests that if the archive directory is full, the utility stops without
updating the archive directory.
The following example shows the ARCAGE parameter specified in the
DGADARRT utility for use within a Process through the Run Task statement:
DGAPSTAT PROCESS PNODE=primary.node -
SNODE=secondary.node -
PRTY=10 -
STARTT=(TODAY) -
&EDSN=
ARC COPY FROM (DSN=&EDSN) -
TO (DSN=stat.archive.dsn(+1) -
DISP=(NEW,CATLG,DELETE) -
DCB=(DSORG=PS,RECFM=VB,LRECL=2048) -
UNIT=CART -
LABEL=(1,SL) )
IF (ARC EQ 0) THEN
RUN TASK (PGM=DGADARRT,PARM=("&EDSN", -
"stat.archive.dsn(+0)", -
"ARCAGE=Y"))
EIF
To prevent aging, set ARCAGE=N. As a result, the newest record is discarded,
rather than the oldest.
DGADARBT
The DGADARBT utility (ARchive BaTch) has the following two functions:
v Notifies Sterling Connect:Direct that a statistics file pair is archived and is
available for reuse
v Optionally adds an entry to the directory of archive files
242 IBM Sterling Connect:Direct for z/OS: Administration Guide

v By default, removes the oldest record from a full archive directory to make room
for the newest record.
Execute DGADARBT as a step within a batch job. Use DGADARBT when
submitting a job that archives the statistical data by executing IDCAMS or some
other utility to COPY the data to another file at statistics file pair switch time. The
system can update the directory and send archive notification upon successful
completion of the copy operation.
DGADARBT requires that the system allocate the archived statistics file with the
data definition name (DDNAME) of STESDS.
DGADARBT always sends archive notification to the DTF. If you specify
STAT.ARCH.CONFIRM=NO and no notification requirement exists, then the
notification has no effect.
If you want DGADARBT to update the directory of archive files, the system must
allocate the following DDNAMEs:
v STADIR, the directory file
v STARCH, the archive file
In the following example, the archive Process submits a batch archive job using
DGADTSUB to substitute the statistics file data set name into the job stream. The
system passes this data set name to the archive Process as the symbolic parameter
&EDSN. Refer to the IBM Sterling Connect:Direct for z/OS User Guide for
information about how to use DGADTSUB. The submitted job uses the IDCAMS
utility to copy the statistics records to an archive file. If the IDCAMS step is
successful, Sterling Connect:Direct invokes DGADARBT to both send the archive
notification and update the directory.
The following figure is a sample archive Process.
ARCHSTRJ PROCESS PNODE=primary.node -
SNODE=secondry.node -
PRTY=10 -
STARTT=(TODAY) -
&EDSN=
RUN TASK (PGM=DGADTSUB, -
PARM=("DSN=SYS3.CONNECT.INSTALL.JCL(ARCHJOB),DISP=SHR",-
"DSNAME &EDSN"))
The following figure is a sample archive job stream.
Chapter 12. Administering Statistics 243

//ARCHJOB JOB (ACCT),CLASS=A
//*
//* ---------------------------------------------------------------- *
//* IDCAMS step to archive the Statistics ESDS: *
//* ---------------------------------------------------------------- *
//*
//STEP1 EXEC PGM=IDCAMS
//SYSPRINT DD SYSOUT=*
//INPUT DD DISP=SHR,DSN=&DSNAME
//OUTPUT DD DISP=(NEW,CATLG,DELETE),
// DSN=stat.archive.dsn(+1),
// UNIT=CART,
// LABEL=(1,SL)
//SYSIN DD *
REPRO INFILE(INPUT) OUTFILE(OUTPUT)
/*
//*
//* ---------------------------------------------------------------- *
//* DGADARBT step to notify DTF that ESDS was archived: *
//* ---------------------------------------------------------------- *
//*
//STEP2 EXEC PGM=DGADARBT,COND=(0,LT,STEP1)
//STEPLIB DD DSN=prod.ndmlib,DISP=SHR
//SYSOUT DD SYSOUT=*
//STESDS DD DISP=SHR,DSN=*.STEP1.INPUT
//STARCH DD DISP=SHR,DSN=*.STEP1.OUTPUT
//STADIR DD DSN=stat.archdir.dsn,DISP=SHR
//
The DGADARBT utility accepts the same ARCAGE parameter as specified for
DGADARRT. It is the first and only OS parameter for this utility.
The following example shows the ARCAGE parameter specified in the
DGADARRT utility to run as a step in a batch job:
//ARCHJOB JOB (ACCT),CLASS=A
//*//
//* ---------------------------------------------------------------- *
//* IDCAMS step to archive the Statistics ESDS: *
//* ---------------------------------------------------------------- *
//*
//STEP1 EXEC PGM=IDCAMS
//SYSPRINT DD SYSOUT=*
//INPUT DD DISP=SHR,DSN=&DSNAME
//OUTPUT DD DISP=(NEW,CATLG,DELETE),
// DSN=stat.archive.dsn(+1),
// UNIT=CART,
// LABEL=(1,SL)
//SYSIN DD *
REPRO INFILE(INPUT) OUTFILE(OUTPUT)
/*
//*
//* ---------------------------------------------------------------- *
//* DGADARBT step to notify DTF that ESDS was archived: *
//* ---------------------------------------------------------------- *
//*
//STEP2 EXEC PGM=DGADARBT,COND=(0,LT,STEP1),PARM=’ARCAGE=Y’
//STEPLIB DD DSN=prod.ndmlib,DISP=SHR
//SYSOUT DD SYSOUT=*
//STESDS DD DISP=SHR,DSN=*.STEP1.INPUT
//STARCH DD DISP=SHR,DSN=*.STEP1.OUTPUT
//STADIR DD DSN=stat.archdir.dsn,DISP=SHR
//
244 IBM Sterling Connect:Direct for z/OS: Administration Guide

To prevent aging, set ARCAGE=N. As a result, the newest record is discarded,
rather than the oldest.
DGADBKEY
The DGADBKEY utility (Build KEYs) loads a statistics key-sequenced cluster with
index information for an associated statistics entry-sequenced cluster. DGADBKEY
must execute as a batch job step.
DGADBKEY enables the recreation of index information for archived statistics data
so that you can issue a SELECT STATISTICS command. You can also use this
utility to rebuild index information for statistics files in the DTF file pair list in
certain cases. Refer to Change the File Pair Configuration for additional
information.
DGADBKEY requires the allocation of DDNAMEs, ESDSnn and KSDSnn, with the
entry-sequenced and key-sequenced clusters respectively. Sterling Connect:Direct
loads the entry-sequenced cluster with the statistics records for building the index
information. The key-sequenced cluster must either be empty, or be defined with
the REUSE attribute. DGADBKEY erases any records in the KSDS before writing
the new information. The size of the KSDS is about 15% of the size of the
associated ESDS. The KSDS must have the characteristics of a statistics
key-sequenced cluster. Refer to VSAM Files DASD Requirement and Description in
the IBM Sterling Connect:Direct for z/OS Configuration Guide for details about
allocating statistics clusters.
The following is an example of a job stream to execute DGADBKEY.
//DGADBKEY JOB (ACCT),CLASS=A
//STEP1 EXEC PGM=DGADBKEY
//STEPLIB DD DISP=SHR,DSN=prod.SDGALINK
//ESDS01 DD DISP=SHR,DSN=stat.esds01
//KSDS01 DD DISP=SHR,DSN=stat.ksds01
//SYSOUT DD SYSOUT=*
//
PARM=CONSOLIDATE allows DGADBKEY to build a KSDS for an ESDS that
contains multiple archived statistics datasets. To use this parameter, create a large
flat file of archived statistics, loading them in date order from the oldest to the
newest. Next, load this file to an ESDS that will hold all the records and create a
KSDS for this ESDS. Then execute DGADBKEY using PARM=CONSOLIDATE to
build the KSDS file. This file pair is available as an Archived Statistics Dataset.
Sample Archiving Setup
Assume that you have the following requirements for archiving:
v Statistics records must remain available for seven days in the file pair list before
being overwritten by new records. After seven days, they must be available in
archive files.
v Each archive file can contain no more than one day of statistics records.
v Batch jobs executing the IDCAMS utility to copy the records to sequential files
on magnetic tape must perform the archiving. The archive files must be
available for 365 days.
v Maintain a directory of archive files.
v Ensure that statistics data is not overwritten before being archived.
Chapter 12. Administering Statistics 245

v Establish a procedure for making archived statistics available to the SELECT
STATISTICS command.
Sample Statistics Configuration
This section describes how to configure the statistics facility to satisfy these
requirements.
You must determine how to configure the statistics file pair list. The rate at which
you log statistics records, availability of the statistics records for seven days before
being overwritten, and each archive file containing no more than one day of
statistics records determine the size and number of file pairs required.
For the statistics records to remain available for seven days after being generated,
the total record capacity of all the entry-sequenced statistics files is seven times the
average number of records generated daily. Run the DGASSTAT utility to
determine how many records, on average, the system writes daily.
According to the sample requirements, a single archive file contains up to the same
number of records as a single statistics entry-sequenced cluster, and an archive file
contains no more than a day of records. Each ESDS also holds about a day of
records, implying that seven statistics file pairs exist. Use the STAT.SWITCH.TIME
initialization parameter to initiate a file pair switch every day at midnight rather
than depend on a file pair switch occurring regularly as a result of file pairs filling.
To ensure that the switches do not occur before midnight as a result of a file pair
becoming full, make each ESDS slightly larger than the daily requirement.
If you determine, using DGASSTAT, that the system writes statistics records at the
rate of about 11,000 daily, define seven file pairs each with a capacity of about
12,000 records (RECORDS(12000)). This figure implies that the associated
key-sequenced clusters are defined with RECORDS(9000).
RECORDS(365) defines the directory of archive files because the system generates
the archive files at the rate of one daily and retains the files for one year.
SYSTEMS.CD.STATS is the data set name prefix for the statistics clusters. The data
set name of the archive directory is SYSTEMS.CD.STATS.DIRECTRY. Member
ARCHPROC in the data set SYSTEMS.CD.ADMINLIB contains the archive Process
that is submitted at file pair switch time.
The following initialization parameters are necessary for the sample archive
requirements.
STAT.DSNBASE = SYSTEMS.CD.STATS /* data set name base */
STAT.FILE.PAIRS = 7 /* number of file pairs */
STAT.SWITCH.TIME = ( 00:00 ) /* switch at midnight */
STAT.SWITCH.SUBMIT = SYSTEMS.CD.ADMINLIB(ARCHPROC) /* archive proc */
STAT.ARCH.DIR = SYSTEMS.CD.STATS.DIRECTRY /* use directory */
STAT.ARCH.CONFIRM = YES /* be sure archive completes */
The archive Process in the member ARCHPROC follows.
246 IBM Sterling Connect:Direct for z/OS: Administration Guide

ARCHIVE PROCESS &EDSN=, - /* passed stats dsname */
SNODE=CD.PROD, - /* PNODE=SNODE */
PNODE=CD.PROD, - /* */
CLASS=1, - /* lowest class */
PRTY=15, - /* highest priority */
REQUEUE=YES /* re-queue on error */
/* */
/* invoke DGADTSUB to submit the archive job... */
/* */
RUN TASK (PGM=DGADTSUB, - /* execute DGADTSUB, */
PARM=("DSN=SYSTEMS.CD.JCL(ARCHJOB),DISP=SHR", - /*job */
/* stream to sub*/
"DSNAME &EDSN")) /* pass stat dsname */
The archive job stream in SYSTEMS.CD.JCL(ARCHJOB) follows.
//ARCHJOB JOB (ACCT),ARCHIVE,CLASS=A,MSGCLASS=Z,MSGLEVEL=(1,1)
//******* archive the statistical data ****************************
//ARCHIVE EXEC PGM=IDCAMS
//SYSPRINT DD SYSOUT=*
//INPUT DD DISP=SHR,CD=&DSNAME /* from DGADTSUB */
//OUTPUT DD DSN=SYS.NDM.ARCH.STATS(+1),DISP=(NEW,CATLG,DELETE),
// UNIT=TAPE,DCB=(BUFNO=6)
//SYSIN DD *
REPRO INFILE(INPUT) OUTFILE(OUTPUT)
/*
//******* notify Connect:Direct that the file pair can be reused, ****
//******* and update the directory of archive files *************
//NOTIFY EXEC PGM=DGADARBT,COND=(0,LT) /* if no errors */
//STEPLIB DD DISP=SHR,DSN=SYS.CD.SDGALINK
//STESDS DD DISP=SHR,DSN=*.ARCHIVE.INPUT /* stat file */
//STDIR DD DISP=SHR,DSN=SYSTEMS.CD.STATS.DIRECTRY /* archive directory */
//STARCH DD DISP=SHR,DSN=*.ARCHIVE.OUTPUT /* archive file */
//SYSOUT DD SYSOUT=*
//
The previous archive job stream indicates that the Sterling Connect:Direct
administrator manages requests for access to archived statistics records. The
submitted requests specify a range of dates and times for the necessary records.
The administrator issues the INQUIRE STATDIR command to determine which
archive files contain records for the specified period. The administrator runs the
following job stream to create a usable archived statistics file pair for each archive
file that it finds. The first step creates the archive file and copies the record to it.
The second step builds the index information.
Chapter 12. Administering Statistics 247

//RESTORE JOB (ACCT),RESTORE,CLASS=A,MSGCLASS=Z,MSGLEVEL=(1,1)
//ARCHIVE EXEC PGM=IDCAMS
//SYSPRINT DD SYSOUT=*
//INPUT DD DISP=SHR,DSN=SYS.CD.ARCH.STATS.GnnnnVnn /* arch seq */
//SYSIN DD *
DEFINE CLUSTER - /* define archive KSDS */
(NAME(SYS.CDARCH.Dyymmdd.KSDS) - /* supply archive date yymmdd */
VOLUMES(USRVOL) -
INDEXED NOIMBED -
FREESPACE(0 0) -
KEYS(27 0) -
RECORDSIZE(32 78) -
REUSE NOREPLICATE -
SHAREOPTIONS(2)) -
DATA -
(CONTROLINTERVALSIZE(4096) -
RECORDS(9000) -
NAME(SYS.CDARCH.Dyymmdd.KSDS.DATA)) -
INDEX -
(CONTROLINTERVALSIZE(512) -
NAME(SYS.CDARCH.Dyymmdd.KSDS.INDEX))
DEFINE CLUSTER - /* define archive ESDS */
(NAME(SYS.CDARCH.Dyymmdd.ESDS) -
VOLUMES(USRVOL) -
REUSE NONINDEXED NOIMBED -
RECORDS(12000) - /* same size as stats files */
RECORDSIZE(275 2048) -
SHAREOPTIONS(2)) -
DATA -
(CONTROLINTERVALSIZE(4096) -
NAME(SYS.CDARCH.Dyymmdd.ESDS.DATA))
IF MAXCC = 0 - /* if clusters allocated OK */
THEN REPRO INFILE(INPUT) - /* then load with stats */
OUTDATASET(SYS.CDARCH.Dyymmdd.ESDS)
/*
//*******
//******* rebuild statistics index information
//*******
//BLDKEY EXEC PGM=DGADBKEY,COND=(0,LT)
//STEPLIB DD DISP=SHR,DSN=SYS.CD.NDMLIB
//SYSOUT DD SYSOUT=*
//ESDSnn DD DISP=SHR,DSN=SYS.CDARCH.Dyymmdd.ESDS /* ESDS cluster */
//KSDSnn DD DISP=SHR,DSN=SYS.CDARCH.Dyymmdd /* KSDS cluster */
//
The archived statistics are now available and you can issue SELECT STATISTICS
against the statistics by coding the name of the key-sequenced file with the
ARCHDSN parameter, as follows.
SELECT STATISTICS WHERE -
(PNAME=USERPROC, ARCHDSN=(SYS.CDARCH.Dyymmdd))
Displaying the Status of the Statistics Logging Facility
The INQUIRE STATISTICS command displays the current status of the Sterling
Connect:Direct statistics logging facility.
The INQUIRE STATISTICS command has the following format.
Label Command Parameters
(optional) INQuire STATistics
248 IBM Sterling Connect:Direct for z/OS: Administration Guide

No parameters are required for the INQUIRE STATISTICS command.
Statistics Inquiry through the Batch Interface
To use the INQUIRE STATISTICS command from the batch interface, perform the
following steps.
Procedure
1. Place your command in a batch job stream as described in the IBM Sterling
Connect:Direct for z/OS User Guide.
2. Submit the job while Sterling Connect:Direct is running.
Note: You must set the fifth character of the DGADBATC output parameter
specification to Y to print the result of the command that is in the temporary
data set.
3. Verify your results.
Statistics Inquiry through the IUI Interface
To use the INQUIRE STATISTICS command from the Sterling Connect:Direct IUI,
perform the following steps.
Procedure
1. Access the statistics facility by selecting option INQ from the Connect:Direct
Administrative Options Menu. The Inquire DTF Internal Status screen is
displayed.
2. Type ISTA and press ENTER to display the status of the statistics logging
facility.
3. Verify your results from the statistics logging facility display that is displayed.
The report includes information such as the configuration of the statistics file
pair list, the active file pair, file percentage utilizations, date and time ranges in
the files, and additional information about the statistics facility.
Results
The following figure shows a partial sample report.
===========================================================
node name *INQ STATS* DATE: mm/dd/yyyy TIME: hh:mm:ss
===========================================================
Status => Enabled Sec. Name => USER01
Return Code => 0 Message ID => SSTL000I
Last "S2" => 00:00:00 Que Wait => No
Dsn Base => USER01.STTX
Excluded => MC
****************** F I L E P A I R #01 ******************
Status => Active
Start Date => 01/20/2013 End Date => 01/20/2013
Start Time => 15:25:29 End Time => 15:51:35
KSDS Size => 196608 ESDS CIS => 4096
ESDS Size => 2211840
Reset Pend. => No Arch. Wait => No
Last Switch => Sel. Count => 0
.
.
.
Chapter 12. Administering Statistics 249

Displaying the Statistics Archive File Directory
The INQUIRE STATDIR command displays the Sterling Connect:Direct statistics
archive file directory.
The INQUIRE STATDIR command has the following format and associated
parameters.
Label Command Parameters
(optional) INQuire STATDIR STARTT = ([date | day][,hh:mm:ssXM])
No parameters are required for the INQUIRE STATDIR command.
The following table describes the optional parameters used with the INQUIRE
STATDIR command:
250 IBM Sterling Connect:Direct for z/OS: Administration Guide

Parameter Description
STARTT = ([date | day]
[,hh:mm:ssXM])
This parameter specifies that the directory display is to begin with the first archive file
created after the designated starting date and time. The date or day and time are
positional parameters. If you do not specify the date or day, a comma must precede the
time. If you omit this parameter, the display begins with the first directory entry.
date
This parameter specifies that the directory display is to start with this specific date. You
can specify the day (dd), month (mm), and year (yy).
You can specify the day (dd), month (mm), and year (yy for 2-digit year and yyyy for
4-digit year). You can use periods or back slashes (/) to separate the components of a
date value.
You can omit the separators only for transfers between mainframe nodes. However, you
must use separators for transfers between mainframes and all other platforms.
After you designate the date order in your initialization parameters, you can use the
following date formats:
DATEFORM=MDY specifies the date format as:
v mm/dd/yy or mm/dd/yyyy
v mm.dd.yy or mm.dd.yyyy
DATEFORM=DMY specifies the date format as:
v dd/mm/yy or dd/mm/yyyy
v dd.mm.yy or dd.mm.yyyy
DATEFORM=YMD specifies the date format as:
v yy/mm/dd or yyyy/mm/dd
v yy.mm.dd or yyyy.mm.dd
DATEFORM=YDM specifies the date format as:
v yy/dd/mm or yyyy/dd/mm
v yy.dd.mm or yyyy.dd.mm
The following Julian date formats are valid:
v yyddd or yyyyddd
v yy/ddd or yyyy/ddd
v yy.ddd or yyyy.ddd
If only date is specified, the time defaults to 00:00.
Chapter 12. Administering Statistics 251

Parameter Description
STARTT = ([date | day]
[,hh:mm:ssXM])
(continued)
day
This parameter specifies to display the first archive file created after this day of the
week. Valid names include MOnday, TUesday, WEdnesday, THursday, FRiday, SAturday,
and SUnday. You can also specify YESTER to search for archive files created after
yesterday or TODAY to search for the archive files created after today.
hh:mm:ssXM
Requests the first archive file created after this time of day, specified in hours (hh),
minutes (mm), and seconds (ss). XM can be AM or PM. You can express the time of day
using the 24-hour clock or the 12-hour clock. If you use the 24-hour clock, valid times
are 00:00–24:00. If you use the 12-hour clock, you can express 1:00 hours as 1:00AM, and
you can express 13:00 hours as 1PM.
If you do not use either AM or PM, Sterling Connect:Direct assumes the 24-hour clock.
You do not need to specify minutes and seconds. You can also specify NOON, which
displays files created after noon, or MIDNIGHT, which displays archive files created
after midnight. The default for the time is 00:00:00, the beginning of the day.
If you specify time of day but not date, the output shows the first available entry in the
archive directory for files created after that time of day. Archive files from all later times
and dates display up to and including the stop time.
Viewing the Statistics Archive Directory through the Batch
Interface
To use the INQUIRE STATDIR command from the batch interface, perform the
following steps.
Procedure
1. Place your command in a batch job stream as described in the IBM Sterling
Connect:Direct for z/OS User Guide.
2. Submit the job while Sterling Connect:Direct is running.
Note: Set the fifth character of the DGADBATC output parameter specification
to Y to print the result of the command that is in the temporary data set.
3. Verify your results.
Viewing the Statistics Archive Directory through the IUI
Interface
To issue the INQUIRE STATDIR command in the Sterling Connect:Direct IUI,
perform the following steps.
Procedure
1. Select option INQ from the Connect:Direct Administrative Options Menu to
display the statistics facility. The Inquire DTF Internal Status screen is
displayed.
2. Type IDIR and press ENTER to display the directory. A sample of the screen
follows.
252 IBM Sterling Connect:Direct for z/OS: Administration Guide

node.name INQUIRE STATISTICS ARCHIVE DIRECTORY
CMD ==> hh.mm
mm/dd/yy
yyyy.ddd
START DATE ==> ________ (Gregorian or Julian)
START TIME ==> __________ (HH:MM:SSXM)
3. Supply the beginning date and time to limit the display for the INQUIRE
STATDIR command. A report showing the results of the inquiry is displayed.
The following figure shows a partial sample report.
======================================================================
node.name *INQUIRE STATDIR* DATE: mm/dd/yyyy TIME: hh:mm:ss
======================================================================
Archival DSN: USER01.STT.DGAPSTAT.G0008V00
Archival Notification: 03/02/1998 98.061 00:01:28
Oldest Record: 03/01/1998 98.060 00:00:06
Newest Record: 03/01/1998 98.060 23:59:54
Archival DSN: USER01.STT.DGAPSTAT.G0009V00
Archival Notification: 03/03/1998 98.062 00:01:35
Oldest Record: 03/02/1998 98.061 00:00:11
Newest Record: 03/02/1998 98.061 23:59:45
.
.
.
Switching the Statistics File Pair
The STATISTICS SWITCH command initiates a statistics file pair switch. The
currently active file pair closes, and logging continues on the next file pair in
sequence. This command provides a means of initiating a file pair switch at any
given time. Otherwise, switching occurs when the active file pair fills, or when a
time of day specified in the STAT.SWITCH.TIME initialization parameter occurs.
The STATISTICS SWITCH command has the following format.
Label Command Parameters
(optional) STATistics SWITCH
No parameters are required for the STATISTICS SWITCH command.
Initiating a Statistics File Pair Switch through the Batch
Interface
To use the STATISTICS SWITCH command from the batch interface, perform the
following steps.
Procedure
1. Place your command in a batch job stream as described in the IBM Sterling
Connect:Direct for z/OS User Guide.
2. Submit the job while Sterling Connect:Direct is running.
3. Verify your results.
Chapter 12. Administering Statistics 253

Initiating a Statistics File Pair Switch through the IUI Interface
The IUI provides a formatted panel that facilitates the issuing of the STATISTICS
SWITCH command. To issue the STATISTICS SWITCH command through the
Sterling Connect:Direct IUI, perform the following steps.
Procedure
1. Select the STAT option of the Administrative Options Menu to access the
Statistics Command panel.
2. Select option FS on the panel to initiate the file pair switch.
Recording Statistics for Specific Record Types
The STATISTICS ON/OFF command enables and disables recording of specific
statistics record types. When you initialize the DTF, Sterling Connect:Direct enables
the recording of all record types unless you specify the STAT.EXCLUDE
initialization parameter. You can use the INQUIRE STATISTICS command to find
out which types are currently disabled.
Use the STATISTICS ON/OFF command prudently when excluding Statistics
records logging because some types of records are critical for problem diagnosis.
Do not exclude the following record types:
v CT – Copy Termination
v PS – Process Submit
v PT – Process Termination
v RJ – Run Job
v RT – Run Task
v SW – Submit within Process
v WO – WTO
Other record types are less critical and you can exclude them.
CAUTION:
Excluding record types can make problem analysis and resolution more difficult.
The STATISTICS ON/OFF command has the following format and associated
parameters.
Label Command Parameters
(optional) STATistics ON | OFF TYPE = (record type list)
The following parameter is required for the STATISTICS ON/OFF command:
Parameter Description
TYPE This parameter specifies the list of statistics record types whose
recording is enabled or disabled. Use the 2-character identifier to
specify record types. These identifiers are in the table beginning on
“Statistics Records” on page 182.
Excluding Statistics Logging through the Batch Interface
To use the STATISTICS ON/OFF command from the batch interface, perform the
following steps.
254 IBM Sterling Connect:Direct for z/OS: Administration Guide

Procedure
1. Place your command in a batch job stream as described in IBM Sterling
Connect:Direct for z/OS User Guide.
2. Submit the job while Sterling Connect:Direct is running.
3. Verify your results. Refer to “Recording Statistics for Specific Record Types” on
page 254 for more information on what not to exclude.
Excluding Statistics Logging through the IUI Interface
To use the STATISTICS ON/OFF command from the IUI, perform the following
steps.
Procedure
1. Select the STAT option from the Connect:Direct Administrative Options Menu.
The Statistics Command screen is displayed.
2. Select option EN to enable logging or option DI to disable logging. Supply the
list of affected record identifiers in the area provided, and press ENTER. Refer
to “Recording Statistics for Specific Record Types” on page 254 for more
information on what not to exclude.
Notifying Sterling Connect:Direct of Statistics File Archival
The STATISTICS ARCHIVED command notifies Sterling Connect:Direct that the
statistics file is archived. It enables the system to erase and overwrite the file with
new records.
When you specify STAT.ARCH.CONFIRM=YES in the DTF initialization
parameters, Sterling Connect:Direct cannot reuse a statistics file pair until it
receives confirmation that the archive is complete. The STATISTICS ARCHIVED
command provides an additional means of sending this notification. Ordinarily it
is sent by the DGADARRT utility after the archive is done by a Sterling
Connect:Direct COPY Process, or by the DGADARBT utility after the archive is
done by a batch step.
The STATISTICS ARCHIVED command has the following format and associated
parameters.
Label Command Parameters
(optional) STATistics ARCHived file pair number
The following parameter is required for the STATISTICS ARCHIVED command:
Parameter Description
file pair number This parameter specifies a number from 1–20 that identifies the statistics
file for which archive notification is sent. This number is given as the
relative number of the file pair in the file pair list. The first pair in the
list is file pair number 1.
Issuing Archive Notification through the Batch Interface
To use the STATISTICS ARCHIVED command from the batch interface, perform
the following steps.
Chapter 12. Administering Statistics 255
Procedure
1. Place your command in a batch job stream as described in IBM Sterling
Connect:Direct for z/OS User Guide.
2. Submit the job while Sterling Connect:Direct is running.
3. Verify your results.
Issuing Archive Notification through the IUI Interface
To use the STATISTICS ARCHIVED command from the IUI, perform the following
steps.
Procedure
1. Select the STAT option from the Connect:Direct Administrative Options Menu.
The Statistics Command screen is displayed.
2. Select option CF, supply the number of the file pair for notification of archival,
and press ENTER.
256 IBM Sterling Connect:Direct for z/OS: Administration Guide

Chapter 13. Managing the Transmission Control Queue
Sterling Connect:Direct stores submitted Processes in the Transmission Control
Queue (TCQ). The TCQ controls Process execution. The IBM Sterling Connect:Direct
for z/OS User Guide contains information about how to submit Processes, how to
control those Processes once they are in the TCQ, the logical queues that make up
the TCQ, and the status values of Processes in the TCQ. The TCQ consists of two
interdependent VSAM data sets:
v The Transmission Control Queue, or TCQ, is a Relative Record Dataset (RRDS)
which contains an internal form of the Process language of each Process and
status flags.
v The Transmission Control Index, or TCX, is an RRDS containing a single record.
It contains bitmaps, that indicate the availability of TCQ space.
The default size of the TCQ, as determined by the sample installation JCL, is 1000
records, but it can be as large as 4016 records if the sample TCX is used. The size
of a Process can range from 1 to 43 records, depending upon the how many steps
it contains. The average Process size varies by installation. If the average Process
size is 5 records, the sample TCQ can contain approximately 200 Processes.
In order to use a TCQ with a capacity that exceeds 4016 records, the TCX must be
defined with a record size and control interval (CI) size larger than those specified
by default in the installation JCL. The IBM Sterling Connect:Direct for z/OS
Configuration Guide and Program Directory for IBM Sterling Connect:Direct for z/OS
contain more information about planning your space requirements.
Note: Both the TCQ and TCX can be defined with a CISIZE (Control Interval size)
of up to 30,720 bytes. The maximum number of TCQ records that can be mapped
by the maximum-sized TCX is 122,804.
To hold the maximum size Process (1 MB), the CISIZE of the TCQ must be at least
24 KB bytes.
Configure the TCQ
Sterling Connect:Direct provides initialization parameters that allow you to
configure the TCQ. These parameters fall into the following categories:
v Controlling startup—two parameters determine what the TCQ does with
existing Processes:
– TCQ = WARM | COLD, whose default value of WARM specifies that all
existing Processes in the TCQ are retained. COLD requests that the TCQ be
cleared of all processes.
– CONFIRM.COLD.START = YES | NO, whose default value you must change
to force the operator to confirm the request for a COLD start before executing
it.
v Controlling efficiency of the TCQ—the following parameters provide several
flexible configuration options in this area.
– MAX.AGE lets you specify the number of days to wait before purging a
Process. With this parameter you can also manage the Wait and Hold queues
by specifying which type of Process to purge (that is, those with a specific
status) or the number of days to wait to purge for each status type.
© Copyright IBM Corp. 1999, 2015 257

– MAX.AGE.TOD used to change the system default of automatically purging
the TCQ at midnight and whenever Sterling Connect:Direct is initialized.
Optional.
– TCQ.THRESHOLD specifies when a warning is issued to indicate the TCQ is
reaching capacity and Processes may be deleted. It is also the auto-deletion
threshold for the PR queue.
v Holding Processes—two parameters determine if submitted Processes are held.
– QUIESCE specifies whether or not Sterling Connect:Direct holds Processes
from execution.
Note: The QUIESCE parameter helps you in your efforts to clean up a TCQ,
that has become corrupt. See Using the TCQ/TCX Repair Utility
(DGADTQFX) for details.
– REQUEUE specifies whether to requeue a Process, that ABENDS or results in
a return code greater than 4.
v Retaining Processes after Execution—set the PROCESS.RETENTION parameter
to save a Process in the PR queue after it has executed. Then view or select
completed Processes.
How to Troubleshoot the TCQ
Sterling Connect:Direct provides several ways to recover from a system
malfunction associated with a TCQ problem.
The TCQ/TCX Repair Utility, DGADTQFX allows you to solve corruption
problems related to the TCQ/TCX data sets without having to cold start the DTF
and reinitialize the TCQ. The DGADTQFX batch program retains the original
TCQ/TCX data sets used in production, and creates a new validated copy of the
TCQ by removing all invalid Processes. The DGADTQFX utility can also be used
to create a TCQ and TCX for pre-version 4.6 Sterling Connect:Direct. Processes that
are larger than 64 KB (the pre-version 4.6 Process limit) are removed from the new
TCQ and TCX when the BACKLEVEL parameter is used.
Note: The DGADTQFX utility builds a new TCX/TCQ pair with increased
CISIZEs to hold larger Processes.
Using the TCQ/TCX Repair Utility (DGADTQFX)
Run the DGADTQFX utility in one of the following ways:
v Rebuild TCX mode, which creates a new TCX by using the current TCQ to
indicate the existence of Processes.
v Use TCX mode, which creates a new TCQ using the current TCX to indicate the
existence of Processes. Use TCX mode is recommended for pre-version 4.4
TCQ/TCX migration use only.
Note: Use different names to distinguish the original and new TCQ/TCX data sets
in case you need to go back and reuse the original data sets.
The Rebuild TCX mode is the preferred mode for rebuilding the TCQ/TCX after
encountering TCQ corruption problems, which cause U3083 abends.
258 IBM Sterling Connect:Direct for z/OS: Administration Guide

CAUTION:
When DGADTQFX runs in Rebuild TCX mode, the TCX is rebuilt based upon
the TCQ contents, and any pre-version 4.4 Processes previously completed but
found intact may be restarted when the DTF initializes. To avoid this potential
problem with pre-version 4.4 TCQs, first run the DGADTQFX utility in Use
TCX mode, and then use the Rebuild TCX mode for all future rebuilds of the
TCQ/TCX.
The Use TCX mode is recommended for TCQs associated with systems running
versions of Sterling Connect:Direct prior to Version 4.4. Prior to Version 4.4,
completed Processes were retained in the TCQ and were not deleted.
The DGADTQFX program, located in $CD.SDGALINK, has one execution
parameter for specifying the report type.
Parameter Description
PARM= SUMMARY
| DETAIL |
BACKLEVEL |
REMOVEPR
Specify SUMMARY to produce a report at the Process level.
Specify DETAIL to produce a report, which shows steps within each
Process, such as RUN TASK, RUN JOB, SUBMIT, and COPY.
Specify BACKLEVEL to create a TCQ and TCX for pre-version 4.6
Sterling Connect:Direct systems.
Specify REMOVEPR to remove all Processes on the PR queue.
Normally, you run DGADTQFX with Sterling Connect:Direct shut down but you
could run it in production. The data sets and reports created will be correct as long
as no update activity to the input TCQ takes place while the utility executes. The
program issues a warning message if the VSAM timestamp for the input TCQ is
changed during execution.
The return codes associated with the DGADTQFX utility are described in the
following table.
Return Code Meaning
0 No errors were found in the input TCQ
4 At least one error was found and removed or a warning message was
issued
8 A severe error occurred during execution and the utility was terminated
Initializing the DTF After DGADTQFX Has Found Errors
If errors were found and corrected when you ran the DGADTQFX utility, replace
the original corrupted data sets in use with the new data sets created by
DGADTQFX. To allocate the new data sets to Sterling Connect:Direct, use IDCAMS
ALTER or regenerate the network map.
Using IDCAMS ALTER
Procedure
1. Shut down the DTF, if necessary.
2. Rename the old TCQ and TCX to save the original data sets.
3. Using ALTER, rename the new TCQ and TCX data sets using the original data
set names.
Chapter 13. Managing the Transmission Control Queue 259

4. Initialize the DTF and specify the QUIESCE=YES initialization parameter.
5. Use SELECT PROCESS to display the TCQ contents, and delete any unwanted
Processes.
6. Issue the MODIFY Sessions command to resume DTF operation.
7. After you are confident that Sterling Connect:Direct is operating normally with
the new TCQ and TCX data sets, delete the original TCQ and TCX datasets.
Regenerating the Netmap
Procedure
1. Shut down the DTF, if necessary.
2. Execute the Unload Netmap utility, DGADNTLD.
3. Change the names of the TCQ and TCX data sets in the unloaded member. The
names are defined within the LOCAL.NODE definition.
4. REPRO the old network map data to preserve a copy of it for fallback
purposes.
5. Delete, define, and reload the netmap.
6. Initialize the DTF and specify the QUIESCE=YES initialization parameter.
7. Use SELECT PROCESS to display the TCQ contents, and delete any unwanted
processes.
8. Issue the MODIFY Sessions command to resume DTF operation.
9. After you are confident that Sterling Connect:Direct is operating normally with
the new TCQ and TCX data sets, delete the original network map, TCQ and
TCX data sets.
DGADTQFX Examples
The following JCL samples are provided in $CD.SDGASAMP:
v DGAXTQF1, which runs DGADTQFX in Rebuild TCX mode. DGADTQFX will
create new TCQ and TCX data sets and print a detailed report.
v DGAXTQF2, which runs DGADTQFX in Use TCX mode. DGADTQFX will use
the current TCX data set to indicate the existence of TCQ Processes. The
program will print a summary report.
v DGAXTQF3, which runs DGADTQFX in BACKLEVEL mode. DGADTQFX will
create new TCQ and TCX datasets and print a summary report. Processes larger
than 64 KB are removed.
The following sample shows part of the JCL within $CD.SDGASAMP library
member DGAXTQF1.
//*************************************************************
//* *
//* Run the TCQ FIX utility in "Rebuild TCX" mode. Create *
//* new TCQ and TCX with any invalid contents of input *
//* TCQ removed. Request detail-level reporting for *
//* input and output TCQ: *
//* *
//*************************************************************
//STEP2 EXEC PGM=DGADTQFX,PARM=DETAIL
//STEPLIB DD DISP=SHR,DSN=CD.LOADLIB
//SYSOUT DD SYSOUT=*
//TCQIN DD DISP=SHR,DSN=CD.OLD.TCQ
//TCQOUT DD DISP=SHR,DSN=CD.NEW.TCQ
//TCXIN DD DISP=SHR,DSN=CD.OLD.TCX (not needed in this mode)
//TCXOUT DD DISP=SHR,DSN=CD.NEW.TCX
//TCQINRPT DD SYSOUT=*
260 IBM Sterling Connect:Direct for z/OS: Administration Guide

You can accomplish tasks depending upon which DD statements are present in the
batch JCL:
v If TCXOUT is present, Rebuild TCX mode is requested; otherwise, Use TCX
mode is requested.
v If TCQINRPT is present, an input TCQ report is generated; otherwise, it is not.
v If TCQOUT is present, a new TCQ is created; otherwise, it is not. You can
therefore analyze and report on the input TCQ without creating any data sets.
Note: TCQOUT and TCXOUT must both be pre-allocated empty VSAM data sets.
DGADTQFX Output
The sample reports shown in this section are a result of running DGADTQFX in
Use TCX mode. The first report shows two invalid TCQ Processes, which were
detected and skipped during the copy of the input TCQ to the output TCQ. The
second report lists all Processes in the input TCQ in sequential Process number
order.
DGADTQFX Output TCQ Report (Summary)
Connect:Direct for z/OS
DGADTQFX execution on 18 Mar 2003 14:58:16
Mode: Use TCX
Output TCQ Summary
PName PNum Cur Step Submitter Node Other Node Stat UserID Submitted
-------- ------- -------- ---------------- ---------------- ----- ------ ----------
D3103UPR 4 STEP0108 PLEX.JOE PLEX.TOM.TCP EX EX CBENN1 19 DEC 2002 11:09:08
D3104UPR 5 STEP0103 PLEX.JOE PLEX.TOM.TCP EX EX CBENN1 19 DEC 2002 11:09:14
D3105UPR 6 STEP0103 PLEX.JOE PLEX.TOM.TCP EX EX CBENN1 19 DEC 2002 11:09:17
D3106UPR 7 STEP01 PLEX.JOE PLEX.TOM.TCP EX EX CBENN1 19 DEC 2002 11:09:21
D3107UPR 8 STEP01 PLEX.JOE PLEX.TOM.TCP EX EX CBENN1 19 DEC 2002 11:09:24
Processes Skipped Summary
PName PNum Cur Step Submitter Node Other Node Stat UserID Submitted
-------- ------- -------- ---------------- ---------------- ------------- ---------
D3101UPR 2 PLEX.JOE PLEX.TOM.TCP HO HI CBENN1 19 DEC 2002 11:08:45
D3102UPR 3 PLEX.JOE PLEX.TOM.TCP HO HI CBENN1 19 DEC 2002 11:08:59
Totals:
Processes found in Input TCQ: 7
Processes written to Output TCQ: 5
Processes not copied to Output TCQ (skipped): 2
STQF001E DGADTQFX ended; RC=04
DGADTQFX Input TCQ Report (Summary)
Input TCQ Summary
PName PNum Cur Step Submitter Node Other Node Stat UserID Submitted
-------- ------- -------- ---------------- ---------------- ----- -------- ------------------
D3101UPR 2 PLEX.JOE PLEX.TOM.TCP HO HI CBENN1 19 DEC 2002 11:08:45
D3102UPR 3 PLEX.JOE PLEX.TOM.TCP HO HI CBENN1 19 DEC 2002 11:08:59
D3103UPR 4 STEP0108 PLEX.JOE PLEX.TOM.TCP EX EX CBENN1 19 DEC 2002 11:09:08
D3104UPR 5 STEP0103 PLEX.JOE PLEX.TOM.TCP EX EX CBENN1 19 DEC 2002 11:09:14
D3105UPR 6 STEP0103 PLEX.JOE PLEX.TOM.TCP EX EX CBENN1 19 DEC 2002 11:09:17
D3106UPR 7 STEP01 PLEX.JOE PLEX.TOM.TCP EX EX CBENN1 19 DEC 2002 11:09:21
D3107UPR 8 STEP01 PLEX.JOE PLEX.TOM.TCP EX EX CBENN1 19 DEC 2002 11:09:24
Chapter 13. Managing the Transmission Control Queue 261
262 IBM Sterling Connect:Direct for z/OS: Administration Guide

Chapter 14. Supporting DBCS and MBCS
Overview of DBCS
Some languages have too many symbols for all characters to be represented using
single byte codes. For example, the English language can be defined within a
single byte range from 1-256, or x'00' through x'FF'. The Korean and other
ideographic languages contain several thousand characters. To create these coded
character sets, two bytes are needed for each character.
The Sterling Connect:Direct Double-byte Character Set (DBCS) support provides a
mechanism for translating ASCII and EBCDIC DBCS data. DBCS support translates
Single-byte Character Set (SBCS) and DBCS data in the form that is supported on
the requested platform.
DBCS character representation differs between operating systems. Specifically, a
mainframe represents data in 8-bit EBCDIC code and a PC represents data in 7-bit
ASCII code. For the mainframe environment, DBCS can be used exclusively within
a file or be mixed with SBCS characters. Special character indicators exist to tell the
difference between SBCS and DBCS characters. The special character indicators are
shift-out (SO) and shift-in (SI), or x'0E' and x'0F' respectively for IBM mainframes.
Shift-out denotes shifting from SBCS to DBCS mode and shift-in denotes shifting
from DBCS to SBCS mode. SO/SI combinations are not required if DBCS is
exclusive within a file. For the PC, the SO/SI characters are not recognized. In this
environment, DBCS is represented by setting the high order bit of the ASCII code.
See the table in RULES for correct mapping of DBCS characters by language.
Note: A DBCS table can be extremely large and complex. Use the sample tables in
this documentation as a reference only. They do not successfully translate all
characters.
Translation Tables
Sterling Connect:Direct provides the following translation tables in both load
module and source form. The executable tables are located in $CD.SDGALINK and
the source tables are in $CD.SDGASAMP. You can copy and customize the source
code format for your processing environment.
For more information on how to use these tables with the SYSOPTS parameter in
the COPY statement, see the Connect:Direct Process Language help.
Table Name Description
DGATXKSC host EBCDIC to ASCII KS5601
DGATKSCX ASCII KS5601 to host EBCDIC
DGATXKPC host EBCDIC to DBCS-PC Korean
DGATKPCX DBCS-PC Korean to host EBCDIC
DGATXJIS host EBCDIC to Japanese International Standard
DGATJISX Japanese International Standard to host EBCDIC
DGATXBG5 Chinese new host code to Chinese Big5
DGATBG5X Chinese Big5 to Chinese new host code
© Copyright IBM Corp. 1999, 2015 263

Table Name Description
DGATXC55 Chinese new host code to Chinese 5550
DGATC55X Chinese 5550 to Chinese new host code
DGATJEFX Japanese host EBCDIC Katakana to ASCII
DGATXJEF ACSII to Japanese host EBCDIC Katakana
DGATGBKX GBK to Chinese new host code
DGATXGBK Chinese new host code to GBK
Customize Translation Tables
You can create and update the translation tables through a preprocessor that takes
simple batch input in a predefined format and creates output compatible with the
assembler. You can then assemble and link-edit the output to produce a translation
table you can load.
Input to the batch preprocessor consists of six main parameters and the END
parameter. All input begins in column one. The following table defines the batch
preprocessor parameters.
Parameter Required Default Format Definition
NAME No XLATE 8 characters Table name information
TITLE No DBCS
TRANSLATION
TABLE
60 characters Table title information
DEFAULT No 0000 2 byte hex
representation
Default translation character
RULES No 80-FF 2 byte hex
representation
Language rules
SBCS No Standard 2 byte hex
representation
Single-byte character set translation table
DBCS Yes None 4 byte hex
representation
Double-byte character set translation table
END Yes None Terminates DBCS, SBCS, and RULES
parameters
DBCS
creates the double-byte character set translation table. This table translates all
double-byte data during a file transfer. This parameter has no default and is
required. The DBCS parameter data begins in column one and is terminated with
the END statement.
The following example shows the syntax for the DBCS parameter.
DBCS
f1f2,t1t2
END
f1 denotes the first byte of the FROM DBCS character.
264 IBM Sterling Connect:Direct for z/OS: Administration Guide

f2 is the second byte of the FROM DBCS character.
t1 is the first byte of the TO DBCS character.
t2 is the second byte of the TO DBCS character.
DBCS Example
The following example translates x'89A1' to x'B0ED', x'89A2' to x'B0EE', x'89A5' to
x'B0EF', and so on to x'D37B' to x'C8F0'.
DBCS
89A1,B0ED
89A2,B0EE
89A5,B0EF
89A8,B0F0
89A9,B0F1
89AA,B0F2
89AB,B0F3
D375,C8EE
D377,C8EF
D37B,C8F0
END
END
is mandatory to terminate each of the following parameters:
v DBCS
v RULES
v SBCS
NAME=[tablename | XLATE]
is an 8-character parameter for displaying table information in batch format.
NAME is optional and is for informational use only. If you use NAME, it must be
the first parameter defined. If you use NAME with TITLE, NAME and TITLE must
be the first two parameters defined. The default for NAME is XLATE.
The following example shows the syntax for the NAME parameter.
NAME=DGATXKSC
The DGATXKSC table is provided in $CD.SDGASAMP.
TITLE=[title name | DBCS TRANSLATION TABLE]
is a 60-character parameter for displaying table information in batch format. TITLE
is optional and is for informational use only. If you use TITLE, it must be the first
parameter defined. If you use TITLE with NAME, NAME and TITLE must be the
first two parameters defined. The default for TITLE is DBCS TRANSLATION
TABLE.
The following example shows the syntax for the TITLE parameter.
TITLE=HOST EBCDIC TO ASCII KS5601 TRANSLATION
The DGATXKSC table is provided in $CD.SDGASAMP.
Chapter 14. Supporting DBCS and MBCS 265

DEFAULT=nnnn
contains the hexadecimal representation you define as the replacement for invalid
DBCS code points. This default character is displayed wherever a nontranslatable
character is displayed in the data being received. The default is 0000.
nnnn denotes the hexadecimal character defined to replace an invalid DBCS code
point.
The following example shows the syntax for the DEFAULT parameter.
DEFAULT=FFFF
RULES
defines what constitutes a double-byte character for the defined language. RULES
is only used when receiving a file from a platform other than z/OS or MVS,
because the host cannot determine valid DBCS characters without language rules.
The default is any character within the range of x'80' through x'FF', meaning
Sterling Connect:Direct interprets any character within this range as the first byte
of a DBCS pair. Both characters in the pair are translated to host DBCS. If
specified, use the END statement to terminate the RULES parameter.
Language Options Table
The following table identifies valid language options for the RULES parameter.
Language Option Range
KS5601 (Korean Standard) x'A1'-x'AC'
x'B0'-x'FD'
KOREAN (Old Style) x'81'-x'BF'
JAPANESE x'81-x'9F'
x'E0'-x'FC'
CHINESE (Traditional/Simplified and
5550)
x'81'-x'FC'
BIG5 (Chinese) x'A4'-x'C6'
x'C9'-x'F9'
x'01'-x'FF' user selectable
The following example shows the syntax for the RULES parameter.
RULES
KS5601
END
The KS5601 language option is in the DGATXKSC table, which is provided in
$CD.SDGASAMP.
The following graphic represents the Sterling Connect:Direct hexadecimal DBCS
code points.
266 IBM Sterling Connect:Direct for z/OS: Administration Guide


The following graphic represents the Korean hexadecimal DBCS code points. The
first character of each code point coincides with the range values in the Language
Options Table.
The following figure is a graphic representation of the Japanese hexadecimal DBCS
code points. The first character of each code point coincides with the range values
in the Language Options Table.
268 IBM Sterling Connect:Direct for z/OS: Administration Guide


The following graphic represents the Chinese (BIG5) hexadecimal DBCS code
points. The first character of each code point coincides with the range values in the
Language Options Table.
The following graphic represents the default hexadecimal DBCS code points.
270 IBM Sterling Connect:Direct for z/OS: Administration Guide

RULES Examples
The following example translates all characters as DBCS that adhere to the KS5601
standard, or all characters that start with an x'A1' through x'AC' or x'B0' through
x'FD'. Treat these characters as double-byte characters.
RULES
KS5601
END
The following example translates all characters as DBCS that adhere to the
customized table. Treat all characters that start with x'90' through x'94' or x'B0'
through x'B4' as double-byte characters.
RULES
90
91
92
93
94
B0
B1
B2
B3
B4
END
SBCS
creates the single-byte character set translation table. This table translates all
single-byte data during a file transfer. The default translation table provided when
the parameter is not specified, translates all EBCDIC characters in the range of x'00'
through' x'FF' to its ASCII equivalent, within the range of x'00' through x'7F'. When
receiving the file from a PC, the data is translated from ASCII to EBCDIC.
Terminate the SBCS parameter with the END statement.
If you define SBCS, you must begin all data in column one and only one
hexadecimal character pair is allowed per line.
The following example shows the syntax for the SBCS parameter.
SBCS
ff,tt
END
ff denotes the FROM translation.
tt denotes the TO translation.
SBCS Example
The following example translates x'C1' to x'41', x'C2' to x'42', x'C3' to x'43', and so
on.
Chapter 14. Supporting DBCS and MBCS 271

SBCS
C1,41
C2,42
C3,43
C4,44
C5,45
C6,46
END
Comments
Comments allow you to include additional information in a batch preprocessor.
Comments are available as a convenience and do not affect Sterling Connect:Direct.
The format for a comment is an asterisk (*) in column 1, followed by the comment.
The following figure is a sample comment with an asterisk in column 1.
* DEFAULT=FFFF instead of 0000.
Sample Preprocessor Input Data Stream
The following sample is the syntax for a preprocessor input data stream. The SBCS
and DBCS tables are incomplete and would require many pages to produce a valid
table.
NAME=MYTABLE
TITLE=SAMPLE TRANSLATION TABLE
RULES
80
81
82
83
84
END
SBCS
C1,41
C2,42
C3,43
C4,44
C5,45
C6,46
END
DBCS
89A1,B0ED
89A2,B0EE
89A5,B0EF
89A8,B0F0
89A9,B0F1
89AA,B0F2
89AB,B0F3
D375,C8EE
D377,C8EF
D37B,C8F0
END
Sample JCL to EXECUTE the Preprocessor
The following sample JCL executes the preprocessor against the input source. The
output produced by the preprocessor is in assembler CSECT form and is input to
the assembler. The assembled object is then link-edited to produce a load module.
272 IBM Sterling Connect:Direct for z/OS: Administration Guide

The following JCL is contained in the member DGAJDBCS in the $CD.SDGAJCL
library.
//JOBNAME JOB (ACCTN),'ADMINISTRATOR',CLASS=A,
// REGION=4098K,MSGLEVEL=(1,1),MSGCLASS=X
//****************************************************************
//*
//* JCL TO CREATE DBCS TRANSLATE TABLE
//*
//* REPLACE THE FOLLOWING ENTRIES IN THE PROCEDURE STATEMENT
//* BELOW WITH SITE DEPENDENT INFORMATION
//*
//* TABLE= NAME OF THE SOURCE TRANSLATE TABLE
//*
//****************************************************************
//BLDDBCS PROC TABLE=XXXXXXXX,CDPREF=’$CD’,TEST=NOTEST,RENT=RENT
//****************************************************************
//* STEP1 CREATE ASSEMBLER OUTPUT FROM PRE-PROCESSOR INPUT
//****************************************************************
//STEP1 EXEC PGM=DMDBCSPR
//STEPLIB DD DSN=&CDPREF..SDGALINK,DISP=SHR
//SYSPRINT DD SYSOUT=*
//SYSTERM DD SYSOUT=*
//SYSOUT DD SYSOUT=*
//SYSABEND DD SYSOUT=*
//CDTABIN DD DSN=&CDPREF..SDGASAMP(&TABLE),DISP=SHR
//CDTABOUT DD DSN=&&SRC,DISP=(,PASS),SPACE=(CYL,(1,1)),
// DCB=(BLKSIZE=1600,LRECL=80,RECFM=FB,DSORG=PS),
// UNIT=SYSDA
//****************************************************************
//* STEP2 ASSEMBLE OUTPUT CREATE BY PRE-PROCESSOR
//****************************************************************
//STEP2 EXEC PGM=ASMA90,
// PARM=’OBJECT,NODECK,XREF(SHORT),&RENT,&TEST,USING(WARN(0X
// ),NOMAP),FLAG(NOCONT)’
//SYSLIB DD DSN=&CDPREF..SDGASAMP,DISP=SHR
// DD DSN=SYS1.MACLIB,DISP=SHR
// DD DSN=SYS1.MODGEN,DISP=SHR
//SYSTERM DD SYSOUT=*
//SYSPRINT DD SYSOUT=*
//SYSUT1 DD UNIT=SYSDA,SPACE=(CYL,(10,5))
//SYSUT2 DD UNIT=SYSDA,SPACE=(CYL,(10,5))
//SYSUT3 DD UNIT=SYSDA,SPACE=(CYL,(10,5))
//SYSLIN DD DSN=&&OBJ,UNIT=SYSDA,DISP=(,PASS),SPACE=(TRK,(5,5)),
// DCB=(DSORG=PS,RECFM=FB,LRECL=80,BLKSIZE=3120)
//SYSIN DD DSN=&&SRC,DISP=(OLD,DELETE)
//****************************************************************
//*
Information on Sterling Connect:Direct Processes, including how to use the table
created from the previous JCL sample using the COPY statement, is available at
the Connect:Direct Process Language help.
Alternate Logic Applied to DBCS and SBCS Translation (LOGIC =B |
(B,RC) )
An alternate form of translation for data that contains both double byte and single
byte data is provided. It supports the translation of mixed mode files using
selectable translation tables.
The normal way that data is described, when a file contains both double and
single bytes characters, is through the use of the shift-in (SI) and shift-out (SO)
Chapter 14. Supporting DBCS and MBCS 273

sequences. By default shift-out is normally 0x0E and shift-in 0x0F, but these values
can be configured. The support within the Sterling Connect:Direct products allows
for the shift-out and shift-in values to be specified if they are different than 0x0E
and 0x0F. Record boundaries are honored. SI or SO strings do not span record
boundaries.
For more information on how to implement this alternate form of translation using
the LOGIC=B|(B,RC) subparameter in the SYSOPTS parameter in the COPY
statement, see the Connect:Direct Process Language help.
It is expected that data which contains DBCS and SBCS strings will use alternating
SO, SI sequences to define the start and end of each string. So a typical file record
might look like:
SI single byte
string
SO double byte
string
SI single byte
string
Any exception to this, such as two SI sequences without an intervening SO
sequence, is considered invalid. When an invalid sequence is encountered, certain
data strings are ignored and all translation is stopped, depending on the sequence
of SI and SO markers.
Alternate Translation allows for the file to be completely transferred and an error
(message SCPA074I with return code 8) noted at the completion of the
transmission. You also have the option of using LOGIC=B|(B,RC) to specify a
different return code within the range of 1-254 for this specific message. If you
specify LOGIC=B without specifying a return code, the default return code of 8 is
used. Sterling Connect:Direct will use the specified return code when issuing the
SCPA074I message. The following coding examples show how to specify a return
code for SCPA074I and the expected results for each:
SYSOPTS="DBCS=(EBCXKSC,0E,0F,LOGIC=(B,4))"
In the example above, if the DBCS transfer produces the SCPA074I message, the
return code generated will be 4.
SYSOPTS="DBCS=(EBCXKSC,0E,0F,LOGIC=(B,254))"
In the example above, if the DBCS transfer produces the SCPA074I message, the
return code generated will be 254 or X'FE'.
See the Connect:Direct Process Language help for more information about
specifying a return code for the SCPA074I message.
Rules
These rules take into account any combination of SI and SO sequences, even ones
with no intervening byte string. Since these rules are dependent on future
sequences of SO or SI characters within the file.
The rules follow this truth table:
Note: SI still means Shift In to single byte mode and SO means Shift Out to
double byte mode. However, no translation will be done if the SI, SO sequences
are invalid.
PRIOR NEXT
274 IBM Sterling Connect:Direct for z/OS: Administration Guide

SI SO
SI Do not translate the
remainder of the record
SBCS translation until SO
occurs
SO DBCS translation until SI
occurs
Do not translate the
remainder of the record
For PAD specification, if EBCDIC to ASCII translation or ASCII to EBCDIC
translation, PAD character will replace SI and SO characters for the entire file
unless an invalid shift sequence is found. When an invalid shift sequence is found
in a record, the shift characters are left as is and the PAD character is not
substituted from that point to the end of the record.
1. Each record is evaluated independently. All translation decisions are made on
each individual record. SI/SO byte strings are not evaluated across record
boundaries.
2. A record may or may not start with a shift character. If a shift character is not
found in the first byte of the record, the byte string is considered SBCS data
until the next shift character in that record is discovered.
3. If an invalid shift sequence is discovered, stop translation and send the record
in a mixed format with the first part translated and the last part in the original,
untranslated form.
4. If a PAD character is specified, use it for those portions of the record that are
translated. Untranslated portions of the record will be left with any SI or SO
characters as is.
5. End of record that occurs without a SI or SO sequence means data that
precedes the end of file is treated as normal DBCS or SBCS data for translation
depending on the previous shift state.
MBCS Conversions
Multibyte Character Set (MBCS) support enables you to convert between Unicode
and other code sets supported on the z/OS platform. To perform an MBCS
conversion, use the CODEPAGE parameter of the COPY statement FROM and/or
TO SYSOPTS clauses.
You can perform MBCS conversions in the following ways:
v Perform a conversion on the FROM node only and then send the Unicode file to
the TO node.
v Send a file to the TO node and let that node perform the conversion.
v Perform a conversion from one z/OS compatible code set to a Unicode code set
supported on the local node (specified in the FROM clause CODEPAGE
parameter). Then send the encoded Unicode file to the remote node to be
converted to another z/OS compatible code set.
Instead of requiring that each Sterling Connect:Direct node provide the capability
to convert from any supported character set to any other supported character set,
the recommended approach is to convert the original character set to a common
intermediate form (UTF-8 or UCS-2) on the local node, transmit the intermediate
form to the remote node, and then perform the conversion to the final desired
character set on the remote node. This way, each node is responsible only for
conversion between the Unicode encoding and the character sets relevant to and
supported by the node.
Chapter 14. Supporting DBCS and MBCS 275

Note: To convert between Unicode (ISO 10646) and other code sets, Sterling
Connect:Direct makes calls to system routines which are part of the optional z/OS
Language Environment component - National Language Support. Verify that your
z/OS installation supports the code set conversions specified in the Process
language.
When you output an MBCS file, it should allow for a flexible output record length,
thus z/OS files should be specified as Variable Format (RECFM=VB). Also, to
allow for a possible increase in data length due to conversion, the LRECL of the
receiving file must be larger than the LRECL of the sending file. In the example
shown below, the LRECL of the sending file is 80.
STEP01 COPY FROM (PNODE DISP=SHR -
DSN=TEST3.MBCS0001.IBM930 -
SYSOPTS="CODEPAGE=(IBM-930,UTF-8)" ) -
TO (SNODE DISP=(,CATLG) -
UNIT=SYSDA SPACE=(CYL,(3,3)) -
VOL=SER=USER01 -
DCB=(RECFM=VB,LRECL=90,BLKSIZE=24000) -
DSN=CHICAGO.MBCS0001.IBM1047 -
SYSOPTS="CODEPAGE=(UTF-8,IBM-1047)" )
For this particular MBCS conversion, the receiving file was successfully created by
specifying LRECL as 90. Other conversions may require a larger value to avoid an
SVSJ032I error during the Copy. If RECFM=VB, BLKSIZE for the output file must
be at least as large as LRECL+4.
To display the CODEPAGE specification for a COPY step in a Process after step
completion, use the Select Statistics command for an SY Statistics record. Each
node involved in a COPY generates an SY record containing the SYSOPTS relevant
to that node.
Except for syntax, the CODEPAGE parameter is not validated when the Process is
submitted. However, when the Process is executed, an MBCS001E error will result
on the node attempting the conversion if an invalid code set is specified.
For additional Process examples, search on MBCS Conversion in the
Connect:Direct Process Language help.
276 IBM Sterling Connect:Direct for z/OS: Administration Guide

Chapter 15. Performance Tuning
Analyzing TCP/IP Performance
Performance problems occur when a system and its network are not operating as
effectively as they should as indicated by slow response times and a decrease in
users’ productivity. These problems can be intermittent or can indicate a growing
strain pointing to capacity issues. Causes can be multifaceted and include both
hardware and software origins or can be quickly solved with proper configuration
settings.
Because of the multi-faceted nature of TCP/IP issues, this section serves as an
analysis tool by providing a checklist of possible factors. By properly analyzing
and defining the problem in terms of a set of symptoms and potential causes, you
can either solve the performance problem yourself or can provide support with
documentation.
When you analyze performance, you must also consider your organization’s
priorities, such as the following goals:
v To maximize throughput in order to achieve the maximum data transfer rate
v To “fill the pipe” and run at full capacity
As you test and fine-tune settings to address specific factors in a problem area,
record the results and note any unusual interactions or behavior. You may want to
change company standards and create a checklist to accommodate new procedures
or settings.
General TCP/IP Problems
This table lists TCP/IP problems and factors to consider
Problem Factors to Consider
Host Issues
v Inadequate memory
v Slow disk speed/contention
v Slow channel speed/contention
v Excessive workload
v Inadequate processors/slow processor speed
v Inefficient performance groups and dispatch priorities
v Resource competition among applications on same system
v Resource competition among LPARs
© Copyright IBM Corp. 1999, 2015 277

Problem Factors to Consider
Network issues At the link level, look for:
v Link errors
v Hardware or interface errors
v Latency problems
Note: UDT is an alternative transport layer protocol designed for
high latency with high-bandwidth connections. If you transfer files
with a trading partner who is geographically distant and
determine that the data congestion is caused by a high-latency,
high-bandwidth connection, analyze your system and see if you
would benefit from UDT. For additional information, see the IBM
Sterling Connect:Direct for z/OS Release Notes.
v Collisions
At the IP layer, look for:
v Discarded packets
v Reassembly failures
v Whether the DoNotFragment Bit is set
v TOS (TCP/IP Type of Service) such as Telnet with low delay
(interactive priorities overriding batch transmissions)
v Small MTU/MSS (Maximum Transmission Unit/Maximum
Segment Size)
Note: If the MTU is too small, inefficiency results whereas if it is
too large, datagram fragmentation may result.
278 IBM Sterling Connect:Direct for z/OS: Administration Guide

Problem Factors to Consider
Network issues
(cont'd)
At the TCP layer, look for:
v Segments retransmitted
v Connections reset
v Frequency of ACKs
v Window size too small
In the TCP/IP stack, look for:
v The maintenance level of the two TCP stacks involved
v The use of PORT and 1364 TCP CDSTC NODELAYACKS which
may delay ACKS
v The values of TCPSENDBFRSIZE and TCPRCVBFRSIZE in the
TCP/IP PROFILE data set
Note: These values affect all applications using the TCP/IP
protocol whereas the V2.BUFSIZE initialization parameter (see
below) affects the operation of the Sterling Connect:Direct
application only.
v Whether the value set for PATHMTUDISCOVERY is an MTU size
of 8992 (the default)
In the Sterling Connect:Direct global initialization parameters file,
look at:
v “V2.BUFSIZE = (maximum transmission buffer size, TCP/IP
send/receive buffer size)” on page 379–The default value of 4096 is
too low for most communications lines which have greater
bandwidth and speed.
v DEBUG–Make sure this setting is 00000000 so that internal traces
are turned off.
v “TCP.API.TIMER = 00:00:00 | hh:mm:ss” on page 371–To reduce
the number of hung sessions, specify this keyword. Set this value
to at least 20 minutes and specify TIMEOUT=YES on IUI signon
panels for individual users. Session waits before timing out and
exiting.
Problems Involving Executing Sterling Connect:Direct
Processes
This table lists factors to consider if a Sterling Connect:Direct Process is executing
inefficiently.
Note: Because FTP is a utility program integrated into the TCP stack (thus running
at the dispatch priority of the TCP stack), FTP may transfer data at a faster rate
than an external application when sending a single file from the same source to the
same destination. The only time an external data transfer application exceeds the
transfer rate of FTP is when parallel data transfers take place between the same
source and destination. Using parallel data transfers between the same source and
destination is how most large production environments operate.
Chapter 15. Performance Tuning 279

Factors to Consider Suggestions
Are you using compression? If so, what
type?
v Compression is generally unnecessary
unless you use a slow line. Send data in
its original state.
v If you use extended compression and
want to see the effects of changing the
default values for the parameters related
to extended compression, see Increasing
Throughput and Decreasing CPU
Utilization.
Are you using checkpoints? If so, what is
the interval?
On a fast link make this interval large, for
example, 100M.
Are you sending text or binary files? When comparing Sterling Connect:Direct
with FTP, send files only in Binary mode
with both Sterling Connect:Direct and FTP.
Binary mode must be used with Text files
because FTP strips trailing blanks and sends
only a partial file.
Note: Sterling Connect:Direct only sends
complete files unless sending HFS files,
where trailing blanks can be stripped.
What does the file structure look like? To speed up the transfer, use a larger
blocksize.
Are you using striped extended-format data
sets for files that have large amounts of data
or in which time is of the essence?
Depending on the number of stripes, you
could see a dramatic increase in the I/O
rate.
Can you break down the Process so as to
send multiple files at once using Sterling
Connect:Direct's parallel session capabilities?
For testing purposes, set the PARSESS
parameter in the network map to at least 10
then submit 10 file transfers in Sterling
Connect:Direct and 10 in FTP. After
verification, change the PARSESS value to fit
your environment.
Are you changing DCB attributes? Avoid giving the sending and receiving data
sets different DCB attributes since that forces
the transfer to "record mode," which
increases CPU utilization and TCP or SNA
I/O.
How to Improve BSAM Data Transfer Rates
To optimize BSAM sequential data set transfer rates, take one or more of the
following approaches:
v If MAXSTGIO is currently defined in the initialization parameter file, review the
setting and consider setting it to the 1 MB default or greater. To fine-tune and
set the Number of Channel Programs (NCP) in the DCB parameter of the COPY
statement, include the second positional parameter as well.
v Increase the block size when it is advantageous to do so. Make the block size of
a disk data set close to (but not more than) half-track blocking (27998 for
non-extended 3390 disk data sets or 27966 for extended 3390 data sets). This
improves performance by increasing the number of bytes transferred per I/O.
For example, when transferring a data set with an LRECL of 80, it takes much
longer to transfer 27920 bytes in 349 blocks (BLKSIZE=80) than in 1 block
(BLKSIZE=27920).
280 IBM Sterling Connect:Direct for z/OS: Administration Guide

Note: Exceeding half-track blocking on disk wastes a significant amount of storage
capacity without improving the transfer rate.
For tape-to-tape transfers, a larger block size improves both performance and
capacity. For disk-to-tape transfers, the I/O performance benefit of reblocking to an
LBI block size (> 32760) may be outweighed by the CPU performance hit of
transferring the data set in "record mode."
Troubleshooting BSAM Data Transfers
Data transfer rates using BSAM vary significantly from run to run even on the
same system. For example, even with a high NCP, the transfer rate deteriorates
when the I/O subsystem is moderately busy. If problems should occur, review
these factors:
v The REGION specified on the job card. With the higher number of I/O buffers
comes the risk that if too many Processes run simultaneously, the above-the-line
storage can be exhausted. To prevent out of storage abends, review both the
MAXSTGIO initialization parameter and the job's region.
v The number of concurrent transfers occurring on one DTF, even when all system
components (CPU, DASD, CU, CHPID or network) run below capacity. For
example, where a single transfer attains a transfer rate of 76 MB per second, two
concurrent transfers potentially reduce it to 66 MB per second for each transfer,
three transfers to 58 MB per second, and 4 transfers to 52 MB per second.
v Hardware caching. When you run the same test case multiple times, usually the
first runs slower than subsequent runs. For example, the initial transfer rate
might be 38 MB/second, which increases to 75 MB/second for the second and
subsequent runs.
v Network. The transfer rate varies widely according both to the speed of the
network and the volume of traffic on it.
v Data set's device, CU, and CHPID configuration, speed, and how busy they are.
v CPU speed, and how busy it is (sometimes a limiting factor).
v Compression. Compression sometimes slows down the transfer due to extra
CPU use.
Problems Involving Checkpoints
If the value specified for the checkpoint interval either as an initialization
parameter or in the TO clause of a COPY statement is too small, it can significantly
reduce transmission speed. Since the purpose of checkpointing is to save time in a
restart, it is usually unnecessary to have a checkpoint interval that translates to less
than a second of transmission time. A checkpoint interval that translates to 5
seconds of transmission time between checkpoints is normally more than adequate.
For example, if the transmission rate to the other node is typically 10 MB/second,
and you desire to lose no more than 5 seconds of transmission time in a restart,
then you would set CKPT=50M.
Increasing Throughput and Decreasing CPU Utilization
Depending on your company's computing environment, Sterling Connect:Direct for
z/OS provides a variety of methods to improve how efficiently your system is
running, including the following:
v The Compression Control Feature, which allows you to control the type of
compression used between nodes
v Extended compression for environments using slow lines and high CPU capacity
Chapter 15. Performance Tuning 281
v The zIIP exploitation feature, which takes advantage of System z Integrated
Information Processor (zIIP) hardware to free up the general purpose processor
resulting in potentially greater performance and cost-competitiveness when
compared with less efficient and more complex distributed network solutions
In addition, if you are using Sterling Connect:Direct Secure Plus, there are other
factors you should take under consideration to fine-tune performance in this area.
Compression Control Feature
The Compression Control Feature (CCF) allows you to control the type of
compression used between nodes, that is, standard versus extended, and how
compression is used on a node, that is, whether the selected compression type is
required, may be used, or is not allowed at all. This control may be forced globally
by the PNODE or negotiated by the SNODE. Global compression control settings
are specified in the initialization parameters, whereas settings for specific nodes are
specified in the adjacent node entry for those nodes.
Because this feature overrides compression settings specified in a Process, its
default settings allow both types of compression so that the Process determines the
type of compression that will be used (standard “COMPRESS” or extended
“COMP EXT”).
When control of compression is being exercised, the PNODE always applies its
rules to the Process and then attempts negotiation. Negotiation is not performed if
the other node does not have the CCF code installed. (The node having Process
control is in charge in this case.)
Where a partner node also has CCF installed, then the two nodes will negotiate the
type of compression that will be used. If one node says that compression must be
used and the other says that it is not allowed, then the step will fail, causing an
IMPASSE situation (SCPA994I). Also, if one node says FORCE EXT and the other
replies FORCE STD, this is also an IMPASSE situation.
The parameters that govern compression control come from either or both the
following initialization parameters and network map parameters:
v Initialization parameters
– COMPRESS.EXT
– COMPRESS.STD
– COMPRESS.NETMAP.OVERRIDE
– COMPRESS.NEGO.FAIL
v Network Map parameters
– COMPRESS.EXT
– COMPRESS.ST
– COMPRESS.STD.PRIMECHA
The CCF initialization parameters are refreshable, so they may be changed at any
time without requiring the DTF to be recycled. When you do make changes to
these initialization parameters, your changes will cause global overrides to
Processes on your system(s). For example, where standard compression is being
used in Processes, if the initialization parameters are changed to specify
COMPRESS.STD=DISALLOW, none of your Processes will use standard
compression (as long as netmap overrides are disallowed or the node definition
does not contain compression control keywords).
282 IBM Sterling Connect:Direct for z/OS: Administration Guide

If you want to put the netmap compression control keywords into effect, you have
to specify values for those keywords in the ADJACENT.NODE definitions because
they do not have default values.
For example, if the netmap is changed for a node (or nodes) to specify
COMPRESS.EXT=FORCE, then all Processes that run on that node will behave as if
COMP EXT was specified in each COPY step.
Because of situations such as these, it is important for you to contact your partners
to discuss how compression will be handled between the two Sterling
Connect:Direct systems to avoid IMPASSE copy failures.
CPU Usage Examples
You have several options for controlling compression on nodes that give you
flexibility in determining whether to spend CPU cycles on compression on a global
or node-by-node basis.
Stop Using Compression
To completely stop using compression, specify the following in the initialization
parameters file:
COMPRESS.EXT=DISALLOW
COMPRESS.STD=DISALLOW
COMPRESS.NETMAP.OVERRIDE=DISALLOW
These values will prevent compression from being performed, and will not allow
any netmap entries to override the compression controls with regards to Processes
under this node's control.
If the partner node(s) have CCF, then they will respond to these negotiation
specifications by either terminating compression, or by sending an SCPA994I, RC=8
message to show that their system specified FORCE as one of the compression
types.
If the partner node does not have CCF, compression will be stopped only when
this node is the PNODE (with the exception of PRECOMP files, which are
precompressed files). If this system is the SNODE, then a message will be written
to the RPLERRCK trace file when it is forced to do compression because the
PNODE does not have CCF.
Prevent Standard Compression
To prevent only standard compression, specify the following:
COMPRESS.STD=DISALLOW
COMPRESS.NETMAP.OVERRIDE=DISALLOW
In this case, only Processes specifying COMPRESS will be affected on this node. If
the partner node has CCF, then all Process steps that specify COMPRESS will be
forced to no compression. However, if the partner has specified
COMPRESS=FORCE, then the step will fail with an SCPA994I, RC=8 message.
Chapter 15. Performance Tuning 283

When a partner node is the PNODE and does not have CCF, then the compression
specified in their Process will be performed. If the compression that is being done
is disallowed on this node, then the node will write a message to the RPLERRCK
trace file to note the situation.
Control Compression on a Node-by-Node Basis
To control compression on a node-by-node basis, you can specify the following
initialization parameter (or simply allow the parameter to default):
COMPRESS.NETMAP.OVERRIDE=ALLOW
You can then set the netmap compression parameters for each node as needed to
allow extended and/or standard compression.
You can also set up the reverse situation on a node-by-node basis, where only
certain nodes are prevented from using compression. In this case, specify
COMPRESS.NETMAP.OVERRIDE=ALLOW in the initialization parameters file and
specify the following netmap parameters for the nodes that will not use
compression:
COMPRESS.EXT=DISALLOW
COMPRESS.STD=DISALLOW
Using Extended Compression
TCP/IP connections accommodate greater bandwidth to transfer large files than
older technologies eliminating the need to compress data. Data can be sent in its
original state saving both time and the need to decompress data once it has been
transferred. However, if you have a slow line and high CPU capacity, compression
may be warranted. Under other conditions, compression consumes a lot of CPU
and slows transfer rates considerably while giving little if any return given the cost
of CPU time.
Different Methods of Using Extended Compression
You can compress and store files in ZLIB-compressed format using one of the
following methods:
v On a global basis using the Extended Compression (ECZ) initialization
parameters. If you always transfer the same type of data, you may benefit by
changing the global default values of the extended compression initialization
parameters.
v On a Process basis using the EXT parameters in the COPY statement. If you
send a variety of data types, it is probably more efficient to retain the default
values of the initialization parameters and override them on a
Process-by-Process basis using the COPY statement. For information on
overriding the extended compression parameters in the COPY statement, see the
Connect:Direct Process Language help.
v Through the DGASACMP batch utility. This option allows the CPU
consumption, or overhead of extended compression, to be offloaded from
Sterling Connect:Direct to the standalone utility. The CPU time consumed by this
utility can be much greater than that consumed by Sterling Connect:Direct
because the DGASACMP utility must use record mode compression whereas
Sterling Connect:Direct can use block mode compression. You can also use the
284 IBM Sterling Connect:Direct for z/OS: Administration Guide

DGASACMP batch utility to decompress the data and store it in its original
format on the remote node where compressed data has been sent. The
DGASACMP utility produces a report, which shows how much the data was
read, written, compressed, and how long it took to compress so you can
determine the benefits of changing the default values of the extended
compression parameters.
Changing the Values of ECZ Parameters
The effects of changing the default values for the ECZ.COMPRESSION.LEVEL,
ECZ.MEMORY.LEVEL, and ECZ.WINDOWSIZE extended compression parameters
are not always predictable and can significantly increase CPU utilization. The
default values for the three parameters produce very good results for a wide
variety of data types. Typically, it is only beneficial to change these default values
if line speeds are limited, data is repetitive, and CPU is available.
zIIP Exploitation Feature
The zIIP Exploitation Feature (ZEF) is designed to offload CPU time to the System
z Integrated Information Processor (zIIP), a special-purpose processor integrated
into the System z server platform infrastructure. By freeing up the general purpose
processor (CP), the efficiency of environments where CPU-intensive activities are
being performed, such as ZLIB compression and SSL/TLS encryption, can be
significantly enhanced.
zIIPs execute programs that are structured to operate under control of
z/OS-preemptable enclave service request blocks (SRB). An enclave is a z/OS
construct that allows a unit of work or transaction to be assigned a goal by the
z/OS Workload Manager (WLM). If a program can operate under control of an
enclave SRB, then it can be made eligible to run on a zIIP processor. The COPY
operation, which is the core operation of Sterling Connect:Direct for z/OS, uses
multiple phases in a pipeline to copy data from source to destination. Because
some of these phases are CPU-intensive, they are good candidates for zIIP-eligible
work.
Requirements to Use the zIIP Exploitation Feature
The ZEF feature requires the following:
v Your System z must have one or more online zIIP processors.
v You must be running z/OS 1/10 or later.
v You must activate ZEF by performing one of the following actions:
– Add the ZIIP parameter to your global or local initialization parameter file.
See “ZIIP = NONE | EXTCOMP | SSLTLS | ALL | PROJECT” on page 381
for a complete description of all settings. Because this parameter is not
refreshable, you must restart Sterling Connect:Direct to activate the ZEF
feature.
– Use the MODIFY command and specify the ZIIP setting you want to use. See
“Sterling Connect:Direct MODIFY Command” on page 315 for more
information.
Chapter 15. Performance Tuning 285

Choosing the Appropriate ZEF Setting
The default value for the ZIIP parameter is NONE meaning that no enclaves or
enclave SRBs will be created and so no CPU time will be offloaded to a zIIP.. If
you select ZIIP=NONE, Sterling Connect:Direct will operate as it has for all
versions prior to Release 5.1.1.
To offload all eligible activities to zIIP, you can select the ALL setting. These
activities include all SSL/TLS encryption and decryption and extended
compression and decompression performed during COPY steps. To check the
results of using the ZEF feature, you can check the Copy Termination and Process
Termination (PT) records in SELECT STATISTICS.
In the following example, no zIIP processor was online, so all work was done
under a CP and is shown in the Time on CP field and no time (0) is shown in the
Time on zIIP field. The zIIP Qualify time indicates the amount of time that could
have been processed on the zIIP, had one been available 100% of the time it was
needed. If work executes on a zIIP processor in a fraction of the time it takes on a
CP, then the wall time for the entire process can be estimated as (Time on CP – zIIP
Qualify) + (zIIP Qualify * fraction). The fraction is needed because the zIIP Qualify
time is normalized to standard processor speed (that is, the fraction is the
normalization factor). For more information on how these new Sterling
Connect:Direct statistics are calculated, see “Additional Information on How Time
is Calculated for Statistics” on page 287.
================================================================================
CD.ART SELECT STATISTICS 06.21.2011
================================================================================
________________________________________________________________________________
Function => Process Term Start Time => 16:17:03
Process Name => ZIIP1 Stop Time => 16:17:06
Process Num => 1.. Comp Code => 00000000
Comp Msg => SVTM100I
Userid => EPETE1
Job Name => EPETE1 Job ID => TSU58526
Secondary Node => CD.BOB
Time on CP => 00:00:13.449
Time on zIIP => 00:00:00.000
zIIP Qualify => 00:00:10.598
___________________________________________________________
You can project how much time could be offloaded to a zIIP without actually using
the zIIP. If a zIIP processor is online, you can specify the PROJECT setting for the
zIIP initialization parameter. All activities will continue being dispatched to the CP.
If there is no zIIP processor online, there is no difference between the PROJECT
and ALL settings.
To segregate extended compression and encryption activities, you can use the
EXTCOMP setting to offload only extended compression and decompression CPU
time to a zIIP or the SSLTLS setting to offload only SSL and TLS data encryption
and decryption CPU time.
Potential Issue When Using ZEF
Because the ZEF feature does not constrain which SRBs are offloaded to zIIPs
when ALL is specified, all available zIIPS could easily be dominated by Sterling
Connect:Direct when multiple concurrent COPY steps with extended compression
286 IBM Sterling Connect:Direct for z/OS: Administration Guide
are executing. To allow zIIP-eligible work to be executed on a CP if all zIIPs are in
use, make sure to set the IEAOPTxx parameter, IIPHONORPRIORITY, to YES. For
more information, see IEAOPTxx (OPT parameters) in MVS Initialization and Tuning
Reference (SA22-7592) or IEAOPTxx (OPT parameters) for the online information
center.
Additional Information on How Time is Calculated for Statistics
Note: IWMEQTME is a Workload Management (WLM) service documented in
z/OS MVS Programming: Workload Management Services. For more information, refer
to document number, SA22-7619.
The three new time-related statistics are derived as follows:
v Time on CP = (IWMEQTME CPUTIME) – (IWMEQTME ZIIPTIME)
v Time on zIIP = (IWMEQTME ZIIPTIME)
v zIIP Qualify = (IWMEQTME ZIIPQUALTIME)
If the installation has no zIIP processors:
Time on zIIP (IWMEQTME ZIIPTIME) = 0
Therefore, Time on CP = (IWMEQTME CPUTIME) – 0
However, regardless of whether the installation has a zIIP processor:
Time on CP (IWMEQTME CPUTIME) – (IWMEQTME ZIIPTIME) + Time on zIIP
(IWMEQTME ZIIPTIME) = (IWMEQTME CPUTIME)
The (IWMEQTME ZIIPTIME) and (IWMEQTME CPUTIME) times in the Process
Termination record example above will be the same (except for rounding errors) as
reported by SMF and RMF for the enclave. But for step statistics reported in COPY
and RUN TASK records, times are "slices" of the enclave times and will add up to
slightly less than the corresponding Process Termination record times. These
differences should be negligible. This occurs because there is a small amount of
between-step processing charged to the enclave that is not charged to any
particular step. All of the between-step time is CP time; none is zIIP qualified.
Because SSL and TLS handshakes occur before an enclave is created, their CPU
time is not reported in any enclave time.
Because Sterling Connect:Direct reports zIIP-qualified time, not zIIP-eligible time,
the IEAOPTxx parameter setting for PROJECTCPU has no effect on the times in
Sterling Connect:Direct statistics. However, if PROJECTCPU=NO, there may be
nothing in SMF or RMF to compare Sterling Connect:Direct statistics to.
Considerations When Using Sterling Connect:Direct Secure
Plus
When using Sterling Connect:Direct Secure Plus, be aware of the following :
v CPU utilization increases dramatically with every increase in the length of the
encryption key. Use the lowest level of encryption allowed by your security
policy.
v Whenever possible, use an encryption key that is supported in the z/ hardware
(3DES or AES128).
Chapter 15. Performance Tuning 287
v Even though extended compression is not recommended for high speed
networks, using extended compression with files that compress well (80-90%)
can reduce total CPU utilization, especially if the encryption key is not
implemented in the hardware.
v If Sterling Connect:Direct Secure Plus is being used between two Sterling
Connect:Direct for z/OS nodes (Version 5.0 or later), but not all files must be
encrypted, consider using one of the following options:
– Specify OVERRIDE=YES on the remote node record in the Sterling
Connect:Direct Secure Plus parameter file and SECURE=OFF in the PROCESS
statement.
– Specify OVERRIDE=YES on the remote node record in the Sterling
Connect:Direct Secure Plus parameter file and SECURE =
(ENCRYPT.DATA=N) in your PROCESS or COPY statement.
ENCRYPT.DATA=N tells Sterling Connect:Direct to not encrypt the actual file
data being copied but rather just the control block information, such as userid
or password, used to establish a session.
Note: Both trading partners must support this capability.
288 IBM Sterling Connect:Direct for z/OS: Administration Guide

Chapter 16. Isolating Problems
To expedite the diagnostics process, prepare the following information for the IBM
Support representative:
v Version, release, maintenance level, and operating system for the Sterling
Connect:Direct products being used on both nodes, for example, Sterling
Connect:Direct for z/OS 5.1.1 with Sterling Connect:Direct for HP NonStop
3.4.00.
v Release levels of the operating system, VTAM, and other software involved
v Details describing the complete scenario, including:
– Commands that are issued, with exact syntax and order
– Files or devices that are involved. Note the file contents and the type of file
(such as DCB file attributes, GDG, Tape, SMS, striped, compressed)
– Interface that you used, such as batch interface, IUI, or operator interface
– Error messages for both nodes
– System logs for both nodes, including any messages generated while the
problem occurred. Check the SYSLOG for Sterling Connect:Direct for z/OS
nodes
– Which side is PNODE/SNODE
– The direction of the data transfer
– What connection protocol you are using (LU0, LU6.2, IBM TCP/IP,
TCPAccess)
– If the node is a Sterling Connect:Direct/Plex or stand alone server
– Sterling Connect:Direct Process including the FILE attributes for the FROM
and TO files for both nodes
– I/O device types
– Network map information
– Statistics information for both nodes including ALLOC information
Note: Be prepared to recreate the problem. Problem recreation is your
responsibility.
Supporting Documentation
Problem determination can be involved and can require extensive research. We ask
you to gather some of the following supporting documentation to help analyze the
problem. Not all of this information is applicable to all problems or all operating
environments.
v SYSLOGs
v Sterling Connect:Direct statistics for both nodes
v RPLERRCK output
v ESTAE output
v VTAM definitions
v APPLID definitions
v Logmode table entry
v Class of Service (COS) entry
v D NET VTAM display
© Copyright IBM Corp. 1999, 2015 289

v Sterling Connect:Direct traces
v Network map information
You can use your network management software or VTAM commands to isolate
any session-related problems.
Diagnostic Rexx Exec for IUI Environments
If you are experiencing problems with the Sterling Connect:Direct IUI, you can use
the DGA#CAP Rexx exec available in the SDGAISPC target library to facilitate
diagnosis of IUI problems.
To invoke the DGA#CAP Rexx exec, type the following TSO command:
TSO %DGA#CAP
The exec issues an ISPF long message containing the dataset name where the
output is written. Contact IBM Support and give the Support representative the
output generated by the DGA#CAP Rexx exec.
Providing Dumps to Customer Support
A Sterling Connect:Direct ABEND can occur when a system failure or system error
exists or when the FORCE parameter is used with the STOP CD command.
When an ABEND is reported, Support searches the problem tracking database for
any similar problems. Often the ABEND is a known bug or a common error, and a
solution is readily available. Otherwise, provide a full SVC dump for diagnosing
ABENDs.
If support cannot locate a reference to the ABEND, you may be required to provide
the following information:
v Send a complete SVC dump, not a snap dump.
v A copy of the Process and the statistics for that Process. If the Process has
symbolics, include the symbolic substitution data. Also, ensure that the statistics
records include WTO records.
Note: Include statistics from both Sterling Connect:Direct nodes.
If the ABEND occurred while executing a Process that has executed successfully,
determine what changes were made, either in the operating system or within
Sterling Connect:Direct, and do the following:
v Send console logs for both Sterling Connect:Direct nodes.
v Note whether the ABEND caused either Sterling Connect:Direct node to
terminate.
v If the ABEND can be recreated, provide details.
v Send a copy of the system log and network error log for both operating systems,
which can indicate any unusual situations occurring with the operating system
or network at the time of the ABEND.
Note: A system log is required when analyzing an ABEND. It is preferable to
review the log for both systems; however, it is essential for the system reporting
the ABEND. When one of the nodes is not in a z/OS environment, check the
output files for Sterling Connect:Direct.
290 IBM Sterling Connect:Direct for z/OS: Administration Guide
v Send RPLERRCK DD output to review I/O errors and other information. See
DD Statements in Startup JCL for more information.
v Send ESTAE DD output to review ABEND conditions and some special I/O
errors. See DD Statements in Startup JCL for more information.
If several ABENDs occur simultaneously, send the dump from the first ABEND
only. Subsequent ABENDs are usually a result of the original ABEND.
When sending a dump on tape, send the JCL that created the tape. DSN, VOLSER,
LABEL, and DCB attributes are needed to facilitate tape unloading. If available,
send a printout of the tape management product display of the VOLSER.
Note: If you are sending a tape with more than one file, ensure that the JCL that
created the tape references the correct file in the LABEL= parameter. This reference
ensures that a previous file is not inadvertently overlaid.
Types of Dumps
To determine and resolve problems, Customer Support may request any of the
following types of dumps:
v Sterling Connect:Direct Data Transmission Facility (DTF) Dumps, which include
SYSMDUMP and CDSVCDMP dumps
v Sterling Connect:Direct IUI ABEND Dumps, which include z/OS Time Sharing
Option (TSO) address space dumps
v DGADBATC Batch Dumps
v VSAM File Dumps
Sterling Connect:Direct Data Transmission Facility (DTF)
Dumps
This dump is generated when an ABEND occurs. It contains the contents of the
Sterling Connect:Direct address space, which is copied into one or more of the data
sets that you specify by ddname in the DTF JCL (CDSVCDMP, SYSABEND, or
SYSMDUMP).
When an ABEND occurs, Sterling Connect:Direct produces an SVC dump with all
of the information for the address space, regardless of whether the ABEND
occurred in the main task or a User Exit subtask. Unless otherwise specified in the
JCL, the dump is written to the standard SVC dump data set, SYS1.DUMPxx. You
can specify an alternate data set by using the CDSVCDMP DD statement in the
JCL.
Note: If the system attempts an SVC dump and fails with: *ERROR* Unable to
take an SVC dump; reason: 0B, the Dump Analysis and Elimination (DAE)
component of the operating system found an earlier dump of this problem already
exists.
Turn off the SVC dump by modifying your JCL. For more information, see Turning
Off the SVC Dump.
Chapter 16. Isolating Problems 291

Multiple DTF SVC Dumps Capture Using CDSVCDMP
You can use CDSVCDMP to capture multiple DTF SVC dumps. A dump is created
for each ABEND and written to a separate data set. You can specify whether the
dumps are written to the SYS1.DUMPxx data sets or to unique user-specified data
sets.
To write dumps to user-specified data sets, you must create a data set name for
each dump that can occur. The first data set name must end with .SYSMDP00.
Each additional data set name must end with .SYSMDPnn, where nn is a
consecutive number up to a value of 99. For example, if you want to create enough
data sets to write five dumps, create five data set names beginning with
xxxx.yyyy.SYSMDP00 and ending with xxxx.yyyy.SYSMDP04.
You must define the data sets with the same attributes as your SYS1.DUMPxx data
sets. The data sets must be preallocated and on the same disk volume.
To record multiple SVC dumps, set the JCL statement for CDSVCDMP as follows.
//CDSVCDMP DD DSN=XXXX.YYYY.SYSMDP00,DISP=SHR
The first dump is written to the .SYSMDP00 data set. When an additional ABEND
occurs, a dump is written to the next data set, .SYSMDP01. Each additional
ABEND creates a dump to the next .SYSMDPnn data set as long as ABENDs occur
and enough .SYSMDPnn data sets are available. If an ABEND occurs and all data
sets are full, the dump is not created and a message is issued stating that all
.SYSMDPnn data sets are full.
You do not have to empty or reset these dump data sets. When the DTF is
initialized, and you are using the .SYSMDPnn data sets, Sterling Connect:Direct
writes over the existing data in the data sets. If you want to save the existing data,
save the data sets using a different data set name before you restart Sterling
Connect:Direct.
Turning Off the SVC Dump
If you want to turn off the SVC dump, place the following statement in your DTF
JCL.
//CDSVCDMP DD DUMMY
Changing Dump Options
For the SDATA parameter specify SDATA=(ALLSDATA). If SDATA=(ALLSDATA)
is not an acceptable default for your system, ensure that the SYS1.PARMLIB
member corresponding to the ddname in the JCL for the DTF specifies, at a
minimum, the following.
SDATA=(NOSUM,PSA,RGN,SQA,SWA,TRT,LPA,GRSQ,CSA,NUC)
For the PDATA parameter for IEADMPxx and IEAABDxx, specify
PDATA=(ALLPDATA).
Note: PDATA is not an option for member IEADMRxx.
292 IBM Sterling Connect:Direct for z/OS: Administration Guide

If you cannot specify ALLPDATA, at a minimum, include PSW, REGS, SA, JPA,
SPLS, and SUBTASKS. Refer to the IBM manual MVS Initialization and Tuning
Reference for the release of z/OS being used.
If you are unable to change the SYS1.PARMLIB member, issue an operator
command to change the dump options.
The following steps guide you in issuing operator commands to change dump
options:
1. Issue the command DISPLAY DUMP,OPTIONS to list the dump options
currently in effect.
2. Issue the command CHNGDUMP SET to change the options.
3. Issue the CHNGDUMP DEL or CHNGDUMP RESET command to reset the
options after recreating the dump.
If the correct dump options are specified in one of the SYS1.PARMLIB members,
change the ddname in the JCL for the DTF to reference the ddname corresponding
to that member.
For further information on changing dump options, refer to the MVS System
Commands IBM manual for the z/OS being used.
Sterling Connect:Direct IUI ABEND Dumps
About this task
When the Sterling Connect:Directs, a system dump might be required for problem
resolution. To obtain a dump of the TSO address space, allocate a SYSMDUMP DD
to an appropriately defined data set, and run the ISPF with the TEST option. To
send a dump of the IUI to a data set, allocate SYSMDUMP with DISP=MOD to
account for the two dumps that Sterling Connect:Direct produces.
To recreate an ABEND of the IUI to produce a dump, perform the following steps:
Procedure
1. Ensure that the SYSMDUMP DD is allocated.
2. Reinvoke ISPF with the ISPF TEST command.
3. To allocate a SYSMDUMP DD, type the following TSO command where
filename is a valid DSN name that has LRECL=4160, BLKSIZE=0, and
RECFM=FBS.
TSO ALLOC F(SYSMDUMP) DA(filename) MOD
The system will determine blocksize, and will prevent short blocks. Generally,
110 cylinders on a 3390 device is enough space for an IUI dump.
4. When the ABEND message is displayed, press ENTER to produce a dump. Two
dump messages (and dumps) are produced. Press PF3/END to bypass the
dump.
DGADBATC Batch Dumps
For DGADBATC batch dumps, ensure the JCL that executes DGADBATC contains
a SYSMDUMP DD statement. Refer to “Sterling Connect:Direct Data Transmission
Facility (DTF) Dumps” on page 291 to ensure that the appropriate dump options
are specified for the corresponding ddname in the JCL for DGADBATC.
Chapter 16. Isolating Problems 293

VSAM File Dumps
If a problem occurs when using a Sterling Connect:Direct VSAM file, you might
need a dump of the VSAM file for problem resolution. To dump a Sterling
Connect:Direct for z/OS VSAM file, use the IBM Access Method Services
(IDCAMS) PRINT command. If you send an IDCAMS PRINT of the TCQ, include
the TCX file.
Refer to the sample job stream in the following example for creating a Sterling
Connect:Direct for z/OS VSAM dump.
//XXXXXX JOB (1111),PROGRAMMER,NOTIFY=TSOID,CLASS=D,MSGCLASS=X,
// MSGLEVEL=(1,1)
//PRINT EXEC PGM=IDCAMS
//SYSPRINT DD SYSOUT=*
//SYSIN DD *
PRINT INDATASET(DUMP1.ZOS.VSAM1) -
DUMP
To copy a VSAM file to tape, use the IDCAMS REPRO command. You must
include the DCB parameters, RECFM=VB, DSORG=PS for the data set created on
the tape. In the LRECL and BLKSIZE parameters for the dataset created, you must
reflect the size specified for the RECORDSIZE parameter used when you defined
the file.
For example, if the Sterling Connect:Direct statistics file was initially defined with
RECORDSIZE (4089 4089), copy the Sterling Connect:Direct statistics file by typing
the following DCB parameters in the DD statement in the JCL.
//OUTDD DD DSN=TAPE.STAT.FILE,
// DCB=(LRECL=4089,BLKSIZE=4089,RECFM=F,DSORG=PS)
Suppressing Dumps for Specific ABEND Codes
About this task
Use the following procedure if you want to suppress the dump for specific ABEND
codes.
Procedure
1. Add the ABEND code for which you want to suppress dumps to the ABEND
codes list defined in the ABEND.CODES.NODUMP parameter.
2. Set the ABEND.RUNTASK parameter to ABEND.CODES.NODUMP. Following
is an example:
ABEND.CODES.NODUMP => (SX37 SX13 U0728 SXD9 S9FC)
ABEND.RUNTASK => ABEND.CODES.NODUMP
294 IBM Sterling Connect:Direct for z/OS: Administration Guide

Resolving the Problem
If Support cannot resolve the problem during, it is documented as a case and is
assigned a reference number. Refer to this number when forwarding
documentation or calling support.
Severity Level Definition
Severity 1 Production system is down; requires immediate attention. For example,
excessive abnormal termination.
Severity 2 A major problem or question; the product operates but is severely
restricted. For example, an incorrect response from a frequently used
command.
Severity 3 A non-critical issue is encountered with the product, but the majority of
functions are still usable. For example, an incorrect response from an
infrequently used command.
Severity 4 A minor problem or question that does not affect product function. For
example, the text of a message is misspelled.
All cases are prioritized based on severity.
Escalating a Problem Resolution
If our normal support cycle does not produce the results you require or your issue
has changed in severity, you can escalate the case. To escalate a case, contact the
technician responsible for your problem.
Reviewing Sterling Connect:Direct Messages and Sense Codes
As you research a problem, note any messages issued by Sterling Connect:Direct.
Look specifically for messages displayed by the API through the IUI or batch
interface. If an error occurred in a file transfer, look at messages for any Processes
executing at that time for both nodes.
Also, check for messages in the JES log for z/OS.
Sterling Connect:Direct messages contain short and long text to explain the error.
Sterling Connect:Direct for z/OS displays the short text when an event occurs. The
following information is displayed for each message if you request the long text:
v Module issuing the message
v Short and long message texts
v System action as a result of the message situation
v User response to correct the situation
Note: For z/OS, press PF1 to display the longer explanation if the message is
issued in an ISPF panel.
Sterling Connect:Direct sense codes address connection errors involving the
netmap and the DGADETLU (alias of DMGNETLU) module. The following is an
example of a sense code display containing both the long and short text. For
additional information, see Messages in IBM Sterling Connect:Direct for z/OS User
Guide.
Chapter 16. Isolating Problems 295

Connect:Direct MESSAGE DISPLAY
DATE => 2010.07.22
TIME => 09:53
MESSAGE ID==> SENS4022
MODULE ==> DMGNETLU
==============================================================================
SHORT TEXT==> LUNAME does not match name of node in NETMAP
LONG TEXT:
LINE 1 ==> The LUNAME or the remote node does not match the LUNAME
LINE 2 ==> that is associated with the symbolic node name in the
LINE 3 ==> C:D Network Map file. See messages SVTR014I and SVTR021I.
LINE 4 ==>
LINE 5 ==>
LINE 6 ==> SYSTEM ACTION: The session is terminated unless NETMAP.CHECK
LINE 7 ==> is specified in the INIT parms with the WARN parameter.
LINE 8 ==>
LINE 9 ==>
LINE 10==> RESPONSE: The Adjacent.Node entry in the Network Map must be
LINE 11==> updated to reflect the proper LUNAME, OR the remote
LINE 12==> node should call in with correct LUNAME.
COMMAND ===> ________ ENTER ’DIR’ TO DISPLAY THE DIRECTORY
Interactive Use of the Sterling Connect:Direct Message Facility
Display the long text message through the IUI by either of the following methods:
v Use the SELECT MESSAGE command in the command line interface.
v Type M at the CMD prompt and press Enter.
v Access the PRIMARY OPTIONS MENU and type the MSG option at the CMD
prompt.
v Type =M from any Sterling Connect:Direct screen at the CMD prompt in the
ISPF Interface and press Enter. The long text for the current message is
displayed.
Displaying an ABEND Message
About this task
Some user ABEND messages are stored in the Sterling Connect:Direct message file.
To access them, insert the ABEND message ID in place of a Sterling Connect:Direct
message ID.
Note: System ABEND messages appear in the JES log for z/OS. They do not
appear in the Sterling Connect:Direct message file. Refer to the appropriate
operating system manuals if you require further details.
For example, to display the description of user ABEND U0075, perform the
following:
Procedure
1. Access the PRIMARY OPTIONS MENU in the IUI.
2. Select the MSG option.
3. Select option 1.
4. Type U0075 on the message ID line and press Enter.
296 IBM Sterling Connect:Direct for z/OS: Administration Guide

Connect:Direct MESSAGE DISPLAY
DATE => mm.dd.yyyy
TIME => hh:mm
MESSAGE ID==> U0075
MODULE ==> DMINIT
==============================================================================
SHORT TEXT==> Connection services initialization failure.
LONG TEXT:
LINE 1 ==> An error has occured while initializing VTAM connection
LINE 2 ==> services. ESTAE output should give a return code and error
LINE 3 ==> flag.
LINE 4 ==>
LINE 5 ==> Verify the applid does not have a password associated with it
LINE 6 ==> in the LOCAL.NODE definition of the Network Map.
LINE 7 ==>
LINE 8 ==> SYSTEM ACTION: ABEND the intialization of the DTF.
LINE 9 ==>
LINE 10==> RESPONSE: Verify that the APPLID is varied active and there is
LINE 11==> not a VTAM password specified in the Network Map.
LINE 12==>
COMMAND ===> ________ ENTER ’DIR’ TO DISPLAY THE DIRECTORY
Examine Output from Select Commands
Problem determination and resolution is often as simple as gathering output from
the Sterling Connect:Direct SELECT commands and examining the output for
obvious errors. For additional information, see the IBM Sterling Connect:Direct for
z/OS User Guide. A description of the commands follows:
Command Description
SELECT
NETMAP
Displays or prints the definitions of nodes with which Sterling
Connect:Direct can communicate.
SELECT
PROCESS
Displays or prints information about Sterling Connect:Direct Processes
in the TCQ. You can use this command before or during Sterling
Connect:Direct Process execution.
SELECT
STATISTICS
Displays or prints statistics from the statistics log. Use this command
only after executing a Sterling Connect:Direct Process.
SELECT TASK Selects, displays, or prints the list of all active users, Processes, and
tasks within Sterling Connect:Direct.
SELECT TYPE Displays or prints type records from the Type file.
SELECT STATISTICS Command
The SELECT STATISTICS command is one of the most useful commands for
problem determination. This section provides a brief overview of the SELECT
STATISTICS command. For more detailed information, refer to the IBM Sterling
Connect:Direct for z/OS User Guide.
If an error occurred during a file transfer, issue the SELECT STATISTICS command
on both the PNODE and SNODE to review the statistics for the Process. Process
statistics are stored in the Sterling Connect:Direct statistics log. You can request
them by either using the IUI Select Statistics (SS) screen, if applicable, or issuing
the Sterling Connect:Direct SELECT STATISTICS command.
Chapter 16. Isolating Problems 297
The statistics log records the following types of information for Sterling
Connect:Direct Processes:
v Function requested (COPY, RUN TASK, RUN JOB, SUBMIT)
v Process name and number
v Start and stop times, and date of the function
v Completion code
v Messages associated with the Process
v Location and ID of the user requesting Sterling Connect:Direct services
v Sending and receiving file names
v Amount of data sent and received
v Security violations
v All Sterling Connect:Direct WTO messages, allocation information, and mount
requests
Note: WTO messages are created during Sterling Connect:Direct Process execution
to document the execution steps and are stored in the Sterling Connect:Direct
statistics file. This type of message is an excellent debugging tool for determining a
Sterling Connect:Direct Process execution failure.
The optional parameters associated with the SELECT STATISTICS command enable
you to define the search criteria and the form in which the report is presented.
Sterling Connect:Direct IUI Select Statistics Screen
The Select Statistics screen provides a convenient, easy method for issuing the
SELECT STATISTICS command. Use the fields to specify statistics selection criteria.
The selection criteria enable you to determine what records to select from the
statistics log, limit the statistics to a certain period of time, or limit the statistics to
a certain Process. The selection criteria also allow Sterling Connect:Direct to select
the requested statistics from the file more efficiently.
The SELECT STATISTICS screen displays general Sterling Connect:Direct Process
information.
v To display the requested information in a formatted report, type a D in the CMD
field and press Enter.
v To print the formatted report, type a P in the CMD field and press Enter. The
output is sent to your TSO sysout.
v For a summary report display, type an S in the CMD field and press Enter.
v To view your statistics file in an unformatted display, type FIL or F in the CMD
field and press Enter.
v The SELECT STATISTICS screen also enables you to exclude certain types of
information from being displayed. Type a Y in any of the following fields and
press Enter.
– MEMBERS - Statistics generated for each partitioned data set (PDS) member
– WTO - WTO (Write to Operator) messages
– WTO - All statistics other than WTO messages
When statistics are requested by Support, do not exclude any information. Set
all the fields listed to N. Support must receive all information to solve the
problem.
298 IBM Sterling Connect:Direct for z/OS: Administration Guide

Verify File Attributes
If a problem occurs during a file transfer, verifying the accuracy of the file
attributes can often resolve the problem. Review the following file attribute
parameters for the file being transmitted when the error occurred. Check both the
input and output files specified in your Sterling Connect:Direct Processes:
v Logical record length (LRECL)
v Block size (BLKSIZE)
v Record format (RECFM)
v File organization (DSORG)
v File disposition (DISP)
v Unit containing the file (UNIT)
v Volume serial number (VOLSER)
v Storage for allocating new files (SPACE)
v Optional processing code (OPTCD)
v Length of keys used in file (KEYLEN)
v Number of blocks or tracks to search for available space (LIMCT)
v SMS options and ACS rules
These parameters are described in detail at the Connect:Direct Process Language
help.
Common Errors
This section describes the following types of common errors:
v Signon and IUI/API errors
v Connect:Direct DTF session establishment errors
v Connect:Direct DTF out-of-storage ABENDS
v Allocation and open errors
v Transmission errors
v Operator interface errors
For each type of error, information on probable causes, actions to take, and data to
collect is provided.
Note: For information on initialization and license key errors, see Initialization
Errors in the IBM Sterling Connect:Direct for z/OS Configuration Guide that deals with
errors that can occur when you start up. For errors related to security, see
Troubleshooting Security Errors .
Signon and IUI/API Errors
Signon errors keep you from accessing Sterling Connect:Direct. IUI/API problems
prevent you from successfully submitting a Process or executing a command.
This section describes the following types of signon and IUI/API errors:
v ISPF signon failures can be caused by a variety of problems. Errors signing onto
the IUI through the ISPF interface can include problems related to VTAM,
TCP/IP, ISPF, or security. Refer to Troubleshooting Security Errors for a
description of common security errors.
Chapter 16. Isolating Problems 299

v IUI/API Sterling Connect:Direct session failures occur when the IUI/API cannot
establish a session with the DTF. A session failure usually means you will be
unable to sign on to Sterling Connect:Direct.
v SELECT command errors occur while issuing SELECT STATISTICS, SELECT
PROCESS, SELECT NETMAP, SELECT USER, SELECT TYPE, and SELECT
TASK commands from the IUI, batch, or operator interface.
Note: You can diagnose most IUI/API problems by running an API-to-DTF session
trace. See information on the NDMCMDS trace in Sterling Connect:Direct
Automatic Traces.
To avoid insufficient space being allocated for the temporary data set upon signon
as well as SB37 ABENDs, the administrator can define global signon defaults so
that users do not have to individually alter their signon default values to increase
their allocation. For more information, see “Global Signon Defaults” on page 28.
Condition: Signon to IUI Denied
Your signon to IUI is denied with the message Error during ACB open.
Error Cause Action Collect
SVTB002I The interactive applid that
is used for signon is not
active, is in an
unacceptable state, or is
not correctly defined to
VTAM.
Review both the short text and long
text messages. Allocate NDMCMDS
to display error messages to your
terminal. NDMCMDS shows all
actual commands issued to the DTF,
including resolution of symbolics. It
can be particularly helpful to debug
Sterling Connect:Direct commands
through the IUI or through the batch
interface if you are having signon
problems, syntax errors, and so
forth.
v For Sterling Connect:Direct for
z/OS, type the following on your
command line:
TSO ALLOC FI(NDMCMDS) DA(*)
v NDMCMDS output
v Applid status display
v Applid definitions
v Network map
Condition: Signon to IUI Denied
Your signon to IUI is denied with the message USER attempted SIGNON with
TIMEOUT=NO. Only an administrator can change the TIMEOUT value and only
on their own signon panel. Non-ADMIN users cannot sign on with the inactivity
timer disabled.
Note: The inactivity timer indicates the number of minutes a user can remain
inactive without communicating with the DTF. This timer is active if an
administrator has specified a value in the TCP.API.TIMER global initialization
parameter.
300 IBM Sterling Connect:Direct for z/OS: Administration Guide

Error Cause Action Collect
SAFA020I The user, who does not
have administrative
authority, attempted to
change the TIMEOUT
parameter value to NO
from an IUI signon panel.
Log off and log on again. Change
the TIMEOUT parameter to YES to
complete the signon process.
v Statistics file
Condition: Signon to IUI Denied - No Error Message
Your attempt to sign on to the IUI is denied, but no error message is displayed.
Error Cause Action Collect
None Your TSO or TSS profile
specifies the NOWTPMSG
option, which inhibits
some error output from
being displayed to the
terminal.
Review both the short text and long
text messages. For z/OS, change to
the WTPMSG option by typing TSO
PROF WTPMSG. With the WTPMSG
option, error messages are displayed
at the terminal. Retry the operation
(sign on).
v None
Condition: Signon Denied - Sterling Connect:Direct not Active
Your signon is denied.
Error Cause Action Collect
SVTB004I
SCIA011I
The Sterling Connect:Direct
you are signing on to is
not active.
Review both the short text and long
text messages. Ensure that Sterling
Connect:Direct has completed
initialization before attempting a
signon. Allocate NDMCMDS to
display additional information about
the session failure. NDMCMDS
shows all actual Sterling
Connect:Direct commands issued to
the DTF, including resolution of
symbolics. It can be particularly
helpful to debug Sterling
Connect:Direct commands through
the IUI or through batch interface if
you are having signon problems,
syntax errors, and so forth.
For z/OS, check to see that the
network map is specified correctly
on the ISPF menu and that the
network map is correctly loaded.
Try to sign on through the batch
interface to isolate the problem.
v NDMCMDS output
v Network map
v Sterling Connect:Direct
initialization parameters
v For z/OS the ISR@PRIM panel
Chapter 16. Isolating Problems 301

Condition: Signon Denied - Users Exceeds Limit
Signon is denied.
Error Cause Action Collect
STAA004I The number of interactive
users on Sterling
Connect:Direct has reached
the limit set in the
MAXUSERS parameter.
Review both the short text and long
text Sterling Connect:Direct
messages. Check the MAXUSERS
parameter in the Sterling
Connect:Direct initialization
parameters data set. If it is
commented out, the default is six
users. Report this error to your
Sterling Connect:Direct
administrator, and determine
whether you need to increase the
value of this parameter. If the
TCP.API.TIMER is not being used,
consider using this global
initialization parameter to terminate
orphaned sessions (some JAI users
do not sign off, they just drop the
connection).
v Sterling Connect:Direct
initialization parameters
Condition: TCP/IP API session terminated
Users who are logged on to the DTF via TCP/IP may have their sessions dropped
and see the message TCP/IP SEND error; Connection Lost. If the user presses F1 to
see the help for this message, the following text is displayed for message
SVTC006I:
MSGID ==> SVTC006I
MODULE ==> DMTSTSND
TCP/IP SEND error; Connection Lost
An error has been detected while sending a command via TCP/IP.
The TCP/IP connection has been lost. A possible cause is
Connect:Direct has been shutdown and all TCP/IP connections
have been closed.
System Action: Normal processing can not continue.
Response: Logoff and attempt to signon again.
In addition, SAFA019 signoff errors are recorded in statistics along with matching
user IDs and the message, TCP API session LOGOFF has been forced. To reduce the
number of active sessions and stay below the limit set in the MAXUSERS global
initialization parameter, the administrator can use the TCP.API.TIMER global
initialization parameter to specify the maximum time of session inactivity a
TCP/IP-connected IUI or API session waits before timing out and exiting. When a
user has not done anything with the IUI to cause it to communicate with the DTF
and the timer period expires, the DTF drops the session, and can then detect and
recover lost sessions without having to be recycled.
302 IBM Sterling Connect:Direct for z/OS: Administration Guide

Error Cause Action Collect
SVTC006I
SAFA019
The TCP.API session has
been inactive for the
period specified by the
TCP.API.TIMER global
initialization parameter.
v A TSO/ISPF/IUI user should log
on to the DTF they lost connection
with.
v A program or system that was
using the API should sign on
again.
v Statistics file–check the user and
completion code (comp code)
associated with the SAFA019I
completion message (comp
msg). On the SELECT
STATISTICS screen, type Y in
the CHANGE EXTENDED
OPTS field and on the next
screen, type SO (signoff) as a
Record Type.
Condition: SELECT Command Issued Successfully - No Output
Produced
The SELECT command is issued successfully and completes with a successful
return code and message, but no output is produced.
Error Messages
SAFF000I SAFF014I SAFK000I SAFL000I SAFL010I SCBB000I
SCBL000I SCBO000I SCBP000I SCBQ000I SCBX000I SOPA000I
SOPA011I SOPE000I SOPS001I
Cause Action Collect
It is likely that Sterling
Connect:Direct is having trouble
allocating the temporary data set
that contains the output from the
SELECT command.
Review both the short text and long text
messages. For Sterling Connect:Direct for
z/OS, specify a UNIT and VOLSER for the
temporary data set, and SPACE
information. You can specify UNIT and
VOLSER on the SIGNON DEFAULTS panel
of the IUI or use the TEMPDSN parameter
on your signon command for batch. Note
that a UNIT type of VIO is not acceptable.
v List of the SELECT commands
that produce output and those
not producing output
v Any error messages
Condition: SELECT Commands - No Output Available
SELECT commands return with no output and a message indicating no output was
available from the command.
Error Cause Action Collect
SOPA010I
SOPB012I
For the SELECT PROCESS
and SELECT STATISTICS
commands, it is likely that
the userid issuing the
command is defined as a
general user by the stage 2
security exit, indicating
that the user is only
allowed to see the
command output for
Processes submitted by
that same userid.
Review both the short text and long
text messages. Check to see that the
userid is defined with the ability to
select Process/statistics for Processes
not submitted by that userid.
v Authorization for the userid
v Statistics file
Chapter 16. Isolating Problems 303

Sterling Connect:Direct DTF Session-Establishment Errors
Sterling Connect:Direct DTF session-establishment errors prevent a successful
connection between two Sterling Connect:Direct systems. This section explains the
most common causes of DTF session-establishment errors, actions to take, and the
types of data you need to collect to troubleshoot the error.
Condition: Cannot Establish a Session with Another Sterling
Connect:Direct Session
The table describes the four possible causes and the courses of action to take.
Error Cause Action Collect
SVTM026I
SVTM045I
SVTM053I
SVTM104I
The links that connect the two Sterling
Connect:Direct systems are not active, or
an error has occurred on the links.
Review both the short text and long text
messages. If you are unable to determine
the problem, check the RPLERRCK DD
for possible clues. Use your network
management software to determine the
status of the links used for
system-to-system communication.
Reactivate the links.
v None
SVTM026I The cross-domain resource definition for
the remote Sterling Connect:Direct system
is not active.
Review both the short text and long text
messages. If you are unable to determine
the problem, check the RPLERRCK DD
for possible clues. Use your network
management software to determine the
status of the Sterling Connect:Direct
cross-domain manager and cross-domain
resource definitions used in
communicating with other Sterling
Connect:Direct locations. Reactivate the
cross-domain resource manager or
cross-domain resources
v None
SNAS0801
SVTM026I
The VTAM applid for the remote Sterling
Connect:Direct system is not active.
Review both the short text and long text
Sterling Connect:Direct messages. If you
are unable to determine the problem,
check the RPLERRCK DD for possible
clues. Use your network management
software to determine the status of the
applid for the remote Sterling
Connect:Direct system. Ensure the remote
Sterling Connect:Direct has initialized.
Reactivate the VTAM applid, or initialize
the remote Sterling Connect:Direct.
system.
v None
304 IBM Sterling Connect:Direct for z/OS: Administration Guide

Error Cause Action Collect
SCCS028I
STAA005I
The maximum number of secondary
sessions is reached on the secondary
Sterling Connect:Direct system.
Review both the short text and long text
messages. If you are unable to determine
the problem, check the RPLERRCK DD
for possible clues. Determine the number
of active VTAM sessions for the
secondary location. Use your network
management software to issue D
NET,ID=applid,E (VTAM applid) at the
secondary location site. Ensure that the
maximum number of secondary sessions
is sufficient for your requirements.
To avoid the situation that causes the
STAA05I error, set the global initialization
parameter, “TCP.CONNECT.TIMEOUT= 0
| number of seconds” on page 372.
v None
Sterling Connect:Direct DTF Out-of-Storage ABENDS
DTF out-of-storage ABENDS may occur during heavy Sterling Connect:Direct
activity or during phases when the DTF has run for a long period of time. This
chapter explains the most common causes of DTF out-of-storage ABENDs, actions
to take, and the types of data to collect.
Condition: Out-of-Storage ABEND Occurs in the DTF
The following table describes two possible causes and associated actions to take.
Error Cause Action Collect
user
ABEND
U0500
user
ABEND
U0501
If this condition
occurs only
during heavy
Sterling
Connect:Direct
activity, you may
need to modify
the initialization
parameters or the
DTF REGION
parameter.
Review both the short
text and long text
messages. Limit the
number of Processes
that can run at one time
using the
MAXPRIMARY,
MAXSECONDARY, and
MAXPROCESS
initialization parameters.
Also, examine the
MAXSTGIO
initialization parameter
to determine if it can be
decreased. The REGION
size in the DTF JCL may
need to be increased to
allow more concurrent
Processes.
v TSubpool that is growing
v Dump taken after controlled
tests when all DTF activity
has ended
v The Sterling Connect:Direct
log
v Sterling Connect:Direct
initialization parameters
v Sterling Connect:Direct STC
(started task) JCL
v Source for any user exits
Chapter 16. Isolating Problems 305

Error Cause Action Collect
System
ABEND
Sx0A
System
ABEND
Sx78
If this condition
appears to be
"storage creep"
and occurs after
the DTF is active
for a long time
(not necessarily
running many
Processes
immediately), you
can take several
actions.
v See Possible Actions
to troubleshoot this
problem.
v Dump taken after controlled
tests after all DTF activity
ended
v The Sterling Connect:Direct
log
v Sterling Connect:Direct
initialization parameters
v Sterling Connect:Direct STC
JCL
v Source for any user exits
Possible Actions
Use the following list to help you troubleshoot DTF out-of-storage ABENDs:
v Examine all RUNTASK programs; ensure that for every file opened, a CLOSE
and a FREEPOOL is also done.
v Examine any user exits for GETMAIN (or STORAGE OBTAIN) macros ; verify
that FREEMAIN (or STORAGE RELEASE) macros are issued for each of those
areas.
v Examine any RUNTASK programs for GETMAIN (or STORAGE OBTAIN)
macros; ensure FREEMAIN (or STORAGE RELEASE) macros are issued for each
area.
v Try to pinpoint the type of Processes or other DTF activity that causes the
problem:
v Does this occur only during a COPY?
v Does this occur when a specific Process is run? What does the Process do?
v Does this occur when a certain command is issued? What is the command?
Note: For the next two suggestions, you can issue an MVS DUMP command for
the Sterling Connect:Direct for z/OS address space to help in your investigation.
Make sure that the SDATA includes the following parameters:
RGN,LSQA,SUM,PSA,GRSQ,SQA,SWA,TRT
See the IBM MVS System Commands manual for the release of z/OS in use.
v If you cannot determine which Process, command, or other activity is causing
the storage creep, run a typical batch of Processes or commands that runs when
the ABEND occurs. Before the out-of-storage ABEND occurs, go to the ADMIN
MD panel and QUIESCE Sterling Connect:Direct for z/OS. For example, if the
ABEND usually occurs after 10 hours of activity, quiesce after about 8 hours.
v If you did determine that a certain Process or command causes the problem,
submit that Process or issue the command several times (the number of times
depends on how long it takes before you get to the ABEND). For example, if it
occurs after the Process runs 100 times, run it 90 times in your tests. Get a dump
of the DTF address space after all DTF activity is finished.
Allocation and Open Errors
Allocation and open errors involve the source or destination files. This chapter
describes errors in which the allocation or opening of a file fails, and the action to
take and types of data you need to collect to troubleshoot the error.
306 IBM Sterling Connect:Direct for z/OS: Administration Guide

Condition: Allocating a User File Fails
Use the following table to troubleshoot this error.
Note: Sterling Connect:Direct initialization parameters (ALLOC.CODES and
ALLOC.RETRIES) determine which allocation errors, if any, cause a Process that
fails on an allocation error to be retried.
.
Error Cause Action Collect
SDAA001I
SDAA004I
SDAA005I
SDAA048I
Sterling Connect:Direct
received an error while
allocating a file or data set.
Review both the short text and long
text messages. Check the SYSLOG,
console, or Sterling Connect:Direct
statistics for the text of the
SDAA004I and SDAB005I messages.
The SDAA004I message contains the
allocation parameters used by
Sterling Connect:Direct. If an error
exists, the ERR=nnnn field of the
SDAB005I message contains
non-zeroes, and error text follows.
Use the Sterling Connect:Direct
message facility to look up the error,
which has a format of SDEnnnnI,
where nnnn is the number in the
ERR field. The operating system
dynamic allocation routine returns
the ERR value.
Note: Sterling Connect:Direct
initialization parameters
(ALLOC.CODES and
ALLOC.RETRIES) determine which
allocation errors, if any, cause a
Process that fails on an allocation
error to be retried.
v Sterling Connect:Direct
allocation string (found in the
WTO records in the statistics
file)
v Sterling Connect:Direct
Process involved
v SDAA004I message output
v SDAB005I message output
Condition: TCQ File Below Defined Threshold Value
Use the following table to troubleshoot this problem.
Error Cause Action Collect
SPQL003I
TCQ file is
now below the
defined
threshold of
&VAR.
The number of VSAM file
CIs used has reached the
defined threshold.
Reduce the number of Processes in
the TCQ, or increase the size of the
TCQ. Refer to “Configure the TCQ”
on page 257 for more information.
v None
Transmission Errors
Transmission errors include consistency problems within communication
components that can occur during Process execution. The errors can occur within
communication components such as VTAM, IBM Network Control Program (NCP),
or links.
Chapter 16. Isolating Problems 307

This section lists possible transmission errors, error messages, probable causes,
actions to take, and data to collect to troubleshoot an error.
Condition: Error During Process Execution Initiation
Error Cause Action Collect
SVTM041I
(SNASYNC1:
Session
abnormally
terminated)
The session or link was lost
before Process execution began.
Review both the short text and long text
messages. Use your network
management software to determine the
status of the link, cross-domain
definitions, and applids used in the
system-to-system communication.
Activate the link, cross-domain
definitions, or applids as required, and
restart the Process
v None
SVTM053I
(Session
acquire failure)
A protocol error occurred within
the Sterling Connect:Direct
system.
Review both the short text and long text
messages. Also, request a session
manager trace and an RPL trace.
v Output from
session manager
v Output from RPL
traces
Condition: Unrecoverable Error Occurs while a Process
Executes
When an unrecoverable send or receive error occurs within the system-to-system
session while a Process executes, the three likely causes of the problem are detailed
in the following table. You may need a backup copy of the file if a file I/O error
caused a send or receive error. If the error is temporary, retrying the Process might
clear up the difficulty.
Error Cause Action Collect
SVTM045I An I/O error within the
primary or secondary node
causes Sterling
Connect:Direct to send a
negative response to the
other location.
Review both the short text and long
text messages. Accompanying
messages indicate the type of error
that caused the send or receive
session to fail. Check your network
management software for VTAM
sense codes, then find the reason the
sense code was issued. Correct the
problem if possible and retry the
Process.
In some cases, you need a VTAM
buffer or an I/O trace of the error.
You may need a backup copy of the
file if a file I/O error caused send or
receive error. If the error is
temporary, retrying the Process
might clear up the difficulty.
v Output from the VTAM buffer
or I/O trace
SVTB020I,
followed by a
U4095 ABEND
A Sterling Connect:Direct
system shuts down with
either the IMMEDIATE or
FORCE parameter
specified on the STOP CD
command.
Review both the short text and long
text messages. Restart Sterling
Connect:Direct.
v None
308 IBM Sterling Connect:Direct for z/OS: Administration Guide

Error Cause Action Collect
SVTM042I
SVTM043I
SVTM044I
SVTM045I
SVTM046I
SVTM047I
SVTM048I
SVTM049I
VTAM sense
code 0870
VTAM sense
code 800A
An error occurs within one
of the communication
components (VTAM, NCP,
or link)
Review both the short text and long
text messages. The communication
component containing the error
issues error messages. Various
VTAM and NCP definitions are
incompatible with Sterling
Connect:Direct operations. Refer to
Selecting RU Sizes in the IBM Sterling
Connect:Direct for z/OS Configuration
Guide for more information.
v VTAM definitions
v NCP definitions
Operator Interface Errors
Operator interface errors occur while you are using the operator interface to issue
commands to Sterling Connect:Direct. You can find more information on the
operator interface in the IBM Sterling Connect:Direct for z/OS Facilities Guide.
This section lists possible operator interface errors, error messages, possible causes,
actions to take, and data to collect to troubleshoot an error.
Task Busy Message
Use the following table to troubleshoot the problem when you receive a Task Busy
message after issuing an Operator Interface command.
Error Cause Action Collect
IEE342I
Modify
rejected - task
busy
An error in the
MCS.SIGNON parameter
in the Sterling
Connect:Direct
initialization parameters.
Ensure that the MCS.SIGNON
parameter reflects a valid
userid-password combination with
Sterling Connect:Direct operator
authority and that the network
map is correctly specified on the
MCS.SIGNON parameter. Remove
comments from this parameter.
v Sterling Connect:Direct
initialization parameters
v SYSLOG output
User Not Authorized Messages
Use the following table to troubleshoot authorization errors you receive when you
issue operator interface commands.
Error Messages
SCBB001I SCBC030I SCBD001I SCBE001I SCBF001I SCBF063I
SCBF064I SCBG001I SCBH001I SCBI001I SCBJ001I SCBK005I
SCBL001I SCBN001I SCBO001I SCBP001I SCBR002I SCBS001I
SCBT005I SCBU003I SCBV001I SCBW001I SCBX001I SCBY001I
SCPA008I SFIA002I SFIA003I SRJA014I SRTA008I SSUB100I
Chapter 16. Isolating Problems 309

Cause Action Collect
The userid attempting to issue
the operator interface
commands is not authorized to
issue them.
Review both the short text and long text
messages. Check the userid specified in the
MCS.SIGNON parameter of the Sterling
Connect:Direct initialization parameters file.
Determine whether that userid has the
authority to issue the command. If you
believe it does, run a security trace to
determine why the user cannot issue the
command.
See Security Traces for information on how to
run the trace.
v Sterling Connect:Direct
initialization parameters
v Security trace
Diagnostic Tools
You can perform some problem isolation and diagnostics by running traces. A trace
is a sequential recording of program events during execution. Trace output is
useful only as a diagnostic tool for the Support.
When running traces for Support, consider the following information:
v Limit Sterling Connect:Direct activity while running traces.
v Trace the simplest case possible.
v Disable traces upon completion. They generate considerable overhead.
v Use traces judiciously. They are for diagnostic purposes only and there is
potential security exposure.
Security Traces
Support uses a security trace to debug security problems. The trace shows:
v Fields from the security control block
v Messages
v Return codes from the security system itself such as IBM RACF, CA-TOP
SECRET, and ACF2
v Data set names, if verifying data sets
v Userids (passwords will not displayed as encrypted or plain text)
Note: To prevent a remote node's security from discovering and then using Signon
dummy passwords to gain access to a primary node, you can use the initialization
parameter, “REMOTE.DUMMY.PASSWORD = [ YES | INTERNAL ]” on page 356.
Starting a Security Trace for the First Time in the DTF
About this task
Note: Once you have completed this procedure, go to Turning a Security Trace On
and Off in the DTF After Initial Setup when you need to start a security trace. You
do not have to reinitialize Sterling Connect:Direct.
Procedure
1. Specify TRACE=DEBUG as a parameter in your security exit source and
reassemble and link-edit the exit.
310 IBM Sterling Connect:Direct for z/OS: Administration Guide
2. For Sterling Connect:Direct for z/OS in the Sterling Connect:Direct startup JCL,
allocate a DD for SECURITY, either to SYSOUT or to a data set on DASD with
attributes of RECFM=VBA, LRECL=121, and BLKSIZE=125 or greater.
To be able to turn security tracing on and off using DEBUG settings, add the
DEBUG= parameter to the global initialization parameter data set, and specify
00100000 (or xx1xxxxx where x is any hex value 0-F).
Note: If you specify Separate trace per task tracing to be done for security
traces, all output for the security trace will be routed to the task DD, for
example, Rnnnnnnn.
To turn security tracing off, you can then specify xx0xxxxx using the Sterling
Connect:Direct MODIFY command to specify the debug setting.
3. If Sterling Connect:Direct is active, stop Sterling Connect:Direct. Restart it with
the modified JCL startup job, and recreate the problem.
Turning a Security Trace On and Off in the DTF After Initial Setup
Use the MODIFY command to turn tracing on and off by specifying DEBUG
settings (see Debug Settings).
Starting a Security Trace in the IUI (ISPF)
You can start a security trace to debug security problems in the IUI.
Procedure
1. To allocate a security trace for the IUI, enter the following command:
TSO ALLOC FI(APISECUR) DA(*) /* FOR ZOS */
Note: As an alternative, to send the information to a preallocated data set with
attributes of RECFM=VBA, LRECL=121, and BLKSIZE=125, you can enter the
follow command:
TSO ALLOC FI(APISECUR) DA('$hlq.APISECUR.TRACE')OLD
2. Log on to the DTF and carry out any commands you want traced. Trace
information is written to the screen immediately upon signon. Sign off when
finished.
3. To stop the security trace, issue the following command:
TSO FREE FI(APISECUR) /* FOR ZOS */
Sterling Connect:Direct Function Traces
Sterling Connect:Direct contains various internal traces for diagnosing problems
and recording events. Based on the trace specified, the Sterling Connect:Direct trace
output is directed to various ddnames. You can enable these traces using one of
the following methods:
v Modify the Sterling Connect:Direct startup job stream to include the trace files
and ddnames for trace output and add the DEBUG=nnnnnnnn parameter to the
initialization parameter data set. The traces are turned on during Sterling
Connect:Direct initialization and continue running until turned off by the
MODIFY command or until Sterling Connect:Direct is terminated.
v Issue the Sterling Connect:Direct MODIFY command to set DEBUG bits. The
trace starts when you issue the MODIFY command. See Sterling Connect:Direct
MODIFY Command.
Chapter 16. Isolating Problems 311

v Reduce the amount of trace information by restricting a trace to a Process
(MODIFY Debug = parameter) or a specific node (NODE.TRACE.ON
parameter). See Sterling Connect:Direct MODIFY Command for more
information about these parameters.
Debug Settings
Use the following debug settings with the DEBUG=nnnnnnnn initialization
parameter, the BITS.ON=X'nnnnnnnn'and BITS.OFF=X'nnnnnnnn' MODIFY
command parameters, and the NODE.TRACE.BITSON=(node name,X'nnnnnnnn')
and NODE.TRACE.BITSOFF=(node name,X'nnnnnnnn') MODIFY command
parameters.
For each debug bit turned on for a trace, you must allocate the equivalent DD
names in the Output DD column to the Sterling Connect:Direct started task. If you
do not specify these DD names in the started task JCL of Sterling Connect:Direct,
you must allocate them using either the DYN (batch) or DYN (IUI) option
described in this section. The one exception is separate trace per task (Rnnnnnnn),
which is dynamically allocated by Sterling Connect:Direct as required. This trace
output is directed to SYSOUT.
The following table shows the available function traces for Sterling Connect:Direct
for z/OS, with their respective DEBUG settings, and the DD names (or filenames)
used for output. Specify these bits using hexidecimal notation, for example, X'80'
plus X'10' would result in X'90' while X'08' plus X'04' would result in X'0C'.
DEBUG
Setting Trace Type Output DD
80000000 COPY Routine and RUN TASK trace RADBDD01
10000000 Full TPCB/SYMBOLICS from DMCBSUBM DMCBSUBM
08000000 Session manager trace RADBDD05
04000000 Separate trace per task
(Example: “R0000005” to trace TASK 5)
Rnnnnnnn
02000000 API session trace RADBDD07
01000000 DMGCBSUB trace RADBDD08
00400000 TCQSH from DMCOPYRT DMCOPYRT
00200000 Make each SVC dump unique N/A
00100000 SECURITY trace control SECURITY
00040000 GETMAIN/FREEMAIN trace RADBDD16
00008000 I/O buffer trace RADBDD21
00004000 WTO all dynamic allocation parameters RADBDD22
00002000 Sterling Connect:Direct/Plex traces
312 IBM Sterling Connect:Direct for z/OS: Administration Guide

DEBUG
Setting Trace Type Output DD
ACTION queue manager trace CDPLXACT
CKPT queue manager trace CDPLXCKP
TCQ queue manager trace CDPLXTCQ
STATS queue manager trace CDPLXSTA
First REQUEST queue manager trace CDPLXREQ
Second and subsequent REQUEST queue manager trace.
For example, “CDPLXR03” traces the third queue
manager.
CDPLXRnn
JOIN queue manager trace CDPLXJOI
00001000 Workload Balancing trace CDPLXWLB
00000800 zIIP-related trace CDZIIP
00000100 In-storage tracing only
Note: The size of this in-storage table is controlled by the
TRACE.BUFFER initialization parameter.
N/A
00000080 RPL trace - long
Note: To avoid generating excessive output when you
use this trace with a large value for the V2.BUFSIZE
initialization parameter, use the short RPL trace.
RPLOUT
00000040 RPL trace - short RPLOUT
00000020 Version 2 session trace RADBDD33
00000008 Logon exit trace RADBDD35
00000004 Logon Processor trace RADBDD36
00000002 SCIP exit trace RADBDD37
00000001 SNMP trap trace SCTRAPDD
Displaying DEBUG Settings
Use the INQUIRE DEBUG command to display the current DEBUG settings for
each adjacent node in the Netmap.
The INQUIRE DEBUG command has the following format and parameter.
Label Command Parameter
(optional) INQuire DEBUG WHERE (SERVER=server name)
The parameter for the INQUIRE DEBUG command is:
Parameter Description
WHERE
(SERVER=server
name)
This parameter is optional. This parameter specifies the Sterling
Connect:Direct/Server whose DEBUG settings you want to view. The
server name parameter is the 1–8 character name assigned to a
Sterling Connect:Direct/Server by the CDPLEX.SERVER initialization
parameter. If you omit this parameter in a Sterling
Connect:Direct/Plex environment, the DEBUG settings for the
Sterling Connect:Direct/Manager are displayed. You cannot use this
parameter in a Sterling Connect:Direct/Stand-alone Server. See
Debug Settings for a descriptions of these settings.
Chapter 16. Isolating Problems 313

Using the INQUIRE DEBUG Command from the Batch Interface
About this task
To use the INQUIRE DEBUG command from the batch interface:
Procedure
1. Place your command in a batch job stream.
2. Submit the job while Sterling Connect:Direct is running.
Note: You must set the fifth character of the DGADBATC output parameter
specification to Y to print the result of the command that is in the temporary
data set.
3. Verify the results.
The following figure shows a partial sample report:
======================================================================
CD.CHI *INQ DEBUG/QUIESCE* DATE: mm.dd.yyyy TIME: hh:mm:ss
SYSTEM INITIALIZED --------(0000)-------- mm.dd.yyyy hh:mm:ss
======================================================================
DEBUG => ’00000000’
QUIESCE => No
TCQ DSN => PROD1.CD.CHI.TCQ
TCX DSN => PROD1.CD.CHI.TCX
TCQ Threshold => No
TCQ File 0% Full. Max.# CI: 1000 # Used CI: 0
NODE TABLE => NODE NAME QUIESCE DEBUG
NODE ENTRY 1 => CD.DAL Yes B0BB0BB0
NODE ENTRY 2 => CD.DAL.CSGA Yes
NODE ENTRY 3 => CD.DAL.CSGB Yes
NODE ENTRY 4 => CD.DAL.LU0 Yes
NODE ENTRY 5 => CD.DAL.LU62 Yes
NODE ENTRY 6 => CD.DAL.UDT Yes
Issuing the INQUIRE DEBUG Command through the IUI
To display the DEBUG settings from the IUI:
1. Select option INQ from the Connect:Direct Administrative Options Menu.
The Inquire DTF Internal Status screen is displayed.
2. If you want to view the DEBUG settings for a specific Sterling
Connect:Direct/Plex member, type the server name in the Server field. If you
want to view the DEBUG settings for a Sterling Connect:Direct/Manager, leave
the Server field blank.
Leave the Server field blank in a Sterling Connect:Direct/Stand-alone Server.
3. Select the IDBG option.
4. Press ENTER.
The current DEBUG settings are displayed.
DEBUG Initialization Parameter
Various settings on the DEBUG=nnnnnnnn initialization parameter turn on a
specific trace option or any combination of options. In the syntax for the DEBUG
initialization parameter, nnnnnnnn represents the DEBUG setting in hexadecimal.
You can place trace DD statements in the system without slowing down Sterling
Connect:Direct performance if you do not turn on the trace by specifying the
DEBUG parameter.
314 IBM Sterling Connect:Direct for z/OS: Administration Guide

For problems with SNA connections, use the following four function traces merged
into a single output file:
v Session manager trace
v Separate trace per task trace
v Long RPL trace
v COPY routine trace
Note: If the problem occurs during file transfer or session establishment of node
connections, run the trace on both the sending and receiving nodes.
Sterling Connect:Direct MODIFY Command
The Sterling Connect:Direct MODIFY command yields the same types of traces as
the DEBUG initialization parameter. Unlike the initialization parameter, however,
the MODIFY command does not require you to bring down and restart the DTF.
The trace starts when you issue the MODIFY command to turn on the trace bits,
provided the DD is allocated.
Note: When JES data sets are dynamically allocated, specify FREE=CLOSE to
ensure that the DD is deallocated and tracing stopped when you close the trace
DD using the MODIFY command.
You can issue the MODIFY command through the batch interface or interactively
through the IUI. See Issuing the MODIFY Command Through the Batch Interface
or Issuing the MODIFY Command through the IUI. To see the current DEBUG
setting, see Displaying DEBUG Settings.
The MODIFY command has the following format and parameters. None of these
parameters are required.
Label Command Parameters
(optional) MODIFY BITS.OFF = X'nnnnnnnn'
BITS.ON = X'nnnnnnnn'
CLOSE = ddname
DDNAME = (ddname, nn)
DEBUG = nnnnnnnn
DYN (batch) = 'dynamic allocation string'
Note: Use an equal sign before and quotes around the
dynamic allocation string.
DYN (IUI) dynamic allocation string
Note: Do not use an equal sign before or quotes around the
dynamic allocation string in the IUI screen unless you are
entering it on the Command Line Interface..
INITPARMS = YES
MODDIR.TRACE = YES
NODE.TRACE.BITSOFF=(node name, X'nnnnnnnn')
NODE.TRACE.BITSON=(node name, X'nnnnnnnn')
NODE.TRACE.ON = (node name, debug bits)
NODE.TRACE.OFF = node name
WHERE(SERVER = server name)
ZIIP = NONE | EXTCOMP | SSLTLS | ALL | PROJECT
Chapter 16. Isolating Problems 315

The following table describes the parameters of the MODIFY command.
Parameter Description
BITS.OFF = X'nnnnnnnn' Turns individual trace bits off. Refer to Debug Settings for
the 'nnnnnnnn' value.
BITS.ON = X'nnnnnnnn' Turns individual trace bits on. Refer to Debug Settings for
the 'nnnnnnnn' value.
CLOSE = ddname This parameter specifies the DD name that is closed in the
Sterling Connect:Direct DTF.
DDNAME = (ddname, nn) This parameter specifies a DD name related to a requested
trace. All trace information generated as a result of the
BITS.ON setting is directed to the DDNAME indicated in the
parameter list, based on the Sterling Connect:Direct TASKID
number nn. This DDNAME provides a consolidated trace of
all activity associated with the task. The DDNAME format is
R00000nn, where nn is the TASKID.
DEBUG = nnnnnnnn Replaces the system-wide debugging bits with the specified
debug bits. Refer to Debug Settings to see all possible debug
bit values.
DYN = 'dynamic allocation
string' (batch)
This parameter specifies that dynamic allocation is invoked
in the DTF using a specified allocation string. Use an equal
sign before and quotes around the dynamic allocation string
in the batch DYN parameter.
You must use an equal sign before and quotes around the
dynamic allocation string in the Command Line Interface for
the IUI.
DYN dynamic allocation
string (IUI)
This parameter specifies that dynamic allocation is invoked
in the DTF using a specified allocation string. Do not use an
equal sign before or quotes around the dynamic allocation
string in the MODIFY DYN field on the MODIFY
COMMAND screen.
Note: If you issue the MODIFY command in the Command
Line Interface (CLI), you must use an equal sign before and
quotes around the dynamic allocation string.
INITPARMS Refreshes initialization parameters qualified to be modified
dynamically while Sterling Connect:Direct is running.
MODDIR.TRACE=YES Requests a module trace.
NODE.TRACE.BITSOFF =
(node name, X'nnnnnnnn')
Turns individual trace bits off for a specified node. The node
name is the 1–16 character name of the node on which the
trace runs. The * and ? wildcard characters are supported
when specifying the node name. Refer to Debug Settings for
the 'nnnnnnnn' value.
NODE.TRACE.BITSON =
(node name, X'nnnnnnnn')
Turns individual trace bits on for a specified node. The node
name is the 1–16 character name of the node on which the
trace runs. The * and ? wildcard characters are supported
when specifying the node name. Refer to Debug Settings for
the 'nnnnnnnn' value.
316 IBM Sterling Connect:Direct for z/OS: Administration Guide

Parameter Description
NODE.TRACE.ON = (node
name, debug bits)
Requests a trace run on one or more specified nodes. The
node name is the 1–16 character name of the node on which
the trace runs. The * and ? wildcard characters are supported
when specifying the node name. The debug bits are the
8-character DEBUG bits setting. See the BITS.OFF =
X'nnnnnnnn' parameter for a listing of debug bits.
The trace runs until turned off by the NODE.TRACE.OFF=
parameter.
NODE.TRACE.OFF = (node
name)
Turns off a trace set by the NODE.TRACE.ON parameter.
The node name is the 1–16 character name of the node on
which the trace is running. The * and ? wildcard characters
are supported when specifying the node name.
WHERE(SERVER=server
name)
This parameter specifies which Sterling Connect:Direct/Plex
member the MODIFY command applies to. The server name
parameter is the 1–8 character name assigned to a Sterling
Connect:Direct/Server by the CDPLEX.SERVER initialization
parameter.
If this parameter is omitted, the MODIFY command applies
to the Sterling Connect:Direct/Manager.
ZIIP = NONE | EXTCOMP
| SSLTLS | ALL |
PROJECT
This parameter specifies the setting for the zIIP exploitation
feature (ZEF). Refer to “zIIP Exploitation Feature” on page
285 and “ZIIP = NONE | EXTCOMP | SSLTLS | ALL |
PROJECT” on page 381.
Issuing the MODIFY Command Through the Batch Interface
To use the MODIFY command from the batch interface:
Procedure
1. Place the command in the batch job stream.
2. Submit the job while Sterling Connect:Direct is running.
3. Verify the results.
Examples of MODIFY Command through the Batch Interface
The following example turns on the short RPLOUT trace:
MODIFY BITS.ON = X’00000040’
The following example turns off the short RPLOUT trace:
MODIFY BITS.OFF = X’00000040’
The following example invokes dynamic allocation in the DTF to the allocated
DDNAME RPLERRCK:
MODIFY DYN = ’DD=RPLERRCK’
The following job turns on the merged COPY routine and DMGCBSUB traces.
Chapter 16. Isolating Problems 317

//TRACEON JOB (1111),'TRACES’,NOTIFY=JSMITH,CLASS=O,
// REGION=1024K,MSGCLASS=X
//STEP01 EXEC PGM=DGADBATC,PARM='YYSLYYY’
//STEPLIB DD DSN=$CD.SDGALINK,DISP=SHR
//DMPUBLIB DD DISP=SHR,DSN=JSMITH.CNTL
// DD DISP=SHR,DSN=JSMITH.PROCESS.LIB
//DMMSGFIL DD DISP=SHR,DSN=JSMITH.CD1.MSG
//DMNETMAP DD DISP=SHR,DSN=JSMITH.CD1.NETMAP
//DMPRINT DD SYSOUT=*
//SYSPRINT DD SYSOUT=*
//NDMLOG DD SYSOUT=*
//SYSIN DD *
SIGNON NETMAP=JSMITH.CD1.NETMAP USERID=(JSMITH)
MODIFY BITS.ON=X'81000000’
SUBMIT PROC=ACCTSEPT
SIGNOFF
The following job turns off the trace.
//NOTRACE JOB (1111),'TRACES’,NOTIFY=JSMITH,CLASS=O,
// REGION=1024K,MSGCLASS=X
//STEP01 EXEC PGM=DGADBATC,PARM='YYSLYYY’
//STEPLIB DD DSN=$CD.SDGALINK,DISP=SHR
//DMPUBLIB DD DISP=SHR,DSN=JSMITH.CNTL
// DD DISP=SHR,DSN=JSMITH.PROCESS.LIB
//DMMSGFIL DD DISP=SHR,DSN=JSMITH.CD1.MSG
//DMNETMAP DD DISP=SHR,DSN=JSMITH.CD1.NETMAP
//DMPRINT DD SYSOUT=*
//SYSPRINT DD SYSOUT=*
//NDMLOG DD SYSOUT=*
//SYSIN DD *
SIGNON NETMAP=JSMITH.CD1.NETMAP USERID=(JSMITH)
MODIFY BITS.OFF=X'81000000’
SIGNOFF
See IBM Sterling Connect:Direct for z/OS User Guide for a description of the batch
interface, and the installation and administration guide for a description of the
MODIFY command.
Issuing the MODIFY Command through the IUI
About this task
To use the MODIFY command features through the IUI:
Procedure
1. Request option MD from the Connect:Direct Administrative Options Menu to
access the MODIFY COMMAND screen.
318 IBM Sterling Connect:Direct for z/OS: Administration Guide

node.name MODIFY COMMAND 14:34
CMD ==>
Server ==> ________ 00000000 (Current DEBUG Settings)
MODIFY DEBUG ==> ________ (nnnnnnnn)
MODIFY BITS.ON ==> ________ (nnnnnnnn)
MODIFY BITS.OFF ==> ________ (nnnnnnnn)
MODIFY DDNAME ==> ___________ (ddname,nn)
MODIFY CLOSE ==> ________ (ddname)
MODIFY MODDIR.TRACE ==> ___ (YES)
MODIFY DYN ==> ____________________________________________________________
MODIFY SESSIONS ==> _ (Quiesce or Resume) NODE ==> ________________
MODIFY NODE.TRACE.ON ==> ( ________________ ________ )
MODIFY NODE.TRACE.OFF ==> ________________
MODIFY NODES ==> ___ (YES)
MODIFY INITPARMS ==> ___ (YES)
MODIFY ZIIP ==> _________ (ALL NONE EXTCOMP SSLTLS PROJECT)
2. Type values in the appropriate fields. See the MODIFY command parameter
descriptions in Sterling Connect:Direct MODIFY Command.
Note: Do not type an equal sign or quotes in the MODIFY DYN field. However, if you
issue the MODIFY command on the CLI, you must type an equal sign before and
quotation marks around the dynamic allocation string.
3. When you have completed your entries, press ENTER.
Note: If you need to modify trace settings for more than one node, you can use
the MODIFY NODES screen which displays the Trace and Debug settings for
all of the Netmap adjacent nodes. See Modify Trace and Debug Settings
Through the Modify Nodes Screen for more information.
Examples of MODIFY Commands through the IUI
This section shows examples of MODIFY commands for Sterling Connect:Direct for
z/OS.
The following MODIFY commands set the bits to turn on a short send/receive
trace and to dynamically allocate the ddname RPLOUT.
MODIFY DYN='DD=RPLOUT,DSN=A985467.PRINT,DISP=SHR,FREE=CLOSE'
MODIFY BITS.ON=X'00000040'
After running the trace, the following MODIFY commands close the ddname
RPLOUT and turn off the short send/receive trace.
MODIFY BITS.OFF=X'00000040'
MODIFY CLOSE=RPLOUT
Modify Trace and Debug Settings Through the Modify Nodes
Screen
Perform the following procedure to modify trace and debug settings through the
Modify Nodes screen.
Procedure
1. Request option MD from the Connect:Direct Administrative Options Menu to
access the Modify Command screen.
2. Type YES in the MODIFY NODES field.
Chapter 16. Isolating Problems 319

3. Press ENTER.
The Modify Nodes screen is displayed.
CD.PRD MODIFY NODES (Unsaved Changes) Row 1 of 1054
CMD ==> SCROLL ===> PAGE
(CMD commands: CLEAR DEBUG/TRACE QUIESCE RESUME; CANCEL END REFRESH SAVE)
(SEL commands: C=Clear Q=Quiesce R=Resume. Overtype Debug setting.)
SEL Node Name Quiesce Debug Chg
--- ---------------- ------- -------- ---
CD.PRD.CSGA OFF 11111111
CD.PRD.CSGB OFF 11111111
CD.PRD.CSGD OFF 11111111
CD.PRD.CSGE OFF 11111111
CD.PRD.CSGF ON 11111111 Y
CD.PRD.CSGG OFF 11111111
CD.PRD.VIPA OFF 11111111
CD.TST OFF FFFFFEFF
CD.TST.%%%%% OFF FFFFFEFF
CD.TST.CSGA ON Y
CD.TST.CSGB OFF FFFFFEFF
CD.TST.CSGD OFF FFFFFEFF
CD.TST.CSGG OFF FFFFFEFF
CD.TST.CTCA1 OFF FFFFFEFF
CD.TST.CTCA2 OFF FFFFFEFF
CD.TST.CTCA3 OFF FFFFFEFF
4. Use one or both of the following methods:
v Issue a Debug or Trace command on the CMD line.
v Issue SEL commands or overtype the Debug field for specific nodes.
For more information, see “Modify Nodes Screen” on page 26.
5. Type SAVE in the CMD field and press ENTER to save your changes.
Sterling Connect:Direct Automatic Traces
You can activate some internal Sterling Connect:Direct traces without using the
DEBUG bits. Activate these traces during normal Sterling Connect:Direct operation.
Others traces are useful mostly for problem diagnosis. You can activate each of
these automatic Sterling Connect:Direct traces by having a DD statement in the
Sterling Connect:Direct startup JCL or allocated in a TSO session, except for
NDMCMDS, which is allocated in the JCL for DGADBATC or through the IUI. For
more information, see DD Statements in Startup JCL.
Note: To avoid generating excessive output, review Security Traces.
Some of the most useful automatic traces are:
v DMVSOPEN contains information related to the allocation of the target data set.
v ESTAE captures information on I/O errors; VTAM connection errors; ABEND
control blocks; open and close errors; TCQ/TCX errors on add, update, and so
forth; and statistics file write errors. Provided in the basic DGAJCONN JCL
member.
v CDESTAE contains various I/O errors from the statistics facility.
v RPLERRCK captures VTAM send and receive errors. Provided in the basic
DGAJCONN JCL member.
v NDMCMDS shows all actual Sterling Connect:Direct commands issued to the
DTF, including resolution of symbolics. It can be particularly helpful to debug
Sterling Connect:Direct commands through the IUI or through batch interface if
you are having signon problems, syntax errors, and so forth.
320 IBM Sterling Connect:Direct for z/OS: Administration Guide

v NDMLOG lists all initialization parameters read from the INITPARM data set
including obsolete parameters, which are indicated by SITA995I messages, and
all modules, along with the last date on which they were modified, and related
fix numbers. Provided in the basic DGAJCONN JCL member.
v CDLOG is a chronological log of Sterling Connect:Direct events listing all master,
console, programmer, and operator messages, and information on failed tests.
DD Statements in Startup JCL
Sterling Connect:Direct provides two members in the JCL file:
v DGAJCONN—Contains the minimum set of DDs to run Sterling Connect:Direct.
You may want to use this set of DD statements as the base and add specific DD
statements from the DGAJCONX member to fit your tracing needs.
v DGAJCONX—Contains all possible DDs to cover stand-alone servers, Sterling
Connect:Direct/Plex systems, automatic traces, and various DEBUG output.
Most of the DD statements in this JCL startup jobstream have been discussed
earlier in this chapter.
The DD statements in the DGAJCONX JCL can be broken down into the following
types:
v Minimal DD statements included in the DGAJCONN JCL
v DD statements for general operations
v DD statements for running automatic traces.
v DD statements for running detailed function traces in conjunction with the
DEBUG initialization parameter in a stand-alone Sterling Connect:Direct system
v DD statements for running detailed function traces in conjunction with the
DEBUG initialization parameter in a Sterling Connect:Direct/Plex system
CAUTION:
The diagnostic DD statements associated with the DEBUG bits cause much
more I/O and allocating them can consume significant CPU resources. To
avoid degrading performance in your production environment, be sure to
follow the guidelines in Diagnostic Tools.
The following DD statements are included in both the DGAJCONN and
DGAJCONX JCL:
DDNAME Function
STEPLIB Sterling Connect:Direct SDGALINK.
DMPUBLIB Sterling Connect:Direct Process library
USRINFO Standard display from User exits
NDMLOG Automatic trace to list all initialization parameters read from the
INITPARM data set including obsolete parameters, which are indicated
by SITA995I messages, and all modules, along with the last date on
which they were modified, and related fix numbers.
ESTAE Automatic trace to capture I/O errors, VTAM connection errors,
ABEND control blocks, open and close errors, TCQ/TCX errors on
adds and updates, and statistics file write errors.
RPLERRCK Automatic trace to capture VTAM/TCP send and receive errors.
The following DD statements run general functions in all systems:
Chapter 16. Isolating Problems 321

DDNAME Function
SYSTERM Standard MVS
NSXOUT SNA NSXEXIT
CDDUMPR
1
Sterling Connect:Direct DUMP command output
ADRIOXLG Sysprint for DSS exit
SECURITY
1
Security trace if Stage 2 exit has TRACE=DEBUG specified
CDSECURI Stage1 Security Trace
DMPRINT
1
Submit command Output
APITRACE
1
Stage2 API Trace, which consists primarily of IUI and batch interface
activity
AXUNIQ Error Recovery
1
Can generate excessive output. Use judiciously.
The following DD statements are used to run automatic traces and perform related
functions.
Note: To handle B37 (out of space) conditions when tracing to disk, code the DD
statement with FREE=CLOSE, which will close and deallocate the dataset. The DD
statement will not be reallocated and tracing will stop. If the DD statement does
not include FREE=CLOSE and a B37 condition occurs, the dataset is closed and
reopened. Tracing continues and all old trace data to this DD is lost. When
FREE=CLOSE is coded for JES datasets, closing the DD makes the JES entry available
immediately for printing or purging without affecting the other JES datasets. You
could specify FREE=CLOSE in the DD statement and then, using the ISPF MD dialog,
periodically close the DD and reallocate it with FREE=CLOSE. This would enable you
to purge old JES entries without having to reinitialize Sterling Connect:Direct.
DDNAME Function
DEVTRACE
1
Traces UCB open and close activity.
DMGEVENT Traces Event Services activity.
DMVSOPEN Formats the allocation block.
CDESTAE Diagnostics on various I/O errors from the statistics facility. Allocate
this name by including in the Sterling Connect:Direct startup JCL.
IGWTRACE
1
Traces PDSE program objects load to unload activity.
LOSTOUT Lost term exit trace.
NDMAPI Used for diagnostics on session errors with the API.
NDMCMDS IUI/Application Program Interface (IUI/API) commands passed to
Sterling Connect:Direct. Also use it for diagnostics on session errors
with the API.
CDCMDS IUI/Application Program Interface (IUI/API) commands passed to
Sterling Connect:Direct. Also use it for diagnostics on session errors
with the API.
CDLOG
1
A chronological log of Sterling Connect:Direct events listing all master,
console, programmer, and operator messages, and information on
failed tests.
1
Can generate excessive output. Use judiciously.
322 IBM Sterling Connect:Direct for z/OS: Administration Guide

The following output DD statements are used to run detailed function traces and
perform related functions in a stand-alone system.
Output DD Trace Type DEBUG Setting
RADBDD01 COPY Routine and RUN TASK trace 80000000
DMCBSUBM Full TPCB/SYMBOLICS from DMCBSUBM 10000000
RADBDD05 Session manager trace 08000000
Rnnnnnnn Separate trace per task
(Example: “R0000005” to trace TASK 5)
Note: DDs are dynamically allocated by Sterling
Connect:Direct as required.
04000000
RADBDD07 API session trace 02000000
RADBDD08 DGADCBSU trace 01000000
DMCOPYRT TCQSH from DMCOPYRT 00400000
N/A Make each SVC dump unique 00200000
SECURITY SECURITY trace control 00100000
RADBDD16 GETMAIN/FREEMAIN trace 00040000
RADBDD21 I/O buffer trace 00008000
RADBDD22 WTO all dynamic allocation parameters 00004000
CDZIIP System z Integrated Information Processor
(zIIP)-related trace
00000800
RPLOUT RPL trace - long
Note: To avoid generating excessive output when
you use this trace with a large value for the
V2.BUFSIZE initialization parameter, use the short
RPL trace.
00000080
RPLOUT RPL trace - short 00000040
RADBDD33 Version 2 session trace 00000020
RADBDD35 Logon exit trace 00000008
RADBDD36 Logon Process or trace 00000004
RADBDD37 SCIP exit trace 00000002
SCTRAPDD SNMP trace 00000001
The following output DD statements are used to run detailed function traces and
perform related functions in a Sterling Connect:Direct/Plex environment:
Output DD Trace Type DEBUG Setting
CDPLXACT ACTION queue manager trace 00002000
CDPLXCKP CKPT queue manager trace
CDPLXTCQ TCQ queue manager trace
CDPLXSTA STATS queue manager trace
CDPLXREQ First REQUEST queue manager trace
CDPLXRnn Second and subsequent REQUEST queue
manager trace. For example, “CDPLXR03”
traces the third queue manager.
CDPLXJOI JOIN queue manager trace
Chapter 16. Isolating Problems 323

Output DD Trace Type DEBUG Setting
CDPLXWLB Workload Balancing trace 00001000
324 IBM Sterling Connect:Direct for z/OS: Administration Guide

Chapter 17. Global Initialization Parameters
Initialization parameters supply values for various Sterling Connect:Direct
functions. Sterling Connect:Direct processes these parameters during initialization.
Global initialization parameters apply to a Sterling Connect:Direct/Stand-alone
Server or each member of a Sterling Connect:Direct/Plex environment.
In a Sterling Connect:Direct/Plex environment, the local initialization parameters
of a member can override some global initialization parameters. See Local
Initialization Parameters for more information about local initialization parameters.
In all cases, initialization parameters are kept in a PDS (Partitioned Data Set) and
may not come from a sequential file.
Note: In a Sterling Connect:Direct/Plex environment, you can only override
initialization parameters allowed in the local initialization parameters file using the
PARM= keyword in the EXEC statement at system startup. In a Sterling
Connect:Direct/Stand-alone Server environment, however, you can override global
initialization parameters with the PARM= keyword in the EXEC statement.
Handling Return Codes
If you receive a return code of 4 when you stop Sterling Connect:Direct, review the
NDMLOG for information regarding obsolete and soon-to-be obsolete parameters.
Once you remove these parameters, you avoid these warning messages at start-up.
These messages are numbered: SITA995I, SITA988I, and SITA989I.
ABEND.CODES.NODUMP=(ABEND code list)
The ABEND code list parameter specifies up to 16 system or user ABENDs. This
parameter does not apply to RUN TASK ABENDS unless you specify
ABEND.CODES.NODUMP for the ABEND.RUNTASK initialization parameter.
When a task ABENDs, Sterling Connect:Direct searches this list. If the ABEND is
found, the dump is suppressed. Use this parameter to prevent dumps on ABEND
codes for which you do not need dump information.
Specify system ABEND codes in the list using an S followed by three characters
such as SB37.
Specify user ABEND codes in the list using a U followed by four numeric digits
such as U4030.
Specify a wildcard masking character in the code using X. Place the X in any
position following either the S or U, such as SX37 or U40XX.
Note: It is not necessary to include the following ABEND codes in the
ABEND.CODES.NODUMP list because they are suppressed by default: S00C
(reason code 4 only), S047, S13E, S222, S422, SA03, U1024, U1025, U1028, SX13,
SX37.
Modifiable through MODIFY INITPARMS command: YES.
© Copyright IBM Corp. 1999, 2015 325

ABEND.RUNTASK = (DUMP | ABEND.CODES.NODUMP)
This parameter specifies whether to refer to ABEND.CODES.NODUMP for ABEND
codes when suppressing dumps.
Value Description
DUMP System dumps when a RUNTASK ABENDs. This value is
the default.
ABEND.CODES.NODUMP An ABEND dump is generated instead of a system dump.
Searches the ABEND.CODES.NODUMP list for a match. If
the ABEND code is found, the dump is suppressed. If the
ABEND code is not found, the system dump continues.
Modifiable through MODIFY INITPARMS command: YES
ALLOC.CODES = (allocation errors)
This parameter specifies allocation errors for which Sterling Connect:Direct retries
the Process step as specified in the ALLOC.RETRIES and ALLOC.WAIT
initialization parameters. These allocation errors are the Dynamic Allocation
Interface Routine (DAIR) codes generated by the dynamic allocation function
(SVC99) of the operating system, such as z/OS. The following is an example of an
IBM error reason code (0210) shown in the Sterling Connect:Direct SDAB005I
message.
SDAB005I - ERR=0210,INFO=0000,REQUESTED DATA SET NOT AVAILABLE.
ALLOCATED TO ANOTHER JOB.
You can find common dynamic allocation error codes in the Sterling
Connect:Direct MSG file by enclosing the code in the message SDExxxxI skeleton,
where xxxx is the error reason code. The variable SDAB005I message short text and
description come from the MVS Programming Authorized Assembler Services Guide
(general publication number SA22-7608-nn), which is accessible on IBM's website.
For ERR codes not found in the Sterling Connect:Direct MSG file, see the MVS
Programming Authorized Assembler Services Guide.
Sterling Connect:Direct defined the following error codes to enable retries for
specific failures.
Value Description
PDSR This is an internally generated Sterling Connect:Direct code, that unlike
the others described in this section, is not an allocation code. When two or
more Processes attempt to write to the same PDS at the same time, only
one can write successfully to the PDS. The remaining Processes have error
messages with this PDSR code and are retried in the same way as the
other codes discussed in this section.
DSNR This option is similar to the PDSR allocation code but works on non-PDS
data sets. When you attempt to send or receive a non-PDS data set, but
cannot because the data set is in use, Sterling Connect:Direct retries the
Process (specified by the retry option) for the number of times specified, if
you have coded the DSNR option.
GDGR This option indicates that if the ENQ fails (as described for the GDGENQ
parameter) for GDG data sets, the Process is retried.
326 IBM Sterling Connect:Direct for z/OS: Administration Guide

Value Description
TAPR This option indicates that a tape Process is retried if the number of tape
Processes specified by MAX.TAPE is reached.
ARCH This option indicates that the data set is archived, and Sterling
Connect:Direct retries based upon the value specified for the
ALLOC.RETRIES initialization parameter. You must use the DGAXARCL
allocation exit for this option to work.
Note: It is not necessary to use the Sterling Connect:Direct DMGALRCL
exit to avoid a common allocation error that ties up the IBM task
input/output table (TIOT) via the enqueue on SYSZIOT. See the discussion
on the sample allocation exit, DGAXARCL (alias of DMGALRCL), in
Sample Allocation Exits, for more detailed information on recall processing
of migrated and archived data sets.
Allocation retries are controlled by the PNODE and supported for z/OS, VM/ESA,
and VSE/ESA platforms only. The following table lists the default allocation error
codes and their meanings.
Code Definition
020C Exclusive use of shared file
0210 Allocated to another job
0218 Volume not mounted
0220 Volume not available
0234 One device required
0068 VM minidisk already linked read-only, if transferring with VM
0069 VM minidisk already linked read-write, if transferring with VM
006A VM minidisk already linked read-write and read-only, if transferring with
VM
Modifiable through MODIFY INITPARMS command: YES
ALLOC.MSG.LEVEL = INFO | WARN | SEVERE
This parameter specifies the severity of dynamic allocation messages to display. By
setting the level, you can suppress unwanted messages. ALLOC.MSG.LEVEL
values correspond to levels defined by Dynamic Allocation and are described in
the IBM Authorized Assembler Services Guide (GC28-1467).
Value Description
INFO This value indicates that all informational messages are displayed.
WARN This value indicates that only warning messages are displayed.
SEVERE This value indicates that only severe messages are displayed.
Modifiable through MODIFY INITPARMS command: NO
Chapter 17. Global Initialization Parameters 327

ALLOC.RETRIES = number of retries
This parameter specifies the number of Sterling Connect:Direct retries of an
allocation failure. The default is 20.
Modifiable through MODIFY INITPARMS command: YES
ALLOC.WAIT = hh:mm:ss
This parameter specifies the amount of time that Sterling Connect:Direct waits
between retries of an allocation failure. The default is 00:03:00.
Modifiable through MODIFY INITPARMS command: YES
ALLOCATION.EXIT = modname
This parameter specifies the name of the user-written interface that communicates
with Sterling Connect:Direct for z/OS. You can invoke the allocation exit prior to
any allocation activity by Sterling Connect:Direct, thereby allowing the exit
program to examine and modify information that Sterling Connect:Direct uses
during the allocation Process, such as the data set name (DSN) and destination
name. In addition, you can set parameters to terminate a copy step before
allocation takes place.
For sample exits, see the $CD.SDGASAMP library. The default is no allocation exit.
Modifiable through MODIFY INITPARMS command: NO
CDPLEX = NO | YES
This parameter indicates whether or not Sterling Connect:Direct initializes as a
Sterling Connect:Direct/Plex operation.
Value Description
NO Sterling Connect:Direct does not initialize as a Sterling
Connect:Direct/Plex operation.
YES Sterling Connect:Direct initializes as a Sterling Connect:Direct/Plex
operation.
Modified through MODIFY INITPARMS command: NO
CDPLEX.MAXSERVER = maximum number of servers | 4
This parameter specifies the maximum number of servers the Sterling
Connect:Direct/Plex Manager will manage. The acceptable range is 1–32. The
default value is 4.
For more information, see Storage Requirements in a Sterling Connect:Direct Plex
Environment in the IBM Sterling Connect:Direct for z/OS Configuration Guide.
Modifiable through MODIFY INITPARMS command: NO
328 IBM Sterling Connect:Direct for z/OS: Administration Guide

CDPLEX.TIMER = 5 | number of minutes
This parameter specifies the time-out value for XCF communications in minutes.
The valid range is 0, 5–99. Zero (0) indicates that no time-out is set for XCF
communications.
Modified through MODIFY INITPARMS command: NO
CDPLEX.WLM.GOAL = (NO | YES, exitname)
This parameter specifies whether the IBM Workload Manager (WLM) Goal Mode
queries are used for balancing Sterling Connect:Direct/Plex Process workload in a
sysplex.
Value Description
NO No Goal Mode queries are made. Process workload is balanced without
determining system capacity information. This is the default value.
YES Goal mode queries are made. A warning message is issued when a
WLM query is made that shows a server is running on a system that is
NOT in Goal Mode.
exitname If you want to implement your own method for using WLM query
information, you can create a WLM user exit and specify the name of
the exit. You can find a sample user exit in $CD.SDGASAMP library
called DGAXWLMX .
Modifiable through MODIFY INITPARMS command: yes
CHECK.CERT.EXPIRE = NO | YES
This parameter indicates whether or not Sterling Connect:Direct will check the
validity of certificates. This parameter is only effective if Sterling Connect:Direct
Secure Plus has been enabled by specifying SECURE.DSN = Sterling
Connect:Direct Secure Plus parameter filename. For more information, see
Certificate Validity Check Used by Sterling Connect:Direct Secure Plus.
Value Description
NO Sterling Connect:Direct does not check the validity of certificates.
YES Sterling Connect:Direct does check the validity of certificates whenever
Sterling Connect:Direct is started.
Modifiable through MODIFY INITPARMS command: YES
CHECK.CERT.EXPIRE.TIME = 00:00:00 | HH:MM:SS
This parameter specifies the time of day that Sterling Connect:Direct will check the
validity of certificates. The default, 00:00:00, indicates that Sterling Connect:Direct
will perform its validity check at midnight. You can enter any value between
00:00:00 and 23:59:59. This parameter is only effective if CHECK.CERT.EXPIRE =
YES and Sterling Connect:Direct Secure Plus has been enabled by specifying
SECURE.DSN = Sterling Connect:Direct Secure Plus parameter filename.
Modifiable through MODIFY INITPARMS command: YES
Chapter 17. Global Initialization Parameters 329

CHECK.CERT.EXPIRE.WARN.DAYS = 30 | nnn
This parameter specifies the number of days prior to the certificate expiration date
that a warning message will be issued. Sterling Connect:Direct. The default is 30
days. You can enter any value between 1 and 365. his parameter is only effective if
CHECK.CERT.EXPIRE = YES and Sterling Connect:Direct Secure Plus has been
enabled by specifying SECURE.DSN = Sterling Connect:Direct Secure Plus
parameter filename.
Modifiable through MODIFY INITPARMS command: YES
CKPT = nK | nM
This parameter enables automatic checkpointing of eligible files if no CKPT
keyword is specified on the Sterling Connect:Direct
®
COPY statement. (See the
CKPT.MODE initialization parameter for further details of automatic
checkpointing.) K means thousands of bytes; M means millions of bytes.
Valid values of n are:
v 0–2147483K
v 0–2147M
Setting a value of 0 means no automatic checkpointing.
The default is no checkpointing.
Sterling Connect:Direct uses the value specified, rounded to the nearest block
boundary, to determine when a checkpoint is taken. The CKPT specification on the
Sterling Connect:Direct Copy statement always overrides the CKPT initialization
parameter value.
Modifiable through MODIFY INITPARMS command: YES
Note: For sequential files, do not specify a CKPT value less than:
BLKSIZE * NCP * 10 * # stripes
where NCP is the number of buffers for reading data from or writing data to a
sequential data set using BSAM and # stripes refers to striped extended-format
data sets. For more information, see Problems Involving Checkpoints .
CKPT.DAYS = number of days
This parameter specifies the number of days that checkpoint records stay in the
Checkpoint file before automatic deletion during Sterling Connect:Direct
initialization. The records can be left in the Checkpoint file if transmission is
interrupted and the Process is deleted without being restarted. The default is 4.
Modifiable through MODIFY INITPARMS command: YES
CKPT.MODE = (RECORD | BLOCK BLOCK | RECORD PDS | NOPDS
NOPDS | PDS VSAM | NOVSAM VSAM | NOVSAM)
This parameter enables you to control checkpointing in both record and block level
transfers.
330 IBM Sterling Connect:Direct for z/OS: Administration Guide

Note: This parameter does not apply to TCP/IP or LU6.2 connections. See Process
Queuing and Recovery for an explanation of when checkpointing occurs.
Subparameter Description
RECORD |
BLOCK
Refers to transferring physical sequential (PS) files. It determines
whether checkpointing is allowed when the CKPT parameter is
specified on the COPY statement. If a record level transfer is taking
place, BLOCK does not allow record level checkpointing, even if you
have coded the request on the COPY statement. If you are performing a
block level transfer, BLOCK enables checkpointing requests coded on
the COPY statement. RECORD enables record level checkpointing.
BLOCK |
RECORD
Refers to transferring PS files. It determines what type of checkpointing
occurs when automatic checkpointing is in effect. You enable automatic
checkpointing by specifying a value in the CKPT parameter in the
initialization parameters. If you use the CKPT parameter, you do not
have to request checkpointing on each COPY statement. If you specify
RECORD for this parameter, both record level and block level
automatic checkpointing occur, depending on the mode of transfer for
each copy. Use BLOCK to prevent automatic checkpointing on a record
level transfer.
PDS | NOPDS Refers to transferring partition data sets (PDS). Because checkpointing
information is sent with each member of a PDS, this subparameter
specifies whether checkpointing is allowed with PDS transmission if a
request is coded on the COPY statement. NOPDS prevents
checkpointing on the PDS, even if you requested it on the Copy
statement. PDS enables PDS transmissions to be checkpointed.
NOPDS | PDS Refers to transferring PDS. It determines what type of checkpointing
occurs when automatic checkpointing is in effect. To enable automatic
checkpointing, specify a value in the CKPT parameter in the
initialization parameters. If you use the CKPT parameter, you do not
have to request checkpointing on each COPY statement. If you specify
PDS, all PDS transmissions are automatically checkpointed. NOPDS
prevents automatic checkpointing of PDS transmission.
VSAM |
NOVSAM
Specifies whether checkpointing takes place for VSAM files when the
checkpoint parameter is specified in the COPY statement.
VSAM |
NOVSAM
Specifies whether automatic checkpointing takes place for VSAM files.
Modifiable through MODIFY INITPARMS command: YES
COMPRESS.EXT = ALLOW | DISALLOW
This parameter specifies whether extended compression will be allowed on a
global basis.
Note: If COMPRESS.NETMAP.OVERRIDE=ALLOW is specified, the
COMPRESS.EXT value specified in the netmap ADJACENT.NODE entry will
override the value specified for this parameter in the global initialization
parameters.
Value Description
ALLOW Extended compression is allowed. This value is the default.
DISALLOW Extended compression is not allowed.
Chapter 17. Global Initialization Parameters 331

Modifiable through MODIFY INITPARMS command: Yes.
COMPRESS.NEGO.FAIL = STEP | PROCESS
This parameter specifies how a Process is handled when negotiations fail (for the
system that has control of the Process).
Value Description
STEP When negotiations fail, the STEP fails with RC=8, and modal logic may
be used to determine how to proceed. This value is the default.
PROCESS When negotiations fail, the Process fails and is placed in HO HE (Held
in Error).
Modifiable through MODIFY INITPARMS command: Yes.
COMPRESS.NETMAP.OVERRIDE = ALLOW | DISALLOW
This parameter specifies whether netmap entries for compression control (on a
node-by-node basis) will override the global compression control settings in the
initialization parameters.
Value Description
ALLOW The netmap compression control settings are allowed to override the
initialization parameters. This value is the default.
DISALLOW The netmap compression control settings are not allowed to override
the initialization parameters.
Modifiable through MODIFY INITPARMS command: Yes.
COMPRESS.STD = ALLOW | DISALLOW
This parameter specifies whether standard compression will be allowed on a global
basis.
Note: If COMPRESS.NETMAP.OVERRIDE=ALLOW is specified, the
COMPRESS.STD value specified in the netmap ADJACENT.NODE entry will
override the value specified for this parameter in the global initialization
parameters.
Value Description
ALLOW Standard compression is allowed. This value is the default.
DISALLOW Standard compression is not allowed.
Modifiable through MODIFY INITPARMS command: Yes.
332 IBM Sterling Connect:Direct for z/OS: Administration Guide

CONFIRM.COLD.START = YES | NO
This parameter indicates whether an operator has to confirm a COLD start of the
Transmission Control Queue (TCQ) and Statistics files.
Value Description
YES Issues a Write to Operator with Reply (WTOR) prompt to force the
operator to confirm the request for a COLD start before executing the
COLD start.
NO Performs a COLD start without requiring operator confirmation.
Modifiable through MODIFY INITPARMS command: NO
CRC = (OFF | ON, YES, No)
This parameter specifies whether cyclic redundancy checking (CRC) is performed
for TCP/IP connections. The CRC parameter is a 32 bit checksum used by Sterling
Connect:Direct to detect network data corruption which occasionally occurs in IP
data networks. If network data corruption is detected, Sterling Connect:Direct will
stop the Process execution and restart the Process from the last checkpoint record.
This provides an extra layer of data integrity when transmitting data over an IP
network. You cannot enable CRC checking when running Sterling Connect:Direct
Secure Plus.
Parameter Description
OFF | ON This parameter specifies whether CRC is ON or OFF for the node. This
first positional parameter establishes the default for the node.
YES | No This parameter specifies whether overrides are allowed. You can
perform overrides in a Process statement or with a network map
parameter.
Modifiable through MODIFY INITPARMS command: YES
CTCA = NO | YES
This parameter specifies whether the channel-to-channel adapter (CTCA) driver is
loaded at Sterling Connect:Direct initialization.
Value Description
NO The CTCA driver is not loaded at initialization. This value is the default.
YES The CTCA driver is loaded at Sterling Connect:Direct initialization.
Modifiable through MODIFY INITPARMS command: NO
CTCA.TIMER = number of seconds
This parameter specifies the number of seconds for a SEND/RECEIVE to wait
before a timeout on the connection occurs. The valid range is from 60–300. The
default is 180 seconds.
Modifiable through MODIFY INITPARMS command: NO
Chapter 17. Global Initialization Parameters 333

DATEFORM = (MDY | DMY | YMD | YDM)
This parameter specifies how dates are displayed and input. Dates are displayed
with a 4-digit year format unless a 2-digit year format is specified. You can use
periods or back slashes (/) to separate the month, day, and year values.
This parameter applies only to Gregorian dates.
Value Description
MDY This value indicates that dates are displayed or input in one of the
following formats:
v MMDDYYYY
v MM/DD/YYYY
v MM.DD.YYYY
v MMDDYY
v MM/DD/YY
v MM.DD.YY
DMY This value indicates that dates are displayed or input in one of the
following formats.
v DDMMYYYY
v DD/MM/YYYY
v DD.MM.YYYY
v DDMMYY
v DD/MM/YY
v DD.MM.YY
YMD This value indicates that dates are displayed or input in one of the
following formats.
v YYYYMMDD
v YYYY/MM/DD
v YYYY.MM.DD
v YYMMDD
v YY/MM/DD
v YY.MM.DD
YDM This value indicates that dates are displayed or input in one of the
following formats.
v YYYYDDMM
v YYYY/DD/MM
v YYYY.DD.MM
v YYDDMM
v YY/DD/MM
v YY.DD.MM
Modifiable through MODIFY INITPARMS command: NO
334 IBM Sterling Connect:Direct for z/OS: Administration Guide

DEBUG = nnnnnnnn
Turns on a specific trace option or any combination of options, where nnnnnnnn
represents a debug setting in hexadecimal. By default, this initialization parameter
is set to 00000000 meaning that the trace is not turned on. You can modify
DEBUG= settings using the MODIFY command. See Sterling Connect:Direct
MODIFY Command.
See Debug Settings for a complete listing of the DEBUG settings, the trace types
produced, and the ddnames used for output.
Modifiable through MODIFY INITPARMS command: NO
DEFAULT.PERMISS = (text_permissions | 644, binary_permissions |
755)
This parameter specifies the default file permissions for HFS files that are created
by Sterling Connect:Direct. If not specified, Sterling Connect:Direct defaults to 644
for text files and 755 for binary files.
To enable the permission setting for HFS files that use DEFAULT.PERMISS, set the
UNIX System Services UMASK to 000 by using the runtime environment variable,
_EDC_UMASK_DFLT. Otherwise, Sterling Connect:Direct uses a default UMASK of
022 that changes the write permissions for GROUP and OTHER.
To set the environment variable, define the _EDC_UMASK_DFLT=000 variable in a
RECFM=VB type file and allocate the ENVIRON DD in the Sterling Connect:Direct
startup JCL. For example: //ENVIRON DD DISP=SHR, DSN=$CD.ENVIRON(TZ).
Value Description
text_permissions Default file permissions for text files.
binary_permissions Default file permissions for binary files.
Permission values contain 3 digits. The first digit indicates the owner’s file
permissions, the second digit indicates the owner’s group’s file permissions, and
the third digit indicates the file permissions for all others. The following are
permission values:
v 0 - No file access is allowed
v 1 - Execute access is allowed
v 2 - Write access is allowed
v 3 - Write and Execute access is allowed
v 4 - Read access is allowed
v 5 - Read and Execute access is allowed
v 6 - Read and Write access is allowed
v 7 - Read, Write, and Execute Access is allowed
Modifiable through MODIFY INITPARMS command: NO
Chapter 17. Global Initialization Parameters 335

DESC.CRIT = (descriptor code)
This parameter specifies the descriptor code used for critical write-to-operator
(WTO) messages. Messages that go to the critical route code are, for example,
disastrous session errors or critical ABENDs. You can specify as many as 16 codes.
The default of DESC.CRIT = (2) specifies immediate action is required.
Modifiable through MODIFY INITPARMS command: YES
DESC.NORM = (n,n,...)
This parameter specifies the descriptor code used for normal (WTO) messages. You
can specify as many as 16 codes.
DESC.NORM = ( ) specifies that no descriptor code is assigned. The default is no
descriptor code.
Modifiable through MODIFY INITPARMS command: YES
DESC.TAPE = (n,n,...)
This parameter specifies the descriptor code for the tape pre-mount message used
by Sterling Connect:Direct for z/OS. (For more information, see the IBM Sterling
Connect:Direct for z/OS Facilities Guide.) You can specify as many as 16 codes.
The default is 2.
Modifiable through MODIFY INITPARMS command: YES
DSNTYPE = YES | NO
This parameter indicates whether the DSNTYPE will be propagated from the
source file (to be used as the default destination file DSNTYPE) or whether it must
be coded within the Process. DSNTYPE=YES must be specified in the receiving
node's initialization parameters for the receiver to perform the propagation of
DSNTYPE from the source file.
Value Description
Yes Indicates that the DSNTYPE of the source file (FROM DSN) will be
used to create the new output file (TO DSN) if it cannot be obtained
from any other COPY statement parameter. The DSNTYPE will be
propagated only when the output data is allocated as DISP=NEW or
does not exist. A COPY statement parameter that influences DSNTYPE
is required when copying to different DSN types, for example, PDSE to
PDS or PDS to PDSE.
No Indicates that the DSNTYPE of the source file (FROM DSN) will not be
propagated to the new output file (TO DSN). The DSNTYPE must be
supplied by a COPY statement parameter, or else it will take the system
default (PDS for partitioned organization or BASIC for sequential
organization).
Modifiable through MODIFY INITPARMS command: NO
336 IBM Sterling Connect:Direct for z/OS: Administration Guide

ECZ.COMPRESSION.LEVEL = 1 | n
This parameter determines the level of compression. The valid value range is 1–9.
The default is 1, which usually provides sufficient compression. The data goes
through the compression code the number of times indicated by the value
specified for the parameter.
CAUTION:
Compression consumes significant CPU resources. To avoid degrading
performance in your production environment by changing the global, default
settings for the extended compression parameters, you should: (1) Review
“Using Extended Compression” on page 284 to view test results that describe
how changing the global, default values affects performance, and (2) Review
Testing the Effects of Changing Values for Extended Compression Parameters in
IBM Sterling Connect:Direct for z/OS User Guide for information on using the
DGASACMP offline utility to perform tests to determine whether changing the
default values of the extended compression parameters at the global level or by
overriding them at the Process level will significantly improve your system
performance.
Modifiable through MODIFY INITPARMS command: YES
ECZ.MEMORY.LEVEL = 4 | n
This parameter identifies how much virtual memory is allocated to maintain the
internal compression state. This memory is above the 16 megabyte line. The valid
value range is 1–9. The default is 4. Level 1 requires the least memory (1 KB); level
9 requires the most memory (256 KB).
Compression consumes significant CPU resources. For more information, see the
caution for the parameter, “ECZ.COMPRESSION.LEVEL = 1 | n.”
Modifiable through MODIFY INITPARMS command: YES
ECZ.WINDOWSIZE = 13 | nn
This parameter determines the size of the compression window or history buffer.
This memory is above the 16 megabyte line. The valid values are 8–15. The default
is 13. Size 8 uses 1 KB of memory, whereas Size 15 requires 128 KB of memory.
Compression consumes significant CPU resources. For more information, see the
caution for the parameter, “ECZ.COMPRESSION.LEVEL = 1 | n.”
Modifiable through MODIFY INITPARMS command: YES
ESF.WAIT = hh:mm:ss
This parameter specifies the maximum amount of time that Sterling Connect:Direct
waits before checking for ESF-submitted Processes. When that time expires,
Sterling Connect:Direct retrieves any Processes submitted through the ESF.
The default is 00:03:00.
Modifiable through MODIFY INITPARMS command: YES
Chapter 17. Global Initialization Parameters 337

EXPDT = (TT,DD,TD,DT) (if multiple values EXPDT = TT | DD | TD | DT |
ALL | NONE (if only one value)
This parameter specifies Sterling Connect:Direct system defaults for propagating
the expiration date from the FROM data set to a NEW data set. The following table
lists the valid keywords for the EXPDT parameter and coding conventions.
Value Meaning Result
TT tape-to-tape Propagate the expiration date if the data set on the sending side
and the data set on the receiving side are both on tape.
DD DASD-to-DASD Propagate the expiration date if the data set on the sending side
is on DASD and the data set on the receiving side is also on
DASD.
TD tape-to-DASD Propagate the expiration date if the data set on the sending side
is on tape and the data set on the receiving side is on DASD.
DT DASD-to-tape Propagate the expiration date if the data set on the sending side
is on DASD and the data set on the receiving side is on tape.
ALL Always propagate the EXPDT from data sets on all device types
to data sets on all device types (works only for DASD and tape).
NONE Never propagate the expiration date of the sending data set to
the receiving data set. This value is the default.
If you specify multiple values, enclose them in parentheses and separate them by a
comma. If you code a single value, you do not need to enclose them in
parentheses. If you code ALL or NONE, you cannot code any other keyword.
The receiving side determines whether or not Sterling Connect:Direct propagates
the expiration date. If the sending side specifies ALL in its initialization parameter,
but the receiving side specifies NONE, the EXPDT is not propagated. Therefore, if
the copy is from SNODE to PNODE, the PNODE side makes the determination; if
the copy is from PNODE to SNODE, the SNODE side determines if the EXPDT is
propagated.
Sterling Connect:Direct overrides the EXPDT initialization parameter in a Process
when the following conditions occur:
v If you code an EXPDT or RETPD parameter for the receiving side (TO side) in
the Process, Sterling Connect:Direct uses that EXPDT or RETPD and ignore the
initialization parameter EXPDT.
v If you code an EXPDT or RETPD for the sending side (FROM side) in a Process
and not for the receiving side, Sterling Connect:Direct uses the EXPDT in the
Process, according to the EXPDT initialization parameter setting on the receiving
side.
v If you do not specify the EXPDT in the Process and the input (FROM) data set is
on DASD, Sterling Connect:Direct obtains the EXPDT from the DSCB. If the
input data set is on tape and the tape is SL or AL (Standard or ASCII), Sterling
Connect:Direct uses the tape label. When Sterling Connect:Direct dynamically
allocates the data set on the receiving side, EXPDT is used, according to the
initialization parameter EXPDT setting on the receiving side.
When you transfer a data set with no associated EXPDT, the following occurs:
If an input data set does not have an EXPDT, and the EXPDT is to be propagated,
then the dynamic allocation string for the output data set specifies LABEL =
338 IBM Sterling Connect:Direct for z/OS: Administration Guide

EXPDT = 00000. DASD data sets are considered to not have an EXPDT if the DSCB
EXPDT is 00000. Tape data sets are considered to not have an EXPDT if the HDR1
label contains 00000 for the EXPDT. When a data set is allocated with LABEL =
EXPDT = 00000, the tape header label or the DASD DSCB contains zeroes for the
EXPDT on the output data set. If you have a tape management system or DASD
management system, their databases can reflect a different EXPDT than the tape
label or DASD DSCB, depending upon the defaults on the receiving side.
Modifiable through MODIFY INITPARMS command: YES
EXTENDED.RECOVERY = NO | YES
This parameter specifies whether Sterling Connect:Direct Extended Recovery is
used.
Value Description
NO Sterling Connect:Direct Extended Recovery is not used. This is the
default value.
YES Sterling Connect:Direct Extended Recovery is used.
Extended recovery is supported in the Sterling Connect:Direct/Stand-alone Server
and Sterling Connect:Direct/Plex environments.
Modifiable through MODIFY INITPARMS command: NO
FIPS = NO | YES
This parameter specifies whether Sterling Connect:Direct FTP+ will will place
System SSL in to FIPS mode. It is a global, non-refreshable initialization parameter
that applies to the TLS protocol. If FIPS=YES, this parameter is effective only if the
following have been met:
v System SSL requirements to enable and run in FIPS mode have been met. For
more information on meeting the System SSL requirements for FIPS mode, see
the System SSL Programming Guide.
v Sterling Connect:Direct Secure Plus has been enabled by specifying the
SECURE.DSN initialization parameter.
Once FIPS mode is requested and successfully set, Sterling Connect:Direct FTP+
will not attempt to switch to non-FIPS mode. To switch to non-FIPS mode, update
the FIPS initialization parameter to FIPS=NO and restart Sterling Connect:Direct
FTP+. If Sterling Connect:Direct FTP+ is in FIPS mode, any attempt to use the SSL
protocol will result in a failure. Processing using the STS protocol is not affected by
FIPS mode.
Modifiable through MODIFY INITPARMS command: NO
GDGALLOC = GENERATION | DSNAME
This parameter specifies whether Sterling Connect:Direct allocates GDG data set by
generation or data set.
Note: Do not specify both GDGALLOC=GENERATION and GDGENQ=YES.
Sterling Connect:Direct will change GDGENQ=YES to GDGENQ=NO, and issue a
warning message, SITA203I, to indicate this change has been performed.
Chapter 17. Global Initialization Parameters 339

Value Description
GENERATION Sterling Connect:Direct allocates by generation, so the allocation is
DATA.SET.NAME(xx), where (xx) is the relative generation such as
(+1), (-3), (0), and so on. Use for SMS GDG files so that duplicate
GDG generations are not created. GDGALLOC=GENERATION
logic supports sites that use both SMS and non-SMS GDG data
sets. The GDGENQ parameter is ignored and Sterling
Connect:Direct handles the ENQ logic. Sterling Connect:Direct
performs an exclusive SYSTEMS ENQ on QNAME NDMGDG and
uses the base GDG name as the RNAME.
This exclusive ENQ causes a serialization within any Sterling
Connect:Direct on the system. First, Sterling Connect:Direct issues a
LOCATE to find the current absolute generation number. Next,
Sterling Connect:Direct performs an exclusive SYSTEM ENQ on
QNAME SYSDSN and uses the data set name returned from
LOCATE as the RNAME. If successful, Sterling Connect:Direct then
performs a shared SYSTEM ENQ on QNAME SYSDSN and uses
the base GDG name as the RNAME. Dynamic allocation (SVC 99)
is performed.
If the data set name allocated is not the same as what the LOCATE
returned, the process ends with an SDEGDGRI error and the file is
deleted. The two SYSDSN ENQs are not released until the end of
the COPY step. The NDMGDG ENQ on the base is released
(DEQueued) after the allocation is performed.
DSNAME Sterling Connect:Direct allocates by data set name (i.e.,
DATA.SET.NAME.G0000V00). If GDGENQ=YES parameter is
coded, Sterling Connect:Direct handles the ENQ logic. Sterling
Connect:Direct performs an exclusive SYSTEMS ENQ on QNAME
NDMGDG and uses the base GDG name as the RNAME.
This exclusive ENQ causes a serialization within any Sterling
Connect:Direct on the system. First, Sterling Connect:Direct issues a
LOCATE to find the current absolute generation number. Next,
Sterling Connect:Direct performs an exclusive SYSTEM ENQ on
QNAME SYSDSN and uses the data set name returned from
LOCATE as the RNAME. If successful, Sterling Connect:Direct then
performs dynamic allocation (SVC 99) on the data set name that
LOCATE returned.
If the ENQ is not successful, the process ends with an SDEGDGRI
error and allocation does not occur. The SYSDSN ENQ is not
released until the end of the COPY step. The NDMGDG ENQ on
the base is released (DEQueued) after the allocation is performed.
This value is the default.
If you code GDGALLOC = GENERATION, then for new non-SMS managed files,
you must use one of the IBM-approved methods of supplying DCB attributes. For
example, you could use one of these methods:
v Code a model DSCB in the Process DCB=(model DSCB data set name).
v Use an existing data set with the attributes desired for the new GDS data set
DCB=(cataloged data set name) in the Process.
v Have a model DSCB defined for the generation data group (GDG).
v Use the LIKE=(cataloged data set name) parameter in the Process.
340 IBM Sterling Connect:Direct for z/OS: Administration Guide

If you fail to use an approved method when creating new GDG data sets by
generation, you will receive an allocation error of 048C.
Modifiable through MODIFY INITPARMS command: YES
GDGENQ = YES|NO
This parameter specifies whether or not Sterling Connect:Direct uses ENQ on the
data set and on the base GDG before allocation to see if another address space or
task has this data set or base GDG allocated. This condition applies to output GDG
data sets only.
Note: Do not specify both GDGALLOC=GENERATION and GDGENQ=YES.
Sterling Connect:Direct will change GDGENQ=YES to GDGENQ=NO, and issue a
warning message, SITA203I, to indicate this change has been performed.
Value Description
YES Sterling Connect:Direct performs an ENQ on the entire data set (with the
G0000V00 appended to the base GDG name) if the Process is copying to an
output GDG data set. The ENQ fails if any job in the system has this data set
allocated (including Sterling Connect:Direct). Another ENQ is done for the
GDG base. This ENQ fails if a different job (excluding Sterling
Connect:Direct) has any generation of this GDG allocated. If either ENQ fails,
the Process is retried according to the ALLOC.CODES, ALLOC.RETRIES, and
ALLOC.WAIT initialization parameters. If GDGR is not specified in the
ALLOC.CODES, then the Process is not queued for retry.
The ENQs are not done for data set names coded in the Process as
data.set.GnnnnVnn, only for data sets that specify a relative generation, such
as (+1) (0) or (-1).
NO The GDGENQ parameter is disabled and no ENQ is done for GDG copies.
NO=default.
Modifiable through MODIFY INITPARMS command: YES
IMMEDIATE.SHUTDOWN = I | R | (I, nnn | 60) | (R, nnn | 60)
This parameter determines how an immediate shutdown issued through the STOP
CD command is executed.
Value Description
I The immediate shutdown waits for all Run Task programs to complete
before shutting down Sterling Connect:Direct. This value is the default
nnn | 60
This value specifies the number of seconds that Sterling Connect:Direct waits
after starting the SHUTDOWN before it forces the DTF to terminate. If the
wait time expires and Sterling Connect:Direct forces a shutdown, the
following message is displayed to the operator:
SITB999I SHUTDOWN IMMEDIATE timed out.
nnn=0 indicates that Sterling Connect:Direct does not have a time limit
within which it must shut down the DTF.
Chapter 17. Global Initialization Parameters 341

Value Description
R The immediate shutdown commands functions as a runtaskimm shutdown.
It terminates all executing Run Task Processes and shuts down Sterling
Connect:Direct.
nnn | 60
This value specifies how many seconds Sterling Connect:Direct waits after
starting the SHUTDOWN before it forces the DTF to terminate. If the wait
time expires and Sterling Connect:Direct forces a shutdown, the following
message is displayed to the operator:
SITB999I SHUTDOWN IMMEDIATE timed out.
nnn=0 indicates that Sterling Connect:Direct does not have a time limit
within which it must shut down the DTF.
Modifiable through MODIFY INITPARMS command: NO
INITPARM.BACKUP = member
Specifies the name of the partitioned data set member that contains the backup of
the global initialization parameter file. It is created when Sterling Connect:Direct
successfully initializes. In case Sterling Connect:Direct cannot start up successfully
after initparm updates have been applied, you can restore the initparms using this
member and then restart Sterling Connect:Direct.
Note: The PDS that is used for the INITPARMS in the PARM= of the JCL is the
data set used to hold the backup. Ensure that the PDS is large enough to hold both
the directory entry (with ISPF type stats) and this backup member.
Modifiable through MODIFY INITPARMS command: NO
INVOKE.ALLOC.EXIT = SEND|RECV|BOTH
Determines whether to invoke the allocation exit upon sending a file, receiving a
file, or both sending and receiving a file.
Value Description
SEND Invokes the allocation exit upon sending a file.
RECV Invokes the allocation exit upon receiving a file. This is the default
value.
BOTH Invokes the allocation exit upon both sending and receiving a file.
Modifiable through MODIFY INITPARMS command: YES
INVOKE.ALLOC.EXIT.ON.RESTART = NO|YES
Indicates whether to invoke the allocation exit on restart of a previously failed
Process.
Value Description
NO This value indicates whether to invoke the allocation exit on restart of a
previously failed Process. This is the default value.
342 IBM Sterling Connect:Direct for z/OS: Administration Guide

Value Description
YES This value indicates whether to invoke the allocation exit on restart of a
previously failed Process.
Modifiable through MODIFY INITPARMS command: YES
INVOKE.SPOE.ON.SNODEID = NO|YES
This parameter indicates whether to invoke Secure Point-of-Entry when a user
codes SNODEID = parameter on the PROCESS.
Value Description
NO Sterling Connect:Direct does not invoke Secure Point-of-Entry when a
user codes SNODEID = parameter on the PROCESS.
YES Sterling Connect:Direct invokes Secure Point-of-Entry when a user
codes SNODEID = parameter on the PROCESS.
Modifiable through MODIFY INITPARMS command: NO
MAX.AGE = (nnn , * | *(nnn) | ALL | ALL(nnn) | status_type |
status_type (nnn) , list)
This parameter specifies how many calendar days to wait before purging a
Process. You can also use this parameter to purge only Processes with a specific
status or define a different time to wait for each status type.
Note: Sterling Connect:Direct software does not automatically delete Processes
when you specify 0.
The following table explains the values.
Value Description
nnn The number of days to wait before purging a Process. The maximum value is
32767. After the specified number of days as passed, the Process is deleted. If
nnn=0, no MAX.AGE processing is performed.
* (asterisk) Purge all Processes.
ALL Purge all Processes with Hold queue error status types (HE, HO, HP, HS, RA,
and RH).
status_type Purge only specified status types (HE, HO, HP, HS, PR, RA, RH, HC, HI, HR,
WC, WT, or WX).
list Specify a list by separating entries with a comma.
Following are the queue status values you can select for automatic removal from
the TCQ.
Parameter Description
ALL This value indicates a request for all of the queue types for the MAX.AGE
parameter. If you specify ALL and another queue type, ALL is ignored.
HE This value indicates to automatically remove held for error (HE) status
values. This parameter is the default.
Chapter 17. Global Initialization Parameters 343

Parameter Description
HO This value indicates to automatically remove held for operator (HO) status
values.
HP This value indicates to automatically remove held due to Process error
(HP) status values.
HS This value indicates to automatically remove held for suspension (HS)
status values.
RA This value indicates to automatically remove held for restart due to
allocation error (RA) status values.
RH This value indicates to automatically remove restart held (RH) status
values.
The order of precedence for MAX.AGE subparameters is:
1. Any specified status types take precedence over the ALL subparameter and the
wildcard (*) subparameter.
2. The ALL subparameter (purge types HE, HO, HP, HS, RA, and RH) takes
precedence over the wildcard (*) subparameter.
3. The wildcard (*) subparameter (purge all valid status types) takes the last
precedence.
An example of the MAX.AGE parameter follows.
MAX.AGE=(10,*,ALL(4),HO(20),HI(0))
The following table explains the values in the example.
Value Description
10 The default number of days before a Process is removed from the Process
queue.
* All Process types are removed. Because no waiting period is specified for *, the
default of 10 days is used.
ALL(4) Processes with Hold queue error status types (HE, HO, HP, HS, RA, and RH)
are removed after 4 days in the Hold queue. Note that the 4-day waiting period
for Processes with these status types overrides the 10-day default waiting
period.
HO(20) Processes with an HO status type are purged after 20 days. As a result, they are
not purged when ALL or wildcard (*) Processes are purged.
HI(0) Processes with an HI status type are not eligible for purge because zero is
specified as the waiting period. They are never automatically purged from the
Hold queue.
In the following example, Processes in the PR queue are aged after one day.
Processes in any other queue or status are not aged:
MAX.AGE = (0,PR(1),*(0))
Modifiable through MODIFY INITPARMS command: YES
344 IBM Sterling Connect:Direct for z/OS: Administration Guide

MAX.AGE.TOD = time
This parameter specifies when to automatically purge a Process queue. If omitted,
the queue is purged at midnight and at Sterling Connect:Direct initialization. You
can use any valid Sterling Connect:Direct time format for the TIME parameter.
In the following example, the Process queue purge runs at 2:30 p.m.
MAX.AGE.TOD=14:30
Modifiable through MODIFY INITPARMS command: YES
MAXBATCH = number of users
This parameter specifies the maximum number of batch users that can sign on to
Sterling Connect:Direct at any one time. No other users are allowed to sign on
when this limit is reached. The range is from 0–512. If you use 0, this parameter is
not used and the signon limit is set by MAXUSERS. The default is the MAXUSERS
value.
Modifiable through MODIFY INITPARMS command: NO
MAXPRIMARY = number of PNODE sessions
A PNODE session is started when initiating a Process to one or more SNODEs.
This parameter specifies the maximum number of PNODE sessions that can be
active concurrently. The range is from 2 to 512. The default is 6.
Note: We recommend you code a MAXPROCESS value of 150 or less for
performance reasons. If you code MAXPROCESS, the value of this parameter can
be up to the MAXPROCESS. There is no advantage to setting it higher than
MAXPROCESS. If you do not code a MAXPROCESS, MAXPRIMARY +
MAXSECONDARY becomes the default for MAXPROCESS. In that case, the
combined values of MAXPRIMARY and MAXSECONDARY should equal 150 or
less.
Modifiable through MODIFY INITPARMS command: NO
MAXPROCESS = number of executing PNODE and SNODE Processes
This parameter specifies the maximum number of executing PNODE and SNODE
Processes allowed at one time. The value allowed is between 2 and 1024, inclusive.
The default is the value of MAXPRIMARY + MAXSECONDARY.
Modifiable through MODIFY INITPARMS command: NO
Note: Although 1024 is the maximum valid value for this parameter,
MAXPROCESS should be set to 150 or less.
MAXRETRIES = number of retries
This parameter specifies the maximum number of retries that is made to start a
node-to-node session. If Sterling Connect:Direct cannot start the session, any
Processes destined for the secondary node are placed in the timer queue for retries
(TI RE). After all retries are exhausted, they go into the HO WC (hold queue,
Chapter 17. Global Initialization Parameters 345

waiting connection). The range for MAXRETRIES is from 0–512. The default is 7.
For related information, see the WTRETRIES initialization parameter.
Modifiable through MODIFY INITPARMS command: YES
MAXSECONDARY = number of SNODE sessions
A SNODE session is started when receiving a Process from a PNODE. This
parameter specifies the maximum number of SNODE sessions that can be active
concurrently. The range is from 2 to 512. The default is 6.
Note: We recommend you code a MAXPROCESS value of 150 or less for
performance reasons. If you code MAXPROCESS, the value of this parameter can
be up to the MAXPROCESS. There is no advantage to setting it higher than
MAXPROCESS. If you do not code a MAXPROCESS, MAXPRIMARY +
MAXSECONDARY becomes the default for MAXPROCESS. In that case, the
combined values of MAXPRIMARY and MAXSECONDARY should equal 150 or
less.
Modifiable through MODIFY INITPARMS command: NO
MAXSTGIO = maximum storage used for sequential data set transfers
for system-determined NCP, maximum I/O storage for user-specified
NCP)
This parameter specifies the maximum amount of storage used for BSAM
sequential data set transfers. MAXSTGIO has two positional parameters that limit
the total I/O buffer size in different circumstances. The first is used to limit it
when the system determines the number of channel programs (NCP). The second
is used to limit it when you specify the NCP in the COPY statement. (The larger
the value, the better the I/O performance for sequential file transfers. However, the
larger the value, the larger the REGION size that may be required for the DTF.)
The valid value range for both parameters is 60000–8,388,608 (60K–8M). The
default value is 1048576 (1M).
v Sterling Connect:Direct uses these parameters to limit the number of
buffers/channel programs used for sequential I/O and calculates the NCP by
dividing the MAXSTGIO value by the block size of the data set being
transferred. The number of channel programs specified can range from 0 (to
have the system determine the value) to 255. For more information on how
Sterling Connect:Direct processes sequential data sets using BSAM, see How to
Improve BSAM Data Transfer Rates.
For example, if you specify the default of 1 MB for MAXSTGIO, the following
number of channel programs/buffers are allocated for data sets with the block
sizes listed in the following table. Also listed is the amount of storage required for
buffers for this transfer, which is a product of the block size and NCP.
BLKSIZE
Number of Channel
Programs/Buffers
Storage Used for
Transfer
80 255 20,400
4,080 192 783,360
6,400 128 819,000
27,998 32 895,936
346 IBM Sterling Connect:Direct for z/OS: Administration Guide

v The data sets in the above table did not take advantage of striping or Large
Block Interface (LBI) support, which affect BSAM sequential data set transfer
rates. In addition, the method for determining NCP did not vary—the NCP
values listed above were all system-determined. You can also specify the NCP
by using the second positional parameter of the MAXSTGIO initialization
parameter.
v If you specify a large value for MAXSTGIO, be sure to review the REGION size
specified for the DTF. The region size must be large enough to accommodate the
maximum number of sequential transfers that could take place at any one time,
multiplied by the value coded for MAXSTGIO, plus the normal amount of
region that the DTF requires.
Modifiable through MODIFY INITPARMS command: YES
MAX.TAPE = number of tape Processes | NONE
This parameter specifies the maximum number of tape Processes that are allowed
to start in a node.
Value Description
number of tape
Processes
The numeric range is 0–32767. The default is 10.
When this limit is reached, one of two events can occur to any Processes
that try to allocate a tape unit:
v The Processes end with a return code of 8 and a SDETAPRI message
v If the ALLOC.CODES initialization parameter includes the code TAPR,
the Processes are placed on the timer retry queue. They are then
retried the number of times specified in the ALLOC.RETRIES
parameter, at the interval specified in the ALLOC.WAIT parameter.
NONE This value indicates that the node does not perform tape Processing.
If you specify NONE, any Process that tries to copy from or to a tape on this node
ends with a return code of 8 and a SDETAPRI message. You can still copy from or
to tapes on the SNODE.
Modifiable through MODIFY INITPARMS command: NO
MAXUSERS = number of users
This parameter specifies the maximum number of interactive users and batch users
that can sign on to Sterling Connect:Direct at any one time. When this limit is
reached, no other users are allowed to sign on. The range for MAXUSERS is from
2–512. The default is 6.
Modifiable through MODIFY INITPARMS command: NO
MCS.CLIST = console operator CLIST library file name
This parameter specifies the file name of the CLIST library of the z/OS console
operator. This parameter is required for use of the console operator interface. No
default exists.
Modifiable through MODIFY INITPARMS command: NO
Chapter 17. Global Initialization Parameters 347

MCS.SIGNON = (SIGNON USERID = (user ID,password) NETMAP =
network map [optional parameters])
This parameter specifies the console Signon command of the operator for the
Operator interface.
Keyword Subparameter Description
USERID user ID The user ID of the console operator.
Password associated with the user ID of the console
operator.
NETMAP network map The VSAM file that identifies all valid Sterling
Connect:Direct nodes and applids in the network.
optional
parameters
Optional parameters associated with the SIGNON
command. These parameters are described in Managing
Sessions in the IBM Sterling Connect:Direct for z/OS User
Guide.
You must specify the SIGNON USERID and NETMAP keywords.
This parameter is required for installations that use the console operator interface.
You can specify all the parameters allowed on the SIGNON command here. There
is no default value.
If a signon without a password occurs in a stage1 exit, the authority is inherited
from the TSO user ID used for the signon. If a signon with a password occurs in a
stage1 exit, the authority of the user ID in the signon command is used.
Modifiable through MODIFY INITPARMS command: NO
MULTI.COPY.STAT.RCD=not set | CT | MC | M2
This parameter creates statistics records for files copied using the DGADSIOX I/O
exit and is particularly useful with the wildcard feature, which can produce large
numbers of files. When this parameter is set, a message is sent to the Console each
time the DGADSIOX I/O exit copies a file, regardless of what other types of
statistics records are being generated. For more information on the DGADSIOX
I/O exit, see Utility Programs in IBM Sterling Connect:Direct for z/OS User Guide.
By default, this initialization parameter is not set. Use the following table to
determine the conditions under which to use each setting.
Value Conditions for Use Description
Not set
v DGADSIOX I/O exit is not
used.
v Information for individual files
is needed.
No file completion statistics records are
created and no console messages are
produced.
CT
v DGADSIOX I/O exit is used.
v Pre-existing customer exits
detect files using CT records.
Produces a Copy Termination type of
statistics record.
348 IBM Sterling Connect:Direct for z/OS: Administration Guide

Value Conditions for Use Description
MC
v DGADSIOX I/O exit is used.
v Sterling Control Center is
installed and monitoring the
Sterling Connect:Direct server.
Produces a PDS Member Copy type of
statistics record, which replaces the
member name with the file name provided
by the ADRDSSU utility.
M2
v DGADSIOX I/O exit is used.
v None of the other conditions
apply.
Produces a “multiple copy” type of
statistics record, which shows the file
name, current return code, bytes processed
as reported by the IBM ADRDSSU utility,
and normal Step information.
Modifiable through MODIFY INITPARMS command: YES
NETMAP.CHECK = NO | (ALL | TCP, ALL | BOTH | NODENAME, FAIL |
WARN | PASS)
This parameter defines the communication types that perform NETMAP checking,
the verification to perform, and the action to take if the node does not exist. This
parameter is ignored for CTCA connections.
Value Description
NO This value indicates that the Sterling Connect:Direct node
attempting to establish a session with this Sterling
Connect:Direct node need not be defined in the network map at
this node. This feature is convenient when another Sterling
Connect:Direct node initiates contact the majority of the time.
ALL | TCP ALL enables NETMAP checking for all communication types
except for TCP/IP.
TCP enables NETMAP checking for TCP/IP communication.
Note: If you code NETMAP.CHECK = TCP, you must provide a
network map entry for each TCP/IP node. The adjacent node
entry must specify the logical node name, port number, TCP/IP
address, and a session type of TCP. For example:
ADJACENT.NODE=((UNIX.DALLAS,5555,199.5.5.5,TCP)
ENVIRONMENT = UNIX)
ALL | BOTH |
NODENAME
ALL or BOTH (for SNA) enables verification on both the logical
node name and APPLID/LUNAME.
ALL or BOTH (for TCP) enables verification on both the logical
node name and IP address.
NODENAME enables verification on the logical node name or
TCP Alias names.
FAIL | WARN | PASS FAIL indicates that access to the system is denied.
WARN indicates that access is allowed, but a warning message
is issued.
PASS indicates that access is allowed without any warning
message being issued.
Chapter 17. Global Initialization Parameters 349

You must define all three parameters to require that the Sterling Connect:Direct
node establishing a session with this Sterling Connect:Direct node be defined in the
network map of this node under certain conditions.
To enable NETMAP checking for all communication types, you must code the
NETMAP.CHECK parameter for each. Following is an example.
NETMAP.CHECK=(ALL,ALL,FAIL)
NETMAP.CHECK=(TCP,NODENAME,WARN)
v The first entry for NETMAP.CHECK causes Sterling Connect:Direct to check all
communication types, except for TCP, for both NODENAME and
APPLID/LUNAME.
v The second NETMAP.CHECK entry checks TCP nodes for NODENAME only. If
the node does not exist, Sterling Connect:Direct issues a warning message but
permits access.
Modifiable through MODIFY INITPARMS command: NO
NETMAP.CHECK.ON.CALL= YES | NO
Indicates how Sterling Connect:Direct handles a HOLD=CALL Process at submit
time.
Value Description
NO This value specifies that the PNODE permits a submit of a Process with
HOLD=CALL, even if the SNODE entry is not in the network map of the
PNODE. However, the TCP.IP.DEFAULT entry must be in the network map of
the PNODE. This value is the default.
YES This value specifies that the PNODE does not allow a submit of a Process
with HOLD=CALL, if the SNODE entry is not in the network map of the
PNODE (even if a TCP.IP.DEFAULT entry exists in the network map). If you
specify Yes, you must define the SNODE in the PNODE network map.
If you specify Yes, you must define the SNODE in the PNODE network map.
Modifiable through MODIFY INITPARMS command: YES
NODE.QUIESCE.OFF = NODENAME
This parameter indicates that all processing in the specified node is not suspended
until a Quiesce is issued with the MODIFY command. You can specify this
node-level parameter for as many nodes as required. Node-level initparms are
processed in the order specified.
The node name parameter is the 1–16 character local node name specified in the
network map of the affected node. You can also specify a partial node name with
the * and ? wildcard characters. If you specify * anywhere in the node name other
than the very end, you must enclose the node name in single quotes. For example,
the following parameter sets Quiesce to OFF on all node names that contain
DETROIT.
NODE.QUIESCE.OFF = '*DETROIT*'
350 IBM Sterling Connect:Direct for z/OS: Administration Guide

Refer to Suspending and Resuming Quiesce and Trace Settings for how to suspend
normal operations by setting SESSIONS to Q (Quiesce) with the MODIFY
command.
Modifiable through MODIFY INITPARMS command: NO
NODE.QUIESCE.ON = NODENAME
This parameter indicates that all processing in the specified node is suspended and
no new processing is permitted until a Resume is issued with the MODIFY
command. You can specify this node-level parameter to suspend processing for as
many nodes as required. Node-level initparms are processed in the order specified.
The node name parameter is the 1–16 character local node name specified in the
network map of the affected node. You can also specify a partial node name with
the * and ? wildcard characters. If you specify * anywhere in the node name other
than the very end, you must enclose the node name in single quotes. For example,
the following parameter suspends processing on all node names that contain
MIAMI.
NODE.QUIESCE.ON = '*MIAMI*'
If the parameter is issued on an SNODE to quiesce processing with a PNODE, the
session with the PNODE is established. However, as soon as the PNODE node
name is determined, the session is terminated. No processing of data occurs.
Use this parameter if you want to suspend processing on a node because of
problems, but want other nodes to continue processing. You can also use it if you
know that a node will be down for some time.
Refer to Suspending and Resuming Quiesce and Trace Settings for how to resume
normal operations by setting SESSIONS to R (Resume) with the MODIFY
command.
Modifiable through MODIFY INITPARMS command: NO
NODE.TRACE.OFF = NODENAME
Turns off tracing for a specified node. You can specify this node-level parameter
for as many nodes as required. Node-level initparms are processed in the order
specified.
The node name parameter is the 1–16 character local node name specified in the
network map of the affected node. Use the * and ? wildcard characters to specify
the node name. If you specify * anywhere in the node name other than the very
end, enclose the node name in single quotes. For example, the following parameter
disables tracing on all node names that contain DALLAS.
NODE.NODE.OFF = '*DALLAS*'
You can modify NODE.TRACE.OFF= settings using the MODIFY command. See
Sterling Connect:Direct MODIFY Command.
Modifiable through MODIFY INITPARMS command: NO
Chapter 17. Global Initialization Parameters 351

NODE.TRACE.ON = (NODENAME,nnnnnnnn)
Turns on a specific trace option or any combination of options for a specified node,
where nnnnnnnn represents a debug setting in hexadecimal. You can specify this
node-level parameter for as many nodes as required. Node-level initparms are
processed in the order specified.
The node name parameter is the 1–16 character local node name specified in the
network map of the affected node. You can use the * and ? wildcard characters to
specify the node name. If you specify * anywhere in the node name other than the
very end, you must enclose the node name in single quotes. For example, the
following parameter enables tracing on all node names that contain DENVER and
sets the debug bits to 80000000.
NODE.TRACE.ON = ('*DENVER*',80000000)
You can modify NODE.TRACE.ON= settings using the MODIFY command. See
Sterling Connect:Direct MODIFY Command.
See Debug Settings for a complete listing of the DEBUG settings, the trace types
produced, and the ddnames used for output.
Modifiable through MODIFY INITPARMS command: NO
NON.SWAPABLE = YES | NO
This parameter specifies whether Sterling Connect:Direct is marked as
non-swappable. When NON.SWAPABLE = YES, Sterling Connect:Direct is not
swapped out during periods of no activity.
Note: When Sterling Connect:Direct is running as a Sterling Connect:Direct/PLEX
or when CTCA has been initialized, NON.SWAPABLE is forced to YES. Otherwise,
this keyword controls the setting.
Modifiable through MODIFY INITPARMS command: NO
PDSE.SHARING = YES | NO
This parameter indicates if the zOS PDSE sharing feature is supported by Sterling
Connect:Direct. The keyword, PDSESHARING in the IGDSMSxx member in
SYS1.PARMLIB , which defines the level of PDSE sharing across subsystems of a
sysplex, has two possible values:
v NORMAL sharing allows users to share a PDSE only at a data set level.
v EXTENDED sharing allows users to share a PDSE at both a data set level and
member level.
For more information on PDSE sharing, including requirements, and test scenarios
and results for both the normal and extended mode, refer to the , which you can
find at IBM Redbook Partitioned Data Set Extended (PDSE) Usage Guide.
352 IBM Sterling Connect:Direct for z/OS: Administration Guide

CAUTION:
Because PDSE sharing allows multiple users to open the same PDSE member
for output, some operations may destroy directories and create data integrity
problems. The last user to issue the STOW macro, which replaces an entry on
the directory, gets their update permanently applied to the member. To ensure
that updates are not lost, keep this consideration in mind so that users can take
the appropriate steps.
When you initialize Sterling Connect:Direct, the IGWLSHR callable service is used
to verify that the operating system can support PDSE sharing. If the operating
system cannot support this PDSE sharing level, the SITA641W error message
Level of PDSE.SHARING is not supported
will display and initialization will continue as if the PDSE.SHARING parameter
had been specified as NO.
Value Description
YES Sterling Connect:Direct will support PDSESHARING as defined by the
operating system.
Note: You must specify SHR as the disposition (DISP) keyword so that you
can share a particular data set with other jobs. All other dispositions – OLD,
NEW, RPL, and MOD – will continue to serialize the PDSE to ensure that
multiple Sterling Connect:Direct processes cannot share the same PDSE.
NO Sterling Connect:Direct will not support PDSE sharing. If multiple processes
attempt to open the same PDSE for output at the same time, the processes
terminate with one of the following error messages:
v SDEPDSRI – PDS already open for output by Sterling Connect:Direct.
v SDE0210I – Requested data set not available. Allocated to another job.
In addition, the processes are placed in the appropriate queue and retried
according to any initialization parameters specified.
Modifiable through MODIFY INITPARMS command: YES
Chapter 17. Global Initialization Parameters 353

PDSENQ = YES | NO
This parameter specifies whether or not Sterling Connect:Direct serializes access of
output PDSes for simultaneous directory updates from Sterling Connect:Direct and
ISPF EDIT or the IBM linkage editor.
Value Description
YES An ISPF/IEWL ENQUEUE (or RESERVE if the device is shared) is
issued to serialize access for output PDS data sets opened with DISP =
SHR. Use of PDSENQ does not prevent simultaneous directory updates
from batch jobs or other sources that do not issue the same enqueues. If
the ENQ or RESERVE fails, DATA SET IN USE allocation error is
issued. The Process retries later if 0210 is specified in the
ALLOC.CODES initialization parameter. Because the ISPF editor only
enqueues a member of a PDS when an ISPF SAVE of the member is
issued, a user can be in edit on the member from a PDS to which
Sterling Connect:Direct is trying to copy. If you attempt to save a
member being edited at the same time that Sterling Connect:Direct is
copying to that PDS, the TSO/ISPF session hangs until the Sterling
Connect:Direct COPY operation is complete. When the Sterling
Connect:Direct COPY operation completes, the ISPF SAVE command
executes, thereby overlaying the member that are recently copied by
Sterling Connect:Direct.
NO An ISPF/IEWL ENQUEUE is not issued.
Modifiable through MODIFY INITPARMS command: YES
PROCESS.RETENTION = YES | NO
This parameter saves a PNODE Process to the PR queue and retains the completed
Process for a period of time. Retaining a Process allows you to troubleshoot
problems with a completed Process or with the use of symbolics.
Because a Process will be stored on the TCQ longer, increase the TCQ space before
activating this parameter. (For more information on enlarging the TCQ, see
Planning the Installation in IBM Sterling Connect:Direct for z/OS Configuration Guide.)
A Process remains in the PR queue until you delete it using the DELETE command
or it is removed when space is needed or based on the values defined in the
MAX.AGE and MAX.AGE.TOD parameters. Use the TCQ.THRESHOLD parameter
to identify when to delete Processes in the PR queue, to make space available for
newly submitted Processes.
Changing the parameter to NO will not delete Processes from the PR queue. It will
prevent more Processes from being added to the PR queue.
Value Description
YES After a PNODE Process is complete, it is moved to the PR queue to allow
you to troubleshoot a problem with a Process or to view PNODE Processes
that have executed.
NO Completed PNODE Processes will not be added to the PR queue. This is the
default.
SNODE Processes cannot be moved to the PR queue.
The TCQ.THRESHOLD parameter is the auto-deletion threshold for the PR queue.
354 IBM Sterling Connect:Direct for z/OS: Administration Guide

Modifiable through MODIFY INITPARMS command: NO
PRTYDEF = Process priority
This parameter specifies the default priority for Processes submitted to Sterling
Connect:Direct. If you do not specify priority on the Process statement, Sterling
Connect:Direct uses the default priority when placing the Process on the TCQ. The
priorities range from zero to 15, with 15 the highest priority. The default is 10. This
parameter is not valid for LU6.2 and TCP/IP flows.
Modifiable through MODIFY INITPARMS command: YES
QUIESCE = YES | NO
This parameter specifies whether or not Sterling Connect:Direct holds Processes
from execution.
Value Description
YES No DTF-to-DTF sessions are started, but you can establish interactive
sessions. Any Process to be executed is placed in the WAIT queue.
Refer to Suspending and Resuming Quiesce and Trace Settings for
information on how to resume normal operations by setting SESSIONS
to R (Resume) with the MODIFY command.
NO Sterling Connect:Direct does not hold Processes from execution.
In a Sterling Connect:Direct/Plex environment, this parameter applies to all
Sterling Connect:Direct/Servers.
Note: When you initialize Sterling Connect:Direct for the first time with allocation
to a TCQ created by DGADTQFX it is recommended that you specify YES for the
QUIESCE parameter. After you delete any unwanted Processes from the TCQ, DTF
activity can be resumed using the Modify command.
Modifiable through MODIFY INITPARMS command: NO
QUIESCE.NODE = node name
If you are using the QUIESCE.NODE parameter, you are encouraged to use the
NODE.QUIESCE.ON parameter as it provides equivalent functionality with
enhanced capabilities. The QUIESCE.NODE parameter is still supported.
This parameter indicates that all processing in the specified node is suspended and
no new processing is permitted until a Resume is issued with the MODIFY
command. You can specify this parameter up to 15 times, which suspends
processing on up to 15 nodes.
The node name parameter is the 1–16 character local node name specified in the
network map of the affected node. You can also specify a partial node name
followed by an asterisk (*). For example, the following parameter suspends
processing on all node names that begin with NODE.CHICAGO.
QUIESCE.NODE = NODE.CHICAGO*
Chapter 17. Global Initialization Parameters 355

If the parameter is issued on an SNODE to quiesce processing with a PNODE, the
session with the PNODE is established. However, as soon as the PNODE node
name is determined, the session is terminated. No processing of data occurs.
Use this parameter if you want to suspend processing on a node because of
problems, but want other nodes to continue processing. You can also use it if you
know that a node will be down for some time.
Refer to Suspending and Resuming Quiesce and Trace Settings for how to resume
normal operations by setting SESSIONS to R (Resume) with the MODIFY
command.
Modifiable through MODIFY INITPARMS command: NO
REMOTE.DUMMY.PASSWORD = [ YES | INTERNAL ]
This parameter controls whether Signon and Process Start is authorized for remote
nodes if a dummy password was specified during Signon.
Value Description
YES Any remote can specify a dummy password to obtain Signon and
Process Start authorization on the local node.
INTERNAL Requires the remote node to have the Adjacent Node attribute of
INTERNAL (see Trusted Node Security) for the authorization to occur.
Modifiable through MODIFY INITPARMS command: NO
REQUEUE = YES | NO
This parameter specifies whether to requeue Processes which ABEND, such as an
x37, or with a return code greater than 4, or to allow any subsequent steps to run,
or go to Process termination.
Value Description
YES Places the Process in the hold queue if it did not end with any of the errors
listed above but ABENDed with a return code greater than 4 and one of the
following is true:
v The Process or SUBMIT command has REQUEUE = YES
v Neither the Process nor the SUBMIT command has REQUEUE specified,
but REQUEUE = YES is specified in the initialization parameters
v The data set on the PNODE side is a tape data set
NO Executes the remaining steps in a Process following a failed COPY STEP,
but the failed COPY STEP is not requeued. If REQUEUE is specified on a
PROCESS or SUB statement, it overrides the initialization REQUEUE
specification.
This parameter is only effective if checkpointing is in use. REQUEUE only applies
to the PNODE, or submitting side that has Process control.
REQUEUE is not effective under any of the following conditions:
v SHUTDOWN IMMEDIATE is requested
v Session error caused the Process to terminate
356 IBM Sterling Connect:Direct for z/OS: Administration Guide

YES places the Process in the hold queue if it did not end with any of the errors
listed above but ABENDed with a return code greater than 4 and one of the
following is true:
v The PROCESS or SUBMIT command has REQUEUE = YES
v Neither the PROCESS nor the SUBMIT command has REQUEUE specified, but
REQUEUE = YES is specified in the initialization parameters
v The data set on the PNODE side is a tape data set
If a dynamic allocation error occurs, the Process goes to ALLOCATION RETRY.
When the specified number of allocation retries is exhausted and if REQUEUE =
YES is specified, the Process is placed in the hold queue with a status of HO RA
(HO = Held by Operator; RA = Held for Restart Due to Allocation Error).
If the Process is ABENDed, the status on the hold queue is HE (hold/error). If the
Process received a return code greater than 4, the status is RH (restart/held).
Modifiable through MODIFY INITPARMS command: YES
RESET.ORIGIN.ON.SUBMIT = YES | NO
This parameter resets the originating node.
Parameter Description
YES The originating node is set to the node where the submit is issued. This
action applies to all connection types.
NO The originating node is not set to the node where the submit is issued.
This parameter only affects Processes submitted to the SNODE that use SNODEID
or SUBMIT. If you use this parameter, both the sending and receiving nodes must
use this parameter. Also test its impact, especially if you or your trading partner
use Secure Point-of-Entry (SPOE). If you use SPOE and apply this parameter, you
may need to update AUTHFILE entries for user ID/node combinations used by
SPOE.
Modifiable through MODIFY INITPARMS command: YES
REUSE.SESSIONS = YES | NO
Enables you to control the use of the sessions initiated by the local node. When
you select a Process for execution between two nodes, control of the session is
negotiated. If only one DTF has work destined for the other DTF, then the DTF
with work to process controls the session. If they both have work to process, then
the one with the higher priority work controls the session. This negotiation takes
place at the completion of each Process. It is possible for the local DTF to initiate a
session and be significantly delayed in utilizing that session based on the workload
of the partner DTF.
Value Description
YES The previously allowed negotiation takes place as described.
NO The remote DTF is not allowed to utilize the sessions established by the
local DTF. (Sterling Connect:Direct does not allow Processes that are
waiting for an eligible session to run when an SNODE session becomes
available.)
Chapter 17. Global Initialization Parameters 357

Modifiable through MODIFY INITPARMS command: YES
ROUTCDE.CRIT = (route code)
This parameter specifies the route code used for critical WTO messages. You can
specify as many as 16 codes. Suppress these messages by typing 0 for the route
code.
ROUTCDE.CRIT = (2,8) specifies master console information and teleprocessing
control.
ROUTCDE.CRIT = (8,11) specifies teleprocessing control and programmer
information. This value is the default.
Modifiable through MODIFY INITPARMS command: YES
ROUTCDE.NORM = (route code)
This parameter specifies the route code used for normal WTO messages. You can
specify up to 16 codes. You can suppress these messages by typing 0 for the value.
ROUTCDE.NORM = (2,11) specifies master console information and programmer
information.
ROUTCDE.NORM = (11) specifies programmer information. This value is the
default.
Modifiable through MODIFY INITPARMS command: YES
ROUTCDE.TAPE = (route code)
This parameter specifies the route code used for the tape mount message issued by
Sterling Connect:Direct for z/OS. You can specify as many as 16 codes. A
specification of 0 suppresses the tape mount message.
ROUTCDE.TAPE = (3,5,11) specifies tape pool, tape library, and programmer
information.
ROUTCDE.TAPE = (5,11) specifies tape library and programmer information. This
value is the default.
Note: If ROUTCDE.TAPE = 0 is coded and TAPE.PREMOUNT = NO, then the
z/OS system mount processing at allocation time holds an ENQ on SYSZTIOT
until mount is satisfied.
Modifiable through MODIFY INITPARMS command: YES
RUN.JOB.EXIT = modname
This parameter specifies the name of the Sterling Connect:Direct module
responsible for user read/write control of job streams. The module name can be
from 1–8 characters long. The first character must be alphabetic. No default exists
for this parameter.
Specify one of the following interface programs to use with Sterling Connect:Direct
for z/OS:
358 IBM Sterling Connect:Direct for z/OS: Administration Guide

v RUN.JOB.EXIT = DGAXACRJ (CA-ACF2)
v RUN.JOB.EXIT = DGAXRACJ (IBM RACF and CA-TOP SECRET)
Sample programs are provided as part of the Sterling Connect:Direct for z/OS
sample library. They may not meet the normal security requirements of an
installation. Modify them accordingly.
You must define a user on all nodes involved in Process execution.
Modifiable through MODIFY INITPARMS command: NO
RUNJOBID = USER | CD
This parameter specifies security environment in force for Sterling Connect:Direct
RUNJOB Processes.
Value Description
USER This value specifies that the Process runs under the ID of the user. This value is
the default.
CD This value specifies that the Process runs under the Sterling Connect:Direct
DTF ID.
Modifiable through MODIFY INITPARMS command: NO
RUN.TASK.EXIT = modname
This parameter specifies the name of the module responsible for verifying that a
user is authorized to run a specified program in the DTF address space. The
modname can be from 1–8 characters; the first character must be alphabetic. No
default exists for this parameter.
Specify one of the following interface programs to use with Sterling Connect:Direct
for z/OS:
v RUN.TASK.EXIT = DGAXACFT (CA-ACF2)
v RUN.TASK.EXIT = DGAXRACT (for IBM RACF and CA-TOP SECRET)
v RUN.TASK.EXIT = DGAXSAFT (CA-ACF2 with SAF enabled)
Sample programs are part of the Sterling Connect:Direct for z/OS sample library.
They may not meet the normal security requirements of an installation. Modify
them accordingly.
You must define a user on all nodes involved in Process execution.
Modifiable through MODIFY INITPARMS command: NO
RUNTASK.RESTART = YES | NO
This parameter determines whether a RUN TASK program executes at restart if
Sterling Connect:Direct is unable to determine whether the program has run.
Value Description
YES RUN TASK program executes at restart if Sterling Connect:Direct is unable to
determine whether the program has run
Chapter 17. Global Initialization Parameters 359

Value Description
NO RUN TASK program does not executes at restart if Sterling Connect:Direct is
unable to determine whether the program has run
This parameter corresponds to the node where the RUN TASK step executes. For
example, if the RUN TASK step is running on the SNODE, the coding of the
RUNTASK.RESTART parameter on the SNODE determines whether the RUN
TASK program executes at restart.
Modifiable through MODIFY INITPARMS command: YES
S+CMD.ENFORCE.SECURE.CONNECTION = YES | NO
This parameter specifies whether Sterling Connect:Direct Secure Plus commands
are accepted from the Sterling Connect:Direct client API on nonsecure connections.
Value Description
YES Sterling Connect:Direct will enforce a secure connection, that is, it will not
accept Sterling Connect:Direct Secure Plus commands from a client API on a
nonsecure connection.
NO Sterling Connect:Direct accepts Sterling Connect:Direct Secure Plus commands
from a client API on a nonsecure connection.
Modifiable through MODIFY INITPARMS command: NO
SECURE.DSN = filename
This parameter specifies the Sterling Connect:Direct Secure Plus parameters file.
Note: To enable FIPS mode, you must specify a filename for this parameter.
Modifiable through MODIFY INITPARMS command: NO
SECURE.SSL.PATH.PREFIX = prefix
This parameter specifies the prefix location of the key database that contains the
certificates for the SSL protocol. Use this parameter if you are using SSL security
with the Sterling Connect:Direct Sterling Connect:Direct Secure Plus and you are
operating in a CD/Plex environment.
Modifiable through MODIFY INITPARMS command: NO
SECURITY.EXIT | SECURITY
This parameter specifies the name of the Sterling Connect:Direct exit which
performs security checking. A sample security exit, DGAMGSAF, is provided in the
$CD.SDGASAMP library. You can modify this exit if it does not meet your security
requirements.
Value Description
module name A name 1–8 alphanumeric characters long, with the first character
alphabetic.
360 IBM Sterling Connect:Direct for z/OS: Administration Guide

Value Description
DATASET Specifies that the exit is invoked only for file security; the Sterling
Connect:Direct Authorization Facility is used for access (signon)
security.
ALL Specifies that the exit is invoked for file and access security.
PSTKT Indicates that the local DTF IBM RACF security is defined to accept
IBM RACF PassTicket passwords. For more information, see Generating
IBM RACF PassTickets .
OFF Specifies that no security exists; all requests are valid.
If you do not specify the SECURITY.EXIT parameter or it is commented out of the
initialization parameters file, customized security is not performed and the Sterling
Connect:Direct Authorization Facility (AUTH file) is used.
For the first installation of Sterling Connect:Direct for z/OS, specify
SECURITY.EXIT = OFF until a security exit is installed.
A user must be defined on all nodes involved in Process execution.
The default is the Sterling Connect:Direct Authorization Facility.
Note: You can also code this parameter as SECURITY=
Modifiable through MODIFY INITPARMS command: NO
SECURITY.NOTIFY = YES | NO | HOLD
This parameter specifies whether Sterling Connect:Direct sends a message to users
informing them of security failures on Processes they have submitted.
Value Description
YES Specifies that Sterling Connect:Direct sends a message to users informing
them of security failures on Processes they have submitted. If you set the
SECURITY.NOTIFY initialization parameter to YES and you specify NOTIFY
= %USER or NOTIFY = user ID on the Process statement, a security failure
sends a TSO notification to the user specified in the NOTIFY parameter of a
SUBMIT or PROCESS statement.
NO Specifies that Sterling Connect:Direct does not send a message to users
informing them of security failures on Processes they have submitted.
HOLD Specifies that Sterling Connect:Direct places Processes in the Hold queue
with a status of HE if the other node returns an error during performance of
security checking.
The following scenarios could occur with this parameter:
v SECURITY.NOTIFY = NO and a Process has NOTIFY = user ID specified. If a
stage 2 security error occurs on the SNODE, the user ID is not notified. The user
ID is notified of all other errors or normal completion. All messages and return
codes are in the Statistics File.
v SECURITY.NOTIFY = YES and a Process does not specify NOTIFY. The user is
not notified of any errors or normal completion. All messages and return codes
are in the Statistics File.
Chapter 17. Global Initialization Parameters 361

v SECURITY.NOTIFY = YES and a Process has NOTIFY = user ID specified. If a
stage 2 security error occurs on the SNODE, the user ID is notified. The user ID
is also notified of all other errors or normal completion. All messages and return
codes are in the Statistics File.
Modifiable through MODIFY INITPARMS command: NO
SNA = YES | NO
This parameter specifies if Sterling Connect:Direct initializes with SNA support.
You must also specify a valid VTAM APPLID in the local node record of the
NETMAP.
Value Description
YES Sterling Connect:Direct tries to open the VTAM ACB. If it cannot open the
ACB, Sterling Connect:Direct prompts the operator for the next action.
NO Only Processes running under TCP/IP or CTCA run or connect to the DTF.
If you change this parameter to SNA = NO after Sterling Connect:Direct initializes,
you must restart Sterling Connect:Direct.
Modifiable through MODIFY INITPARMS command: NO
SNMP = YES | NO
Initializes the SNMP trap agent environment.
Value Description
YES Enables the SNMP trap agent environment.
NO Disables the SNMP trap agent environment.
Modifiable through MODIFY INITPARMS command: YES
SNMP.DSN = data set name | data set name (member)
This parameter identifies the data set used by the SNMP task to initialize the
default trap variables and user defined trap triggers. The data set contains the trap
events that you want to disable and any trap triggers you define. All traps are
enabled by default. A sample data set is installed in the $CD.SDGASAMP library
called DGAXSNMP .
Modifiable through MODIFY INITPARMS command: YES
SNMP.MANAGER.ADDR = hostname | IP address
This parameter determines the TCP/IP address or hostname of the host where the
SNMP network manager is initialized. By default, this address is the same as the
Sterling Connect:Direct TCP/IP address, or the local hostname. In a Sterling
Connect:Direct/Plex environment, the default is the TCP/IP address for the
Sterling Connect:Direct Manager. You may specify the IP address as an IPV4 or
IPV6 address.
362 IBM Sterling Connect:Direct for z/OS: Administration Guide

This parameter is required if the SNMP network manager resides on a different
host or is required to use a different TCP/IP address.
Modifiable through MODIFY INITPARMS command: YES
SNMP.MANAGER.PORTNUM = port-number
This parameter is the TCP/IP port that is defined for UDP traffic to the SNMP
network manager. The default is port number 162. If the defined UDP port number
is something other than 162, this parameter is required.
Modifiable through MODIFY INITPARMS command: YES
STAT.ARCH.CONFIRM = YES | NO
This parameter indicates whether or not Sterling Connect:Direct is to have
confirmation that the contents of a statistics file pair are archived before erasing
them and reusing the file pair to record new information.
Value Description
YES Specifies that Sterling Connect:Direct requires confirmation before
reusing the file. The Sterling Connect:Direct for z/OS utilities
DGADARRT and DGADARBT provide archive confirmation. You can
invoke these utilities from an archive Process or an archive batch job,
respectively.
If archive confirmation has not occurred at the time a file is to be
switched to and therefore erased, Sterling Connect:Direct issues a
WTOR requesting operator permission to overwrite the file. DTF
activity halts until you type a response to the WTOR. An affirmative
response causes an immediate file pair switch. A negative response
disables the statistics logging function, but the DTF remains active.
NO Specifies that Sterling Connect:Direct erases the file contents at the time
of a pair switch regardless of whether indication that the file was
archived is received.
Note: If you code the STAT.ARCH.CONFIRM parameter as YES, then
also specify the STAT.SWITCH.SUBMIT parameter.
Modifiable through MODIFY INITPARMS command: NO
STAT.BUFFER.ESDSDATA | STAT.BUFFER.KSDSINDX |
STAT.BUFFER.KSDSDATA
This parameter specifies the number of buffers VSAM allocates for the statistics
clusters. Sterling Connect:Direct uses the values when generating VSAM access
method control blocks (ACBs) for the statistics files. Generating these blocks
provides a means of tuning VSAM performance for statistics file access in the DTF.
Sterling Connect:Direct specifies separate buffers for the index and data
components for the key sequenced clusters. Each buffer is the size of the control
interval of the specified component.
Note: These buffers are allocated above the 16 megabyte line.
The syntax for this parameter is as follows:
Chapter 17. Global Initialization Parameters 363

STAT.BUFFER.ESDSDATA = number of ESDS data buffers
STAT.BUFFER.KSDSINDX = number of KSDS index buffers
STAT.BUFFER.KSDSDATA = number of KSDS data buffers
The defaults are:
v STAT.BUFFER.ESDSDATA = 6
v STAT.BUFFER.KSDSINDX = 6
v STAT.BUFFER.KSDSDATA = 6
Modifiable through MODIFY INITPARMS command: NO
STAT.ERROR = ABEND | DISABLE
This parameter specifies the action of the DTF for certain types of errors which can
occur in the Statistics Facility, such as VSAM errors or repeated ABENDs.
Value Description
ABEND Specifies that the DTF ABENDs with U3400. This value is the default.
DISABLE Specifies that the Statistics Facility is disabled but the DTF remains
active. The DTF operates normally. However, no statistics records are
written.
When an ABEND occurs within the Statistics Facility, an SVC dump is written to a
SYS1.DUMPxx data set and recovery is attempted. After five recovery attempts, the
DTF ABENDs with U3400 or the Statistics Facility is disabled, depending on the
value specified for the STAT.ERROR parameter.
Modifiable through MODIFY INITPARMS command: NO
STAT.EXCLUDE = (record type list)
This parameter specifies what record types to exclude from the statistics log. The
system does not pass excluded records to the statistics exit. The 2-character
identifiers specify the record types in the list. Refer to “Statistics Records” on page
182 for a complete list of record type identifiers.
You can also selectively exclude using the Statistics exit. See “Recording Statistics
for Specific Record Types” on page 254 for more information. You can also turn
recording of specific record types on and off during DTF execution using the
STATISTICS ON/OFF API command.
The following example excludes PDS member records from the statistics log.
STAT.EXCLUDE = (MC)
Statistics records are often useful or indispensable in debugging problems.
Excluding records from the statistics log makes problem determination difficult. Do
not exclude the following record types:
Record Type Description
CT Copy Termination
PS Process Submit
364 IBM Sterling Connect:Direct for z/OS: Administration Guide

Record Type Description
PT Process Termination
RJ Run Job
RT Run Task
SW Submit within Process
WO Write to Operator (WTO)
No default exists for this parameter.
Modifiable through MODIFY INITPARMS command: YES
STAT.INIT = WARM | COLD
This parameter specifies whether to erase the contents of the statistics files for the
DTF at initialization.
Value Description
WARM Specifies that the system does not erase the contents at DTF initialization. In this
case, statistics from prior DTF executions are available in the new execution.
This value is the default.
COLD Specifies that the system erases all preexisting records. Only records generated
during the current execution are available.
Modifiable through MODIFY INITPARMS command: NO
STAT.QUEUE.ELEMENTS = statistics record queue size
This parameter specifies the size of the queue that holds statistic records to be
written.
The range of the STAT.QUEUE.ELEMENTS initialization parameter is 1-9999
elements, with a default of 100. A queue that is too small can degrade system
performance, whereas a queue that is too large can cause wasteful storage
allocation above the 16 megabyte line. In a Connect:Direct Plex environment, the
queue element number is calculated by taking the CDPLEX.MAXSERVER value,
adding 1 (for the manager) and then multiplying it by the
STAT.QUEUE.ELEMENTS value. If this is less than 5000, then 5000 is used. If
greater than 10000, then 10000 is used.
When a Sterling Connect:Direct task writes a statistic record, it queues the record
to be written to the statistics facility asynchronously. The statistics facility then
processes the queue and writes the statistics record. This parameter controls the
size of this queue. When the queue becomes full, tasks that write a statistics record
are held until a slot in the queue becomes available.
You should choose the size of the queue based on how busy Sterling
Connect:Direct is expected to be during peak-use periods. A lightly loaded system
(up to 5 Processes executing concurrently) can run with a small queue, so the
default queue size of 100 elements is usually adequate. Busier systems require a
larger queue (200-1500 elements) to avoid performance degradation caused by
queue contention.
Chapter 17. Global Initialization Parameters 365

There are two size considerations for the statistics queue, the total size and the
threshold size. The total size is initially specified by the value of the
STAT.QUEUE.ELEMENTS initialization parameter, and can be adjusted if
necessary. Each stat queue element takes up 2 KB of space and is allocated above
the 16 megabyte line. The threshold size is a value smaller than the total size, and
represents a portion of the queue that is reserved for peak-use periods. This helps
to improve queue availability under a high workload. The threshold size is
calculated automatically, and is usually one-fourth the total size. If the threshold
size is inadequate, the total queue size should be increased.
Note: To ensure that an adequate amount of virtual storage above the line is
allocated for the queue holding the statistics records in a Sterling
Connect:Direct/Plex environment, specify REGION=0M on the job card that starts
Sterling Connect:Direct. For more information about storage requirements, see
Planning the Installation in IBM Sterling Connect:Direct for z/OS Configuration Guide.
Modifiable through MODIFY INITPARMS command: NO
STAT.SNODEID = (NO | YES,NO | YES)
This parameter specifies whether the submitter’s ID should be placed in the
statistics record. The first subparameter applies to version 1 flows (SNA-LU0) and
the second subparameter applies to version 2 flows (SNA-LU6.2/TCP).
Note: STAT.SNODEID affects the user ID (original submitter ID or SNODEID)
which is used to execute a SUBMIT within a Process, instead of affecting just the
submitter’s ID in the statistics record.
A value of YES causes the SNODEID, if present, to be placed in the statistics
record.
A value of NO causes the submitter's ID to be placed in the statistics record.
Modifiable through MODIFY INITPARMS command: NO
STAT.SWITCH.SUBMIT = dsn [member]
This parameter enables a site to name a sequential data set or a member of a PDS
that contains a Process to be submitted at statistics file pair switch time. Use this
feature to submit a Process that archives the statistics file pair that has just filled.
Alternatively, the Process can submit a batch job which in turn archives the
statistics records.
Note: The STAT.SWITCH.SUBMIT parameter is identical in format to the DSN
parameter of the Sterling Connect:Direct SUBMIT statement. See the Connect:Direct
Process Language help for information on the SUBMIT statement.
If you code the STAT.ARCH.CONFIRM parameter as YES, then also specify the
STAT.SWITCH.SUBMIT parameter.
Sterling Connect:Direct internally generates a SUBMIT command to submit the
Process, and specifies a single symbolic parameter, &EDSN. The symbolic
parameter &EDSN specifies the data set name of the entry sequenced cluster just
filled. Therefore, the DTF supplies to the archive Process the name of the ESDS
cluster to archive.
366 IBM Sterling Connect:Direct for z/OS: Administration Guide

You can make archived statistics records available to the SELECT STATISTICS
command by copying them to a VSAM entry sequenced cluster, and then use the
DGADBKEY utility to recreate the associated index information in a VSAM key
sequenced cluster.
No default exists for this parameter.
Modifiable through MODIFY INITPARMS command: NO
STAT.SWITCH.TIME = (hh:mm:ss , ...)
This parameter specifies times of day to perform a statistics file switch. The
STAT.SWITCH.TIME is in 24-hour clock format. You can specify up to four times
in this parameter. The system initiates a switch whenever one of the named times
occurs, regardless of whether the currently active files are full. If you do not
specify the STAT.SWITCH.TIME parameter, switching occurs whenever a file pair
becomes full or in response to the API command STATISTICS SWITCH.
Modifiable through MODIFY INITPARMS command: NO
STAT.TPREC = (start_time, end_time, snaps_per_hour)
This parameter instructs Sterling Connect:Direct to create a statistics record that
contains the number of Processes and the amount of data sent and received for a
node. You can use the statistics record for load balancing and tracking trends.
Value Description
start_time This value indicates the start time for the statistics records creation. The
valid format is hh:mm:ss.
Valid values are 00:00:00 through 23:59:59.
end_time This value indicates the time when the statistics record generation ends.
The valid format is hh:mm:ss.
Valid values are 00:00:00 through 23:59:59.
snaps_per_hour Valid values are 1–60. If you specify a value of 1, Sterling
Connect:Direct takes one snapshot per hour. If you specify a value of
60, Sterling Connect:Direct takes one snapshot per minute, or 60 per
hour. No default exists for this parameter.
Modifiable through MODIFY INITPARMS command: NO
STAT.USER = (user ID, [password])
This parameter specifies the security ID under which the statistics log is written
and any archive Process or batch job runs. Use this parameter when implementing
a stage 2 security exit.
A system task (a separate TCB) does the writing of the statistics files to minimize
the impact of statistics logging on the throughput of the DTF. File pair switching
and archive Process submission is also done by this task. Such processing is done
in the background within the DTF, and therefore, has less impact on other activity.
Sterling Connect:Direct for z/OS creates this task using the security user ID from
the STAT.USER parameter. The system also propagates the user ID to the archive
Process and to any batch jobs the archive Process submits.
Chapter 17. Global Initialization Parameters 367

If your site is running with full stage 1/stage 2 security implemented, it is not
necessary to supply the password with this parameter.
Value Description
user ID Specifies the security ID that Sterling Connect:Direct passes to a security exit.
It contains 1–8 characters.
Note: Certain Sterling Connect:Direct statistics records are written with the
STAT.USER ID in their user ID field. For example, the S2 records that contain
information about the statistics logging Process are written with this ID.
Because user ID is one of the indexed statistics record fields, specifying a
unique ID facilitates the rapid retrieval of these records through the SELECT
STATISTICS command when the TYPE and USER selection criteria are
specified.
password Specifies the current security password. The security exit uses this parameter
to validate the current security password.
If you do not specify this parameter, or if you do not implement the stage 2
security exit, the statistics logging task runs with the security ID of the DTF job,
and with the user ID of NDM. In this case, the TP and S2 records are written with
NDM in their user ID fields.
Modifiable through MODIFY INITPARMS command: NO
STATISTICS.EXIT = modname | (modname[,MANAGER | SERVER |
BOTH])
This parameter specifies the name of the Sterling Connect:Direct statistics exit
module you can invoke to complement the Sterling Connect:Direct statistics
gathering functions. Use this program to log Sterling Connect:Direct information,
perform IBM system management facilities (SMF) functions, and log custom
information. To use this feature, you must explicitly code this initialization
parameter and supply a module name—the default is no security exit.
For more information on the Sterling Connect:Direct sample statistics exits, which
are located in the $CD.SDGASAMP library, see Sample Statistics Exits.
In a Sterling Connect:Direct/Plex environment, you can specify whether the
Manager, the server(s) or both launch the statistics exit. By specifying the
MANAGER keyword, only the Manager region launches the statistics exit. By
specifying SERVER, all servers launch the statistics exit. Specifying BOTH causes
all regions—servers and the Manager—to launch the statistics exit and for the
same records to be processed twice.
In a Sterling Connect:Direct/Plex environment, MANAGER is the default entity to
launch the exit, but you must still specify the module name.
Modifiable through MODIFY INITPARMS command: NO
STRNO.MSG = number | 5
This parameter specifies the number of strings allowed to message file processing.
The acceptable range is 5–100. The default value is 5.
Modifiable through MODIFY INITPARMS command: NO
368 IBM Sterling Connect:Direct for z/OS: Administration Guide

SUBMIT.EXIT = modname
This parameter specifies the name of the module responsible for controlling
changes to Sterling Connect:Direct parameters, such as Process name, priority,
class, and secondary node. The module name can be from 1–8 alphanumeric
characters long, with the first character alphabetic. No default exists for this
parameter.
For more information on the Sterling Connect:Direct sample exits, which are
located in the $CD.SDGASAMP library, see Sample Submit Exits.
Modifiable through MODIFY INITPARMS command: NO
SYSOUT = class
This parameter specifies the JES output class for spool output generated during
DTF execution. The class must be one character in length. No default exists for this
parameter.
Modifiable through MODIFY INITPARMS command: YES
TAPE.PREMOUNT = YES | NO | LIST
This parameter specifies whether the Sterling Connect:Direct for z/OS tape
premount message is displayed.
Value Description
YES Tape premount message is displayed.
NO Tape premount message is not displayed.
LIST LIST instructs Sterling Connect:Direct to list up to 10 tape volume serial
number on the SVST000I tape premount message.
Note: If ROUTCDE.TAPE = 0 is coded and TAPE.PREMOUNT = NO, then the
z/OS system mount processing at allocation time holds an ENQ on SYSZTIOT
until mount is satisfied.
Modifiable through MODIFY INITPARMS command: YES
TAPEIO = EXCP | BSAM
This parameter does one thing prior to Version 5.0 and something different
afterwards.
Prior to Version 5.0, this parameter controlled what access method was used by the
COPY function to read and write to tape, either BSAM or EXCP. When BSAM was
specified, BSAM was used to read and write the tape, NOTE TYPE=REL was used
to generate tape checkpoint records, and POINT TYPE=REL was used to set the
tape restart point. When EXCP was specified, EXCP was used to read and write
the tape, a channel command equivalent to NOTE TYPE=ABS was used to
generate tape checkpoint records, and a channel command equivalent to POINT
TYPE=ABS was used to set the restart point.
After Version 5.0, BSAM is always used to read and write to tape, NOTE
TYPE=ABS is always used to generate new tape checkpoint records, and POINT
Chapter 17. Global Initialization Parameters 369

TYPE=ABS is always used to set the tape restart point from new checkpoint
records. The TAPEIO parameter is re-purposed and tells Sterling Connect:Direct
what the TAPEIO setting was prior to Version 5.0 so that it can switch to using
POINT TYPE=REL when restarting using pre-Version 5.0 checkpoint records. This
information is critical to the successful functioning of checkpoint restart if a tape is
created by a Sterling Connect:Direct prior to Version 5.0 and the restart attempted
on or after Version 5.0. This includes checkpoint records stored in the local node's
checkpoint dataset, as well as checkpoint records stored in a remote node's
checkpoint dataset.
Thus, the TAPEIO parameter setting becomes irrelevant and can be removed once
there is no possibility of restarting a tape COPY function using Sterling
Connect:Direct prior to Version 5.0.
Modifiable through MODIFY INITPARMS command: NO
TAPEMOUNT.EXIT = modname
This parameter specifies the name of interface to StorageTek Tape Silo software,
which provides status information on the volumes to satisfy a tapemount request.
You can invoke the exit prior to a tape VOLSER mount request to automatically
cancel the request should any volume not be available for the Silo to process. For
more information, see Tapemount Exit.
The module name can be from 1–8 alphanumeric characters long, with the first
character alphabetic. No default exists for this parameter.
The Sterling Connect:Direct sample exit is named DGAXTAPX and located in the
$CD.SDGASAMP library.
Modifiable through MODIFY INITPARMS command: NO
TCP = OES | NO
This parameter specifies whether the TCP/IP connection modules are loaded
during initialization and if so, the type of modules.
Value Description
OES Specifies the TCP/IP OpenEdition Sockets Interface support.
Note: You must install and run the IBM BPX facility, the series of IBM
programs that comprise the OES functionality, before you can transfer files
using the TCP = OES support of the Sterling Connect:Direct. In addition, IBM
RACF sites must install the OMVS security segment before using the OES
interface to transfer files.
NO Causes no modules for the TCP/IP connection to load during initialization.
Modifiable through MODIFY INITPARMS command: NO
TCP.API.LISTEN = ((addr , port) , (addrn , portn))
Use this parameter to define up to eight different address and port combinations
for each server for incoming connection requests.
The TCP.API.LISTEN parameter allows for a list of IP address and port number
combinations to support multiple addresses, including IPv6.
370 IBM Sterling Connect:Direct for z/OS: Administration Guide

For each server in a Sterling Connect:Direct Plex environment, override the global
initialization parameter by specifying the TCP.API.LISTEN parameter in that
server's local initialization parameters. The first address defined in the parameter
becomes the local or default address.
There is no default for TCP.API.LISTEN if the parameter is not specified. If the
parameter is specified with an address only, the port can default. The default port
for TCP.API.LISTEN is 1363.
The syntax for the TCP.API LISTEN parameter is similar to the following example:
TCP.API.LISTEN = ( (addr1 , port1) , (addrn , portn) )
In the example, addr1 through addrn is specified as either the word ANYADDR or
ANYADDR6, a TCP hostname or a specific IP address. Also, port1 through portn is
specified as a single port number. The following example demonstrates this
specification:
TCP.API.LISTEN =(MVSA , 1363) /* establish single API listen
Value Description
ANYADDR6 When you specify ANYADDR6, 0::0 or (::), both IPv4 and IPv6
connection requests are accepted through this listen. To define a single
listen task to accept IPv4 and IPv6 requests, specify the
TCP.API.LISTEN parameter as follows.
TCP.API.LISTEN=(ANYADDR6,1363)
Modifiable through MODIFY INITPARMS command: NO
TCP.API.TIMER = 00:00:00 | hh:mm:ss
This parameter specifies the maximum time of session inactivity a TCP/IP
connected IUI or API session waits before timing out and exiting. The default
value of 00:00:00 indicates that no timer is used. The effective range is
00:20:00–02:00:00 (20 minutes–2 hours).
If you are using Sterling Control Center to monitor your Sterling Connect:Direct
for z/OS server, set this value to at least twice the value of the Monitor Rest Time
setting in Sterling Control Center.
Note: It is recommended that you set the value for the TCP.API.TIMER parameter
to at least one minute greater than the wait timeout value set for IBM system
management facilities (SMF) to avoid problems when restoring migrated data sets.
For information on the TIMEOUT parameter, see Signing On to Sterling
Connect:Direct for z/OS in IBM Sterling Connect:Direct for z/OS User Guide.
Modifiable through MODIFY INITPARMS command: YES
Chapter 17. Global Initialization Parameters 371

TCP.CONNECT.TIMEOUT= 0 | number of seconds
This parameter defines the length of time in seconds that a non-DTF interface
(Sterling Control Center, Sterling Connect:Direct Browser User Interface, TELNET,
port scanners etc) will be allowed to linger when an attempt is made to connect to
the TCP.LISTEN port rather than the TCP.API.LISTEN port.
The default value is 0.
Modifiable through MODIFY INITPARMS command: YES
TCP.FMH.TIMER=hh:mm:ss
This parameter defines the length of time in hours, minutes, and seconds that the
TCP session can be inactive waiting on a Sterling Connect:Direct FMH to be
received from the remote node before the TCP session is terminated. The default
value of 00:00:00 indicates that no timer is used. For a Sterling Connect:Direct Run
Task step, the timer value does not apply.
The Sterling Connect:Direct Process is placed in the Timer Retry queue and retried
after the amount of time specified by the WTRETRIES initialization parameter has
elapsed. However, if the session times out a second time, the Process is placed in
Held in Error status and remains in the Hold queue to give you an opportunity to
analyze the problem to prevent this Process from retaining TCP resources.
Care should be taken in specifying these timer values in that Sterling
Connect:Direct Processes could perform differently than expected due to the
session being prematurely terminated.
Use this parameter only when necessary, and when you do, set it to an extremely
high value. It is difficult to estimate how much time it takes, for example, for a file
to be allocated by means of a manual tape mount. Through trial and error, you
should be able to select an appropriate value for this parameter.
Modifiable through MODIFY INITPARMS command: NO
TCP.LISTEN = ((addr , port) , (addrn , portn))
Use this parameter to define up to 64 different address and port combinations for
each server for incoming connection requests.
The TCP.LISTEN parameter allows for a list of IP address and port number
combinations to support multiple addresses, including IPv6.
For each server in a Sterling Connect:Direct Plex environment, override the global
initialization parameter by specifying the TCP.LISTEN parameter in that server's
local initialization parameters. The first address defined in the parameter becomes
the local or default address.
There is no default for TCP.LISTEN if the parameter is not specified. If the
parameter is specified with an address only, the port can default. The default port
for TCP.LISTEN is 1364.
The syntax for the TCP.LISTEN parameter is similar to the following example:
TCP.LISTEN = ( (addr1 , port1) , (addrn , portn) )
372 IBM Sterling Connect:Direct for z/OS: Administration Guide

In the example, addr1 through addrn is specified as either the word ANYADDR or
ANYADDR6, a TCP hostname or a specific IP address. Also, port1 through portn is
specified as a single port number. The following example demonstrates this
specification:
TCP.LISTEN = ((MVSA , 1364), - /* using DNS for address & Default
(10.20.129.3 , 4100), - /* specific address, specific port
(10.20.129.3 , 4101))
Value Description
ANYADDR6 When you specify ANYADDR6, 0::0 or (::), both IPv4 and IPv6
connection requests are accepted through this listen. To define a single
listen task to accept IPv4 and IPv6 requests, specify the TCP.LISTEN
parameter as follows.
TCP.LISTEN=(ANYADDR6,1364)
Modifiable through MODIFY INITPARMS command: NO
TCP.RUNTASK.TIMER = hh:mm:ss
The TCP.RUNTASK.TIMER initialization parameter defines the length of time in
hours, minutes, and seconds that the PNODE will wait for the RUN TASK on the
SNODE to complete before the TCP session is terminated. The default value of
00:00:00 indicates that no timer is used. This timer value only applies to a Run
Task function when the RUNTASK is being performed on the SNODE.
Modifiable through MODIFY INITPARMS command: NO
TCP.SRC.PORTS
This parameter specifies a destination IP address (or multiple addresses) and the
source ports associated with the destination addresses. The values in this
parameter are loaded into a table that Sterling Connect:Direct uses to find a match
when establishing a session. It is available only for z/OS nodes using TCP=OES.
The syntax for this parameter is as follows:
TCP.SRC.PORTS = (ip.address,port-ranges),(ip.address2,port1,port2), -
(ip.address3,port-ranges)
TCP.SRC.PORTS = (ip.address/submask,port-ranges), ...
TCP.SRC.PORTS = (ip.address/0XFFFFFFFFFFFFFFFF,ports,ranges)
Use a wildcard character [* or 0 (zero)] to define a destination IP address pattern.
The wildcards must be in the least significant positions.
You can add an optional subnet mask for the destination IP address, followed by
the source port number and/or range of port numbers for the destination IP
address.
For IPv4, valid subnet mask values are:
v Dotted quad notation, such as 255.255.0.0
Chapter 17. Global Initialization Parameters 373

v Hexadecimal notation, such as 0xffffff00
For IPv4 address specification, the ip.address can be fully qualified such as
199.1.1.1, or a generic address such as 199.1.*
You cannot use a subnet mask if you use wildcards in the destination IP address
pattern.
Specify the range of source ports from lowest port number to highest port number
order. For example, 1025–2000 is valid, whereas 2000–1025 is invalid. The source
port numbers must be between 1025–65535, inclusive.
Note: The number of source ports defined must be sufficient to handle the number
of concurrent Sterling Connect:Direct sessions. If not, performance can be severely
affected.
Following is an example.
TCP.SRC.PORTS = (199.2.4.*, 5000-5050), -
(199.2.4.7, 1376), -
(200.200.4.4/255.255.2.4, 2000-2100, 3000-3100), -
(138.16.*.*, 2000-2050, 3000-3050, 4001, 4005)
For IPv6 specification, the ip.address is specified in IPv6 format with colons. It can
be fully qualified such as 1:2:3:4:5:6:7:8 or a generic address 1:2:3:4:*. Generic
specification of the IPv6 ip.address cannot use the shortcut specification. For
example, 1111:0:0:0:0:6666:7777:8888 can be specified as 1111::6666:7777:8888 as a
fully qualified name. However, 1111::6666:* is not allowed because there is no way
to know how many zeros have been eliminated.
For IPv6, valid subnet mask values are:
v Hexadecimal notation, such as 0XFFFFFFFFFFFFFFFFFFFFFFFF00000000
Note: If the specification of an IPv6 address, mask and ports takes more than one
line, split at the slash dividing the ip.address from the submask.
The following example demonstrates how to specify an IPv6 address, mask and
ports over more than one line:
TCP.SOURCE.PORTS=(1111:2222:3333:4444:5555:6666:7777:8888/ -
0XFFFFFFFFFFFFFFFFFFFFFFFF00000000,02000-03000,03500), -
(199.1.1.2/255.255.0.0,04000-05000,05500)
Modifiable through MODIFY INITPARMS command: NO
TCP.SRC.PORTS.LIST.ITERATIONS = number of scans
This parameter specifies the number of times that Sterling Connect:Direct scans the
available ports list to attempt a connection before going into a retry state. Use any
value between 0 and 255.
Modifiable through MODIFY INITPARMS command: NO
374 IBM Sterling Connect:Direct for z/OS: Administration Guide

TCP.TIMER = wait time
This parameter specifies the number of seconds that a Process waits on a TCP or
UDT data read before the Process is cancelled and put in timer retry status. The
number can range from 0–32767. The default value of 0 indicates that no timer is
used.
Use a value of 60 or greater to keep Processes from waiting indefinitely because of
a lost connection.
This parameter can have the following impacts on Processes:
1. Setting the parameter to 0 causes a Process to become stranded and requires
you to manually requeue and restart the Process.
2. Setting this parameter to a high value (such as 1800 [a half-hour] or 3600 [an
hour]) to allow long running tasks to complete prevents any shutdowns during
that time. Also, long running tasks tie up communications links and associated
resources for the time period. System resources are used more efficiently by
breaking a task into smaller units, with a RUN JOB submitting the long
running Process.
Modifiable through MODIFY INITPARMS command: NO
TCQ = WARM | COLD
This parameter specifies how the TCQ is initialized.
Value Description
WARM Sterling Connect:Direct uses the TCQ as it exists.
COLD Sterling Connect:Direct reinitializes the TCQ and any Processes left on
the TCQ are lost.
Modifiable through MODIFY INITPARMS command: NO
TCQ.THRESHOLD = NO | YES | nn
This parameter specifies how Sterling Connect:Direct issues warning messages as
the TCQ reaches a defined capacity. Use the TCQ.THRESHOLD parameter to
identify when to delete Processes in the PR queue, to make space available for
newly submitted Processes.
Value Description
No Indicates that a warning message is not produced when control intervals
(CIs) reach a certain level on the TCQ file. A message is issued when the
TCQ is completely full. This value is the default.
Yes Indicates that a warning message is issued when the TCQ becomes 90% full.
The message is reissued when the percentage changes but remains above
90% full.
Chapter 17. Global Initialization Parameters 375

Value Description
nn Allows you to specify a 2-digit percentage of the number of VSAM file
control intervals used on the TCQ file. When the TCQ reaches this
percentage, Sterling Connect:Direct issues a message. The message is reissued
when the percentage changes and remains above the percentage specified
here. The range for percentage value is 0 through 99.
Note: A value of 0 is the equivalent of the default NO value, that is, no
SPQL002I warning message is produced; only when the TCQ is completely
full is a message issued.
Processes on the PR queue are automatically deleted on a space-needed basis at
non-ESF SUBMIT time, thus not affecting the TCQ.THRESHOLD.
Modifiable through MODIFY INITPARMS command: YES
THIRD.DISP.DELETE = YES | NO
The PNODE setting for the THIRD.DISP.DELETE= parameter controls how Sterling
Connect:Direct processes the value of the third subparameter of the (TO)DISP=
parameter during a COPY operation when an ABEND occurs in the COPY step on
the receiving node.
Value Description
YES Enables the third disposition delete feature.
NO Disables this feature.
The following table describes the conditions under which
THIRD.DISP.DELETE=YES is enforced and the result it produces.
This processing occurs When all of these conditions are present
The data set on the receiving node is
deleted.
ABEND occurs in the COPY step on the receiving
node (SNODE).
THIRD.DISP.DELETE=YES.
Third subparameter of the TO(DISP) parameter is
not defined, or is defined as DELETE.
Third subparameter of the TO(DISP) parameter is
not defined as KEEP or CATLG.
The destination output file does not exist, that is,
the COPY statement creates a file, which means
that if RPL is specified, there is no file to replace.
The DISP parameter of the TO side of the COPY
statement is set to one of the following options:
v DISP=(NEW,CATLG)
v DISP=(NEW,CATLG,DELETE)
v DISP=(NEW,KEEP)
v DISP=(NEW,KEEP,DELETE)
v DISP=(RPL,CATLG)
v DISP=(RPL,CATLG,DELETE)
v DISP=(RPL,KEEP)
v DISP=(RPL,KEEP,DELETE)
376 IBM Sterling Connect:Direct for z/OS: Administration Guide

This processing occurs When all of these conditions are present
The Process is ineligible for REQUEUE because
one of the following is true:
v Checkpointing is turned OFF.
v REQUEUE=NO is specified in the Process
statement or as an initialization parameter.
When THIRD.DISP.DELETE=NO is set, the following processing occurs:
v Sterling Connect:Direct does not apply the third subparameter value, even if it is
set to DELETE in the Process itself.
v Sterling Connect:Direct uses the value set for the second subparameter of the
TO(DISP) parameter as the value for the third subparameter. For example, if the
second subparameter is set to CATLG, the third subparameter is treated as if
CATLG were specified.
CAUTION:
When you create GDG data sets using relative numbering, for example,
DATA.SET.NAME(+1), you must specify CATLG as the third subparameter of
the TO(DISP) parameter. If you fail to do so, a RETRY failure occurs. For
example, you can specify DISP=(NEW,CATLG,CATLG) or
DISP=(,CATLG,CATLG).
Modifiable through MODIFY INITPARMS command: YES
TRACE.BUFFER = nnn | 2
This parameter specifies how much space in 64-bit storage is allocated for tracing.
By default, two megabytes are allocated for the in-storage wrap trace buffer. To
turn off in-storage tracing, specify TRACE.BUFFER=0.
Modifiable through MODIFY INITPARMS command: NO
TRANS.SUBPAS = YES|NO
This parameter specifies whether the submitter password is sent to the receiving
node if the receiving node submits within a Process back to the submitting node.
Value Description
YES The submitter password is sent to the receiving node
NO The submitter password is not sent to the receiving node
Modifiable through MODIFY INITPARMS command: YES
UDP.SRC.PORTS
This parameter specifies a destination IP address (or multiple addresses) and the
source ports associated with the destination addresses to use when making UDT
connections. The values in this parameter are loaded into a table that Sterling
Connect:Direct uses to find a match when establishing a session.
The syntax for this parameter is as follows:
Chapter 17. Global Initialization Parameters 377

UDP.SRC.PORTS = (ip.address,port-ranges),(ip.address2,port1,port2), -
(ip.address3,port-ranges)
Use a wildcard character [* or 0 (zero)] to define a destination IP address pattern.
The wildcards must be in the least significant positions.
Specify the range of source ports from lowest port number to highest port number
order. For example, 1025–2000 is valid, whereas 2000–1025 is invalid. The source
port numbers must be between 1025–65535, inclusive.
Note: The number of source ports defined must be sufficient to handle the number
of concurrent Sterling Connect:Direct sessions. If not, performance can be severely
affected.
Modifiable through MODIFY INITPARMS command: NO
UDP.SRC.PORTS.LIST.ITERATIONS = number of scans
This parameter specifies the number of times that Sterling Connect:Direct scans the
available ports list to attempt a UDT connection before going into a retry state. Use
any value between 0 and 255.
Modifiable through MODIFY INITPARMS command: NO
UDT = YES|NO
This parameter specifies whether UDT connection modules are loaded during
initialization.
Value Description
YES Loads modules for the UDT connections during initialization.
NO Causes no modules for UDT connections to load during initialization.
Modifiable through MODIFY INITPARMS command: NO
UDT.MAXPROCESS = 2 | number of executing UDT Processes
This parameter specifies the maximum number of concurrent UDT processes. Value
range 1 to 512. Default is 2.
CAUTION:
Although 512 is the maximum valid value for this parameter, you should set
UDT.MAXPROCESS to a value much lower than the MAXPROCESS
initialization parameter setting. The higher you set the UDT.MAXPROCESS
parameter, the greater the negative impact on UDT performance.
Modifiable through MODIFY INITPARMS command: NO
UDT33.LISTEN = ((ipaddr,port)[,(ipaddr,port)...])
Use this parameter to define up to eight different address and port combinations
for each server for incoming connection requests.
378 IBM Sterling Connect:Direct for z/OS: Administration Guide

The UDT33.LISTEN parameter allows for a list of IP address and port number
combinations to support multiple addresses, including IPv6.
For each server in a Sterling Connect:Direct Plex environment, override the global
initialization parameter by specifying the UDT33.LISTEN parameter in that server's
local initialization parameters. The first address defined in the parameter becomes
the local or default address.
The default port for UDT33.LISTEN is 1366.
Value Description
ANYADDR6 When you specify ANYADDR6, 0::0 or (::), both IPv4 and IPv6 connection
requests are accepted through this listen. To define a single listen task to
accept IPv4 and IPv6 requests, specify the UDT33.LISTEN parameter as
follows.
UDT33.LISTEN=(ANYADDR6,1364)
Modifiable through MODIFY INITPARMS command: NO
UPPER.CASE = YES|NO
This parameter specifies whether initialization messages sent to the console are
displayed in uppercase letters.
Value Description
YES Initialization messages sent to the console are displayed in uppercase
letters
NO Initialization messages sent to the console are displayed in uppercase
and lowercase letters
Note: You must define this parameter on the execution parameter overrides to
ensure that all initialization messages are displayed in uppercase letters.
Modifiable through MODIFY INITPARMS command: NO
V2.BUFSIZE = (maximum transmission buffer size, TCP/IP send/receive
buffer size)
The first positional parameter specifies the default maximum buffer size that
Sterling Connect:Direct uses for LU6.2 and TCP/IP data transmission. Valid values
range from 3712–256K. The default is 4K. (K means thousands of bytes.)
The second positional parameter is used to alter the TCP/IP send and receive
buffer sizes within TCP/IP. The maximum value is 256K. The minimum value is
set by TCPCONFIG in the TCP/IP PROFILE data set. If a value is specified that is
lower than the TCPCONFIG value, the TCPCONFIG value is used. The default of
the second parameter is double the first parameter, unless this is lower than the
value set by TCPCONFIG in the TCP/IP stacks PROFILE data set. For example,
TCPCONFIG TCPSENDBFRSIZE 64K TCPRCVBFRSIZE 64K in the TCP/IP
PROFILE would set the default to 64 KB. This default value of 64K would be used
unless the first parameter is greater than 32 KB, or the second parameter is greater
than 64 KB.
Chapter 17. Global Initialization Parameters 379

Note: If the TCP stack size does not override Sterling Connect:Direct’s defaults, the
default values would be as if V2.BUFSIZE=(4K,8K) was coded.
In general terms, the second positional parameter should be at least the same and
not less than the first parameter and should be big enough to handle the largest
V2.BUFSIZE override from the netmap. A good common practice is to have the
second parameter be a multiple of the first parameter and at least twice or more
than the first parameter.
Also, note that the first positional parameter can be overridden in the
ADJACENT.NODE entry in the netmap using the BUFFER.SIZE parameter. For
details, see BUFFER.SIZE=V2.buffer override.
Modifiable through MODIFY INITPARMS command: NO
WTMESSAGE = NO | YES | (YES,nnn)
This parameter specifies whether a WTO message is generated when a Process is
placed on the timer retry queue.
Value Description
YES Specifies that message SVTM110I is written to the console each time a
Process is placed on the timer queue.
NO Specifies that message SVTM110I is not written to the console each time
a Process is placed on the timer queue.
(YES,nnn) Specifies the number of times the SVTM110I messages are written to
the console. Valid value for nnn is 1–512. The default is 1, which
specifies that the message is written every time. If you specify 2, every
second message is displayed, and so on.
Sterling Connect:Direct uses this parameter with the MAXRETRIES initialization
parameter when attempting to establish a lost session.
Modifiable through MODIFY INITPARMS command: YES
WTRETRIES = hh:mm:ss | 00:03:00
This parameter specifies the amount of time between attempts to reestablish a
node-to-node session. The default is 00:03:00. Sterling Connect:Direct uses this
parameter with the MAXRETRIES initialization parameter when trying to establish
a lost session.
Modifiable through MODIFY INITPARMS command: YES
XCF.NAME = XCF group name
This parameter specifies a unique name for a Sterling Connect:Direct/Plex
environment, or for a Sterling Connect:Direct/Stand-alone Server (including the
standby system) using extended recovery. This parameter is not needed in a
Sterling Connect:Direct/Stand-alone Server that does not use extended recovery.
XCF group names cannot begin with the letters “A” through “J” or with the letters
“SYS” because these are reserved by IBM. You cannot modify this parameter
through the MODIFY INITPARMS command.
380 IBM Sterling Connect:Direct for z/OS: Administration Guide

Modifiable through MODIFY INITPARMS command: NO
ZIIP = NONE | EXTCOMP | SSLTLS | ALL | PROJECT
This parameter enables you to specify the setting for the zIIP Exploitation Feature.
For more information, see “zIIP Exploitation Feature” on page 285.
Subparameter Description
NONE The default. No CPU time is offloaded to a zIIP and Sterling
Connect:Direct continues to operate as it has for all versions prior to
Release 5.1.1.
EXTCOMP Schedules SRBs to offload COPY step extended (ZLIB) compression and
decompression CPU time to a zIIP.
SSLTLS Schedule SRBs to offload COPY step SSL and TLS data encryption and
decryption (not the handshake) CPU time to a zIIP.
ALL Schedules SRBs to offload COPY step SSL and TLS data encryption and
decryption (not the handshake) and extended (ZLIB) compression and
decompression CPU time to a zIIP.
PROJECT Same as ALL, except the SRBs are always dispatched to a general
purpose (CP) processor, not a zIIP processor. This allows you to project
C:D zIIP usage (rather than use the zIIP) when you have a zIIP
processor online. If no zIIP processor is online, there is no difference
between PROJECT and ALL.
Note: The PROJECT setting requires that you set the IEAOPTxx
parameter, PROJECTCPU to YES. For more information, see IEAOPTxx
(OPT parameters) in MVS Initialization and Tuning Reference
(SA22-7592-21 or http://publib.boulder.ibm.com/infocenter/zos/
v1r12/index.jsp?topic=/com.ibm.zos.r12.ieae200/ieaopt.htm)
Modifiable through MODIFY INITPARMS command: NO
Sterling Connect:Direct System File Initialization Parameters
The following section identifies the initialization parameters for Sterling
Connect:Direct system files. You must specify each initialization parameter. These
initialization parameters are considered global parameters in a Sterling
Connect:Direct/Plex environment.
AUThHDSN = dsn
This parameter specifies the file name of the Sterling Connect:Direct VSAM
Authorization file. No default exists for this parameter.
Modifiable through MODIFY INITPARMS command: NO
CKPTDSN = dsn
This parameter specifies the file name of the Sterling Connect:Direct VSAM
Checkpoint/restart file. No default exists for this parameter.
Modifiable through MODIFY INITPARMS command: NO
MSGDSN = dsn
This parameter specifies the file name of the Sterling Connect:Direct VSAM
Message file. No default exists for this parameter.
Chapter 17. Global Initialization Parameters 381

Modifiable through MODIFY INITPARMS command: NO
NETDSN = dsn
This parameter specifies the file name of the Sterling Connect:Direct VSAM
network map file. No default exists for this parameter.
Modifiable through MODIFY INITPARMS command: NO
STAT.ARCH.DIR = archive directory file name
This parameter specifies the data set name of the directory of statistics archive
files. Use the directory to maintain information about the files containing archived
statistics records. This information includes the date/time range covered by the
records in each file, and is useful in locating the archive file containing records for
a specific date/time. When you omit this parameter, the archive directory functions
are unavailable. No default exists for this parameter.
Modifiable through MODIFY INITPARMS command: NO
STAT.DSN.BASE | STAT.FILE.PAIRS
The STAT.DSN.BASE parameter specifies the high-level qualifiers for the statistics
files cluster names. Use any valid z/OS data set name qualifiers for this parameter.
The high-level qualifier can range from 1–37 characters. The syntax for this
parameter is as follows:
STAT.DSN.BASE = dsname base
The STAT.FILE.PAIRS parameter indicates the number of file pairs to use. You
must specify at least two file pairs. The number of file pairs ranges from 2–20. The
syntax for this parameter is as follows:
STAT.FILE.PAIRS = number
The two parameters specify the statistics file pair list. During DTF initialization,
Sterling Connect:Direct uses these two values to develop the data set names for the
statistics files. The low-level qualifier, ESDSnn, is added to the base data set name
to form the names of the ESDS clusters. In ESDSnn, nn is the number that
identifies the position of the file pair in the list. Sterling Connect:Direct uses
KSDSnn as the qualifier to form the names of the KSDS clusters.
The following example uses both STAT.DSN.BASE and STAT.FILE.PAIRS to specify
the statistics file pair list.
STAT.DSN.BASE = CD.STATS /* STATISTICS DSNAME BASE */
STAT.FILE.PAIRS = 3 /* NUMBER OF PAIRS */
The example in the previous figure generates the following file pair list.
CD.STATS.ESDS01 /* FIRST FILE PAIR ... ESDS */
CD.STATS.KSDS01 /* FIRST FILE PAIR ... KSDS */
CD.STATS.ESDS02 /* SECOND FILE PAIR ... ESDS */
CD.STATS.KSDS02 /* SECOND FILE PAIR ... KSDS */
CD.STATS.ESDS03 /* THIRD FILE PAIR ... ESDS */
CD.STATS.KSDS03 /* THIRD FILE PAIR ... KSDS */
382 IBM Sterling Connect:Direct for z/OS: Administration Guide
Modifiable through MODIFY INITPARMS command: NO
TYPEDSN = dsn
This parameter specifies the file name of the Sterling Connect:Direct VSAM Type
file. No default exists for this parameter.
Modifiable through MODIFY INITPARMS command: NO
Chapter 17. Global Initialization Parameters 383
384 IBM Sterling Connect:Direct for z/OS: Administration Guide

Chapter 18. Local Initialization Parameters
Local initialization parameters are only used in a Sterling Connect:Direct/Plex
environment. They only apply to a specific member of the Sterling
Connect:Direct/Plex. Each Sterling Connect:Direct/Plex member must have its own
local initialization parameter member with the CDPLEX.MANAGER=YES|NO
parameter as the first statement in the member.
You can override any initialization parameter allowed in the local initialization
parameters member using the PARM= keyword in the EXEC statement.
Local and Global Initialization Parameters
The following local initialization parameters are also global initialization
parameters. See the description for the corresponding Global Initialization
Parameter for a description of these parameters:
v “CTCA = NO | YES” on page 333
v “CTCA.TIMER = number of seconds” on page 333
v “DEBUG = nnnnnnnn” on page 335
v “MAXBATCH = number of users” on page 345
v “MAXPRIMARY = number of PNODE sessions” on page 345
v “MAXSECONDARY = number of SNODE sessions” on page 346
v “MAX.TAPE = number of tape Processes | NONE” on page 347
v “QUIESCE = YES | NO” on page 355
v “SECURITY.EXIT | SECURITY” on page 360
v “SNA = YES | NO” on page 362
v “STAT.INIT = WARM | COLD” on page 365
v “STATISTICS.EXIT = modname | (modname[,MANAGER | SERVER | BOTH])”
on page 368
v “TCP = OES | NO” on page 370
v “TCP.API.LISTEN = ((addr , port) , (addrn , portn))” on page 370
v “TCP.LISTEN = ((addr , port) , (addrn , portn))” on page 372
v “TCP.TIMER = wait time” on page 375
v “TCQ = WARM | COLD” on page 375
v “TRACE.BUFFER = nnn | 2” on page 377
v “UDT = YES|NO” on page 378
v “UDT.MAXPROCESS = 2 | number of executing UDT Processes” on page 378
v “UDT33.LISTEN = ((ipaddr,port)[,(ipaddr,port)...])” on page 378
v “UPPER.CASE = YES|NO” on page 379
v “V2.BUFSIZE = (maximum transmission buffer size, TCP/IP send/receive buffer
size)” on page 379
v “ZIIP = NONE | EXTCOMP | SSLTLS | ALL | PROJECT” on page 381
© Copyright IBM Corp. 1999, 2015 385

CDPLEX.INITPARM.BACKUP = member
This parameter specifies the name of the data set member to be used as a backup
of the local initialization parameter member if Sterling Connect:Direct cannot start
up successfully after initparm updates have been applied. To ensure that this
backup member contains valid initialization parameters, this member is written to
after initialization is completed successfully.
Modifiable through MODIFY INITPARMS command: NO
CDPLEX.MANAGER = NO | YES
This parameter indicates whether this Sterling Connect:Direct/Plex member is a
Sterling Connect:Direct/Manager or a Sterling Connect:Direct/Server and must be
the first statement in all local initialization parameter members. Only one Sterling
Connect:Direct/Manager is allowed in a Sterling Connect:Direct/Plex.
Value Description
YES Indicates that this Sterling Connect:Direct/Plex member is a Sterling
Connect:Direct/Manager or a Sterling Connect:Direct/Server.
NO Indicates that this Sterling Connect:Direct/Plex member is not a
Sterling Connect:Direct/Manager or a Sterling Connect:Direct/Server.
This is the default.
Modifiable through MODIFY INITPARMS command: NO
CDPLEX.MSGID = NONE | xx
This parameter specifies two characters that identify the Sterling
Connect:Direct/Plex member. These characters display after the message number
in messages sent to a console operator. They enable the operators to identify the
message source.
Following is an example of the message display if the CDPLEX.MSGID value is set
to S1. The two character identifier is highlighted in this example.
SVTM055I S1 SESSION (001) ESTABLISHED WITH SNODE=SC.DUB.TPYLA2
SVTM055I S1 SESSION (001) ESTABLISHED WITH PNODE=SC.DUB.TPYLA2
SVTM036I S1 PROCESS STARTED MVSMVST3( 1) PNODE=SC.DUB.TPYLA2
SVTM036I S1 PROCESS STARTED MVSMVST3( 1) SNODE=SC.DUB.TPYLA2
If your site uses automated operations monitoring and you use this parameter to
identify Sterling Connect:Direct/Plex members, you may need to revise your
monitoring program because of the change in message format. In this case, you
may want to leave this parameter at NONE.
Modifiable through MODIFY INITPARMS command: NO
386 IBM Sterling Connect:Direct for z/OS: Administration Guide

CDPLEX.PLEXCLASSES = (*,plexclass,...,plexclass)
This parameter specifies which PLEXCLASSes are supported by the Sterling
Connect:Direct/Server. You can restrict a Sterling Connect:Direct/Server to run
only jobs in the specified PLEXCLASSes. An asterisk (*) indicates that the Sterling
Connect:Direct/Server supports any Process that does not specify a PLEXCLASS or
specifies a PLEXCLASS of ‘*’.
If you specify CDPLEX.PLEXCLASSES, you must explicitly specify ‘*’ as its value
to run any Processes with a Plexclass of ‘*’ on that Sterling Connect:Direct/Server.
The PLEXCLASS name is 1–8 characters long and up to 8 classes may be specified.
Modifiable through MODIFY INITPARMS command: NO
CDPLEX.REDIRECT
This parameter is used by the Sterling Connect:Direct Plex Manager in the Sterling
Connect:Direct Plex environment to determine the redirection address that is
presented to the remote node. It allows you to specify redirection addresses based
on the security node type (internal or external) and session type (TCP or UDT33)
of the adjacent node in the network map for the Sterling Connect:Direct Plex
Servers within the local initialization parameters.
The syntax for this parameter is as follows:
CDPLEX.REDIRECT = ((INT_IPv4,EXT_IPv4),(INT_IPv6,EXT_IPv6),
(INT_UDT_IPv4,EXT_UDT_IPv4),(INT_UDT_IPv6,EXT_UDT_IPv6))
The CDPLEX.REDIRECT parameter is a local initialization parameter for servers
only, and defaults to the first IPv4 or IPv6 address indicated for the server.
The following shows an example of the syntax for the CDPLEX.REDIRECT
parameter followed by an example with actual TCP/IP and UDT addresses and
port numbers.
CDPLEX.REDIRECT=((INT TCP IPV4 , PORT),(EXT TCP IPV4 , PORT ) -
(INT TCP IPV6 , PORT),(EXT TCP IPV6 , PORT ) -
(INT UDT IPV4 , PORT),(EXT UDT IPV4 , PORT ) -
(INT UDT IPV6 , PORT),(EXT UDT IPV6 , PORT ) )
CDPLEX.REDIRECT=((10.20.201.2,4199),(199.1.22.333,4199) -
(FD00::22CE:0:0:0:82,4299),(FD00::22CE:1:2:3:99,4299) -
(10.20.201.2,4399),(199.1.22.333,4399) -
(FD00::22CE:0:0:0:82,4499),(FD00::22CE:1:2:3:99,4499) )
Modifiable through MODIFY INITPARMS command: NO
Chapter 18. Local Initialization Parameters 387

CDPLEX.REDIRECT.EXCEPTION = ((Mgr-IP, Ext_Svr-IP, Ext_Svr-port,
Exception-IP, Exception-port),...)
This parameter specifies exception redirection IP addresses and ports in addition to
those specified in the CDPLEX.REDIRECT parameter and will be used based on
how the remote server contacts the Sterling Connect:Direct/Plex Manager. If the
remote Sterling Connect:Direct server contacts the Sterling Connect:Direct/Plex
Manager on the Mgr-IP listen address and the Sterling Connect:Direct/Plex
Workload manager selects a Sterling Connect:Direct/Plex server whose
CDPLEX.REDIRECT IP and Port matches the Ext_Svr-IP and Ext_Svr-port, the
Exception-IP and Exception-port will be used instead of the Sterling
Connect:Direct/Plex Server's CDPLEX.REDIRECT IP address and port.
This parameter is only valid for the Sterling Connect:Direct/Plex Manager.
You can use TCP/IP IPv4, TCP/IP IPv6, UDT IPv4, and UDT IPv6 addresses in the
CDPLEX.REDIRECT.EXCEPTION parameterm but all of the IP addresses in any
given CDPLEX.REDIRECT.EXCEPTION string must be of the same type (IPv4 or
IPv6). In addition, the Sterling Connect:Direct/Plex Manager must listen on specific
IP or UDT addresses and not listen on ANYADDR (0.0.0.0) or ANYADDR6, for
example:
TCP.LISTEN=((10.20.201.3,3802),(10.20.129.165,3802), -
(FD00:0:0:22CE::3802,3802))
Value Description
Mgr-IP Sterling Connect:Direct/Plex Manager's Listen IP
address
Ext_Svr-IP, Ext_Svr-port Sterling Connect:Direct/Plex Server's
CDPLEX.REDIRECT EXTernal IP address and
port for the Sterling Connect:Direct/Plex server
selected by Workload Manager for this Process
Exception-IP, Exception-port Exception IP address and port.
The following shows an example of the syntax for the
CDPLEX.REDIRECT.EXCEPTION parameter where:
v If the remote node contacts the Sterling Connect:Direct/Plex Manager on
10.20.129.165 and the selected Sterling Connect:Direct/Plex Server redirects to
10.20.201.3 port 3811, then 10.20.129.162 port 3811 will be used instead.
v If the remote node contacts the Sterling Connect:Direct/Plex Manager on
FD00:0:0:22CE::3802 and the Sterling Connect:Direct/Plex Server redirects to
FD00:0:0:22CE::3803 port 4812, then FD00:0:0:22CE::3805 port 3811 will be used
instead.
v Otherwise, the address and port specified in the CDPLEX.REDIRECT parameter
will be used.
CDPLEX.REDIRECT.EXCEPTION=( -
( 10.20.129.165, 10.20.201.3, 3811, 10.20.129.162, 3811) -
( FD00:0:0:22CE::3802, FD00:0:0:22CE::3803, 4812, -
FD00:0:0:22CE::3805, 3811) )
Modifiable through MODIFY INITPARMS command: NO
388 IBM Sterling Connect:Direct for z/OS: Administration Guide

CDPLEX.SERVER = Sterling Connect:Direct/Server name
This parameter specifies the name of the Sterling Connect:Direct/Server. Use only
for Sterling Connect:Direct/Plex members whose CDPLEX.MANAGER parameter
value is NO. Each Sterling Connect:Direct/Server in the Sterling
Connect:Direct/Plex must have a unique 1–8 character name. The Sterling
Connect:Direct/Server name cannot be the same as the XCF.NAME name. (The
XCF.NAME name is used as the Sterling Connect:Direct/Manager name).
Modifiable through MODIFY INITPARMS command: NO
CDPLEX.SERVER.JOBDSN = data set name
This parameter specifies the data set name that contains the various jobs or started
tasks that are submitted at initialization. This parameter is only valid for the
Sterling Connect:Direct/Manager.
Modifiable through MODIFY INITPARMS command: NO
CDPLEX.SERVER.JOBMEM = ((member name,server name),...)
This parameter specifies the CDPLEX.SERVER.JOBDSN member containing the JCL
or start command that starts the specified Sterling Connect:Direct/Server. The
member name can be up to 8 characters long.
This parameter is only valid for the Sterling Connect:Direct/Manager.
You can specify a maximum of 32 member/server name combinations.
If you want to start the Sterling Connect:Direct/Server as a started task in a JES2
environment, use one of the following to issue a start command:
v To issue a START command on the same z/OS image, include START= as the
first statement in the member. The member is not submitted as JCL, but a
START command is issued with the rest of the first statement.
For example, if START=HOST4100,X is the first statement, then the command
START HOST4100,X is issued to z/OS.
v To issue a START command on a different z/OS image, include
/*$VS,‘command’ as the first statement in the member. The member is
submitted to JES, but JES identifies the /*$VS and issues the appropriate
command to z/OS.
For example, if /*$VS,‘RO CSGB,S CDICOMB’, the member is submitted to JES
and the
RO CSGB,S CDICOMB command is issued by JES to z/OS rather than placed in
the job queue.
Modifiable through MODIFY INITPARMS command: NO
CDPLEX.SERVER.NODE = node name
This parameter specifies a unique 1–16 character name for a Sterling
Connect:Direct/Server. This parameter is not used for a Sterling
Connect:Direct/Manager.
Chapter 18. Local Initialization Parameters 389

In a Sterling Connect:Direct/Plex, all members appear to external Sterling
Connect:Direct systems as a single local node. However, if you use network map
checking and an external Sterling Connect:Direct system communicates with more
than one Sterling Connect:Direct/Server, you can specify a name to identify each
Sterling Connect:Direct/Server.
The adjacent node's USE.SERVER.NODE network map parameter (see “Keyword
Parameters for Adjacent Node Entries” on page 107) must specify that the Sterling
Connect:Direct/Server use this name in the initial communications.
Modifiable through MODIFY INITPARMS command: NO
CDPLEX.TIMER = 5 | number of minutes
This parameter specifies the time-out value for XCF communications in minutes.
The valid range is 0, 5–99. Zero (0) indicates that no time-out is set for XCF
communications.
Modified through MODIFY INITPARMS command: NO
CDPLEX.VTAM = (VTAM-APPL,P/S-Node-APPL)
This parameter specifies the VTAM APPLIDs for a Sterling Connect:Direct/Server.
This initialization parameter is required for a Sterling Connect:Direct/Server if
SNA=YES is specified in the global initialization parameters.
Modifiable through MODIFY INITPARMS command: NO
390 IBM Sterling Connect:Direct for z/OS: Administration Guide

Chapter 19. Using the UDT Protocol
This section provides information for using UDT (UDP-based Data Transport) to
achieve higher throughout rates for file transfers on high-speed networks with
latency.
Installation Considerations
Due to requirements for UDT, the installation procedure defines the SDGALINK
data set as a PDSE with the following attributes and space allocation requirements:
v RECFM = U
v LRECL = 0
v BLKSIZE = 32760
v DSNTYPE = LIBRARY
Initialization Parameters for UDT Connections
To implement UDT connections, specify the global initialization parameter,
UDT=YES, to load the UDT connection modules during initialization. If UDT= NO
is specified, no Sterling Connect:Direct for z/OS Processes can run using the UDT
protocol. If the PNODE is defined to use UDT with a remote node, the remote
node must also be set up to accept UDT connections.
To specify the UDT listen ports and related parameters, include the following
parameters in the initialization parameter file suitable for your environment:
v UDP.SRC.PORTS
v UDP.SRC.PORTS.LIST.ITERATIONS
v UDT=YES
v UDT33.LISTEN
v UDT.MAXPROCESS
CAUTION:
You cannot use the same port for both TCP and UDT listens.
Note: The UDT, UDT33.LISTEN and UDT.MAXPROCESS parameters can be
specified as a global or local initialization parameter where in a Sterling
Connect:Direct for z/OS Plex server environment, the local parameter will override
the global setting.
If you have a Sterling Connect:Direct for z/OS Plex environment, you may also
want to include the CDPLEX.REDIRECT parameter to specify a redirection address
to be used by the Sterling Connect:Direct Plex Manager based on a UDT33 session
type.
Network Map Parameters
To specify UDT as the protocol to use for a particular adjacent node, specify
UDT33 as the session type positional parameter. To specify UDT as the protocol
used for an alternate address, specify UDT33 as the ALTernate.TYPE in the
ALTernate.COMMinfo keyword parameter definition.
© Copyright IBM Corp. 1999, 2015 391

For more information on using UDT as the session type, see Positional Parameters
for Adjacent Node Entries.
PROCESS Statement Parameter
To specify a UDT connection not defined in the network map, you can add the
value, UDT33NAM, to the SNODE parameter of the PROCESS statement.
In the example below, The CSDPERF.TESTFILE data set is being copied to the
SNODE via a UDT connection, which specifies to use the IPv4 address of
10.20.129.20 along with a port value of 1363.
UDTNAM PROC SNODE=UDT33NAM=10.20.129.20;1363
STEP01 COPY FROM( PNODE -
DSN=CSDPERF.TESTFILE -
DISP=SHR ) -
TO( SNODE -
DSN=CSDPERF.TESTFILE.OUTPUT -
DISP=(NEW,CATLG,DELETE))
For a complete description of the SNODE parameter and how to use it in the
PROCESS statement, see the Connect:Direct Process Language help.
392 IBM Sterling Connect:Direct for z/OS: Administration Guide

Notices
This information was developed for products and services offered in the US. This
material might be available from IBM in other languages. However, you may be
required to own a copy of the product or product version in that language in order
to access it.
IBM may not offer the products, services, or features discussed in this document in
other countries. Consult your local IBM representative for information on the
products and services currently available in your area. Any reference to an IBM
product, program, or service is not intended to state or imply that only that IBM
product, program, or service may be used. Any functionally equivalent product,
program, or service that does not infringe any IBM intellectual property right may
be used instead. However, it is the user's responsibility to evaluate and verify the
operation of any non-IBM product, program, or service.
IBM may have patents or pending patent applications covering subject matter
described in this document. The furnishing of this document does not grant you
any license to these patents. You can send license inquiries, in writing, to:
IBM Director of Licensing
IBM Corporation
North Castle Drive, MD-NC119
Armonk, NY 10504-1785
US
For license inquiries regarding double-byte character set (DBCS) information,
contact the IBM Intellectual Property Department in your country or send
inquiries, in writing, to:
Intellectual Property Licensing
Legal and Intellectual Property Law
IBM Japan Ltd.
19-21, Nihonbashi-Hakozakicho, Chuo-ku
Tokyo 103-8510, Japan
INTERNATIONAL BUSINESS MACHINES CORPORATION PROVIDES THIS
PUBLICATION "AS IS" WITHOUT WARRANTY OF ANY KIND, EITHER
EXPRESS OR IMPLIED, INCLUDING, BUT NOT LIMITED TO, THE IMPLIED
WARRANTIES OF NON-INFRINGEMENT, MERCHANTABILITY OR FITNESS
FOR A PARTICULAR PURPOSE. Some jurisdictions do not allow disclaimer of
express or implied warranties in certain transactions, therefore, this statement may
not apply to you.
This information could include technical inaccuracies or typographical errors.
Changes are periodically made to the information herein; these changes will be
incorporated in new editions of the publication. IBM may make improvements
and/or changes in the product(s) and/or the program(s) described in this
publication at any time without notice.
Any references in this information to non-IBM websites are provided for
convenience only and do not in any manner serve as an endorsement of those
© Copyright IBM Corp. 1999, 2015 393
websites. The materials at those websites are not part of the materials for this IBM
product and use of those websites is at your own risk.
IBM may use or distribute any of the information you provide in any way it
believes appropriate without incurring any obligation to you.
Licensees of this program who wish to have information about it for the purpose
of enabling: (i) the exchange of information between independently created
programs and other programs (including this one) and (ii) the mutual use of the
information which has been exchanged, should contact:
IBM Director of Licensing
IBM Corporation
North Castle Drive, MD-NC119
Armonk, NY 10504-1785
US
Such information may be available, subject to appropriate terms and conditions,
including in some cases, payment of a fee.
The licensed program described in this document and all licensed material
available for it are provided by IBM under terms of the IBM Customer Agreement,
IBM International Program License Agreement or any equivalent agreement
between us.
The performance data and client examples cited are presented for illustrative
purposes only. Actual performance results may vary depending on specific
configurations and operating conditions.
Information concerning non-IBM products was obtained from the suppliers of
those products, their published announcements or other publicly available sources.
IBM has not tested those products and cannot confirm the accuracy of
performance, compatibility or any other claims related to non-IBMproducts.
Questions on the capabilities of non-IBM products should be addressed to the
suppliers of those products.
Statements regarding IBM's future direction or intent are subject to change or
withdrawal without notice, and represent goals and objectives only.
All IBM prices shown are IBM's suggested retail prices, are current and are subject
to change without notice. Dealer prices may vary.
This information is for planning purposes only. The information herein is subject to
change before the products described become available.
This information contains examples of data and reports used in daily business
operations. To illustrate them as completely as possible, the examples include the
names of individuals, companies, brands, and products. All of these names are
fictitious and any similarity to actual people or business enterprises is entirely
coincidental.
COPYRIGHT LICENSE:
This information contains sample application programs in source language, which
illustrate programming techniques on various operating platforms. You may copy,
modify, and distribute these sample programs in any form without payment to
394 IBM Sterling Connect:Direct for z/OS: Administration Guide

IBM, for the purposes of developing, using, marketing or distributing application
programs conforming to the application programming interface for the operating
platform for which the sample programs are written. These examples have not
been thoroughly tested under all conditions. IBM, therefore, cannot guarantee or
imply reliability, serviceability, or function of these programs. The sample
programs are provided "AS IS", without warranty of any kind. IBM shall not be
liable for any damages arising out of your use of the sample programs.
Each copy or any portion of these sample programs or any derivative work must
include a copyright notice as shown in the next column.
© 2015.
Portions of this code are derived from IBM Corp. Sample Programs.
© Copyright IBM Corp. 2015.
Trademarks
IBM, the IBM logo, and ibm.com are trademarks or registered trademarks of
International Business Machines Corp., registered in many jurisdictions worldwide.
Other product and service names might be trademarks of IBM or other companies.
A current list of IBM trademarks is available on the web at "Copyright and
trademark information" at www.ibm.com/legal/copytrade.shtml.
Adobe, the Adobe logo, PostScript, and the PostScript logo are either registered
trademarks or trademarks of Adobe Systems Incorporated in the United States,
and/or other countries.
IT Infrastructure Library is a registered trademark of the Central Computer and
Telecommunications Agency which is now part of the Office of Government
Commerce.
Intel, Intel logo, Intel Inside, Intel Inside logo, Intel Centrino, Intel Centrino logo,
Celeron, Intel Xeon, Intel SpeedStep, Itanium, and Pentium are trademarks or
registered trademarks of Intel Corporation or its subsidiaries in the United States
and other countries.
Linux is a registered trademark of Linus Torvalds in the United States, other
countries, or both.
Microsoft, Windows, Windows NT, and the Windows logo are trademarks of
Microsoft Corporation in the United States, other countries, or both.
ITIL is a registered trademark, and a registered community trademark of the Office
of Government Commerce, and is registered in the U.S. Patent and Trademark
Office.
UNIX is a registered trademark of The Open Group in the United States and other
countries.
Java
™
and all Java-based trademarks and logos are trademarks or registered
trademarks of Oracle and/or its affiliates.
Cell Broadband Engine is a trademark of Sony Computer Entertainment, Inc. in the
United States, other countries, or both and is used under license therefrom.
Notices 395

Linear Tape-Open, LTO, the LTO Logo, Ultrium and the Ultrium Logo are
trademarks of HP, IBM Corp. and Quantum in the U.S. and other countries.
Connect Control Center
®
, Connect:Direct
®
, Connect:Enterprise
®
, Gentran
®
,
Gentran
®
:Basic
®
, Gentran:Control
®
, Gentran:Director
®
, Gentran:Plus
®
,
Gentran:Realtime
®
, Gentran:Server
®
, Gentran:Viewpoint
®
, Sterling Commerce
™
,
Sterling Information Broker
®
, and Sterling Integrator
®
are trademarks or registered
trademarks of Sterling Commerce
®
, Inc., an IBM Company.
Other company, product, and service names may be trademarks or service marks
of others.
Terms and conditions for product documentation
Permissions for the use of these publications are granted subject to the following
terms and conditions.
Applicability
These terms and conditions are in addition to any terms of use for the IBM
website.
Personal use
You may reproduce these publications for your personal, noncommercial use
provided that all proprietary notices are preserved. You may not distribute, display
or make derivative work of these publications, or any portion thereof, without the
express consent of IBM.
Commercial use
You may reproduce, distribute and display these publications solely within your
enterprise provided that all proprietary notices are preserved. You may not make
derivative works of these publications, or reproduce, distribute or display these
publications or any portion thereof outside your enterprise, without the express
consent of IBM.
Rights
Except as expressly granted in this permission, no other permissions, licenses or
rights are granted, either express or implied, to the publications or any
information, data, software or other intellectual property contained therein.
IBM reserves the right to withdraw the permissions granted herein whenever, in its
discretion, the use of the publications is detrimental to its interest or, as
determined by IBM, the above instructions are not being properly followed.
You may not download, export or re-export this information except in full
compliance with all applicable laws and regulations, including all United States
export laws and regulations.
IBM MAKES NO GUARANTEE ABOUT THE CONTENT OF THESE
PUBLICATIONS. THE PUBLICATIONS ARE PROVIDED "AS-IS" AND WITHOUT
WARRANTY OF ANY KIND, EITHER EXPRESSED OR IMPLIED, INCLUDING
BUT NOT LIMITED TO IMPLIED WARRANTIES OF MERCHANTABILITY,
NON-INFRINGEMENT, AND FITNESS FOR A PARTICULAR PURPOSE.
396 IBM Sterling Connect:Direct for z/OS: Administration Guide

Index
A
ABEND.CODES.NODUMP initialization
parameter 294, 325
ABEND.RUNTASK initialization
parameter 326
ABENDs
DTF, out-of-storage 305
messages 296
multiple
Sterling Connect:Direct for
z/OS 292
out-of-storage 179
Run Task 291
ADD request
I O exit 202
Address space 69, 303, 309
ADMDSN 43
Administrative Options Menu 1
ALLOC.CODES initialization
parameter 326
ALLOC.MSG.LEVEL initialization
parameter 327
ALLOC.RETRIES initialization
parameter 328
ALLOC.WAIT initialization
parameter 328
ALLOCATION.EXIT initialization
parameter 193, 328
Alternate communication paths 115
API
communications 120
events 171
session trace 300
signons 122
Archiving data sets 195
AUTH file 146
AUTHDSN initialization parameter 381
Authorization file 73
SELECT USER 83
Automatic traces 320
B
Batch interface
DEBUG settings 314
DELETE TYPE 97
DELETE USER 82
displaying Sterling Connect
Direct/Plex status 19
FLUSH TASK 11
INQUIRE APFILE 177
INQUIRE CDPLEX 19
INQUIRE DEBUG 314
INQUIRE INITPARM 14
INSERT TYPE 94
IUI 16
MODIFY SESSIONS 24
resuming processing on a node 24
SELECT TASK 7
SELECT TYPE 99
Batch interface (continued)
SELECT USER 85
STOP CD 21
suspending processing on a node 24
UPDATE NETMAP 132
UPDATE TYPE 94
viewing initialization parameters 14
BEGIN request
I/O exit 202
BSAM data transfers
improving performance 280
C
C option 2
CA-TOP SECRET
environment requirements 63
sample source module 57
Calling conventions
statistics exit 181
CDESTAE trace 320, 322
CDLOG trace 321
CDPLEX initialization parameter 328
CDPLEX.INITPARM.BACKUP
initialization parameter 386
CDPLEX.MANAGER initialization
parameter 386
CDPLEX.REDIRECT initialization
parameter 387
CDPLEX.REDIRECT.EXCEPTION
initialization parameter 141, 388
CDPLEX.TIMER initialization
parameter 329, 390
CDPLEX.WLM.GOAL initialization
parameter 329
CHECK.CERT.EXPIRE initialization
parameter 329, 330
CHECK.CERT.EXPIRE.WARN.DAYS
initialization parameter 330
CKPT file 145
CKPT initialization parameter 330
CKPT.DAYS initialization parameter 330
CKPT.MODE initialization
parameter 330
CKPTDSN initialization parameter,
system file 381
CLOSE request
data exit 208
I/O exit 203
Close task 6
Command sequence
SIGNON 33
Commands
DELETE USER 81
FLUSH TASK 9
MODIFY INITPARMS 16
SELECT STATISTICS 233
SELECT TASK 6
SELECT USER 83
Communication paths
alternate 115
COMPRESS.EXT initialization
parameter 331
COMPRESS.NEGO.FAIL initialization
parameter 332
COMPRESS.NETMAP.OVERRIDE.FAIL
initialization parameter 332
COMPRESS.STD initialization
parameter 332
CONFIRM.COLD.START initialization
parameter 257, 333
Control block
definitions 198
format 188
modifications 198
COPY routine trace 315
CR option 2
CRC initialization parameter 333
Cross-domain signon 60
CTCA initialization parameter 333
CTCA.TIMER initialization
parameter 333
Customizing
levels of functional authority 46
D
Data direction restriction 60
Data exit 205
data transfers
improving performance 280
DATEFORM initialization parameter 334
DBADSN 43
DBCS support
comments 272
using SO/SI 263
DDESCR control block format 198
DEBUG initialization parameter 335
DEBUG Settings
displaying 313
DEFAULT.PERMISS initialization
parameter 335
DELETE TYPE
batch interface 97
IUI 97
DELETE USER
batch interface 82
IUI 83
DESC.CRIT initialization parameter 336
DESC.NORM initialization
parameter 336
DESC.TAPE initialization parameter 336
DEVTRACE trace 322
DGA$MFLG macro 49, 50
DGA@SM03 screen
modifying 225
DGASECUR
stage 2 security exit macro 46
DGAXPRCXT exit 212
DGAXRACT
sample source module for RACF and
CA-TOP SECRET 57
© Copyright IBM Corp. 1999, 2015 397
displaying initialization parameters 13
DMGEVENT trace 322
DMVSOPEN trace 322
Double-byte Character Set 263
DSNTYPE (Type file parameter) 91
DSNTYPE initialization parameter 336
DT option 2
DU option 2
Dumps
batch 293
DTF 291
IUI 293
requirements 290
VSAM file 294
E
ECZ.COMPRESSION.LEVEL initialization
parameter 337
ECZ.MEMORY.LEVEL initialization
parameter 337
ECZ.WINDOWSIZE initialization
parameter 337
END request
data exit 209
I/O exit 203
ESF.WAIT initialization parameter 337
Example adjacent node
i5/OS 128
OpenVMS 127
Stratus VOS 128
UNIX 127
VM/ESA 126
VSE/ESA 126
Windows 127
Execution events 171
Exit
Data 205
I/O 200
Processing Exit for Testing 212
statistics 180
submit 186
WLM 210
Exits
31-bit addressing environments 179
Linkage editor attribute
requirements 180
out-of-storage abends 179
EXPDT initialization parameter 338
Extended Recovery
setting up for a Sterling
Connect:Direct/Plex 166
Extended Recovery Facility 165
Extended Submit Facility (ESF) scan
task 6
EXTENDED.RECOVERY initialization
parameter 339
External security node type, see Trusted
node security 59, 126
F
File attributes 299
overriding 87
File pair configuration 233
FIPS initialization parameter 339
FLUSH TASK 9
batch interface 11
IUI 11
Flush tasks 2
Functional Authority 42
Functional authority parameter
ADMDSN 43
DBADSN 43
GENDSN 43
OPRDSNF 43
G
GDGALLOC initialization
parameter 339
GDGENQ initialization parameter 341
GENDSN 43
GET request
data exit 208
I/O exit 202
Global initialization parameters 325
I
I/O Exit 200
i5/OS adjacent node examples 128
i5/OS SNUF 128
IGWTRACE trace 322
IMMEDIATE.SHUTDOWN initialization
parameter 341
Incident resolution 295
INFO request
I/O exit 202
INIT variables 228
Initialization events 170
Initialization parameters
ABEND.CODES.NODUMP 294, 325
ABEND.RUNTASK 326
ALLOC.CODES 326
ALLOC.MSG.LEVEL 327
ALLOC.RETRIES 328
ALLOC.WAIT 328
ALLOCATION.EXIT 193, 328
AUTHDSN 381
CDPLEX 328
CDPLEX.INITPARM.BACKUP 386
CDPLEX.MANAGER 386
CDPLEX.REDIRECT 387
CDPLEX.REDIRECT.EXCEPTION 141,
388
CDPLEX.TIMER 329, 390
CDPLEX.WLM.GOAL 329
CHECK.CERT.EXPIRE 329, 330
CHECK.CERT.EXPIRE.WARN.DAYS 330
CKPT 330
CKPT.DAYS 330
CKPT.MODE 330
CKPTDSN 381
COMPRESS.EXT 331
COMPRESS.NEGO.FAIL 332
COMPRESS.NETMAP.OVERRIDE 332
COMPRESS.STD 332
CONFIRM.COLD.START 257, 333
CRC 333
CTCA 333
CTCA.TIMER 333
Initialization parameters (continued)
DATEFORM 334
DEBUG 335
DEFAULT.PERMISS 335
DESC.CRIT 336
DESC.NORM 336
DESC.TAPE 336
displaying 13
DSNTYPE 336
ECZ.COMPRESSION.LEVEL 337
ECZ.MEMORY.LEVEL 337
ECZ.WINDOWSIZE 337
ESF.WAIT 337
EXPDT 338
EXTENDED.RECOVERY 339
FIPS 339
GDGALLOC 339
GDGENQ 341
global 325
IMMEDIATE.SHUTDOWN 341
INITPARM.BACKUP 342
INVOKE.ALLOC.EXIT 342
INVOKE.ALLOC.EXIT.ON.RESTART 342
INVOKE.SPOE.ON.SNODEID 343
MAX.AGE 257, 343
MAX.AGE.TOD 258, 345
MAX.TAPE 347
MAXBATCH 345
MAXPRIMARY 345
MAXPROCESS 345
MAXRETRIES 345
MAXSECONDARY 346
MAXSTGIO 346
MAXUSERS 347
MCS.CLIST 347
MCS.SIGNON 348
modifying 15
MSGDSN 381
MULTI.COPY.STAT.RCD 348
NETDSN 382
NETMAP.CHECK 349
NETMAP.CHECK.ON.CALL 350
NODE.QUIESCE.OFF 350
NODE.QUIESCE.ON 351
NODE.TRACE.OFF 351
NODE.TRACE.ON 352
NON.SWAPABLE 352
PDSE.SHARING 352
PDSENQ 354
PROCESS.RETENTION 354
PRTYDEF 355
QUIESCE 258, 355
QUIESCE.NODE 355
refreshing 15
REMOTE.DUMMY.PASSWORD 38,
356
REQUEUE 258, 356
RESET.ORIGIN.ON.SUBMIT 357
REUSE.SESSIONS 357
ROUTCDE.CRIT 358
ROUTCDE.NORM 358
ROUTCDE.TAPE 358
RUN.JOB.EXIT 358
RUN.TASK.EXIT 359
RUNJOBID 359
RUNTASK.RESTART 359
398 IBM Sterling Connect:Direct for z/OS: Administration Guide
Initialization parameters (continued)
S+.CMD.ENFORCE.SECURE.CONNECTION 360
SECURE.DSN 360
SECURE.SSL.PATH.PREFIX 360
SECURITY.EXIT 360
SECURITY.NOTIFY 361
SNA 362
SNMP 362
SNMP.DSN 363
SNMP.MANAGER.ADDR 362
SNMP.MANAGER.PORTNUM 363
STAT.ARCH.DIR 382
STAT.BUFFER.ESDSDATA 363
STAT.DSN.BASE 382
STAT.ERROR 364
STAT.EXCLUDE 364
STAT.INIT 365
STAT.QUEUE.ELEMENTS 365
STAT.SWITCH.SUBMIT 366
STAT.SWITCH.TIME 367
STAT.TPREC 367
STAT.USER 367
STATISTICS.EXIT 368
STRNO.MSG 368
SUBMIT.EXIT 369
system file 381
TAPE.PREMOUNT 369
TAPEMOUNT.EXIT 369
TCP 370
TCP.API.LISTEN 370
TCP.API.PORTNUM 371
TCP.CONNECT.TIMEOUT 372
TCP.FMH.TIMER 372
TCP.LISTEN 372
TCP.RUNTASK.TIMER 373
TCP.SRC.PORTS.LIST.ITERATIONS 374
TCP.TIMER 375, 378
TCQ 257, 375
TCQ.THRESHOLD 258, 375
THIRD.DISP.DELETE 376
TRACE.BUFFERS 377
TRANS.SUBPAS 377
TYPEDSN 383
UDP.SRC.PORTS 377
UDP.SRC.PORTS.LIST.ITERATIONS 378
UDT.MAXPROCESS 378
UDT33.LISTEN 378
updating 15
UPPER.CASE 379
V2.BUFSIZE 379
WTMESSAGE 380
WTRETRIES 380
XCF.NAME 165, 380
Initialize traces 2
INITPARM.BACKUP initialization
parameter 342
INQ option 3
INQUIRE APFILE
batch interface 177
IUI 176
INQUIRE CDPLEX
batch interface 19
IUI 19
INQUIRE DEBUG
batch interface 314
IUI 314
INQUIRE INITPARM
batch interface 14
IUI 14
INQUIRE STATISTICS command 234
INQUIRE TCP 120
INSERT TYPE
batch interface 94
IUI 94
Insert/Update type record screen 94
Internal security node type, see Trusted
node security 59, 356
INVOKE.ALLOC.EXIT initialization
parameter 342
INVOKE.ALLOC.EXIT.ON.RESTART
initialization parameter 342
INVOKE.SPOE.ON.SNODEID
initialization parameter 343
IPv4 protocol 117
IPv6 protocol
special consideration for Sterling
Connect:Direct/Plex 141
IT option 1
IU option 2
IUI
DEBUG settings 314
DELETE TYPE 97
DELETE USER 83
diagnostics 318
displaying Sterling
Connect:Direct/Plex status 19
errors 299
FLUSH TASK 11
INQUIRE APFILE 176
INQUIRE CDPLEX 19
INQUIRE DEBUG 314
INQUIRE INITPARM 14
INSERT TYPE 94
MODIFY 318
MODIFY SESSIONS 24
removing tasks 11
Resuming processing on a node 24
SELECT TASK 8
SELECT TYPE 99
STOP CD 21
Suspending processing on a node 24
task 6
traces 318
UPDATE NETMAP 132
UPDATE TYPE 94
viewing initialization parameters 14
L
Linkage editor attribute requirements
Exit 180
Local Node as Adjacent Node 103
Local node entry 101
Local node records
examples 123
LOGON task 6
M
Maintain network map 3
Managing DTF tasks 6
Master task 6
MAX.AGE initialization parameter 257,
343
MAX.AGE.TOD initialization
parameter 258, 345
MAX.TAPE initialization parameter 347
MAXBATCH initialization
parameter 345
MAXPRIMARY initialization
parameter 345
MAXPROCESS initialization
parameter 345
MAXRETRIES initialization
parameter 345
MAXSECONDARY initialization
parameter 346
MAXSTGIO initialization parameter 346
MAXUSERS initialization parameter 347
MCS.CLIST initialization parameter 347
MCS.SIGNON initialization
parameter 348
MD option 2
Message file 145
Message IDs
defining 224
RACF095I 70
RACF097I 69
SAFA002I 71
SAFA019I 303
SAFA020I 301
SAFF014I 303
SAFK000I 303
SAFL000I 303
SAFL010I 303
SCBB000I 303
SCBB001I 69, 309
SCBC030I 69, 309
SCBD001I 69, 309
SCBE001I 69, 309
SCBF001I 69, 309
SCBF063I 69, 309
SCBF064I 69, 309
SCBG001I 69, 309
SCBH001I 69, 309
SCBI001I 69, 309
SCBJ001I 69, 309
SCBK005I 69, 309
SCBL000I 303
SCBL001I 69, 309
SCBN001I 69, 309
SCBO000I 303
SCBO001I 69, 309
SCBP000I 303
SCBP001I 69, 309
SCBQ000I 303
SCBR002I 69, 309
SCBS001I 69, 309
SCBT005I 69, 309
SCBU003I 69, 309
SCBV001I 69, 309
SCBW001I 69, 309
SCBX000I 303
SCBX001I 69, 309
SCBY001I 69, 309
SCIA011I 301
SCPA008I 69, 309
SFIA002I 69, 309
SFIA003I 69, 309
Index 399
Message IDs (continued)
SOPA000I 303
SOPA010I 303
SOPA011I 303
SOPB012I 303
SOPE000I 303
SOPS001I 303
SRJA014I 69, 309
SRTA008I 69, 309
SSUB100I 69, 309
STAA004I 302
SVTB002I 300
SVTB004I 301
SVTC006I 303
Message library
Adding messages 223
Miscellaneous events 174
MODIFY
IUI 318
Modify command 315
MODIFY INITPARMS 16
IUI 16
MSGDSN initialization parameter, system
file 381
MULTI.COPY.STAT.RCD initialization
parameter 348
Multiple ABENDs
Sterling Connect
Direct for z/OS 292
N
Native command structure 3
NDMCMDS trace 322
NETDSN initialization parameter, system
file 382
NETMAP file 146
NETMAP.CHECK initialization
parameter 349
NETMAP.CHECK.ON.CALL initialization
parameter 350
Network map
contents 101
Local Node as Adjacent Node 103
local node entry 101
unloading to the source format 137
updating while Sterling
Connect:Direct is not executing 129
updating while Sterling
Connect:Direct is running 130
NM option 3
NODE.QUIESCE.OFF initialization
parameter 350
NODE.QUIESCE.ON initialization
parameter 351
NODE.TRACE.OFF initialization
parameter 351
NODE.TRACE.ON initialization
parameter 352
NON.SWAPABLE initialization
parameter 352
O
OPEN request
data exit 208
OPEN request (continued)
I/O exit 202
Open task 6
OpenVMS adjacent node example 127
Operator interface task 6
OPRDSN 43
P
Parallel session values
conversion 193
PDSE.SHARING initialization
parameter 352
PDSENQ initialization parameter 354
PNODE task 6
PNODE=SNODE Processing 116
Preprocessor
batch input 264
input data stream 272
JCL to execute 272
Preprocessor parameter
DBCS
description 264
DEFAULT 266
END 265
NAME 265
RULES
description 266
SBCS
description 271
TITLE 265
PROC variables 229
Process execution
sequence 35
Process exit for Testing 212
PROCESS statement
overriding security function values for
all protocols 392
PROCESS.RETENTION initialization
parameter 354
PROTECTD parameter for RACF 40
PRTYDEF initialization parameter 355
PUT request
data exit 208
Q
QUIESCE initialization parameter 258,
355
QUIESCE.NODE initialization
parameter 355
R
RACF
errors 68
sample source module 57
Recalling data sets 195
refreshing initialization parameters 15
REMOTE.DUMMY.PASSWORD
initialization parameter 38, 356
Removing tasks
batch interface 11
IUI 11
REQUEUE initialization parameter 258,
356
RESET.ORIGIN.ON.SUBMIT initialization
parameter 357
Resuming processing on a node 24
IUI 24
Retrieving data sets 195
REUSE.SESSIONS initialization
parameter 357
ROUTCDE.CRIT initialization
parameter 358
ROUTCDE.NORM initialization
parameter 358
ROUTCDE.TAPE initialization
parameter 358
RPL trace 315
Run Task security exit 57
RUN.JOB.EXIT initialization
parameter 358
RUN.TASK.EXIT initialization
parameter 359
RUNJOBID initialization parameter 359
RUNTASK.RESTART initialization
parameter 359
S
S+.CMD.ENFORCE.SECURE.CONNECTION
initialization parameter 360
secure point of entry 57
SECURE.DSN initialization
parameter 360
SECURE.SSL.PATH.PREFIX initialization
parameter 360
Security
data direction restriction 60
trusted node 59
Security During Signon Command 33
Security exit
Run Task 57
stage 1 signon 36
stage 2 38
Security exits invoked during
processing 32
security trace
starting in the IUI 311
SECURITY.EXIT initialization
parameter 360
SECURITY.NOTIFY initialization
parameter 361
Select command
output 297
SELECT PROCESS authorization 50
SELECT STATISTICS
command 297
retrieving statistics 233
SELECT TASK 2, 6
batch interface 7
IUI 8
SELECT TYPE
batch interface 99
IUI 99
SELECT USER
authorization file 83
batch interface 85
sense codes 295
Separate trace per task trace 315
Session creation TCA task 6
Session manager trace 315
400 IBM Sterling Connect:Direct for z/OS: Administration Guide
Severity levels 295
Shutdown events 171
SIGNON command sequence 33
SN option 3
SNA initialization parameter 362
SNMP
API events 171
Execution events 171
initialization events 170
miscellaneous events 174
Setting up 175
shutdown events 171
STATS events 173
trap variables 169
type events 170
SNMP initialization parameter 362
SNMP.DSN initialization parameter 363
SNMP.MANAGER.ADDR initialization
parameter 362
SNMP.MANAGER.PORTNUM
initialization parameter 363
SNODE task 6
Source Modules 38
SOURCEIP netmap parameter 109, 113
ST option 1
Stage 1
signon security exit 36
Stage 2
security exit 38
security exit macro (DGASECUR) 46
STAT option 3
STAT.ARCH.DIR initialization parameter,
system file 382
STAT.BUFFER.ESDSDATA initialization
parameter 363
STAT.DSN.BASE initialization parameter,
system file 382
STAT.ERROR initialization
parameter 364
STAT.EXCLUDE initialization
parameter 364
STAT.INIT initialization parameter 365
STAT.QUEUE.ELEMENTS initialization
parameter 365
STAT.SWITCH.SUBMIT initialization
parameter 366
STAT.SWITCH.TIME initialization
parameter 367
STAT.TPREC initialization
parameter 367
STAT.USER initialization parameter 367
Statistics
SELECT STATISTICS command 233
Statistics archive submit task 6
Statistics Exit 180
Statistics Facility 233
Statistics records 182
Statistics task 6
STATISTICS.EXIT initialization
parameter 368
STATS events 173
Sterling Connect:Direct Process
statistics 298
Sterling Connect:Direct/Plex
advanced configuration
considerations 142
Sterling Connect:Direct/Plex (continued)
Configuration examples using one
Sterling Connect:Direct for z/OS
system 158
Converting an existing Sterling
Connect:Direct Stand-alone server to
a Sterling Connect:Direct/Plex 149
Converting two existing Sterling
Connect:Direct Stand-alone server
systems to a Sterling
Connect:Direct/Plex 152
External nodes communicate with
individual Sterling Connect:Direct
servers 159
External nodes communicate with one
Sterling Connect:Direct Server 158
local node naming
considerations 147
setting up 142
system file considerations 145
STOP CD
batch interface 21
IUI 21
Stopping Sterling Connect
Direct 19
Stratus VOS adjacent node
examples 128
STRNO.MSG initialization
parameter 368
SU option 2
Submit exit 186
Submit screens
customizing 225
SUBMIT.EXIT initialization
parameter 369
Support requirements 290
Suppressing Dumps for Specified ABEND
Codes 294
Suspending and resuming processing 24
System file initialization parameters 381
AUTHDSN 381
CKPTDSN 381
MSGDSN 381
NETDSN 382
STAT.ARCH.DIR 382
STAT.DSN.BASE 382
TYPEDSN 383
System tasks 6
T
TAPE.PREMOUNT initialization
parameter 369
TAPEMOUNT.EXIT initialization
parameter 369
Task management 6
Task status 6
TCP API task 6
TCP initialization parameter 370
TCP task 6
TCP/IP addressing 117
TCP/IP considerations 116
TCP/IP default entry 121
TCP.API.LISTEN initialization
parameter 370
TCP.API.PORTNUM initialization
parameter 371
TCP.CONNECT.TIMEOUT initialization
parameter 372
TCP.FMH.TIMER initialization
parameter 372
TCP.LISTEN initialization parameter 372
TCP.RUNTASK.TIMER initialization
parameter 373
TCP.SRC.PORTS initialization
parameter 64
TCP.SRC.PORTS.LIST.ITERATIONS
initialization parameter 374
TCP.SRC.PORTS.LIST.ITERATIONS
initialization parameter, system file 64
TCP.TIMER initialization parameter 375,
378
TCQ
File 146, 257
Related initialization parameters 257
Repair Utility 258
Sterling Connect
Direct/Plex system file 146
TCQ initialization parameter 257, 375
TCQ.THRESHOLD initialization
parameter 258, 375
TCQE Fields 191
TCX
File 257
TF option 2
THIRD.DISP.DELETE initialization
parameter 376
Timer task 6
TOP SECRET environment
requirements 63
TRACE.BUFFER initialization
parameter 377
Traces
automatic
CDESTAE 320, 322
CDLOG 321
DMVSOPEN 320
ESTAE 320
LOSTOUT 322
NDMAPI 322
NDMCMDS 320
NDMLOG 321
RPLERRCK 320
TRANS.SUBPAS initialization
parameter 377
Translation tables
customizing 264
Trap variables
identifying 169
Troubleshooting methods
running traces 310
Trusted node security 31, 59, 106
TS option 2
Type defaults file 1
Type events 170
TYPE file 146
Type keys 87
Type Record
DELETE TYPE 96
Insert/Update 94
TYPEDSN initialization parameter,
system file 383
Index 401
U
UDP.SRC.PORTS initialization
parameter 377
UDP.SRC.PORTS.LIST.ITERATIONS
initialization parameter 378
UDT.MAXPROCESS initialization
parameter 378
UDT33.LISTEN initialization
parameter 378
UNIX adjacent node examples 127
UNM option 3
UPDATE NETMAP
batch interface 132
IUI 132
UPDATE TYPE
batch interface 94
updating initialization parameters 15
Updating the Network Map 129
UPPER.CASE initialization
parameter 379
User authorization file 2, 73
User record display 85
User tasks 6
V
V2.BUFSIZE initialization parameter 379
Validation
functional authority 45
View network map 3
VM/ESA SNA LU0 adjacent node
example 126
VSE/ESA SNA LU0 adjacent node
example 126
VTAM Independence 120
W
Windows adjacent node examples 127
Workload Manager Exit 210
WTMESSAGE initialization
parameter 380
WTO messages 298
WTRETRIES initialization parameter 380
X
XCF.NAME initialization parameter 165,
380
402 IBM Sterling Connect:Direct for z/OS: Administration Guide
IBM®
Product Number: 5655-X01
Printed in USA
