
1
ZOOM Presentation without screen sharing Live on Facebook w/Interpreters
In this document we will cover the best way to provide a Zoom Presentation Live without
sacrificing the ability to show sign language interpreters. This method shows the
Presentation (PPT/Keynote), Primary Speaker, and sign language interpreter all on screen
during a live showing at roughly the same size. The Zoom Meeting and Webinar operate
differently for the last portions of the process and the Webinar process requires
additional permissions for the interpreter in order for them to appear.
Host Requirements (A.Meeting and B.Webinar):
1. Zoom only *Note* Tested with both Current Gen Models of Apple and Windows Devices. We
know this process can work as long as the tech specs are met.
2. The Host must have a computer with the technical prerequisites to use Virtual Background
3. The host must have the PowerPoint or Keynote converted to a PNG image file.
4. The Host must set up the meeting to follow specific settings for meeting and webinar:
a. Settings for Meeting: Hide Non-video Participants, Gallery View, audio muted on entry,
multi pin enabled. (Better if Host not connected to computer audio)
b. Settings for Webinar: Allow Panelist to show video*Critical*, Hide Non-video
Participants, Gallery View, Audio muted on entry. (Better if Host not connected to
computer audio)
5. Host must set up their computer to physically block the camera for to avoid issues.
6. Host must allow interpreters to join
a. The Meeting: Both Interpreters must be allowed to turn on their camera (switching
interpreters will require one interpreter turning off their camera and one turning their
camera on.)
b. The Webinar: Bother Interpreters must be given the links for the Webinar and will
appear as attendees. They will need to rename themselves as interpreter. Interpreter
must then be elevated to Panelist Status, and then given the authority to turn on their
camera, to do this they must then be given Co-Host status.
7. Host must then stream using the correct layout for best quality. (Pinning the speakers and
PowerPoint)
Step 1: Prerequisites (Images No Green Screen)
For either computer type we recommend you have second screen/monitor to work with for ease of
use and to avoid blocking the presentation with a nonviewable screen.
Windows:
• Zoom desktop client for Windows, version 5.2.0 or higher
• Windows 10 (64-bit)
• Intel i3 - 4-cores or higher, gen 8 or higher (excluding Y-series)
• Intel i5 - 2-cores or higher, gen 6 or higher (excluding Y-series)

2
• Intel i7 - 2-cores or higher, gen 6 or higher (excluding Y-series)
• AMD Ryzen 5/7/9 or higher
Apple:
• Zoom desktop client for macOS, 4.6.0 (13614.1202) or higher
• 4th generation i7 quad-core or higher processor
• 6th generation i5 dual-core or higher processor
• Note: 6th generation i5 dual-core processor, requires macOSOS 10.14 or higher
Step 2: The Settings Before the Meeting (Two Main Settings for Accessibility)
• For Captions and other Languages:
• Virtual Background enabled:

3
All of these settings can be found on the Zoom Website Dashboard once you have logged on. It is
important to do all of these steps before the meeting begins since most of them cannot be enabled once
a meeting starts.
Step 3: Converting PowerPoint/Keynote Slides into a PNG for Virtual Backgrounds
Windows PowerPoint:
• When saving the PPT file make sure to save as a PNG file like so:
• You will then get a prompt that ask if you want all of the slides saved, click yes:

4
• When saved as PNGs they will show up as a new folder (This will happen in both Apple or
Windows programs) which you can then open and add the files as virtual backgrounds.
Editing PPT Slides to use as Virtual Backgrounds on Zoom:
• Check camera settings to verify aspect ratio. In this example, it is 16:9 (1280x720).

5
• Open the PNG of the PPT slide to be used as the virtual background. Select crop, custom aspect
ratio, and select the aspect ratio that matches the camera.
• Now adjust the text on the slide to show within the crop area. Some slides may need to have
fewer lines of text so it will all be visible on Zoom.

6
• Save a copy of the PNG image to use as the virtual background. Remember to name the slides in
number order that they will be shown.
Apple Keynote:
• Click File and then Export to, this will give you the option of saving as images:

7
• You will be given the option of what format to save as, click the options and scroll to PNG:
Step 4: Adding the Images to your virtual backgrounds:
• Start your Zoom Meeting and then click on the arrow next to the Video Icon, A few selections
will appear, click Choose Virtual Background:

8
• You will then be brought to the Settings Menu with the Background & Filters Section
Highlighted:
• Click the plus icon near the right of the screen:

9
• You can then pick each image you want added from the folder of the PPT or Keynote. Each
image must be added separately, not as a group. Leave the Settings box open off screen – you
will advance the slides here by clicking on the next image. *Note You can rename each Image of
each slide before this to reflect the order of the slides before they are added*:

10
Step 5 A: Settings During the Meeting before a guest can join (Extra Steps needed for Webinar):
• There is a way to both Show and Hide Non-video participants in Zoom, we recommend that all
non-video participants, be hidden (This will limit the number of videos that will show up on the
live stream) you must first be in Gallery Mode*Note I am showing the non-video participant in
this demo*:
• Go to the Non-video Participant and click the 3 buttons on the top right-hand side, you will see
an option to Hide Non-Video Participants, click the button and the only screens that will show
are the Presentation and the people who are on screen:

11
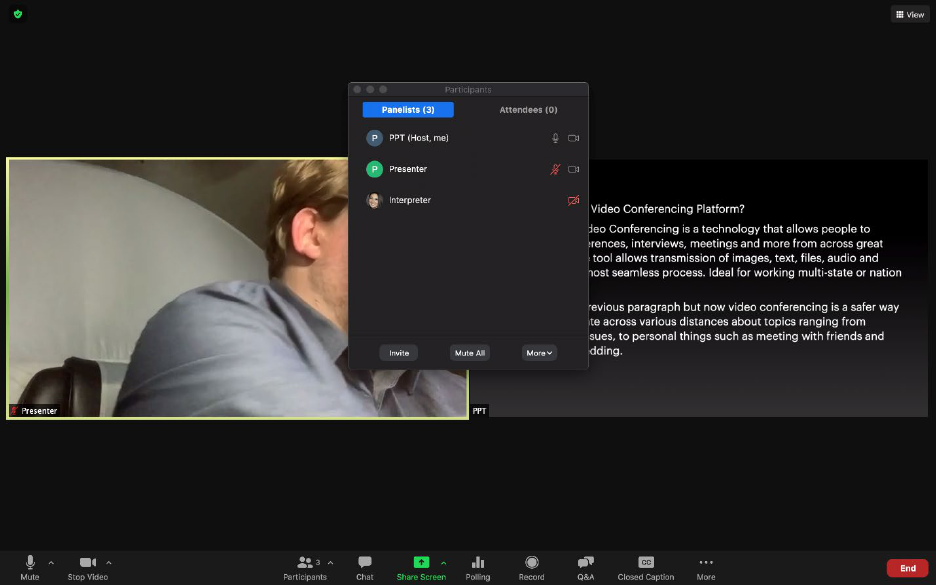
Step 5 B: Additional Settings During the Webinar general attendees join:
• The interpreters must be logged first as attendees then elevated to panelist status first. The
Hide non-video participants will be necessary as well to limit the number of visible boxes on the
live video.

12
13
• Once they are set as Panelist they can turn on and off their video unless the settings were not
changed. If the settings were not changed then Interpreter will need to be elevated to Co-host.

14
The end result will be two individuals on screen with the presentation as the other screen.
Step 6: Physically blocking the camera and either muting or removing audio:
You cannot turn off your screen for the virtual background to work so you must block it with some sort
of

15
item either a post-it or solid tape. If you do not you will show up in front of the presentation like so:
• Once the video is physically blocked it will look like this:
• I do not know the best way for your audio situation, but you can mute yourself or disconnect
from the audio.

16
• Once you have everything set the presenter will show up like so:
• If you want to you can Pin either the presenter or the Presentation so that it shows up first, then
the presenter will move to the right and so forth.

17
• Once an interpreter is added you will see this. Pinning will keep the layout from diverting from
this set up. If there is no pinning and non-video participants are visible this layout will not be
what you see because people turning off their screens will have an impact on placement *Note
this is what we saw during a live (private) Feed when ensuring it would work for meetings*:

18
• And for Webinars:
